Provision users automatically with Microsoft Entra ID or Active Directory
Axon Evidence offers advanced Identity and Access Management (IAM) efficiency through automatic user and group account provisioning with Advanced User Management (AUM), using the System for Cross-domain Identity Management (SCIM) protocol to seamlessly connect with Microsoft Entra ID and SCIM. If you use Active Directory instead of Microsoft Entra ID, you can do this using the Axon Directory Sync Tool.
You can also automatically provision users with Provision users automatically with Okta if you use that as your SIngle Sign On (SSO) provider.
For information about configuring IAM to use Single SSO, refer to the Single Sign-On Quick Start Guide.
After you configure automatic provisioning, Microsoft Entra ID runs a synchronization process every 5 minutes. The process queries Axon for assigned users and groups and then creates or modifies them to match the assignment details in Microsoft Entra ID.
This article describes the integration of the Groups feature with advanced IAM features. For detailed information about the Groups feature, see the Groups Overview and related Axon Help articles.
Microsoft Entra ID and SCIM
This section provides information on configuring your Microsoft Azure account and your Axon Evidence agency. The process requires having two browsers open, copying information from each browser, and pasting it into the other browser. It is essential that you copy and paste the correct information.
Your Microsoft Entra ID account must be a Premium edition account, and you must be a global administrator for that account to enable provisioning.
- In a web browser, launch the Azure management portal: https://portal.azure.com
- Under Azure Services, browse to Microsoft Entra ID. If necessary, switch to the correct tenant that contains the user accounts you would like to use with Axon Evidence.
- Under Basic Information, find your Tenant ID and copy it to your clipboard.
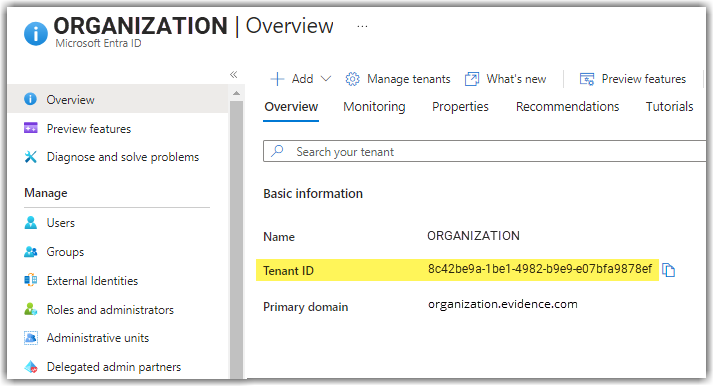
Your Azure Tenant ID is a Globally Unique ID (GUID) in a hyphenated, hexadecimal format.
For example: 8c42be9a-1be1-4982-b9e9-e07bfa9878ef -
Select Enterprise applications. Leave the web browser open on the Enterprise Applications page.
-
Open a second web browser or tab, go to your agency's unique URL (https://yourorganization.evidence.com) and sign in.
Note: Depending on your organization's location and setup, your actual URL might include additional elements such as a region or enterprise destination. For example: https://organization.ca.evidence.com. -
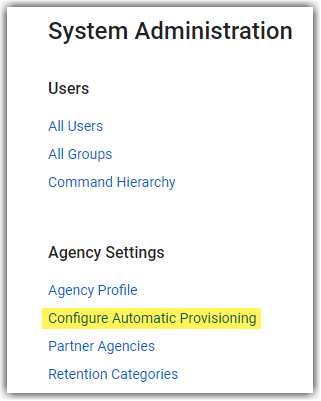
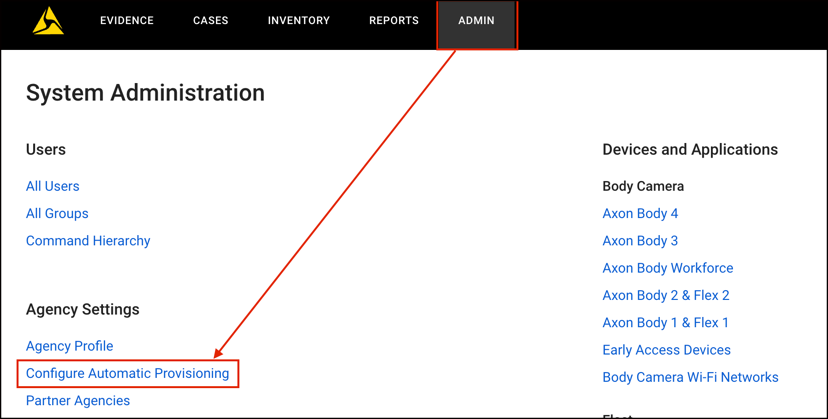
On the menu bar, select Admin and then under Agency Settings, select Configure Automatic Provisioning.
- On the Configure User Provisioning page, change the Provisioning Options dropdown to Azure SCIM Provisioning.
Note: When setting up Azure SCIM provisioning you can use the Sync Configuration option to Sync users only or Sync users and groups. - Under Enter Tenant ID from Azure, paste the Tenant ID you copied in step 3 into the Tenant ID field, and then select Configure. Select Copy Link next to the Enter Endpoint URL in Azure field.
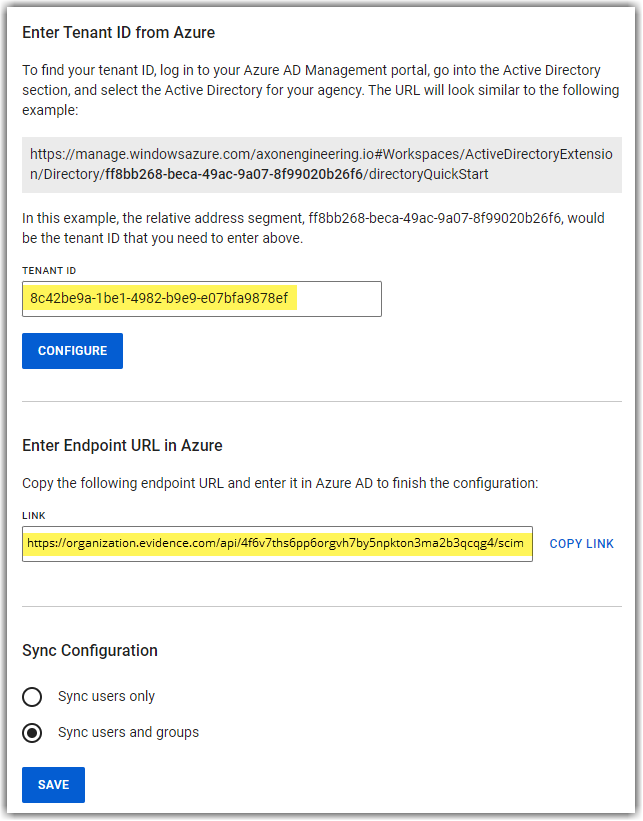
- Choose Copy Link.
- Return to the web browser that is open to the Enterprise Applications page in the Azure management portal.
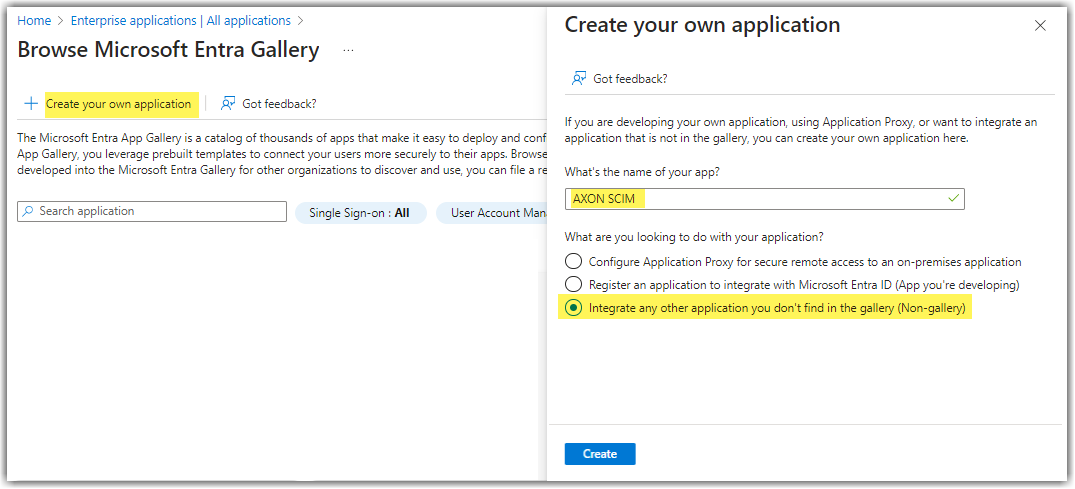
- At top of the page, select + New Application, and the Microsoft Entra ID Gallery appears.
- Select + Create your own application.
- Add an easily-understood name for the app, such as "AXON SCIM".
- Select the radio button next to Integrate any other application you don't find in the gallery (Non-gallery), then select Create.
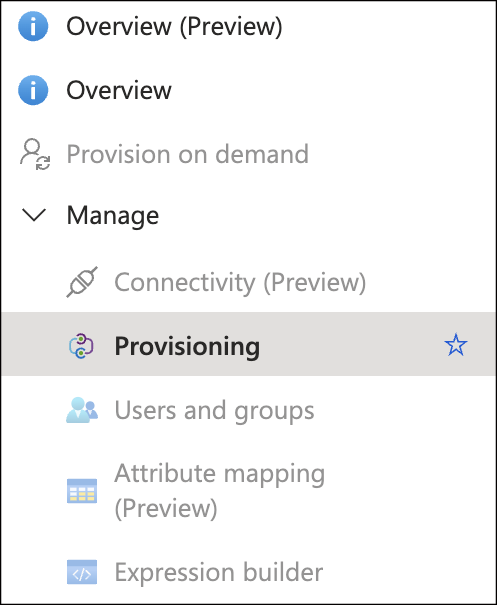
- On the next screen, from the left navigation menu, under Manage, select Provisioning.
- Change the Provisioning Mode to Automatic, expand Admin Credentials, and paste the URL that you copied in step 10 into the Tenant URL field. Verify that "/scim" is shown at the end of the URL.
Example: https://organization.evidence.com/api/4f6v7ths6pp6orgvh7by5npkton3ma2b3qcqg4/scim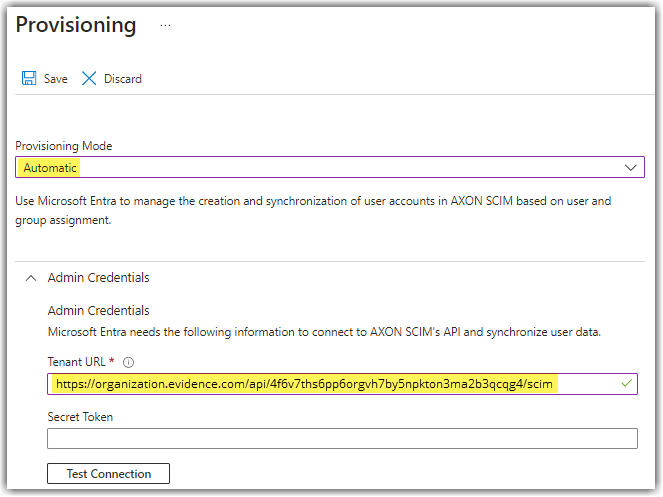
- Select Test Connection. Azure attempts to connect to the Axon Evidence SCIM endpoint. If the attempt fails, Azure displays diagnostic information. If it's successful, Save the configuration.
- Expand the Mapping section, select the Provision Microsoft Entra ID Users and verify the following Target Attributes are mapped to the Source Attribute (Microsoft Entra ID):
| Axon Evidence Attribute | SCIM Target Attribute | Commonly Used Microsoft Entra ID Attribute | Notes |
|---|---|---|---|
| STATUS | active | Switch([IsSoftDeleted], , "False", "True", "True", "False") | Use the default value. |
| FIRST_NAME | name.givenName | givenName | |
| LAST_NAME | name.familyName | surname | |
| USERNAME | userName | mailNickname | Must be unique, shouldn't be an email address. |
| BADGE_NUMBER | urn:ietf:params:scim:schemas:extension:2.0:axon:badgeId | employeeId | If no badgeId is received, Axon Evidence will default to using whatever is sent as the userName attribute. Must be unique. |
| EXTERNAL_ID | externalId | objectId | This field can be used to link accounts for SSO. Must be unique. |
| emails[type eq “work”].value | Must be unique. | ||
| RANK | urn:ietf:params:scim:schemas:extension:2.0:axon:rankName | jobTitle | The Rank must exist in Axon Evidence before provisioning. |
| SUPERVISOR_EMAIL | urn:ietf:params:scim:schemas:extension:enterprise:2.0:User:manager | manager | Optional. Used to set user's Direct Supervisor. |
| EVIDENCE GROUP | urn:ietf:params:scim:schemas:extension:2.0:axon:evidenceGroupName | department | If the Group doesn't exist in Axon Evidence, it will be created. |
| USER GROUP | urn:ietf:params:scim:schemas:extension:2.0:axon:userGroupName | department | If the Group doesn't exist in Axon Evidence, it will be created. |
- To map badgeId, select the Show advanced options checkbox then choose Edit attribute list for customappsso.

- Scroll to the bottom of the Edit Attribute List page and add
urn:ietf:params:scim:schemas:extension:2.0:axon:badgeIdwith a type of String. Select Save and accept the changes.
- From the Attributes Mapping page add a new mapping.
- Select employeeId for the Source Attribute and enter
urn:ietf:params:scim:schemas:extension:2.0:axon:badgeIdfor the Target attribute, then choose OK and Save.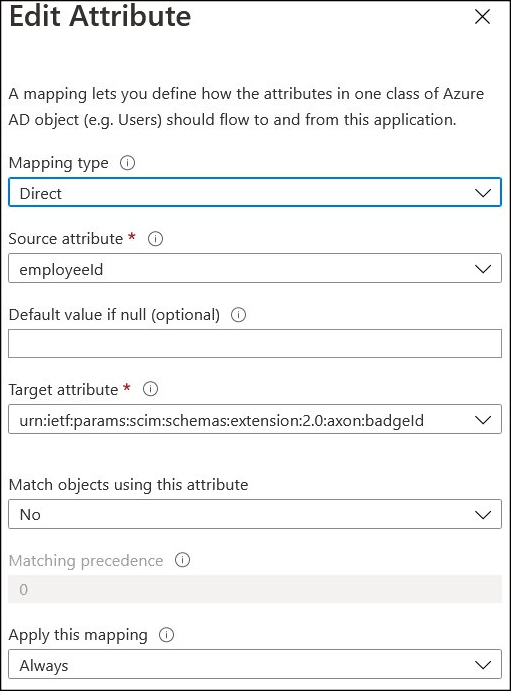
- Back on the Provisioning settings page, leave the Provisioning Status off, Save the configuration, and then close the page.
- Return to the applications Overview, and under Manage, select Users and groups.

- In the resulting Users and groups section, assign any users or groups who you want to automatically provision within Axon Evidence. When groups are selected, all users of that group will be assigned to the SCIM application and synchronize with Axon Evidence. Once the assignment of users and groups is complete, the application is ready to be activated.
- Nested user groups are not supported for provisioning in Microsoft Entra ID.
- When provisioning Users via Groups in Microsoft Entra ID, administrators can choose to also assign all users in a Group to an Axon Evidence Role. This can be a problem for users that are in more than one of the AD Groups that have been selected for provisioning. In this situation administrators can select and "Blank and " as a Role value, so that users are not assigned to an Axon Evidence Role based on that particular AD Group.
- To start the automatic provisioning, return to Provisioning from the navigation menu. Select Start Provisioning.
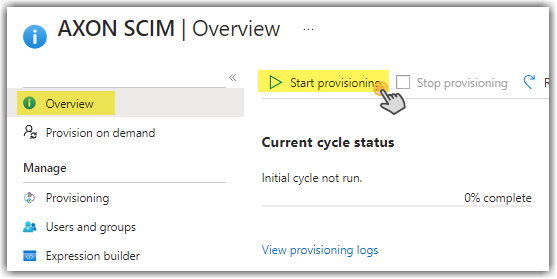
Note: This process does not start immediately. It may take up to an hour for the Initial Cycle to begin. Incremental Cycles will occur every 40 minutes. - Review the Initial Cycle and Cycle Status for any errors after it completes.
Notes:
Azure Group to Axon Evidence Role Mapping
If you do not configure the role mapping, users will be added into the existing "User" role by default and you will need to manually move users into their correct role, if different. If this role does not exist in your Axon Evidence agency or has been renamed, then you will receive an "InternalServerError - Code: 500" error during automated provisioning. If you get this error, use the below steps to configure role mapping to a non-default role name.
Before automatically provisioning user roles to Axon Evidence, Roles must be defined and configured in Axon Evidence. Users will be mapped to these defined roles. To learn more, see Roles and Permissions.
- In a web browser, launch the Azure management portal (https://portal.azure.com).
- Under Azure Services, browse to Azure Active Directory > [your tenant] > Tenant Information. If necessary, switch to the correct tenant that contains the user accounts you would like to use with Axon Evidence.
- From the left-hand menu, select App registrations, and then All applications. Then select the Axon Evidence application that you created in the previous procedure.
- Select Manifest.
- Add the appropriate appRoles to the manifest.
- Save the manifest, and Close to return to the Directory Overview
- Select Enterprise applications, then edit your Axon Evidence application.
- Select Provisioning from the menu, and then Edit attribute mappings.
- Open Provision Azure Active Directory Users and Add New Mapping.
- Choose Expression as the type. Enter the value
SingleAppRoleAssignment([appRoleAssignments])as the expression, add an optional default value, and choose the target attribute ofroles[primary eq and "True and "].value. Important: The optional Default value if null field can be used to define a role for a user who has not been explicitly assigned an application role. If this is left blank, users will not be automatically created or updated, since role is a required field for user management.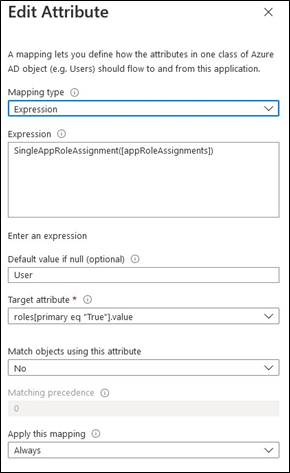
- Select OK, and then Save the Attribute Mappings. Then choose Close.
- Return to the application Overview page and select Users and groups.
- Select + Add user.
- Select any users or groups you would like to add and assign them one of the roles you added to the manifest in Step 5.
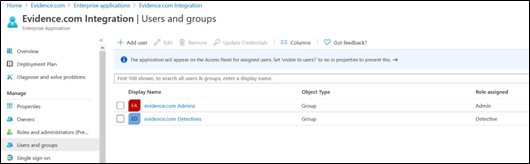
- You should now see the assignments in the list. If you do not see the defined roles, you might need to log out of your Azure Portal and sign back in.
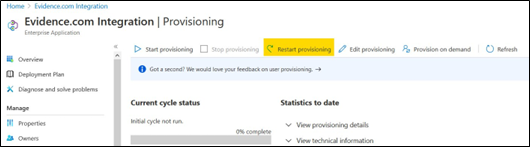
- Select Provisioning, and then choose the Restart provisioning button.
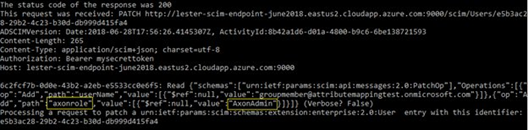
- After a short delay, you should begin seeing new SCIM messages posted to your endpoint with the new role attribute being added as a PATCH operation after the User record is created via POST. Note that the user in the below example was not assigned to the application role directly, but instead inherited the role from AD group membership.
- When one AD user belongs to several AD groups, follow the steps outlined in the AppRoleAssignmentsComplex section of the Provisioning a role to a SCIM app Microsoft tutorial (third-party link) and assign the AD role the name Blank (Axon Evidence will ignore this AD role name) in Azure to avoid conflicts:
- Add new customappsso User Attribute roles with Multi-Value support:

- Add new Attribute Mapping:
Expression:
AppRoleAssignmentsComplex([appRoleAssignments])Target attribute:
roles
Do not alter the "msiam_access" role. You can modify the existing "User" appRole or use it as a template to create additional roles. Each role must have a unique "id" attribute, so be sure to generate a new GUID for any roles you add.
You can use an online GUID generator, such as https://www.guidgenerator.com (third-party link), to generate a GUID.
Note: The displayName field must match the Role name defined in Axon Evidence exactly.
Example:
        {
            "allowedMemberTypes": [
                "User"
            ],
            "description": "e.com Admin",
            "displayName": "Admin",
            "id": "3af65294-84f7-46df-bb06-16c273360c54",
            "isEnabled": true,
            "lang": null,
            "origin": "Application",
            "value": null
        },
        {
            "allowedMemberTypes": [
                "User"
            ],
            "description": "User",
            "displayName": "User",
            "id": "18d14569-c3bd-439b-9a66-3a2aee01d14f",
            "isEnabled": true,
            "lang": null,
            "origin": "Application",
            "value": null
        },
| Axon Evidence field | SCIM target attribute | Example Microsoft Entra ID field | Notes |
|---|---|---|---|
| ROLE | roles[primary eq "True"].value
|
SingleAppRoleAssignment([appRoleAssignments])
|
The value of this attribute must exactly match the name of an existing role in Axon Evidence. |
Axon Directory Sync Tool
The Axon Directory Sync application is a part of the suite of Advanced User Management features that simplify user and group management for integrating Axon Evidence with the most popular user management systems. This greatly reduces the time and effort required to administer users and groups.
The Axon Directory Sync application is a desktop application and Windows service that allows an organization to use their existing on-premises Microsoft Active Directory™ implementation to automate user management.
How It Works
The Axon Directory Sync application creates and updates users in Axon Evidence from an organization's Active Directory. It matches the external ID of the user in Active Directory to a user in Axon Evidence. Note that the external ID can be mapped to any attribute in the organization's Active Directory.
This means that if the application does not find a matching external ID in Axon Evidence, the tool will attempt to create a new user. If the process runs into duplicate values or any other errors when synchronizing users, it will skip the affected user, move on to the next user, and include detailed error information in the synchronization notification email.
If a user is not included in the set of users to be synchronized from Active Directory, the tool will disable the user's Axon Evidence account. If a user account is disabled in Active Directory, the application will disable the user account in Axon Evidence.
Changes to users in Active Directory will always overwrite the user information in Axon Evidence. The only exception is if the agency chooses not to synchronize user roles. When that option is disabled, a user and #x27;s role in Axon Evidence will not be updated with information from Active Directory.
System Requirements
The Axon Directory Sync application must be installed on a computer or server that has access to the agency and #x27;s Active Directory.
The Axon Directory Sync application is designed to run on a Windows PC. Microsoft .NET version 4.6.2 or higher is required. If Microsoft .NET is not installed, the application will prompt you to install .NET.
Note: The application can be installed side-by-side with the Vievu AD Sync tool.
Pre-Installation Actions
Before installing the Axon Directory Sync application, an Axon Evidence administrator must configure an API client and the Automatic Provisioning Email Settings.
API Client Configuration
Before installing the application, an Axon Evidence administrator must create an API client that can be used by the application. The Client ID, Client Secret, and partner ID will be required when configuring the AD Sync Tool.
- Sign in to Axon Evidence.
- On the menu bar, select Admin and then under Security Settings, select API Settings.
- If you do not see API Settings on the page, then API access is not enabled on the currently accessed instance. Use another instance or contact the Axon Technical Support team to ask about activating this functionality.
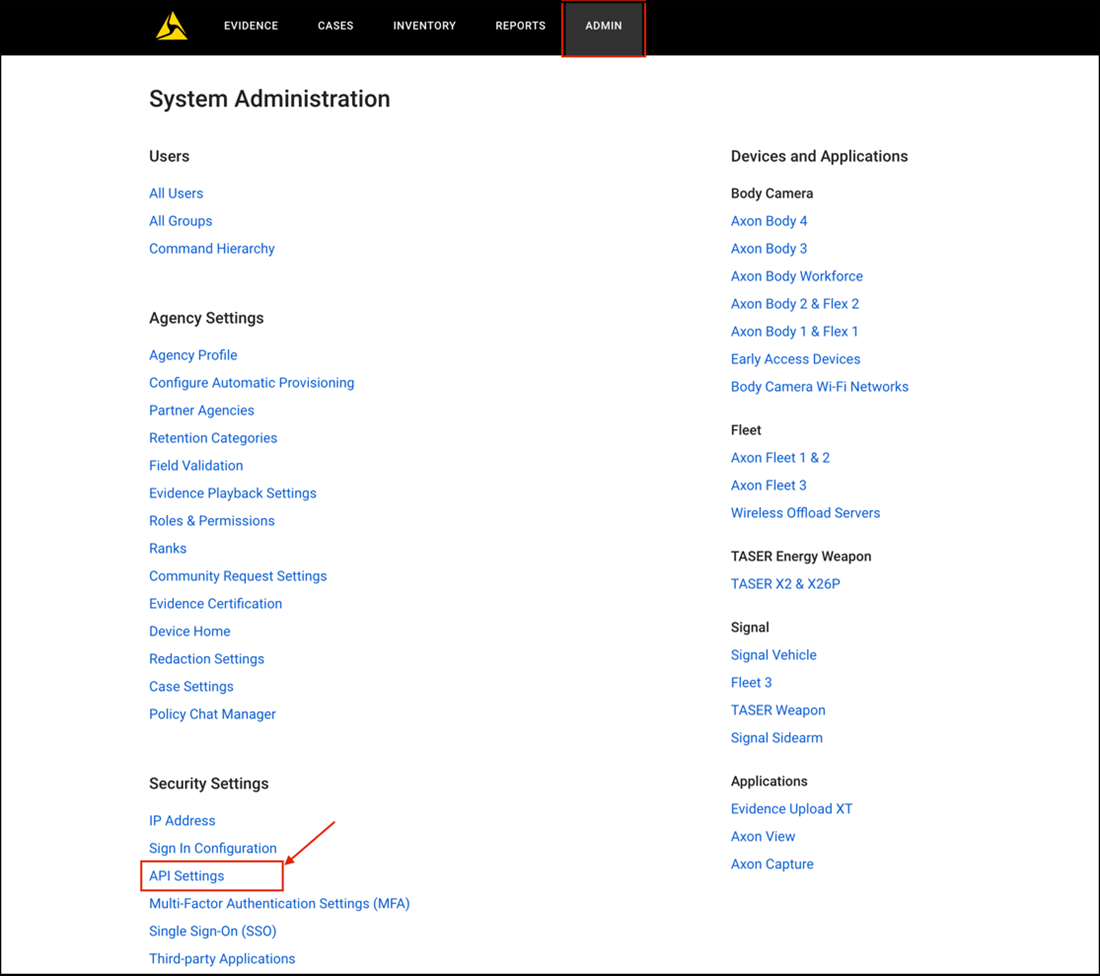
- Select Create Client.
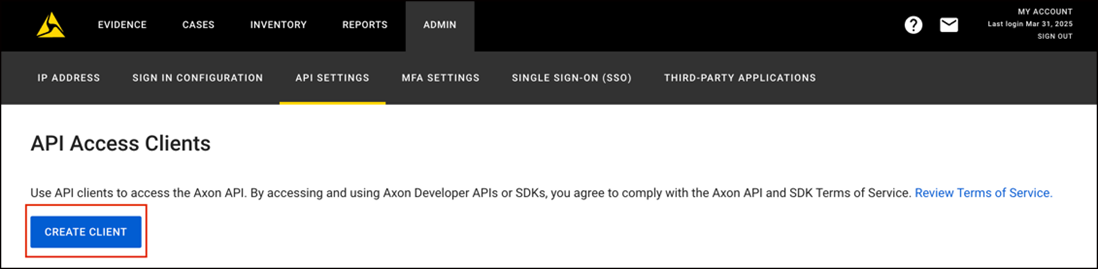
- Enter a easy-to-understand name for the API Client in the Client Description field, such as Directory Sync.
- In the Select Permissions section, select Allowed for the following items:
- Under Partner: edit
- Under Groups: modify and read
- Under Users: read and modify
- Select Save.
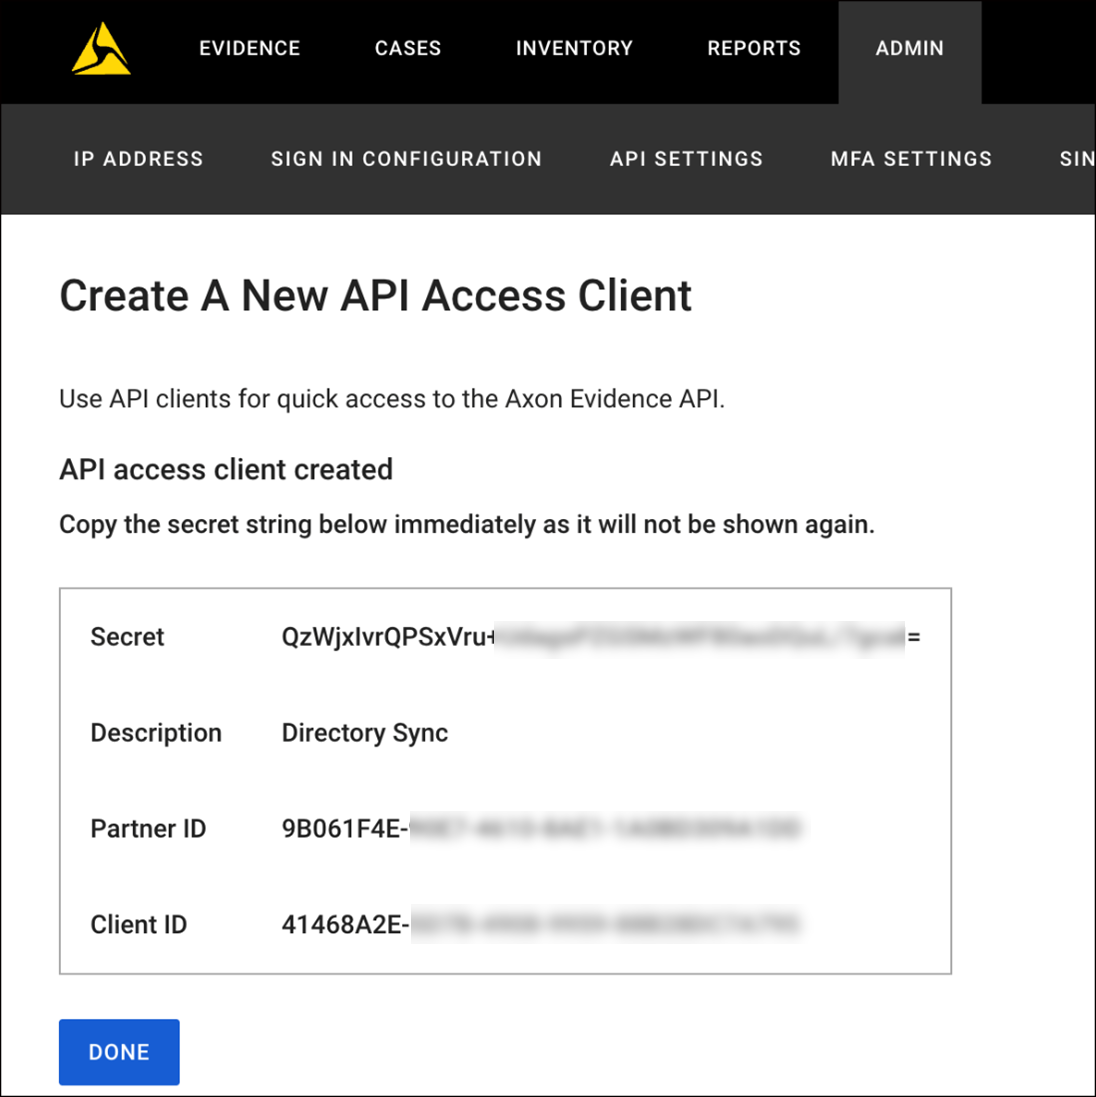
- Axon Evidence saves the client and displays the Client Secret, the Partner ID, the Client ID, and the client description.
Important: This is the only time you can see the Client Secret. As soon as you leave the page or select Create Another Client, the Secret becomes inaccessible.
Take note of the Client Secret, Partner ID, and Client ID. This information is used as part of the Axon Directory Sync application configuration.
Automatic Provisioning Email Setting Configuration
Users will need to configure synchronization.
- Sign in to Axon .
- On the menu bar, select Admin and then under Agency Settings, select Configure Automatic Provisioning.
- Select Active Directory from the Provisioning Options list. Note: The options in the list vary depending on agency configuration. It can contain Disabled, Azure SCIM Provisioning, and Active Directory Provisioning.
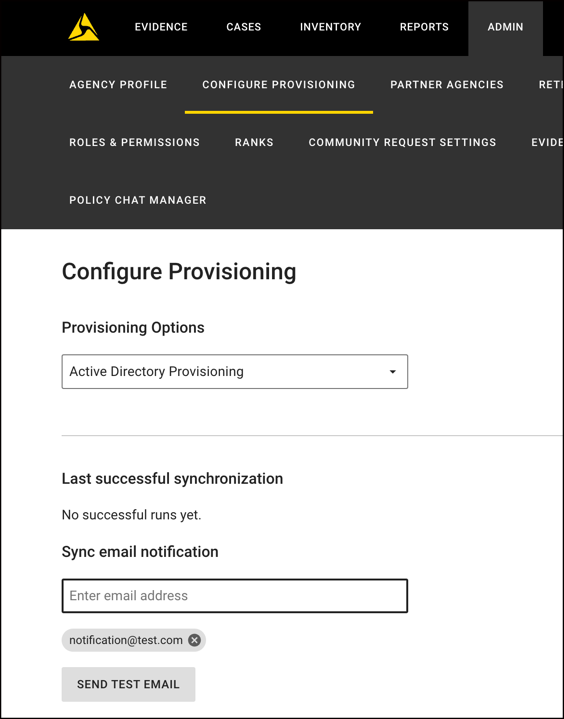
- Last successful synchronization shows when the last synchronization was run. This will also include synchronizations that included some errors.
- Optionally, you can define a list of emails that will receive a notification summary when a synchronization is completed. Emails are sent every time the synchronization process runs. If the process encounters any errors, the details of the errors are included in the email.
- To receive email notifications when the synchronization process has run, enter the appropriate email addresses in Sync email notification, and press Enter. The email addresses are shown below the field.
- Select Send Test Email if you want to test the entered email addresses.
- You can remove an email address by selecting the X adjacent to the address.
Note: You will not see a confirmation when changes are saved.
Installing Axon Directory Sync
To install the Axon Directory Sync application:
- Run the installation executable. The installation agreement is shown.
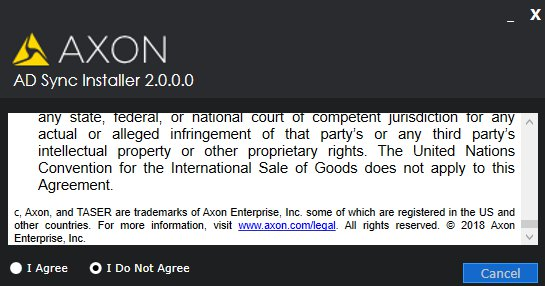
- Select I Agree and choose Install to begin the installation. Cancel will end the installation process instead.
- A confirmation message is displayed when the installation is complete.
- Select Finish to complete the installation.
Configuring and Synchronizing the Application
Once installed, run the Axon Directory Sync application to configure the application settings and synchronize the user directory.
Part 1: Connection Configuration
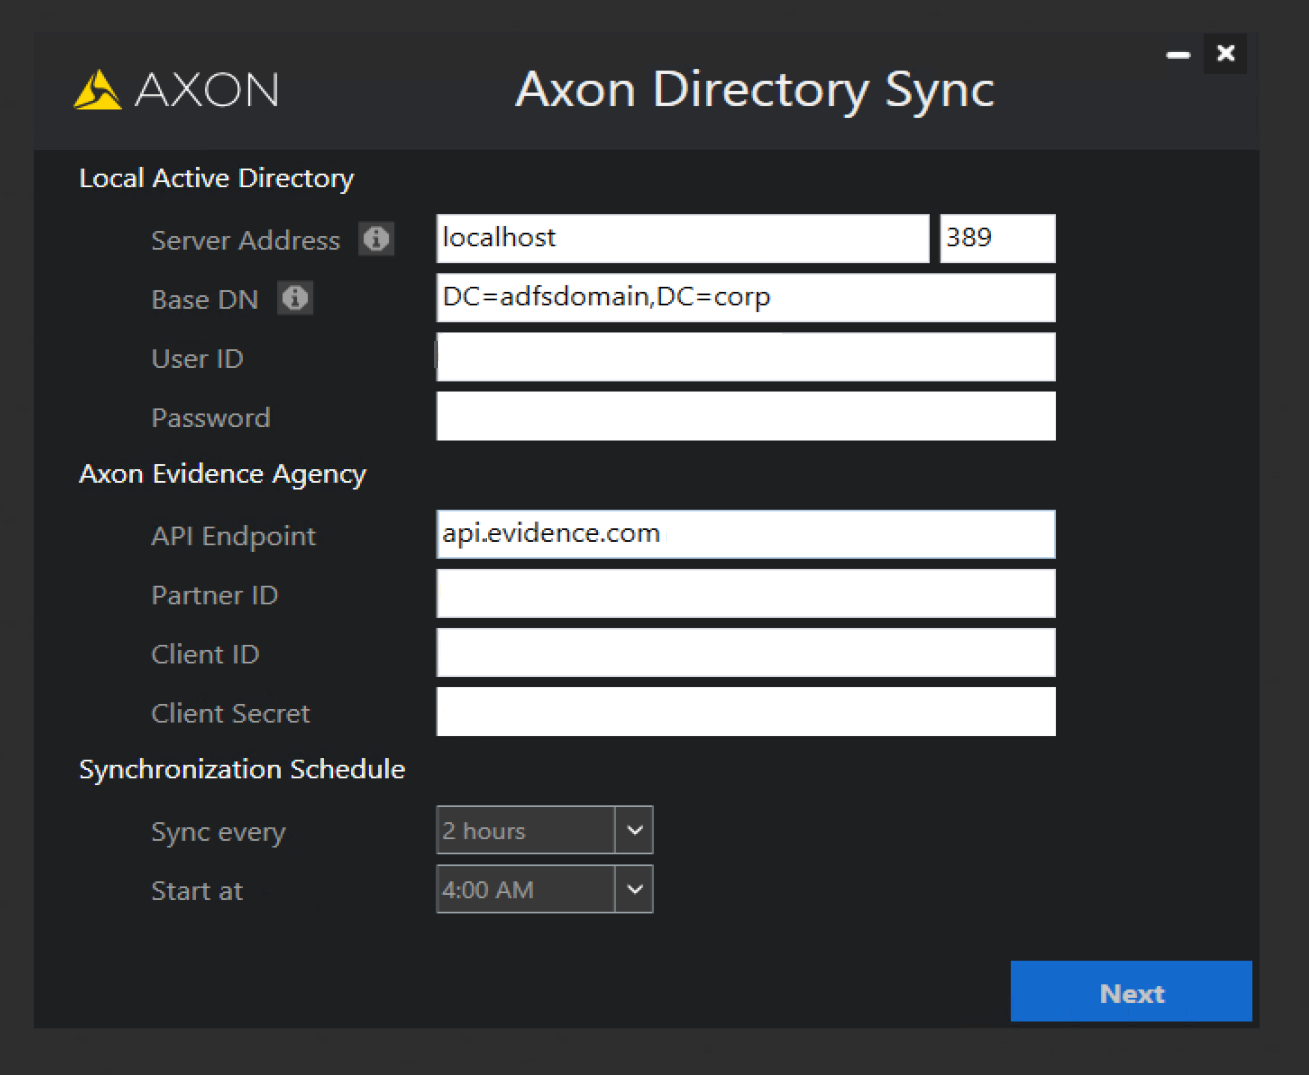
- Enter your Local Active Directory information.
- Enter the domain controller information and specify an account with access to the domain. The Base DN can connect to an Active Directory OU or Domain.
- Enter your Axon Evidence Agency information.
- In the API Endpoint field, enter api.evidence.com, or the endpoint for your region. Note: API endpoints vary depending on your region. The endpoint must match your agency URL. For example, if your agency URL is [organization].ca.evidence.com, then enter api.ca.evidence.com as your API endpoint.
- In the Agency ID, Client ID, and Client Secret fields, enter the information from the API Client configuration section above.
- Select the Synchronization Schedule. Synchronization can be scheduled to run every 1 to 24 hours and scheduled to start on any hour.
- Select Next.
Part 2: User Synchronization Configuration
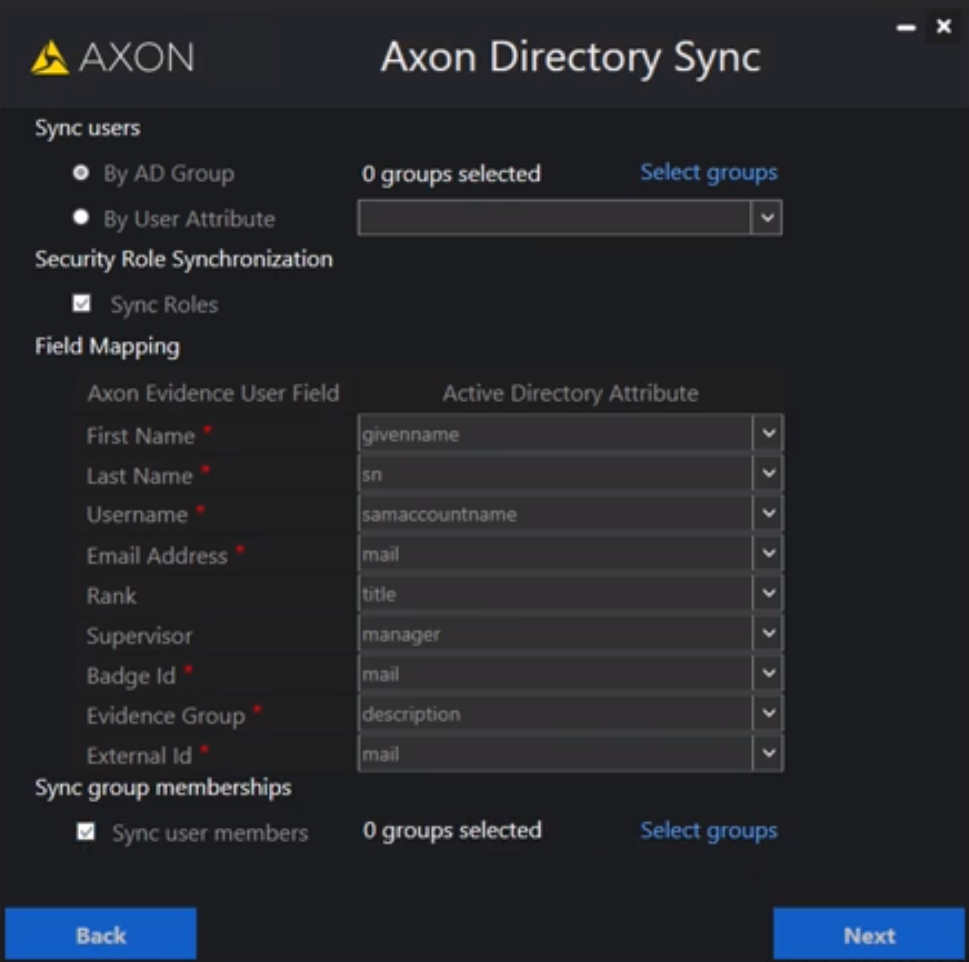
- Select how you want to Sync users:
- By AD Group selects which AD Groups are used for synchronization in Part 3.
- By User Attribute selects which user attribute is used for synchronization. If selected, the adjacent list will be populated with user attributes. Select one user attribute from the list. The specific value of the user attribute is selected in Part 3.
- Sync Roles is optional. You are not required to synchronize roles between AD and Axon Evidence. However, all Axon Evidence users must have an assigned role.
- If this option is selected and a user is in multiple groups, the first group alphabetically will be synced.
- If Sync Roles is not selected:
- A default role (AD Sync) is created, and the user is assigned to that role. The AD Sync role only has the permission to sign in to Axon Evidence. You should update the permissions for this default role in Axon Evidence.
- Users with the AD Sync role won't be updated when synchronizing.
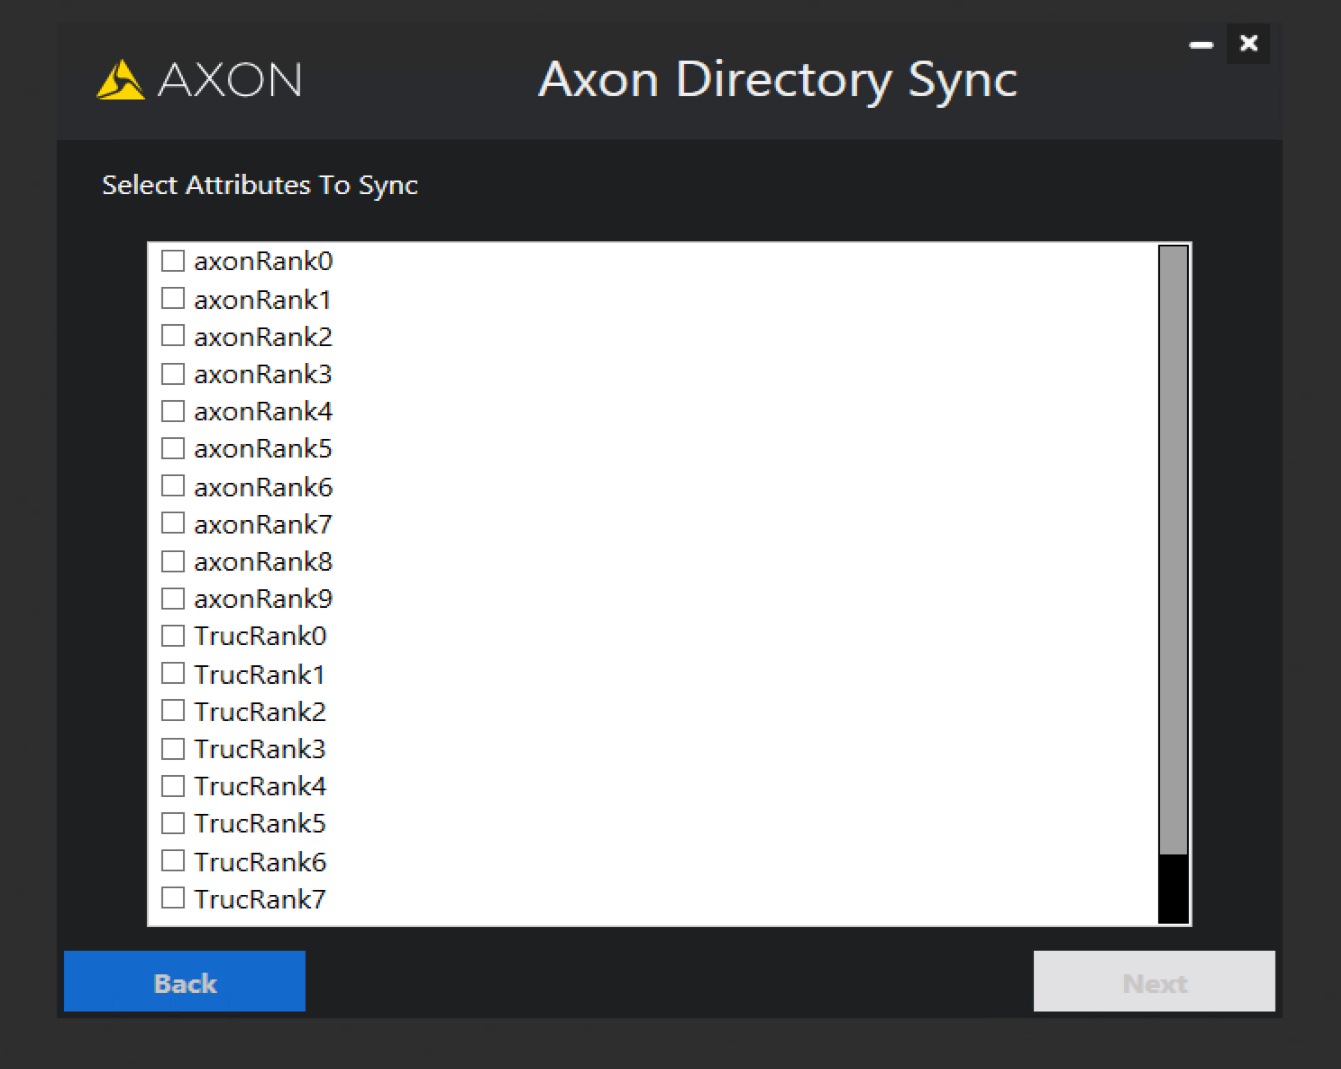
- Field Mapping defines how Active Directory user attributes are mapped to Axon Evidence attributes. Fields with an asterisk (*) are required.
- Important: The External ID attribute is required for mapping users in Active Directory to users in Axon Evidence. It must be a unique and unchanging identifier for each user.
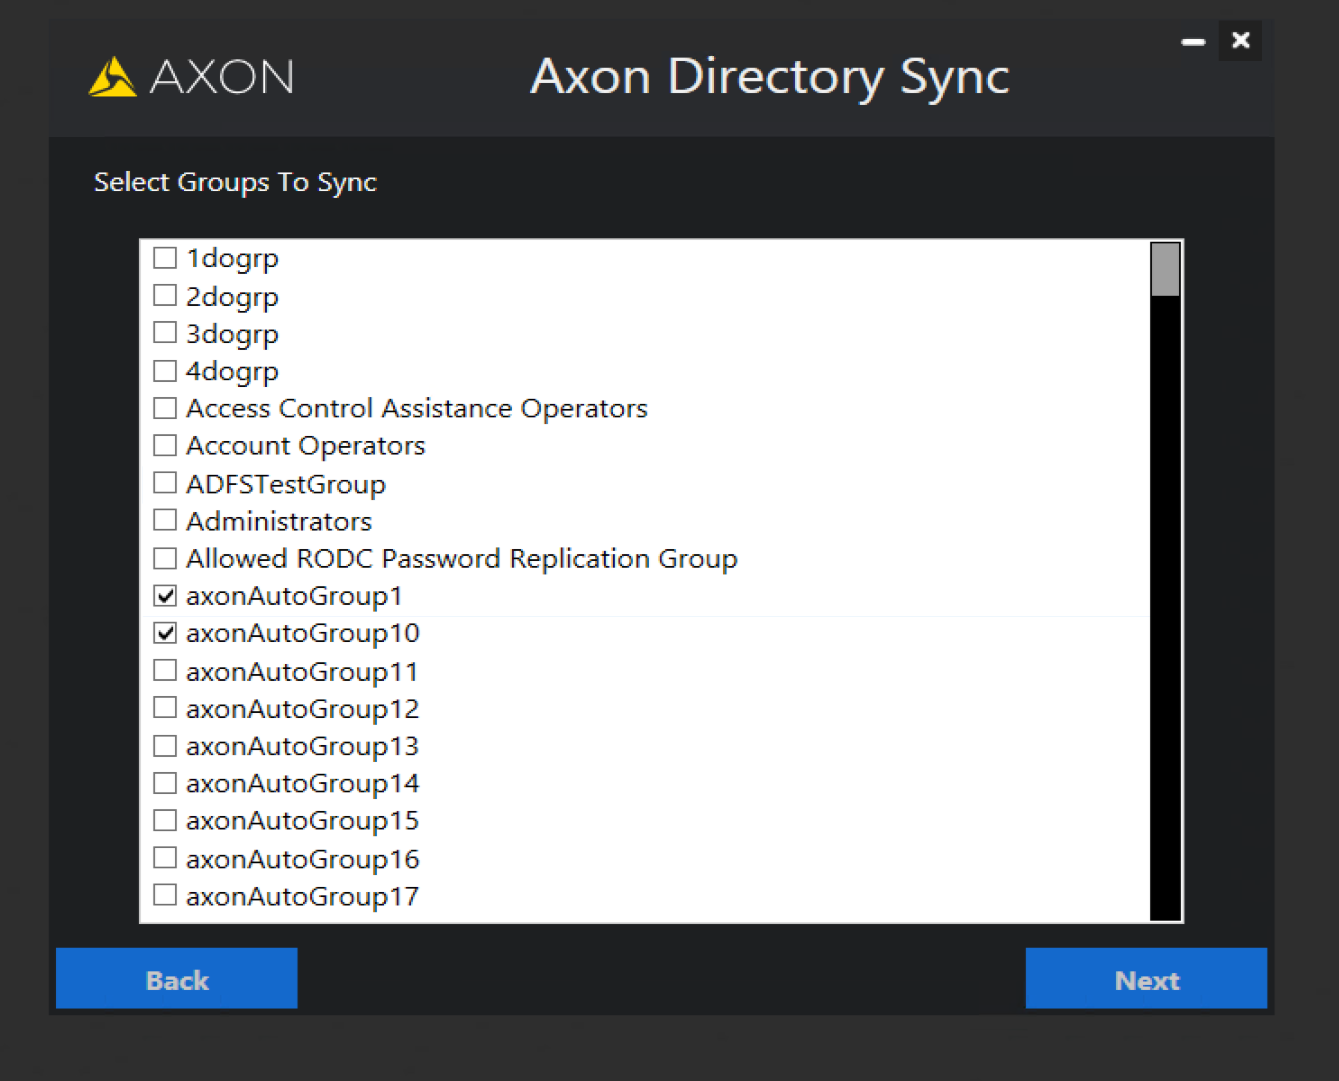
- Sync user members creates Axon Evidence groups based on the Active Directory groups you select. If the option is selected, choose Select groups to show a list of Active Directory groups. Select the groups that will be created and synchronized as part of the synchronization process. Only users in the selected groups will be synchronized.
Users are assigned to an Evidence Group based on the Field Mapping Evidence Group attribute. When the synchronization operation runs, it checks Axon Evidence for a group with the same name. If a group with the same name exists, the user is added to the group membership. If a group with the same name does not already exist, a new group with that name is automatically created and the user is added to the group membership.
Important: when using the Axon Directory Sync application, users will only be assigned to one Evidence Group at a time based on the field mapping. If users are added to different groups within Axon Evidence, the users will be reassigned to only their Evidence Group at the next synchronization.
Group hierarchy can be maintained through the Sync group memberships option. Groups can be nested to create parent and child groups. Changing the group hierarchy does not effect a user's Evidence Group. Users can access evidence that belongs to their group and subordinate (child) groups, if they have the following permissions:
-
View/List Evidence - required to view any evidence.
-
Access evidence in their Command - Allows a user to access evidence where the evidence group is set to their Command Hierarchy group or a subordinate (child) group.
-
Access evidence uploaded by users in their Command - Allows a user toaccess evidence that was uploaded by users in their Command Hierarchy group and subordinate (child) groups.
For more information about Groups, see the Axon Evidence Groups articles.
Part 3: Select Synchronization Settings
- Select the synchronization settings based on the sync options you chose in Part 2, above.
- If By AD Group was selected, choosing Select groups shows a list of Active Directory groups. Select the groups that will be synchronized as part of the synchronization process. Only users in the selected groups will be synchronized.
- If By User Attribute was selected, a list of the values for the selected User Attribute is shown. Select the attribute values that will be synchronized as part of the synchronization process. Only users with the selected attribute value will be synchronized.
- Select Next.
Part 4: Sync Now
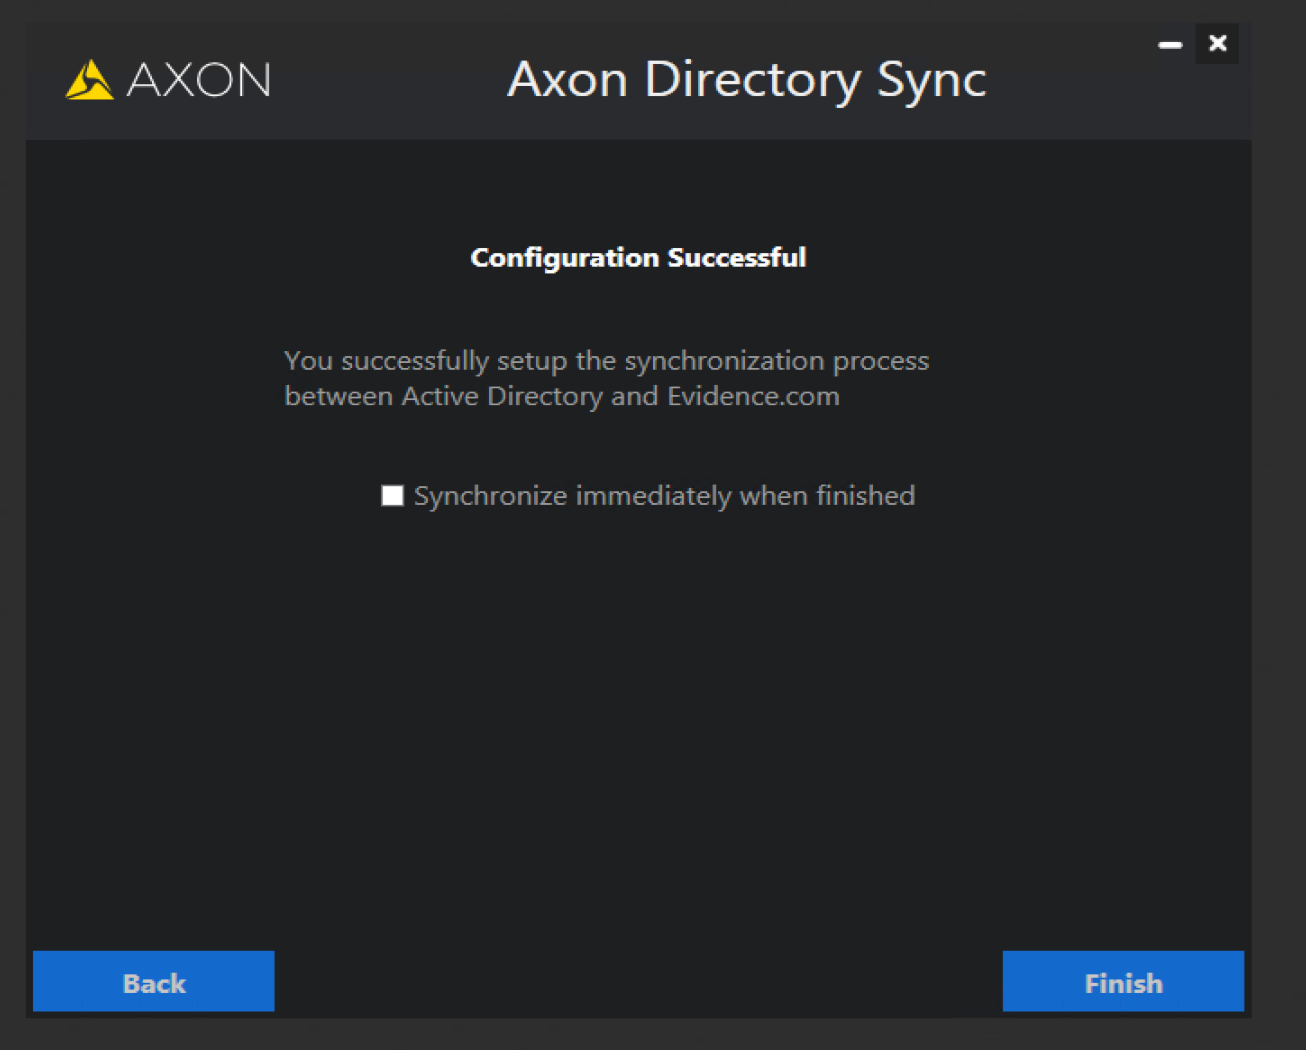
Once the configuration is complete, the application displays a confirmation page.
You can choose to start a synchronization immediately, or just let the synchronization run as scheduled.
Select Finish to complete the configuration. If you checked Synchronize immediately when finished, the application will close without any additional messages after the user information is transmitted to Axon Evidence.
The synchronization process might take some additional time to start after the application closes while the data is processed. The time to process data depends on the number of users being synchronized.
An email will be sent to the email addresses defined in Step 4 of the Automatic Provisioning Email Setting section when synchronization is complete.
Part 5: Find logs
Axon Directory Sync stores applications information and error logs in the C:\programdata\Axon\ADSync folder.
There are 2 primary logs to review:
-
[YYYY]-[MM]-ADSyncService_Errors
-
[YYYY]-[MM]-ADSyncService_Info