This article describes evidence access control and the access list in Axon Evidence, including information on user access to evidence and role permissions, access list information, providing access outside your organization, and access classes and categories. See the Cases Access Control Overview for information on case access control.
Axon Evidence uses access classes to control access to evidence. Each piece of evidence in Axon Evidence is assigned to one of the following access classes:
- Unrestricted
- Restricted
- Confidential
Evidence can only be assigned to one access class at a time. Evidence normally enters Axon Evidence with the Unrestricted access class. The access class can be changed to Restricted or Confidential manually, by assigning the evidence to a Restricted or Confidential category, or by adding it to a Restricted or Confidential case.
There are no Axon Evidence-specific definitions for the Restricted and Confidential access classes. Your organization should determine how these classes are used within your organization.
User access to evidence and user permissions
Default access to evidence is based on the permissions for a user's assigned role. The role-based permissions affect a user's ability to search for, view, and change the access class for evidence.
Additionally, each piece of evidence has its own access list, which allows your organization to manage evidence access inside and outside your organization on an as needed basis. Users and groups inside your organization can be granted access to evidence by being added to the access list. The access list is additive to role-based access. So, both users with role-based access and users on the access list are granted permission to search for and view the evidence. Being added to an access list allows a user to access the evidence, but it does not grant them any additional permissions beyond what is already included in their role.
The following table describes a user's ability to search for, view, and change the access class for evidence for the different permission settings.
| Permission | Setting | Role-Based Access | Access List Member | |
|---|---|---|---|---|
| User | Group Monitor | |||
| - List Unrestricted Evidence - List Restricted Evidence - List Confidential Evidence Sets permission to search for evidence and include evidence in reports evidence for the set access class. |
Prohibited | No evidence | No evidence | Can search and run reports if on the evidence access list |
| Only Their Own | If assigned as evidence owner | If evidence owned by group member | ||
| Any Evidence | Any evidence | Any evidence | ||
| - View Unrestricted Evidence - View Restricted Evidence - View Confidential Evidence Sets permission to access evidence for the set access class |
Prohibited | Can't apply access class | Can't apply access class | No effect |
| Only Their Own | If assigned as evidence owner | If evidence owned by group member | ||
| Their Groups' & Their Own | If assigned as evidence owner or if evidence is assigned to a group the user is a member or monitor of | |||
| Any evidence | Any evidence | Any evidence | ||
| - Apply Access Class - Restricted - Apply Access Class - Confidential - Remove Access Class - Restricted - Remove Access Class - Confidential Sets permission to apply/remove the access class |
Prohibited | Can't apply/remove access class | Can't apply/remove access class | |
| Only Their Own | If assigned as evidence owner | If evidence owned by group member | ||
| Their Groups' & Their Own | If assigned as evidence owner or if evidence is assigned to a group the user is a member or monitor of | |||
| Any evidence | Any evidence | Any evidence | ||
Evidence search page views
The information shown to users on the evidence search page depends on the permissions for the user’s assigned role and if the user has been added to an access list. If a user does not have list permission for an access class, then no evidence in that access class is shown on the Evidence Search page, unless that user is manually added to the access list for a particular piece(s) of evidence.
Example 1: User A is in a role with “List Restricted Evidence = Prohibited”. All evidence and the associated evidence metadata marked as restricted will not be shown to that user on the evidence search page, unless another user at the agency manually adds User A to the “Manage Access” list on the specific piece of restricted evidence. In that case, User A will only see that piece of restricted evidence in their search results, but will not see other restricted evidence in their search results.
Example 2: User B is in a role with “List Unrestricted Evidence = Only Their Own” and is not on any access lists. In this scenario, User B will only see evidence where they are the assigned owner on the evidence search page; they will not see any other evidence marked as restricted or confidential in their search results.
If a user has List Evidence permission for an access class set to “Any Evidence” and View Evidence permission set to “Only Their Own” for that access class, then the user will see all the evidence in that access class in their search results, but will only be able view their own evidence. The user can request access to other evidence, as shown in [image 1].
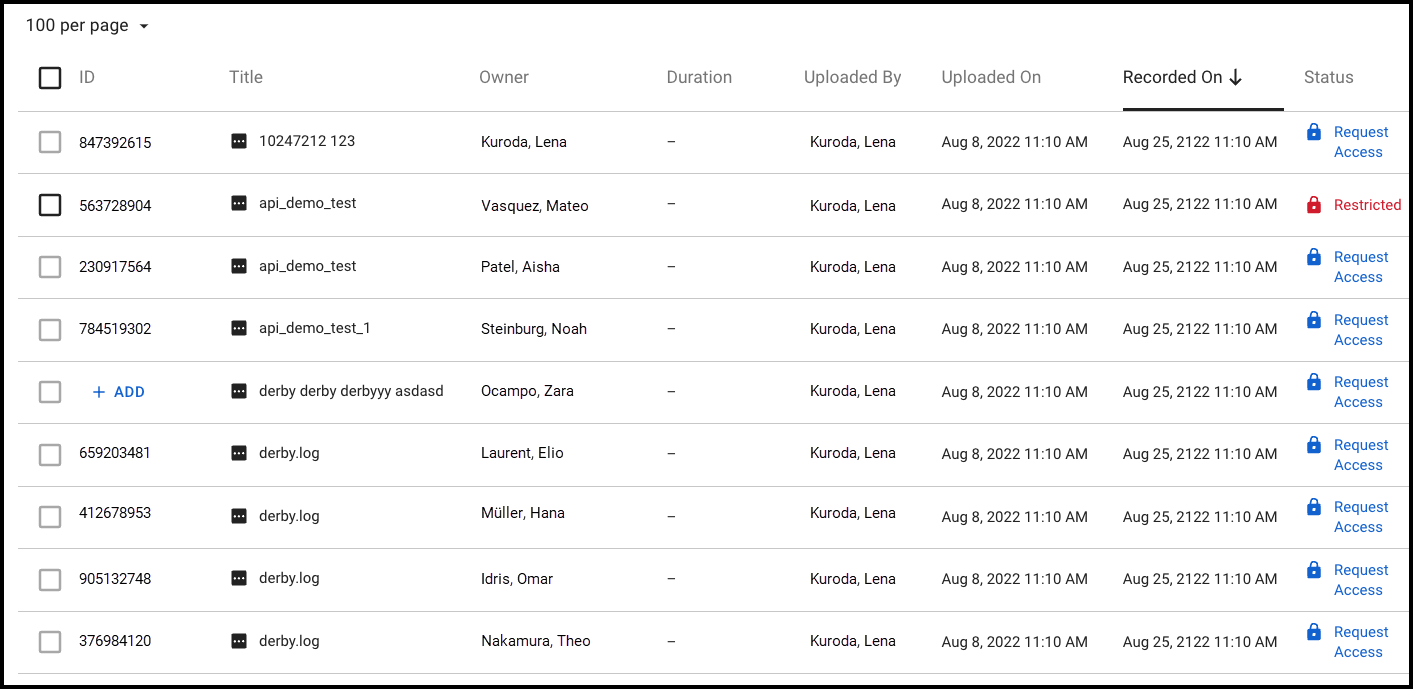
Image 1
In this example, the logged in user has List Restricted Evidence permission = “Any Evidence” but View Restricted Evidence permission = “Prohibited”. The logged in user was manually added to the access list for the second evidence (ID = “563728904”), hence why they can click in to view that evidence but must request access for the other restricted evidence (including restricted evidence where they are the assigned owner).
When evidence is marked as Restricted, users who have “List Restricted Evidence” permission set to “Any Evidence” or “Only Their Own” will still see all metadata about that evidence in the search results, as shown in [image 1]. If they do not have the same “View Restricted Evidence” permissions, for any evidence they can see in the search results (List permission) but not view (View permission), they will need to request access to view.
Axon also provides a configuration to blur out metadata in the evidence search front end if they want certain users to be able to return restricted evidence in the search results, but not view that evidence as shown below in [image 2]. Note that even in this configuration, users could still gain access to the evidence metadata programmatically if they have external API access or use advanced browser inspection tools. It’s also important to note that in this configuration certain metadata, including the evidence ID and location, are still shown to users on the evidence search page. To enable this configuration option, please reach out to your Customer Success Manager.
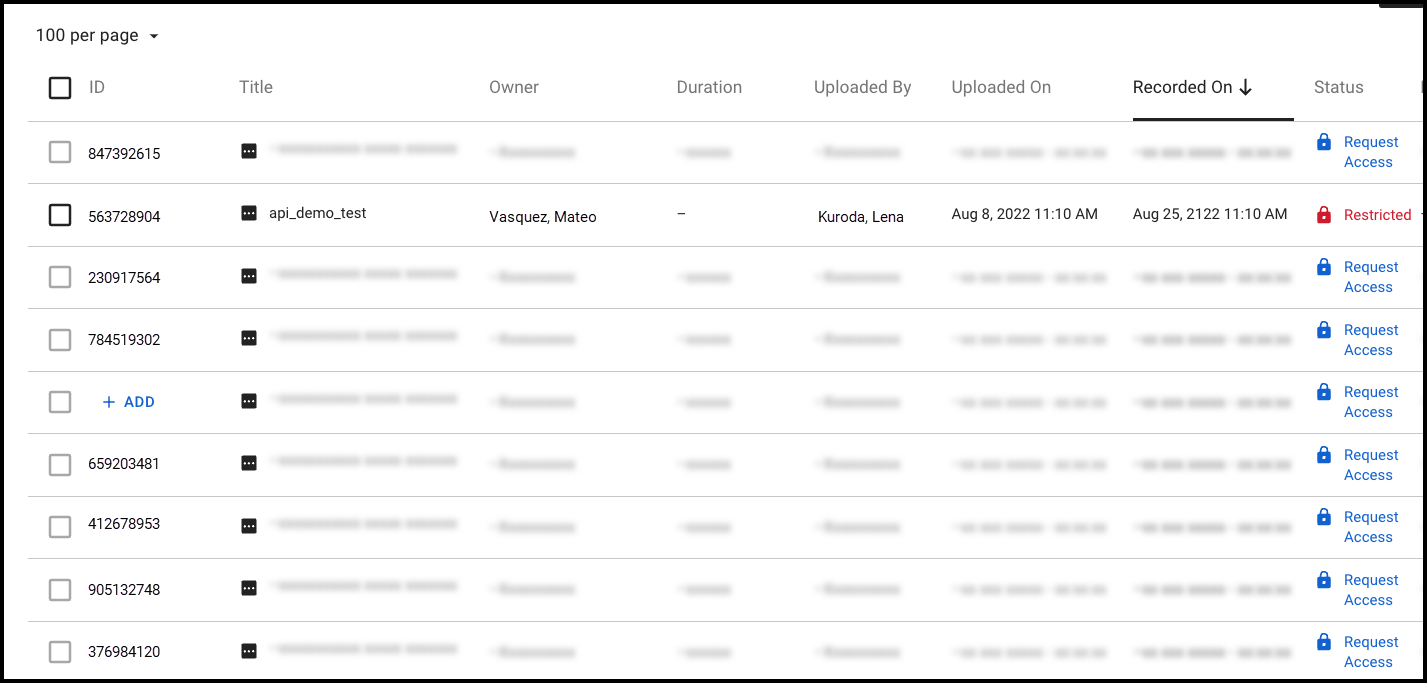
Image 2
In this example, the agency configured metadata to be hidden for restricted evidence and the logged in user has List Restricted Evidence permission = “Any Evidence” but View Restricted Evidence permission = “Prohibited”. The logged in user was manually added to the access list for the second evidence (ID = “563728904”), hence why they can see the metadata for that evidence but not others, and need to request access for the other restricted evidence.
Access list information
To get a snapshot view of the number of users that can access an evidence file, select its row and look at the Manage Access section on the Evidence Detail page. Below we see that 509 role-based users and users added to the access list inside this organization have access to this evidence; Group Monitors and Evidence Groups users are not included in the count. Additionally, this evidence has been shared with 1 agency outside the organization.
For a detailed view of user access, select Manage Access. The upper portion of this panel shows the number of users and groups on the access list, the number of users that can view the evidence due to their role-based permissions, and the access class for the evidence. It also includes a link to the evidence page (Copy link), allowing users to easily paste it into reports or other documents. Anyone accessing the link later must still sign into their Axon Evidence account and must either be on the access list or have permission to view the evidence.
The Manage Access screen is also used to add and remove users and groups from the evidence access list and to change the evidence access class. Users must have the appropriate permission to apply or remove an access class. The lower portion of the Manage Access screen shows the users and groups on the access list for the evidence. The list shows the user or group name, access level, evidence access duration, and when the user or group was added to the list. If the evidence is in the restricted or confidential access class, then only users in roles that grant them access to evidence in the restricted or confidential access class and the users and groups on the access list can view the evidence.
Provide access to evidence outside your organization
Watch this video to learn more about sharing evidence with access lists.
Users with the appropriate permissions can provide access to the evidence for partner agencies and users outside your organization using the Manage Shares pane. Additionally, they can provide access to evidence using an unauthenticated download link from the evidence search page.
The Manage Shares option does not provide a copy of the evidence to the partner agency. This is unlike sharing evidence by case to partner agency, which does provide a copy of the evidence and allows the agency to manage the video based on their own retention policies.
Access classes and categories
The categories feature lets you apply a Restricted or Confidential access class to evidence. When evidence is assigned to a category that applies an access class, the evidence access class changes automatically. Because evidence can only have one access class assigned at a time, if evidence is assigned to both a Restricted and Confidential category, the access class is changed to Confidential.
If a user does not have permission to apply the Restricted or Confidential access class, they will be unable to assign evidence to a category that applies the access class change in Axon Evidence. Users applying categories using Axon mobile or desktop apps are not restricted from assigning categories.
Once an access class has been changed to Restricted or Confidential, it can only be changed to Unrestricted from the Evidence Detail page.
Access control is a critical component of evidence management, ensuring that sensitive information is only available to authorized users. Whether you need to add users to an access list, provide external access to evidence, or modify access, this article provides the information you need to handle these tasks with precision and care.
Manage Access quick start
Step 1
Begin on either the Evidence detail page to add evidence individually, or the Evidence search page to add multiple pieces of evidence at once.
From the Evidence detail page:
Select either Manage Access to manage internal access, or Manage Shares to manage external access.
From the Evidence search page:
Select the check boxes next to the evidence files you wish to work with, and then select Manage Access. Choose either Inside my agency to manage internal access or Outside my agency to manage external access.
Step 2
After your selection, a Manage Access or Manage Shares pane will open with additional options to manage access. These options will vary depending on whether you chose to manage access for internal or outside users.
Changing Evidence Access Classes
The access class for evidence can be changed by assigning a Restricted or Confidential category to the evidence or by manually changing the evidence access class. See Add or edit Evidence Categories for information on assigning a category to evidence.
Changing the access class of an evidence file only allows users that are on the evidence access list or that have list and view permissions for the access class to search for and view the evidence. Users that do not have list permission cannot see the evidence on the Evidence Search page.
Changing evidence access class from the evidence search page
From the evidence search page, you can change an access class and add users and groups to the access list for one or more evidence files at a time. You can also replace the current access list with a different one and restrict the files.
- Search for the evidence files you want to work with.
- In the search results, select the check box next to the evidence ID for each evidence file that you want to change.
-
NoteThe user that sets the evidence's access class to Restricted or Confidential will automatically be added to the access list.
- Under Access Class, select Unrestricted, Restricted or Confidential.
- Under Bulk Options, select how the access lists for the selected evidence files are affected:
- Add to: Will add the selected users or groups to the current access list.
- Replace: Will replace the users and groups currently on the access list with the list of users and groups added below.
If this option is selected, only users and groups added will be on the access list for the selected evidence files. All other users and groups will be removed from the access list.
- From the Access Level list, select the access level for the user or group.
- If Role is selected, the actions a user can take with the evidence depends on the permissions associated with their assigned role.
- If View is selected, the user can only view the evidence.
- From the Duration list, select the period of time the user or group can access the evidence.
The default value is Until Removed, which means access to the evidence is granted until the user or group is manually removed from the access list.
- In the Add Access field, enter the name, badge ID, or email address of the user or the name of the group. Axon Evidence shows a list of matching users or groups as you enter the information. Select the user or group you want to add to the access list.Note
If you incorrectly add a user or group to the list, remove the user by selecting theRemove Access button (trash can), and then select Remove.
- Repeat step 8 to add other users and groups.
- Select Save.
- A dialog box showing access was granted is displayed. Select Close to continue.
An email is sent to each user informing them that they have been added to the access list for the selected evidence files.
If the Add to option was selected, an email is sent to users that were on the access list for this evidence informing them that the evidence was restricted, but that they still have access. If the Replace option was selected, an email is sent to users that were on the access list for this evidence informing them that they no longer have access to the evidence.
Changing evidence access class from the evidence detail page
From the Manage Access section you can add users and groups to the access list for an evidence file and change the evidence's access class. If you want to add users to the access list and change evidence access class for more than one evidence file at a time, use the process for Changing Evidence Access Class from the Evidence Search Page.
- On the evidence details page select Manage Access.
- Under Access Class, select Unrestricted,Restricted or Confidential.Note
If you are not already on the access list, you are automatically added to the list. An email is sent to users and groups that were already on the access list for this evidence informing them that the evidence was restricted, but that they still have access.
- In the User or Group field, enter the name, badge ID, or email address of the user or the name of the group. Axon Evidence shows a list of matching users as you enter the information. Select the user or group you want to add to the access list.
You can add multiple users and groups if they will have the same access duration and access level.
- From the Access Level list, select the access level.
- If Role is selected, the actions a user can take with the evidence depends on the permissions associated with their assigned role.
- If View is selected, the user can only view the evidence.
- From the Duration list, select the period of time the user can access the evidence.
The default value is Until Removed, which means the user can access the evidence until they are manually removed from the access list.
- Select Add.
The user information is added to the list and an email is sent to the user informing them that they have been added to the access list for the evidence.
- Repeat steps 3 through 6 to add other users.
- After all users and groups are added, select Done to return to the Evidence Detail page.
Removing a restricted or confidential access class from evidence
Evidence Restricted or Confidential access class can only be removed from the Evidence Detail page.
- On the evidence details page select the check box next to the evidence for each evidence file that you want to change.
-
- Under Access Class, select Unrestricted.
- Select Save to return to the Evidence Detail page.
The restriction on the evidence is removed and an email is sent to each user on the access list informing them that the restriction was removed from the evidence file.