Work with evidence
In Axon Evidence, you can manage how evidence is organized, updated, and assigned. From the evidence details page, you can edit titles and IDs, update recorded-on details, and add or remove categories, tags, and flags. You can also reassign evidence, request access, or delete and restore files when needed.
To begin, locate and open the evidence file you want to update:
- Select Evidence, and then select All Evidence, My Evidence, or Shared Evidence.
- Search for the evidence file you want to edit.
- Select the title of the evidence to open it in the evidence details page.
Edit the ID or title
- Select Evidence, and then choose how you would like to search – All Evidence, My Evidence, or Shared Evidence.
- Enter search criteria to search for the evidence you need. Learn more about how to search for evidence.
- Select the title of the evidence you wish to view to open the evidence details page.
- Select Edit, and then enter your updates into the Title or ID box, adhering to the character limits:
- Evidence titles: Can be up to 200 alphanumeric characters.
- Evidence IDs: Can be up to 75 alphanumeric characters, unless your administrator has configured evidence validation that enforces different minimum or maximum ID length.
- Select Save to apply the changes.
Edit recorded on date and time
On the evidence details page, the recorded date and time appear in the Metadata section.
- Select Evidence, and then search for the evidence files you want to edit. Learn more about how to search for evidence.
- Select the title of the evidence you wish to edit to open the evidence details page.
- Under Metadata, in the Recorded On box, select Edit Recorded On (pencil button). This enables an interactive calendar, and time selector. From here you can:
- Manually edit the date and time: Directly enter the date and time in the Recorded On box.
- Use the calendar and time selector to edit the date and time: Use the calendar and time selector to choose a new date and time.
- Select Save.
- In the confirmation window, verify the new recorded on date and time, and then select OK.
Frequently Asked Questions about the recorded-on date and time
What types of video files can I adjust the Recorded On date and time for?
Adjustments to the Recorded On date and time are specifically available for video streams associated with a CCTV file. For Axon body worn cameras (BWC) and Fleet videos, adjustments can only be made at the evidence level, without the presence of any child files or streams. Note: This feature is not available for multicam videos.
Who is permitted to use this feature?
Any user with Edit Evidence permission can edit the Recorded On value. Additionally, administrators with the necessary permissions can control display, extraction, and enable default overlay settings, including time adjustments.
How does the feature affect shared evidence?
When sharing evidence, the Recorded On overlay will be visible to the receiving party only if the sharing settings allow for it. The settings for overlays must be configured to enable this visibility. Here’s how it works across different sharing flows:
- Manage Access Inside My Agency – Users added to the Internal Access Control List can review evidence with metadata overlays. Whether they can view extraction with metadata overlays is determined by their permission to edit evidence.
- Manage Access Outside My Agency – Users added to the External Access Control List can view evidence with metadata overlays, but they can’t create extractions.
- Manage Access Outside My Agency using a Download Link – Metadata overlays can’t be used during evidence playback. To share evidence with the metadata overlays, an extraction must be created and shared.
- Sharing Evidence through a Case – Metadata information included in the evidence is included when the evidence is shared in a case but is not displayed by default. When the original video is shared to a partner agency, all overlays available to the original agency are also available to the partner agency. However, there are exceptions, ‘Assigned To’ and ‘Vehicle Information’ (such as vehicle name, vehicle speed, radar, etc.), will not be displayed in the partner agency. This is because these overlays receive new values due to changes in video assignment when sharing through the copy flow. In this situation, when only limited overlays are available or when certain overlays must be embedded in a video, it is recommended that you create a video extraction with the overlays. Partner agencies can independently manage the extraction of videos with overlays.
When extracted evidence files are shared, the metadata overlays are visible to the viewer and cannot be changed.
Will the new Recorded On value be applied for the evidence?
No, the new Recorded On value will only apply to the converted file(s). It will not change the original Recorded On value of the evidence, which remains as it was when the evidence was collected. To update the Recorded On date and time of the evidence itself, go to the Metadata section on the evidence detail page.
Add a category to evidence
In Axon Evidence, you have the ability to add or remove categories from evidence. Individual files can be categorized from the evidence detail page. You can also add categories to one or more files at a time from the Evidence search page.
If a user doesn't have permission to apply the Restricted or Confidential access class, then the user will not be able to assign evidence to a category that applies the access class change in Axon Evidence. Users applying categories using Axon mobile or desktop apps are not restricted from assigning categories.
- Categories: Existing categories that are assigned to the evidence are displayed on the evidence details page. Select a category to go to the filtered evidence search results showing all items assigned to that same category.
- Edit: Select Edit to modify the title, ID, or categories from the evidence details page.
Watch this video to learn more about how to add or remove categories.
Add, edit, or remove a category from the evidence search page
- Select Evidence, and then find the evidence you want to work with. Enter search criteria to narrow the results, or select Saved to apply a saved filter—like My evidence, Shared with me, or a custom saved search.
- Select the checkbox to the left of the evidence you want to edit or remove categories for.
- Select Edit Metadata on the action bar, and then select Category.
- In the Edit categories dialog box, choose whether you want to Add or Remove, select a category from the list, and then select Submit.
- In the confirmation window, select Confirm.
Tag Evidence
Tags are labels that you can apply to evidence and cases. Adding tags to evidence can help you find the evidence more easily later. Evidence searches allow you to filter the search results by tags.
Add or remove tags from the evidence details page
- In the Tags area of the evidence detail page, select Edit (pencil button).
- Enter a tag. Axon Evidence shows you a list of existing tags that start with the letters you entered.
A tag can be up to 256 alphanumeric characters.
- If the tag you want to apply appears in the list, select it.
- Otherwise, finish entering the tag, and then press Enter on your keyboard.
- To remove a tag, select X next to the tag name.
- Add or remove additional tags as needed.
- Select Save.
Add tags from the evidence search page
- Enter search criteria to search for the evidence you want to tag. Learn more about how to search for evidence.
- Select the check boxes next to the evidence you wish to add tags to.
- Select Edit Metadata, and then select Tag.
- In the 'Edit tags' window, select Add, and then begin entering the tag name. Axon Evidence shows you a list of existing tags that start with the letters you entered.
- If the tag you want to apply appears in the list, select it.
- Otherwise, finish entering the tag, and then press Enter on your keyboard.
- Select Submit.
Flag and unflag evidence
You can flag evidence that you want to find more easily in the future. Evidence searches allow you to filter the search results by the flag status of evidence.
Use the Flag or Unflag button on the evidence details page.
- Evidence that is not flagged has a Flag button.
- Evidence that is flagged has an Unflag button.
Assign evidence to an evidence group
All evidence recorded by users who are assigned to an evidence group is automatically assigned to the recording user's evidence group.
The evidence group information for a piece of evidence is included in the Evidence Created, Evidence Deleted, and Uncategorized Evidence reports. These reports can be filtered to only show evidence from a selected Evidence Group.
Users assigned to Roles with the Evidence Search and Edit Evidence Group permissions can manually assign or reassign evidence to an Evidence Group from the associated evidence details page or the evidence search page.
To manually assign or reassign evidence to an Evidence Group from the evidence details page, select the Details tab, and then in the Evidence Group box, select the appropriate Evidence Group.
To manually assign or reassign evidence to an Evidence Group from the evidence search page, find and select the appropriate evidence in the search results, select Edit Metadata on the action bar, and then select the appropriate Evidence Group.
Delete evidence
- Select Evidence, and then search for the evidence files you want to reassign. Learn more about how to search for evidence.
- Select the title of the evidence you wish to delete to open the evidence detail page.
- Above the evidence preview, select Delete.
- In the confirmation window, select Delete. Under Metadata, the Queued for Deletion On date will update to reflect the date when the evidence is set to be permanently deleted. Files marked for deletion move to a seven-day holding queue, where they remain recoverable by an administrator before being permanently deleted.
Restore evidence
Important considerations for restored evidence and retention periods:
- If assigned to a category with a retention period: The new deletion date for evidence is set to 30 days from the current date, regardless of the category's retention period,
- If assigned to a category without a retention period: No deletion date is set for the evidence.
Restore evidence from the evidence details page
- Select Evidence, and then search for the evidence file you want to restore. Learn more about how to search for evidence.
- Select the title of the evidence you wish to restore to open the evidence detail page.
- Above the evidence preview, select Restore.
- In the confirmation window, select Restore.
Reassign evidence
When you need to change the owner of evidence to another user, you can reassign the evidence from the results of an evidence search or from the evidence details page. Once evidence has been reassigned, the new owner is shown in the Owner column of the search results.
Watch this video for an overview of reassigning evidence.
Reassign evidence from the evidence search page
- Select Evidence, and then search for the evidence file you want to reassign. Learn more about how to search for evidence.
- For each evidence file that you want to reassign, select the check box next to the evidence.
- Select More Actions (...) , and then select Reassign.
- In the Reassign evidence dialog box, enter the name of the user you want to assign the evidence to. Axon Evidence shows a list of matching users as you enter the information, select the appropriate user from the list.
- Select Reassign.
- In the confirmation window, select OK.
Reassign evidence from the evidence details page
- Select Evidence, and then search for the evidence files you want to reassign. Learn more about how to search for evidence.
- Select the title of the evidence you wish to reassign to open the evidence details page.
- Select Reassign.
- In the Reassign evidence dialog box, begin entering the last name, first name, badge ID, or email address of the user you wish to reassign the evidence to. The system will automatically generate a list of matching users based on the information entered. Select a user from the list, and then select Reassign to complete the process.
Request access to evidence
On the evidence search page, the results can include evidence that you do not own and that you do not have permission to view.
- Select Evidence, and then search for the evidence that you want the owner to share with you
- Under Status, select Request Access.
- In the Request Access dialog box, enter an optional message to the evidence owner, and then select Send.
- In the confirmation window, select OK.
Axon Evidence sends the owner a notification email about your request. After the owner grants you access, Axon Evidence sends you a notification email, and you can access the evidence from the All Evidence or Shared Evidence page.
Import evidence
Users who are allowed the Upload External Files permission can import evidence files into your Axon Evidence organization. The user who uploads evidence files becomes the owner of the evidence.
You can use this feature to import evidence that was not recorded on Axon devices, such as pictures taken with your smartphone and saved on your computer.
When you import an evidence file, Evidence.com classifies the file by its file type (video, image, audio, or document) based on the file extension. You can filter evidence searches by file type. If Axon Evidence does not recognize a file extension, it classifies the file as “Other”.
The maximum file size is 4 Gigabytes.
Steps to import evidence
- Select Evidence and then, under the search filters, select Import Evidence to open the Import Evidence page.
- Add the files that you want to import, using either of the following methods:
- Find the files on your computer and then drag and drop the files onto the Import Evidence page.
- Select Choose Files and then use the dialog box to find and select the files on your computer.
Note: You can add up to 500 files at one time.
- To record website content, select Record and Share.
- A panel appears on the right side of the page. In the same browser, open a new browser window or tab and go to the website you want to record.
- Select Start Sharing, select the window or tab to record, and indicate if audio should be recorded.
- When you are ready to stop recording, select Stop in the selected tab/window or Stop Sharing in the panel.
- Review the recording and, if needed, start over. You can add a Title, Evidence ID, and Category, as needed. Once you are ready to accept the recording, select the checkbox and select Accept. Repeat this step to record other website content.
- Once the files are added, you can edit the Title, ID, and Category information individually for each file. You can also edit the IDs and Categories for all the imported evidence or select and edit the IDs and Categories for specific files using the Edit All IDs and Edit All Categories options.
If your agency has evidence ID field validation enabled, it is enforced when files are uploaded.
Although it is recommended that you add the title, ID, and category now, Axon Evidence enables you to add this information after importing the evidence.Information Purpose Title A meaningful name for the evidence. If you omit the title, Evidence.com assigns the file name as the title. ID It is recommended that you assign evidence the same ID as the case that the evidence is associated with. After you import evidence, you can easily add it to the case. Category Determines the retention period for evidence that is not assigned to an active case. For sensitive evidence, restricted categories provide additional, permission-based control of who can view the evidence. - Select Upload. Axon Evidence begins uploading the evidence files. When Axon Evidence has successfully uploaded a file, the Progress column shows “Upload Complete”. If an upload fails, you can use the Retry option to try to upload the files without having to choose the files again.
- When you have finished uploading evidence files, close the Import Evidence page.
Export evidence
Export your evidence search results from Axon Evidence. Export options include PDF, Excel, text, or CSV formats.
Export considerations
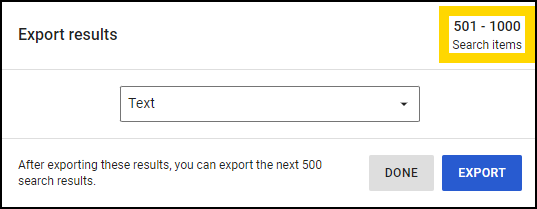
- Search results with more than 500 files are segmented; only the first 500 are included in the initial download, with a dialog prompt to download subsequent files.
- In Microsoft Excel and CSV formats, the Device Assignee First Name and Last Name are split into separate columns, and a Badge ID column is included.
- The evidence export will download in the format you specify.
Export evidence
- Select Evidence, and then choose how you would like to search - All Evidence, My Evidence, or Shared Evidence.
- Enter search criteria to search for the evidence you need. Learn more about how to search for evidence.
- Select More actions... and then select Export results.
- In the Export results window, select a file type from the list, and then select Export.The evidence will begin to download immediately. The exact download behavior depends on your browser.
- To download additional search results, select Export again. The Export results window will indicate the range of files included in your subsequent downloads.
Download evidence
Download evidence from the evidence details page
- Select Evidence, and then search for an evidence file.
- Select an evidence title to open the evidence detail page.
- Select Download > Evidence.
- In the Download evidence window, select Download.
Download speed information
Files on Axon Evidence download at different rates. Axon Evidence does not throttle file downloads. The speed of your download depends on file size and your Internet connection speed.
File sizes on Axon Evidence vary, depending on a number of factors, such as recording quality and duration. The size of an evidence file can be found in the Metadata section on the evidence detail page.
Your Internet Service Provider can help you determine your specific download speed or you can check your speed with an online Internet Speed Test tool. If you encounter issues where your download times are significantly different than the estimated download time, check with your IT organization for any potential network issues. For additional assistance, contact Technical Support.
The table below provides estimated download times and speeds for different files sizes.
|
Approximate Download Speed |
||||
|---|---|---|---|---|
|
File Size |
50 Mbps |
250 Mbps | 500 Mbps | 1000 Mbps |
|
50 MB |
10 seconds |
2 seconds | 1 second | 0.5 seconds |
|
250 MB |
50 seconds |
10 seconds | 5 seconds | 2.5 seconds |
|
1 GB |
3 minutes 20 sec |
40 seconds | 20 seconds | 10 seconds |
|
25 GB |
1 hour 20 minutes |
16 minutes | 8 minutes | 4 minutes |
Download times are approximate, and may vary depending on factors such as network congestion, and any limitations of your hardware or software. Some providers may deliver speeds higher or lower than those listed in the table.