Axon Signal configuration
Axon Signal alerts your Axon Body, Flex, or Fleet camera to begin recording. With Axon Signal sending the alerts, officers can focus on critical situations rather than on their cameras.
Axon Evidence administrators can configure which Axon Signal events alert Axon body-worn and vehicle cameras for their agency. Use the Axon Evidence Signal Configuration page to configure the events for the following Axon Signal products:
- Axon Signal Vehicle – The in-vehicle product reports in-vehicle events, such as turning on a vehicle's light bar, to alert Axon cameras to begin recording.
- Axon Fleet 3 Hub – Includes Signal triggers for Axon Fleet 3 cameras.
- TASER energy weapons – TASER battery packs report events that can alert Axon cameras to begin recording.
- Axon Signal Sidearm and Signal Sensor – This holster accessory reports when a sidearm or other device is drawn to alert Axon cameras to begin recording.
The default Signal Configuration setting alerts all near body worn and Fleet vehicle front cameras to begin recording. You can adjust this setting to change this behavior.
Configure Signal Vehicle
While the Axon Signal Vehicle inputs and events are set on an agency-wide basis, an Axon Signal Vehicle event for one vehicle will not alert the Fleet cameras for another vehicle. However, body worn cameras are alerted by events from any Axon Signal Vehicle.
Example: Axon Signal Vehicle is configured to alert body worn cameras and the Fleet front camera when a vehicle's light bar is turned on. When vehicle A turns on its light bar, the Fleet front camera in vehicle A and any body cameras within range are alerted to begin recording. But the front cameras in other vehicles are not.
| Note | In the August 2019 release, the Evidence Audit Trails and Device Audit Trails were updated to specifically reflect the Signal Input pin number on the Axon Signal Vehicle that initiated an Axon Fleet camera activation signal. In situations where two inputs were active at the time of camera activation, both Axon Signal input pins are included in the audit trail entry. |
- Select Admin, then under Signal select Signal Vehicle.
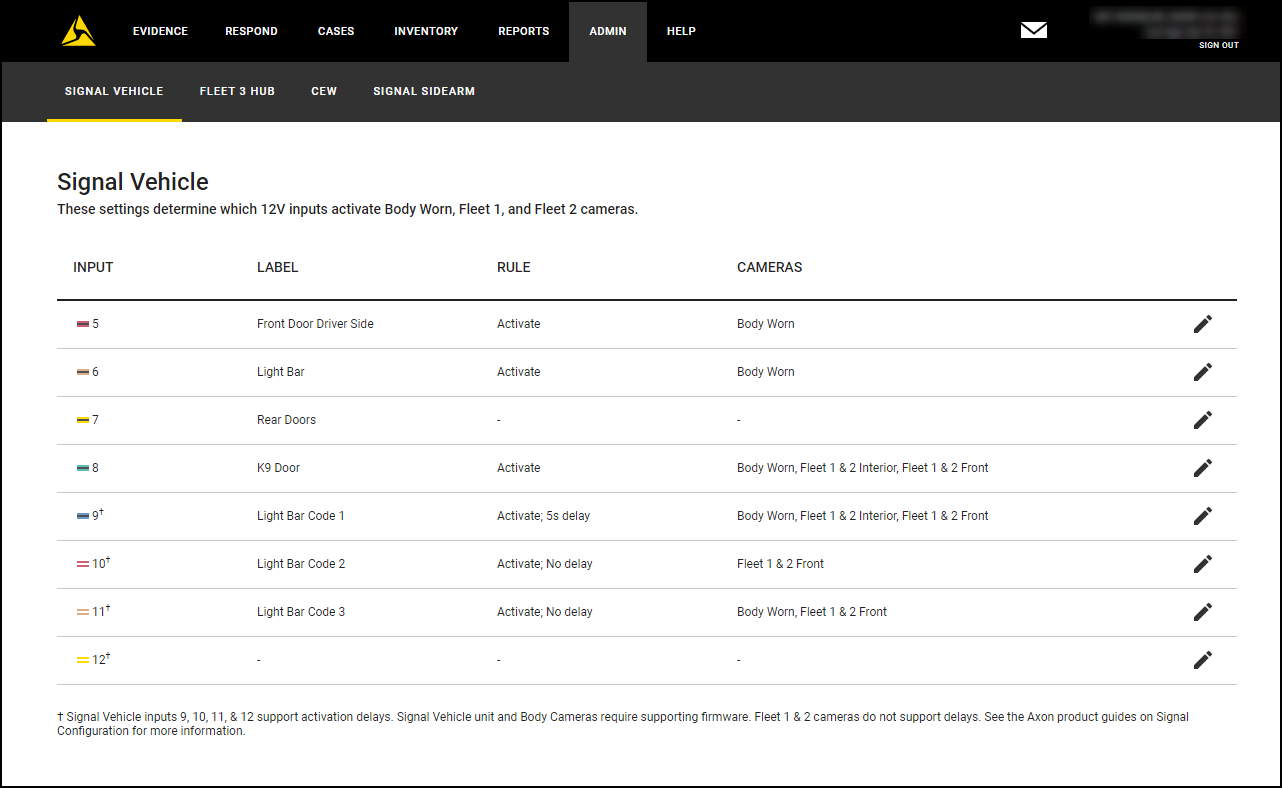
- For each input to configure, select Edit
 . The Input column shows the inputs available for configuration for Axon Signal Vehicle at your organization and represents the wire connection on the Axon Signal Vehicle device. Inputs 1 through 4 are reserved and cannot be configured.
 - Select the appropriate Label from the list. This is the trigger the Axon Signal Vehicle device is wired to in the installation, such as Front Door or Light Bar. The Rule setting is not active and cannot be changed.
- Select the cameras (Body, Fleet front, and Fleet back cameras) to alert with this trigger. The Fleet 1 and 2 Front and Back camera settings are only available to agencies that use Axon Fleet.
- Select Save.
- To configure another input, repeat steps 2–5.
Configure Fleet Hub
- Select Admin, then under Signal select Fleet 3. This menu configures Fleet Hub to activate Fleet 3 cameras.

- To configure an input, select Edit for that row. Brakes are only configurable on inputs 13 and 14.
- Select the desired Label from the dropdown.
- Some labels have a letter in parenthesis. This indicates the letter shown on the metadata overlays when reviewing an associated video in Axon Evidence.
- Select the dropdown under the Rule column and choose the desired behavior. Log status logs the action in the audit trail; activate activates the selected cameras.
- If the selected Rule includes activation, select the Cameras in the dropdown to activate.
- When you finish configuring an input, select Save.
- To configure another Fleet Hub input, repeat steps 2–6.
Configure TASER Signal settings
- Select Admin, then under Signal select TASER Weapon.

- Shows the TASER Weapon page for Signal.
- Select Edit for the TASER device to set.
- Select the cameras (Body, Fleet front, and Fleet back cameras) to alert with this device activation. The Fleet 1 and 2 Front and Back camera settings are only available to agencies that use Axon Fleet.
- Select Save.
- For any remaining device activations, repeat steps 2–5.
- Optionally, toggle Assigned Officer Activation to enable or disable this capability. When enabled, the Axon Signal transmission from a device only activates the Axon body camera assigned to the device user. When disabled, it activates any in-range Axon body camera.
Important To ensure the TASER Assigned Officer Activation setting functions as designed, your organization must ensure TASER weapons and Axon body cameras are correctly assigned and distributed to officers.
Configure Signal Sidearm
- Select Admin, then under Signal select Signal Sidearm or Signal Sensor.
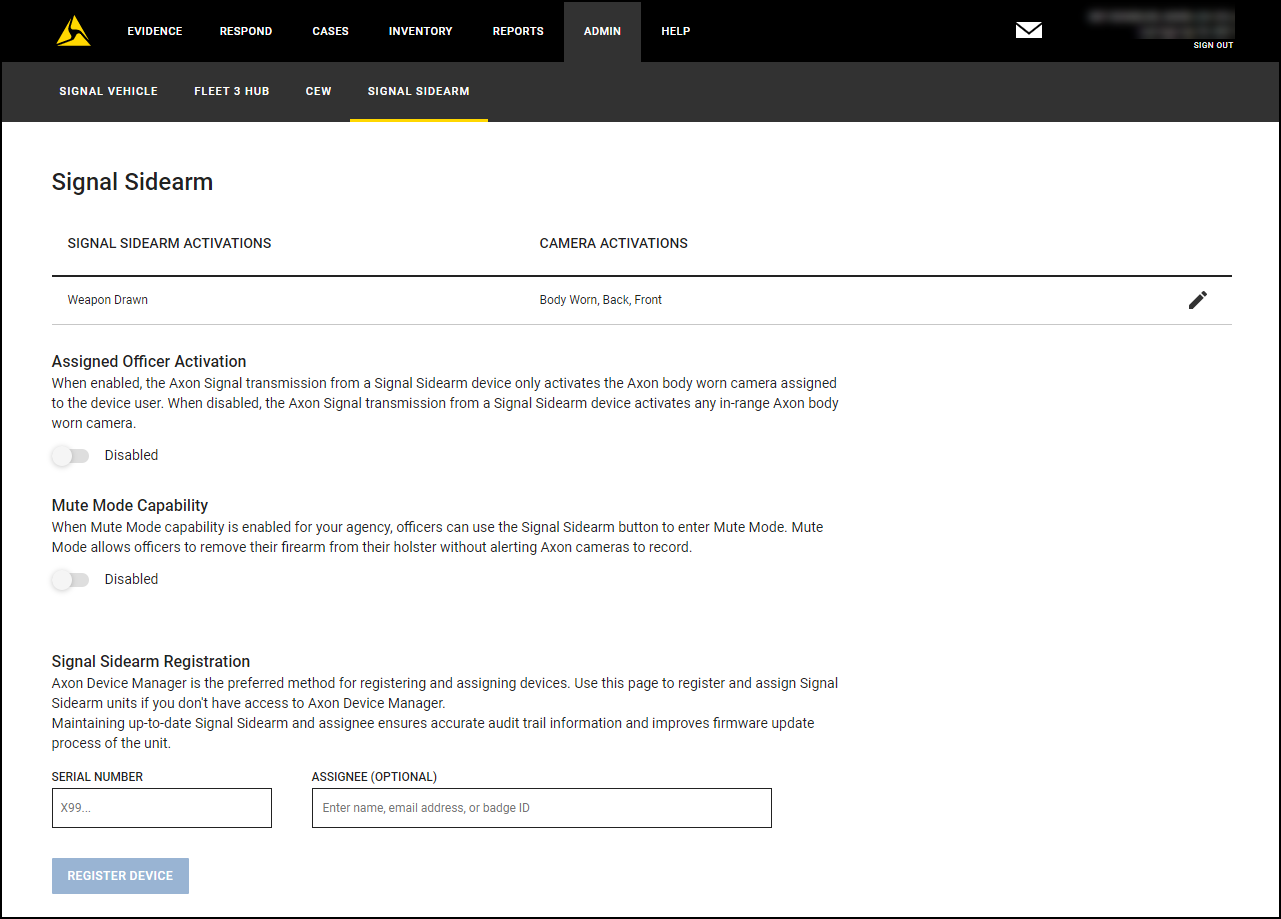
- Select Edit beside Weapon Drawn.
- Select the cameras (Body, Fleet front, and Fleet back cameras) to alert with Signal Sidearm or Sensor. Fleet 1 and 2 Front and Back camera settings are only available to agencies that use Axon Fleet.
- Select Save.
- Optionally, toggle Assigned Officer Activation to enable or disable this capability. When enabled, the Axon Signal transmission from a device only activates the Axon body camera assigned to the user. When disabled, it activates any in-range Axon body camera.
Important To ensure the Assigned Officer Activation setting functions as designed, your organization must ensure Signal Sidearm and Axon Body cameras are correctly assigned and distributed to officers. - Optionally, toggle Mute Mode Capability to enable or disable Mute mode capability. When enabled, users can use the Signal Sidearm button to enter Mute mode, which lets them remove their sidearm from their holster without alerting Axon cameras to record.
- Select Save.
Last modified - 27 March 2026