Mobile Digital Interview Recording (DIR) Kit Quick Start Guide
The mobile digital interview recording (DIR) kits for Axon Interview, provide a versatile and portable solution for capturing interviews in the field. These kits ensure high-quality, reliable interview recordings anytime, anywhere. Lightweight and equipped with all the necessary components, the DIR kits facilitate seamless operation in diverse environments.
Find your way around the mobile DIR kit
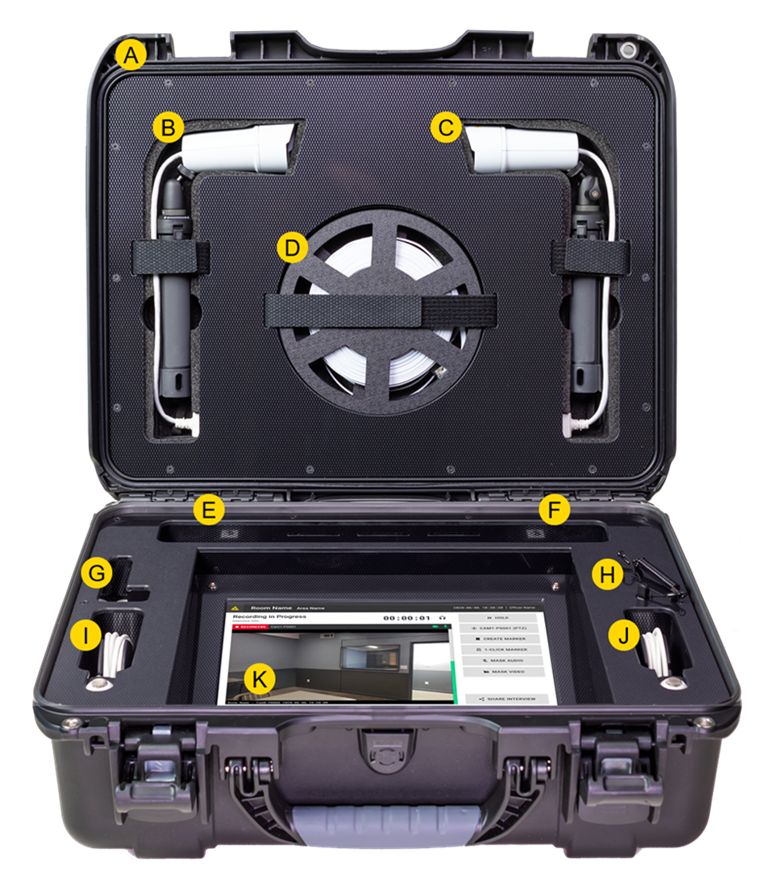
A. Rugged case: The lightweight, durable case houses all components securely, ensuring protection during transportation.
B. HD Camera (left side): A modular HD camera with desktop tripod for stable and flexible positioning.
C. HD Camera (right side): A modular HD camera with desktop tripod for stable and flexible positioning.
D. Cable reel: A dedicated cable reel for managing and storing camera cables, ensuring they are neatly organized and accessible.
E. Camera and microphone ports (left side): Ethernet and AUX ports where the HD cameras and microphones connect.
F. Camera and microphone ports (right side): Ethernet and AUX ports where the HD cameras and microphones connect.
G. Wired connection hub: A wired connection hub with three USB 3.0 connections, and a network port for additional connectivity options.
H. Stylus pen: Attached stylus with storage compartment for easy access and safekeeping.
I. Microphone (left side): A high-quality microphone for optimal audio capture.
J. Microphone (right side): A high-quality microphone for optimal audio capture.
K. Display: A Panasonic Toughbook tablet with Axon Interview pre-installed. Built to withstand rugged conditions such as extreme temperatures, drops, and vibrations.
Additional components not pictured
- Power cable: Choose from a US, UK, or EU power cable. A convenient storage space contains the power cable when it is not in-use.
- Optionally, a keyboard or Blue-ray DVD burner may be added.
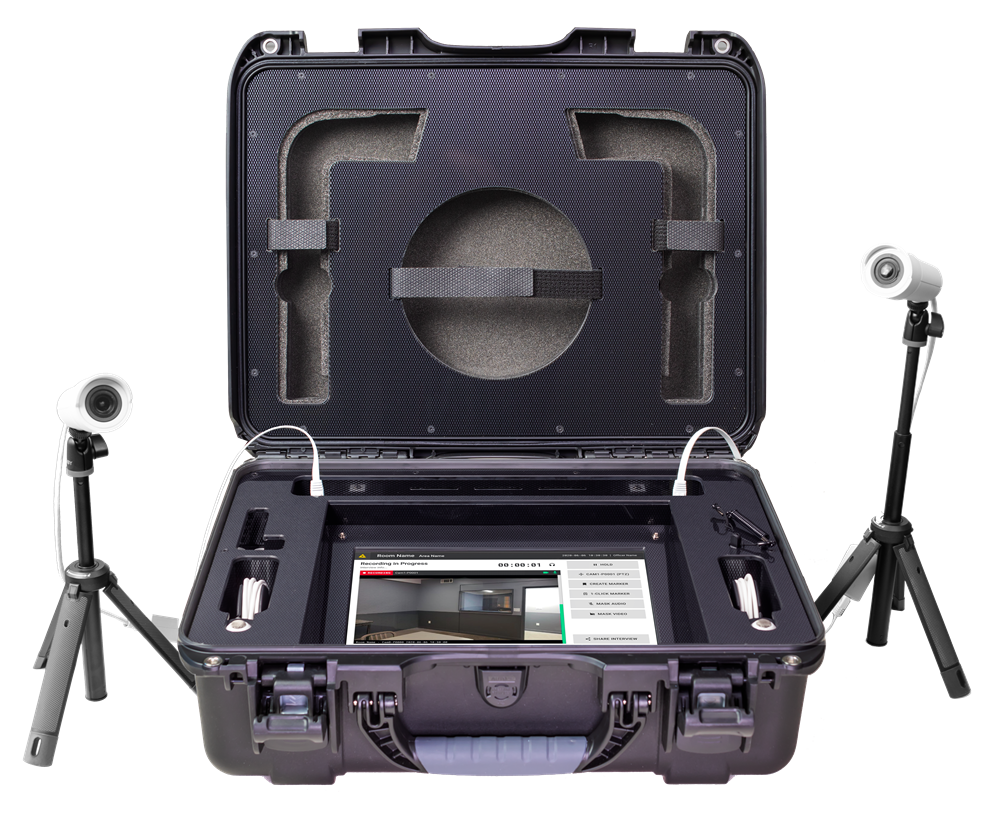
The image shows a mobile DIR kit with both cameras connected to ports on each side of the case using the included cables. One end of each cable connects to the camera, and the other end plugs into the Ethernet ports on either side of the case.
Get started with the mobile DIR kit
Step 1: Unpack the DIR kit
- Unlock and open the DIR kit case.
- Locate and remove the cameras, camera cables, microphone cables, power cord, and any other accessories such as a keyboard or Blu-ray DVD burner.
Step 2: Set up the cameras and microphones
- Unfold the camera tripods, and position the cameras as needed.
- Attach one end of each camera cable into the port on the cameras, and the other end into the Ethernet ports on the left and right side of the kit.
- Attach one end of each microphone cable to the microphone jacks next to each camera port.
Step 3: Power and network connection
- Attach the power cable to the power input on the DIR kit, and then connect the other end to a power outlet.
- Set up a network connection:
- Wired network connection: Connect an Ethernet cable to the network port located on the USB hub inside the kit.
- Wireless network connection: Configure the wireless network as needed.
Step 4: Interview set up and configuration
- Power Axon Interview on, and sign in to your account.
- Set the cameras to the orientation needed to ensure they capture the correct field of view. Use the camera menu to adjust the settings as needed.
- Ensure the microphones are properly connected and positioned.
- Use the video screen to monitor the recording setup and make adjustments.