Personnel Data Tool
The Personnel Data Tool in the Administrator Console lets you manage Personnel information, offering import and export capabilities.
Import information
You can add or edit multiple users' profiles using the Personnel Data Tool's CSV templates. After updating the CSV template, you can then import the updated information into the Personnel module using the Personnel Data Tool. The steps below outline this process.
See the Personnel fields section below for more information about the fields that appear by default in the Personnel module. These fields can be configured for each organization.
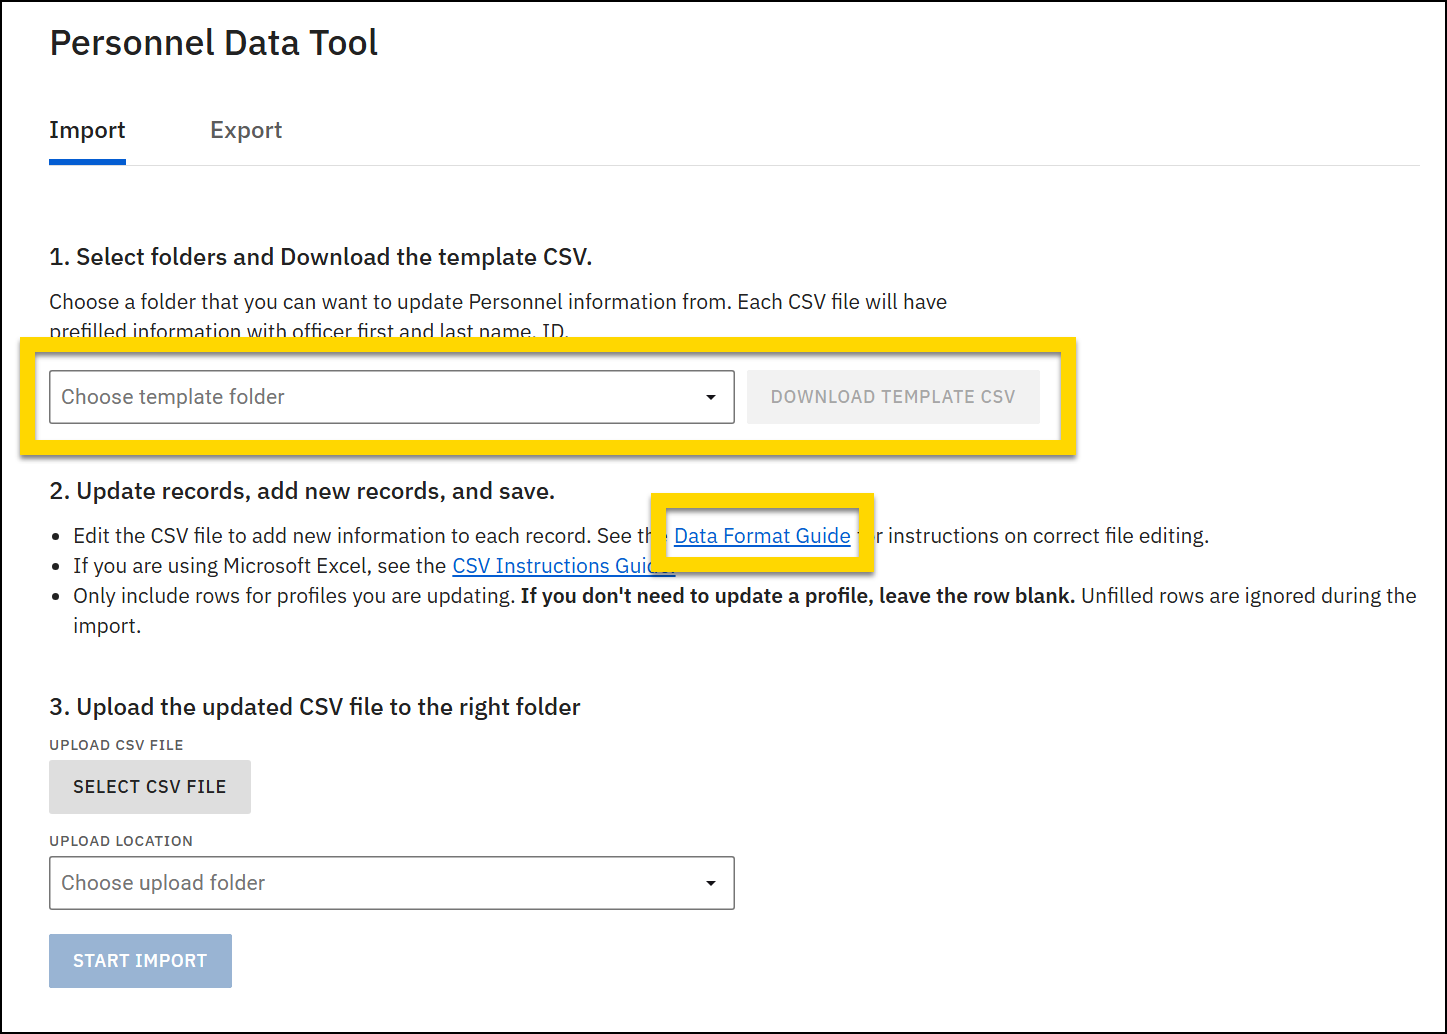
Download the template
- Open the Administrator Console.
- Select Personnel data tool.
- From the Import tab, open the Choose template folder dropdown menu and choose the type of information you want to update.
- The options in this menu correspond to the sections that appear on a user's profile in the Personnel module (Demographics, Service History, etc.).
- Select Download template CSV to download the template to your computer.
- Download the Data format guide to see the formatting requirements for each field.
Edit the template
Before you open the template CSV file in Microsoft Excel, make sure your Excel settings use a comma as the delimiter character. If a different character is used, incorrect formatting will appear in the file when you open it in Excel.
To update the delimiter settings:
- Select File > Options.
- Open the Advanced section.
- Make sure the Use system separators option is unchecked.
- Enter a period (.) in the Decimal separator box and a comma (,) in the Thousands separator box.
- Select OK.
After verifying your Excel settings are correct, open the template and add information as appropriate. While you are editing, keep in mind:
- In the template, each row belongs to one person. Only add details for the people you need to update.
- Some columns require a specific type of data to upload successfully. Download the Data Format Guide from the Personnel Data Tool page, to see which values can be entered in each column in the template.
- Never delete a column or change the column header. The file will not upload if a column is missing, or a header is changed.
- You can leave cells empty; a blank cell won't change or remove information that currently appears in that person's profile in the Personnel module.
After you've put all the information into the CSV file, save it to your computer.
Upload the updated information
- Open the Personnel data tool from the Administrator Console.
- From the Import tab, click Select CSV file.
- Find the CSV file you updated.
- From the Upload Location menu, choose the type of information you are updating.
- The options in this menu correspond to the sections that appear on a user's profile in the Personnel module (Demographics, Service History, etc.).
- Select Start import to upload the CSV file.
Export information
To view all information that has been entered into the Personnel module, export personnel information:
- Open the Administrator Console.
- Select Personnel data tool.
- Switch to the Export tab.
- Open the Choose folder dropdown menu and select the information you want to download.
- The options in this menu correspond to the sections that appear on a user's profile in the Personnel module (Demographics, Service History, etc.).
- Select Download CSV.
In the file that downloads, each row equates to a user who has been added to the Personnel module. The columns contain the fields associated with that section of the module (Demographics, Service history, etc.).
Personnel fields
When the Personnel module is enabled for your organization, it contains a default set of fields—and options or values that can be entered into each of the fields. These fields are sometimes referred to as "out-of-the-box" or "OOTB" fields. For example, Blood type is a default field that appears in the Demographics section of a user's Personnel profile. The available options for this field include all blood types (A-, A+, B-, etc.).
You can customize these fields and their options for your organization by contacting your Axon representative or Axon Support. You can always view all fields an options that have been configured for your organization from the Personnel Import Tool:
- To view the fields configured for a given section of the module: On the Import tab, select a section from the Choose template folder menu.
- To view the options that have been configured for all fields in the module: On the Import tab, download the Data format guide.
The sections below outline examples of the default fields that appear in each section of the Personnel module.
Demographics
The fields in the Demographics section provide basic information about the user. These fields include:
- Identity and identifiers: Legal first / middle / last name, preferred name, badge number, employee ID, date of birth, SSN (where configured)
- Contact: Work email, personal email, work phone, personal phone, home address components
- Employment basics: Hire date, employment type (sworn / non-sworn / volunteer), employment status (active / inactive / retired / terminated), primary assignment, current rank
- Placement in the organization: Department, division, unit, shift, command hierarchy group
Service history
The fields in the Service history section track how a user’s assignment and rank change over time:
- Effective start / end dates
- Assignment / position name
- Rank at the time
- Unit / division / bureau / shift
- Reason for change (hire, transfer, promotion, demotion, separation, etc.)
Commendations and awards
The fields in the Commendations and awards section record positive performance events:
- Date of incident / recognition
- Commendation type (e.g., letter of commendation, medal, citizen thank-you)
- Source (citizen / supervisor / peer)
- Narrative / citation text
Performance review
The fields in the Performance review section track performance evaluations:
- Year
- Score
- Type
Promotions
The fields in the Promotions section capture discrete promotion events:
- Effective date
- From-rank / to-rank
- Promotion type (e.g., probationary → permanent, step increase)
- Approving authority and narrative notes
Discipline
The fields in the Discipline section summarize disciplinary actions separate from the underlying case reports:
- Case / incident reference
- Allegation type(s) and findings
- Discipline type (written reprimand, suspension, termination, etc.)
- Effective dates and, where modeled, progressive discipline stage
Custom sections
Additional, custom sections, such as Claims, can be configured. These sections can be customized from a starting template that includes the following fields:
- Type
- Reference ID
- Notes