Simulator Training: Tactical Clearance
The Simulator Training: Tactical Clearance Facilitator's Guide and Sample Course Roster are available for download on the Training Materials page on Axon Help.
Simulator Training: Tactical Clearance builds real-world room-clearing proficiency through immersive, scenario-based VR training. Designed for one- or two-officer teams, it delivers realistic reps in navigating open doorways, dead spaces and complex threat environments. Officers practice muzzle discipline, coordinated movement and quick assessment and response to potential threats. With real-time feedback and repeatable sessions, Tactical Clearance helps agencies strengthen decision-making, reduce coordination errors and sustain high-stakes skills that require regular, realistic practice.
Safety guidelines
Before you start training, make sure you follow these safety guidelines:
- Make sure the Training Space is free of any live weapons, objects, and other people that may interfere with the simulation. For more information, see the Virtual Reality (VR) Training Safety and Health Warnings.
- If possible, we recommend having a trainer act as a safety officer to monitor the trainee’s movements in the physical space. If a safety officer is unavailable, make sure there is at least 5 feet of clearance between the edge of the virtual boundary (Training Space) and the physical space to help prevent accidental collisions.
Prerequisites
Test your network before training using the built-in network speed test on the VR tablet, or visit https://vr.evidence.com/vr-net-test. This test measures network performance but does not verify that required ports are open. Confirm that your network configuration includes the required ports listed in Network requirements for VR headsets and tablets.
Before launching Tactical Clearance on the tablet or headset, make sure:
- Your agency has met the minimum network requirements.
- The Training Space is free of any live weapons, objects, and other people that may interfere with the simulation.
Choosing the right room for the Training Space
To support accurate tracking and help provide a safe training environment, follow these guidelines when selecting a room for the Training Space.
Room requirements
- Use a room that is at least 30 ft x 30 ft (9.144 m x 9.144 m).
- The room should be well-lit with no harsh shadows.
Avoid rooms with:
- Repeated patterns, like striped flooring or wallpaper.
- Reflective surfaces, such as mirrors. If you have reflective surfaces you can cover or remove them.
Set up the room
Tactical Clearance requires the headset to be in VO mode. For information on setting this up, see Manage boundaries and visual odometry mode.
Set the Play area dimensions setting in the headset to 10x10 (located under Settings > Boundary). This setting is measured in meters.
To prepare the room:
- Clear the room by moving furniture and other objects to create an open space.
- Add tracking elements to improve headset tracking by hanging wall art or placing tape. For example, you can overlap tape of any width into simple shapes—like an "X"—to create stronger tracking points.
Room Marker
The Room Marker is a printed reference tool used in Room Clearing to align the real-world training space with the virtual environment. It defines the virtual room’s orientation and helps co-locate multiple trainees in the same VR session.
If you have not received a Room Marker or need a replacement, you can order one from the Axon Store.
What it looks like
The Room Marker is a 16 x 28 inch mat with two large black-and-white square shapes.

How to position it
The trainer should place the Room Marker flat on the floor in the center of the physical Training Space.
Set up the Room Marker
To set up the Room Marker, the trainer should perform the following:
- Place the Room Marker on the ground in the center of the Training Space.
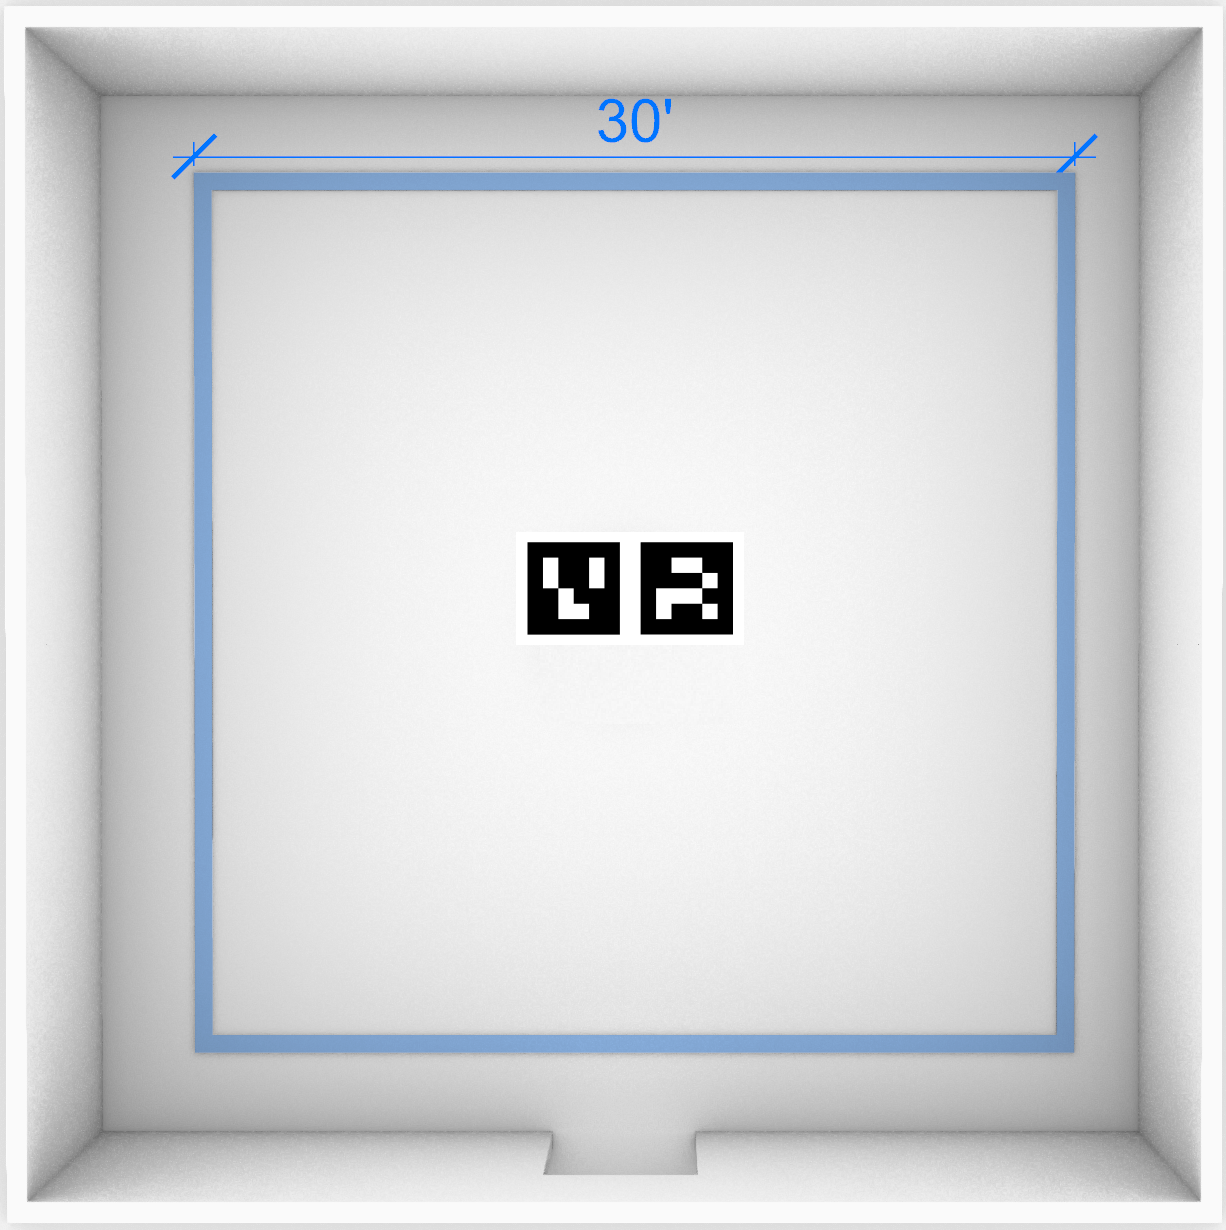
- Trainees scan the Room Marker using their headset during setup. After a successful scan, a blue virtual outline appears, showing the boundary of the virtual Training Space.
- Each trainee checks their headset to confirm that the Training Space is safe and correctly aligned.
- Make sure the virtual boundary doesn't overlap with any physical walls, furniture, or other objects.
- If it does, move the object.
- If the object is immovable, reposition the Room Marker and have trainees re-scan it.
- Confirm the virtual floor aligns with the physical floor. If it doesn't, re-scan the Room Marker.
- Make sure the virtual boundary doesn't overlap with any physical walls, furniture, or other objects.
Workflow
Tactical Clearance can be run with either one or two trainees. The steps below apply regardless of how many trainees are participating.
Tactical Clearance requires coordinated steps from both the trainer (tablet user) and trainee (headset user). Here's a high-level overview of this workflow:
- Trainer signs in to Simulator Training on the tablet.
- Selects Tactical Clearance.
- Trainees open Simulator Training in their headsets.
- Pair VR Controllers.
- Wait in the Simulator Training Library for the trainer to complete their setup.
- Can view the description of Tactical Clearance in this Library.
- Trainer pairs the tablet with the headsets.
- Trainer sets up the exercise on the tablet.
- Picks a room from the pre-configured list.
- Chooses whether to include a subject.
- Sets the starting (spawn) location for each trainee and the subject.
- Selects Begin Training, which brings the trainees into Briefing Room to begin the virtual alignment flow.
- Trainees complete their setup in headset:
- Accept the legal disclaimer.
- Review the tutorial steps and select Start Scan.
- Scan the Room Marker.
- Complete the safety check.
- Check the alignment of your partner's avatar by tapping your partner.
- Follow onscreen instructions to the starting location.
- Exercise starts.
- A countdown begins once the trainees are in position and the Training Space is confirmed safe.
- Trainees run through the exercise.
- Trainer monitors the session from the tablet.
- Trainer ends the exercise.
- Trainer selects End Scenario.
- Essential data (the training date/time, trainer name, trainee name, and exercise type) from the session is uploaded to VR web app.
- Trainer reviews the After-Action Report with the trainees from the tablet.
- Trainer chooses to:
- Replay the scenario to re-run the exact same room configuration.
- Load a new scenario.
- Quit the training session.
Understand the Tactical Clearance app actions
Exercise configurations cannot be saved. However, trainers can choose to replay the same exercise with the same settings after it ends.
When you open Tactical Clearance on the tablet, you'll see three action buttons in the top navigation bar:
- Info: Opens an overview of the app and what to expect
- Change Exercise: Lets you open a different Simulator Training exercise
- Begin Training: Starts the Tactical Clearance exercise with the configured settings. If no configurations are set, the default settings are applied.
This section describes the different actions you can take on each tab within Tactical Clearance on the tablet:
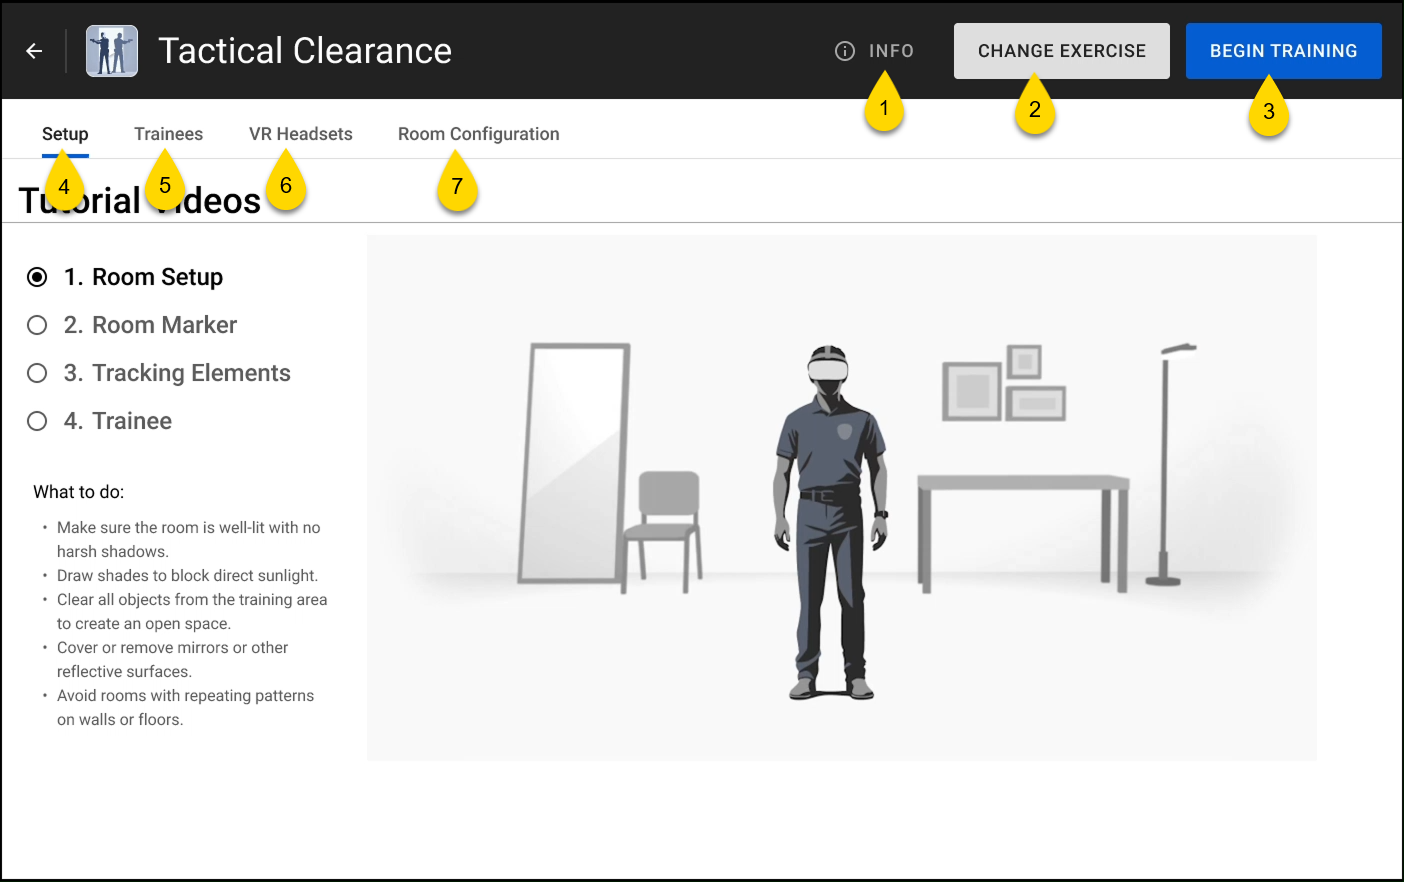
Setup tab
When you open Tactical Clearance the Setup tab displays by default. This tab includes a series of tutorial videos that explain how to properly set up the Training Space before starting the exercise. Watch these videos in order, from top to bottom:

When you're ready, select Trainees on the tablet to start the pairing process.
Room Setup video
Set up your Training Space in a room that's at least 30 ft x 30 ft (9.144 m x 9.144 m). This provides at least 5 feet of clearance between the edge of the virtual boundary (Training Space) and the physical space, helping to prevent accidental collisions.
In the headset, set the Play area dimensions setting in the headset to 10x10 (located under Settings > Boundary). This setting is measured in meters.
Tracking Elements video
After the room is cleared and has the correct lighting, add tracking elements to help improve tracking accuracy for the headset cameras.
You can add tracking elements by hanging wall art or placing tape. For example, you can overlap tape to create stronger tracking points.
Room Marker video
The Room Marker helps define the starting position for trainees. During setup, a trainee will scan the Room Marker using the headset.
To set up the Room Marker:
- Place the Room Marker on the ground in the center of the physical Training Space.
- Participating trainees will each scan the Room Marker during their setup. If the Training Space is unsafe, they will ask you to to either move the Room Marker or clear the objects from the physical Training Space.
Trainee video
After the Room Marker is placed, each participating trainee scans it in their headset during their setup process. This aligns the virtual and physical space for the headsets.
The trainees then look around the space in the headset. If there are immovable obstacles within that space, the trainees will ask you to move the Room Marker.
Once the Training Space is clear, the trainees confirm the space in their headsets. Then they walk to their starting position where they perform one more safety check of the Training Space. During this process, the trainees can see the boundaries of the Training Space and their real surroundings in the headset.
Trainees tab
Use the Trainees tab to add trainees to a new training group or load an existing one.
See Run Simulator Training with a Trainer for more information on how to create a training group.
VR Headset tab
A maximum of two headsets can be paired at a time. If you try to pair more, an error message will display.
The VR Headset tab displays the headsets available to pair with your tablet.
- Select the + icon next to the headset you want to assign.
- Select the trainee that will use that headset.
- Select Switch Trainee to confirm the assignment.
- Repeat these steps to assign another trainee to a headset.
After you've finished pairing headsets with your tablet, select Room Configuration to continue.
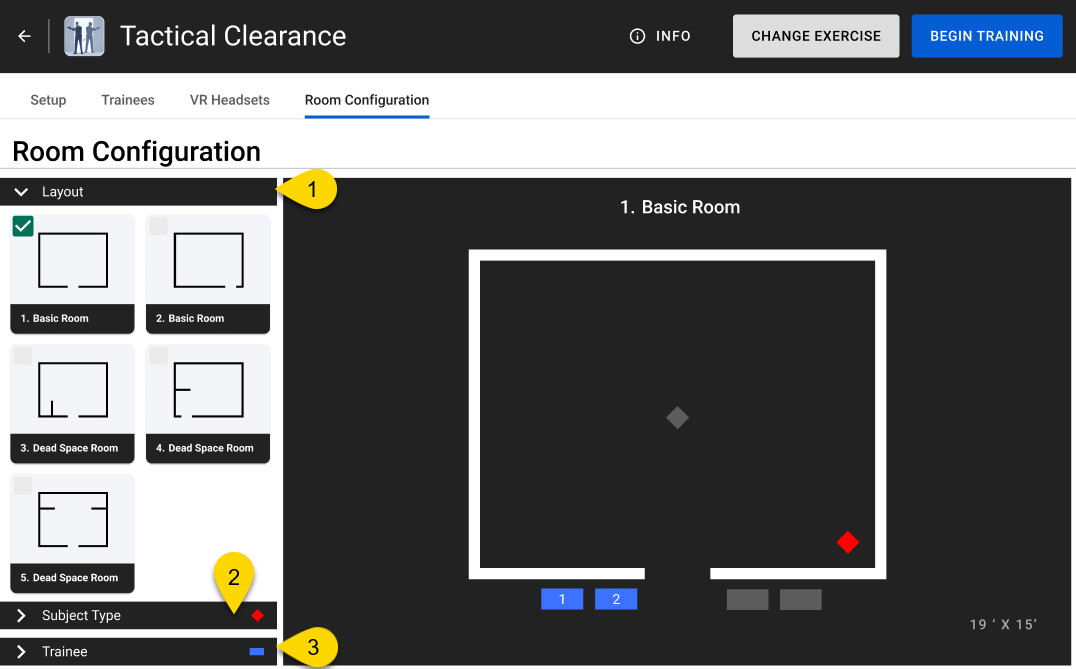
Room Configuration tab
The Room Configuration tab has these configurable settings:
If no configurations are set, the default settings are applied.
Layout
Additional room layouts are coming soon and may not yet appear in your current version.
Select the virtual room layout for the exercise.
| Layout name | Entry point | |
|---|---|---|
| 1. Basic Room | Center of the south wall | 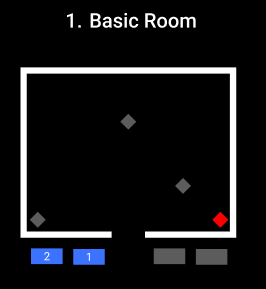
|
| 2. Basic Room | Corner of the south wall | 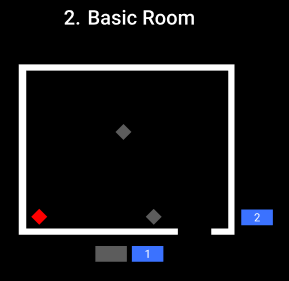
|
| 3. Dead Space Room | Center of the south wall | 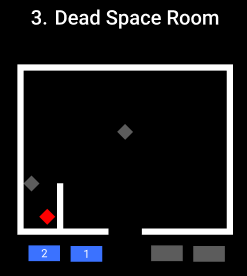
|
| 4. Dead Space Room | Corner of the south wall | 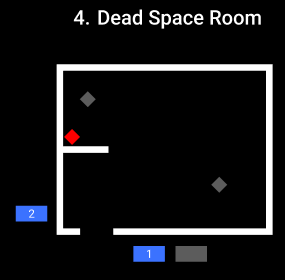
|
| 5. Dead Space Room | Center of the south wall | 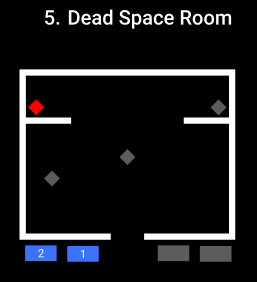
|
| 6. Dead Space Room | Center of the south wall | 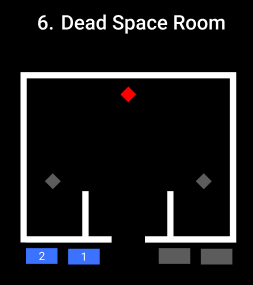
|
| 7. Dead Space Room | Center of the south wall | 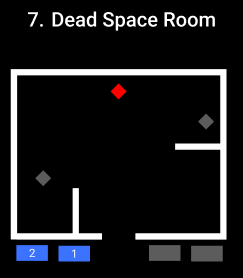
|
| 8. Lobby | Corner of the south wall | 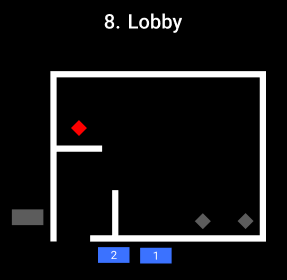
|
| 9. Lobby | Corner of the south wall | 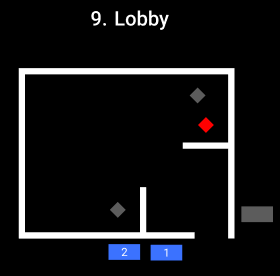
|
| 10. Dead Space Room | Corner of the south wall | 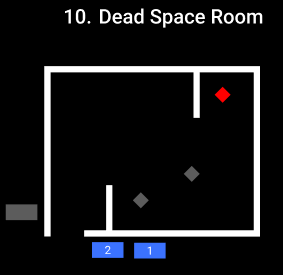
|
| 11. Multiple Rooms | Corner of the south wall | 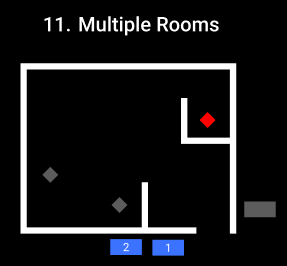
|
| 12. Multiple Rooms | Corner of the south wall | 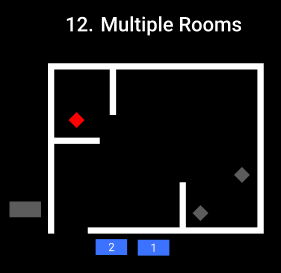
|
| 13. Multiple Rooms | Corner of the south wall | 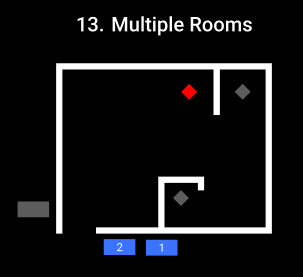
|
| 14. Multiple Rooms | Center of the south wall | 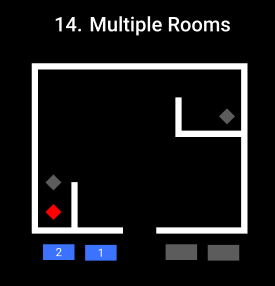
|
| 15. Hallway | Corner of the west wall | 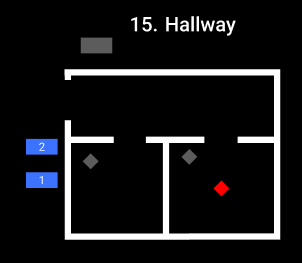
|
| 16. Hallway | Center of the east wall | 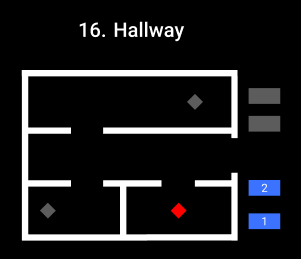
|
Subject Type
The "With Rifle" subject type is coming soon and may not yet appear in your current version.
Select the type of subject to use in the exercise from the Subject drop-down menu. Then , choose the subject's starting point by selecting a diamond icon in the room layout.
| Subject type | Prop | Pose |
|---|---|---|
| With Gun | Handgun | 
|
| No Subject | None | 
|
| Officer | Handgun and police badge | |
| With Hostage | Handgun | 
|
| With Knife | Knife | 
|
| Idle | None | 
|
| With Phone | Mobile phone | 
|
| Aggressive | None | 
|
| Surrending | None | 
|
| With Rifle | Rifle | 
|
Trainee
The names of the paired trainees display in the Trainee section.
- Select the name of the trainee you want to set the starting location for.
- Select the rectangle icon in the place you want the trainee to start.
- Repeat the steps for the other trainee, if applicable.
After you finish configuring the room, select Begin Training. If no configurations are set, the default settings are applied. Trainees then load from the Simulator Training Library into the Tactical Clearance briefing room.
Trainer workflow
Before launching Tactical Clearance, make sure the Training Space is free of any live weapons, objects, and other people that may interfere with the simulation.
Starting Tactical Clearance requires actions from both the trainer (tablet user) and the trainee (headset user). This article describes the tablet workflow. To view the trainee workflow, see Trainee workflow
To start a Tactical Clearance exercise on the tablet:
- Sign into Simulator Training on the tablet.
- Select Tactical Clearance from the Library.
- Pair the headsets. For more information, see Run Simulator Training with a trainer.
- The Setup tab displays. Watch the tutorial videos and prepare the Training Space.
- When ready, select Room Configuration. (Exercise configurations cannot be saved. However, trainers can choose to replay the same exercise with the same settings after it ends.)
- Select a room from the Layout section.
- Select a Subject Type.
- Select the starting location for the subject.
- Select the starting locations for the trainees.
- Select Begin Training.
- Wait for the trainees to complete their setup in headset.
- Once a trainee confirms the Training Space is safe and all trainees are properly positioned on their starting points, then the exercise with automatically begin.
- Monitor the exercise on the tablet.
- End the scenario by selecting one of the following:
- End Scenario takes you to the After-Action Report playback screen.
- Quit Training takes you to the Simulator Training Library.
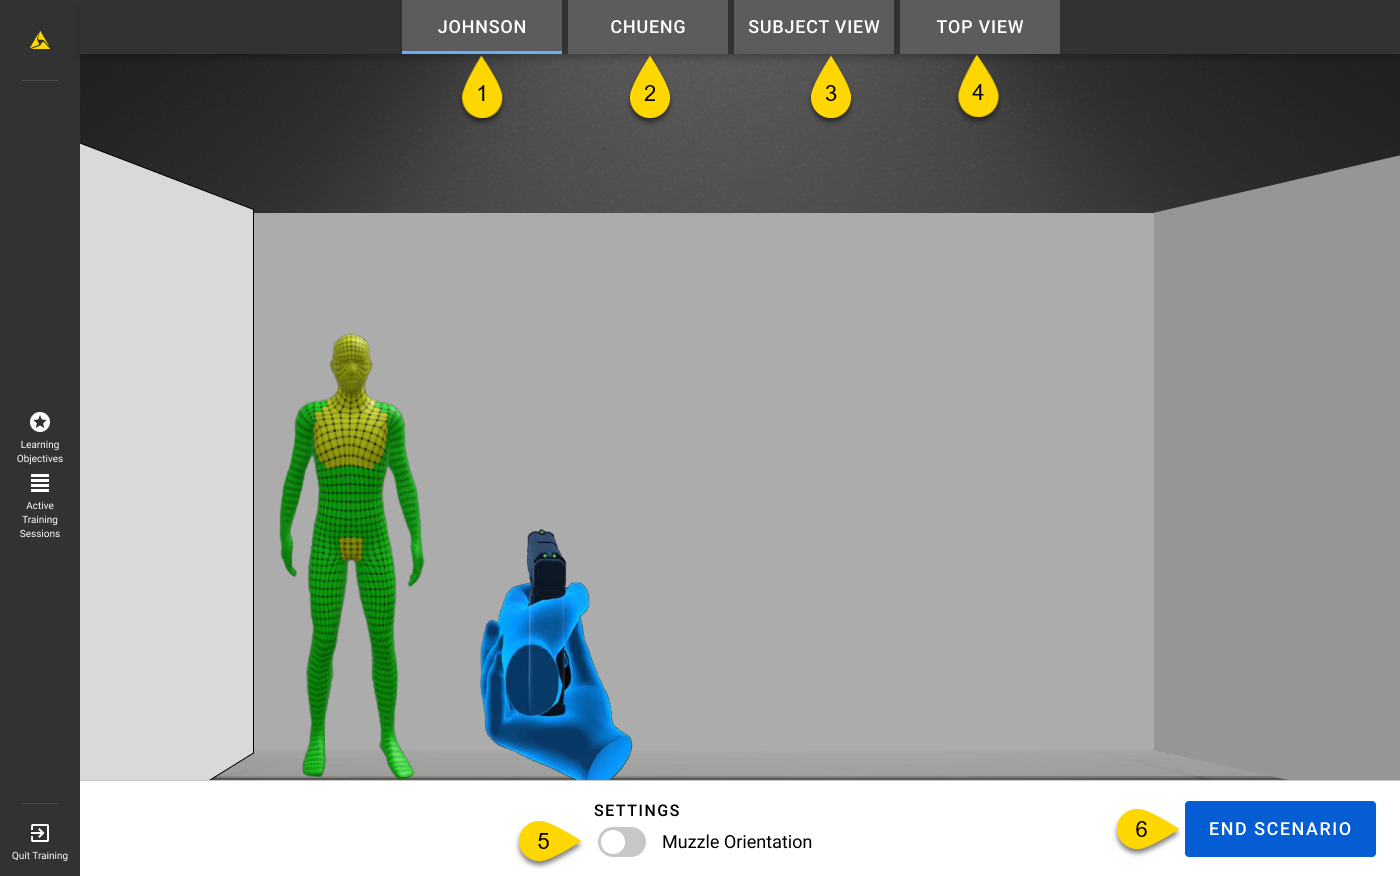
Monitor progress on tablet
While monitoring, you can take the following actions on the tablet:
- Trainee 1: Watch from this trainee's perspective.
- Trainee 2: Watch from this trainee's perspective.
- Subject View: Watch from the subject's perspective.
- Top View: Watch from an overhead view of the entire room.
- Muzzle Orientation: Displays a line showing where each trainee's unholstered weapon is pointing. If a weapon crosses over their partner's position, the line turns red. This setting is on by default.
- End Scenario: Ends the exercise and takes you to the After-Action Report playback screen where you can playback the positions, field of view, and weapon handling for all trainees in the scenario.
Trainee workflow
Tactical Clearance requires coordinated steps from both the trainer (tablet user) and trainee (headset user). This article describes the trainee workflow. To view the trainer workflow, see Trainer workflow
Tactical Clearance can have up to two trainees. If there are two trainees, they both must follow the instructions below.
Before putting on your headset, wait for the trainer to place the Room Marker. After it's been placed, stand in front of it. Now follow these steps:
- Start Simulator Training.
- Pair VR Controllers.
- Pair headsets with tablet.
- Wait for the trainer to complete their setup. Afterward, you'll be brought into Tactical Clearance.
- Review the Disclaimer and select I understand.
- Review the tutorial steps and select Start Scan.
- Scan the Room Marker.
- The headset automatically turns on passthrough mode, allowing you to see your real surroundings.
- Walk to the edge of the Room Marker.
- With the headset on, slowly look down to scan the Room Marker. If it doesn't scan, keep your head still until the blue outline turns green.
-
After you scan the Room Marker, a green outline appears briefly to confirm that the marker was captured. Then, a blue virtual outline appears, showing the boundaries of the Training Space. This indicates a successful scan.
- Look around and make sure that:
- The virtual Training Space doesn't overlap with any physical walls, furniture, or objects.
- The virtual floor aligns with the physical floor.
If either issue is present, follow these steps:- Select Re-Scan.
- Ask the trainer to either move the Room Marker or clear the objects from the virtual Training Space.
- Re-scan the Room Marker.
- Recheck the virtual Training Space.
- Once the Training Space is clear, select Confirm.
- Check the alignment of your partner's avatar by tapping your partner.
- If the alignment is off, one of the trainees can select Re-Scan to rescan the Room Marker.
- When the alignment looks correct, select Confirm. (Only one trainee needs to confirm.)
- Each trainee sees their own starting location as a blue, animated circle in the headset, while their partner's starting position appears as a gray, non-animated circle. Follow the on-screen instructions to your designated starting position.
- Once both trainees are standing on their starting positions and facing the correct direction, a countdown displays and the exercise starts.
Additional notes
- If you take off the headset for 15 seconds or more, you'll be prompted to re-scan the Room Marker.
- If you move too close to a virtual wall while in the exercise, the headset fades to black.
FAQs
Where can I find Tactical Clearance?
- In the headset, open Simulator Training, then pair with your trainer's tablet. Your trainer will bring you into Tactical Clearance after they've completed their setup. In the meantime, trainers can review the description for Tactical Clearance in the Simulator Training Library.
- On the tablet, open Simulator Training, select Tactical Clearance.
Training Space
What is the minimum room size required for the physical Training Space?
The minimum room size required for the Training Space is 30 ft x 30 ft (9.144 m x 9.144 m).
Room Marker
How should the Room Marker be placed?
Place the Room Marker flat on the floor in the middle of the physical Training Space.
The headset isn't scanning the Room Marker. How can I resolve this?
If the Room Marker isn't scanning, it could be due to one of the following:
- The Training Space is too bright or too dark. Try closing blinds if there's direct sunlight.
- The headset is too far away from the Room Marker. With the headset on, walk up to the Room Marker and look down at it.
- The headset isn't scanning it from the correct angle. Make sure you're standing in front of the Room Marker.
How can I re-scan the Room Marker?
Let your headset go to "sleep" by taking your headset off for 15 seconds or more. This will prompt trainees to re-scan the Room Marker.
Re-scanning the Room Marker may be necessary if:
- The headset loses tracking
- You and your partner are no longer aligned
- The headset is removed from the Training Space and put back on
I scanned the Room Marker and see a blue virtual outline. What is that?
The blue virtual outline is a visual representation of the virtual Training Space. Make sure there are no obstacles—like furniture or walls—overlapping the virtual Training Space. Also confirm that the virtual floor aligns with the physical floor. If the alignment is off, re-scan the Room Marker.
Starting location (spawn)
What do the different colored circles mean?
The circles indicate the starting location (spawn point) for the trainees.
Each trainee will see their own starting location as a blue, animated circle in the headset. Their partner's starting position appears as a gray, non-animated circle.
Once setup is successful, the circle turns green and the countdown for the exercise begins.
Exercise
Why isn't the exercise starting?
For the exercise to start, the following must occur:
- All participating trainees must scan the Room Marker and accept the safety of the Training Space.
- All participating trainees must stand on their designated starting locations (circles), face the direction the arrows point, and with all paired VR Controllers.
- Each trainee is assigned to a blue circle. The circle remains blue if the trainee isn't standing on it properly. Once they are in the correct spot, the circle turns green.
Why does the view in the headset fade to black in certain areas?
The headset view fades to black when you are approaching a virtual wall. Back up a few steps to re-enter the playable space.
How do I restart an exercise on the tablet?
To restart an exercise, on the tablet, select End Scenario, then Replay Scenario.
Troubleshooting
The app is unresponsive
If the app is unresponsive, try the following:
1. Exit the app: Depending on the app, either look down and select Exit, or use gaze selection to select Exit App.
2. In the library, use your hand to pinch and select the app tile to relaunch it.
Connectivity
Test your network before training using the built-in network speed test on the VR tablet, or visit https://vr.evidence.com/vr-net-test.
Poor Internet Performance
The "Poor Internet Performance" message can display when the tablet is experiencing network connectivity issues. If this occurs, the tablet feed might be delayed.
Make sure your network meets the minimum network requirements as described in Run Simulator Training with a trainer.
Trainee has disconnected from the training session
The "Trainee has disconnected from the training session" message displays when a headset loses connection to the exercise. This can happen if:
- A headset runs out of battery or loses internet connectivity
- A trainee ends the scenario early
- There are too many devices using the same network at a time
To check your internet connection on your headset, go to the Axon VR Library and navigate to Settings > Connectivity > Wi-Fi. For additional details, see the FAQ Why can't I connect to my secure Wi-Fi network?.
If you are still experiencing network connectivity issues, try the following:
- Check to make sure other devices can connect to the internet on the same wireless network.
- Reduce the number of devices using the same network at a time.
- Consult with your IT department or help desk to troubleshoot your local network.
Tablet setup
Trainee is already in a session
The "Trainee is already in a session" message displays on the tablet when the trainee's headset is paired with a different tablet.
SIM Version does not match. Please update your tablet.
The "SIM Version does not match. Please update your tablet" message displays on the tablet when the headset and tablet are on different versions of Simulator Training.
Connect your devices to the internet for the app to automatically update.
VR Controller connection error
The "VR Controller connection error" message displays on the tablet when at least one paired VR Controller has powered off or entered Sleep mode.
Ask the trainees to check their devices to make sure they are powered on.
Pairing
Maximum of 2 Trainees
The "Maximum of 2 Trainees" message displays on the tablet if the trainer attempts to select more than two trainees on the Trainee tab.
The trainer can only select up to two trainees at a time. Deselect an existing trainee to select a different one.
No VR headsets are currently paired
The "No VR headsets are currently paired" message displays on the tablet when no headsets are paired with the tablet.
- On the tablet, go to the VR Headsets tab and make sure the headsets are connected and the checkmark is checked for one or both headsets.
- If a headset was previously paired but is powered off or in Sleep mode, power it back on to reconnect it. For more information, see Power on/off headset and activate Sleep mode.
- If a headset has never been paired with the tablet before. See Run Simulator Training with a trainer for pairing instructions.