Simulator Training: vRBT
This video explains how to start a Simulator Training: vRBT playlist. For more information, see Start Simulator Training: vRBT: Facilitated Mode.
This video explains how to manage Simulator Training: vRBT scenarios. For more information, see Manage and configure Simulator Training: vRBT scenarios.
Simulator Training: vRBT (Virtual Reality-Based Training) sets a new standard for law enforcement training, immersing officers in dynamic, high-pressure scenarios that mirror real-world situations. With a variety of scenarios, diverse environments and character reactions, Simulator Training: vRBT prepares officers for the unpredictable nature of police work, enhancing decision-making and de-escalation skills in high-stress, and sometimes hostile situations.
Building on foundational skills developed through Axon VR’s Community Engagement Training, vRBT Live Action, and Simulator Training: Range Skills, Simulator Training: vRBT offers an advanced decision-making and tactical training environment. Officers apply their knowledge in unpredictable evolving environments, refining their ability to make tactical decisions, practice verbal de-escalation, and react appropriately to real-world encounters with unmatched realism.
Safety guidelines
Before you start Simulator Training: vRBT, make sure you follow these safety guidelines:
- Make sure the training room is free of any live weapons, objects, and other people that may interfere with the simulation. For more information, see the Virtual Reality (VR) Training Safety and Health Warnings.
- The minimum recommended size for the training space is 10' x 10'. However, for optimal training experiences, we recommend a space of at least 20' x 20'. This larger area allows for greater movement and interaction.
- If possible, we recommend having a trainer act as a safety officer to monitor the trainee’s movements in the physical space. If a safety officer is unavailable, make sure there is at least 5 feet of clearance between the edge of the virtual boundary and the physical space to help prevent accidental collisions. For more information on setting up a training space, see Manage boundaries and visual odometry mode.
The Play area dimensions setting in the headset (located under Settings > Boundary) is measured in meters.
Training modes
Simulator Training: vRBT offers two training modes:
- Solo mode:
- Lets trainees run the training directly on their headset without the need of a trainer or an active internet connection.
- Trainees can choose from a list of Axon pre-configured playlists.
- Facilitated mode:
- Requires an active internet connection for the trainer to facilitate a trainee's training from a tablet.
- Trainers can choose from a list of Axon pre-configured playlists or customize a playlist.
Solo mode
Configure Solo mode settings
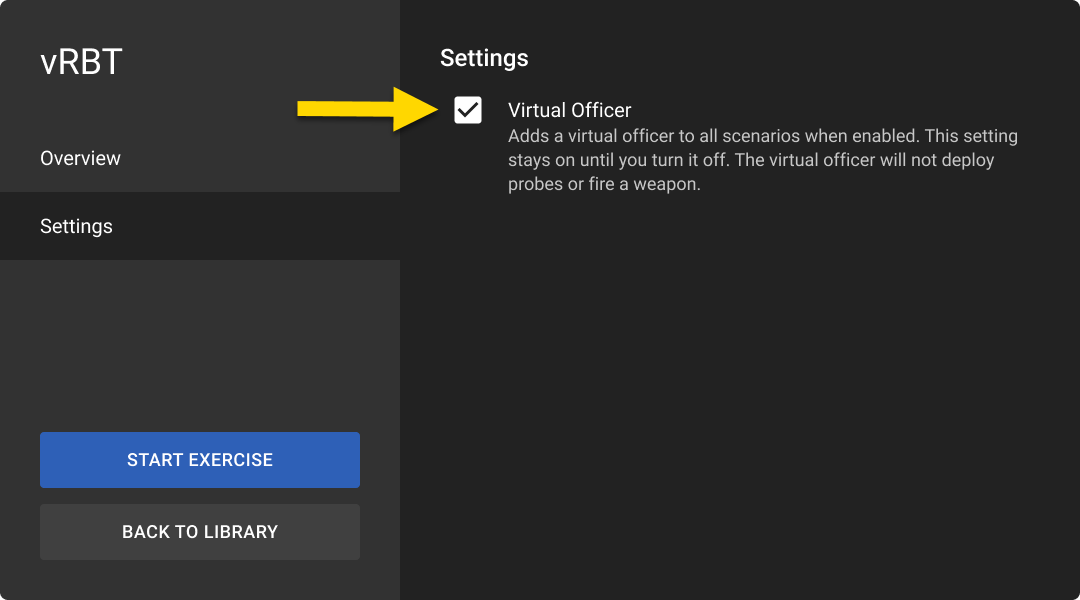
Before starting a Solo mode session, you can select Settings to enable Virtual Officer. This will add a backup officer to each scenario.
The Virtual Officer:
- Never moves or fires a weapon.
- Does not respond to voice commands.
- Behaves according to preset conditions built into the scenario.
This setting is off by default. When enabled, it remains on until manually turned off.
In Facilitated mode, the Virtual Officer setting is controlled by the trainer on the tablet and cannot be changed in-headset.
Run Simulator Training: vRBT Solo mode
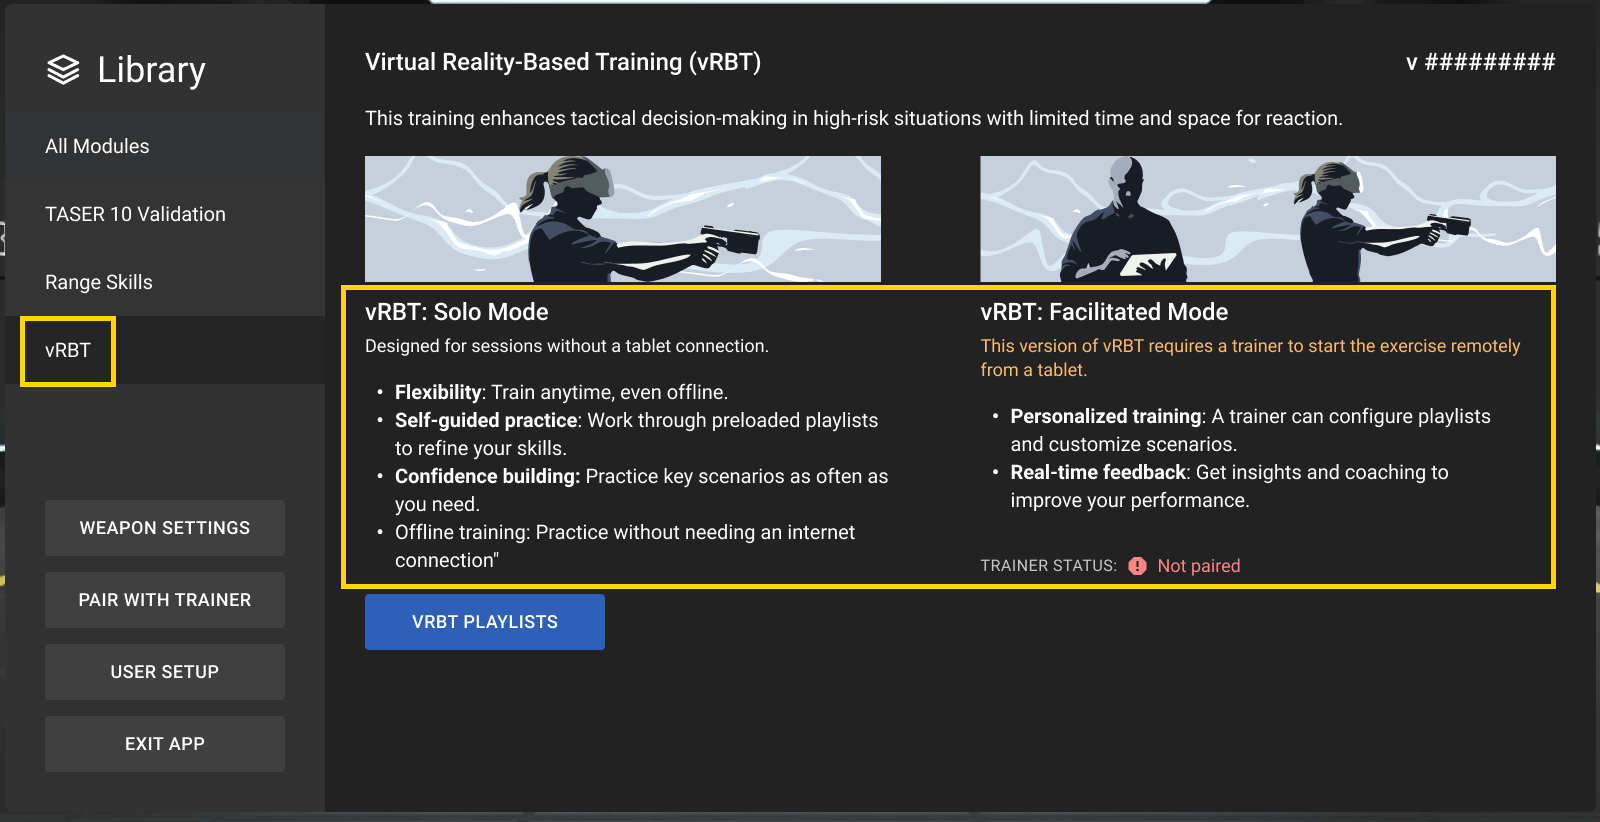
In the headset, the vRBT screen displays the two training modes—Solo and Facilitated—along with brief descriptions of each mode as shown in the image below.
- Turn on your headset by pressing the Power button for five to seven seconds.
- Put on the headset.
- In the lobby, pinch to select Simulator Training.
- After you've paired your VR Controller(s), the Simulator Training library displays.
- Select vRBT.
- Select vRBT Playlists.
- Select a playlist. (Trainees can only pick an Axon pre-configured playlist in Solo mode; they cannot choose a customized playlist.)
- Select Start Exercise.
- Simulator Training checks for a paired VR Controller.
- If a VR Controller is paired, the app prompts you to select whether you'll use your left or right hand.
- If a VR Controller isn't paired, you can pair one in Simulator Training. See Pair VR Controllers in Simulator Training.Note
It's recommended to pair both the handgun and TASER VR Controllers and holster them at the start of each scenario. This action simulates a scenario where an officer is just arriving on scene.
- If a VR Controller is unholstered, a dialog box will appear prompting you to re-holster it. This action simulates a scenario where an officer is just arriving on scene. However, you can proceed without holstering the VR Controller. Select Continue in the dialog box.
-
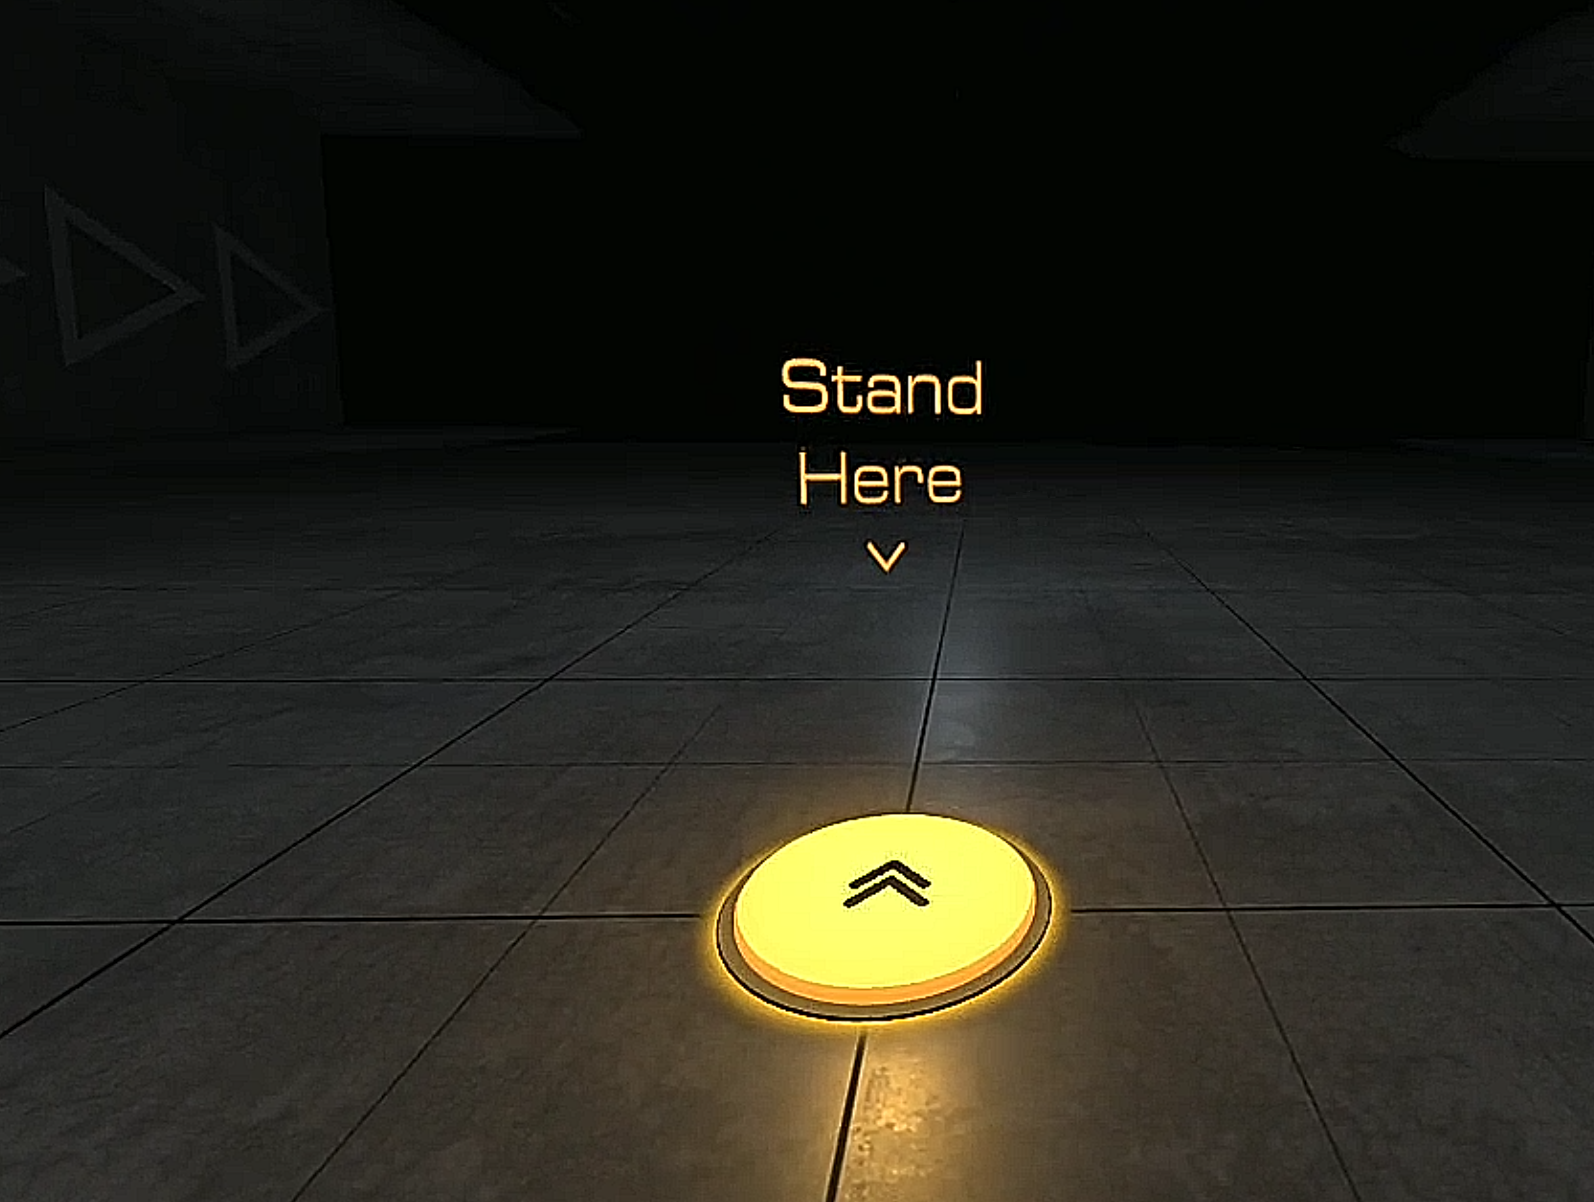
A Stand Here circle may display if you are not already standing in the designated starting location. If you don't see it, check by your sides or behind you.
-
Review the Dispatch Report.
-
Use gaze selection to select Continue. The first scenario in the playlist begins.
-
After you've completed the playlist, an After-Action Report (AAR) will display. Review this report to analyze your performance. You can choose to replay the same playlist or return to the lobby to end your session or choose a different playlist from this report.
Facilitated mode
Running Simulator Training: vRBT with a trainer requires actions on both the headset and tablet.
Simulator Training: vRBT requires an active internet connection
Test your network before training using the built-in network speed test on the VR tablet, or visit https://vr.evidence.com/vr-net-test. This test measures network performance but does not verify that required ports are open. Confirm that your network configuration includes the required ports listed in Network requirements for VR headsets and tablets.
An active internet connection is required for tablet-facilitated training so that trainers can actively oversee and participate in the trainee's scenario-based training. To view the list of minimum network requirements, read Run Simulator Training with a trainer. If you are experiencing internet connectivity issues, see Simulator Training: vRBT troubleshooting.
Start Simulator Training: vRBT on headset
- Turn on your headset by pressing the Power button for five to seven seconds.
- Put on the headset.
- In the lobby, pinch to select Simulator Training.
- Simulator Training checks for a paired VR Controller.
- If a VR Controller is paired, the app prompts you to select whether you'll use your left or right hand.
- If a VR Controller isn't paired, you can pair one in Simulator Training. See Pair VR Controllers in Simulator Training.Note
It's recommended to pair both the handgun and TASER VR Controllers and holster them at the start of each scenario. This action simulates a scenario where an officer is just arriving on scene.
- After you've paired a VR Controller, the Simulator Training library displays.
- To participate in facilitated training, pair with your trainer.
- Once paired, Simulator Training: vRBT will automatically launch when your trainer starts a scenario. In the meantime, you can begin a training session or start a Simulator Training: Range Skill exercise.
Start Simulator Training: vRBT on Samsung VR tablet
- Turn on your tablet by pressing the Power button for about five seconds.
- Sign in to the Simulator Training app.
- Select the vRBT tile from the Library tab.
- The training screen lets you build a training group.
- The vRBT Playlist tab lets you switch to a new playlist or adjust your custom playlist.
- After you've built your training group, you can start a playlist.
Start a playlist on the tablet (trainer)
Only the trainer can view the playlists. When the trainer starts one, the trainee will run the scenarios with only the information from the Dispatch Report.
To start a playlist on the tablet:
- Open Simulator Training: vRBT on the tablet by following the steps provided above.
- Pair the tablet with the headset. For more information on pairing, see Run Simulator Training with a trainer.
- Create or select a training group. For more information, see Run Simulator Training with a trainer.
- Select the vRBT Playlist tab.
- By default, the last loaded playlist displays. If you want to start a different playlist, perform the following steps:
- Select Load New Playlist.
- Select a playlist. From here you can view the details of each scenario. You can also randomize the order in which the scenarios play. For more information, see Manage and configure Simulator Training: vRBT scenarios.
- Select Load Playlist.
- Select Load New Playlist.
- Select Begin Training. The first scenario in the playlist begins. The Begin Training button will be enabled after the trainee selects their name in-headset. If they are a guest, they should select the Guest option instead.
Run through a playlist in-headset (trainee)
Trainees cannot start a Simulator Training: vRBT playlist from the headset during facilitated training; only trainers can initiate a Simulator Training: vRBT training session for users in-headset from the trainer's tablet.
To run through a playlist in-headset:
- Open Simulator Training in-headset. For more information, see Start Simulator Training.
- Pair the headset with the tablet. For more information on pairing, see Run Simulator Training with a trainer.
- After the trainer starts a playlist, a Stand Here circle may display if you are not already standing in the designated starting location. If you don't see it, check by your sides or behind you.
- If a VR Controller is unholstered, a dialog box will appear prompting you to re-holster it. This action simulates a scenario where an officer is just arriving on scene. Select Continue in the dialog box.
- Review the Dispatch Report.
- Use gaze selection to select Continue. The first scenario in the playlist begins.
- After you've completed the playlist, an After-Action Report (AAR) will display. Review this report with your trainer to analyze your performance.
Scenarios overview
The Simulator Training: vRBT Facilitator's Guides are available for download on the Training Materials page on Axon Help.
Each scenario represents a distinct situation that officers may encounter in the field, providing opportunities to assess threats, apply de-escalation techniques, and determine appropriate use-of-force responses.
Each scenario includes multiple variations, which change key details such as subject behavior, compliance levels, and the likelihood of force being required. These variations help trainees adapt their decision-making and response strategies based on different situational factors.
The main description in this article outlines the general premise of the scenario, while each variant description specifies how the subject behaves and how the scenario may unfold.
Scenario descriptions
Burglar with Concealed Handgun
Officer has intercepted a burglar trying to evade police on foot.
Flee or Surrender
The subject has a concealed handgun, but is intent on fleeing the scene. They will surrender to show of lethal force.
Show of Force Attack
The subject, armed with a concealed handgun, defiantly challenges police to fight or step aside, and draws their gun on show of force.
Standoff and Attack
The subject, armed with a concealed handgun, is intent to draw their weapon rather than surrender.
Inmate Refuses Lockdown
Officer responds to an inmate by the common area phones, refusing to return to their cell.
Standoff
Officer responds to an inmate refusing to return to their cell. The inmate attempts to talk their way into getting their phone call but will eventually leave without incident.
Show of Force Surrender
Officer responds to an inmate refusing to return to their cell. The inmate attempts to talk their way into getting their phone call and becomes confrontational.
Approach and Attack
Officer responds to an inmate refusing to return to their cell. The inmate attempts to talk their way into getting their phone call and becomes confrontational, attacking the officer.
Inmate Self-Harm
Officer responds to an inmate experiencing personal crisis.
Standoff
Officer responds to an inmate experiencing personal crisis. The inmate is distressed, but cooperative and compliant. The situation doesn’t escalate.
Show of Force Surrender
Officer responds to an inmate experiencing personal crisis and their behavior becomes threatening. It requires issuing multiple TASER energy weapon Warning Arcs/Alerts for the inmate to drop their weapon.
Self-harm Infliction
Officer responds to an inmate experiencing personal crisis and their behavior becomes threatening. The inmate is intent to self-harm despite any show of force by the officer.
Inmate with Contraband
Officer responds to an inmate shortly after an altercation with another inmate.
Quick Surrender
Officer responds to an inmate shortly after an altercation with another inmate. The inmate is standoffish but becomes compliant after a brief argument.
Show of Force Surrender
Officer responds to an inmate shortly after an altercation with another inmate. The inmate attempts to hide contraband but will drop it after issuing a TASER energy weapon Warning Arc/Alert.
Approach and Attack
Officer responds to an inmate shortly after an altercation with another inmate. The inmate is brandishing contraband, inevitably approaching and attacking the officer.
Irate Phone Caller
Officer called to investigate disorderly conduct by an individual having a heated and profane conversation on their phone.
Walks Away
The individual approaches officers rudely before leaving.
Approach and Walk Away
The individual approaches officers aggressively but voluntarily leaves after having some choice words with the officer.
Approach and Attack
The individual approaches officers aggressively and attacks.
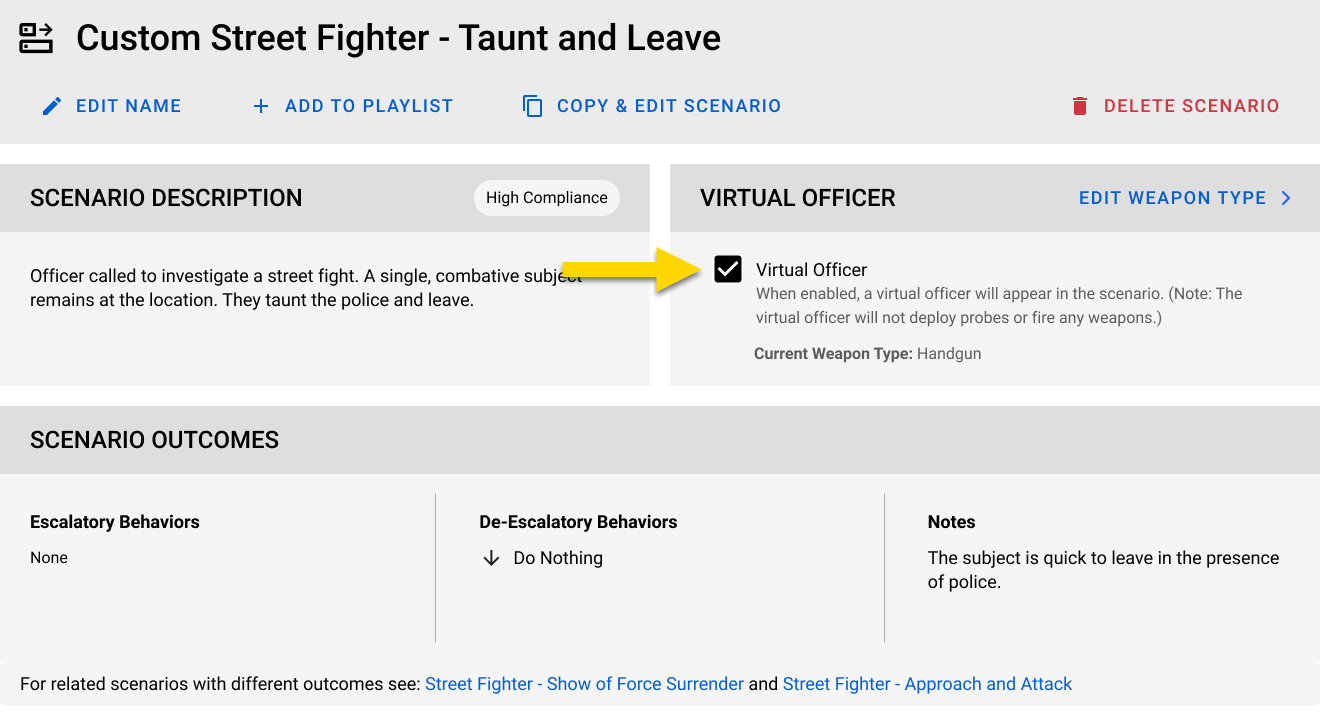
Street Fighter
Officer called to investigate a street fight.
Taunt and Leave
A single, combative subject remains at the location. They taunt the police and leave.
Show of Force Surrender
A single, combative subject at the location wants to fight but can be de-escalated with a TASER warning alert/arc.
Approach and Attack
A single, combative subject at the location taunts police, then approaches and attacks.
Suspicious Person with Knife
Officer called to investigate a suspicious person and finds the subject clutching a large knife.
Disarm and Standoff
With show of force, the subject will disarm, but try to argue their way out of trouble.
Disarm and Fight
The subject tries to talk their way out of trouble and will drop their knife, but then attempt to attack with fists.
Approach and Attack
The subject tries to talk their way out of trouble, but then attacks with the knife.
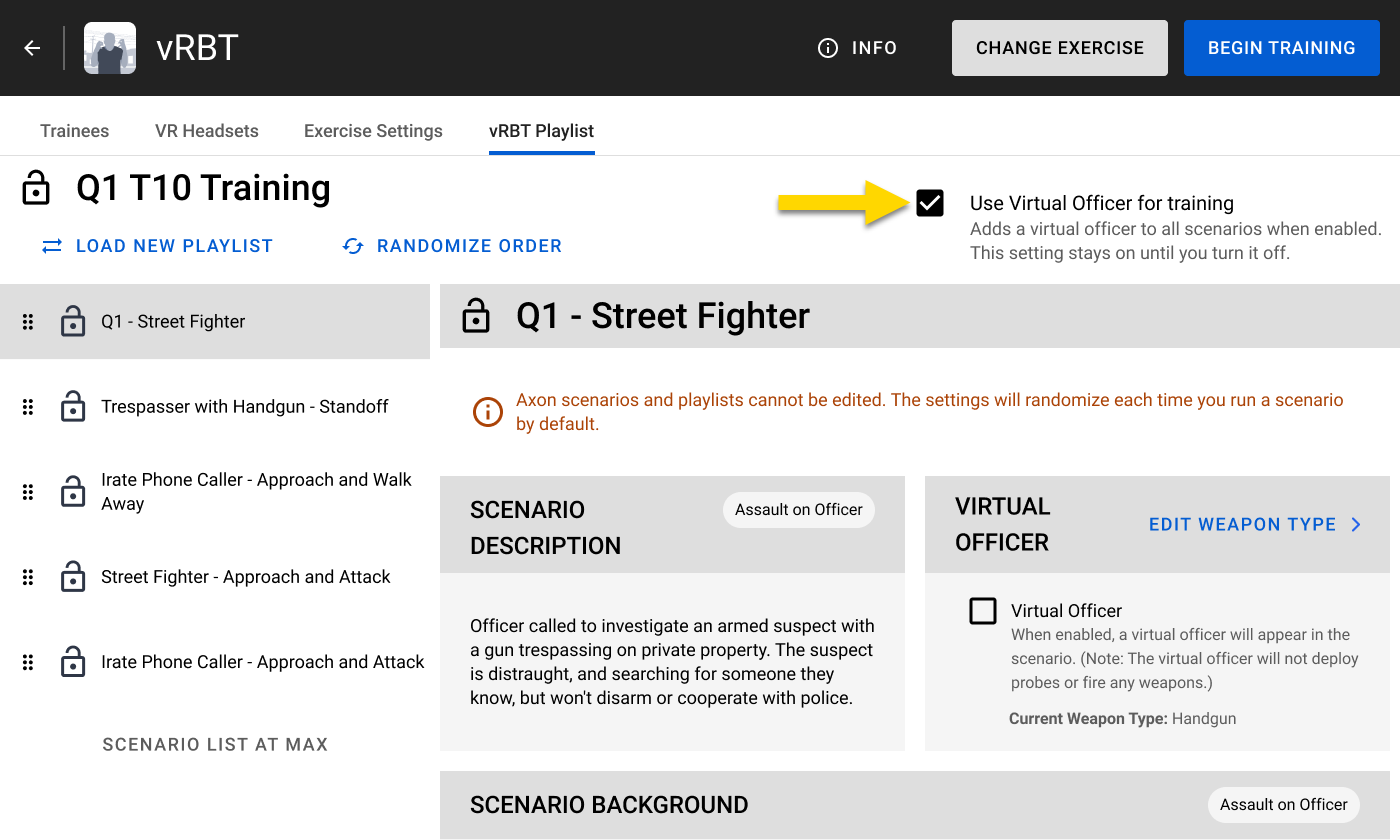
Trespasser with Handgun
Officer called to investigate an armed subject with a gun trespassing on private property.
Quick Surrender
The subject is confused and searching for someone, but will disarm on any show of force.
Lethal Force Surrender
The subject is distraught and searching for someone they know, but will reluctantly disarm on show of lethal force.
Standoff
The subject is distraught, and searching for someone they know, but won't disarm or cooperate with police.
Scenario types
Simulator Training: vRBT includes several Axon pre-configured playlists. However, you can customize a scenario by setting up a unique location, situation, and action.
You can have a maximum of 100 scenarios, including the Axon ones.
Axon scenarios
Axon scenarios are denoted by a lock icon next to the title. These scenarios cannot be edited. Simulator Training: vRBT will automatically randomize the settings each time these scenarios are run.
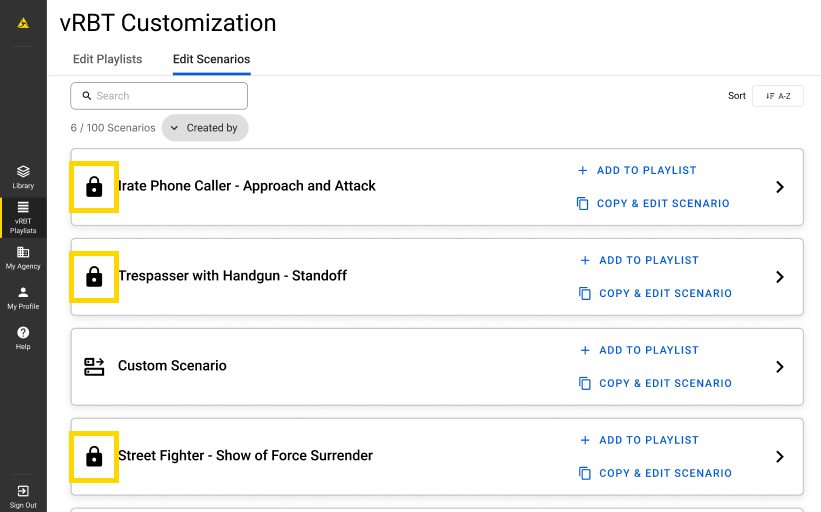
View scenarios
- Sign in to Simulator Training app on the tablet.
- Select vRBT Playlists in the left pane.
- Select the Edit Scenarios tab. The list of scenarios displays.
- Select a scenario to view its details.
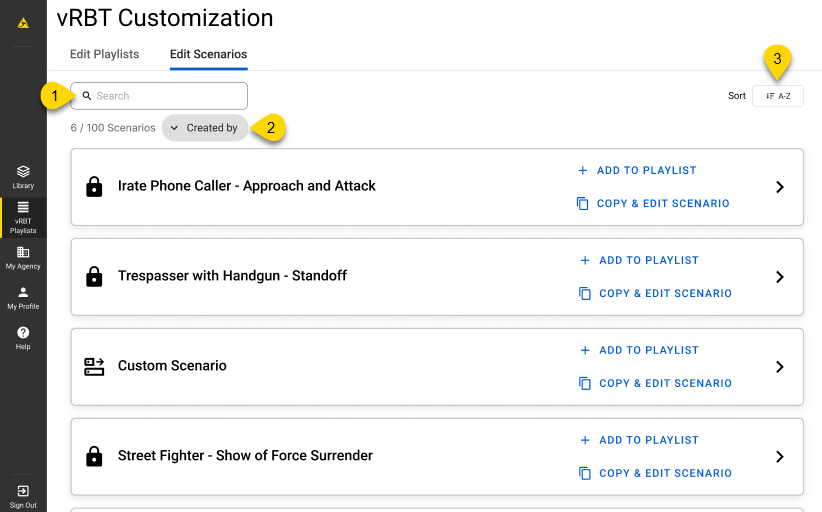
Sort, filter, and search
By default, the scenarios display in alphabetical order from A to Z. You can search for, filter, and sort scenarios.
- Search: Enter keywords to search for a scenario title.
- Filter: Display only Axon scenarios or your agency's custom scenarios. To display both types of scenarios, open the Filter menu and select Reset.
- Sort: Arrange scenarios alphabetically in ascending (A to Z) or descending (Z to A) order.
View the scenario configuration actions
Trainers can configure scenarios. The different actions they can perform include the following:
- Edit Name: Edit the name of the custom scenario
- Add to Playlist: Add the scenario to a custom playlist
- Copy & Edit Scenario: Duplicate the opened scenario
- Delete Scenario: Delete the custom scenario

View the scenario details
Trainers can access detailed information about each scenario on the vRBT Playlist tab. This information helps trainers understand the scenario's context, potential outcomes, and details about the possible subjects.
The scenario details include the following sections:
- Description: A brief overview of the scenario, outlining what trainers can expect the trainee to encounter during training.
- Virtual Officer: Adds a backup officer who many draw a weapon. The officer never moves or fires a weapon. The setting is Off by default. For more information, see Virtual Officer below.
- Escalatory Behaviors: Actions by trainees that may escalate a situation.
- De-Escalatory Behaviors: Actions by trainees that may help de-escalate a situation.
- Notes: Any important information regarding the scenario's possible outcomes.
- Related Scenarios: Each scenario includes multiple variations, which change key details like subject behavior, compliance levels, and the likelihood of force being required. The related scenarios listed here are the variations.
- Training Objectives: Each scenario includes suggested Training Objectives. See the Facilitator's Guides for more information.
- Subject: A description of the subject.
- Starting Distance from Trainee: The distance between the subject and the trainee, based on the trainee's starting location:
- Close: 10–20 feet
- Medium: 20–30 feet
- Far: 40+ feet
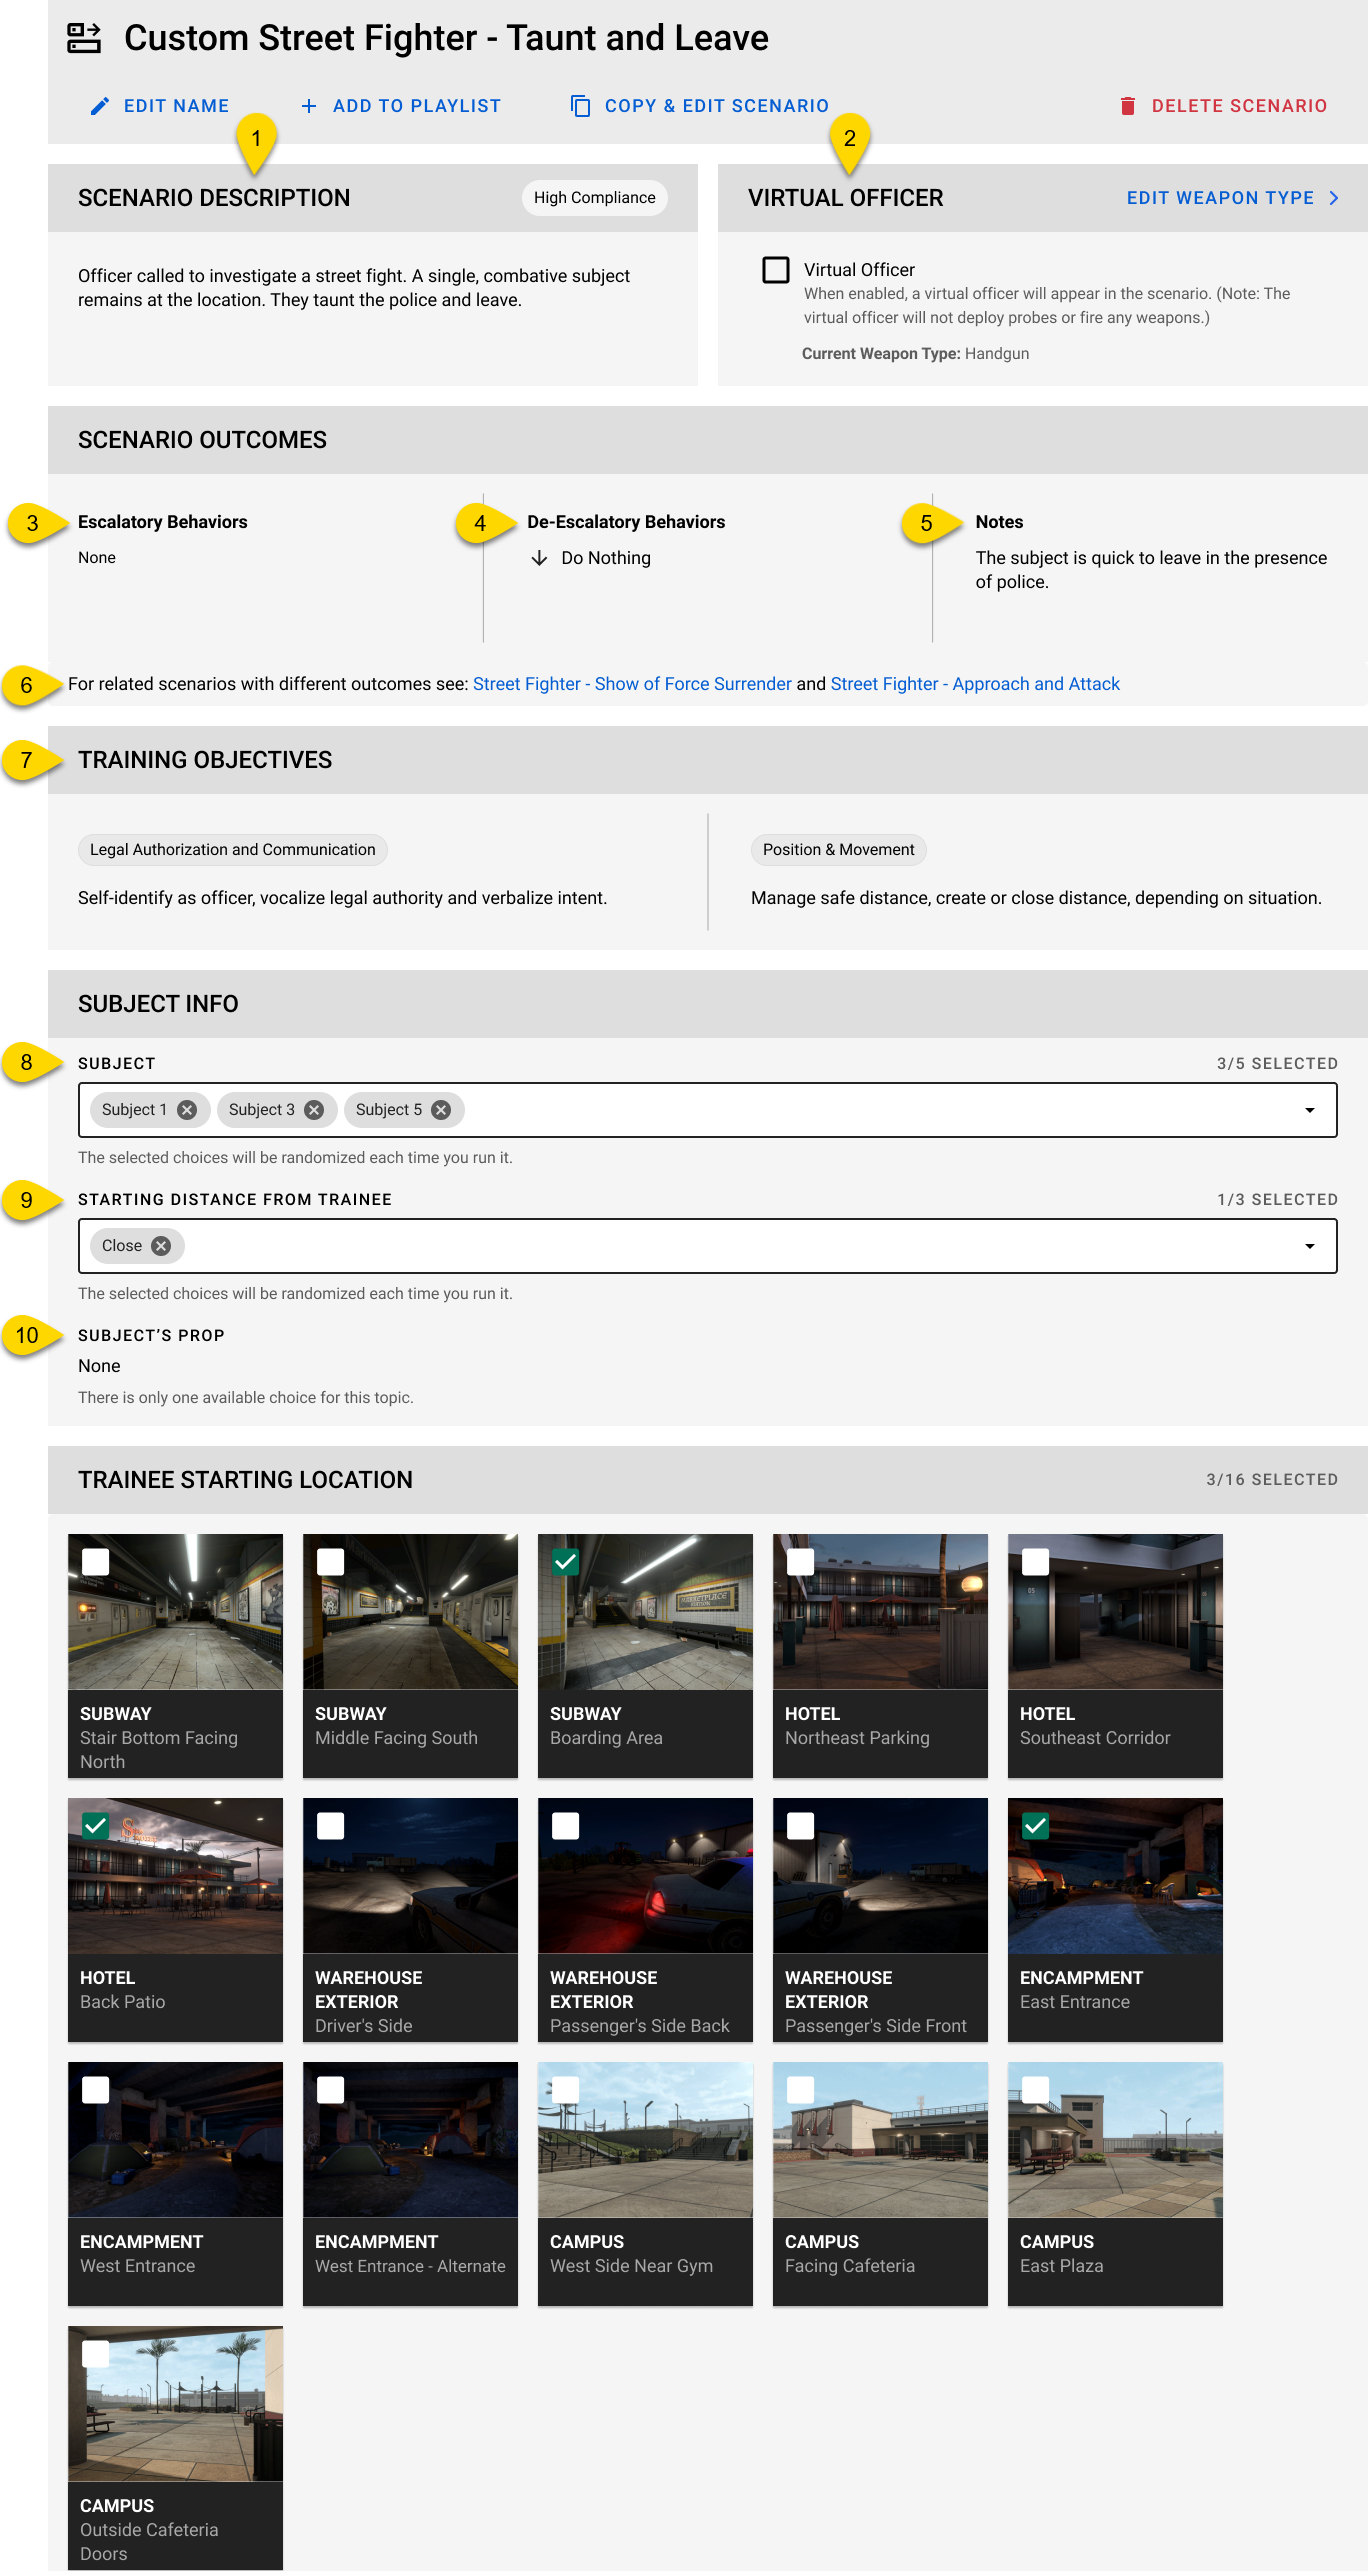
Virtual Officer
The Virtual Officer setting adds a backup officer to the scenario. When enabled, the officer appears in the trainee's peripheral view at the start of the scenario. They may draw a TASER or firearm, depending on the scenario.
The Virtual Officer:
- Never moves or fires a weapon.
- Does not respond to voice commands.
- Behaves according to preset conditions built into the scenario.
This setting is off by default. Trainers can enable it for custom scenarios in Facilitated mode, meaning the trainer sets up and launches the scenario for the trainee. In Solo mode—where the trainee launches and completes the scenario independently—trainees can turn it on in the Settings.
How to enable the Virtual Officer setting
Trainers have two ways to enable the setting on the tablet:
- Globally: From the playlist level by selecting Use Virtual Officer for Training. This setting helps trainers quickly enable the feature at scale without editing each scenario individually.
- Per scenario: From a custom scenario by selecting Virtual Officer.
After enabling this setting, trainers can choose which weapon the Virtual Officer may draw:
- TASER device: The Virtual Officer may draw a TASER device but will never deploy any probes.
- Handgun: The Virtual Officer may draw a handgun but will never fire the weapon.
- None: The Virtual Officer will not draw any weapon.
To learn how to enable the setting in Solo mode, see .
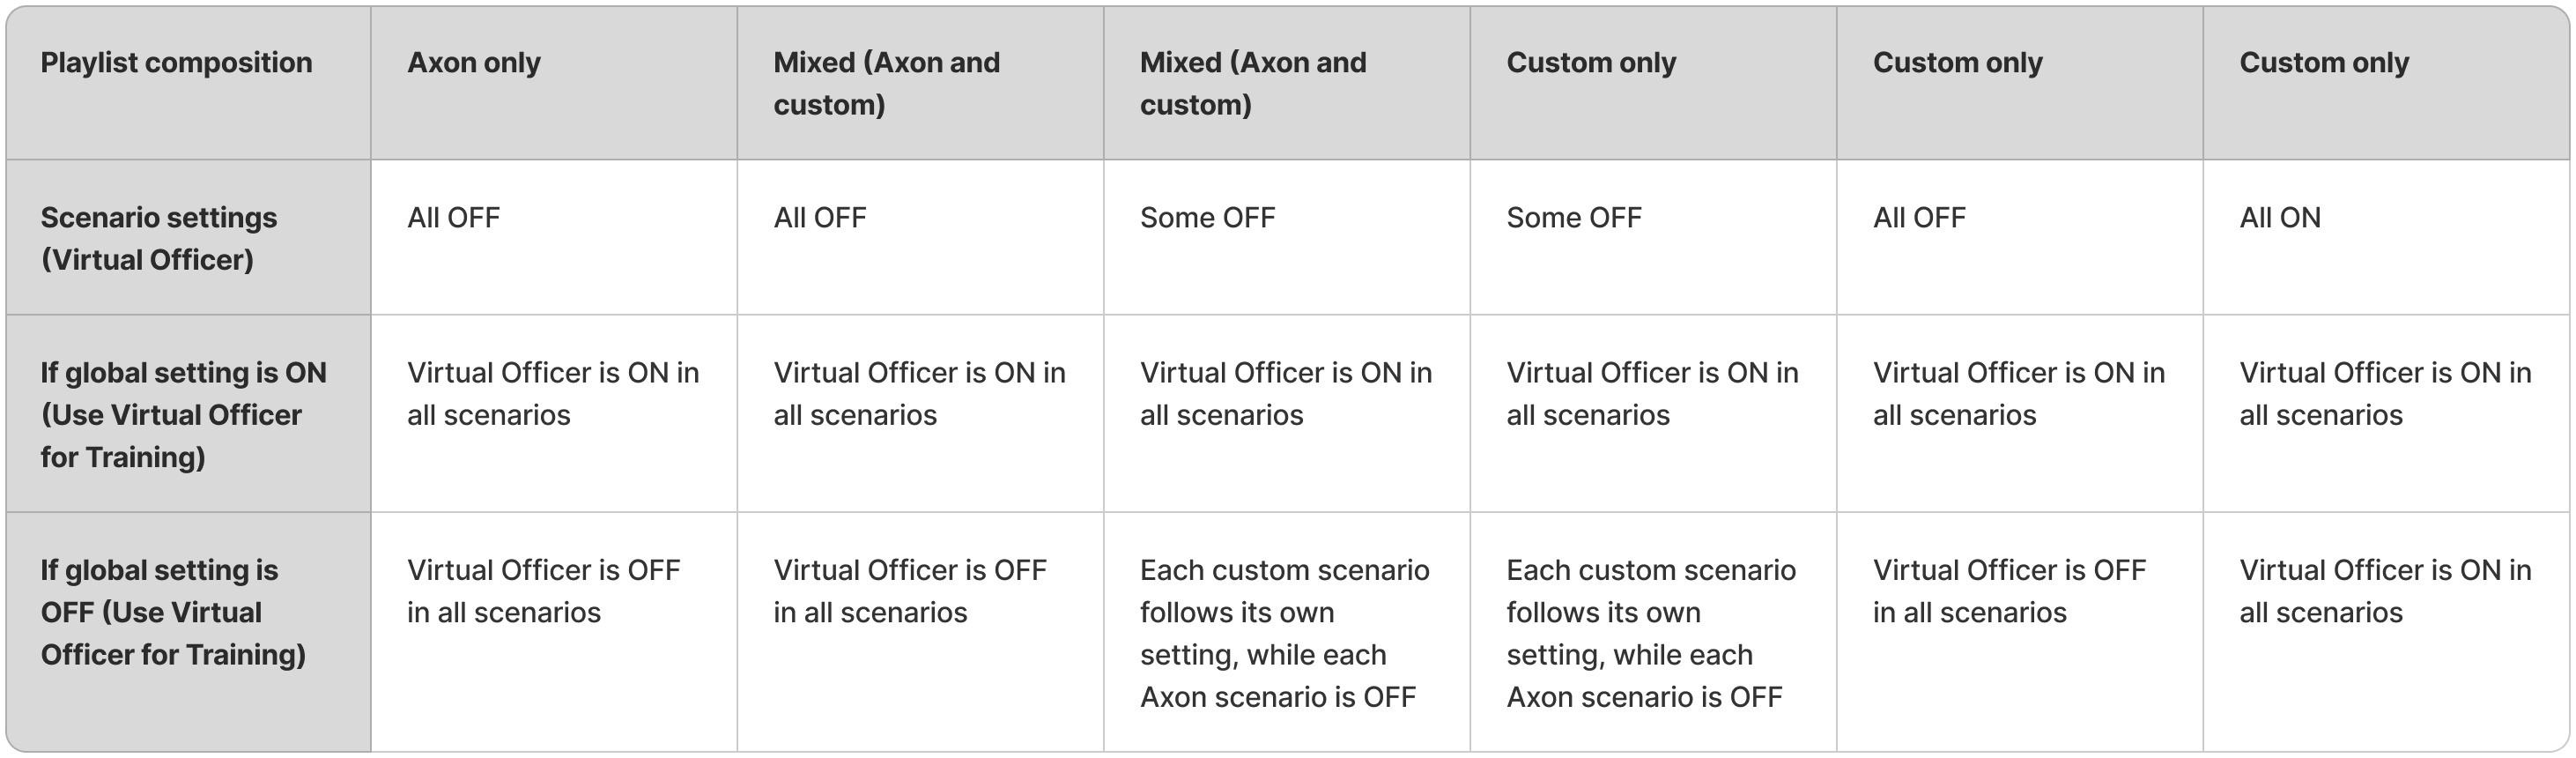
How the Virtual Officer setting behaves across playlist types
In Facilitated mode, playlists can include two types of scenarios:
- Axon scenarios: Denoted by a lock icon next to the title, these playlists cannot be edited or deleted.
- Custom scenarios: Created or modified by trainers and configurable at the scenario level.
How the Virtual Officer setting behaves depends on the playlist composition and whether it's been enabled globally or at the scenario levels.
Copy and edit a scenario
You can duplicate a scenario and customize its settings. Saved custom scenarios are only accessible from the account the trainer was signed into when they created them.
To customize a scenario:
- Open Simulator Training: vRBT to the list of scenarios.
- Open the scenario you'd like to duplicate.
- Select Copy & Edit Scenario.
- By default, the name is the original scenario name followed by "Copy". Edit the name as needed.
- Select Copy.
- Configure the settings as needed as described in the section below.
- Changes are automatically saved.
- Select the < Playlists button to navigate back to the list of playlists.
Scenario settings
Trainers can customize scenarios to align with specific agency goals and learning objectives to reflect community demographics and unique challenges on the Samsung VR tablet.
These are the different settings you can configure:
| Setting | Description | Select up to* |
|---|---|---|
| Subject | Select from a variety of characters | 5 |
| Starting Distance from Trainee | Select the starting distance between the trainee and the subject | 3 |
| Trainee Starting Location | Select the specific environment and designated starting location within that environment for the trainee to start | 10 |
| *By default, the settings will randomize each time the scenario is run, helping to ensure both replayability and unpredictability. If only one setting is selected, there will be no randomization of that setting. | ||
Edit a scenario
You can only edit custom scenarios; you cannot edit Axon scenarios.
To edit a scenario in the tablet:
- Open Simulator Training: vRBT to the list of scenarios.
- Select the scenario you want to edit.
- Make the updates.
- Changes are automatically saved.
- Select the < Playlists button to navigate back to the list of playlists.
Delete a scenario
You can only delete custom scenarios; you cannot delete Axon scenarios.
- Deleting a scenario cannot be undone.
- When you delete a custom scenario, it will automatically be removed from any playlists it is in.
To delete a scenario:
- Open Simulator Training: vRBT to the list of scenarios.
- Select the scenario you want to delete.
- Select Delete Scenario.
- Select Delete in the dialog box to confirm the action.
Change order of scenarios
When viewing a playlist, trainers can change the order of scenarios in a playlist by performing one of the following actions:
- Clicking and dragging the name of the scenario in the left panel to the desired location to manually change the order
- Selecting Randomize Order to automatically shuffle the scenarios
Add a scenario to a playlist
You can only add scenarios to existing custom playlists; you cannot add scenarios to Axon playlists. For more information on creating a playlist, see Manage and configure Simulator Training: vRBT playlists.
To add a scenario to a playlist:
- Open Simulator Training: vRBT to the list of scenarios.
- Select Add to Playlist.
- Select the playlists you want to add the scenario to.
- Select Add Scenario to Playlist.
Remove a scenario from a playlist
You can only remove scenarios from a custom playlist; you cannot remove them from an Axon playlist.
To remove a scenario from a playlist:
- Sign in to the Simulator Training app.
- Select vRBT Playlists in the left pane.
- Select the Playlists tab.
- Select the playlist that has the scenario you want to remove.
- Select Edit Playlist.
- Select the scenario you want to remove.
- Select Remove from Playlist.
Playlists overview
This video explains how to manage Simulator Training: vRBT scenarios. For more information, see Manage and configure Simulator Training: vRBT scenarios.
Simulator Training: vRBT features a range of Axon pre-configured playlists designed to replicate real-world situations. Trainers can create custom playlists to align with specific agency goals and learning objectives, configuring character avatars and environments to reflect community demographics and unique challenges.
- Trainers can view and configure playlists without pairing the tablet with a headset. This allows them to set up playlists in advance, maximizing training time with their officers.
- Trainers can create playlists ahead of training sessions and access them later
- Saved playlists are only accessible from the account used to create them. Other trainer accounts, including alternate accounts, will not have access.
Playlist configuration
A playlist is a collection of up to five scenarios that run sequentially.
Axon playlists
Axon playlists are denoted by a lock logo next to the title. These playlists cannot be edited or deleted. Simulator Training: vRBT will automatically randomize the settings each time the scenarios in a playlist are run.
![]()
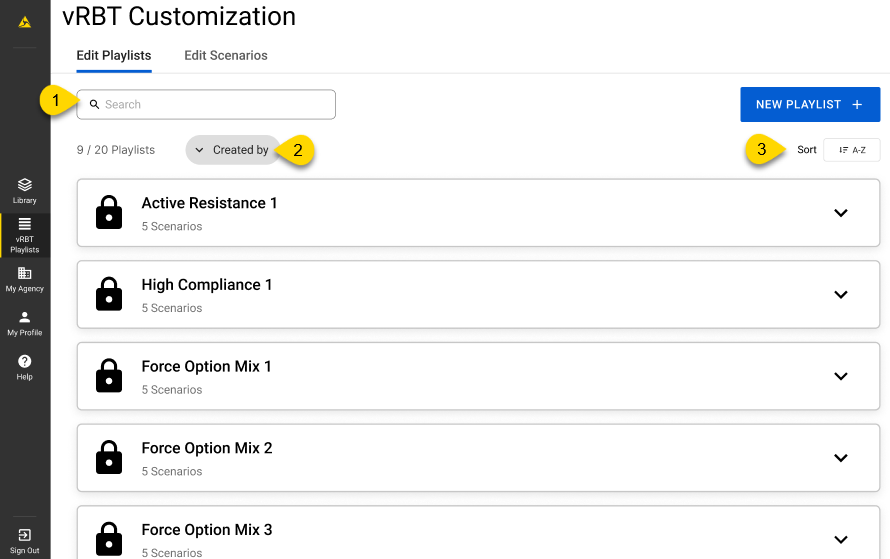
View playlists
To view the playlists on the Samsung VR tablet:
- Sign in to the Simulator Training app.
- Select vRBT Playlists in the left pane.
- Select the Edit Playlists tab.
- By default, the playlists display in alphabetical order from A to Z.
- You can select a playlist to view a quick overview of the scenarios in that playlist.
Sort, filter, and search
By default, the playlists display in alphabetical order from A to Z. You can search for, filter, and sort scenarios.
- Search: Enter keywords to search for a playlist title.
- Filter: Display only Axon playlists or your agency's custom playlists. To display both types of playlists, open the Filter menu and select Reset.
- Sort: Arrange playlists alphabetically in ascending (A to Z) or descending (Z to A) order.
Create a playlist
There can only be a maximum of 20 playlists, including the Axon playlists.
Saved playlists are only accessible from the account used to create them. Other trainer accounts, including alternate accounts, will not have access.
To create a playlist:
- Open Simulator Training: vRBT to the list of playlists.
- Select New Playlist.
- Enter a name for the playlist in the Playlist Name field.
- Select Create.
- Select Add Scenario.
- Select up to five scenarios.
- Select Add Scenario. Your playlist automatically saves.
- Select the < Playlists button to navigate back to the list of playlists.
Edit a playlist
You can only edit custom playlists; you cannot edit Axon playlists.
To edit a playlist:
- Open Simulator Training: vRBT to the list of playlists.
- Select the playlist you want to edit.
- Make the necessary changes.
- Your playlist automatically saves.
- Select the < Playlists button to navigate back to the list of playlists.
Delete a playlist
There can only be a maximum of 20 playlists, including the Axon playlists. If you need to make another playlist, you can make room by deleting a custom one.
Deleting a playlist cannot be undone.
To delete a playlist:
- Open Simulator Training: vRBT to the list of playlists.
- Select the playlist you want to delete.
- Select Delete Playlist.
- Select Delete to confirm the action.
Playlist descriptions
Active Resistance 1 Playlist
This playlist prepares trainees for scenarios involving intense subjects, emphasizing decisive actions and the likelihood of use of force.
The playlist includes the following scenarios:
- Irate Phone Caller - Approach and Walk Away
- Trespasser with Handgun - Lethal Force Surrender
- Street Fighter - Approach and Attack
- Burglar with Concealed Handgun - Show of Force Attack
- Suspicious Person with Knife - Approach and Attack
Active Resistance 2 Playlist
This playlist has an alternate version with "with Virtual Officer" in the title. Both playlists include the same scenario content, but the "with Virtual Officer" version has the setting enabled by default. This makes it easier to access Virtual Officer training without creating a custom playlist.
This playlist prepares trainees for encounters with intense subjects who escalate situations into physical resistance, requiring decisive actions and control tactics.
The playlist includes the following scenarios:
- Suspicious Person with Knife - Disarm and Fight
- Street Fighter - Approach and Attack
- Burglar with Concealed Handgun - Standoff and Attack
- Irate Phone Caller - Approach and Attack
- Trespasser with Handgun - Standoff
Armed Subjects Mix 1
This playlist has an alternate version with "with Virtual Officer" in the title. Both playlists include the same scenario content, but the "with Virtual Officer" version has the setting enabled by default. This makes it easier to access Virtual Officer training without creating a custom playlist.
This playlist focuses on encounters with armed individuals, emphasizing threat assessment, force decision-making, and strategic responses to varying levels of compliance.
The playlist includes the following scenarios:
- Suspicious Person with Knife - Disarm and Standoff
- Trespasser with Handgun - Quick Surrender
- Burglar with Concealed Handgun - Show of Force Attack
- Suspicious Person with Knife - Disarm and Fight
- Trespasser with Handgun - Standoff
Corrections Mix 1
This playlist presents correctional scenarios involving inmate non-compliance, contraband, and self-harm risk, emphasizing communication, de-escalation, and timely use-of-force decisions. Scenarios span low- to high-compliance encounters requiring officers to balance proportional response with rapid intervention across a range of force options.
The playlist includes the following scenarios:
Corrections Mix 2
This playlist presents higher-risk correctional scenarios involving escalating resistance, contraband threats, and active self-harm behavior. Scenarios emphasize rapid threat assessment and decisive action, requiring officers to transition from communication to force when necessary, including managing sudden assaults and time-sensitive self-harm intervention across a range of force options.
The playlist includes the following scenarios:
High Compliance 1 Playlist
This playlist focuses on scenarios where there is a clearer path to de-escalation, highlighting low-threat interactions and techniques for effective de-escalation with a reduced likelihood of use of force.
The playlist includes the following scenarios:
- Irate Phone Caller - Walks Away
- Burglar with Concealed Handgun - Flee or Surrender
- Trespasser with Handgun - Lethal Force Surrender
- Street Fighter - Show of Force Surrender
- Suspicious Person with Knife - Disarm and Fight
High Compliance 2 Playlist
This playlist reinforces techniques where there is a clearer path to de-escalation, emphasizing de-escalation and effective communication with reduced likelihood of force.
The playlist includes the following scenarios:
- Burglar with Concealed Handgun - Flee or Surrender
- Street Fighter - Taunt and Leave
- Trespasser with Handgun - Lethal Force Surrender
- Suspicious Person with Knife - Disarm and Standoff
- Irate Phone Caller - Approach and Walk Away
Force Option Mix 1
This playlist offers a diverse range of use-of-force options and scenarios, encouraging adaptability in response strategies.
The playlist includes the following scenarios:
- Suspicious Person with Knife - Disarm and Standoff
- Street Fighter - Approach and Attack
- Irate Phone Caller - Walks Away
- Trespasser with Handgun - Lethal Force Surrender
- Burglar with Concealed Handgun - Show of Force Attack
Force Option Mix 2
This playlist includes contrasting suspect reactions and threat assessments, providing varied responses to dynamic situations.
The playlist includes the following scenarios:
- Street Fighter - Show of Force Surrender
- Trespasser with Handgun - Quick Surrender
- Burglar with Concealed Handgun - Standoff and Attack
- Irate Phone Caller - Approach and Attack
- Suspicious Person with Knife - Disarm and Fight
Force Option Mix 3
This playlist emphasizes critical dynamics of compliance and confrontation, exploring tactical positioning and distance management in a variety of scenarios.
The playlist includes the following scenarios:
- Street Fighter - Taunt and Leave
- Trespasser with Handgun - Standoff
- Suspicious Person with Knife - Approach and Attack
- Burglar with Concealed Handgun - Flee or Surrender
- Irate Phone Caller - Approach and Walk Away
Force Option Mix 4
This playlist has an alternate version with "with Virtual Officer" in the title. Both playlists include the same scenario content, but the "with Virtual Officer" version has the setting enabled by default. This makes it easier to access Virtual Officer training without creating a custom playlist.
This playlist expands on the dynamics of compliance and confrontation, challenging trainees to assess and respond to varying levels of threat with appropriate force options.
The playlist includes the following scenarios:
- Irate Phone Caller - Approach and Attack
- Street Fighter - Show of Force Surrender
- Trespasser with Handgun - Lethal Force Surrender
- Suspicious Person with Knife - Approach and Attack
- Burglar with Concealed Handgun - Standoff and Attack
Using Escalate and De-Escalate in a scenario
The Escalate and De-Escalate feature is available in all Simulator Training: vRBT scenarios. During a facilitated session, trainers can use this feature to adjust how subjects respond by either increasing or decreasing scenario intensity.
This section explains when Escalate and De-Escalate is available, how the feature behaves during a scenario, and how it can be used multiple times to affect subject compliance levels.
When the controls are available
The Escalate and De-Escalate buttons appear at the right of the tablet screen automatically when a scenario begins. They are enabled by default and available in all Axon and custom scenarios.
By default, the buttons are temporarily disabled during the scenario introduction and conclusion to maintain narrative flow. Once the live portion of the scenario begins, the buttons become active and remain active throughout the scenario.
Using Escalate and De-Escalate is optional
You can choose whether to interact with the Escalate and De-Escalate buttons:
- If you do not make a selection, the scenario continues as scripted.
- If you select Escalate or De-Escalate, the subject completes their current line of dialogue before responding accordingly.
- You can adjust the intensity multiple times during a scenario without interrupting the timeline.
Repeated use and escalation levels
You can use Escalate or De-Escalate more than once during a scenario.
Selecting Escalate multiple times increases the intensity of the subject's behavior. For example, using Escalate more than once may shift the subject from verbal resistance to physically aggressive
Each scenario includes three levels of subject compliance:
- High compliance: The subject fully cooperates with law enforcement commands without resistance or hesitation.
- Mid compliance: The subject follows some commands but may show hesitation, verbal resistance, or delayed responses.
- Low compliance: The subject resists commands, either passively (for example, refusing to move) or actively (such as attempting to engage aggressively).
The specific actions associated with each compliance level may vary by scenario.
Show or hide Escalate and De-Escalate
By default, the Escalate and De-Escalate buttons display during all Axon and custom scenarios. Trainers can hide the buttons when observing a session without providing input or to reduce on-screen distractions.
- To hide the controls, select Hide Buttons on the tablet. The buttons are removed from the interface, but the feature remains active in the background.
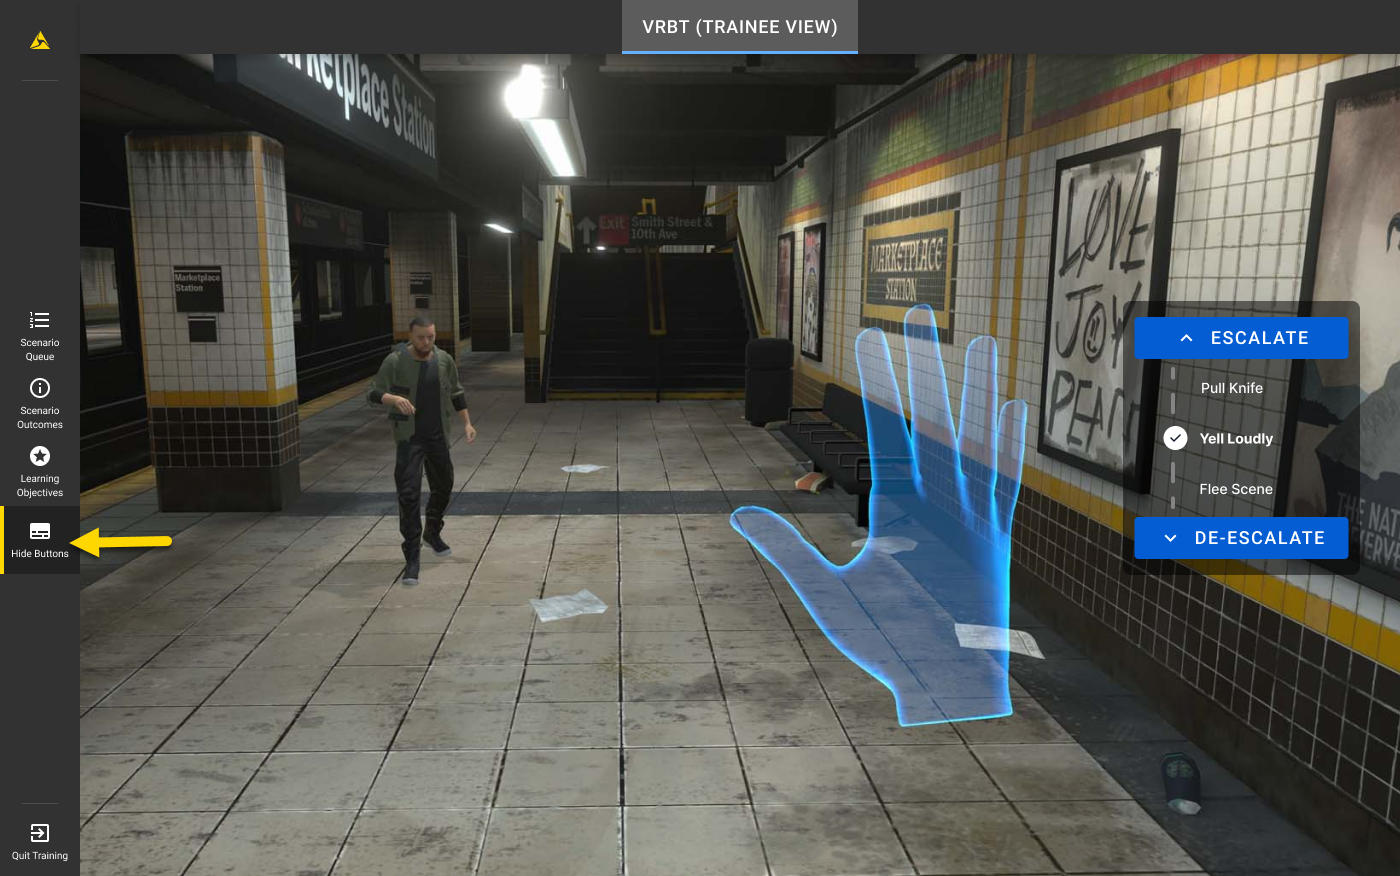
- To show the buttons again, select Show Buttons.
After-Action Report overview
After a trainee completes a Simulator Training: vRBT playlist in-headset, an After-Action Report (AAR) will display on both the headset and tablet. This report is tailored for both the trainer and trainee, so each user sees their own separate report. Actions by one user do not affect the report of the other.
Trainees will not be able to move past the AAR until the trainer exits the AAR screen on their tablet.
The AAR consists of several tabs, each representing one of the scenarios in the completed playlist. Select a tab to analyze the details of that scenario.
To determine whether the AAR is for a Handgun or TASER VR Controller, look for the Spread visual, which only appears in TASER AARs. Additionally, the Shot Accuracy visual will depending on the weapon used.
The AAR includes the following visual indicators and buttons as shown in the tablet view below:
- Scenario type
- Virtual Officer
- Scenario adjustments
- Dispatch report
- Shot/deployment placements
- Shot/deployment accuracy
- Toggle handgun or TASER shot/deployment placement view
- Deployments playback
- Restart training
- Start a new training

Scenario type
The name of the scenario that the AAR is for.
Virtual Officer
The Virtual Officer setting adds a backup officer to a scenario.
This section displays:
- Whether the Virtual Officer was present
- The weapon type they drew (if any)
Scenario adjustments
This section summarizes how the subject's behavior changed during the scenario and whether a trainer used the Escalate or De-Escalate controls.
- Started: The subject's initial compliance level and associated behavior
- Ended: The subject's final compliance level and behavior at the end of the scenario
- Action by Trainer:
- Number of times Escalate was used
- Number of times De-Escalate was used
Dispatch report
The transcript of the dispatch message delivered at the start of the scenario.
Shot/deployment placement
This section displays the precise locations where the shots or deployments landed on or near the subject.
Shot/deployment accuracy
This section provides a detailed breakdown of outcomes, including the number of shots or deployments that landed in the following categories:
- Preferred Area (TASER AAR only): Deployment that successfully hit preferred placement areas
- Sensitive Area (TASER AAR only): Deployment that landed in sensitive placement areas
- Ineffective (TASER AAR only): Deployment that landed in ineffective placement areas
- Unattained (TASER AAR only): Deployment landed on the target but did not achieve the desired effect, such as hitting clothing
- Hit (Handgun AAR only): Shot that hit the subject
- Missed: Deployment or shot that missed the subject entirely
This breakdown helps assess the accuracy and effectiveness of the TASER energy weapon and handgun deployments or shots.
Toggle handgun or TASER shot/deployment placement view
This feature is only available if both a TASER and Handgun VR Controller were fired during a scenario.
Select the handgun or TASER icon to toggle and view the shot/deployment placement details for each weapon.
Deployments playback
The distance between the trainee and the subject at the beginning of the scenario may affect shot placement.
If any shots were fired using a Handgun or TASER VR Controller, you can select Deployments Playback to replay the animation to see where the shots landed.
For TASER deployment hits, the shots are color-coded:
- Green: Preferred placement area
- Yellow: Sensitive placement area
- Gray: Ineffective placement area
Restart training
The trainer can restart the playlist by selecting Restart Training.This will reset the exact same playlist for the same trainee. If you want to change the playlist or the order of the scenarios, see the section below.
Start a new training
The trainer can start a new playlist by selecting New Training. This will take the trainer to the VR Headsets tab. From here, they can change the playlist or trainee as needed.
FAQs
Escalate and De-Escalate
Can I use Escalate and De-Escalate in Solo Mode?
No. Escalate and De-Escalate is only available in Facilitated Mode, where a trainer uses a tablet to launch the scenario.
What happens if I don't use Escalate and De-Escalate?
The scenario will continue as scripted. Using this feature is optional and allows you to influence subject behavior without interrupting the scenario flow.
Why are the Escalate and De-Escalate buttons disabled sometimes?
The buttons are automatically disabled during the introduction and conclusion of a scenario. They become active once the live interaction portion of the scenario begins.
Can I turn off Escalate and De-Escalate?
You can hide the buttons by selecting Hide Buttons on the tablet. This removes the controls from the interface, but the feature remains active in the background.
System requirements and setup
Are there minimum requirements to run Simulator Training: vRBT?
Yes. You must meet minimum network requirements as specified in the article Run Simulator Training with a trainer.
Why do I need an active online connection to use Simulator Training: vRBT with a trainer?
Simulator Training: vRBT requires a headset to be paired with a Samsung VR tablet so that trainers can actively oversee and participate in the trainee's scenario-based training. To maintain this pairing, both devices must have an active internet connection.
An internet connection is not required for running Simulator Training: vRBT solo.
How do I pair a headset with a tablet?
See Run Simulator Training with a trainer for more information.
What are the size requirements for the Training Space be?
The Play area dimensions setting in the headset (located under Settings > Boundary) is measured in meters.
The minimum recommended size for the Training Space is 10' x 10'. However, for optimal training experiences, we recommend a space of at least 20' x 20'. This larger area allows for greater movement and interaction.
If possible, we recommend having a second trainer act as a safety officer to monitor the trainee’s movements in the physical space. If a safety officer is unavailable, ensure there is at least 5 feet of clearance between the edge of the virtual boundary and the physical space to help prevent accidental collisions.
If there will be multiple headsets in use at the same time, the recommended space between each user is a minimum of 18 feet. For more information on VO mode, see Boundary Setup/VO Mode/Multiple Headset Rule.
Tablet sign-in credentials
Can I use Axon Evidence credentials to sign in to the tablet?
Yes! For more information on setting up this process, see Set up Axon Evidence accounts for tablet sign-in.
Scenario management
Why do scenarios randomly change from each playthrough?
Scenarios are designed to change randomly with each playthrough to enhance replayability and prevent trainees from predicting the outcome based on prior experiences.
While the choices made by the user will always lead to consistent outcomes, the visual elements and environment of the scenario may vary each time.
What if I don't want any randomization for one or all customizable options?
Only select one option for each setting. If you pick multiple options, then the settings will randomize each time a scenario is run.
How do I know what will happen in a scenario?
Trainers can view the scenario details when loading a playlist to better understand each scenario's purpose and structure. This includes reviewing the title, description, and scenario outcomes. For more information, see .

How can I see which characters and environments are included in a scenario?
You can find details about the characters and environments included in a scenario by viewing the scenario details when viewing a playlist. For more information, see .
The trainer started the training in-headset, but the scenario isn't starting. What should I do?
The scenario won't start until the trainee has stepped into the "Stand Here" circle. This is the designated starting location for every scenario. If they don't see it, they should check to their sides or behind them.
Playlist management
Why did the playlist start the next scenario when I tried to skip it on the tablet?
You can only skip a scenario after it has started. You cannot skip it beforehand.
How do I restart a training with a new trainee?
To restart a training with a new trainee, trainers should follow these steps: select VR headsets tab > select a new trainee > select vRBT Playlist tab > verify the correct playlist is selected > select Begin Training.
Virtual Officer
What does the Virtual Officer do?
The Virtual Officer appears in a neutral or on-target stance. They may draw a TASER energy weapon or handgun, depending on the scenario, but they do not move, fire a weapon, or respond to commands.
Their behavior is controlled by preset logic built into each scenario and is not affected by trainee input.
Can the Virtual Officer fire a weapon or move?
No. The Virtual Officer never moves, fires a weapon, or responds to commands.
Why doesn't the Virtual Officer appear in some scenarios?
The Virtual Officer setting is off by default.
To appear in a scenario:
- In Solo mode, the trainee must enable the setting in the headset. (See Configure Solo mode settings.)
- In Facilitated mode, the trainer must enable the setting from the tablet. (See View the scenario details.)
Why does the After-Action Report (AAR) include a Virtual Officer section even when it wasn't enabled?
The Virtual Officer section always appears in the AAR. If the setting wasn't enabled, the section will show that the officer wasn't present.
Why do some playlists include "with Virtual Officer" in their names?
There are three playlists that include "with Virtual Officer" in the title. These versions use the same scenario content as the original playlists but have Virtual Officer enabled by default. This lets trainees to quickly run scenarios with a Virtual Officer without building a custom playlist.
After-Action Report analysis
If only one weapon was used in a scenario, how can I determine whether a handgun or TASER energy weapon was used when viewing the After-Action Report?
If a TASER VR Controller was used, the After-Action Report will display details such as the spread and type of hit (preferred area, sensitive area, or ineffective area).

Troubleshooting
Test your network before training using the built-in network speed test on the VR tablet, or visit https://vr.evidence.com/vr-net-test. This test measures network performance but does not verify that required ports are open. Confirm that your network configuration includes the required ports listed in Network requirements for VR headsets and tablets.
The app is unresponsive
If the app is unresponsive, try the following:
1. Exit the app: Depending on the app, either look down and select Exit, or use gaze selection to select Exit App.
2. In the library, use your hand to pinch and select the app tile to relaunch it.
Escalate and De-Escalate
Escalate and De-Escalate buttons are grayed out
This is expected behavior. The buttons are disabled during the scenario introduction and conclusion. They become active once the live portion of the scenario begins.
I escalated twice, but nothing changed immediately
The subject completes their current line of dialogue before responding to escalation. This timing prevents mid-sentence interruptions and helps preserve narrative continuity.
Simulator Training: vRBT facilitated mode
Both the headset and Samsung VR tablet must have an active internet connection for facilitated Simulator Training: vRBT sessions. However, solo sessions can be run offline. For more information, see Manage Axon IP addresses in network allowed lists.
Simulator Training runs slowly
Ensure your network meets the minimum network requirements. For more information, see Run Simulator Training with a trainer.
No internet connection detected on headset
To check your internet connection on your headset, go to the Axon VR Library and navigate to Settings > Connectivity > Wi-Fi. For additional details, see the FAQ Why can't I connect to my secure Wi-Fi network?.
If you are still experiencing network connectivity issues, try the following:
- Check to make sure other devices can connect to the internet on the same wireless network.
- Consult with your IT department or help desk to troubleshoot your local network.
No internet connection detected on tablet
To check your internet connection on your tablet, go to Settings > Wi-Fi.
If you are still experiencing network connectivity issues, try the following:
- Check to make sure other devices can connect to the internet on the same wireless network.
- Consult with your IT department or help desk to troubleshoot your local network.
Simulator Training: vRBT playlists
Can't access saved playlists or scenarios on tablet
Trainers must be signed into the same account they used to create the saved playlists and scenarios to access them.
Can't access saved playlists or scenarios on headset
Saved playlists and scenarios are unavailable in Solo mode; only the Axon playlists and scenarios can be run in Solo mode.
Can't click the "Begin Training" button
During a facilitated training, the trainee must select their name in-headset for the "Begin Training" button in the tablet to be enabled. If the trainee is a guest, they should select the "Guest" option instead.

Simulator Training: vRBT scenarios
Scenario ends abruptly
To prevent unexpected scenario termination, ensure that VR Controllers are properly holstered at the start of the scenario, if applicable. VR Controllers being holstered at the start helps ensure smooth operation throughout.
Scenario won't start
The scenario won't start until the trainee has stepped into the "Stand Here" circle. This is the designated starting location for every scenario. If they don't see it in-headset, they should check to their sides or behind them.
Simulator Training: vRBT configuration
"You have reached the maximum limit of 100 scenarios" message
This message displays when you're attempting to create a scenario but you've reached the maximum limit of 100 scenarios. To create a new one, you can either delete or edit an existing custom scenario. (Axon scenarios cannot be edited or deleted.)
"At least one option must be selected" message when creating scenarios
This message displays when you're trying to create a scenario but one or more settings have not been selected. Make sure each setting has at least one option selected, then try again.
Virtual Officer
The Virtual Officer didn't appear in the scenario
- Make sure the setting is enabled:
- In Solo mode, the trainee must enable the setting in the headset. (See Configure Solo mode settings.)
- In Facilitated mode, the trainer must enable the setting from the tablet using one of the following settings. (See View the scenario details.)
- Virtual Officer to add one to the open scenario.
- Use Virtual Officer for training to add one to all scenarios in the playlist.
- Virtual Officer to add one to the open scenario.
- In Solo mode, the trainee must enable the setting in the headset. (See Configure Solo mode settings.)
- If using a custom scenario, make sure it hasn't been manually set to disable the Virtual Officer. (See How to enable the Virtual Officer setting.)
- For Axon scenarios, the setting must be enabled at the playlist level, since individual scenario editing is not available. (See How to enable the Virtual Officer setting.)
Device firmware
Available firmware update for paired VR Controller detected
If you see a firmware update available after pairing your controller, see Update controller firmware.
Available firmware update for headset detected
If you see a firmware update available for your headset, see the FAQ How do I check or update the headset firmware?.
Tablet sign-in
I signed in to my Axon Evidence account on the tablet, but I can't see all trainee accounts
Make sure the VR groups were created with specific settings. For more information, see Set up Axon Evidence accounts for tablet.
My agency has multiple domains and I only see some trainee accounts
For more information on which trainee accounts are visible based on the signed in account type, see Tablet sign in and multiple domains.