Clips and markers
Markers and clips help you work with video evidence. Markers and clips allow you to highlight specific moments or isolate sections of a video.
This article provides an overview of how markers and clips function.
Watch this video to learn more about working with clips and markers.
What is a marker?
A marker is a pointer to a specific time in an evidence file. You can create a marker for any frame in an evidence file, and assign a title and description to the marker.
For video evidence, a marker is associated with a single frame of a video evidence file. You can also download the marker as a picture file. For example, if a video includes a frame that shows an important detail, you can create a marker for that frame, which can be useful in several ways:
- Easily find important moments when you play the evidence file later.
- Users with whom you share the evidence can easily locate moments that you have marked, and read the title and description of the marker.
- For video evidence only, you can download the marker as a PNG image file and send it to others in an email or using other sharing methods.
- To manage markers in a video, user the Markers and Clips tab next to the video player. from here, you can add, edit, or delete markers using either the scrub bar on the timeline or by entering specific timestamps.
What is a clip?
A clip is a continuous segment of an evidence file that you can define. You can create a clip for any segment of an evidence file and assign the clip a title and description. For example, if a 10-minute video includes a 30-second segment that captures important actions and audio, you can create a clip for the important segment. Here are a few useful ways you can use clips:
- Easily play important segments of a media evidence file later.
- Users with whom you share the evidence can easily locate and play clips that you have created, and read the title and description of the clip.
- When you want to share only a portion of an evidence file with others, you can extract a new media evidence file from the clip and share it rather than sharing the original evidence.
- You can redact a clip that you extract from a longer video evidence file, to reduce the amount of redaction work required.
- Clips can be created and manages using the Markers and Clips tab next to the video player. Adjust a clip's start and end times by dragging the handles on the timeline or entering precise times in the input fields.
Timeline and scrub bar controls
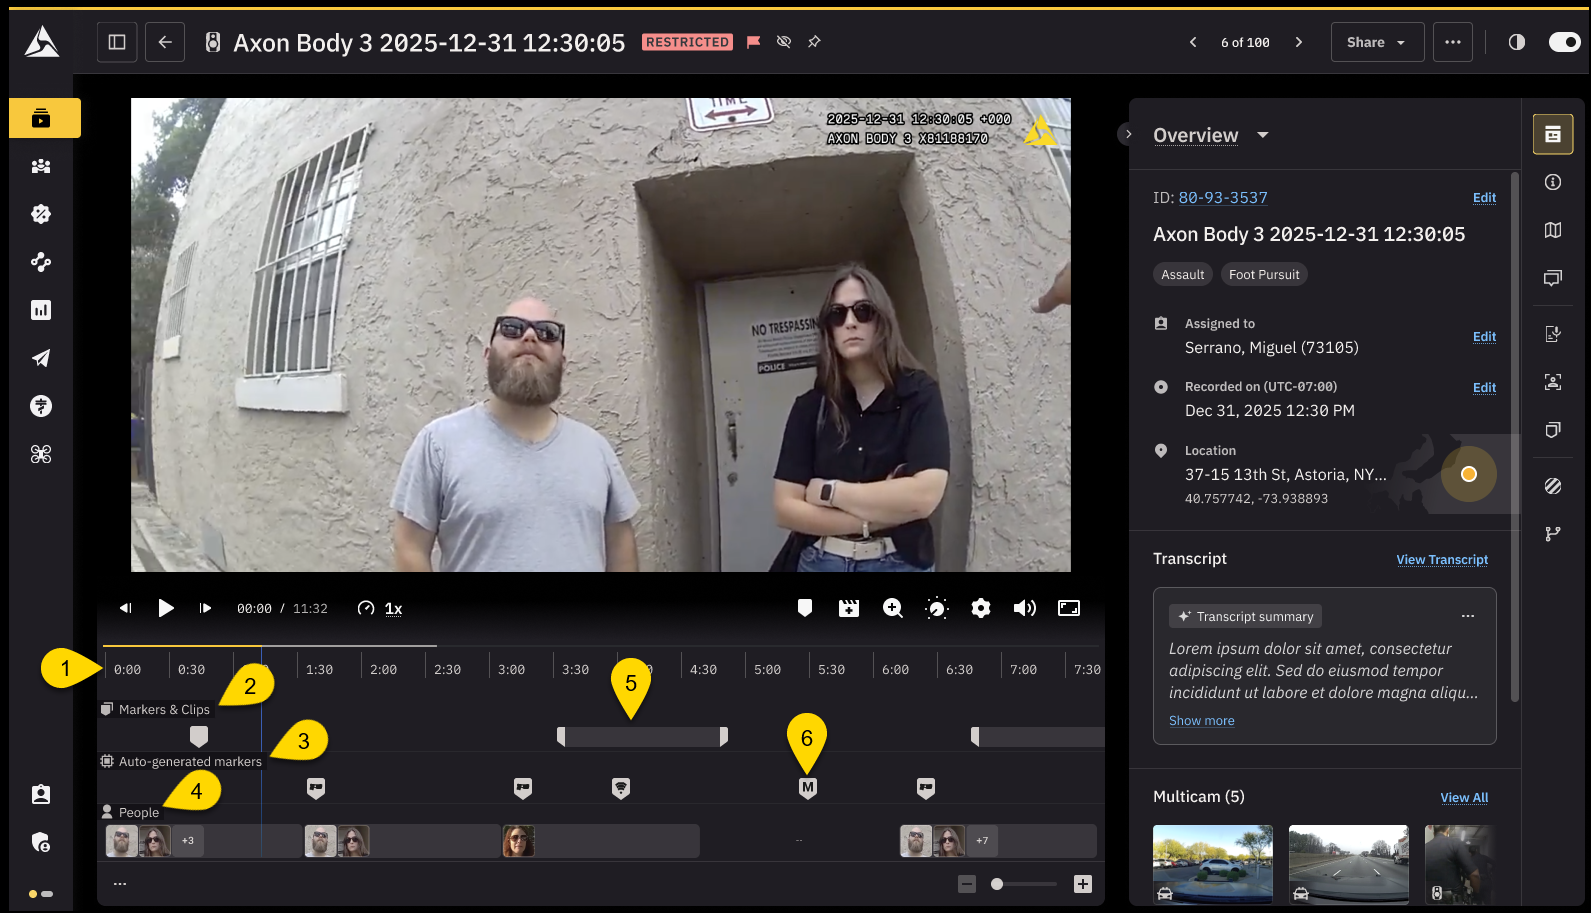
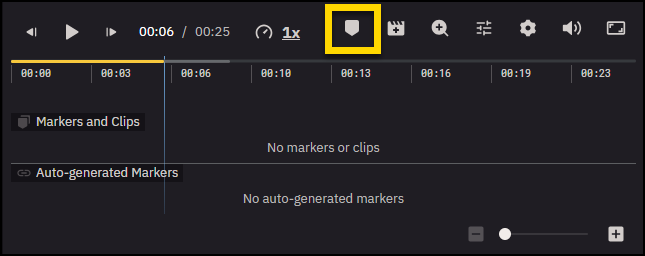
Create and manage both markers and clips using the controls for working with markers and clips that appear below the scrub bar. The following figure shows the controls that appear when a media file has one marker and one clip.
- Timeline: The timeline is a visual representation of the video's playback time. It allows yous to see the entire duration of the video and navigate to different parts of the video evidence. You can zoom in and out of the timeline for more precise control when working with markers and clips. If your agency has access to Smart Detection, detected people appear on the video timeline below the clips and markers.
- Marker handle: The marker handle appears on the timeline at the frame where a marker is created. You can click and hold the marker handle to drag it to a different time in the video file if you need to adjust the marker's location.
- Clip handle: Clip handles are used to define the start and end points of a clip within the video timeline. There are start and end handles that you can move to select the exact portion of the video you need in the clip. Just drag these handles left or right as needed.
- Clips and Markers track: This track is a visual representation of the clips and markers created by users on Axon Evidence.
- Auto-generated Markers track: This track is a visual representation of the markers which are automatically generated by Axon devices.
- People track: This track is a visual representation of human forms that appear in the video, powered by Smart Detection. Learn more about Smart Detection.
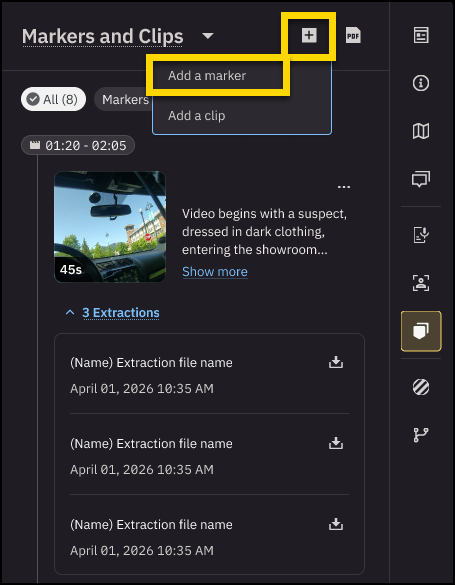
Markers and Clips tab
The Markers and Clips tab shows a list of all the markers and clips created for the video.
From the support pane, select the Markers and Clips tab. ![]()
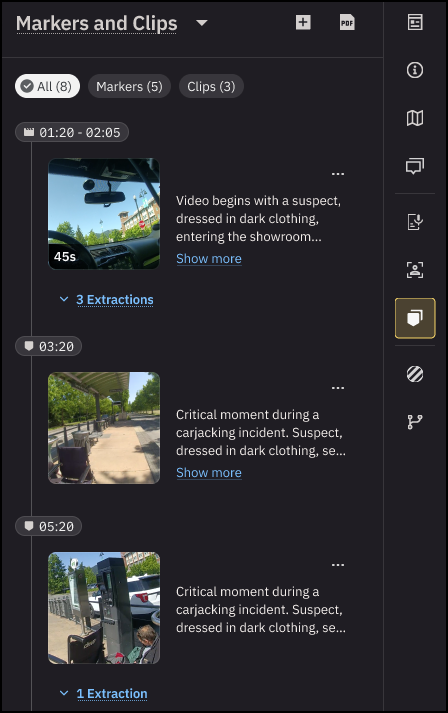
- Select a marker or clip from the list to navigate to its exact point in the video. The scrub bar automatically moves to the corresponding frame.
- The tab allows you to view, add, edit, or delete markers and clips. You can also enter specific timestamps directly in the tab for precise control over markers and clips.
Auto-generated markers
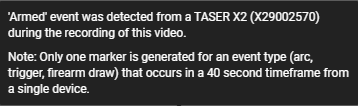
When enabled for your organization, the auto-generated markers feature automatically adds a hypermedia marker to Axon body camera and Fleet recordings when a TASER device is armed, arced, or deployed, or when an Axon Signal device detects a draw weapon.
This feature has minimum firmware requirements that differ by device. Keep your firmware updated for continued access to this feature.
The TASER and Signal Sidearm events are shown as markers in the video timeline and Clip and Markers tab.
Hovering your cursor over the information icon in the marker shows information about the event, including the type and serial number of the device that initiated the marker.
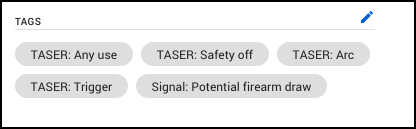
In addition to adding markers, tags for the TASER and Signal Sidearm actions are automatically added to the video. The tags cannot be removed from the video. These tags help ensure that key events are not missed during review, helping agencies manage risk and improve performance.
Add a marker
You can create many markers in a media evidence file; however, you can only create one marker at a time. When you create a marker, it is available in the list of markers and clips until you delete it.
- Locate the evidence you want to add a marker to, and then select the evidence to open it in the evidence details page.
- On the scrub bar of the media player, drag the playhead until it is at a time you want to mark. A common approach is to pause the player, select and hold the scrub handle, and then drag the scrub handle to the time that you want to mark.
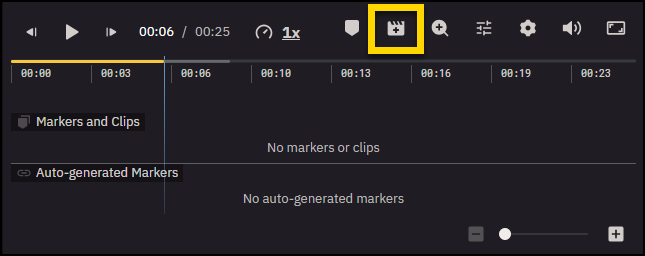
- Select Add marker on the scrub bar.
- Enter a marker description (up to 3,000 characters), and then select Add. The new marker appears in the Markers and Clips tab with the current timestamp shown in the player.
After a marker is added, take the following actions:
From the Clips & Markers tab:
- View a marker: Select the marker from the list. The handle on the scrub bar jumps to the corresponding frame in the video.
- Edit a Marker: Locate a marker in the list, select More options (...), and then select Edit. Edit the marker description (up to 3,000 characters), or adjust the timestamp by dragging the marker handle on the timeline. Select Save to confirm the changes.
- Delete a Marker: Locate a marker in the list, select More options (...), and then select Delete. Select Delete again to confirm. You cannot restore a deleted marker.
- Extract a Marker: Locate a marker in the list, select More options (...), and then select Extract The extraction will appear under the marker in the list.
- Download a marker: Locate a marker in the list, select More options (...), and then select Download. The download begins. The exact behavior depends on the browser you use and its download settings. The marker frame will be saved as a .png file.
- Export markers: Locate a marker in the list, select More options (...), and then selectA PDF report of the markers, including metadata and timestamps, will open in a new browser tab.
Extracted marker details
Extracting a file from a marker creates a new evidence file. Evidence files created by extracting a marker appear in evidence searches. The file from which a marker is extracted is known as the parent file.
You can extract a file from a marker more than once. Each time you extract a file, a new evidence file is created. If the title of the marker is the same each time you extract a file from the marker, the files created have identical titles.
A jpg file extracted from a marker inherits the metadata of the parent file, such as the case IDs, categories, tags, and evidence location. Inheriting the metadata helps ensure that extracted files are associated with the correct cases and that the applicable evidence retention policy is enforced, including any restricted categories. In addition, Evidence.com applies the tag ?AXONMarker? to the extracted file.
The title of the parent file and a link to the parent file are available on the evidence detail page.
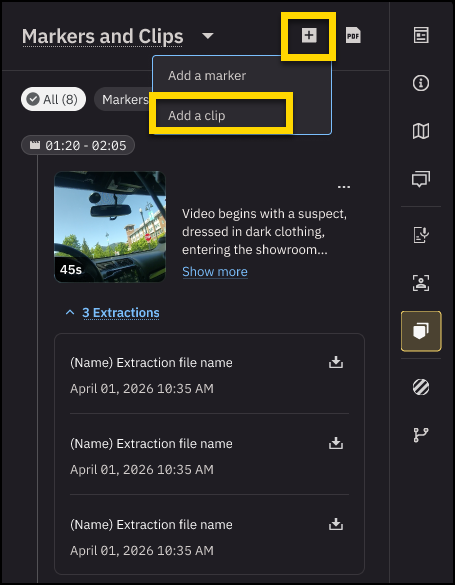
Add a clip
Create as many clips as you need. For example, if you want to share different segments of a media evidence file with different sets of users, you can create a clip for each set of users.
Each clip you create is independent of other clips for the same media evidence file. Clips can overlap. A shorter clip can be within a longer clip.
- Locate the evidence you want to add a clip to, and then select the evidence to open it in the evidence details page.
- On the scrub bar of the media player, drag the playhead until it is at a time for the clip. A common approach is to pause the player, select and hold the scrub handle, and then drag the scrub handle to the desired starting point.
- Select Add clip on the scrub bar.
- Enter a clip description (up to 3,000 characters), and then select Add. The new clip appears in the Markers and Clips tab with the current timestamp shown in the player.
After a clip is added, you can:
From the Markers and Clips tab:
- Adjust the Clip Duration: Select a clip from the list. The handle on the scrub bar jumps to the corresponding clip in the video. Drag the start and end handles on the timeline to define the clip duration. To adjust both handles simultaneously, hover over the blue area between them, then select and drag the handles left or right.
- Edit a Clip: Locate a clip from the list, select More options (...), and then select Edit. Adjust the start or end times by dragging the clip handles on the timeline or updating the times manually in the tab. Edit the title if needed, and then select Save.
- Delete a Clip: Locate a clip from the list, select More options (...), and then select Delete. Select Delete again to confirm. You cannot restore a deleted clip.
- Play a clip: Locate and select the clip you want to play in the list. On the scrub bar, the scrub handle jumps to the first frame of the clip. On the playback control bar, select Play. Starting at the beginning of the clip, Axon Evidence plays the file.
- Extract a clip: Locate a clip from the list, select More options (...), and then select Extract. On the confirmation window, select OK. The clip begins to extract as a new evidence file. You will receive an email notification after extraction is complete. The extraction appears under the clip in the list.
From the timeline under the media player:
Adjust the Clip Duration: Drag the start and end handles on the timeline to define the clip duration. To adjust both handles simultaneously, hover over the blue area between them, then select and drag the handles left or right. Select Save to confirm the changes.
Extracted clip details
Extracting a file from a clip creates a new evidence file whose start and end are exactly those that you specified in the clip. Evidence files created by extracting a clip appear in evidence searches. The file from which a clip is extracted is known as the parent file.
You can extract a file from a clip more than once. Each time you extract a file, a new evidence file is created. If the title of the clip is the same each time you extract a file from the clip, the files created have identical titles.
A file extracted from a clip inherits the metadata of the parent file, such as the case IDs, categories, tags, and evidence location. Inheriting the metadata helps ensure that extracted files are associated with the correct cases and that the applicable evidence retention policy is enforced, including any restricted categories. In addition, Evidence.com applies the tag ?AXONclip? to the extracted file.
The title of the parent file and a link t the parent file are available on the evidence detail page.
Output video details
Video files can be extracted if the file format is one of our supported file types. Otherwise, your organization must have Third-Party Video Support enabled.
- File format: MP4
- File size: Up to 30GB
- Video dimensions, quality, and frame rate: Same as the original video