Using Redaction Studio to redact evidence
Audio redaction
The Audio Extraction functionality lets you extract a redaction as audio evidence in M4A format with no associated video.
- On the evidence details page for the evidence you want to redact, select the Redactions tab.
- Select + Create redaction.
This launches Redaction Studio within the browser window.
- Select Extract.
- Select Extract Audio, and then select Extract.
- The redaction processing dialog box is displayed. Select Okay to continue. The redaction begins processing. When processing is complete, you receive a notification email with a link to the audio file.
- Select X to exit Redaction Studio and return to the evidence details page.
All work done to a video in Redaction Studio is saved.
When you use Redaction Studio, you might want to redact certain portions of the audio for privacy or security purposes. With Audio Redact via transcript, you can use the transcript of the audio track to redact certain sections of the recording.
Watch this video to learn how to redact audio via the transcript.
Find a word to redact
- Navigate within video/audio using the transcript.
- Select a word to navigate to the timestamp where this word located.
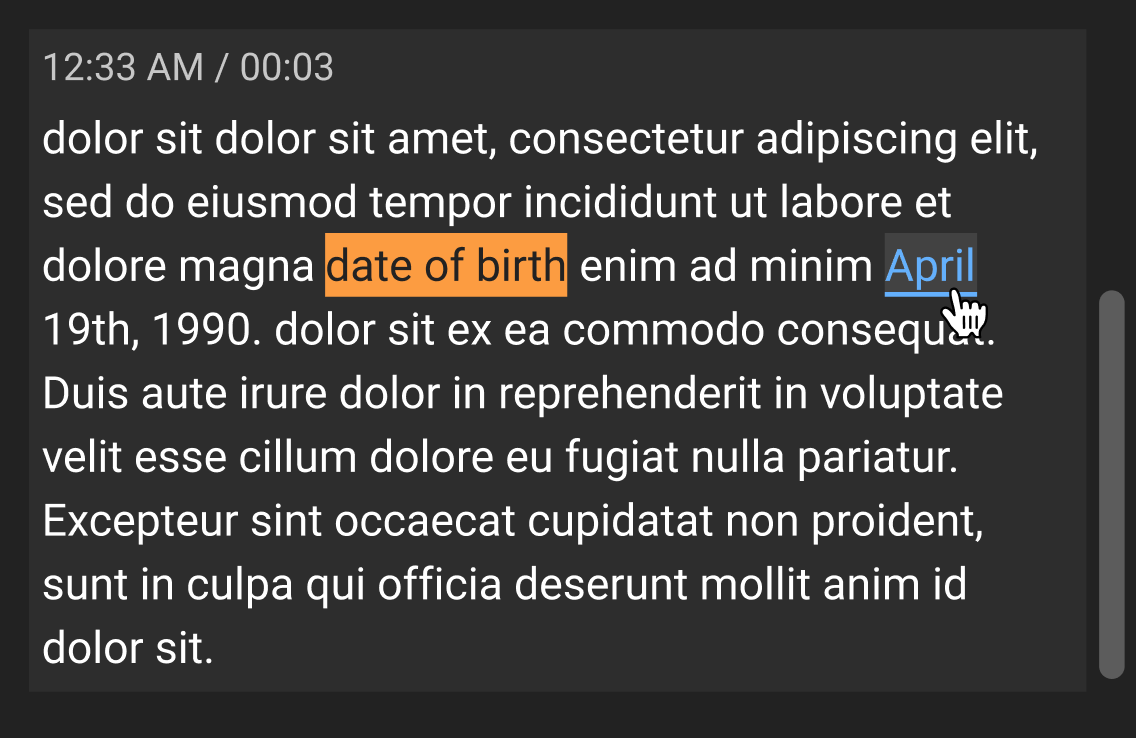
Redact audio through the transcript
- To select a single word, either double-click or right-click the word.
- Select Redact. Shows a section of transcript text with the word
OR
- Select either a sentence or a phrase.
- Select Redact.
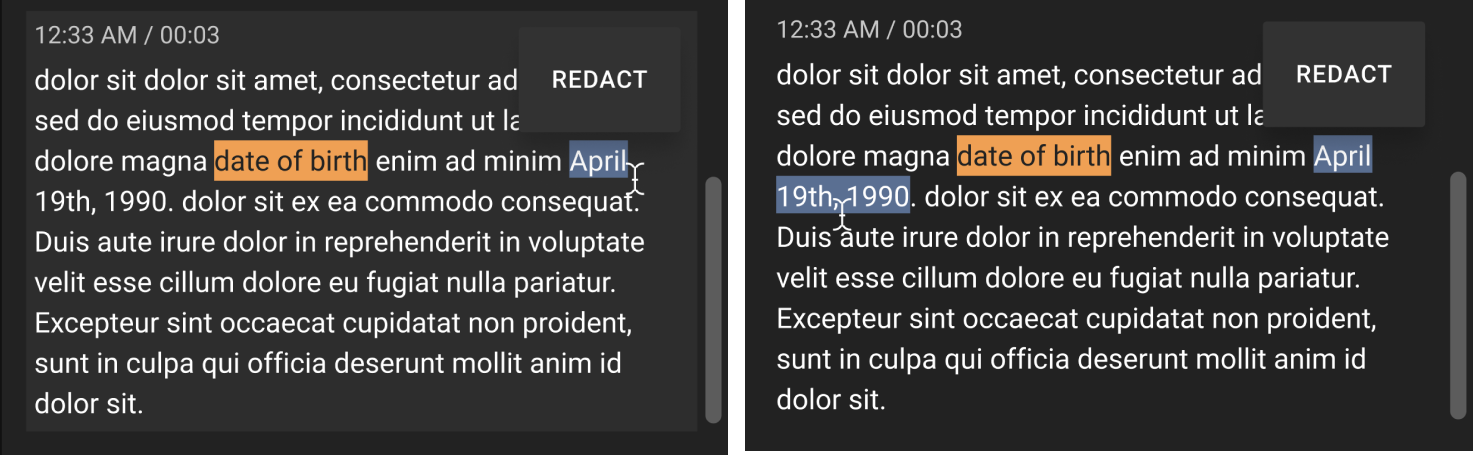
Redacted words and phrases are displayed in red with a strikethrough.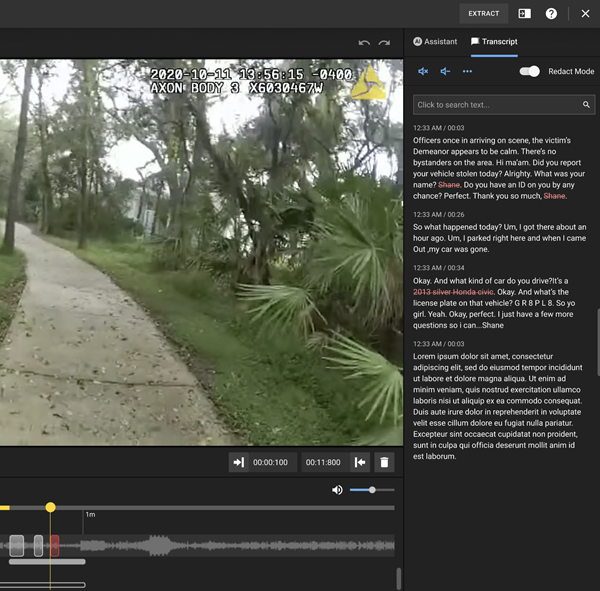
Redact via transcript when multiple audio streams are available is not yet supported.
Suggested list of keywords to find and redact
The following items usually contain personally identifiable information (PII), which you will likely need to redact:
- Name
- Address
- Phone number
- Social security number
- Birthday, Date of birth
- Birthplace, Place of birth
- Credit card number
Currently, image redaction only supports .jpeg and .png file types. Support for other file types will be added in future releases.
Steps to Redact an Image
- On the evidence details page for the evidence you want to redact, select the Redactions tab.
- Select + Create redaction . This launches Redaction Studio within the browser window.
- If needed, rotate the image before and while adding masks.
- Place the cursor on the image, then select and drag to add a mask.
- Once a mask is added, adjust the size of the mask using one of the following methods:
- Use the mask frame handles to resize the mask.
- Press the W key to increase the mask size or the S key to decrease the mask size.
- To move a mask, do one of the following:
- Select and hold the mask, then drag it to the correct location.
- Use the arrow keys to move the mask.
- Set the mask blur level as needed. With the mask selected, select the blur level to cycle through the following options:
- Light
- Medium
- Heavy
- Blackout
- When you have finished adding and configuring all the masks, select Extract.
- The redaction processing dialog box is displayed. Select Okay to continue.
- Submit the redaction.
Axon Evidence begins processing the redaction. When processing is complete, Axon Evidence sends you a notification email with a link to the redacted image.
- Select X to exit Redaction Studio and return to the evidence details page.
All work done to a video in Redaction Studio is saved.
View videos extracted from clips and redactions
Axon Evidence keeps track of evidence files extracted from a parent file. This helps ensure that you are viewing the correct evidence file. It may also be more convenient if you aren’t sure of the name given to an extracted file but do remember the name of the parent file.
- Open the evidence details page of the parent file.
- Select the Related tab. A list of related files appears.
- Select the extracted file that you want to view. The evidence details page of the extracted file opens.
Using Redaction Studio to redact a PDF
Document Redaction lets you redact text, highlight text, and add text annotation to PDFs in Axon Evidence. This article includes information on Document Redaction Best Practices and Redacting a PDF document.
Document Redaction Best Practices
- Password protected documents: Redaction Studio currently does not support password-protected PDF documents. Password protection must be removed before opening the document in Redaction Studio.
- File size: Document Redaction does not have a file size limit. However, it works with PDF documents of up to 800 pages. Documents that contain images or other memory-intensive data might load slowly. PDF documents with more than 800 pages are not limited but can cause a lagging experience.
- Hyperlinks: While a document is open in Redaction Studio, external hyperlinks in the document are disabled. This prevents accidental access to external content while redacting. Those hyperlinks are preserved after extraction and can access external content while being viewed on the Evidence Detail page. Hyperlinks that go to a point within the document are not disabled while in Redaction Studio.
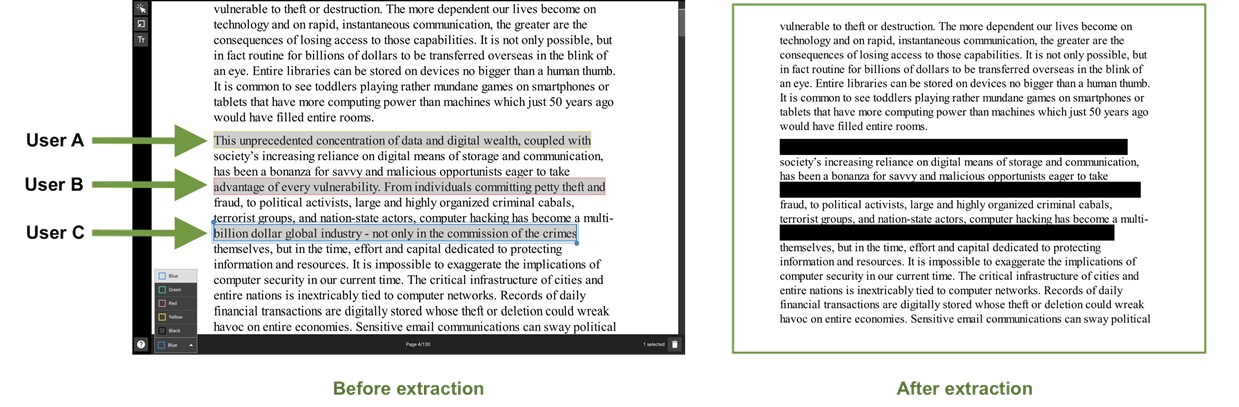
- Multi-user collaboration: Document Redaction currently allows multiple users to access and work on the same document at the same time. However, it is recommended that users do not work in the same areas to reduce overlapping edits.
If in doubt, or if Redaction Studio informs you of conflicting changes, refresh the browser page to see the latest changes.
Additionally, you can select different mask border colors to distinguish between users' work and avoid overlapping. Mask color settings do not affect the mask appearance after extraction.
- Mask and annotation usage: Only use the redaction mask tool for redacting and the annotation tool for marking or leaving notes. Annotation text with a solid background appears to mask text but is not as secure as redaction masks created with the Text Selection tool mask or Mask tool.
- Page navigation: The scrollbar on the right side of the page provides yellow marks to show where masks or annotations are placed in the document. Click on the scrollbar or move the cursor to jump to a mask or annotation in the document.
- Keyboard controls: The following keyboard controls can be used with document redaction. You can download a PDF file of the keyboard controls from the Axon Evidence product guide page on My Axon.
| Key | Action |
|---|---|
| V | Selection tool |
| M | Mask tool |
| T | Annotation tool |
| W | Increase selected mask size |
| S | Decrease selected mask size |
| Arrow keys (up, down, left, right) | Move selected mask |
| Ctrl/Cmd+F | Open search (Redaction Assistant users only) |
| Del | Delete selected mask |
Redacting a PDF
- On the evidence details page for the PDF evidence you want to redact, select the Redactions tab.
- Select + Create redaction. This launches Redaction Studio.
- Select the tool you want to use and add masks and annotations as needed to the document.
- Selection tool: This tool lets you use your mouse to select text in the document and then create a mask over the text or highlight the text.
- Select the text you want to redact and select Create Mask.
- Text is hidden by masks, and the mask will be black after extraction.
- The Selection tool can also be used to select multiple masks and annotation text boxes by selecting the first box and then holding the Ctrl or Cmd key and selecting other text boxes.
- Mask tool: This tool lets you use your mouse to select an area in the document and create a mask over the area. Select and hold a location in the document, then drag your cursor to create the mask. While a mask is selected, you can change its size and location. Text and images are hidden by masks, and the mask will be black after extraction. The mask color (black, yellow, green, blue, or red) can be used during redaction to indicate work by different users.
- Annotation tool: This tool lets you add text annotations to the document. Select a location in the document and type the annotation text. You can select a background color and text color for the annotation, along with using the slide bar to set the text size.
Note: Annotation is not redaction. While annotation text with a solid background appears to mask text, it is not as secure as redaction done with the Text Selection tool mask or Mask tool. Annotation text can be reversed to reveal the content. - Redaction Assistant search: Redaction Assistant users can use the search and redact functionality to search for keywords in the document and create masks in bulk. The search feature also supports jumping to search results to preview.
- Selection tool: This tool lets you use your mouse to select text in the document and then create a mask over the text or highlight the text.
-
When you have finished adding and configuring all the masks, select Extract.
-
The media processing dialog box is displayed. Select OK to continue. Redaction Studio begins processing the redaction. When processing is complete, Axon Evidence sends an email notification with a link to the redacted document.
After processing is complete, review the document to verify it is correctly redacted.