Trusted Upload
Axon Justice trusted upload is designed to facilitate the secure and efficient collection of evidence from trusted third-party partners. This feature maintains the integrity of digital chain of custody, ensuring that evidence is preserved and securely transferred throughout the process.
Watch this video to learn how to configure trusted upload users.
Trusted upload tips
- Inform your partners about the trusted upload feature. A proactive approach ensures they're aware of the process, and ready to collaborate.
- Let your partners know they'll receive email notifications from your organization via Axon. This will help them anticipate these important communications, and take action quickly.
Watch this video to learn how to configure trusted upload users.
Manually add trusted users
- Sign in to your Axon Justice administrator account.
- Select Admin, and then under Sharing Settings select Trusted Upload.
- Select Add User.
- Enter the email address of the trusted user, and then select Add.
After you add a trusted user, they will be listed on the Trusted upload page.
Manage trusted users
Request evidence from a trusted user
- Select Cases, and then locate and select the case you want to request evidence for.
- Select the Requests tab.
- Select a Trusted User from the list, and then choose the information you wish to include in the request email:
- Police Number
- Accused
- Court Number
- Enter an optional Email Note, and then select Send Request.
The sent request will appear in the Requests tab.
Find your way around the Requests page
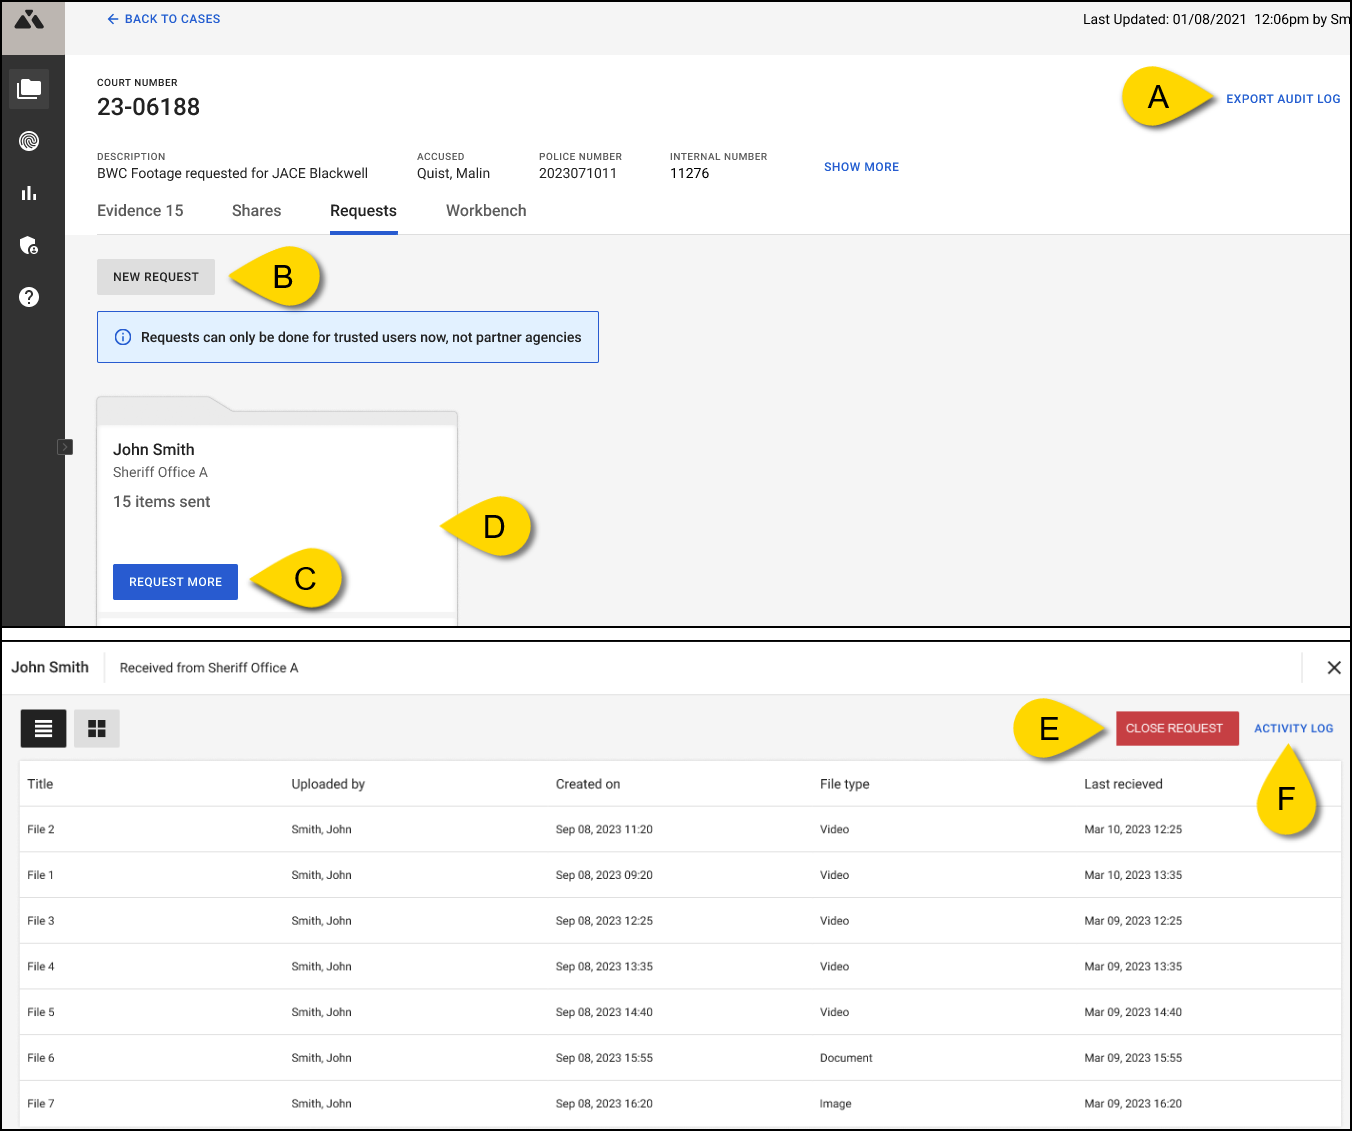
From the Requests page, you can:
- Export audit log – Download an audit log of activity for a case.
- New request – Submit a new request for evidence from a different trusted user.
- Request more – Request additional evidence from the same trusted user.
- View activity – Select an existing request folder to view a trusted users activity log.
- Close Request – From the activity log page, select Close Request. When a request is closed, the trusted user will receive an email notification containing a link to view their activity log.
- Activity Log – Download a report of the upload activity.
Receive evidence from a trusted user
Go to the Evidence tab of the case. New evidence is indicated by a red dot.
Trusted user experience
This section provides information for Axon Justice trusted users on how to receive invitations, and securely upload requested evidence through the system.
Invitation to upload
As a trusted user, when a request for evidence is made, you'll receive an email from the requesting organization containing a link to securely upload evidence. The invitation will contain the details and instructions you need to get started.
- Look for an email from the requesting organization.
- Select the Upload Securely button in the email to upload your evidence.
If you receive an Access expired message when you try to upload evidence from an expired link in your email, follow these steps to regain access:
-
From the Access expired page, select Refresh Access.
-
Check your email for instructions to regain access.
-
Select Refresh Access from your email. Access to the Axon Justice uploader will be refreshed and open to the file upload page.
Upload evidence
Before you begin uploading evidence, ensure that your browser's pop-up blocker is disabled for the Axon Justice uploader URL. Pop-up blockers may prevent important notifications from appearing.
- Drag and drop or Click to Upload your files.
The Axon Justice uploader accepts files up to 1.5TB and common formats like .mp4, .jpg, .g64, etc. If your file isn't supported or is too large, it may need to be converted or compressed before you retry. View all file types supported by Axon Justice. -
After adding files, they will appear in a list below the upload area. These files are not uploaded to the system until you select Upload. Prior to uploading, you have the option to:
- Add more evidence by dragging and dropping, or clicking to upload more files.
- Remove any files you do not want to upload by selecting Remove (trash can) next to the files you wish to remove.
- After ensuring all files are correctly listed, select Upload to finalize the upload of your files to the system. Progress bars will show the status of your files as they are being uploaded.
- After your upload is complete, an Activity Log shows the number of items uploaded and the date, with a green check mark indicating a successful upload.
After uploading you can:
- Continue to add more evidence by dragging and dropping, or clicking to upload more files.
- Select Activity Report to generate an Upload Activity Log for a detailed overview of the uploaded files.
Troubleshooting
Upload errors
During the upload process, you might encounter errors indicating that either some files failed or were duplicates. If you encounter an error while uploading, here are some things you can try:
- Select failed next to the error message to view the affected files.
- Take note of the failed or duplicate files.
- Select Go back to return to the previous screen, make appropriate changes to the files, and re-upload them.
If re-uploading the files does not resolve the issue:
- Ensure you have a stable internet connection, as interruptions can affect the upload process.
- Check the file size and format. The Axon Justice uploader accepts files up to 1.5TB and common formats like .mp4, .jpg, .g64, etc. If your file isn't supported or is too large, it may need to be converted or compressed before you retry. View all file types supported by Axon Justice.
Access expired
If you unexpectedly receive an Access expired message when trying to upload files, select Refresh Access, You'll receive a link in your email to regain access to the Justice uploader.