Wall mounting the TASER dock
Safety instructions
Before mounting your TASER Dock:
- Ensure that the area behind the wall where the dock will be located is clear of obstructions to avoid damage to surroundings, pipes, or existing wiring.
- Ensure that your cables meet all applicable building and fire codes. For in-wall installation, most require UL-rated wire labeled CL2 or CL3.
Tools and materials
| Tools | Materials |
|---|---|
| Cable-wire tester/locator | Wall Mount Kit |
| Level | |
| Pencil | |
| Power drill and bits | |
| Screwdriver | |
| Stud finder | |
| Tape measure |
Dimensions
The dimensions below show the mounting hole locations of the Wall Mount Bracket and the overall size of the assembly with the dock attached. The power supply is designed to go behind the unit on the horizontal shelf.
Dimensions for a TASER Weapons Dock Multi-Bay with TASER battery packs in a mounting bracket
All dimensions are in inches (and centimeters).
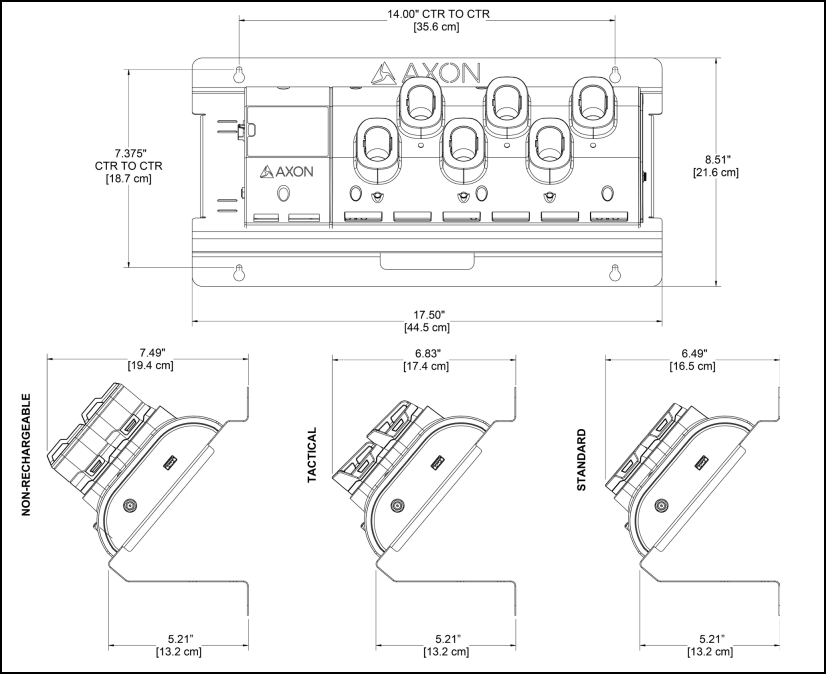
Use the overall size of the wall mount bracket to determine the spacing and fit between multiple assemblies. The power input and Ethernet input are also shown above.
Step 1: Preparation
- Ensure that you have all necessary hardware and cables required to complete the installation.
- Read all of the manufacturer’s installation instructions for both the dock and the Wall Mount Bracket.
- Decide if you will leave the cables showing or hide them in the wall behind your dock.
Step 2: Attach the dock to the wall mount bracket
- Place your dock on the Wall Mount Bracket.
- Align the holes of the core unit with the holes on the bracket.
- Use the screws provided in the dock wall mount kit to attach and mount the core portion of the dock to the bracket.
- Use the screws, washers, and wing nuts to mount the opposite end bay portion to the bracket.
- Put the screws through the furthest set of mounting holes in the bay (making sure the core and bays are securely mated together).
- As the screws come out the back of the bracket, attach the washers and add the wing nuts.
- Confirm that the core and bay units are securely mated.
- Finish tightening all of the screws.
Step 3: Identify dock placement
- Determine the best wall location for mounting the dock.
- Look for a location away from heat sources and direct sunlight that does not obstruct movement.
- Choose a location close to an electrical outlet and a network outlet (See Register dock for a picture of an Internet port). Measure the length of the dock’s power cord to be sure that it will reach.
Step 4: Attach the Wall Mount Bracket to the wall (stud mount)
Your Wall Mount Kit comes with hardware for mounting the bracket to a stud or mounting directly into drywall. If you are going to install the bracket to drywall, go to Step 5: attach the Wall Mount Bracket to the wall (drywall mount).
Use the longer screw for mounting the bracket into a stud.
- Using a stud finder, mark the location of each stud’s center with a pencil.
- Use a nail to confirm a stud has been located.
Note
Depending on the wall construction, you may not be able to mount both ends of the Wall Mount Bracket into the stud.
- Use the drywall anchors in the Wall Mount Kit for the other mounting locations if needed.
- Position the Wall Mount Bracket on the wall and align the mounting keyhole in the left side of the bracket with the center line of the stud.
- Use a level to ensure the bracket is level before marking the holes.
- Mark the center of the left side keyholes in the center of each wall stud.
- Using a power drill, drill a pilot hole smaller than the screw diameter.
- Install the screws into the stud until there is 1/8" (3.2 mm) of space between the bottom of the screw head and the wall. This will allow the bracket to be placed onto the screws and settle in the keyhole (the holes in the bracket are shaped like keyholes to make it easier to adjust the mount’s position on the wall).
- Repeat steps 5–8 for the other side of the mount bracket.
- After the Wall Mount Bracket is positioned correctly, tighten all of the screws.
- Go to Step 6: Connect the cables.
Step 5: Attach the Wall Mount Bracket to the wall (drywall mount)
Your Wall Mount Kit comes with hardware for mounting the bracket to a stud or mounting directly into the drywall. If you are installing the bracket to a wall stud, go to Step 4: Attach the Wall Mount Bracket to the Wall (Stud Mount).
Use the screw-in anchors and shorter screws for drywall installation.
- Find the location where you want to mount the Wall Mount Bracket.
- Locate the Wall Mount Bracket on the wall.
- Use a level to ensure the bracket is level before marking the holes.
- Mark the center of the four keyholes on the wall.
- Remove the Wall Mount Bracket and screw in the drywall anchors in each location.
- Screw in each of the screws until there is 1/8" (3.2 mm) of space between the bottom of the screw head and the wall.
- This will allow the bracket to be placed onto the screws and settle in the keyhole.
Step 6: Connect the cables
There is space provided on the horizontal shelf to secure the power supply for the dock.
- Position the power supply between the slots in the bracket and secure the power supply to the bracket with the Velcro strap.
- Route the barrel connector around the edge guard and plug the barrel connector into the power jack on the dock.
- You can secure the cable in position with the attached zip tie and the associated slots in the bracket.
- Plug the power supply cable into a power strip or nearby AC outlet.
- Plug the CAT 5e (or better) cable from your agency’s network data jack into the WAN port on the dock.
- You can secure the cable in position with the attached zip tie and the associated slots in the bracket.