Configure single sign-on with Microsoft Active Directory Federation Services
This article details the process to accomplish the following tasks:
- Configure your local Active Directory Federation Services (AD FS) installation to support Single Sign-On (SSO) for your Axon organization.
- Configure your Axon organization to use your AD FS installation for SSO.
After completing the steps in this article, you can also configure certificate-based authentication (CBA) for SSO on Mobile devices for your organization. Axon supports CBA for use with mobile devices and the most recent versions of Axon mobile apps. Learn more about pre-requisites and information on integration with a Mobile Device Manager.
Prerequisites
- AD FS server with admin access.
- Admin access to Axon Evidence.
- The federation metadata XML file from your AD FS setup.
Tips for a successful SSO integration
- When you configure your Axon SSO settings in Step 8, keep the Admin Bypass setting enabled during testing to prevent lockouts.
- Regularly update and review the SSO configuration to accommodate any changes in your AD FS setup.
- Ensure that all URLs within the steps are entered correctly and that you replace all instances of Your ADFS.tld with the top-level domain name of your organization's AD FS domain.
- Ensure that either (a) the email address for each user in your Axon organization is identical to the user's email address or User Principal Name (UPN) in AD FS, or (b) the externalID for each user in your Axon organization matches the attribute mapped to the externalID in AD FS.
- Note: If there is a mismatch between externalID and email address for mapping accounts, externalID will take precedence.
- It's recommended that all Axon users have a correctly configured account in the directory instance in the AD FS that you will use for SSO with Axon.
Configure SSO with AD FS
Before you can configure your Axon organization to use SSO, it's recommended that you first prepare your local AD FS installation to support SSO for your agency. This ensures that your Axon users can sign in to your Axon apps as soon as you enable SSO for your agency.
Step 1 - Obtain certificate and verify server information
First, you need the required certificate from your AD FS server. This will be used later when you configure your Axon Evidence organization. The certificate is included in an XML file available from your server.
This process also ensures that the information about your AD FS server name and domain name are correct.
- Open a web browser and navigate to the URL of your AD FS installation:
- https://YourADFS.tld/federationmetadata/2007-06/federationmetadata.xml
- Replace Your ADFS.tld with the top-level domain name of your organization's AD FS domain.
- The browser will open or download a federationmetadata.xml file. The exact behavior will depend on the browser you use and its download settings for files.
- Save the federationmetadata.xml file in a location where you can access it later.
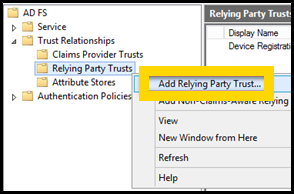
Step 2 - Add a relying party trust for Axon tenant
- On a server in the top-level domain of your AD FS installation, open the AD FS Management console.
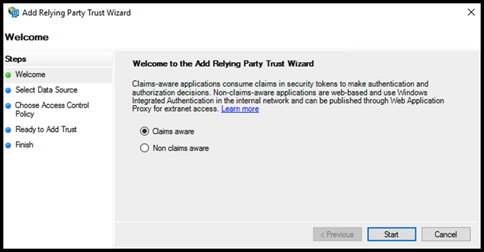
- Under ADFS\Trust Relationships, right-click Relying Party Trusts, and then select Add Relying Party Trust to open the Add Relying Trust Party Wizard.
- On the Welcome page, select Claims aware. and then select Start.
- On the Select Data Source page, select Enter data about the relying party manually, and then select Next.
- On the Specify Display Name page, in the Display Name field, enter a meaningful name such as Axon, under Notes enter a description for this relying party trust, and then select Next.
- On the Configure Certificate page, select Next without making any changes.
- On the Configure URL page, select Next without making any changes.
- On the Configure Identifiers page, in the Relying party trust identifier field, enter your organization's Axon Evidence URL, select Add, ensure the URL appears in the Replying party trust identifiers list, and then select Next. For example, add:
- https://organization.evidence.com
or - https://id.<region>.evidence.com/login?domain=<organization>.<region>.evidence.com&skipSso=1
- Note: The <region> entry is only required if it is included in your agency URL (examples: us.evidence.com, ca.evidence.com, or ent.evidence.com).
- https://organization.evidence.com
- On the Configure Multi-factor Authentication Now page, you can configure multi-factor authentication (MFA). Axon recommends using MFA to best protect your accounts and data. Learn more about using MFA to protect your accounts.
- On the Choose Access Control Policy page, select Permit everyone, and then select Next. AD FS creates the relying party trust.
- On the Finish page, select the option to clear the Configuration claims issuance policy for the application, and then select Close.
Step 3 - Add an endpoint to the relying party trust
- In the AD FS management console, right-click the Axon relying party trust, and then select Properties to open the Properties window for the relying party trust.
- Select the Endpoints tab, and then select Add SAML to open the Add an Endpoint dialog box.

- In the Endpoints type list, select SAML Assertion Consumer.
- In the Binding list, select POST.
- In the Trusted URL field, enter your organization's Axon Evidence HTTPS URL.
For example, https://organization.evidence.com/?class=UIX&proc=Login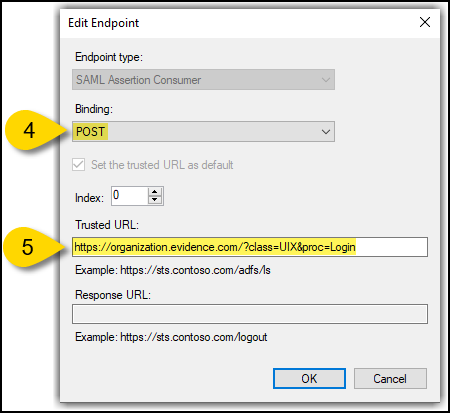
- Select OK. The endpoint will appear in the list on the Endpoints tab of the Properties dialog box, select OK again.
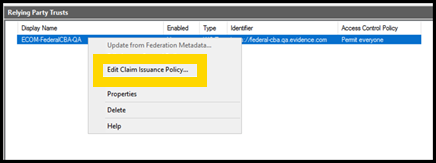
Step 4 - Add a rule to send LDAP attributes as a claim
- In the AD FS management console, right-click the Axon Evidence relying party trust, and then select Edit Claim Issuance Policy to open the Edit Claims Issuance Policy dialog box.
- On the Issuance Transform Rule tab, select Add Rule to open the Add Transform Claim Rule Wizard.
- On the Select Rule Template page, under Claim rule templates, select Send LDAP Attributes as Claims from the list, and then select Next.
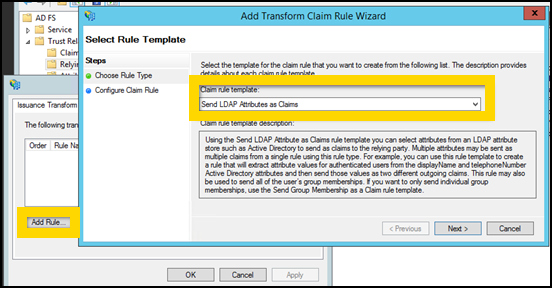
- In the Claim rule name field, enter a meaningful name for the rule.
For example, enter default. - In the Attributes store list, select Active Directory.
- Under Mapping of LDAP attributes to outgoing claim types, in the LDAP Attribute column, select E-Mail-Address, and then, in the Outgoing claim type column, select E-Mail Address. On the next line, select any attribute to be mapped to the External ID, and then, in the Outgoing Claim type column enter:
urn:axon:identity:claims:externalid
- Select Finish to add the LDAP-attribute claim rule.
You might need to enter either the Email address or UPN, or the externalID for AD FS users (at least one is required), and change the externalId of users in your agency to match with whatever field you define for LDAP Attribute.
Step 5 - Add a custom claim rule
- In the AD FS management console, right-click the Axon relying party trust, and then select Edit Claim Rules
- On the Issuance Transform Rule tab, select Add Rule to open the Add Issuance Authorization Claim Rule Wizard. This will list the LDAP-attribute claim rule that you just configured.
- On the Select Rule Template page, under Claim rule template, select Send Claims Using a Custom Rule from the list, and then select Next.
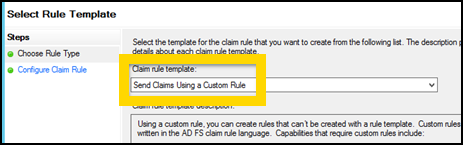
- In the Claim rule name field, enter a meaningful name for the rule.
For example, enter persistentID. - Under Custom rule, enter or paste the following rule and replace YourADFS.tld with the top-level domain name of your AD FS installation.
c:[Type == "http://schemas.microsoft.com/ws/2008/06/identity/claims/windowsaccountname"] => add(store = "_OpaqueIdStore", types = ("https://YourADFS.tld/internal/persistentId"), query = "{0};{1};{2}", param = "ppid", param = c.Value, param = c.OriginalIssuer);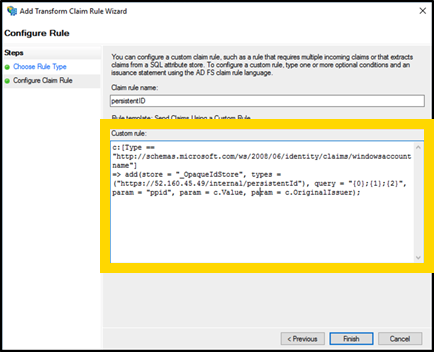
- Under Custom rule, verify that you replaced YourADFS.tld with the top-level name of your AD FS installation, and then select Finish to add the custom claim rule.
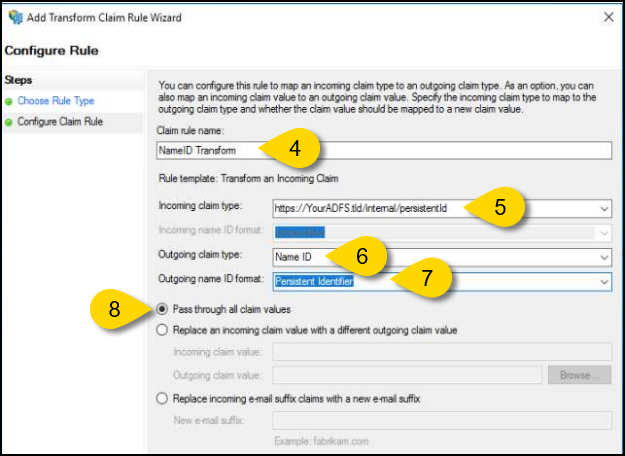
Step 6 - Add a rule to transform incoming claims
- In the AD FS management console, right-click the Axon relying party trust, and then select Edit Claim Rules.
- On the Issuance Transform Rule tab, select Add Rule to open the Add Issuance Authorization Claim Rule Wizard. This will list the LDAP-attribute claim rule, and the custom claim rule that you just configured.
- On the Select Rule Template page, under Claim rule template, select Transform an Incoming Claim from the list, and then select Next.
- In the Claim rule name box, type a meaningful name for the rule.
For example, enter NameID Transform. - In the Incoming claim type list, select the URL entered in the persistentID custom claim rule, replace YourADFS.tld with the top-level domain name of your AD FS installation.
https://YourADFS.tld/internal/persistentId - In the Outgoing claim type list, select Name ID.
- In the Outgoing name ID format list, select Persistent Identifier.
- Select Pass through all claim values, and then select OK to add the AD FS custom claim rule.
- In the AD FS management console, right-click Axon Evidence relying party trust, and then select Edit Claim Rules. In the Add Issuance Authorization Claim Rule Wizard dialog box, verify that the Issuance Transform Rules tab lists the three claim rules you just created in the previous steps.
Step 7 - Assign users to the Axon tenant in AD FS
In the AD FS instance where you've set up the Axon tenant, you need to assign all user accounts that require access to your Axon organization to the Axon tenant.
Depending on your organization's AD FS subscription, different methods are available for user assignment. For tiers supporting group assignments to Axon apps, it's advisable to create a directory group comprising members who need access to your Axon organization and assign this group to the app.
If group assignment isn't supported in your tier, individual users can be added manually to Axon apps, as described in Step 8 - Configure Axon Evidence for SSO.
Step 8 - Configure Axon Evidence for SSO
Before you enable SSO for your organization, it's highly recommended that you test the setup. This can be done using a test tenant (if available) or during off-hours to minimize disruption. For testing instructions, see Step 9- Verify the SSO Configuration. Verification is crucial to confirm all assigned users will have uninterrupted access through SSO.
- Before getting started, verify that you have the AD FS federationmetadata.xml file you downloaded in Step 1.
- Sign in to your Axon Evidence account, select Admin, and then under Security Settings, select Single Sign-On.
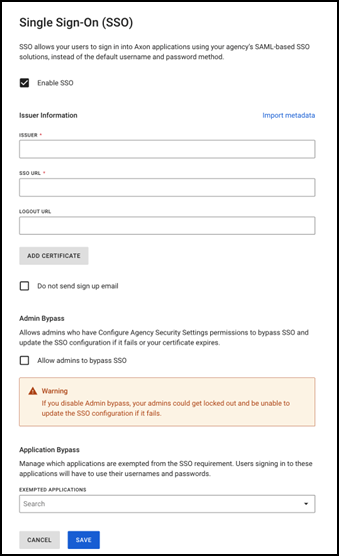
- Select the check box next to Enable SSO.
- In the Issuer field, enter the unique identifier of the identity provider. This is typically a URL.
- In the Single Sign-On URL field, and again in the Single Logout URL field, enter the URL of your AD FS installation:
https://YourADFS.tld/adfs/ls/
Replace Your ADFS.tld with the top-level domain name of your organization's ADFS domain that you used to obtain the certificate data. - Select Add Certificate to open a Security Certificate field on the settings page.
- Use a text editor to open the federationmetadata.xml file that you downloaded in Step 1. Locate the first X509Certificate start-tag <X509Certificate>, copy all of the text inside (but not including) the X509Certificate start-tag and end-tag.
- On the Single Sign-On settings page, paste the certificate information into the Security Certificate field.
Important: It is recommended that you manually paste the certificate data rather than using the Import Metadata option. The file might contain multiple certificates and manually adding the certificate data ensures the proper configuration. - Configure these optional settings:
- Do not send signup email: Select this if you don't want your users to receive an email from Axon Evidence when they are added to the system.
- Admin Bypass: This setting will allow admins who have Configure Agency Security Settings permissions to bypass SSO and update the SSO configuration if it fails or their certificate expires. It is recommended that this is enabled in case there's a problem with your SSO sign in, at least until you have finished verifying the SSO configuration.
- Select Save to enable SSO for your organization.
Step 9 - Verify the SSO Configuration
Follow these steps to verify and test that Axon sign in with AD FS is correctly configured:
- Sign out of Axon and close your browser window or tab.
- In a new window or tab, go to your organization's Axon home page. Replace organization with the subdomain of your Axon Evidence organization. The protocol must be https:
https://organization.evidence.com - The Axon sign-in system redirects the browser to a Microsoft web site. Sign in using your credentials of the Microsoft Entra ID account that you assigned to the Axon app.
- Once testing is complete, you may want to go back to your Axon SSO settings and disable the Admin Bypass setting.
Once you've successfully confirmed SSO functionality, learn more about the process for new user registration, existing user first sign-in with SSO, and daily sign-in.
Additional Resources
For further guidance and detailed information on configuring SSO with Axon Evidence, refer to the following resources:
For further guidance and detailed information on configuring SSO with Axon, refer to the following resources:
- Considerations for Implementing SSO: Explore the strategic considerations for choosing an identity provider and understand directory synchronization compatibility.
- User Registration and Sign-In with SSO
- Configure Certificate-Based Authentication for SSO on Mobile Devices.