Configure Single Sign-On with Microsoft Entra ID
This article details the process to accomplish the following tasks:
- Configure your Microsoft Entra ID to support Single Sign-On (SSO) for your Axon organization.
- Configure your Axon organization to use your Microsoft Entra ID installation for SSO.
After completing the steps in this article, you can also configure certificate-based authentication (CBA) for SSO on Mobile devices for your organization. Axon supports CBA for use with mobile devices and the most recent versions of Axon mobile apps. Learn more about pre-requisites and information on integration with a Mobile Device Manager.
Prerequisites
- Microsoft Entra ID portal with admin access.
- Admin access to Axon Evidence.
Tips for a successful SSO integration
- When you configure your Axon SSO settings in Step 4, keep the Admin Bypass setting enabled during testing to prevent lockouts.
- Regularly update and review the SSO configuration to accommodate any changes in your AD FS setup.
- Ensure that all URLs within the steps are entered correctly and that you replace all instances of organization with the subdomain of your Axon organization.
- Ensure that either (a) the email address for each user in your Axon organization is identical to the user's email address or User Principal Name (UPN) in Microsoft Entra ID, or (b) the externalID for each user in your Axon organization matches the attribute mapped to the externalID in Microsoft Entra ID.
- Note: If there is a mismatch between externalID and email address for mapping accounts, externalID will take precedence.
- It's recommended that all Axon users have a correctly configured account in the directory instance in the Microsoft Entra ID that you will use for SSO with Axon.
Configure SSO with Microsoft Entra ID
The first process you must complete is to add the Axon tenant to your Microsoft Entra ID. The Axon Evidence app is available in the Microsoft Entra ID directory.
Step 1 - Add the Axon tenant to your Microsoft Entra ID
- Sign in to the Microsoft Entra ID portal and on the left navigation pane, select Azure Active Directory.
- Select the directory you want to use for SSO with your Axon organization. By default, the portal shows the Users view of the directory.
- In the Manage menu, select Enterprise Applications. The portal lists any applications currently enabled for the selected directory.
- At the top of the portal page, select New Application.
- In the search box in the upper left of the dialog box, enter Evidence.com.
- In the results pane, select Evidence.com, update the app Name if needed, and then choose Create. The Evidence.com application is added to the Applications list and the portal opens the Evidence.com app overview page. Continue to Step 2 to configure your Axon organization to use SSO.
Step 2 - Configure and enable SSO
- On the Axon app overview page, under 2. Set up single sign on section, select Get Started to open the Select a single sign-on method page.
- Select SAML to be redirected to the SAML-based sign on page.
- Select Edit on the right-hand side of the Basic SAML Configuration section. The Basic SAML configuration section will appear n the right.
- Update the identifier (Entity ID) field to your Axon Evidence based URL below and ensure the Default box is checked. Replace organization with the subdomain of your Axon organization. The protocol must be https:
https://organization.evidence.com
or
https://id.<region>.evidence.com/login?domain=<organization>.<region>.evidence.com&skipSso=1
Note: The <region> entry is only required if it is included in your agency URL (examples: us.evidence.com, ca.evidence.com, or ent.evidence.com). - In the Reply URL (Assertion Consumer Service URL) field, enter your Axon login URL:
https://organization.evidence.com/?class=UIX&proc=Login - In the Sign on URL field, enter your Axon Evidence login URL:
https://organization.evidence.com/?class=UIX&proc=Login - Select Save. After the app successfully saves, close the Basic SAML Configuration section. If prompted to Test single sign-on with Evidence.com, select No, I'll test later.
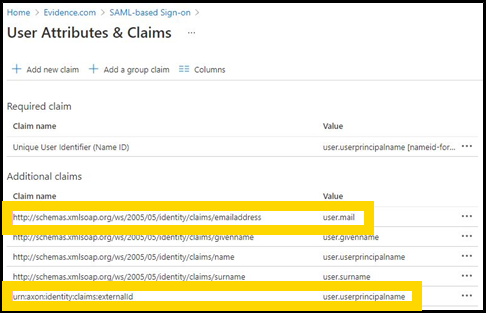
- Select Edit on the right-hand side of the User Attribute & Claims section. Confirm the claim http://schemas.xmlsoap.org/ws/2005/05/identity/claims/emailaddress maps to the correct Email attribute value for your organization.
- Select Add new Claim.
- In the Name field, enter urn:axon:identity:claims:externalId.
- In the Source Attribute dropdown, select the attribute you would like to map to ExternalID.
- Select Save.
- Confirm your attributes are listed correctly and close the User Attributes & Claims section.
- Under the SAML Signing Certificate section, download the Certificate (Base64) and ensure you know where the downloaded .cer file is.
- Open the .cer file, and then open a text editor. Select and copy the contents of the .cer file.
Important: The remaining steps must use separate browser windows or tabs to access your Axon Evidence organization and your Microsoft Entra ID portal at the same time. Do not close the Microsoft Entra ID broswer window or tab when you open your Axon organization page.
Step 3 - Assign users to the Axon tenant in Microsoft Entra ID
In the Microsoft Entra ID directory instance where you've set up the Axon tenant, you need to assign all user accounts that require access to your Axon organization to the Axon tenant.
Depending on your organization's Microsoft Entra ID subscription tier, different methods are available for user assignment. For tiers supporting group assignments to Axon apps, it's advisable to create a directory group comprising members who need access to your Axon organization and assign this group to the app.
If group assignment isn't supported in your tier, individual users can be added manually to Axon apps, as described in Step 5 - Verify the SSO configuration.
Step 4 - Configure Axon for SSO
Before you enable SSO for your organization, we highly recommend you test the setup. This can be done using a test tenant (if available) or during off-hours to minimize disruption. For testing instructions, see Step 5- Verify the SSO Configuration. Verification is crucial to confirm all assigned users will have uninterrupted access through SSO.
- Sign in to your Axon account, select Admin, and then under Security Settings, select Single Sign-On.
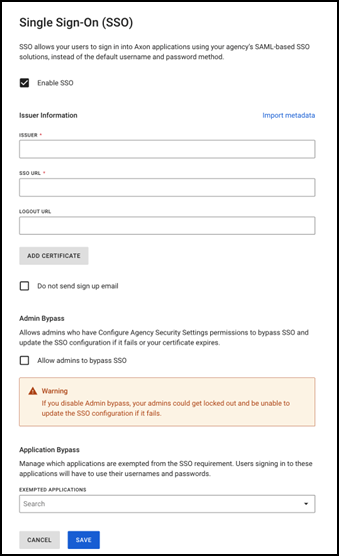
- Select the check box next to Enable SSO.
- In the Issuer field, enter the unique identifier of the identity provider. This is typically a URL.
- In the Single Sign-On URL field, and again in the Single Logout URL field, enter the URL of your Microsoft Entra ID installation.
- Select Add Certificate to open a Security Certificate field on the settings page.
- Copy and paste the certificate file you saved in Step 2.
- Configure these optional settings:
- Do not send signup email: Select this if you don't want your users to receive an email from Axon Evidence when they are added to the system.
- Admin Bypass: This setting will allow admins who have Configure Agency Security Settings permissions to bypass SSO and update the SSO configuration if it fails or their certificate expires. It is recommended that this is enabled in case there's a problem with your SSO sign in, at least until you have finished verifying the SSO configuration.
- Select Save to enable SSO for your organization.
Step 5 - Verify the SSO configuration
Follow these steps to verify and test that Axon sign in with Microsoft Entra ID is correctly configured:
- Sign out of Axon and close your browser window or tab.
- In a new window or tab, go to your organization's Axon home page. The protocol must be https:
https://organization.evidence.com - The Axon sign-in system redirects the browser to a Microsoft web site. Sign in using your credentials of the Microsoft Entra ID account that you assigned to the Axon app.
- Once testing is complete, you may want to go back to your Axon SSO settings and disable the Admin Bypass setting.
Once you have successfully signed in and the browser opens your Axon organization, SSO with Microsoft Entra ID is correctly configured. Learn more about the process for new user registration, existing user first sign-in with SSO, and daily sign-in.
During the SSO configuration verification, you may notice entries marked as "skipped" in the Microsoft Entra ID provisioning log. This can occur even if users are correctly assigned to the application. Such entries typically result from how the provisioning service processes directory changes, not necessarily indicating an error with your configuration:
-
Scoping filters – If your scope is set to include all users and groups with specific filters, logs may show "skipped" for users not meeting these criteria.
-
Assigned users and groups – If your scope is set to include assigned users and groups, you may continue to see users in the logs as "skipped" even if they are NOT assigned to the application. This is due to how the provisioning service receives changes from the directory.
For more information on log analysis, visit the Microsoft How-To Guide: Analyze Provisioning Logs.
Additional Resources
For further guidance and detailed information on configuring SSO with Axon Evidence, refer to the following resources:
For further guidance and detailed information on configuring SSO with Axon, refer to the following resources:
- Considerations for Implementing SSO: Explore the strategic Single Sign-On overview and understand directory synchronization compatibility.
- User Registration and Sign-In with SSO
- Certificate-based authentication for Single Sign-On on mobile devices