Request Skydio drone support from an Axon Body 4
Overview
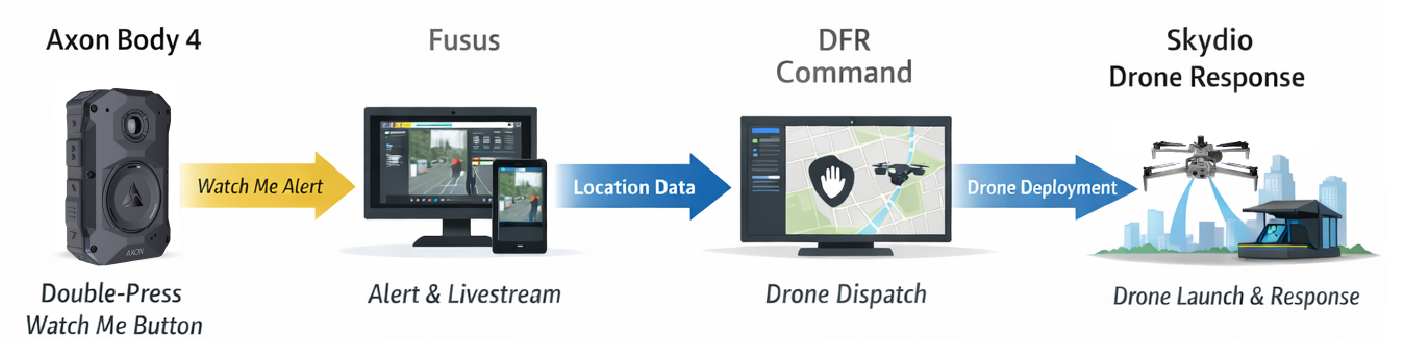
Watch Me gives officers wearing an Axon Body 4 camera a way to request support and allow supervisors, command staff, and dispatchers to view a live stream from the camera. When drone support is enabled, Watch Me also lets officers request a Skydio drone directly from their Axon Body 4 by double-clicking a programmable button on the camera.
When an officer sends a Watch Me request, alerts display in Fusus and Skydio DFR Command, allowing a drone to be dispatched and autonomously routed to the officer's location.
The feature described in this document is compatible only with Axon Body 4 cameras or newer.
Roles
- Officers: Request drone support without using a radio or phone
- Real-time crime center (RTCC) and Command staff: Gain real-time situational awareness through livestream video and two-way audio
- Drone pilots and dispatchers: Receive a map marker and dispatch a drone from DFR Command
How Watch Me works with drone support
This section provides a high-level overview of requesting drone support using Watch Me after required setup is complete (see Set up Watch Me drone requests below).
From the field (officer)
- An officer sends a Watch Me request for drone support from their Axon Body 4.
- The camera provides confirmation and starts recording.
- The officer's location is shared with Command.
From the RTCC and DFR Command
- Fusus displays a Watch Me alert and makes the livestream available.
- DFR Command displays a drone request banner and recommends the closest available drone.
- The drone flies autonomously to the officer's location. (A pilot can take over flight control at any time.)
- When the response ends, the drone can return and land in the dock autonomously.
Set up Watch Me drone requests
Before you can request drone support using Watch Me, the following systems must be configured:
The sections below describe the required setup in each system.
Axon Body 4
Before Axon Body 4 cameras can be used for Watch Me requests, they must be claimed into your agency and set up for use. For detailed instructions, see the Axon Body 4 Introduction and registration article.
Axon Evidence
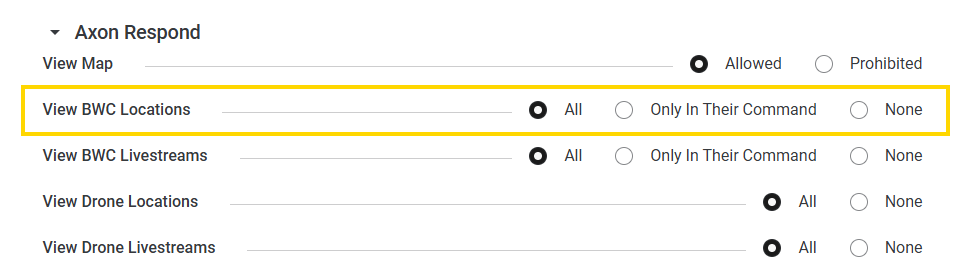
Configure permissions to view Watch Me alerts
Before users can view Watch Me alerts, DFR Command users must be assigned to a role with permissions to view body-worn camera locations.
In Axon Evidence:
- Go to Admin > Organization Settings > Roles & Permissions.
- Open the role you want to modify and select Edit role (pencil icon).
- Scroll down to Axon Respond.
- Set View BWC Locations to All. (If this setting is grayed out, set View Map to Allowed.)
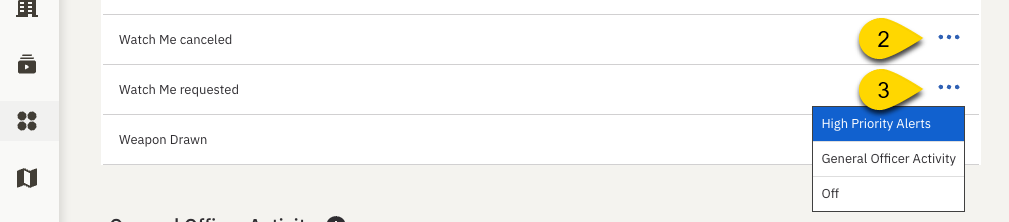
Configure Watch Me alerts for high priority
Configure these settings so Watch Me triggers notifications and audible alerts in both Fusus and DFR Command.
In Axon Evidence:
- Go to Admin > Respond Settings.
- Select the ellipses (...) next to Watch Me canceled, then choose High Priority Alerts.
- Repeat for Watch Me requested.
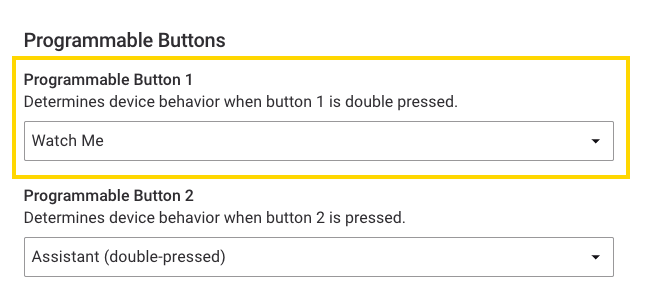
Configure Axon Body 4 programmable button
You can assign Watch Me to Programmable Button 1 on the Axon Body 4.
In Axon Evidence:
- Go to Admin > Body 4.
- Open the profile you want to edit.
- Scroll down to Programmable Buttons.
- Set Watch Me to Programmable Button 1.
If the "Watch Me" option is unavailable, contact your Axon representative for assistance.
Fusus
Turn off Axon Respond Layer
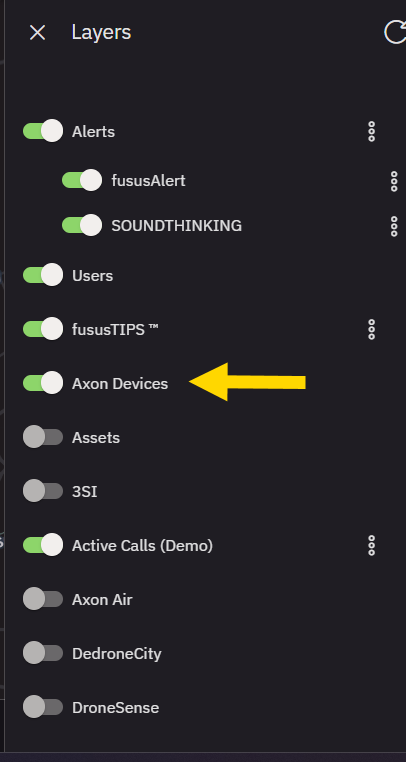
In Fusus, open the Layers menu, scroll down to Dynamic & Alert Layers and make sure:
- Axon Respond is OFF
- Axon Devices is ON
Set Alert Viewer permissions
In Fusus:
- Open the menu and select Users.
- Open the user or permission group you want to edit.
- Select Edit (pencil icon).
- Under Permissions select Alert Viewer.
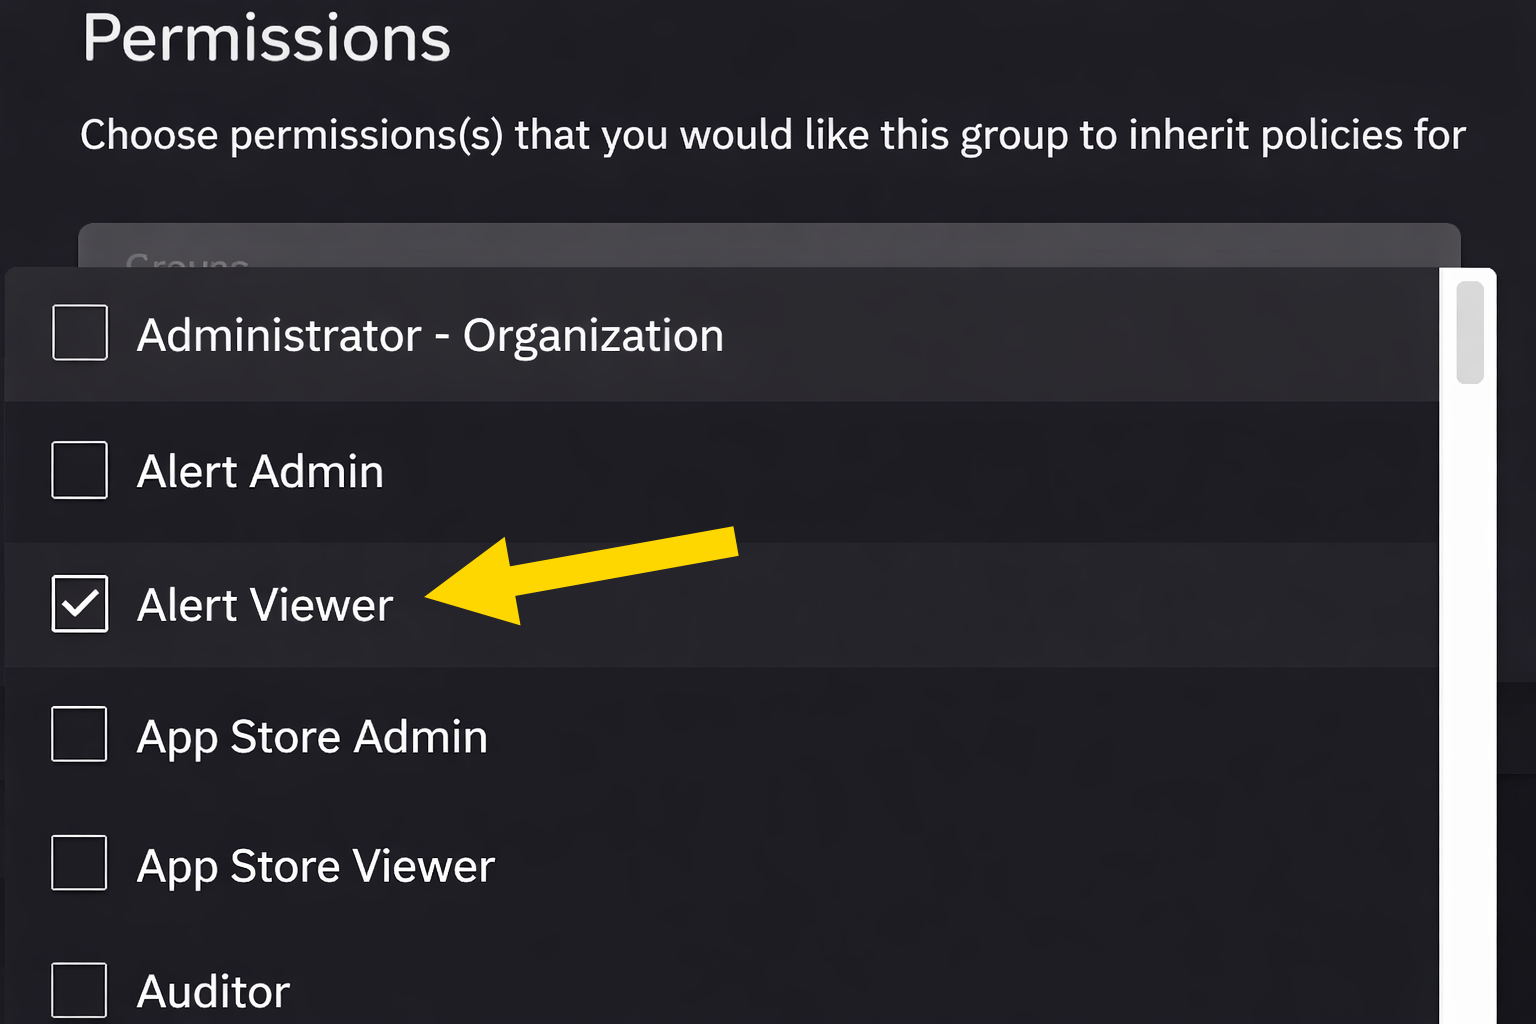
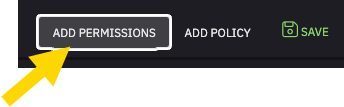
- If Alert Viewer is not selected, click Add Permissions to do so.
Skydio
For more information on how to integration, see How to Integrate Skydio Cloud with Axon Evidence and Devices.
In Axon Evidence, go to Admin > Axon Air API Settings (redesigned) or Axon Air Settings (legacy) to verify that Skydio appears as an integrated service.

If Skydio doesn't appear, contact your Axon representative for assistance.
Skydio Cloud
To receive Watch Me alerts in Skydio DFR Command, users must sign in to Skydio Cloud using Sign in with Axon. This sign-in uses the same credentials as Axon Evidence.
In Skydio Cloud (cloud.skydio.com):
- Enter your email address.
- Select Sign in with Axon.
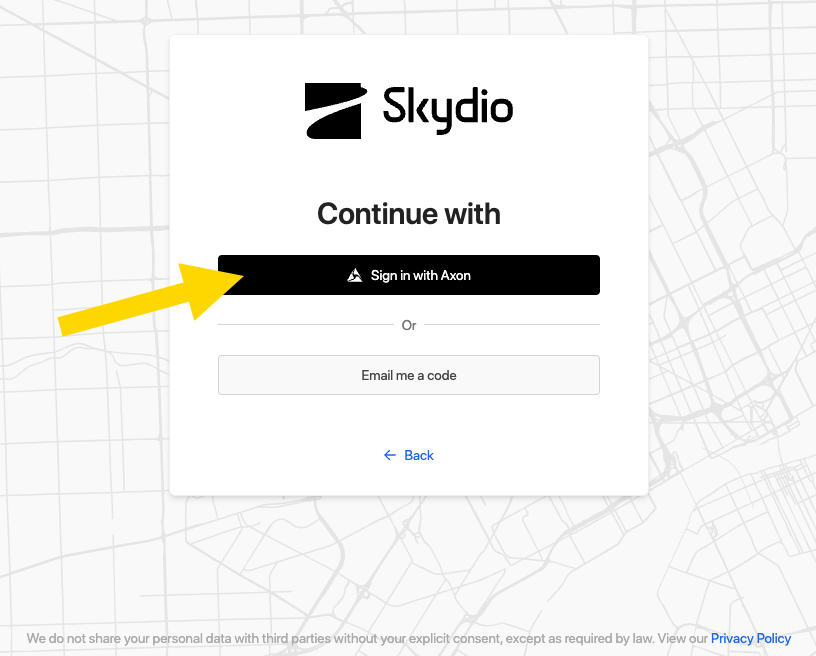
- Follow the prompts to sign in.
If you have access to multiple Axon Evidence instances, confirm that you sign in using credentials that match the domain shown on the Axon Evidence sign-in page.
Respond to a Watch Me request
After an officer sends a Watch Me alert from an Axon Body 4, alerts display in Fusus and DFR Command, allowing command staff or a drone pilot to review the officer's location and initiate a drone response.
In Fusus
- A hand icon appears above the officer's body camera on the map.
- Select the body camera or play icon to open the livestream.

In DFR Command
- Select View to center the map to the officer's location.
- Select Respond or Respond Here to start a drone response.

- If multiple drones are available, DFR Command recommends the closest option. Select Respond with drone name to dispatch the drone.
![A yellow callout pointing to the Respond with [drone name] button on the DFC Command map](../../images/devices/ab4/watch-me-drone/watchmerespond.png)
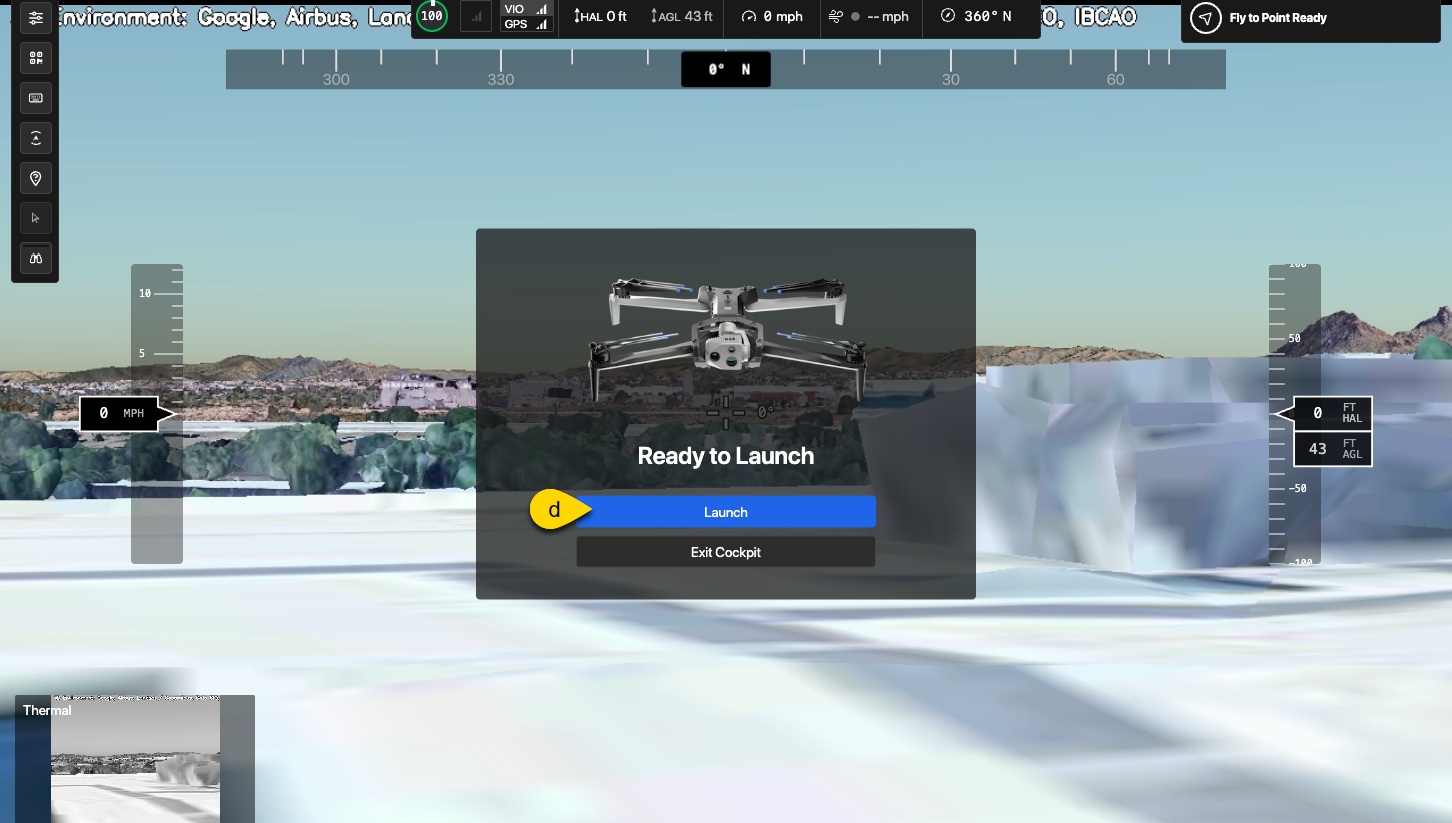
- When the drone is ready, the pilot selects Launch to begin the response. The drone flies autonomously to the officer's location. (The pilot can take over flight control at any time.) For more information on how to use the Skydio X10, see the Skydio X10 support documentation.
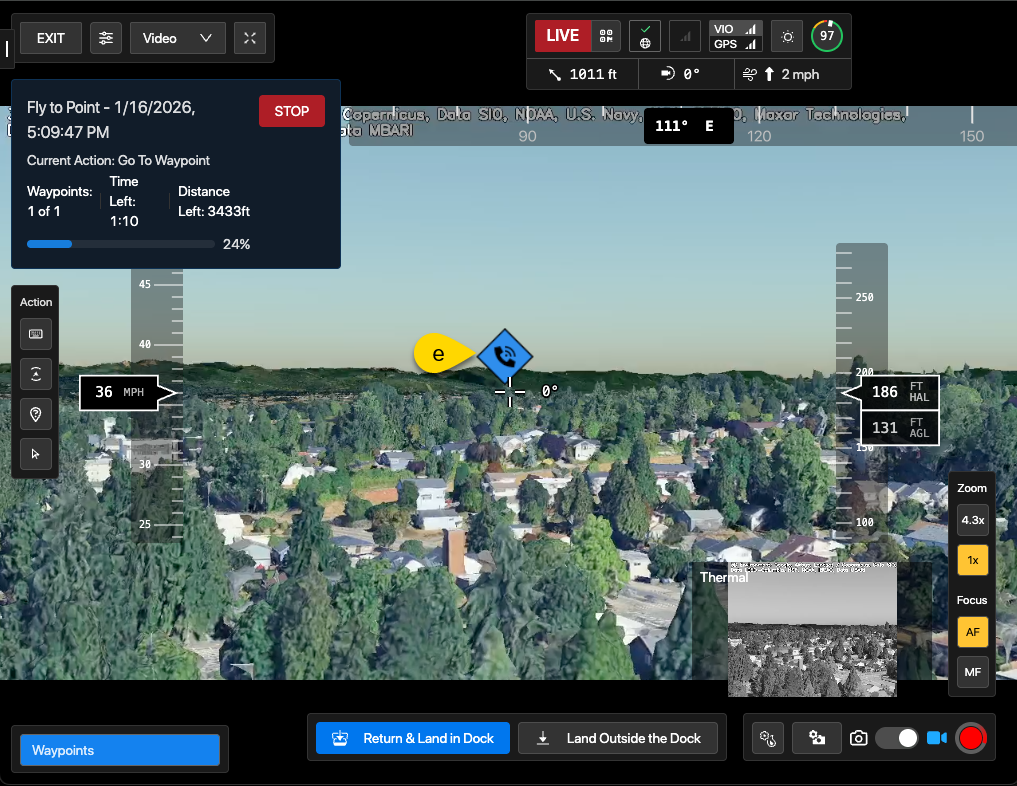
- During flight, the cockpit view displays the distance and estimated time of arrival. If the pilot has enabled the augmented reality overlay, the location of the Watch Me request will also appear superimposed on the camera view as a blue diamond icon.
End a Watch Me response
On the Axon Body 4
- Hold the Axon button to stop recording and cancel the Watch Me request.
- If configured to do so:
- Use the arrow keys on the Axon Body 4 and select one or more tags for the recording.
- Hold Select to save the recording.
After the request ends
After a Watch Me request is canceled on the Axon Body 4, the following behaviors can occur in Fusus and DFR Command:
Fusus
The Axon Body 4 automatically ends the alert.
DFR command
The Drone Request banner is dismissed.
FAQ
How does an officer know when a drone has been dispatched?
Command staff must notify the officer using standard communication methods (for example, radio or phone) or by using the bi-directional communications (BDC) feature on the Axon Body 4.
Troubleshooting
I don't see the Axon Body 4 camera on the map in Fusus
If Axon Devices is enabled but the camera doesn't appear on the Fusus map, try one or more of the following actions:
- Refresh the browser.
- Select the Axon delta icon in the menu.
- Sign out and back in, and then toggle the Axon Device panel and confirm a green check mark appears
I can't sign in to Skydio Cloud using Axon
Check the following if you're unable to sign in to Skydio Cloud using Sign in with Axon:
Verify user sign-in methods
Your account must list Axon as a sign-in method.
- In DFR Command, go to Settings > Users.
- Locate your account.
- Confirm that Axon appears under Login Methods.

If you don't see this method, organization admins can enable it at the user or organization level.
To enable it for a user:
- In DFR Command, go to Settings > Users.
- Locate the account you want to edit.
- Select the vertical ellipses in the user's row.
- Enable Sign in with Axon.
To enable it for an organization:
- In DFR Command, go to Settings > Users > Login Methods.

- Scroll down to Add Login Method.

- Select Sign in with Axon.
- Select your Axon Evidence instance.
- Sign out and back in using Axon Evidence.