Evidence details page
Evidence in Axon Evidence includes all digital files uploaded or ingested into the system—such as video, images, audio, and documents. From the Evidence section, you can search for evidence, view file details, manage metadata, organize by cases or tags, and take actions like sharing, downloading, and redacting. Roles and permissions determine which features are available to each user.
The evidence details page
When you select an evidence file, the evidence details page opens. This is your central workspace for viewing and managing a single piece of evidence.
Watch this video to learn more about the evidence details page.
Access to features and functions are controlled by user roles and permissions. Not all users will have permission to view or interact with every evidence option.
- Select Evidence, and then find the evidence you want to work with. Enter search criteria to narrow the results, or select Saved to apply a saved filter—like My evidence, Shared with me, or a custom saved search.
- Select the title of the evidence you wish to view.
- If the evidence matched on ID, title, tags, categories, users or groups, or case ID, the evidence details page opens.
- If the evidence matched on a transcript keyword or document text, the preview panel opens. Select Details page to open the evidence details page.
- If the evidence matched on ID, title, tags, categories, users or groups, or case ID, the evidence details page opens.
Tabs on the evidence details page
The evidence details page opens to the Overview tab. You can switch between tabs to view metadata, collaborate, and take additional actions:
- Overview: Get a quick summary of the evidence. Learn more about the Overview tab.
- Details: View or update extended metadata, including any custom metadata used by your organization. Learn more about the Details tab.
- Map: See where the evidence was captured, when available. The map shows GPS coordinates, timestamps, and movement paths, helping you visualize locations over time. Select copy to copy the displayed GPS coordinates from the Map tab for easier reuse.
If you have permission to view evidence, you can open the Map tab. If you have permission to edit evidence, you can update the location information when editing is allowed. - Notes: Add or review internal notes shared within your organization.
- Transcript: Review transcripts for supported audio or video files, or use keyword search to jump to specific moments in the recording.
- People: View people automatically detected with Smart Detection or manually tagged. Learn more about Smart Detection.
- Markers and clips: Access saved clips and markers. Learn more about markers and clips.
- Investigate: Review tags and case-specific annotations applied to the file.
- Redaction: Open existing redactions or start a new one. Learn more about Redaction.
- Related: Find linked or derived files, like clips, redacted version, or grouped items. Learn more abut related evidence.
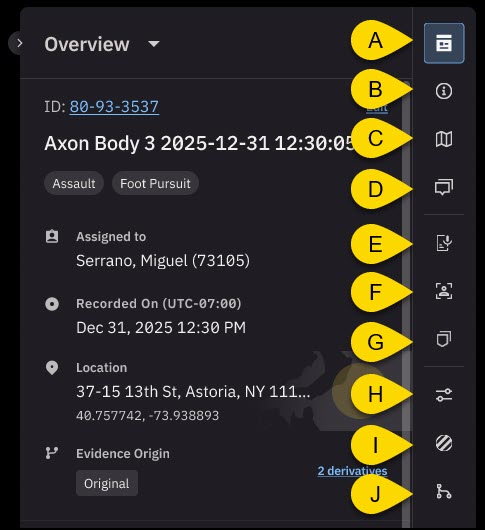
Overview tab
The evidence details page opens to the Overview tab. From here you can:
- Edit the evidence ID, Title, Categories, Assigned to, and Recorded on: Select Edit next to "ID" to make changes.
- Location: View the location GPS coordinates or hover over the map and select View in Map to open the Maps pane.
- Evidence Origin: Shows whether the evidence is an original or a derivative. If derivatives exist, select Derivatives to open the Related tab. The number next to Derivatives indicates how many derivative files are linked to the current evidence.
- Review videos in multicam: Select View all next to "Multicam" to open the multicam selection page.
- Community Request: View a summary of Community Request information associated with the evidence, including key details such as request ID, description, and status when available.
Details tab
When you open the Details tab, all sections are expanded by default. Select Collapse sections to hide the contents of each section. Select Expand sections to show the contents again.
From the Details tab, you can view or update:
- Custom metadata: Select Custom metadata to view or make changes to the ID, Title, Categories, Description, Assigned to, Tags, Evidence group, Recorded on, Uploaded by, Uploaded on, Evidence serial number, or add Custom metadata.
- Retention: Select Retention to view information about when or if the evidence is Queued for deletion, Extend the retention period, Effective Retention, and Evidence based retention date.
- Evidence certifications: Select Evidence certifications to view existing certifications, add a certificate or upload a scan.
- Cases: Select Cases to add the evidence to a case and view associated cases.
- Source: Select Source to view information about the device used to capture the evidence. If available, this section also includes Community Request metadata associated with the evidence, such as request details provided by your organization.
- File data: Select File Data to view the evidence File name, File Format, File Size, Duration, Original date/time, and Document Checksum.
- EXIF data: Select EXIF data to view technical details from the capturing device, including camera model , exposure settings, data/time captured, and lighting conditions.
Additional tools
Media player
Media player Use the media player to review video or audio evidence. Playback controls include play, pause, seek, and volume. For supported formats, you can view captions and switch camera angles in multicam mode.
Share
Select Share to:
- Manage internal access for users in your organization.
- Create an external share link with optional expiration and download settings.
Take quick actions
Select More actions to:
- View the audit trail
- Download the evidence
- Delete the evidence
- Open with Investigate
- Go to Draft One