Manage courses
All courses that have been created for your organization can be found by opening the Training module and going to Training Management > Courses.
Use the search bar to find a specific course and the filters to refine which courses are displayed in the list. Options include:
- Instructor
- Time / Date
- Status
- Curriculum
Use the Sort By menu to set the order in which courses are listed. Options include:
- Created Date (Newest to Oldest)
- Created Date (Oldest to Newest)
- Scheduled Date / Time (Newest to Oldest)
- Scheduled Date / Time (Oldest to Newest)
The following information about each course appear on this page:
- Course Name: This name also appears for learners on their My Courses page.
- Instructor: Instructors can take all actions on a course except cancel the course or change the curriculum.
- Date / Time: The date and time the course is scheduled for
- Enrolled Learners: The number of learners enrolled in the course. If the course has a limited capacity, the total capacity is also shown.
- For example, 3/12 indicates that 3 learners are enrolled in a course that has a capacity of 12.
- Course Status: A course can have one of four statuses:
- Upcoming: The course has been created and is scheduled for a future date.
- In Progress: The instructor has taken attendance and the course is in progress.
- Completed: The course has been finalized.
- Canceled: The course was canceled.
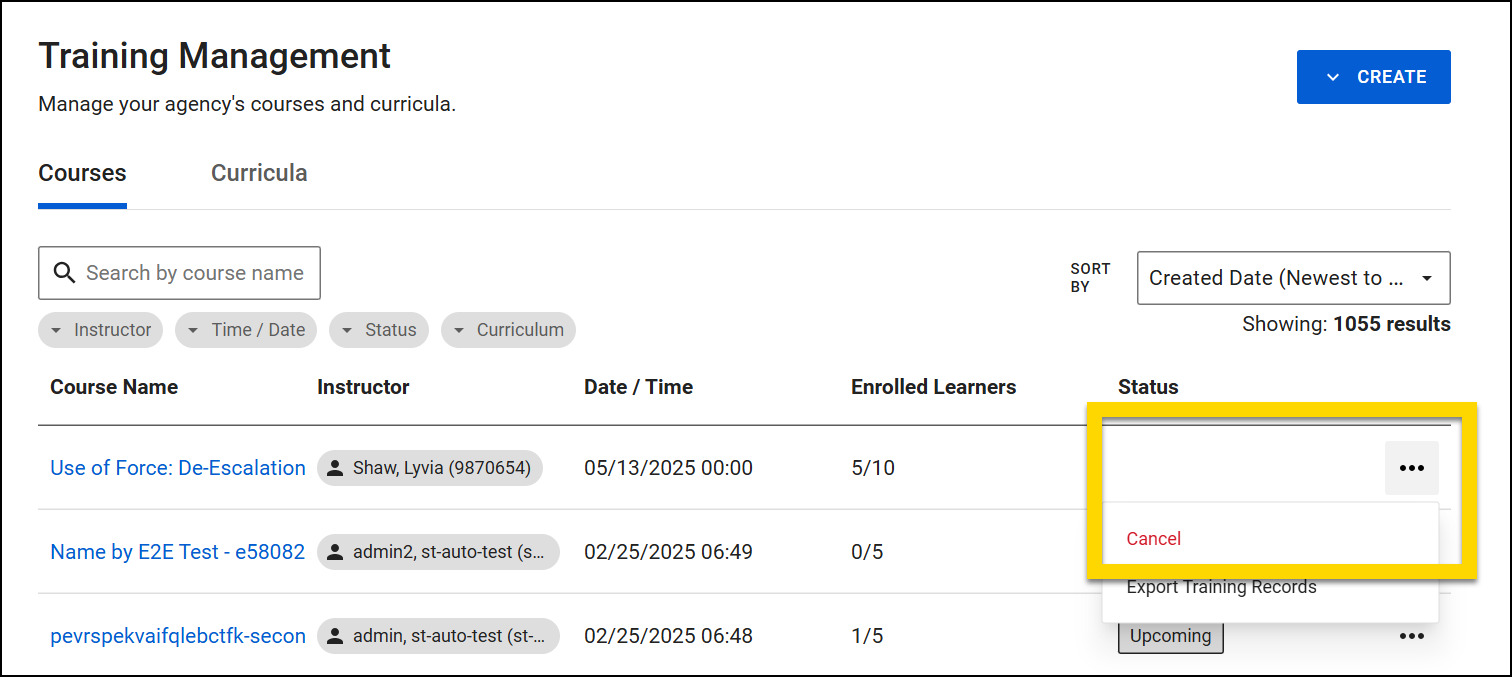
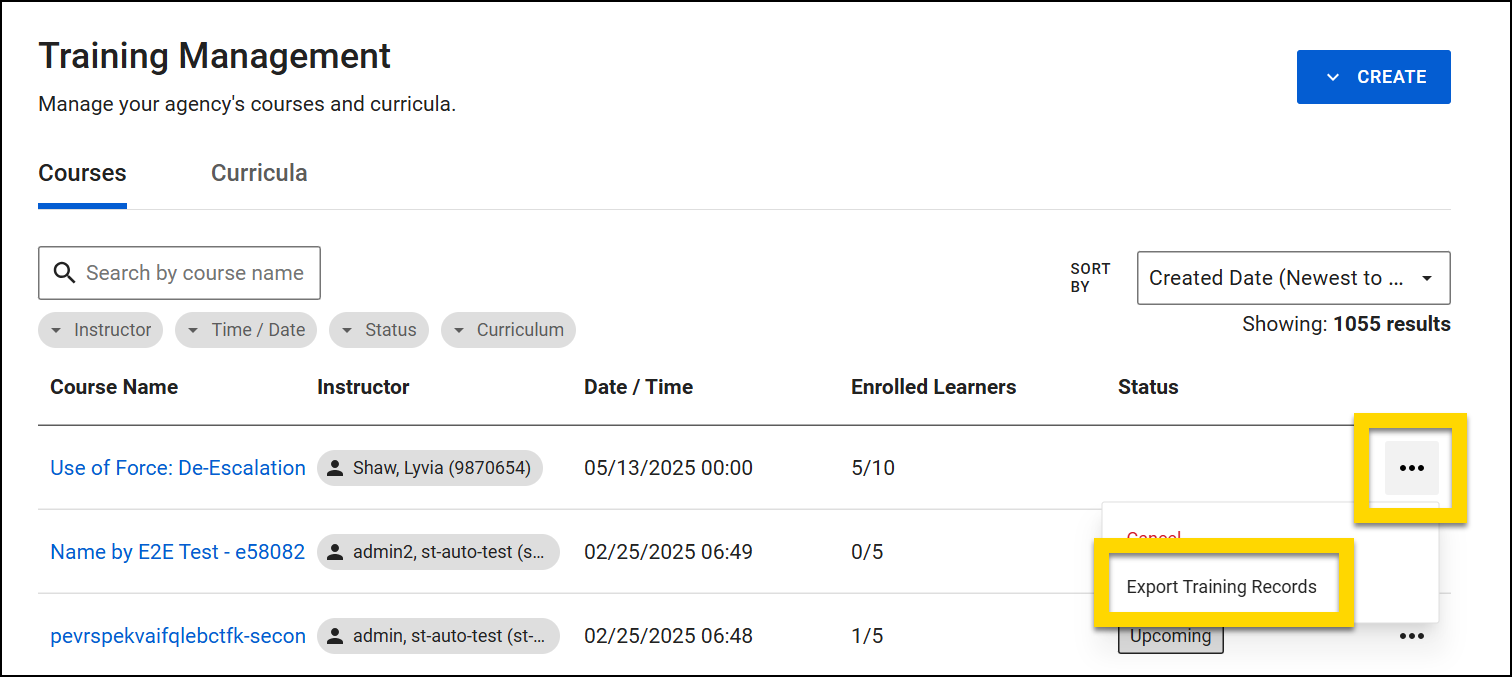
Open the More Actions [...] menu to cancel a course (if it is upcoming) or export learning records (if it is in progress).
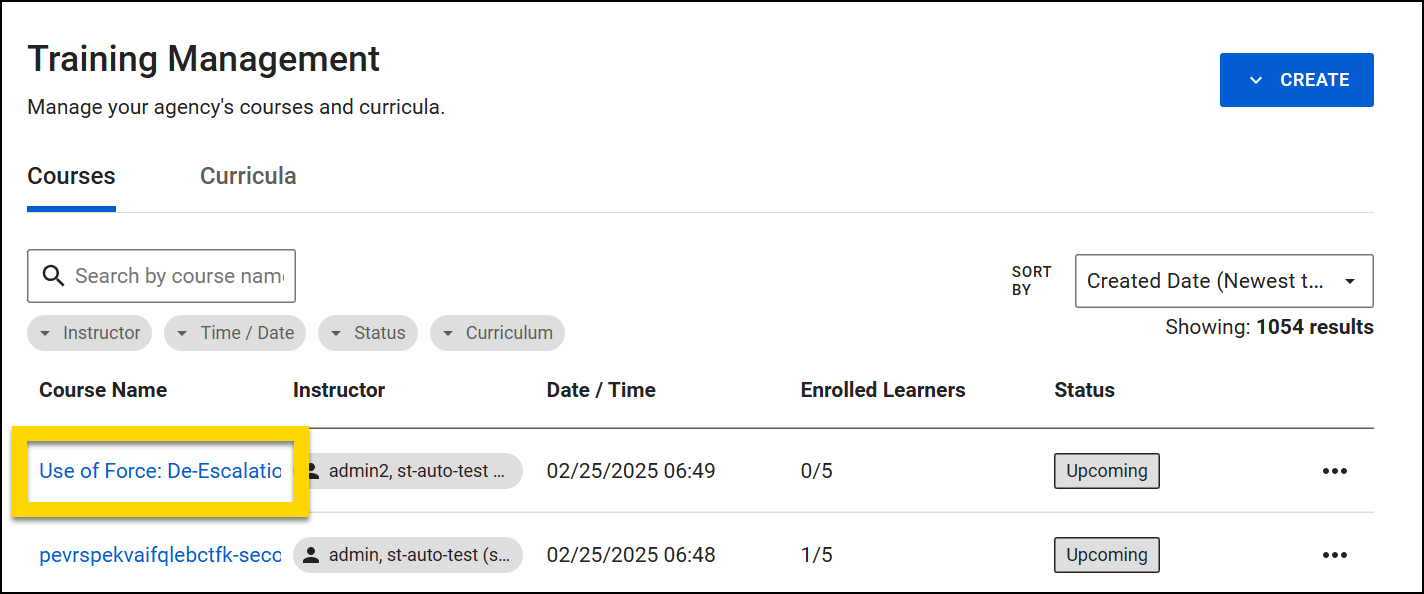
Select a course name to open the course and view the course details page. At the top of the page, basic information about the course is displayed, including name and status.
The Overview tab contains all course information, including Course Details, Curriculum Details, Training Material, and Certification Settings. Use the arrows to expand and collapse each section.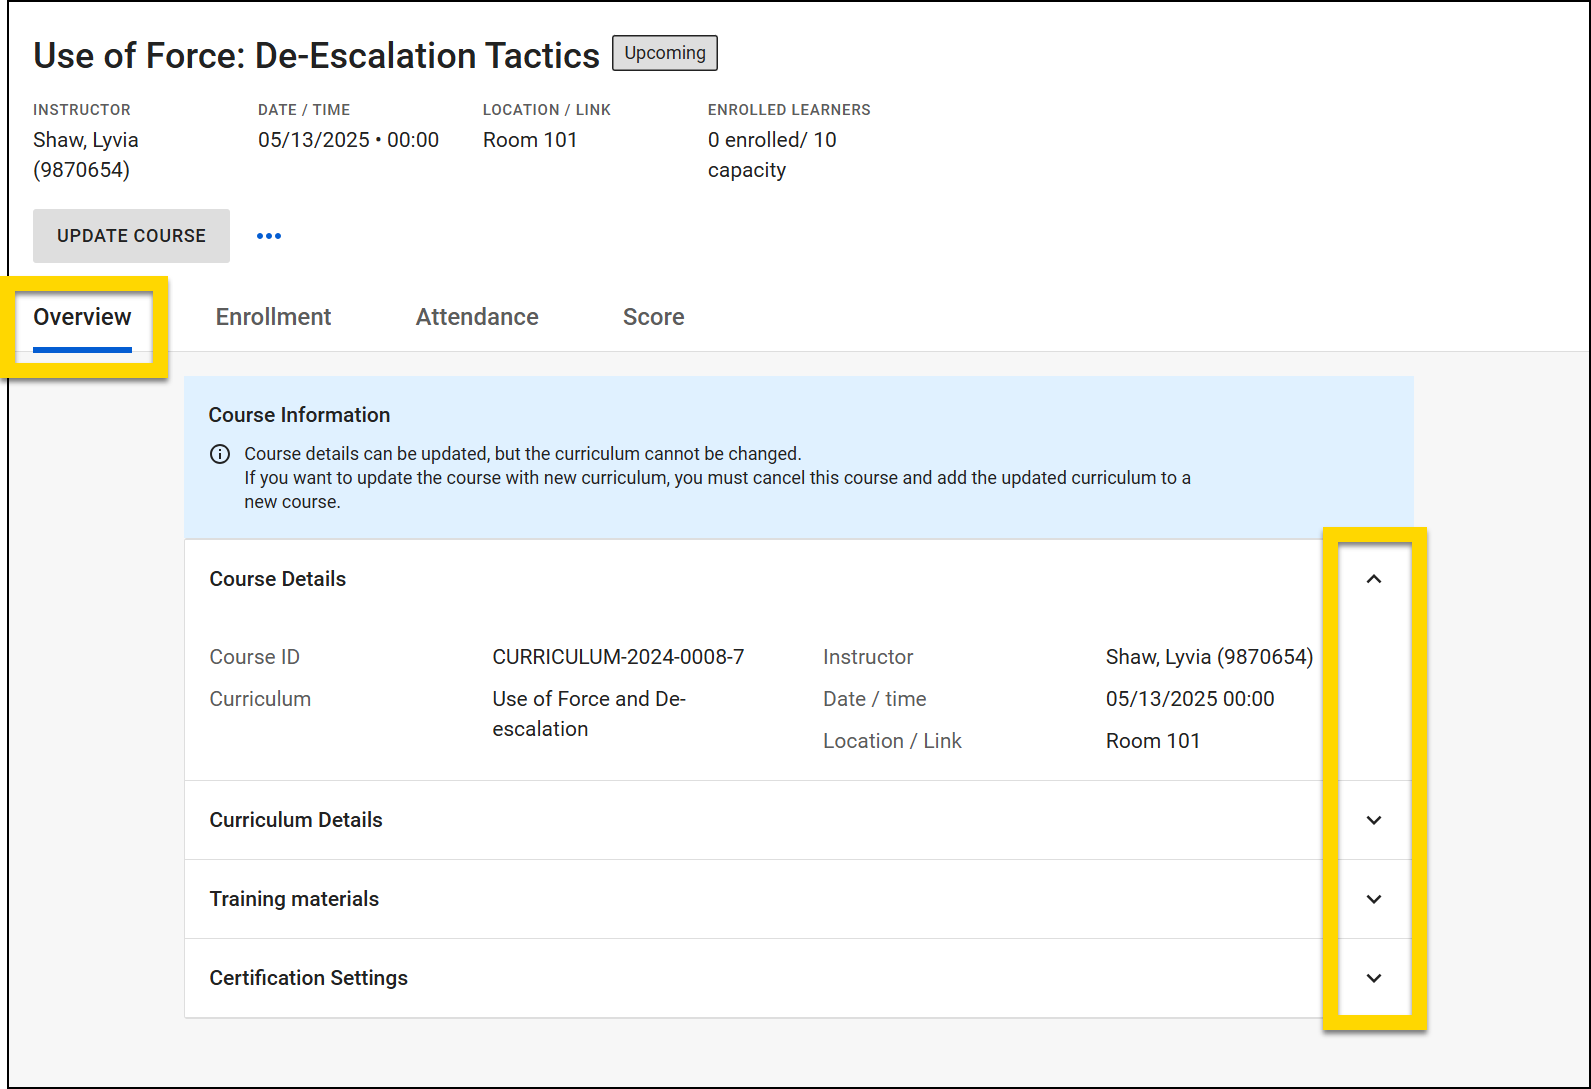
Take actions on the course from the other tabs, including:
- Update course
- Enroll learners
- Take attendance
- Record scores
Open the More Actions [...] menu to cancel a course (if it is upcoming) or export learning records (if it is in progress).
Watch this video for an overview of courses (starting at 08:03).
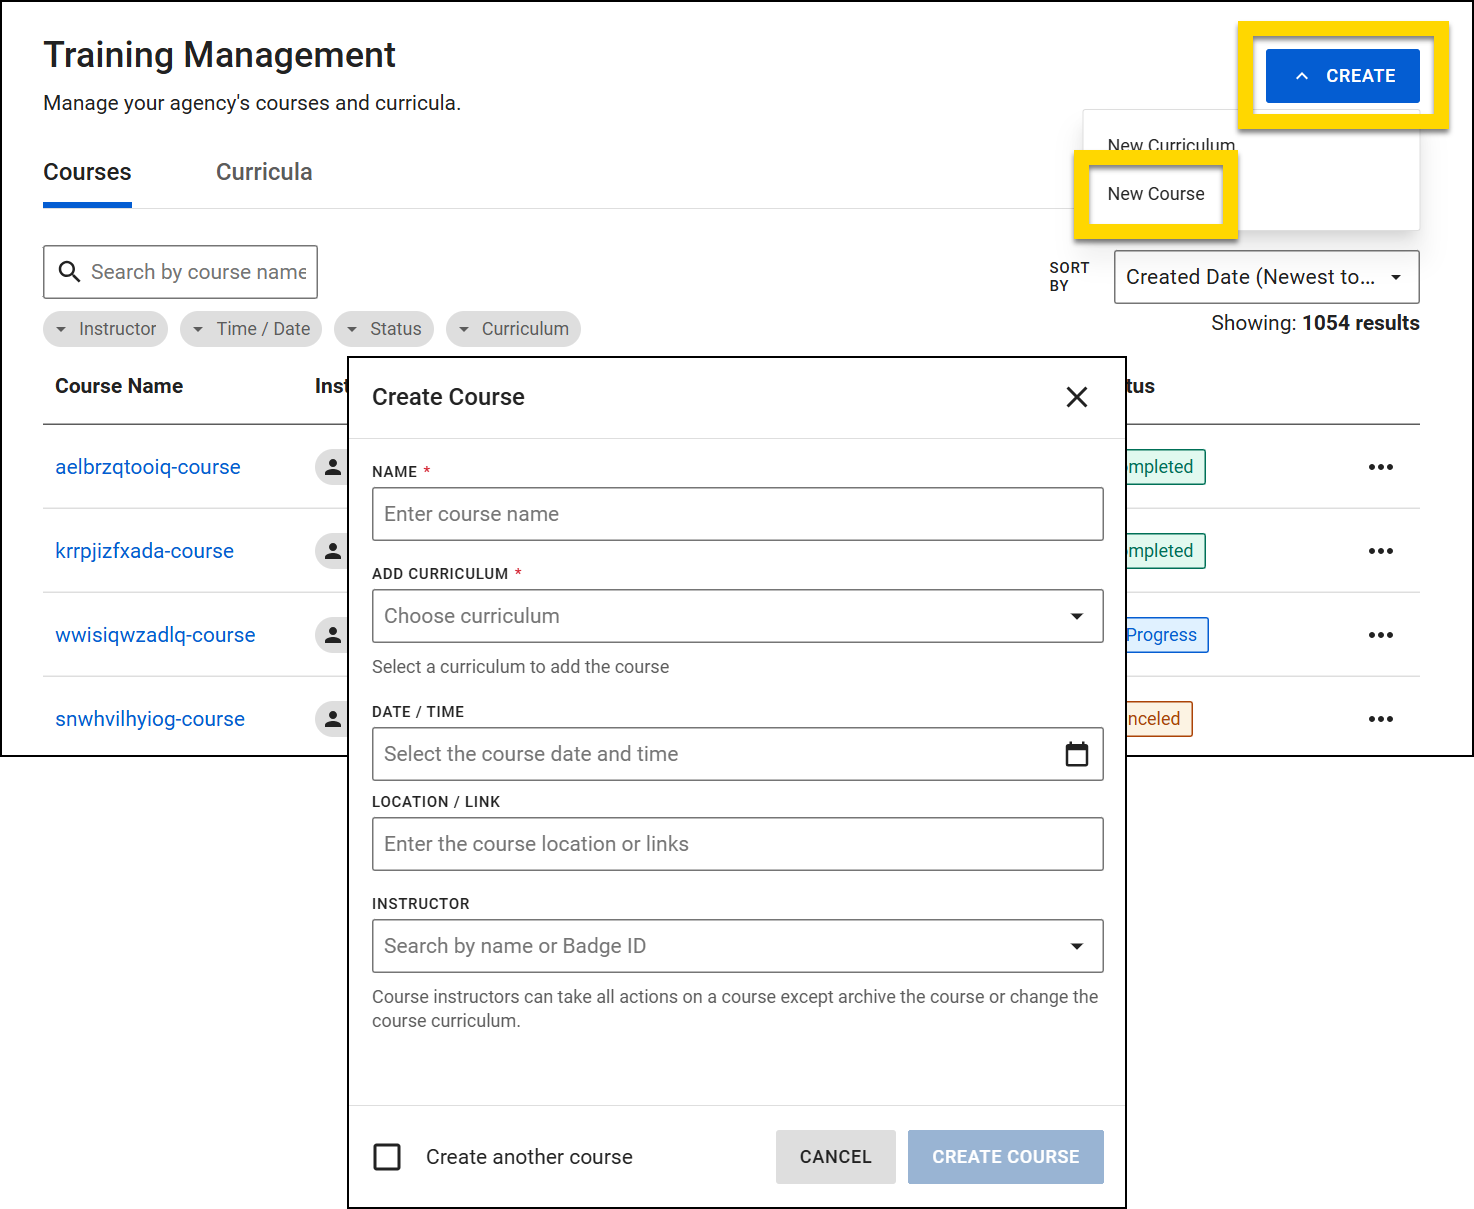
Create courses
To create a course, take these steps:
- Open the Training module and select Training Management.
- Select Create > New Course.
- Enter all course details, including:
- Name: This course name will be shown to learners.
- Curriculum: The curriculum that the instructor will teach during the course.
- Date/Time: Specify the date and time for the course.
- Location/Link: Enter the location where the course will be conducted. If the training is an online instructor-led course, provide the video conference link (e.g., Zoom, Teams, etc.).
- Instructor: Assign an instructor from the list. Instructors can take all actions on a course except cancel the course or change the curriculum.
- If you plan to immediately create another course after creating this one, select the Create another course checkbox.
- Select Create Course.
- Once a course is created, you can view it and update as necessary from the Courses tab.
Watch this video for an overview of creating courses (starting at 06:18).
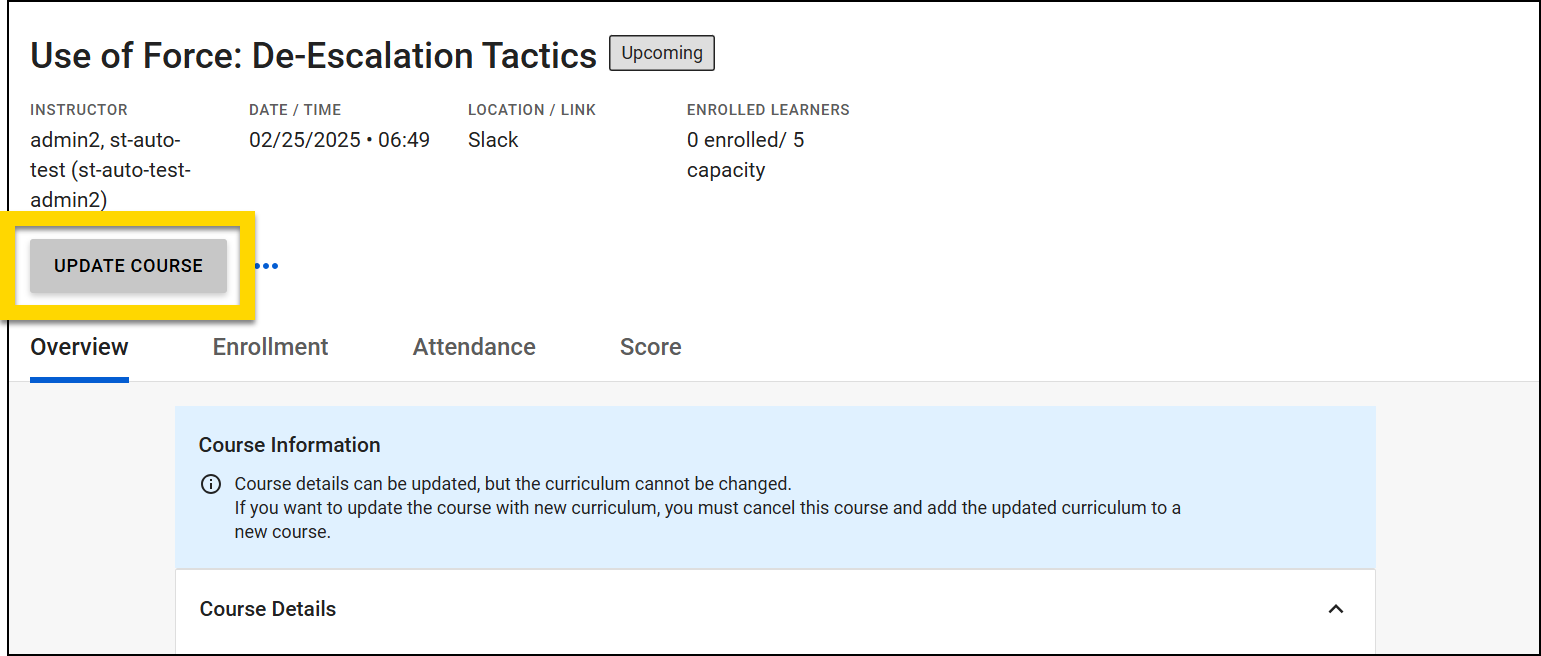
Update courses
To update an upcoming course, take these steps:
- Open the Training module and select Training Management.
- On the Courses tab, select a course name to open the course.
- Select Update Course.
- Update the course information as necessary, then select Update Course to save your changes.
- You CANNOT change which curriculum has been added to the course. Instead, you must cancel the course, create a new course, and add the desired curriculum to that course.
- If changes are made to a curriculum that has already been added to a course, those updates are NOT reflected in the course. If you want the updated curriculum to be used for the course, you must cancel the course, create a new course, and add the updated curriculum to that course.
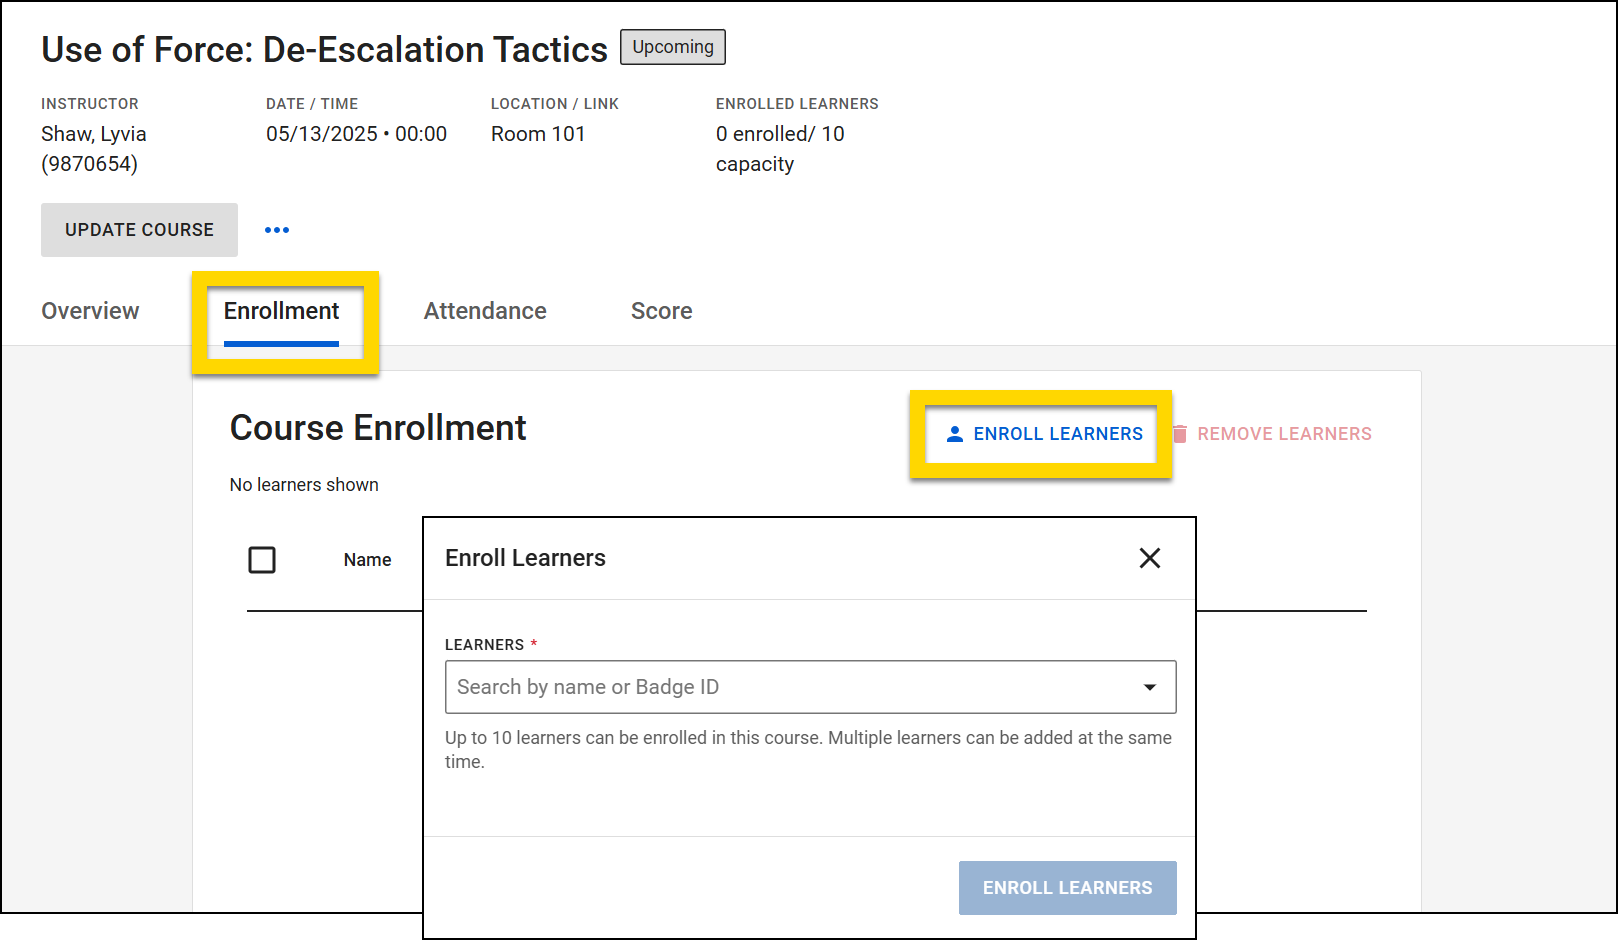
Enroll learners in courses
To enroll learners in a course, take these steps:
- Open the Training module and select Training Management.
- Select a course name to open the course.
- Open the Enrollment tab.
- Select Enroll Learners.
- Add one or more learners by searching for them in the Learners field.
- If the course has limited capacity, the maximum number of learners is displayed below this field. This number updates as you add learners to the field, telling you how much space is left in the course.
- A course capacity is determined by the curriculum that has been added to it.
- After selecting the appropriate learners, select Enroll Learners.
Once a learner is enrolled in a course, the course appears on their My Courses page.
Remove learners from a course by selecting the checkbox beside their name then Remove Learners.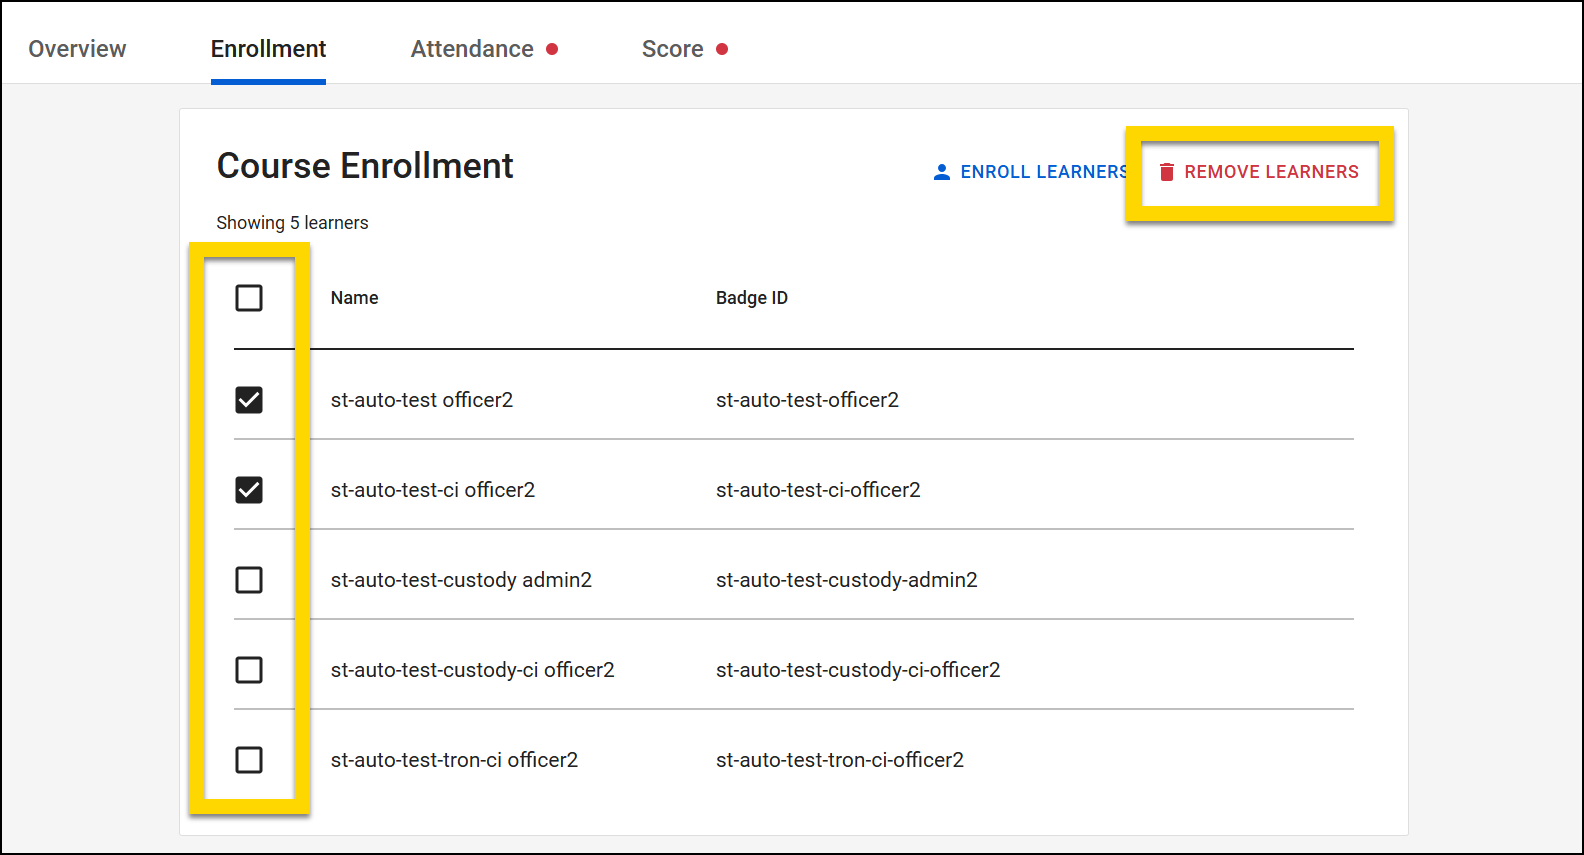
Watch this video for an overview of enrolling learners in a course (starting at 08:03).
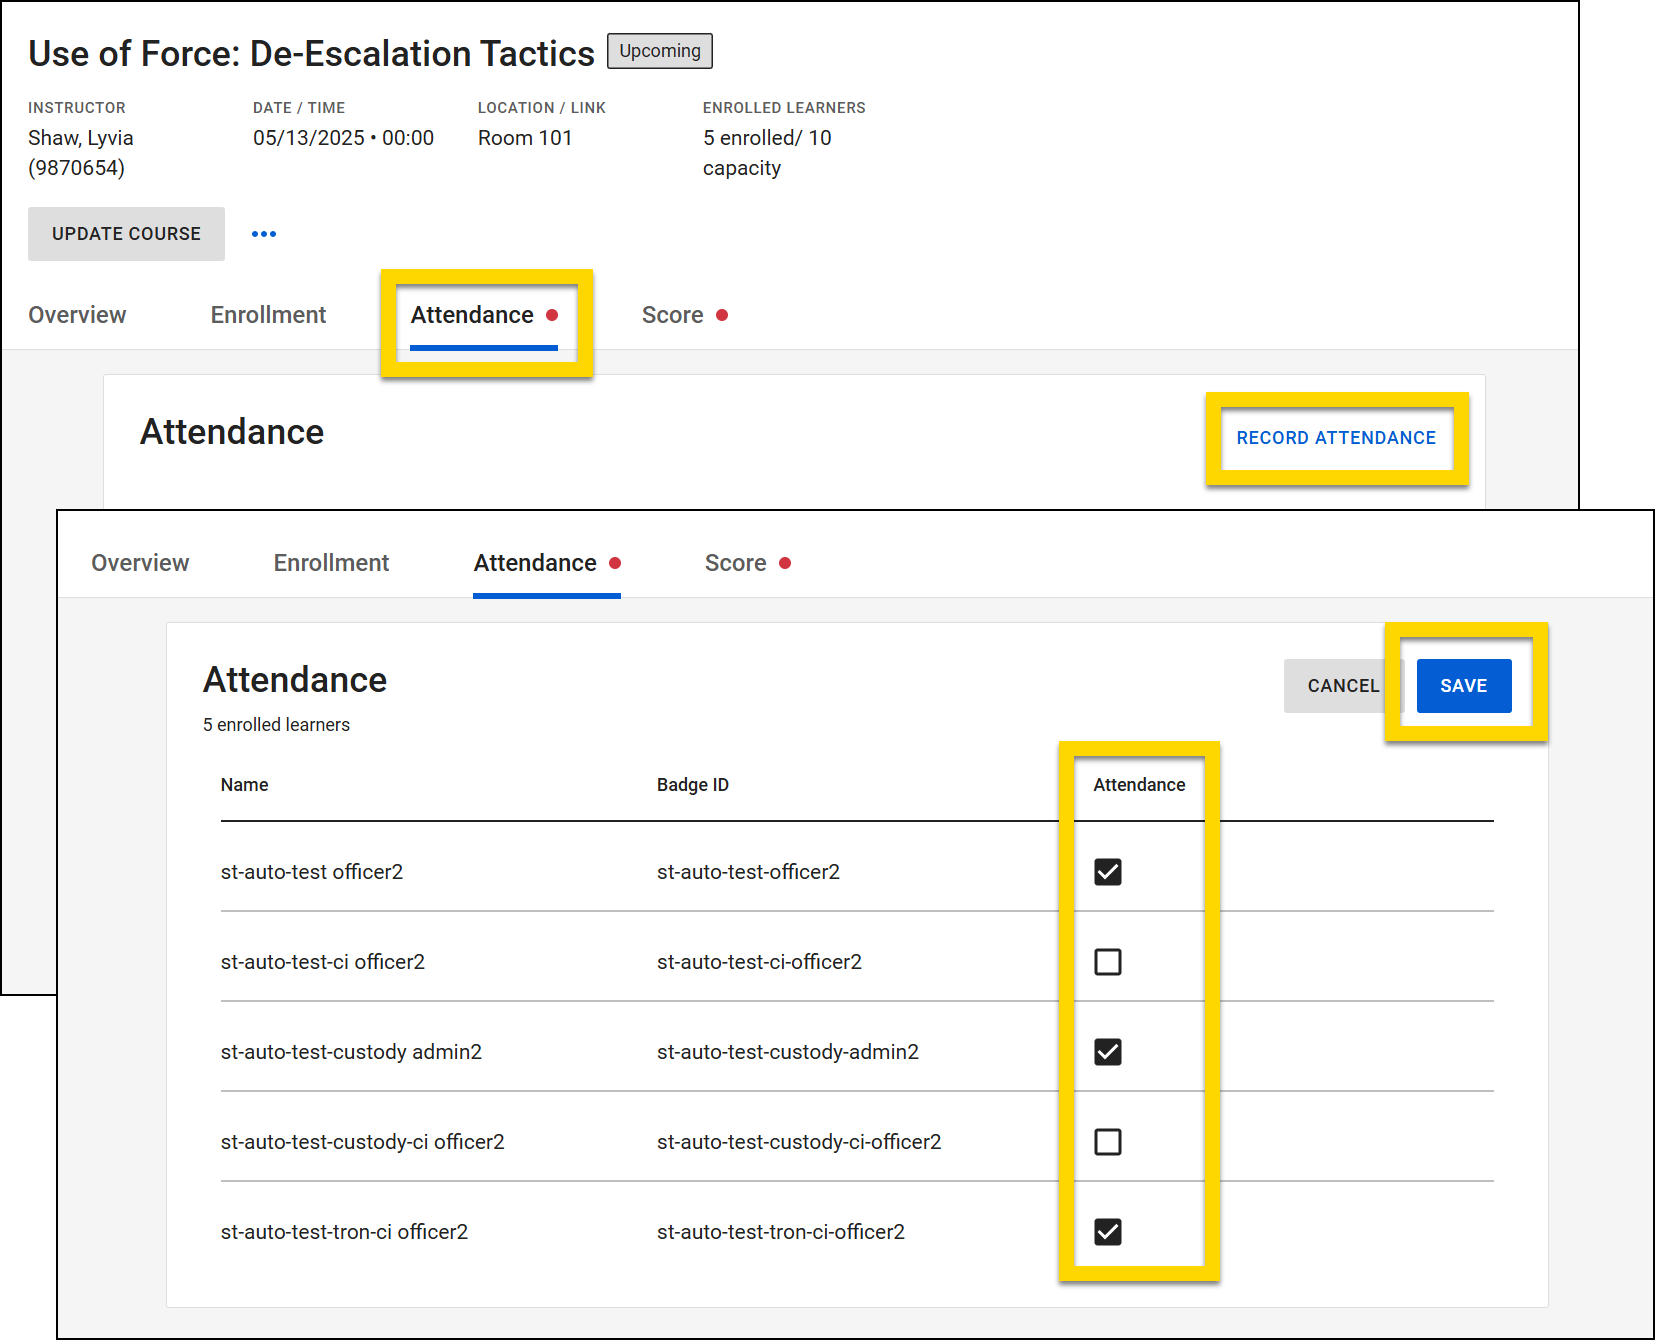
Take attendance for courses
Once learners have been enrolled in a course, you can record attendance, indicating which users did and did not attend.
Once you record attendance, you can no longer update the course details (date/time and instructors).
To take attendance for a course, follow these steps:
- Open the Training module and select Training Management.
- Select a course name to open the course.
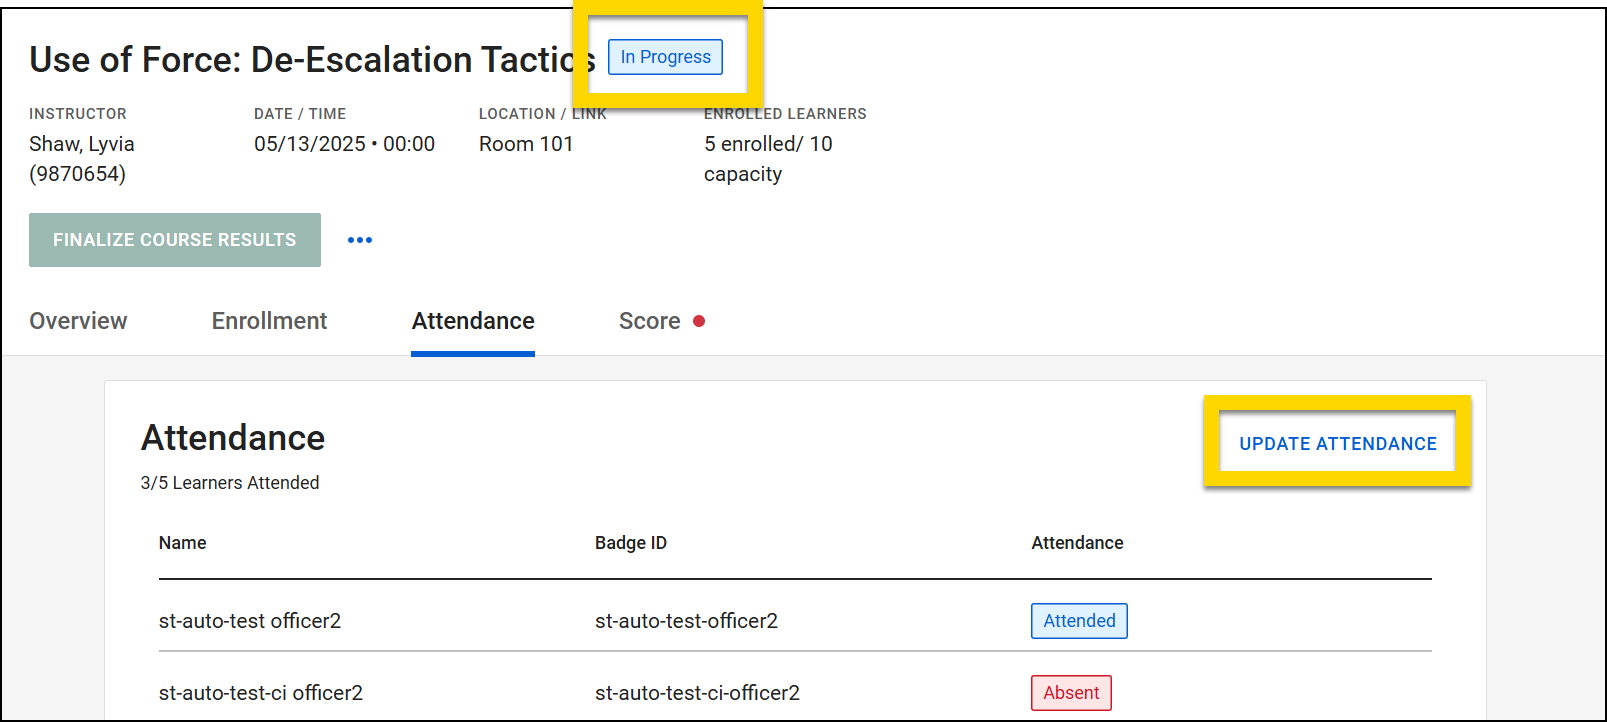
- Open the Attendance tab.
- Select Record Attendance and confirm that you are ready to record attendance on the dialog box that appears.
- A list of enrolled learners appears where you can select the checkboxes beside each learner in attendance to indicate whether or not they attended.
- After making your selections, select Save.
Once you record attendance for a course, the course status changes from Upcoming to In Progress. To update attendance for a learner:
- Select Update Attendance.
- Deselect the box for any learners who were absent.
- Select Save.
Record scores and finalize courses
Scores for all learners must be entered before a course's results can be finalized. To record scores, take these steps:
- Open the Training module and select Training Management.
- Select a course name to open the course.
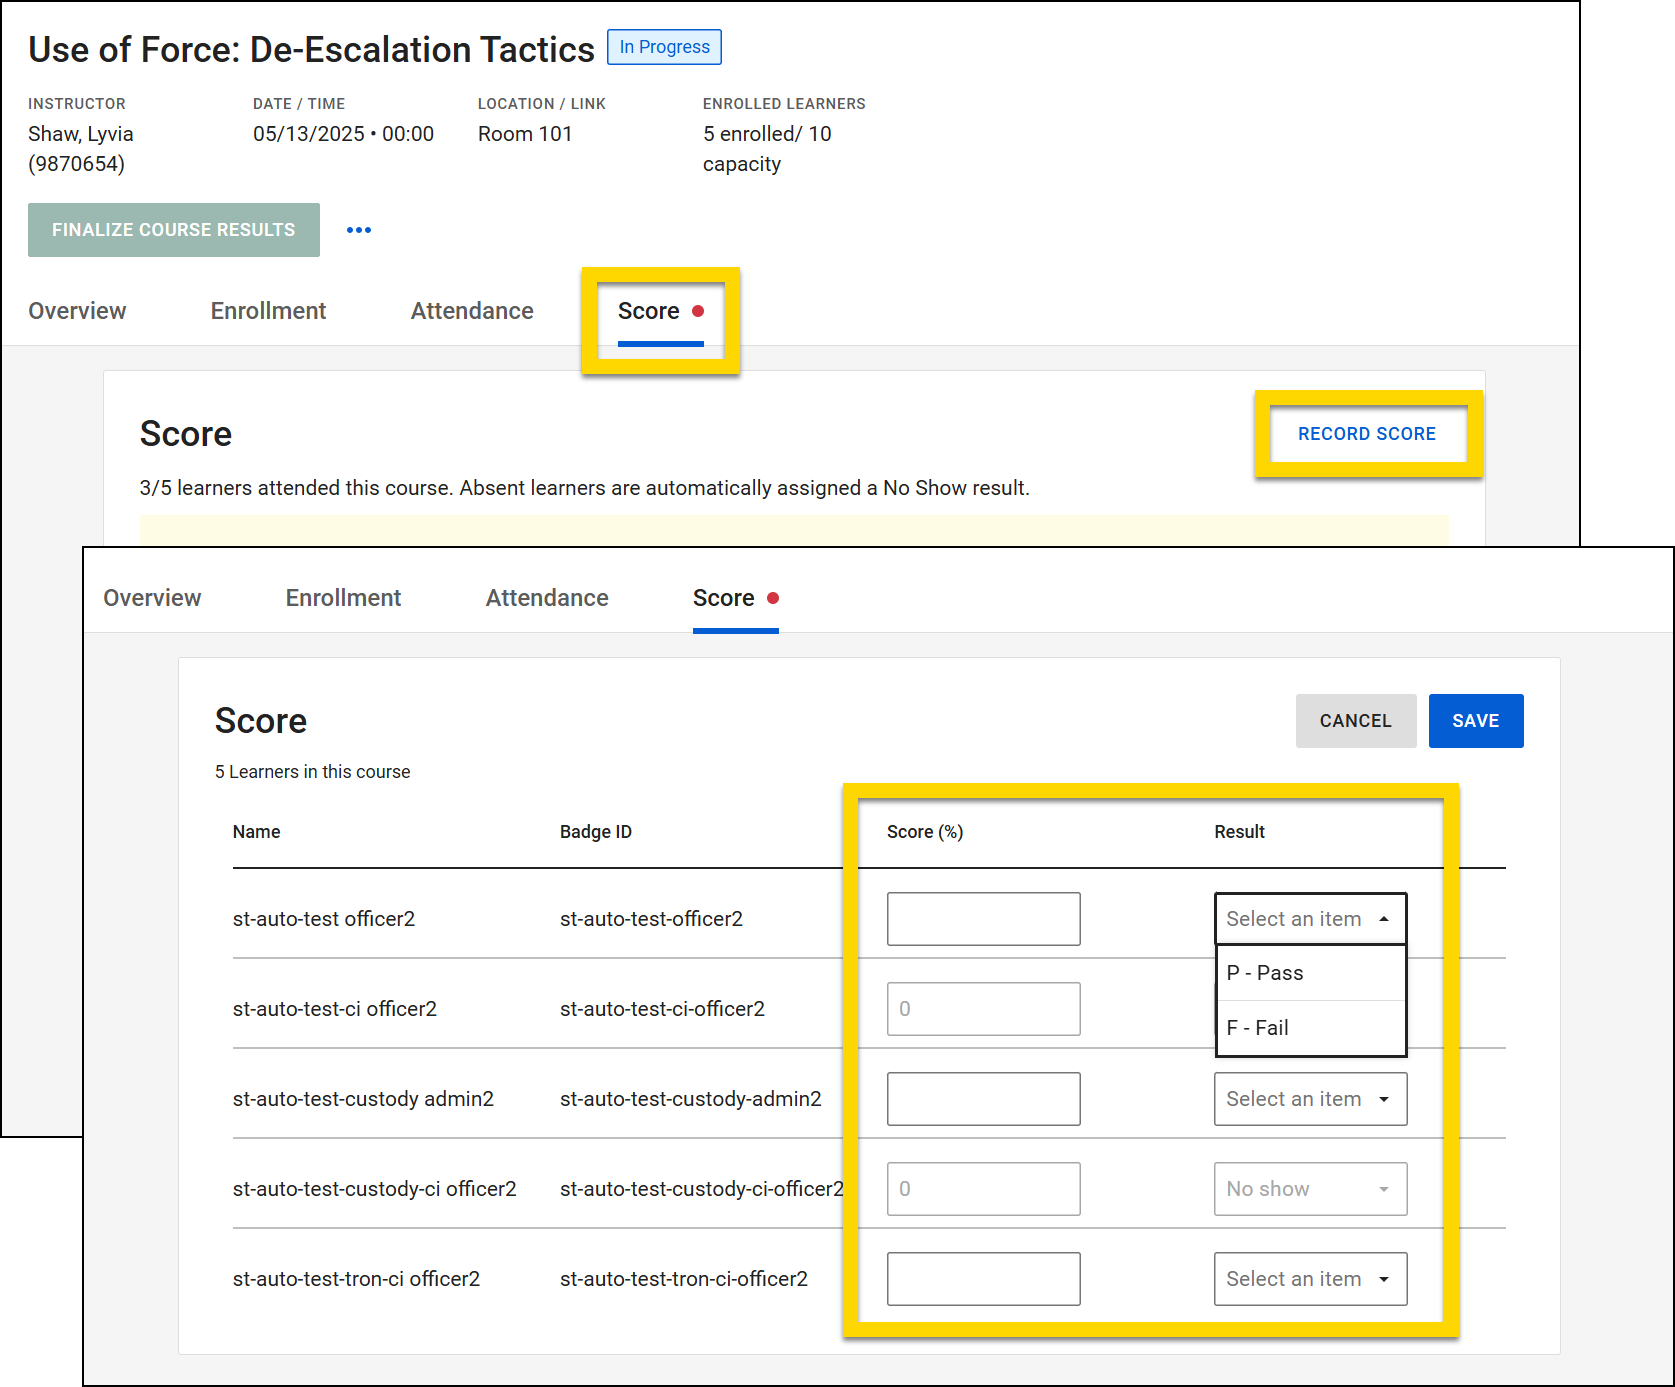
- Open the Score tab.
- Select Record Score.
- Depending on the curriculum settings, you can enter a percentage score and a result (pass/fail) or just a result.
- Scores can only be entered for learners who are marked as having attended the course.
- Select Save after you have entered all results.
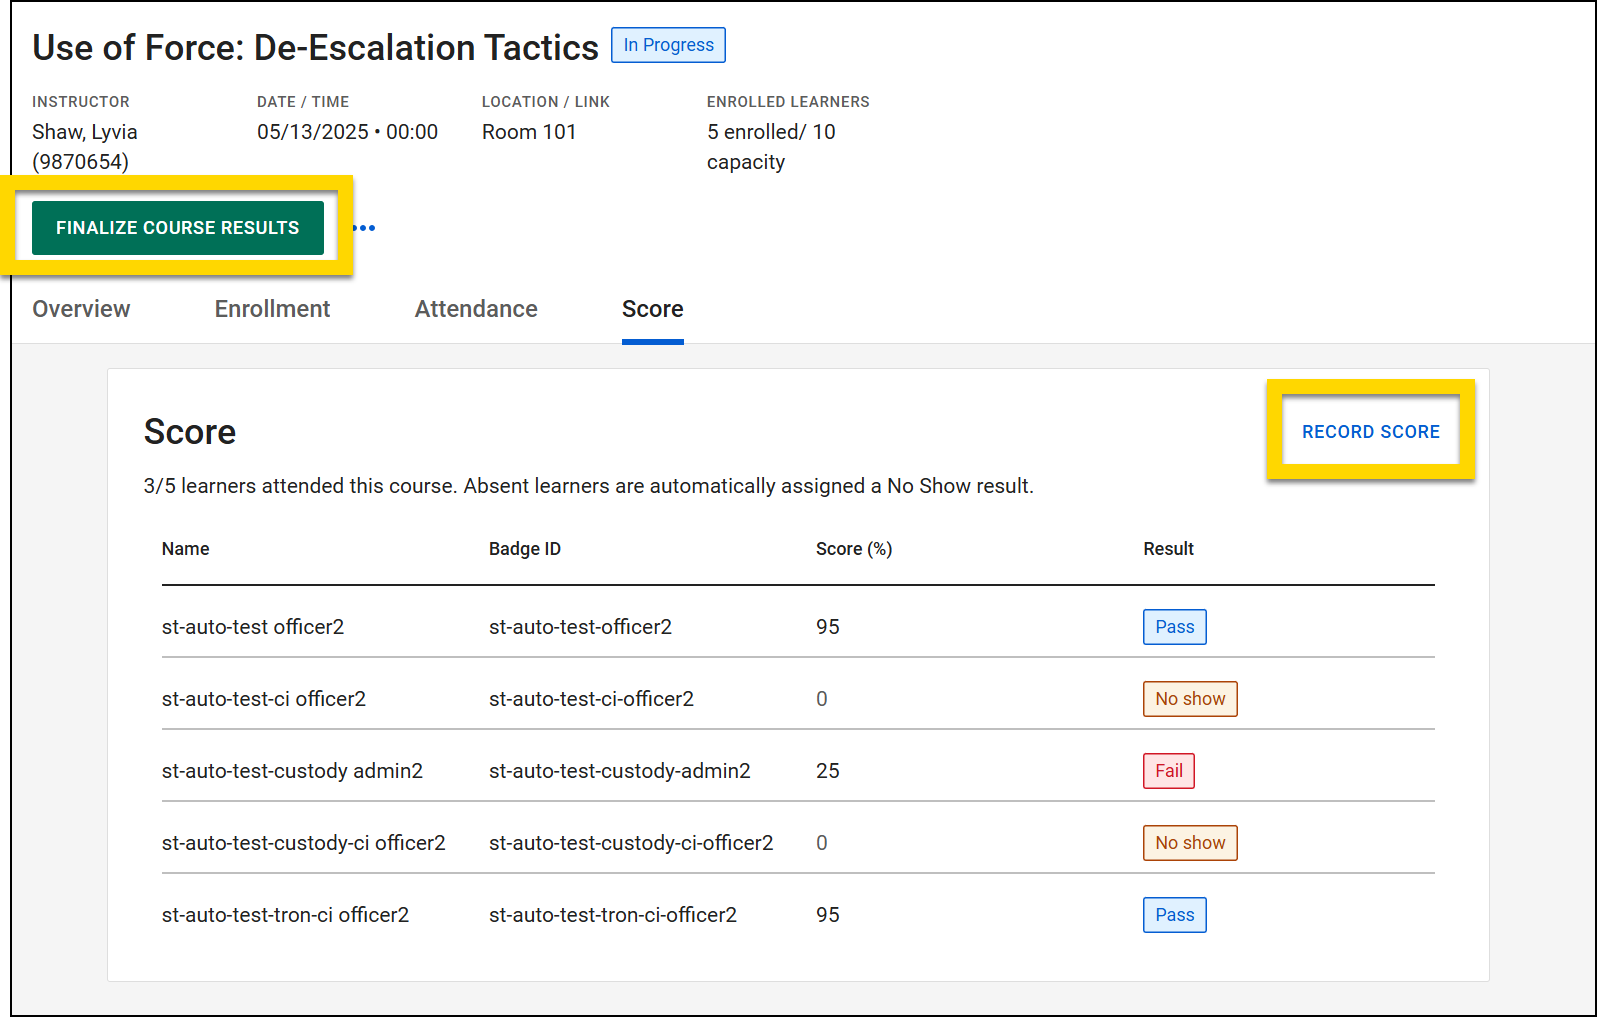
Until the course is finalized, you can update learners scores by selecting Record Score.
To finalize the course, select Publish Course Result.
Once a course is finalized, learner scores can no longer be changed.
Export learning records
Learning Records can be exported for a course as soon as attendance has been taken. A learning record report is exported in CSV format and includes the following information:
- Course ID
- User name
- Badge number
- Attendance (Attended / Absent)
- Result (Pass / Fail)
- Score (percentage, where applicable)
To export learning records:
- Open the Training module and select Training Management.
- Select More Actions > Export Learning Records for the course from which you need records.
Cancel courses
A course can be canceled any time up until the course is finalized. When a course is canceled, it still appears on a learner's My Courses page, but its status is displayed as Canceled.
Once a course is canceled, it can't be restored.
To cancel a course:
- Open the Training module and select Training Management.
- Select More Actions > Cancel on the course you want to cancel.