Prepare for upload
Interface overview
The Evidence Upload XT application pages are shown and described in the following images.
Upload Files Page (empty)
When you first sign in to Evidence Upload XT, an empty Add Files page is shown. From this page you can begin adding files for upload to Axon Evidence.
![]()
Upload Files Page (files in table format)
After files have been added, the file information is shown in gallery or table format. The table format is the default information view.
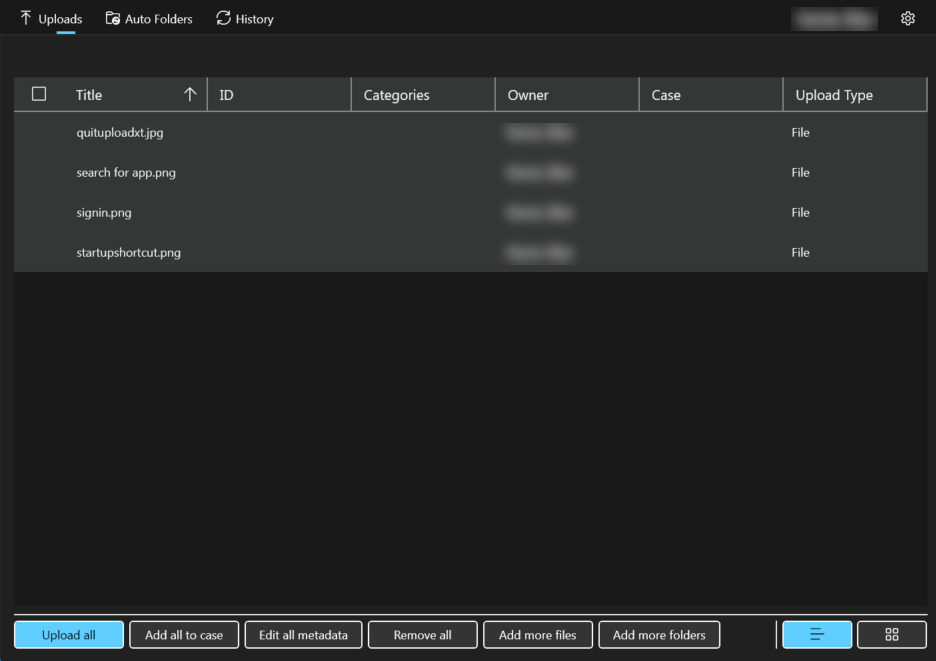
The different sections of the page in this format are:
- File information: Shows Information on each file that has been added to the page. You can click the column header to set the sort order (ascending or descending) for the files. The checkboxes are used to select the files you want to work with. Double-clicking on a file line will open the File Details page.

- Action buttons: These are used to add and work with the files and folders. It includes the Upload all button to start uploading the files.

- Display options: These are used to set the viewing options for the files. You can select if files are shown in gallery or table format.
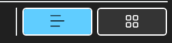
Upload Files Page (gallery format)
If you select the gallery view from the display options on the upload files page, the display will change to show thumbnails for image and video files. You can choose Sort By column or Sort Order.
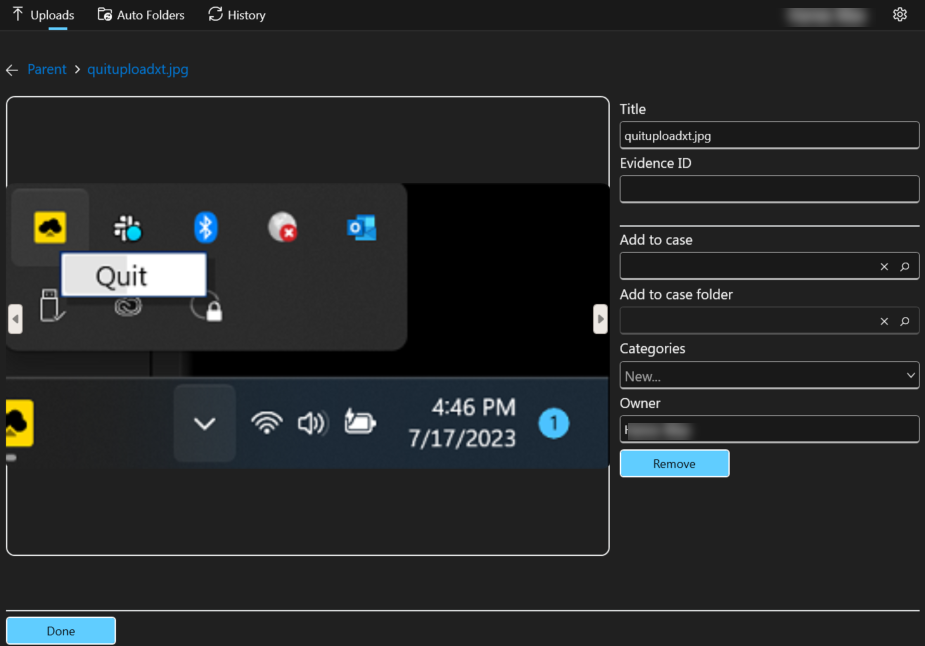
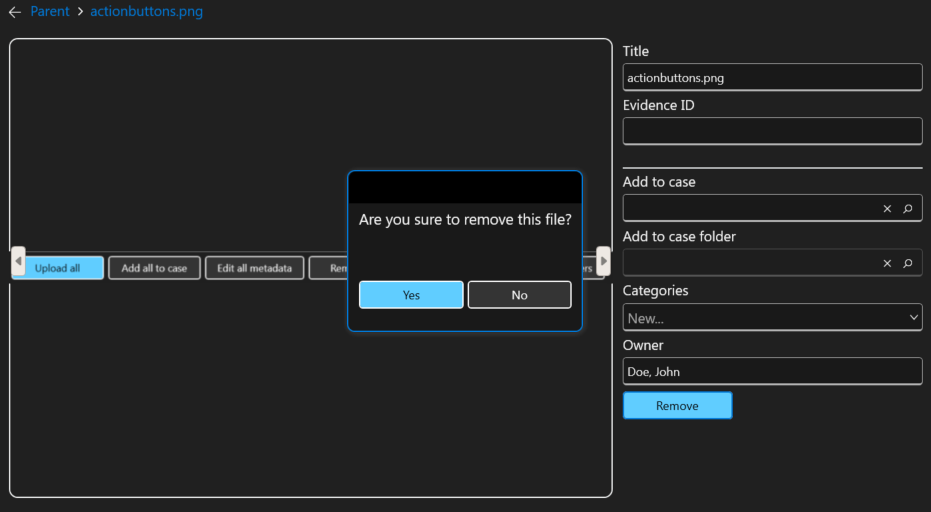
File Detail Page
The File Detail page shows the file image with the file metadata on the right. You can edit the metadata associated with the file or remove the file. The left and right arrows on either side of the file image are used to navigate to the previous or next file. Selecting Done returns to the Upload Files page.
Add files and folders to upload
You can add any type and number of files to Evidence Upload XT for uploading to Axon Evidence. However, the maximum file size for a single file is 1.5 TB.
You can only preview image files in Evidence Upload XT. Additionally, viewing or playback of certain video or audio files might not be supported on Axon Evidence media player. See Supported file types in the MyAxon Help Center for more information.
To add files and folders for upload:
- Drag the file or folder from your desktop or File Explorer, and drop it on the Evidence Upload XT page.
- Note If you drag-and-drop a folder on to the page, all the files in the folder are added, but the folder structure isn't retained.
OR
- Using Select files or Select folders, navigate to the file or folder location, select it, and then choose Open. The files and folders are added to the upload queue and shown on the Upload Files page. Select the file title in table view to go to the File Detail page for that file.
- Select Add more files or Add more folders to add more files or folders. Navigate to the file or folder location, select it, and then choose Open.
After adding files or folders to upload, you can do any of the following:
- Edit file and folder metadata to add information
- Add files and folders to a case from the Upload Files page if needed
- Select Folder upload options if you want the folders organized a certain way
- If necessary, Remove files from your upload
- Upload files
Evidence UploadXT v2.12 and above support UNC Paths so you don’t need to map the network drives manually.
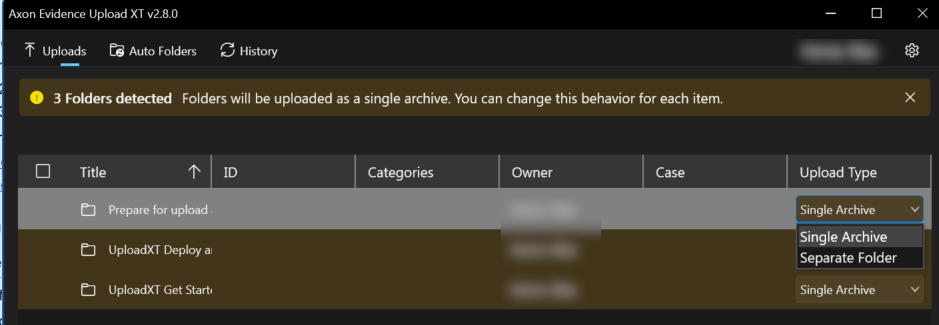
Folder upload options
Uploading by folders provides an easy way to maintain folder organization when adding items to a case. You can:
- Upload a folder as Single archive - a single lossless .ZIP file.
- Keep the folder structure by upload as Separate folders
- UseAdvanced options to upload as a folder, but also select some or all of the subfolders in it as .ZIP files instead.
After selecting folder upload options, you can do any of the following:
- Edit file and folder metadata to add information
- Add files and folders to a case from the Upload Files page if needed
- If necessary, Remove files from your upload
- Upload files to Axon Evidence
Single archive
By default, the files in the folder are uploaded to Axon Evidence as a single archive in a lossless .ZIP compression file. To choose this option, simply drag-and-drop the folder into Evidence Upload XT, or choose Select Files or Select Folders to choose your uploads from File Explorer.
To add Evidence ID, Categories, add the evidence to a Case, or change the Owner:
- Select Edit all metadata from the action buttons to apply the metadata to all folders in the list.
- Check the box next to Title, and then choose Edit metadata to apply the metadata only to the selected folders.
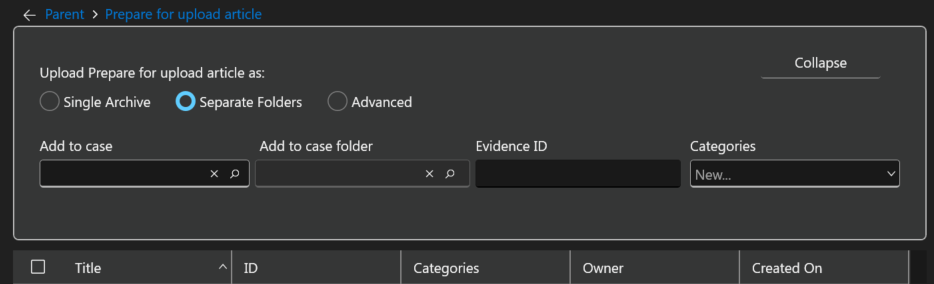
Separate folders
If you want to upload the folder contents as separate files and folders, you must select that option for each folder you want to upload this way.
You have the following options for uploading separate folders:
- Selecting Separate Folder from the Upload Type drop-down for each folder you want to upload.
- Separate folder gives you the following options:
- (Required) Select the Case the folder is added to.
- (Required) Add Categories for the folder.
- (Optional) Select the Case folder that the folders will be added to.
- You can add Evidence ID or change the Owner the same way you would using Single archive.
- Double-clicking the file line, selecting Change, and then choosing Separate Folders gives you more options:

- (Required) Select the case the folder is added to.
- (Required) Add Categories for the folder.
- (Optional) Select the Case folder that the folders will be added to.
- (Optional) Add an Evidence ID to all items in the folder.
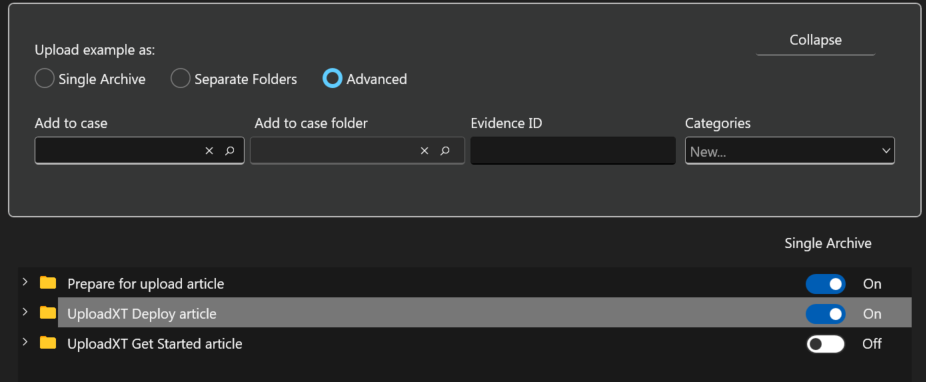
Advanced options
Double-clicking the file line, selecting Change, and then choosing Advanced allows you to upload a folder with its folder structure intact, but also set if any subfolders are uploaded as a single archive in a lossless .ZIP compression file.
Edit file and folder metadata
You can edit the metadata for a single file, or for multiple files at the same time. If you choose to edit multiple files, the entered metadata is applied to all files. You can do this from the Upload Files page or the File Detail page.
Edit Metadata from the Upload Files Page
- Select the check box for each file you want to edit.
- Note: If you dont select any files, the metadata edits will apply to all
- Select Edit metadata, or Edit All Metadata if you havent selected specific files. The Edit Metadata dialog is shown.
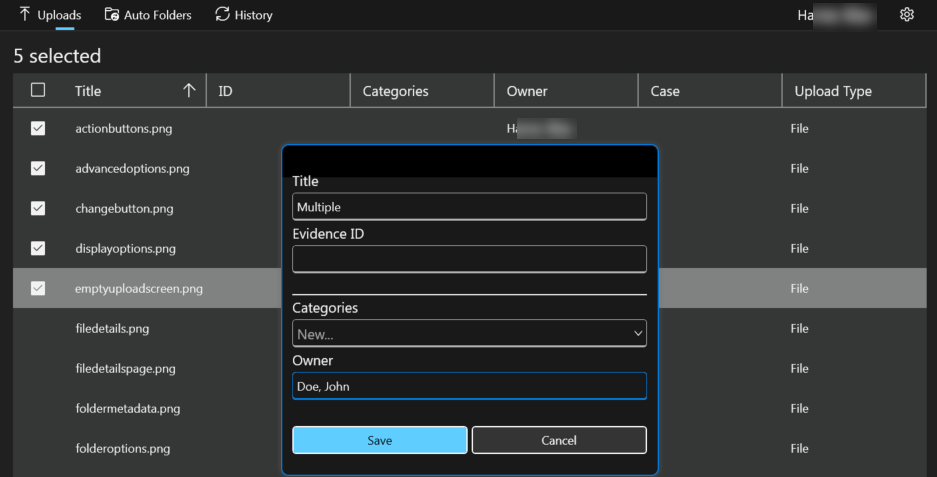
- Enter the appropriate information in the Title, ID, Category, and Owner
- The Category and Owner fields will show a list of matching items as you enter the information. You can add multiple categories to the file.
- Select Save.
Edit Metadata for a File from the File Detail Page
- If you aren't on the File Detail page for the file, double-click the file title in table view, or the file image in gallery view.
- Enter the appropriate information for the file:
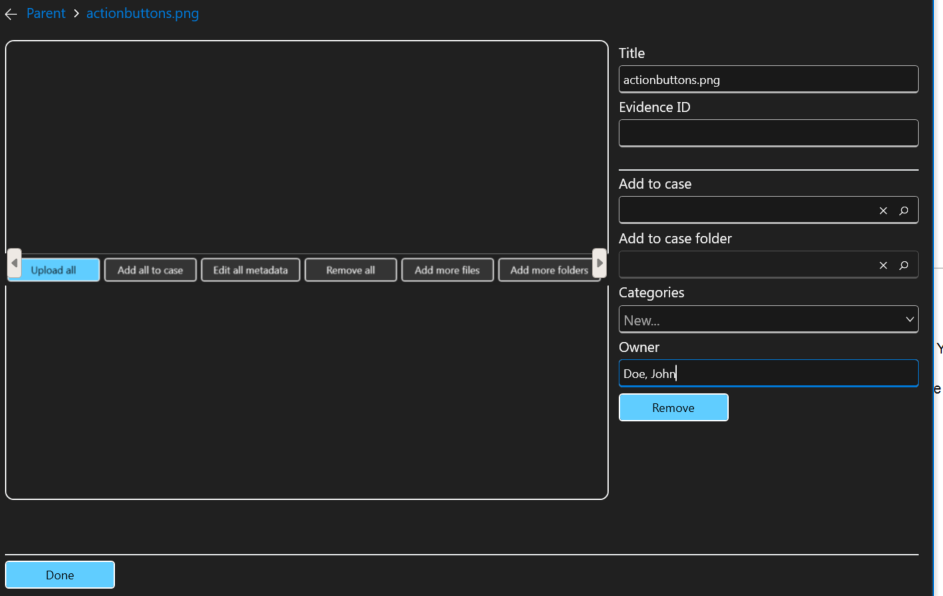
- Changes to the Title, ID, Category, and Owner fields are applied as you add the information.
- The Category and Owner fields will show a list of matching items as you enter the information. Select the appropriate Category or Owner. You can add multiple categories to the file.
- For the Add to Case and Add to case folder fields, enter the case ID and then the case folder name.
- The Add to case and Add to case folder fields will show a list of matching cases as you enter the information. Select the appropriate value. You can also type a new case ID to create a new case.
- Select Done to return to the Upload Files page.
You can also use the left and right arrows on either side of the file image to navigate to the previous or next file.
After editing file or folder metadata, you can do any of the following:
- Add files or folders to a case if needed
- Select folder upload options if you want the folders organized a certain way
- If necessary, remove files from your upload
- Upload files
Add files and folders to a case from the Upload Files page
This process allows you to add files to an existing case, or create a new case with the files. You can also add files to a case by editing the metadata.
- Select the check box for each file you want to edit.
- Note: If you don't select any files, then the edits will apply to all
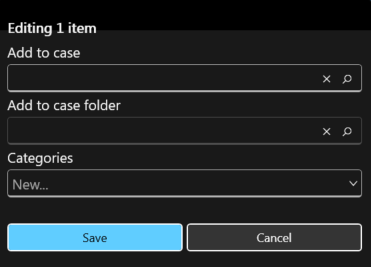
- Select Add to case, or Add all to case if you haven't selected specific files. The Add to Case dialog is shown.
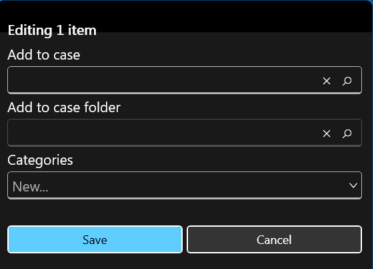
- Enter the case ID in Add to case, or enter a case folder name in Add to case folder.
- The Add to case and Add to case folder fields will show a list of matching cases as you enter the information. Select the appropriate case, or you can enter a new case ID to create a new case.
- You can also choose to add one or more Categories to the files.
- Select Save.
The files will be added to the case; or, if the case does not already exist, the case will be created when the files are uploaded to Axon Evidence.
After adding files or folders to a case, you can do any of the following:
- Edit file or folder metadata to add information
- Select folder upload options if you want the folders organized a certain way
- If necessary, remove files from your upload
- Upload files
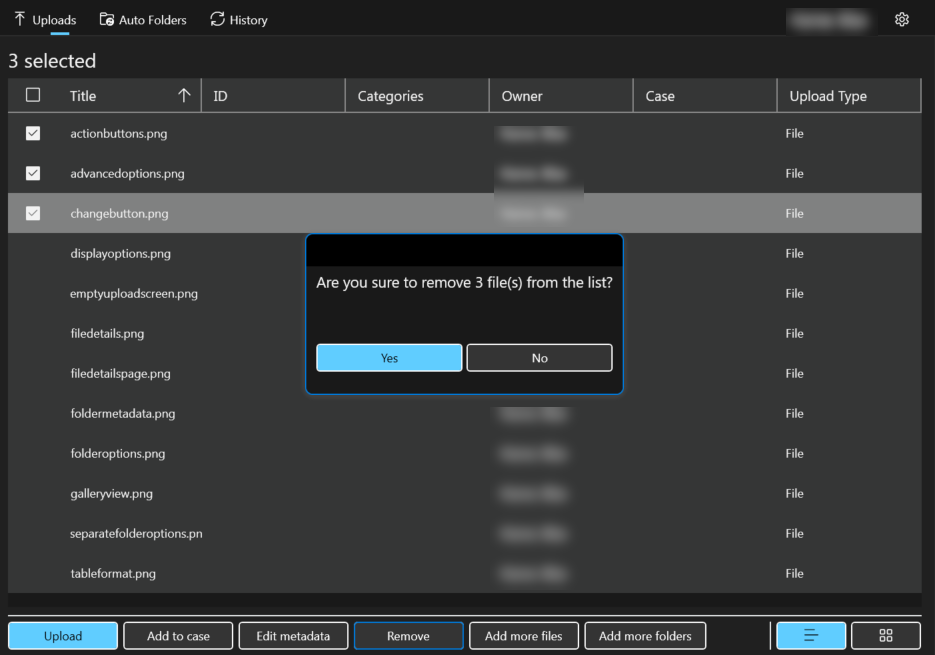
Remove files from your upload
This action only removes files from Evidence Upload XT. It does not remove them from your computer or Axon Evidence. You can do this from the Upload Files page or the File Detail page.
Remove Files from the Upload Files Page
- Check the box for each file you want to remove.
- Note: If you don't select any files, then all files will be removed.
- Select Remove, or Remove All if you haven't selected specific files.
- Choose Yes to confirm and remove the files from your upload.
Remove a File from the File Detail Page
- If you are not on the File Detail page for the file, select the file image in gallery view or double-click the file title in table view.
- Select Remove.
- Choose Yes to confirm and remove the files from your upload.
The files are removed from the Evidence Upload XT list and you are shown the next file. If there are no other files, you are returned to the Upload Files page.