Operation
Before operating an Axon Body camera, ensure it is fully charged and properly configured. For details, see Charge the battery.
Watch this video for additional information about operating a Body 4 camera.
Operating modes
This camera has two operating modes:
- Ready (Buffering) – Camera is on and is pre-event buffering
- Recording (Event) – Camera is recording
Turn on the camera and Ready mode (buffering)
When the camera is in Ready mode:
- The camera display shows READY.
- The Operation LED on top of the camera blinks green
 .
. - The camera is capturing video but not recording to permanent memory.
The pre-event buffer is configurable between 0 and 120 seconds, but set at 30 seconds by default.
When Recording (Event) mode is activated, the buffered video captured directly before the event is saved and attached to the event in permanent memory. This feature captures the video of an incident just before a recording begins. The camera does not capture audio within the pre-event buffer by default (but can be set to do so by an admin).
Ready mode starts when the camera is turned on. It does not buffer video when the camera is turned off
Start Recording mode (event)
- To begin recording, double-press Event. When your camera starts recording, it emits two short tones and two short vibrations
- The camera display shows STARTING and then the recording icon.
- The Operation LED on the camera blinks red
 .
. - The camera emits two short tones and two short vibrations every two minutes as a recording reminder.
- To stop recording and return to Ready mode, press Event for three seconds. The camera emits one long tone and vibrates. .
Mute audio recording
If your organization’s administrator has configured your camera to do so, you can mute audio while recording video. While muted, audio will not be recorded and is not recoverable.
If Static Mute mode is enabled:
- Press
 while the camera is muted.
 - Press Select another three seconds to cancel mute.
If Push and Hold Mute mode is enabled:
- Press Select for three seconds and hold to mute audio capture. The microphone off icon appears on the camera display and the Operation LED blinks blue while the camera is muted.
- Release Select to re-enable audio recording.
Stealth mode
Use Stealth mode to turn off the LEDs, sounds (audio prompts), and vibrations (haptic feedback) on your camera. This is useful for both tactical situations and when dealing with members of the public with light/sound sensitivity.
To enter and exit Stealth mode:
Use camera controls
- To enter Stealth mode –
- To exit Stealth mode – Press Volume Up p or Volume Down q for three seconds. The S icon disappears from the display.
Use Axon View or View XL
Tap the switch to the right of Stealth mode to change the setting.
Add markers while recording
Markers are useful for indicating an important event that you want to easily find when replaying the video. The marker is shown when the video is replayed in Axon Evidence and documented in the audit trail.
To add a marker to a video while you are recording, press Select.
High resolution photo capture
Press Event once to capture a 1440p high-resolution photo (regardless of video resolution) at any time, whether the camera is in recording or buffering mode. With a Connectivity license (formerly Respond Basic), photos automatically upload immediately over LTE (if allowed) to Axon Evidence. Capturing photos won’t affect active recordings and are stored as independent evidence files.
This feature is off by default and can be enabled by an Admin. Photos cannot be tagged in Axon View or View XL Standalone. Photos are not linked to the recording session they were captured in.
Illuminate the camera display
In low-light situations,
To change light settings, see Light setting and Stealth mode.
Battery status
The battery capacity for your camera appears on the camera display as a percentage. The Operation
Sleep mode
Sleep mode puts the camera in an idle state that disables recording and buffering. While in this state, an automatic activation enabled at your organization will not initiate camera recording.
The ability to use Sleep mode is enabled by your organization Axon Evidence administrator and may not be available at your organization.
Sleep mode is useful for situations where camera users may need momentary privacy. You can enter Sleep mode from the buffering state in less than three seconds, as opposed to turning the camera completely off. Similarly, the camera will exit Sleep mode and enter a buffering or recording state in less than three seconds.
The device audit trail reflects when Sleep mode is entered and exited. While Sleep mode can be used as an alternative to completely powering down the camera during private situations, it should not be considered a replacement for powering the camera off. Certain background processes are running while the camera is in Sleep mode and the battery still depletes while in this mode, but at a slower rate.
Enter and exit sleep mode
To enter Sleep mode
- Press Power.
- With Sleep selected, press Select to enter sleep mode.
To enter Sleep mode with Power Off Confirmation enabled:
- Press Power. The default option will be Sleep.

- Within

To exit Sleep mode, either:
- Press Power to return the camera to buffering state, or
- Press Event once, or
- Press Event twice to begin recording.
On-camera categorization
On-camera categorization lets you add categories to videos directly from the camera. To do so, ensure your admin enables the On Camera Categorization feature in Axon Evidence at Admin > Axon Body 4 > profile under Device management.
Once enabled, after you end a recording, the BWC will prompt you with a list of categories. Scroll or make a selection within 30 seconds or the opportunity to assign a category will expire.
To select a category:
- Scroll to the appropriate category.
- Press Select (between the volume buttons). A check mark appears next to a selected category.
- To remove the applied category, press Select again.
- Scroll to and select multiple categories if needed.
- When finished, hold Select to save the selected categories to the recording.
Any selected categories will save automatically if another recording starts while you're assigning them, for example, if triggered by Axon Signal.
You can also tag videos using the Axon View app, View XL, or Fleet 3 Dashboard, none of which require the Add Categories feature.
Device pooling
Cameras shared between users are considered part of a pool. A pooled camera in an Axon Dock is not available for use until evidence is offloaded and its battery reaches 70% of full charge (if your camera requires 90%, leave it in a networked dock for at least eight hours so it can receive a firmware update). Once assigned via the device pooling kiosk, the camera's LED flash rate increases and the screen color inverts to make it easier to find among other cameras still charging. For details on device pooling, contact your Axon representative.
The RFID bulk import capability for device pooling simplifies the management of RFID card assignments by letting you efficiently create multiple simultaneous RFID card-to-user mappings using CSV file imports. The interface centralizes the viewing, searching, and removal of RFID assignments and supports bulk creation, deletion, and management of RFID card-to-user mappings, with options to download backup, template, and error files for streamlined system management and error handling.
Watch this video for an overview of how to check out a device.
Watch this video for an overview of how to enable self-checkout for devices.
Watch this video for an overview of how to configure the device pooling kiosk.
Multi-factor authentication (MFA)
Your body camera can function as an MFA device (sometimes called Two-Factor Authentication, or 2FA). For MFA to be available on a body camera, your Axon administrator must:
- Enable camera as an MFA method for your agency.
- Ensure cameras are on the latest firmware.
- Ensure the camera is assigned to the user.
- Ensure the camera is not in a lost or stolen state.
- Sign into Axon Evidence (or other apps).
- Select Body camera from the MFA select screen.
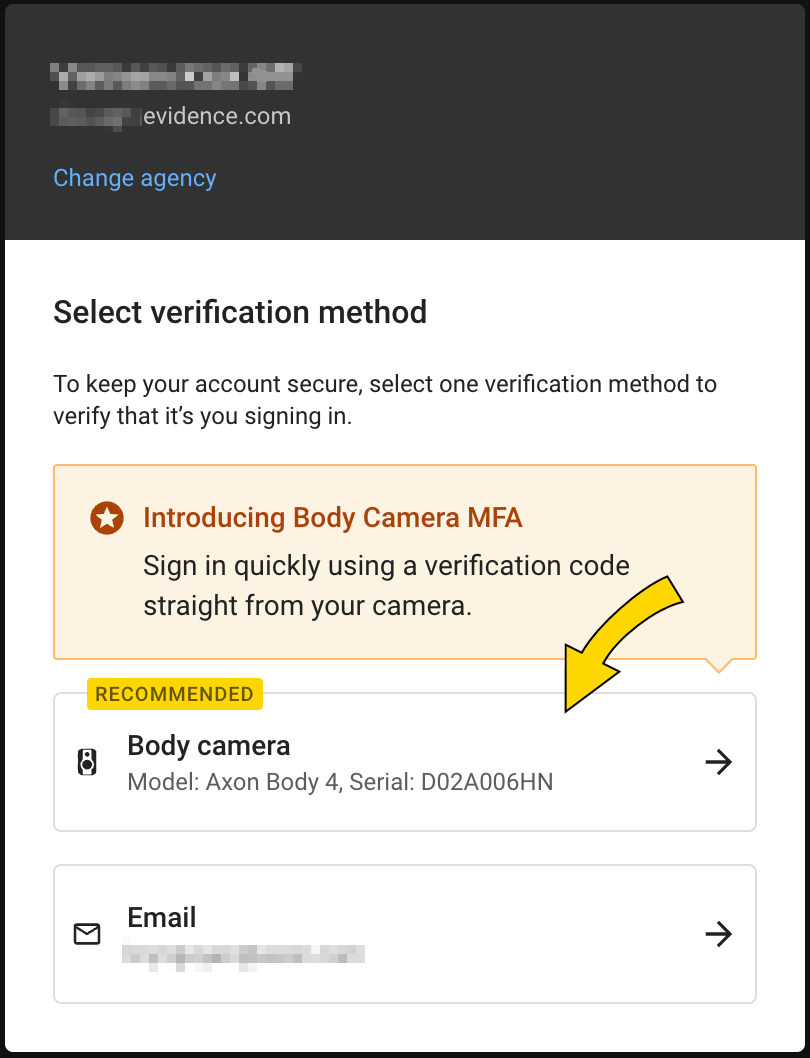
- On your body camera, double-press Programmable Button 2 (P2) to use the MFA shortcut. Or...
-
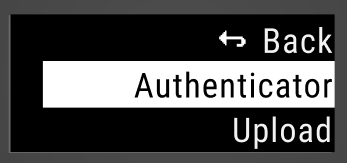
- Use the MFA code displayed to sign in. The progress bar at the bottom shows when the code will refresh.

MFA may start midway through a code cycle, depending on when you request it. The camera returns to the main screen after 60 seconds or with any button press.
You can use the shortcut to access the MFA screen while recording unless your agency has assigned it to a different action.
Learn more at MFA User Guide and (for admins) MFA Admin Guide.
Watch this video for an overview of this function.