Create and finalize notes

Note

The Axon Notes Module is currently only available for use by Canadian organizations. Contact your Axon representative or Axon Support if you are a non-Canadian organization and are interested in using this feature.

In the Axon Notes module, you can create detailed field notes during your shift, finalize them when complete, and add supplement notes if updates are needed later. If you temporarily lose network connectivity, you can continue working offline and sync your changes and finalize your notes when you are back online. Whether you're using a mobile device or a computer, you can include names, vehicles, attachments, and shift details in each note to capture all relevant information.

Create notes

To create a new note, select the Plus icon > Create note (mobile) or Create note (computer). If your organization has configured custom note types, you can select which note you want to create after selecting Create note.
The image shows a comparison between a mobile device (left) and a desktop (right). On both platforms, the My Recent Notes section is featured. On the left, the mobile version displays a simplified interface with the My Notes and My Evidence sections. The Create Note button is highlighted in yellow at the bottom. On the right, the desktop version includes a more detailed layout with additional information, including a list of notes with dates, brief content summaries, and filtering options for In Progress or Finalized. The Create Note button is also highlighted in yellow at the top right.

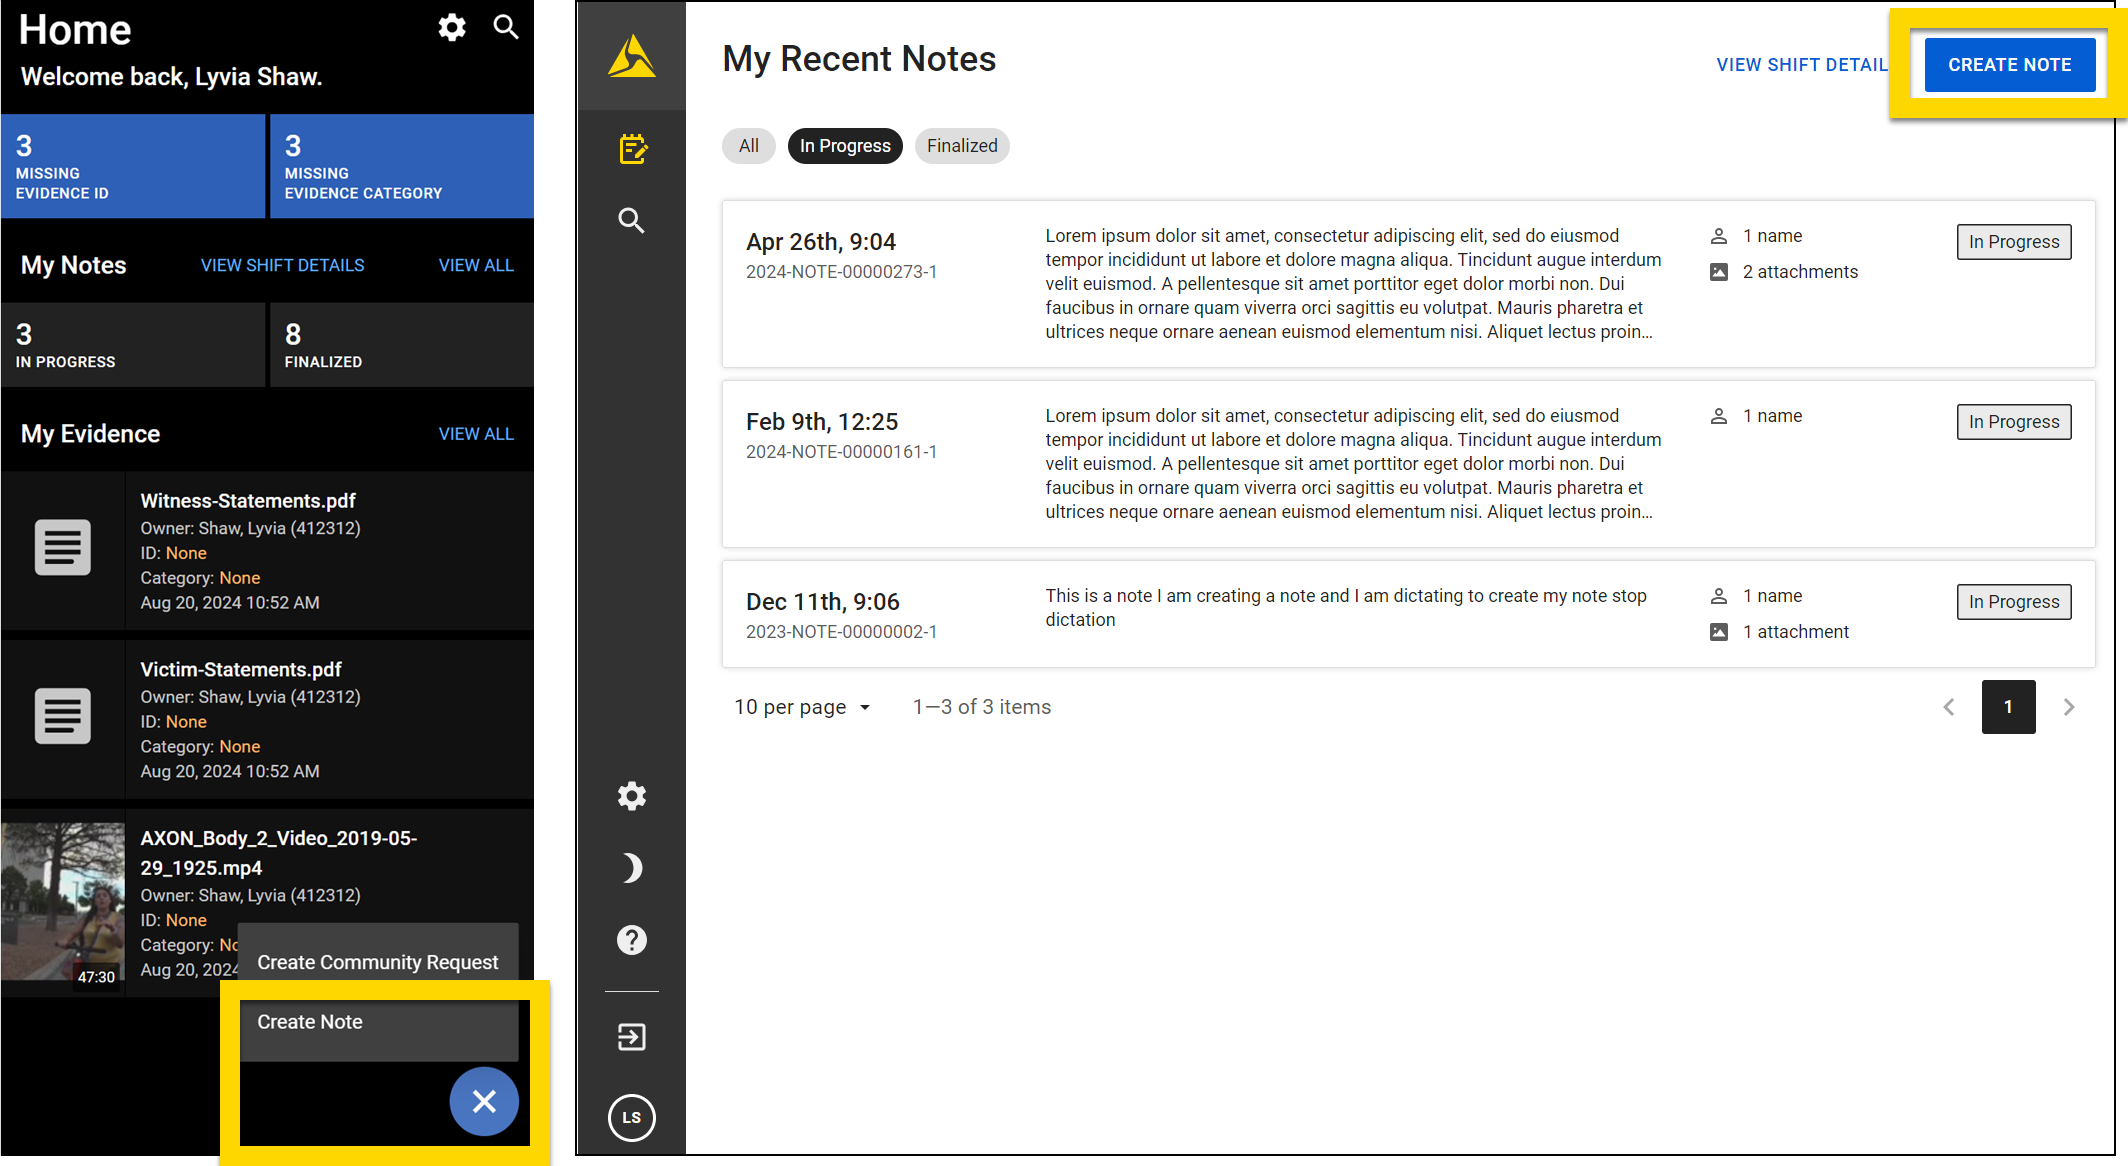
Once the note has been created, you can add different kinds of information:

  • Text
  • Names
  • Vehicles
  • Files
Note

Notes are customizable, so your organization may ask for different information than the items listed above.

If you are using the Axon app and lose network connectivity, you can still create a new note or continue working on a note that was previously opened on your device. Some functionality, such as dictation, adding people to notes, and finalizing notes is not available while you are offline. See Offline notes for more information.

This video explains how to create a note.

This video explains how to edit an existing note.

This video explains how to use custom note types, or Quick Notes.

Add text

Add text by typing in the text area. You can also dictate by pressing the microphone icon (mobile) / Start dictation (computer). (Dictation is not available when you are offline.)
The image shows a comparison between a mobile device (left) and a desktop (right). On the left, the mobile version displays a note creation screen with a yellow-highlighted area prompting the user to start typing or tap the microphone icon to begin dictation. Below that, there are sections for Incident Details, Names, Vehicles, and more. On the right, the desktop version features a more detailed note creation interface with a yellow-highlighted area that includes formatting options like headings, paragraph styles, and list options, along with a blue Start Dictation button. Below this, there is a Dictation Guide that provides tips and shows the spoken phrases needed to insert punctuation and other formatting elements.

Quickly add the current date and time on mobile by selecting the clock and calendar icons. Depending on your device screen size, you may need to scroll up or down to show these icons, as they could be hidden initially behind your device's keyboard.
The image shows two screenshots from a mobile interface, with yellow-highlighted areas drawing attention to specific features. The top screenshot displays a menu opened by selecting the three-dot icon, revealing options the Show tools option. The bottom screenshot highlights the toolbar that appears after selecting Show tools, including formatting options such as undo, redo, various heading levels, paragraph formatting, and list options.

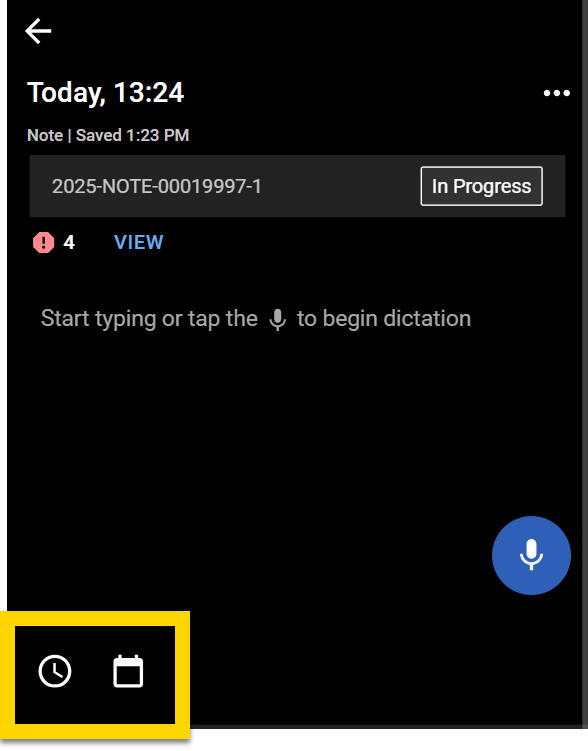
This video explains how to add a timestamp to a mobile note.

When using Notes on mobile, select More actions [...] > Show tools to reveal note formatting options (heading, bullet lists, numbered lists, etc.)
The image shows a screenshot from a mobile interface, with yellow-highlighted areas drawing attention to the clock and calendar icon at the bottom of the screen.

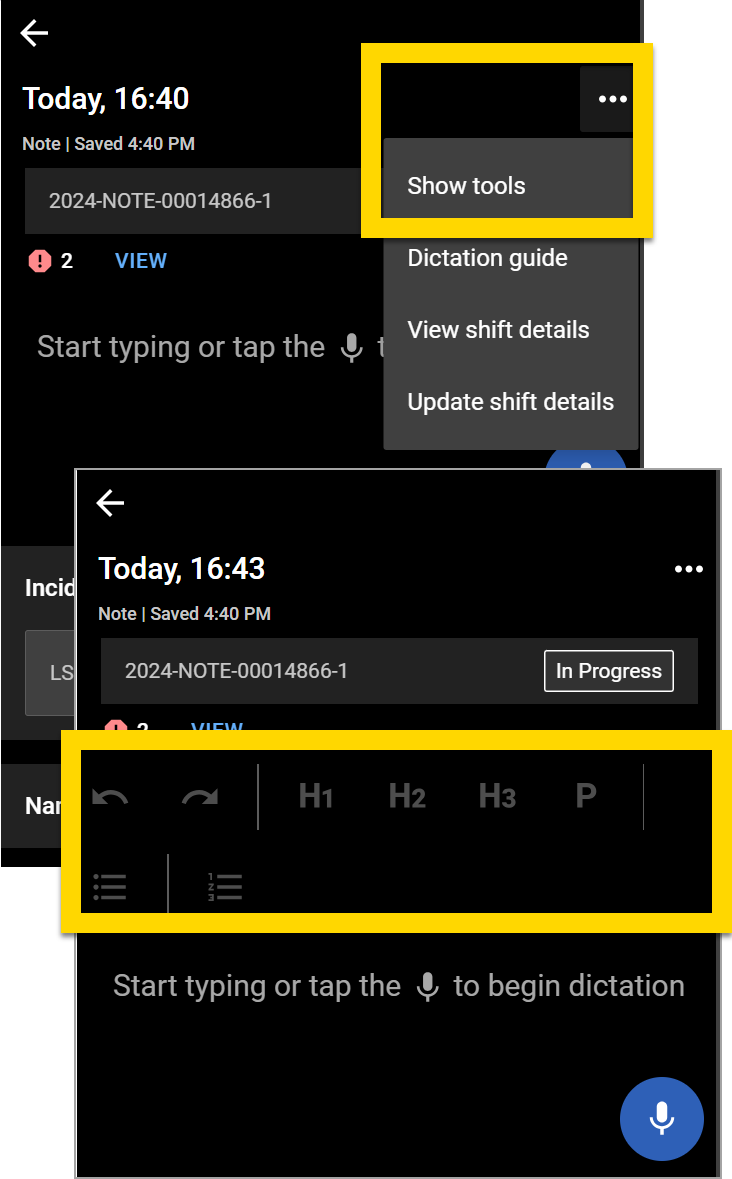
To undo an action while working on a note, select the back arrow in the toolbar. This option is available on both desktop and mobile.

Add names

There are two types of people you can add to a note:

  • Known: A known person is someone who can be positively identified. This could be someone whose identity is fully confirmed, such as a person who has presented valid identification or has been recognized by someone else. A known person can also be partially known. For example, if witnesses report seeing a male in a blue sweater running from the scene, this individual is considered a known person because some identifying information is available.
  • Unknown: An unknown person is someone who cannot be identified or described. For example, if a car is broken into with no witnesses, the person who committed the break-in would be considered an unknown person.

Note that you cannot add people to notes while you are offline.

To add a Known person to a note, take these steps:

  1. Select Add in the Names section (mobile) or Add name (computer).
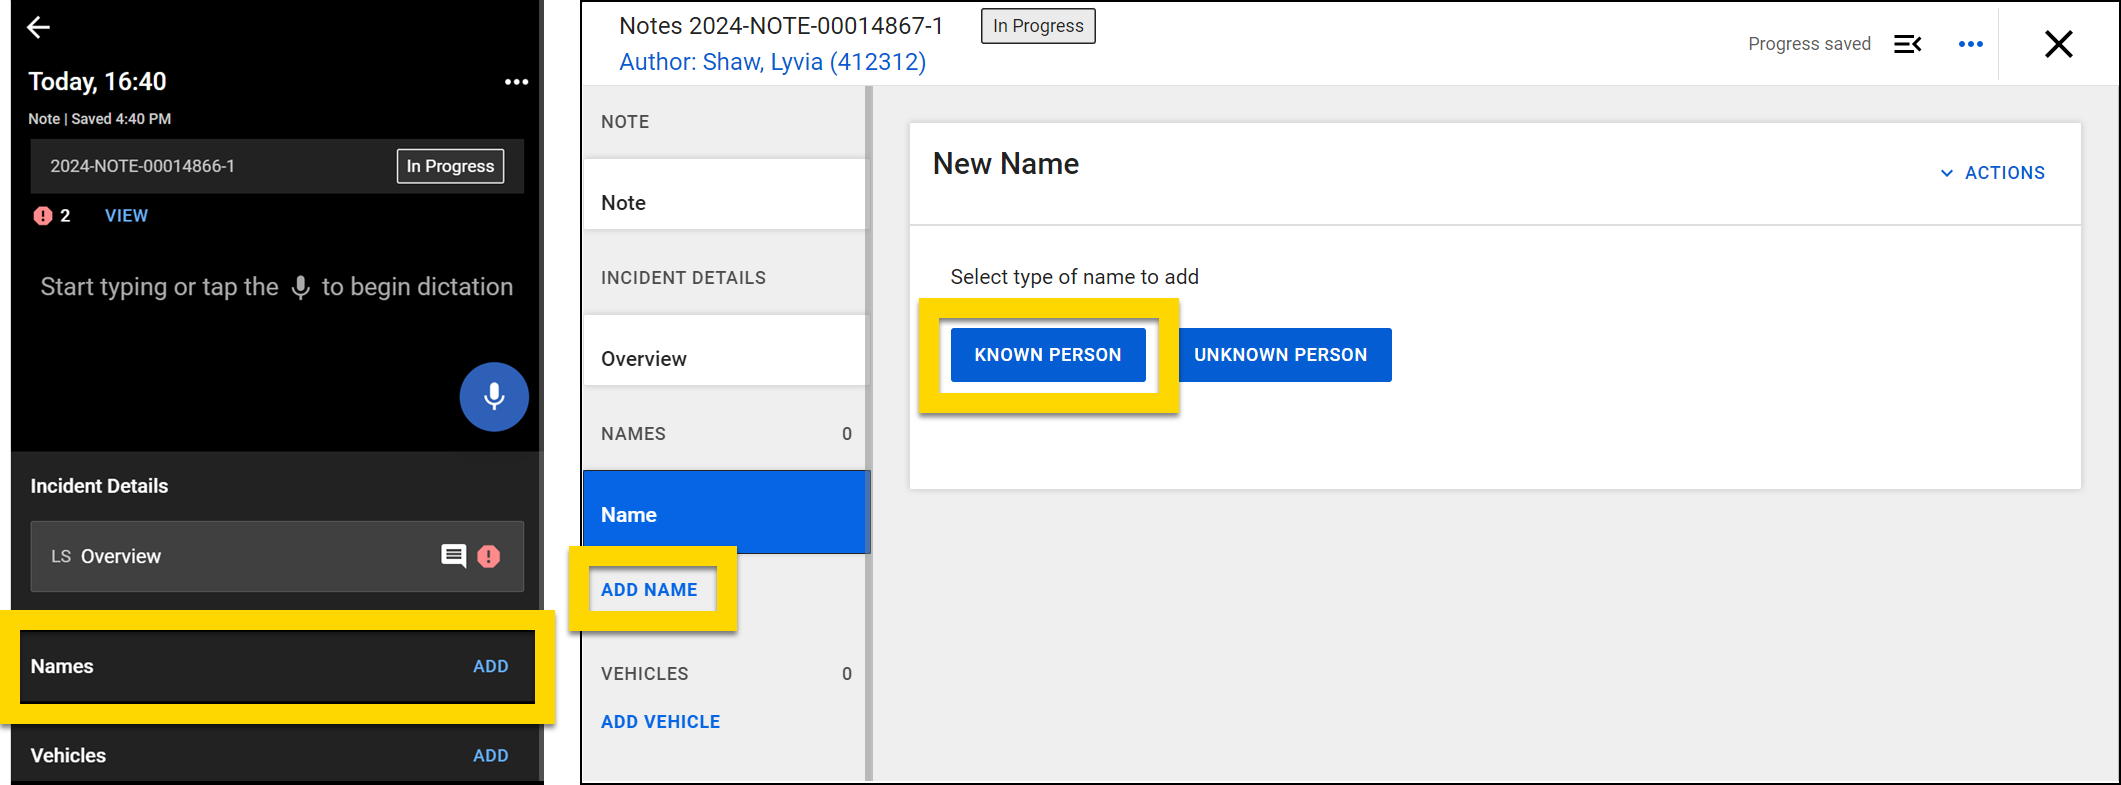
    • When writing the note on a computer, select Known for the person type.
      The image shows two screenshots side by side. The left screenshot displays a note in the mobile app with a section titled Names, which is highlighted with a yellow box, along with an option to add names. The right screenshot shows a note on a computer, with two buttons labeled Known Person and Unknown Person. Both buttons are highlighted in yellow.
  2. To avoid creating a duplicate profile, enter information in the search fields to see if that person already exists in the database.
    The image shows two screenshots side by side. The left screenshot, from the mobile app, displays a search form with fields to enter details. The search category is set to People, and the last name field is filled with Smith. The search button is located at the bottom of the form. The right screenshot, from a computer, shows search results for the last name Smith, with search filters highlighted in yellow for entering or reviewing details. Below filters, there are search results for existing persons.
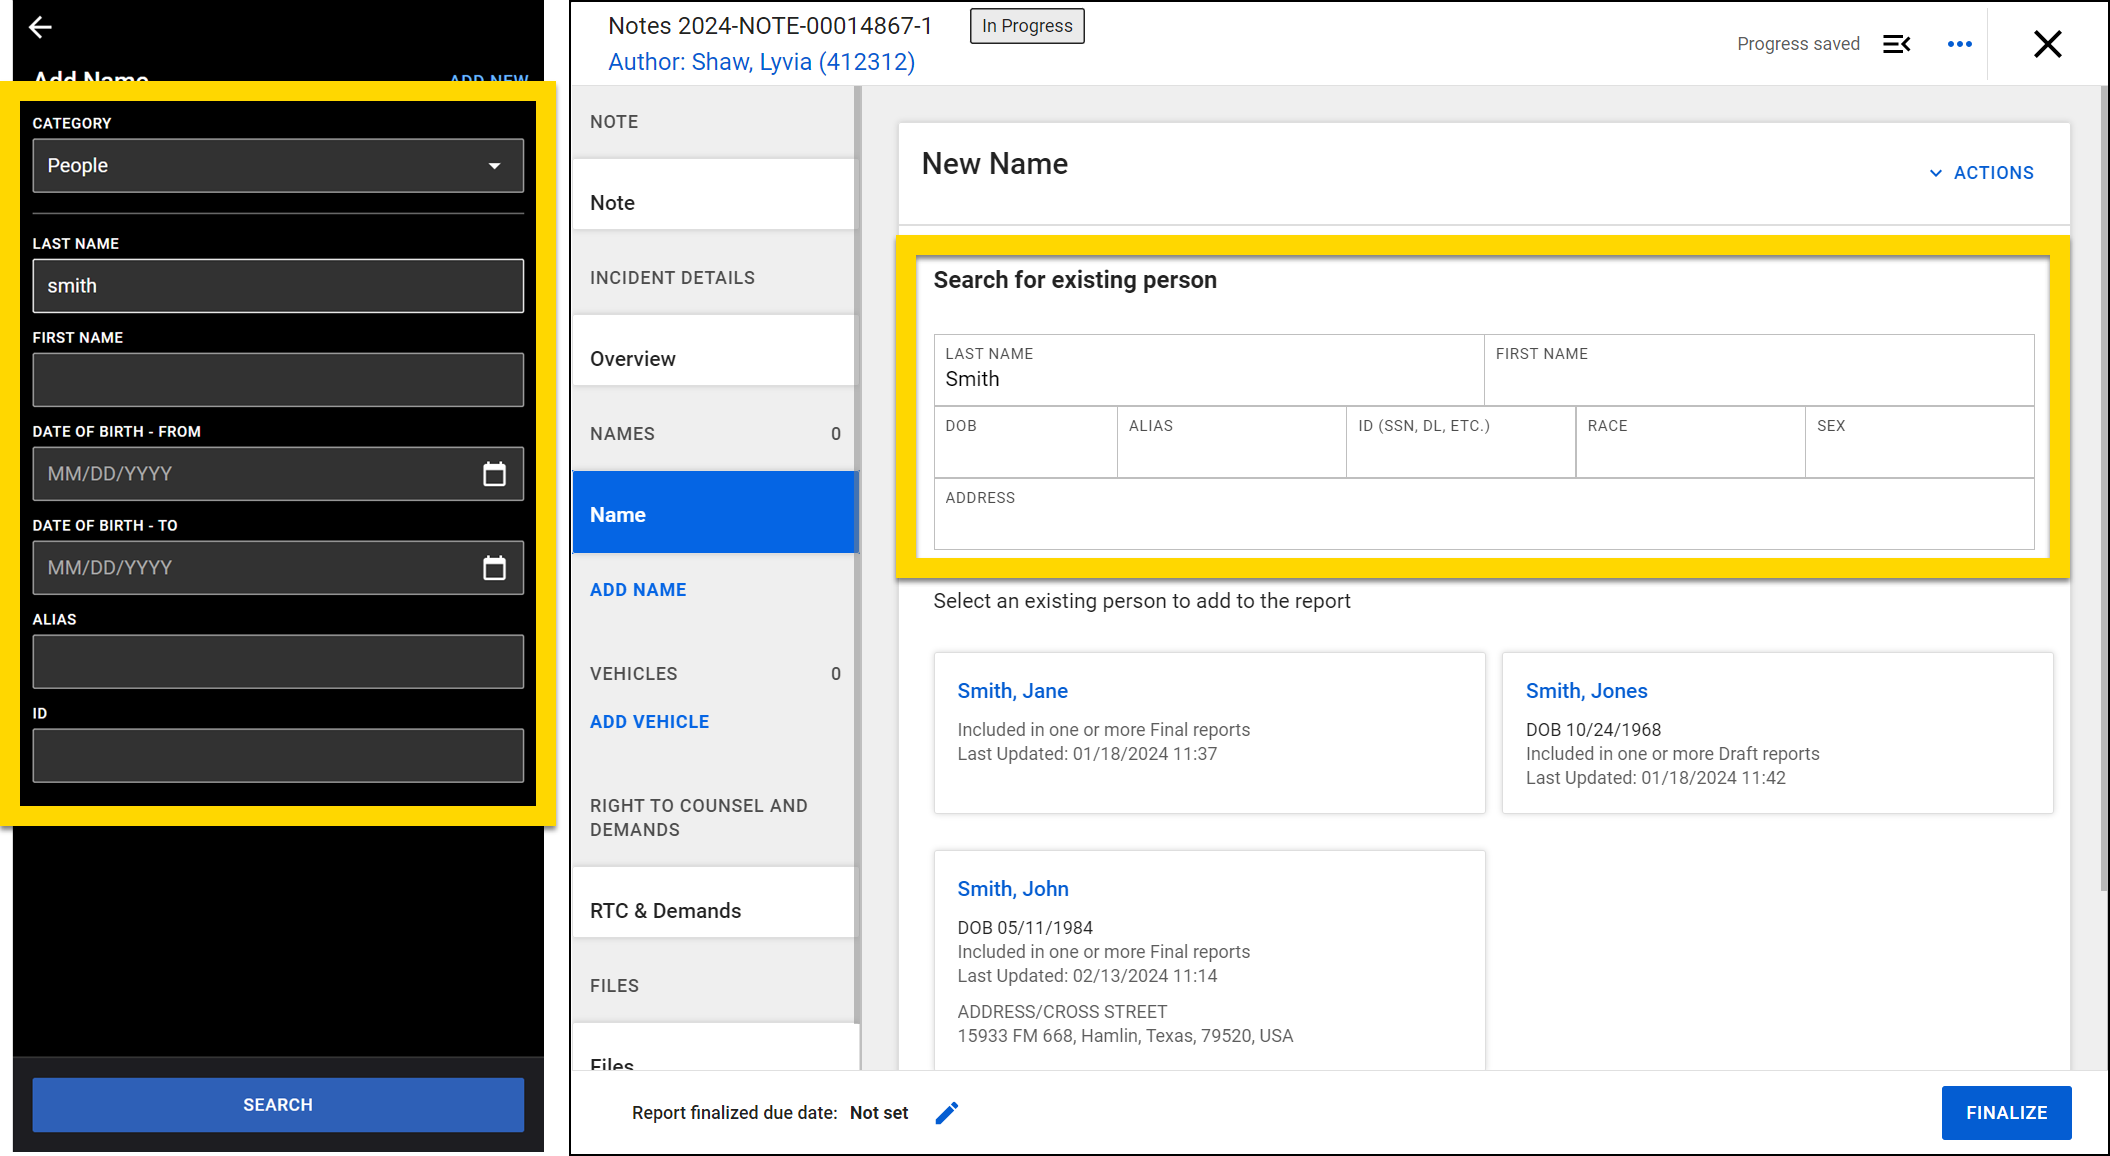
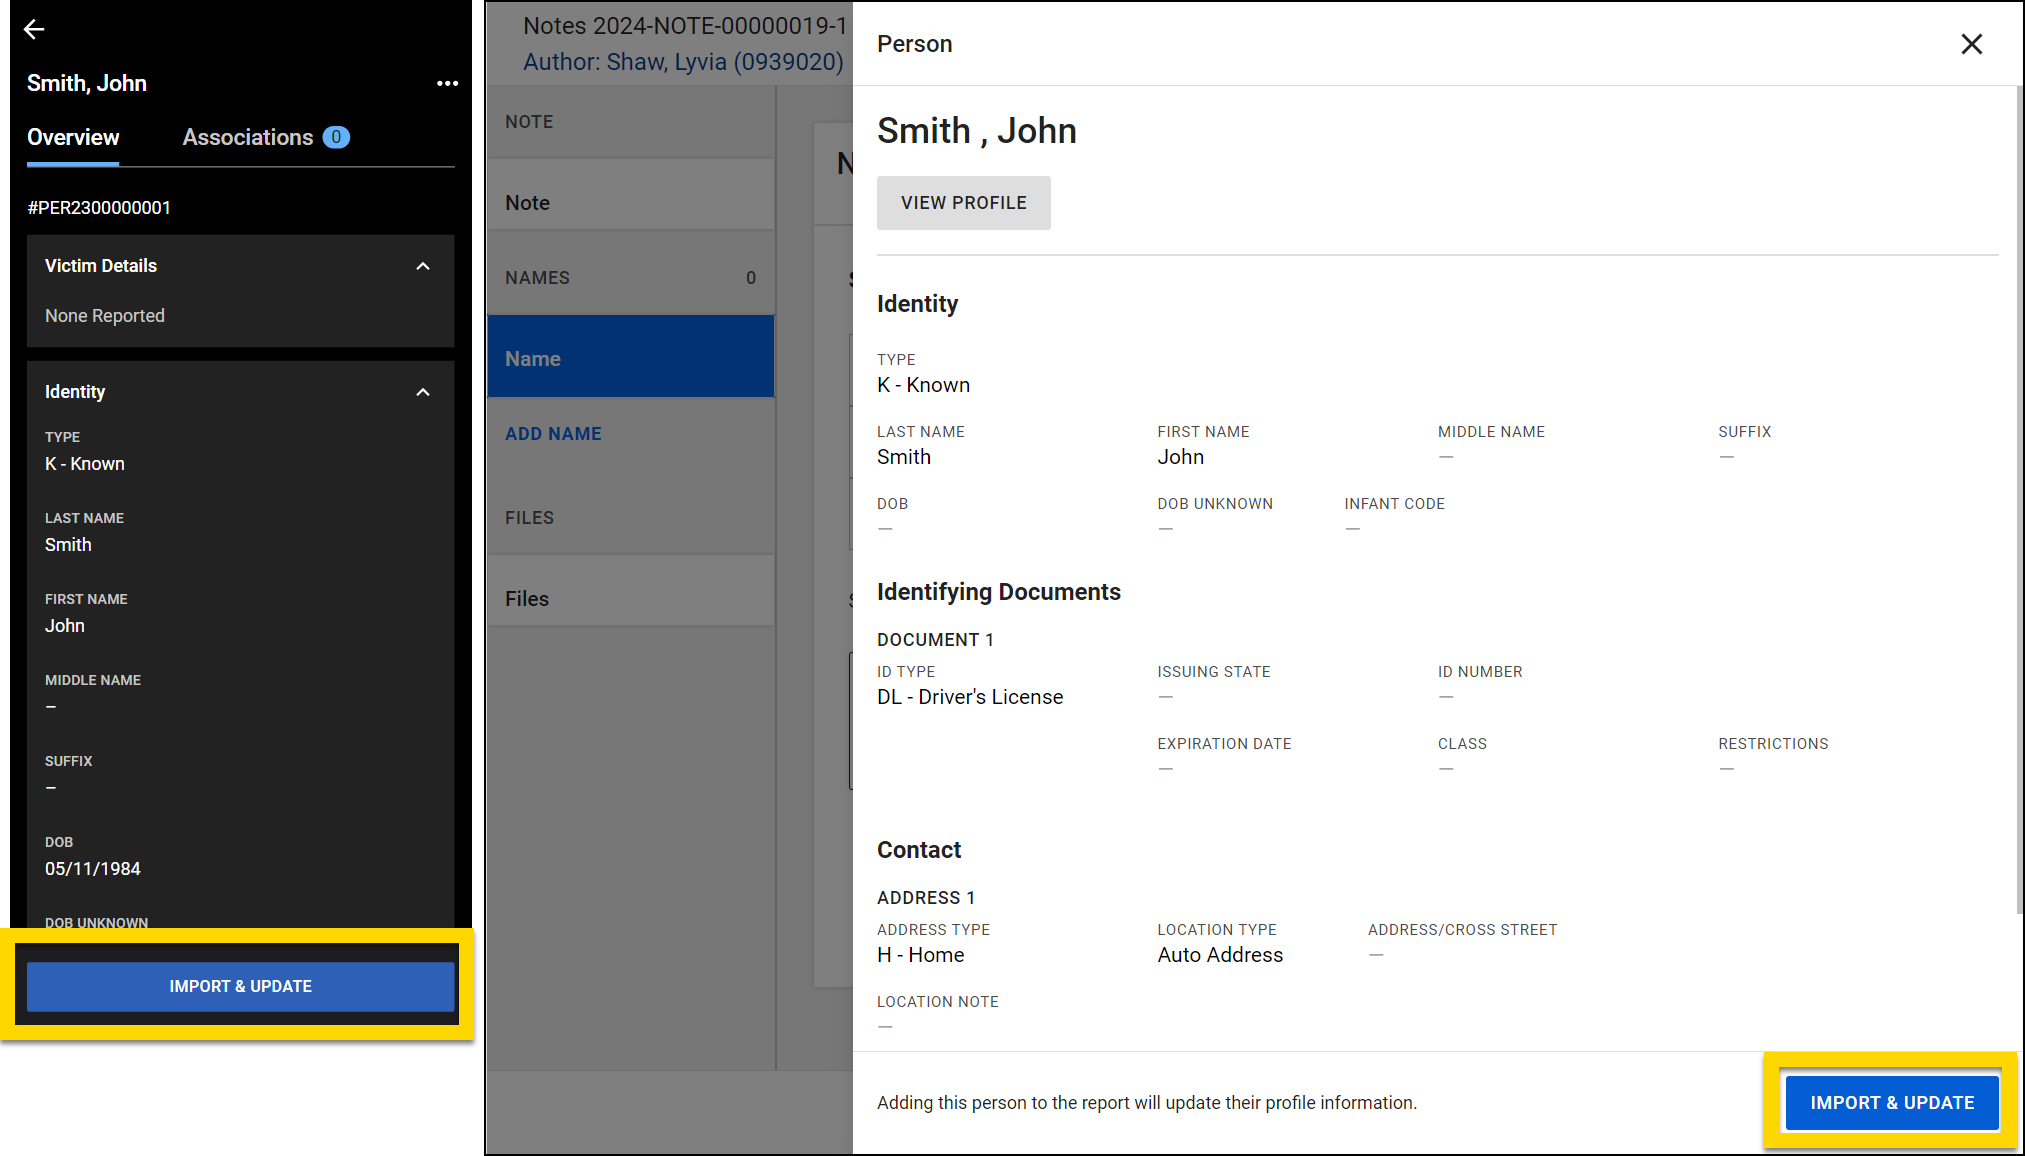
    • Select a name to open a preview of that person's profile. Select Import and update to add that person to your note. After adding a person to a note, you can edit any of the fields to update their identity, description, or contact information.
      The image shows two screenshots side by side. The left screenshot, from a mobile app, displays a profile for John Smith. At the bottom, there is a blue Import and Update button highlighted in yellow. The right screenshot, from a computer, shows the same profile for John Smith. At the bottom of the screen is a blue Import and Update button, also highlighted in yellow.
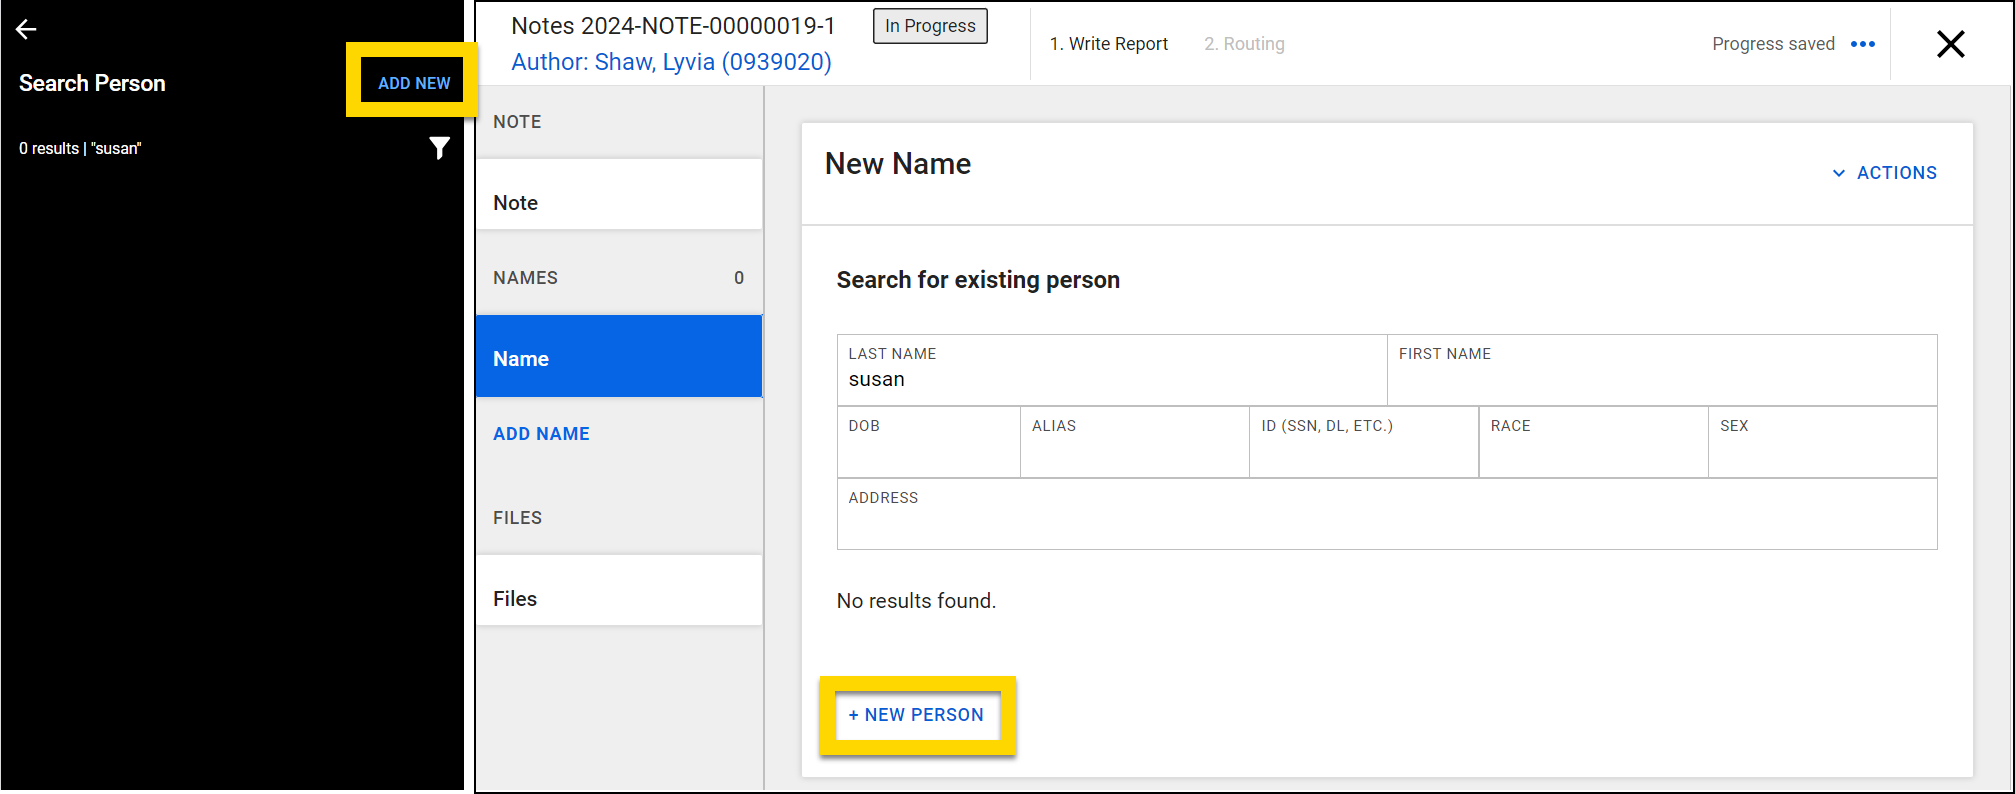
    • If you don't find the person in the database after searching for them, you can add them by selecting Add new (mobile app) or New person (computer).
      The image shows two screenshots side by side. The left screenshot, from the mobile app, displays a search screen for a person with no results found. There is an option to add a new person, highlighted in yellow at the top. The right screenshot, from a computer, shows a similar search interface with no results found. A yellow-highlighted button labeled New Person is in the center of the screen.

To remove a person from a note , select More actions [...] > Remove person (mobile) or Actions > Remove person to remove them. If the person you added was someone who already existed in the database, you can also select Remove person in the orange banner at the top of the screen.
The image shows two screenshots side by side. The left screenshot, from the mobile app, shows note section containing Margaret Wilson. The More Actions menu is opened with option to remove the person highlighted in yellow. The right screenshot, from a computer, shows the same note with a highlighted actions dropdown showing the option to remove the person.

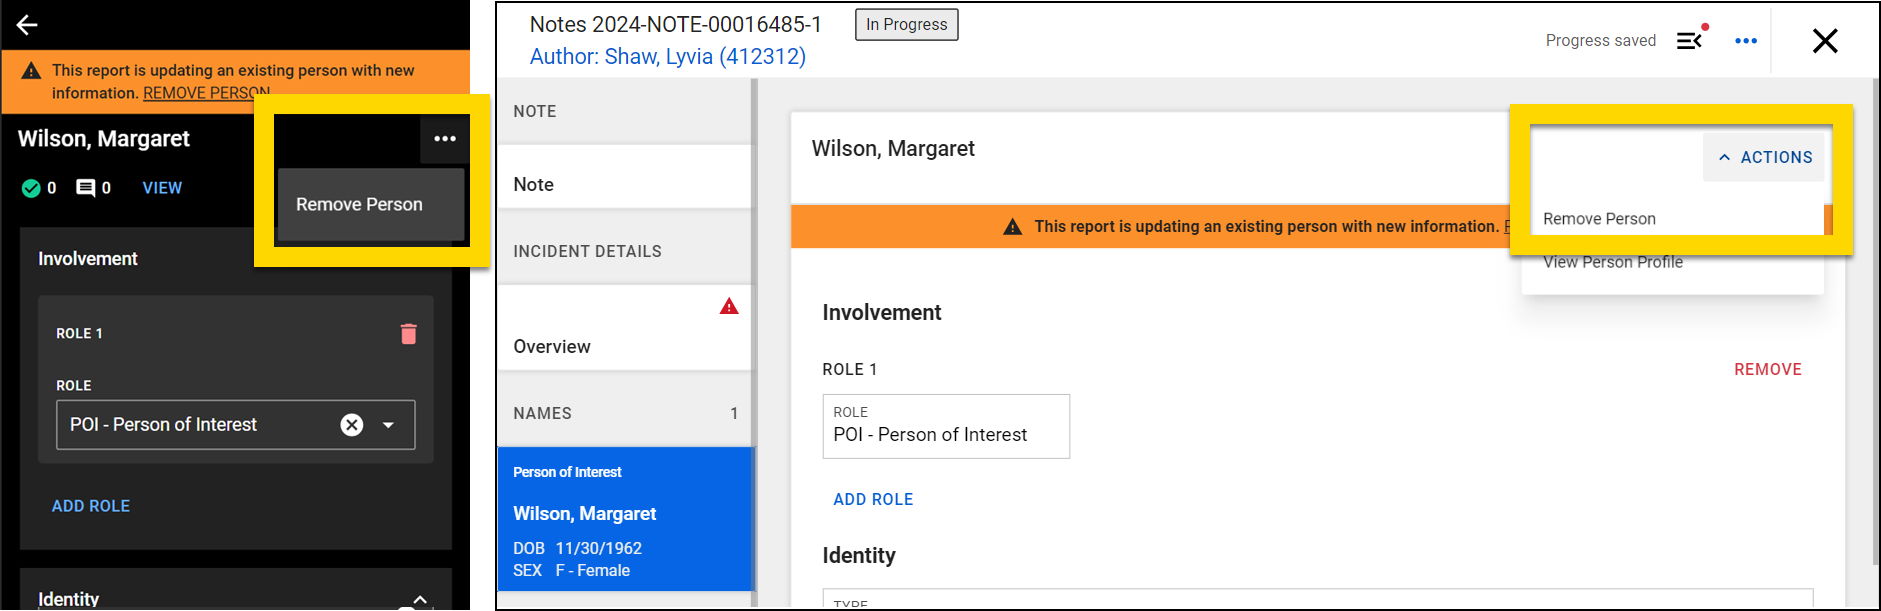
When you add a person to a note, the Associations section on their profile updates to reflect their involvement in the note. This Associations section only appears when you are viewing person profiles on a computer.
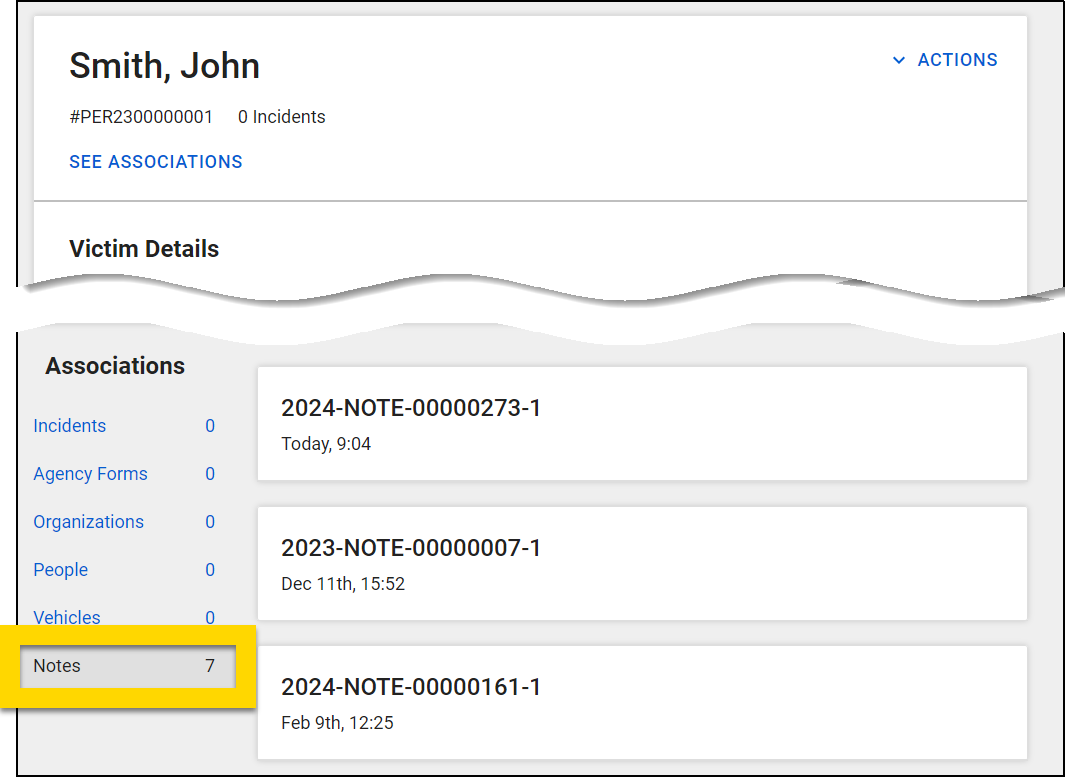
The image displays the profile of John Smith. The top section includes John Smith's name, a unique identifier, and an option to see associations. Below that, the Associations panel on the left lists categories like incidents, agency forms, organizations, people, vehicles, and notes. The Notes section is highlighted in yellow, showing a total of seven notes.

Add vehicles

To add a vehicle to a note, take these steps:

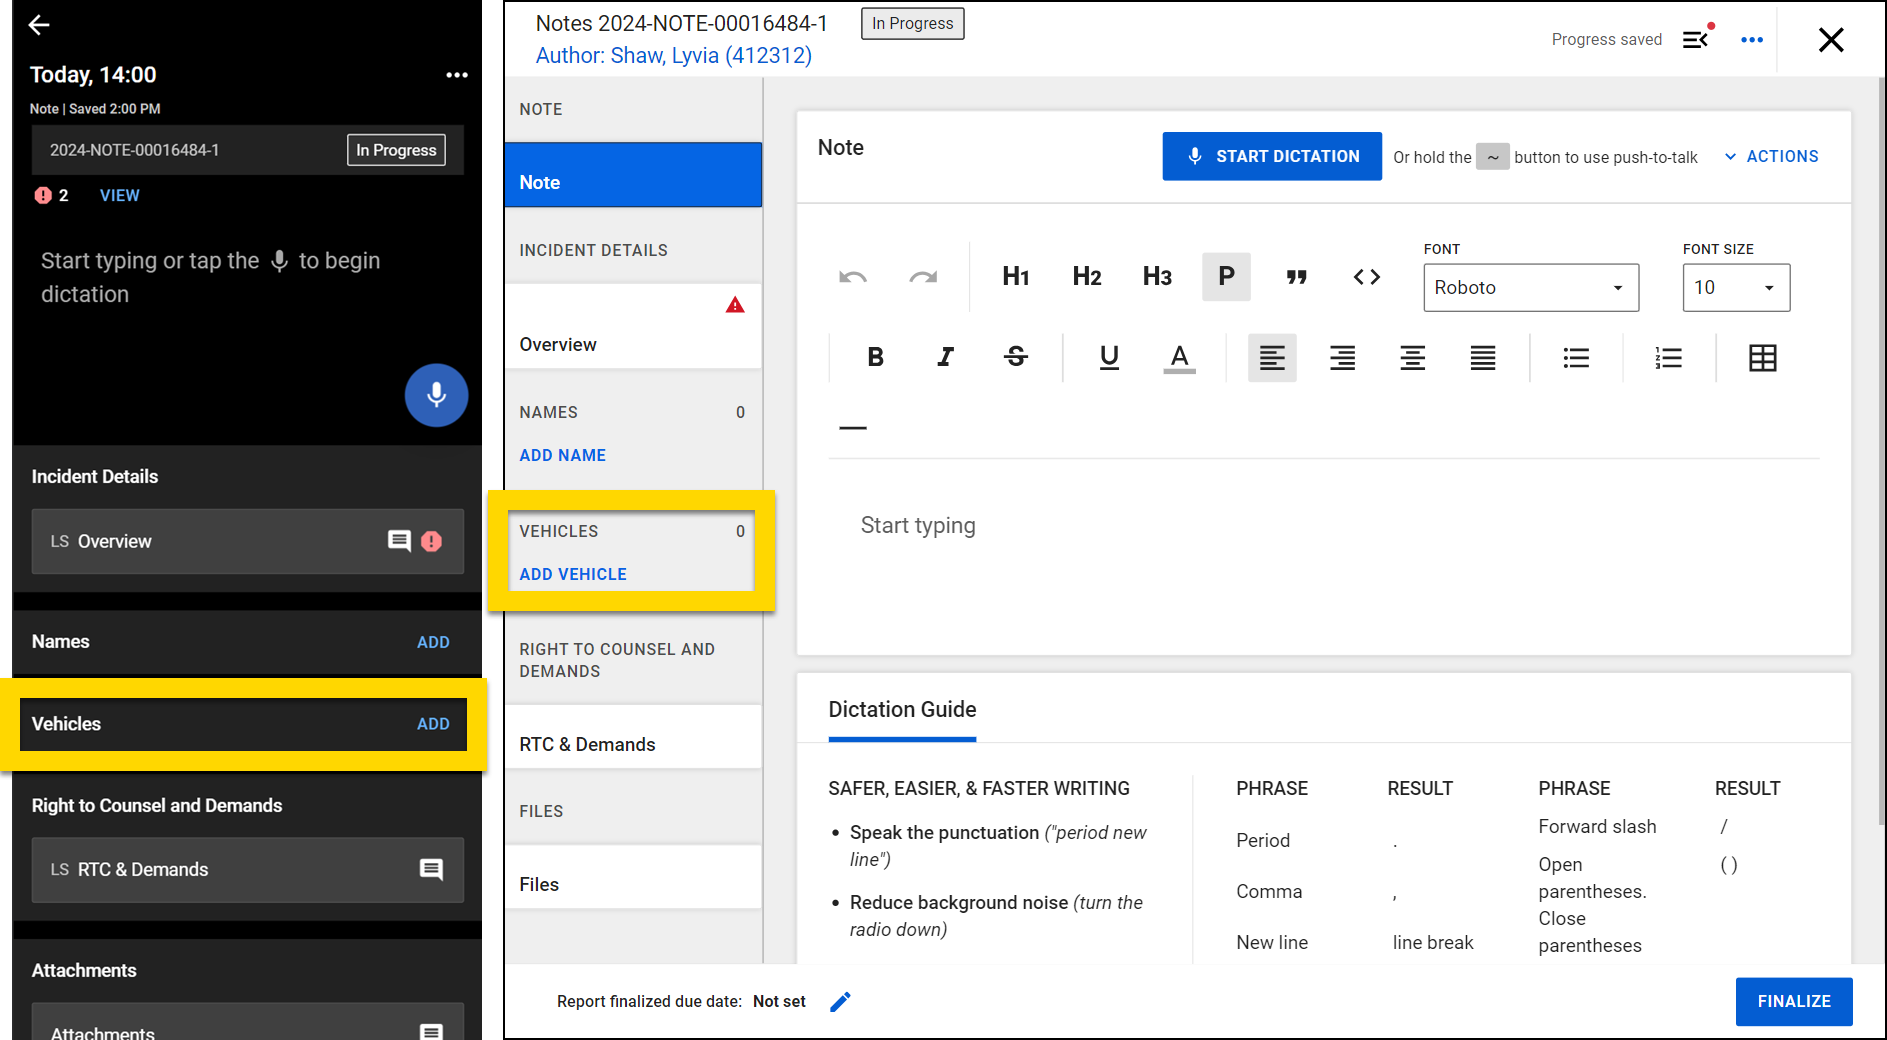
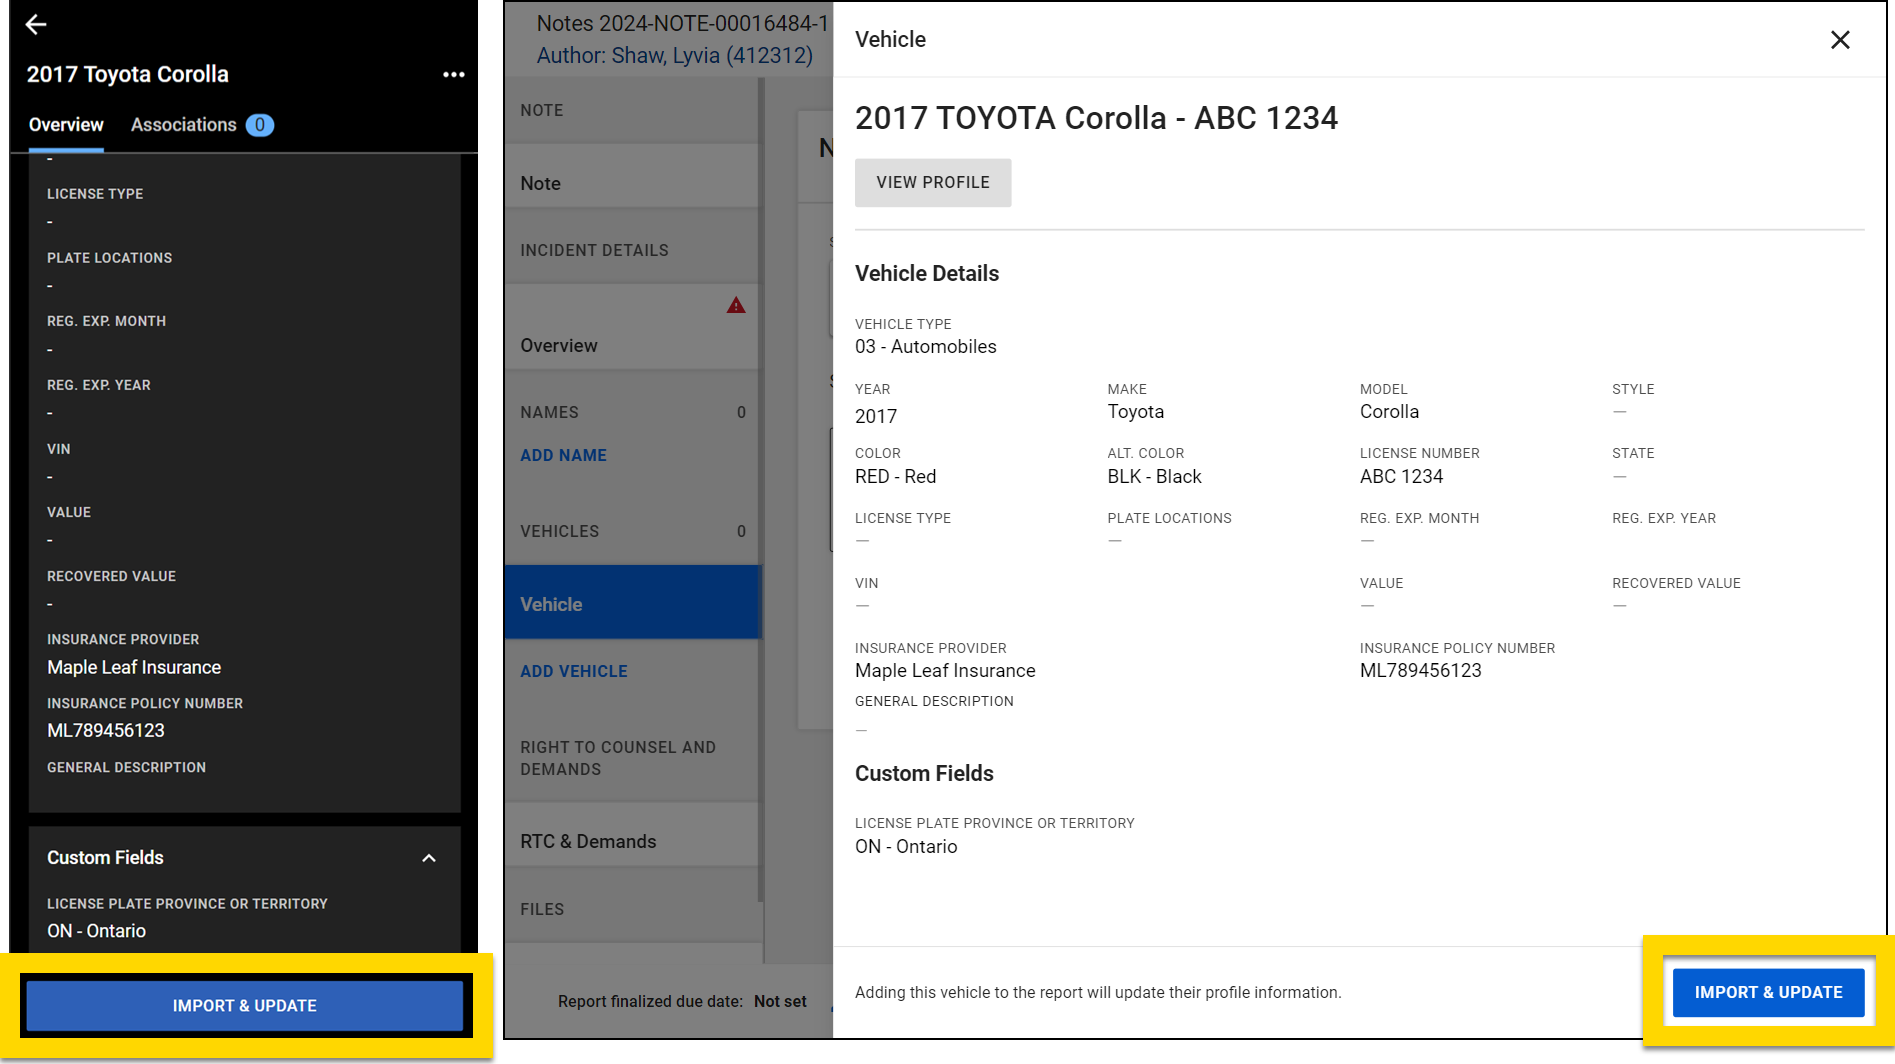
  1. Select Add in the Vehicles section (mobile) or Add vehicle (computer).
    The image shows two screenshots side by side. The left screenshot displays a note in the mobile app with a section titled Vehicles, which is highlighted with a yellow box, along with an option to add vehicles. The right screenshot shows the note on a computer, with the option to Add Vehicle highlighted in yellow.
  2. To avoid creating a duplicate profile, enter information in the search fields to see if that vehicle already exists in the database.
    The image shows two screenshots side by side. The left screenshot, from the mobile app, displays a search form with fields to enter details. The search category is set to Vehicles. The search button is located at the bottom of the form. The right screenshot, from a computer, shows search results for toyota. There are search results for existing vehicles below the search area.
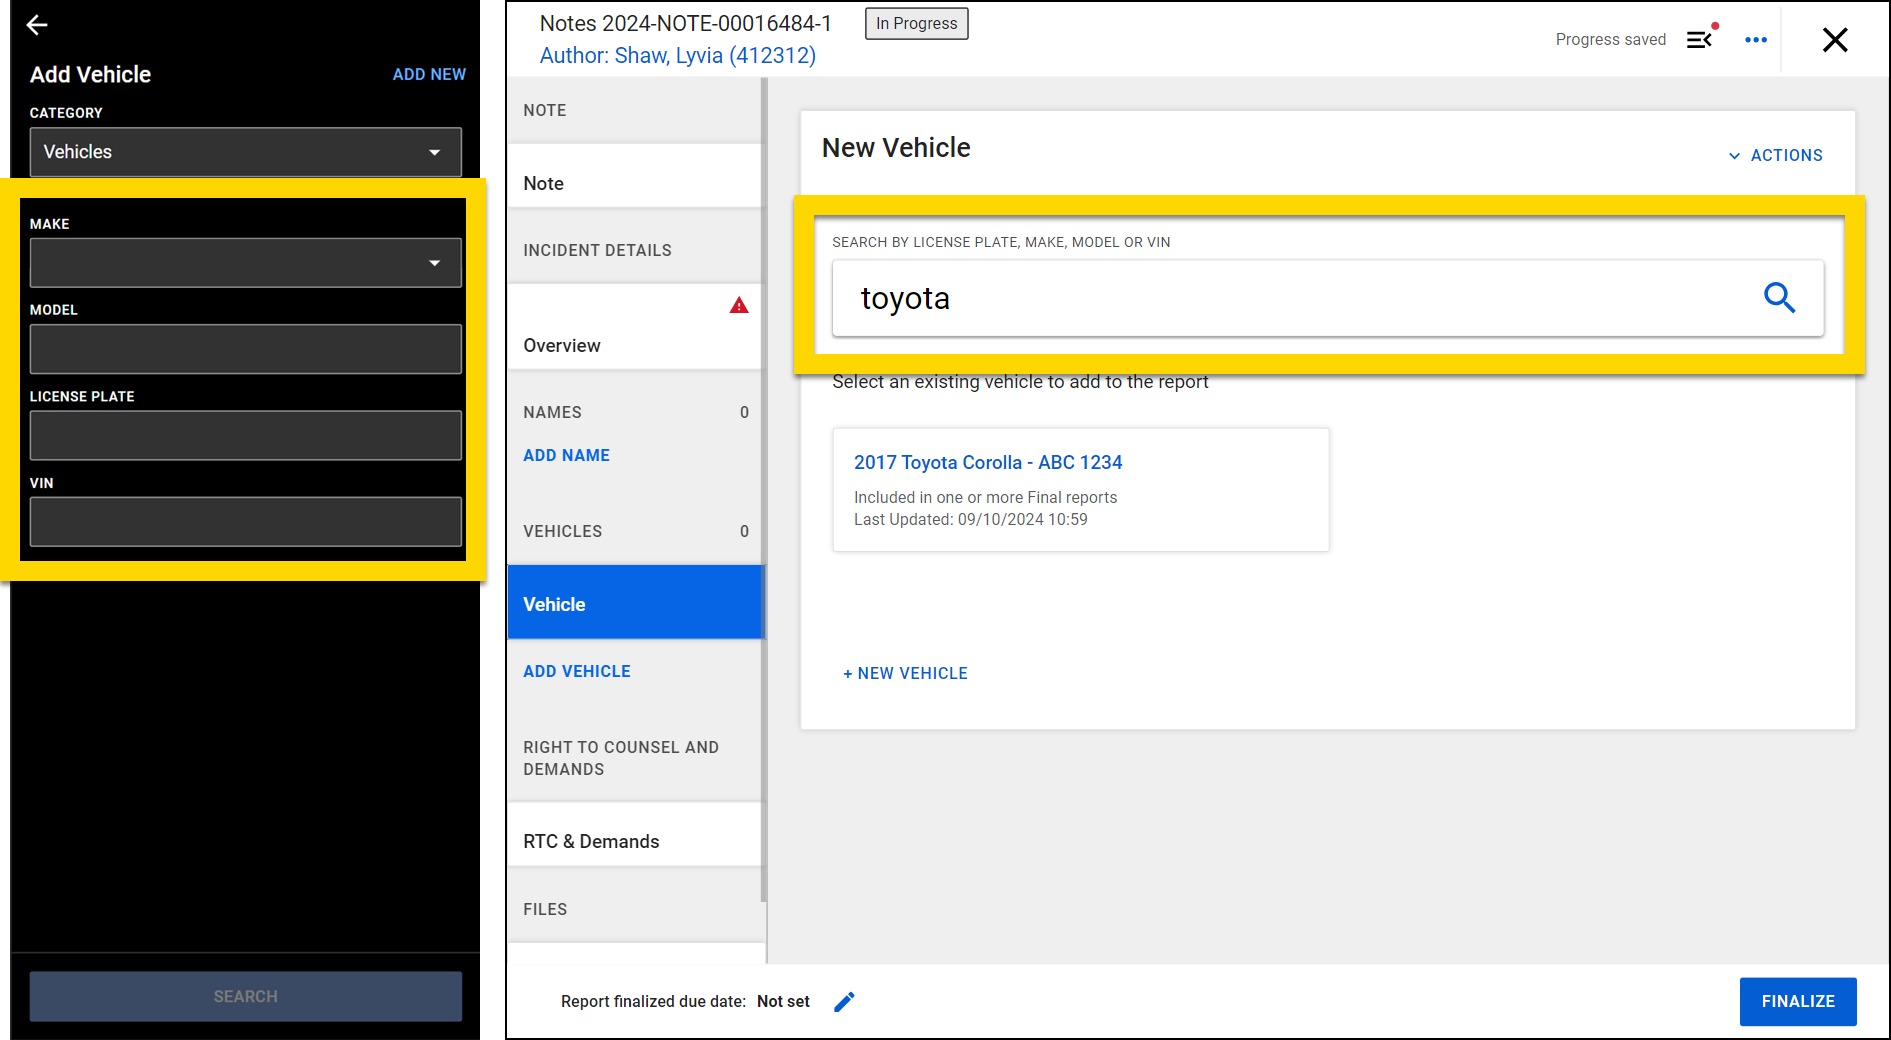
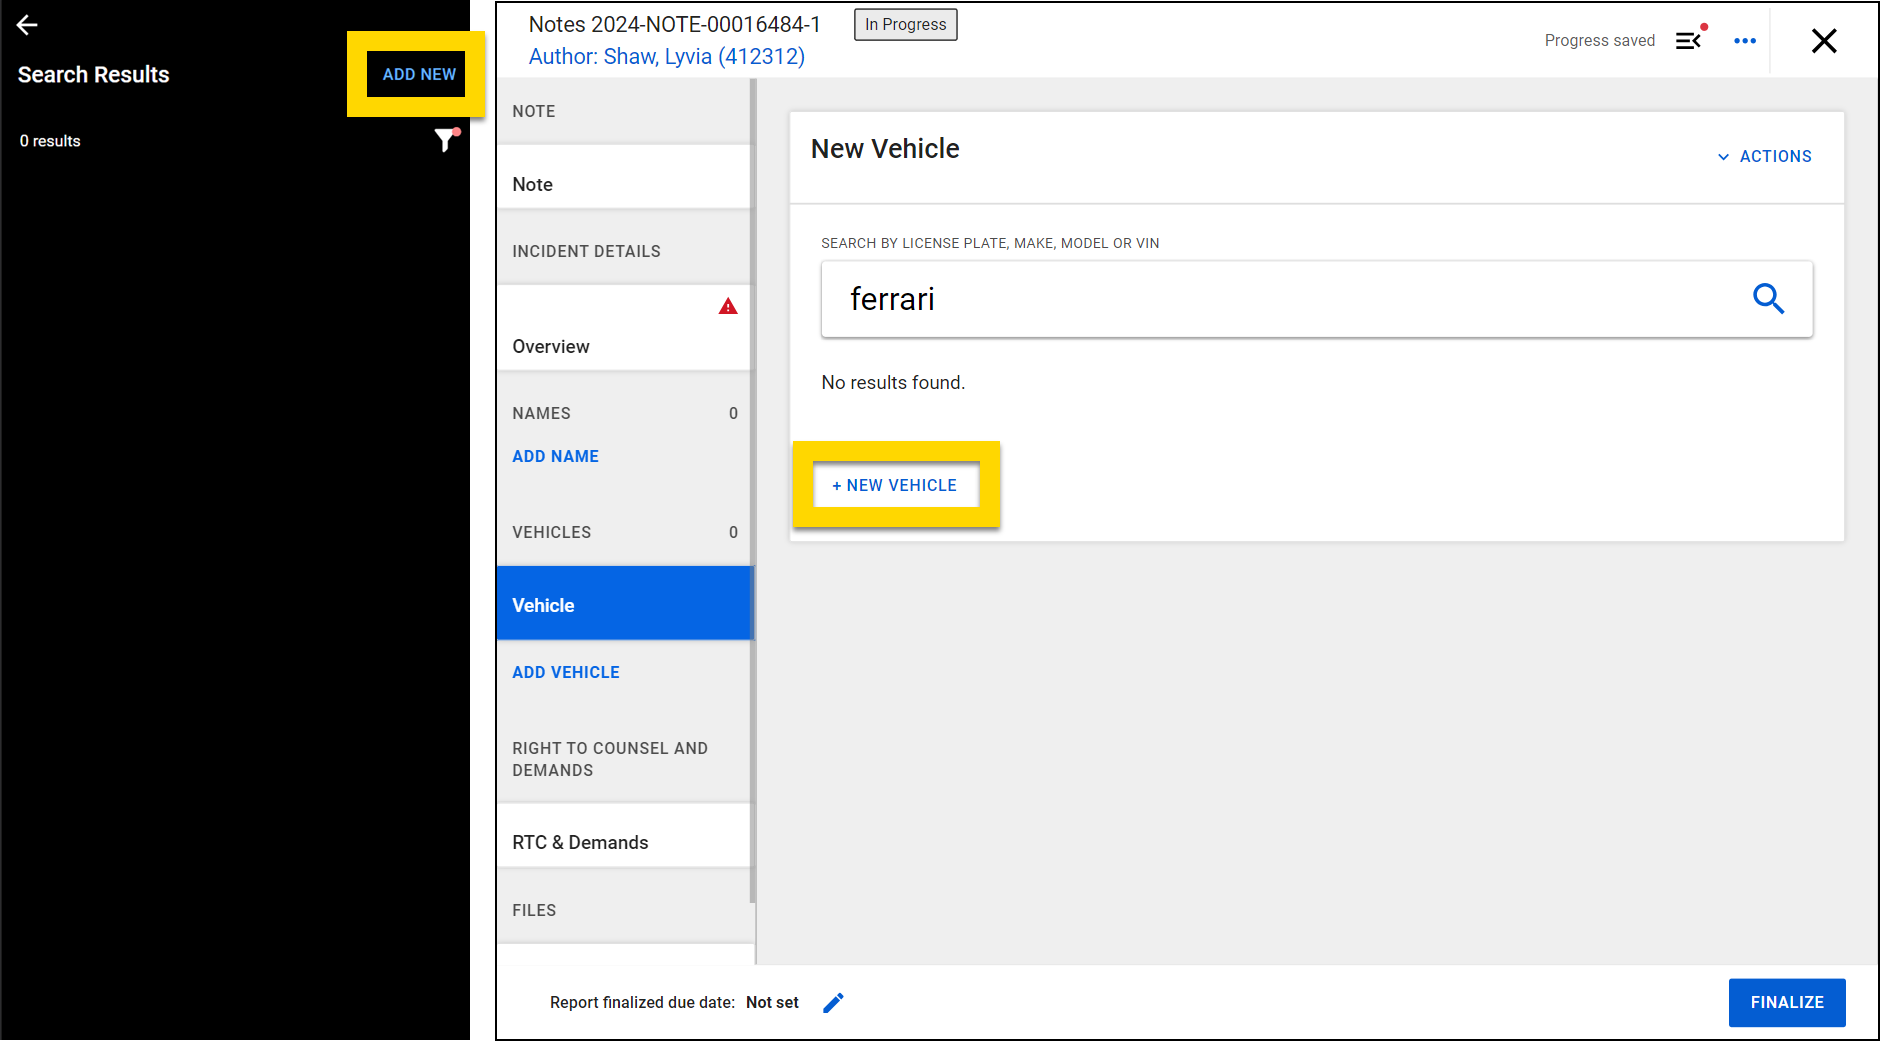
    • Select a name to open a preview of that vehicle's profile. Select Import and update to add that vehicle to your note. After adding a vehicle to a note, you can edit any of the fields to update its information.
      The image shows two screenshots side by side. The left screenshot, from a mobile app, displays a profile for a vehicle. At the bottom, there is a blue Import and Update button highlighted in yellow. The right screenshot, from a computer, shows the same profile for the vehicle. At the bottom of the screen is a blue Import and Update button, also highlighted in yellow.
    • If you don't find the vehicle in the database after searching for it, you can add it by selecting Add new (mobile app) or New vehicle (computer).
      The image shows two screenshots side by side. The left screenshot, from the mobile app, displays a search screen for a vehicle with no results found. There is an option to add a new vehicle, highlighted in yellow at the top. The right screenshot, from a computer, shows a similar search interface with no results found. A yellow-highlighted button labeled New Vehicle is in the center of the screen.

To remove a vehicle from a note , select More actions [...] > Remove vehicle (mobile) or Actions > Remove vehicle to remove it. If the vehicle you added already existed in the database, you can also select Remove vehicle in the orange banner at the top of the screen.
The image shows two screenshots side by side. The left screenshot, from the mobile app, shows note section containing a vehicle. The More Actions menu is opened with option to remove the vehicle highlighted in yellow. The right screenshot, from a computer, shows the same note with a highlighted actions dropdown showing the option to remove the vehicle.

Add files

To add a file to your note, select Attachments (mobile) or Files (computer).

In the mobile app, you can either select Take photo to open your device's camera, or Select file to chose a file you already have on your device. Once you add files to the note, the buttons will disappear. You can find the Take Photo and Select File options by selecting +Add.

If you are creating your note on a computer, you can instead select Upload file to add a file from your computer.
The image shows two screenshots side by side. The left screenshot, from a mobile app, displays a section titled Attachments with an option to add files or take a photo. A dropdown shows the options to take a photo or select a file, and below that, a button labeled Take Photo is highlighted in yellow. The right screenshot, from software on a computer, shows a similar section labeled Files, which indicates that no files have been uploaded yet. A blue Upload File button is highlighted with a yellow arrow pointing to it.

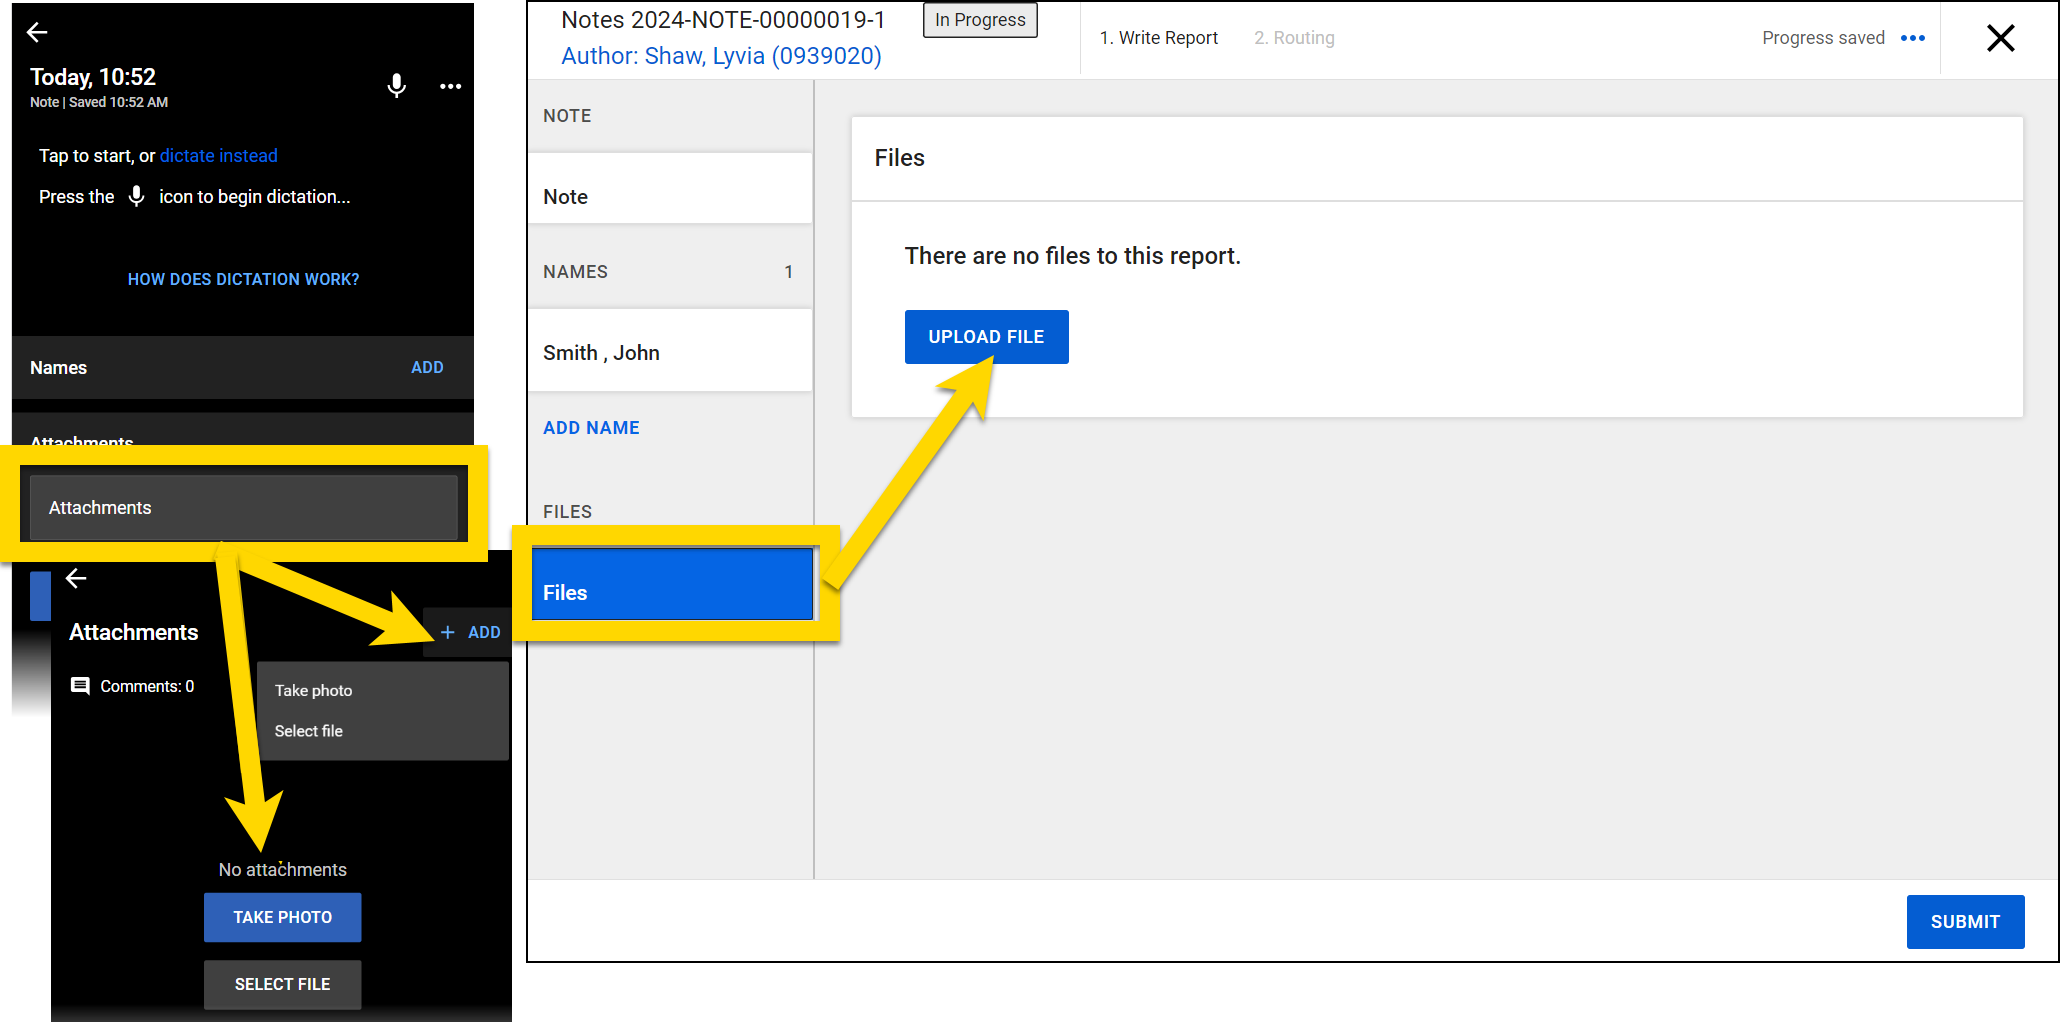
When a file is added to a note, it is also uploaded to Axon Evidence as a piece of evidence. To view the evidence details on mobile, select More actions [...] > View evidence details. To view evidence details on a computer, select the file name. The evidence details page in Axon Evidence will open in a new tab.
The image shows multiple screenshots displaying details about an evidence file titled bicycle.jiff across both mobile and desktop interfaces. On the left, the mobile app displays an image of the bicycle with an option highlighted in yellow to view evidence details. On the right, the desktop software shows the same evidence file in the Files section of a report. The file name bicycle.jiff is highlighted in yellow. An arrow points from this file name to the Evidence Details page in Axon Evidence, which displays the metadata of the evidence, including the file size and timestamps, along with options for managing access, shares, and other actions.

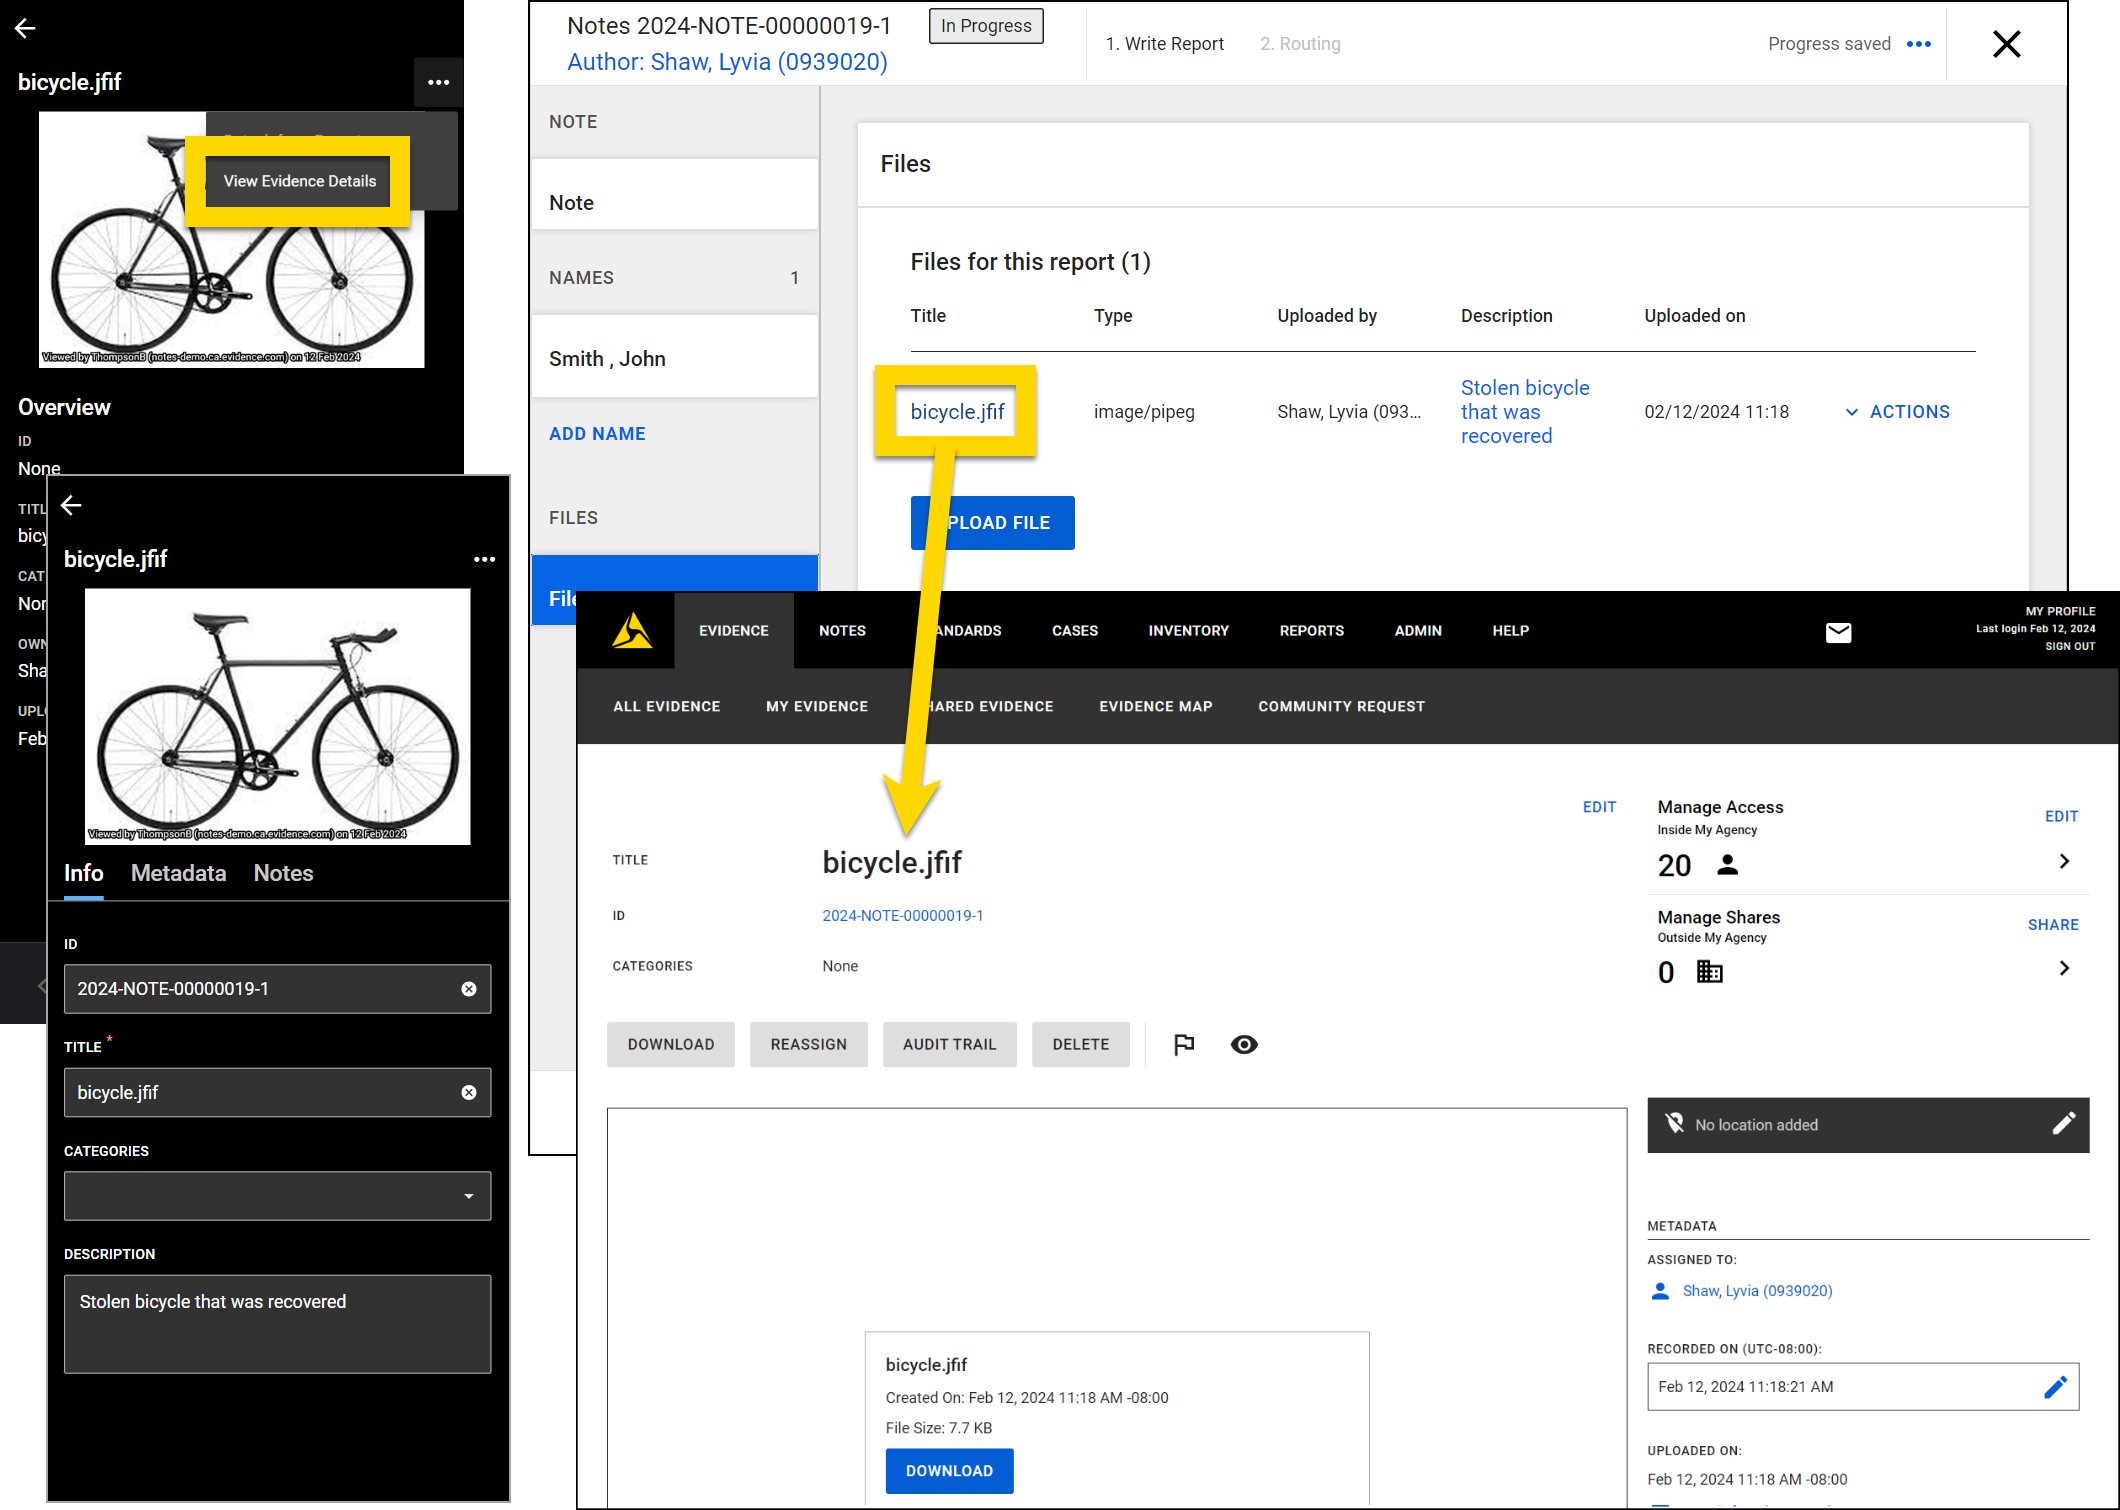
To remove a file from a note on mobile, select More actions > Detach from report.To remove a file from a note on a computer, select Actions > Remove. Removing a file from your note does not delete it from Axon Evidence. To completely delete a file, you must open Axon Evidence and delete the file from there. For more information about deleting files from Axon Evidence, see the Axon Evidence user guide.
The image shows two screenshots displaying details of an evidence file titled bicycle.jiff across mobile and desktop interfaces. On the left, the mobile app displays an image of the bicycle with an option highlighted in yellow to detach from the report. Below the image, an overview section shows the file's title, owner, and other metadata. On the right, the desktop software displays the same evidence file in the Files section of a report. An Actions dropdown is highlighted in yellow with options to remove or edit the file.

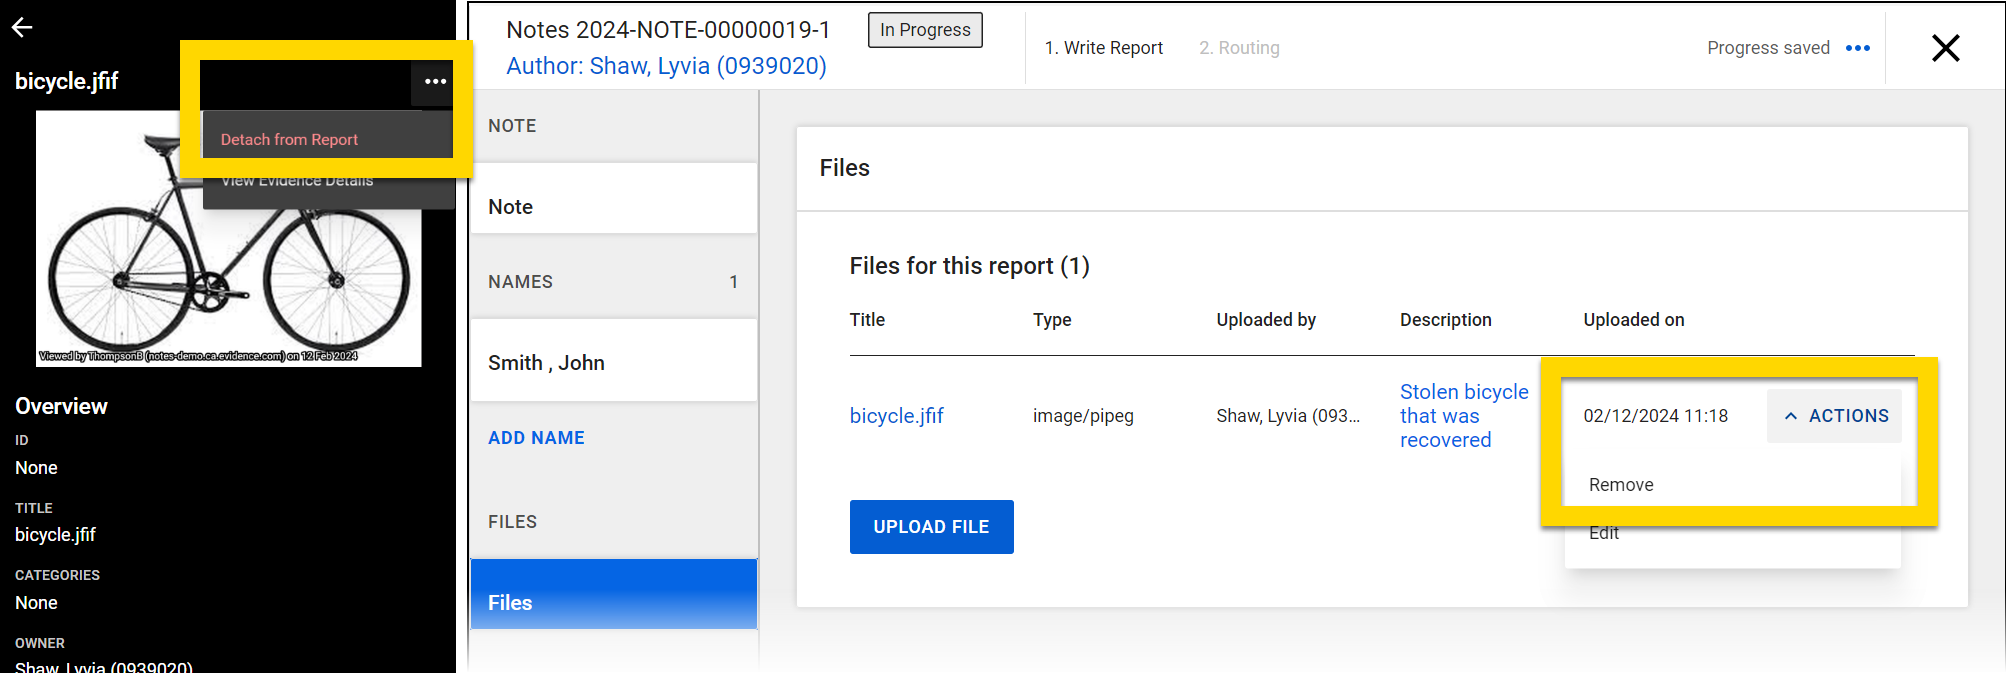
Create supplement notes

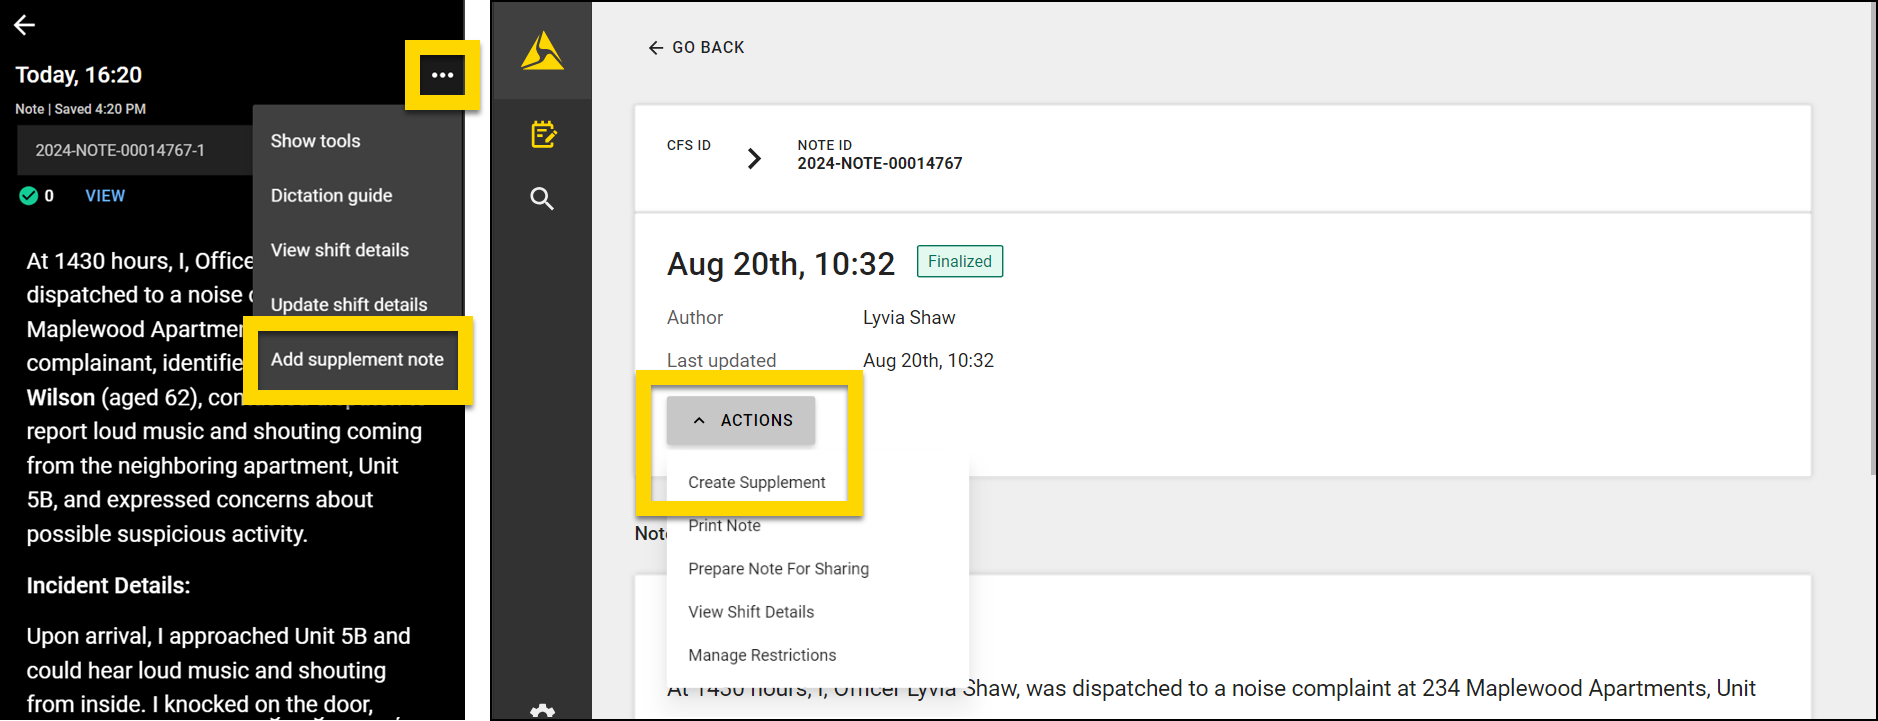
Once it is finalized, a note can no longer be edited. However, if you later need to add or adjust the information in a note, you can add a supplement. To do this, open the note and select:

  • Mobile: More actions [...] > Add supplement note.
  • Computer: Actions > Create supplement.
    The image shows two screenshots displaying options to add a supplement note across mobile and desktop interfaces. On the left, the mobile app displays a note with an options menu expanded. The option to add a supplement note is highlighted in yellow. On the right, the desktop software shows the same note, with an actions dropdown menu. The option to create a supplement is highlighted in yellow within the actions menu.

The supplement opens, and you can add additional information text, people, vehicle, and files as you would when creating a new note. You can tell you are working on a note supplement because a "-2" appears at the end of the Note ID. If you were to add an additional supplement, you would see "-3" and so on.
The image shows two screenshots displaying a supplement note across mobile and computer interfaces. On the left, the mobile app shows a supplement note with the note ID highlighted in yellow. On the right, the computer interface displays the same supplement note with the same note ID highlighted in yellow.

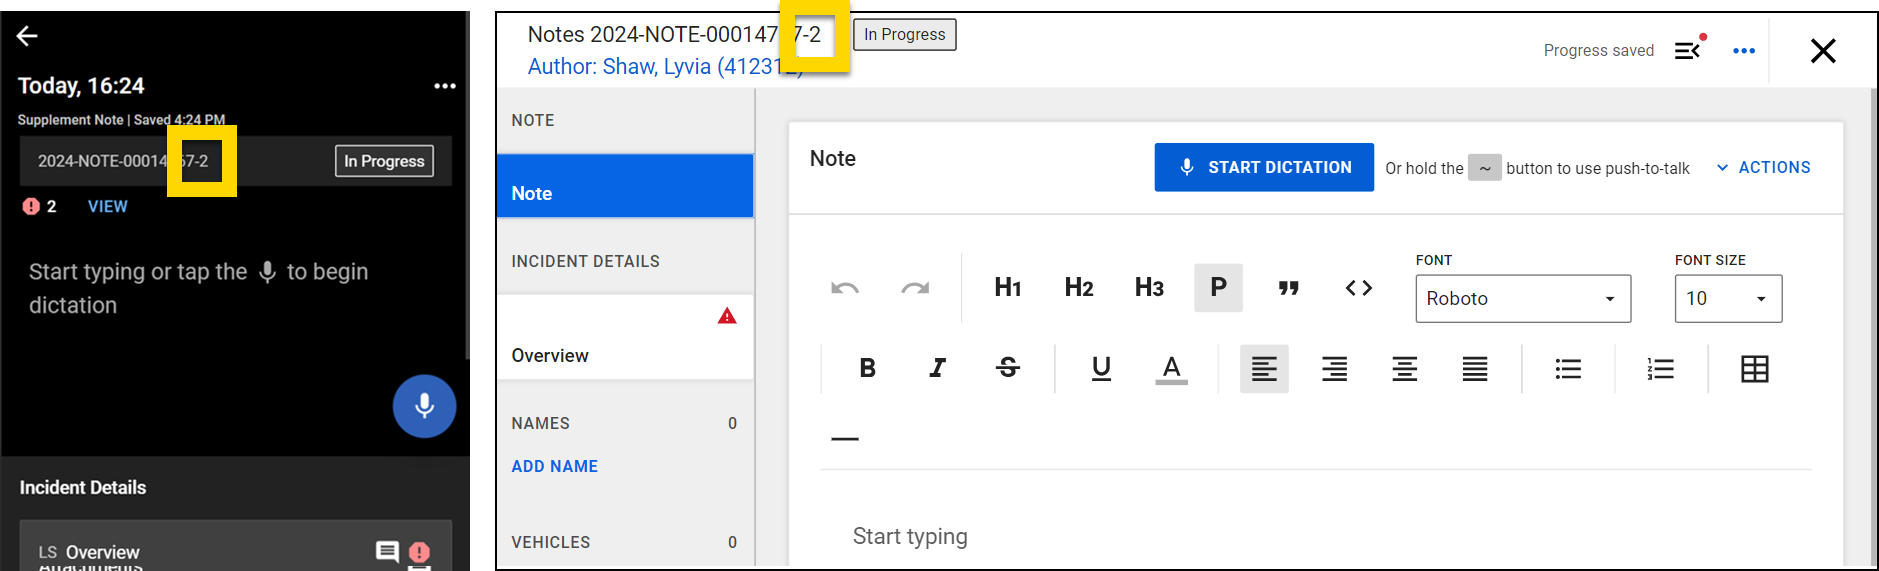
View supplements and original notes

When you open a supplement note on mobile, the sections for the supplement appear at the top of the screen, and the original note, plus any other supplements appear at the bottom. Select View note to view all content in the original note or any of the supplement notes.
The image shows two screenshots from a mobile app. On the left, a supplement note is displayed. At the bottom, the original note is shown, with an option to view the full note highlighted by a yellow arrow that points to the full note opened on the right.

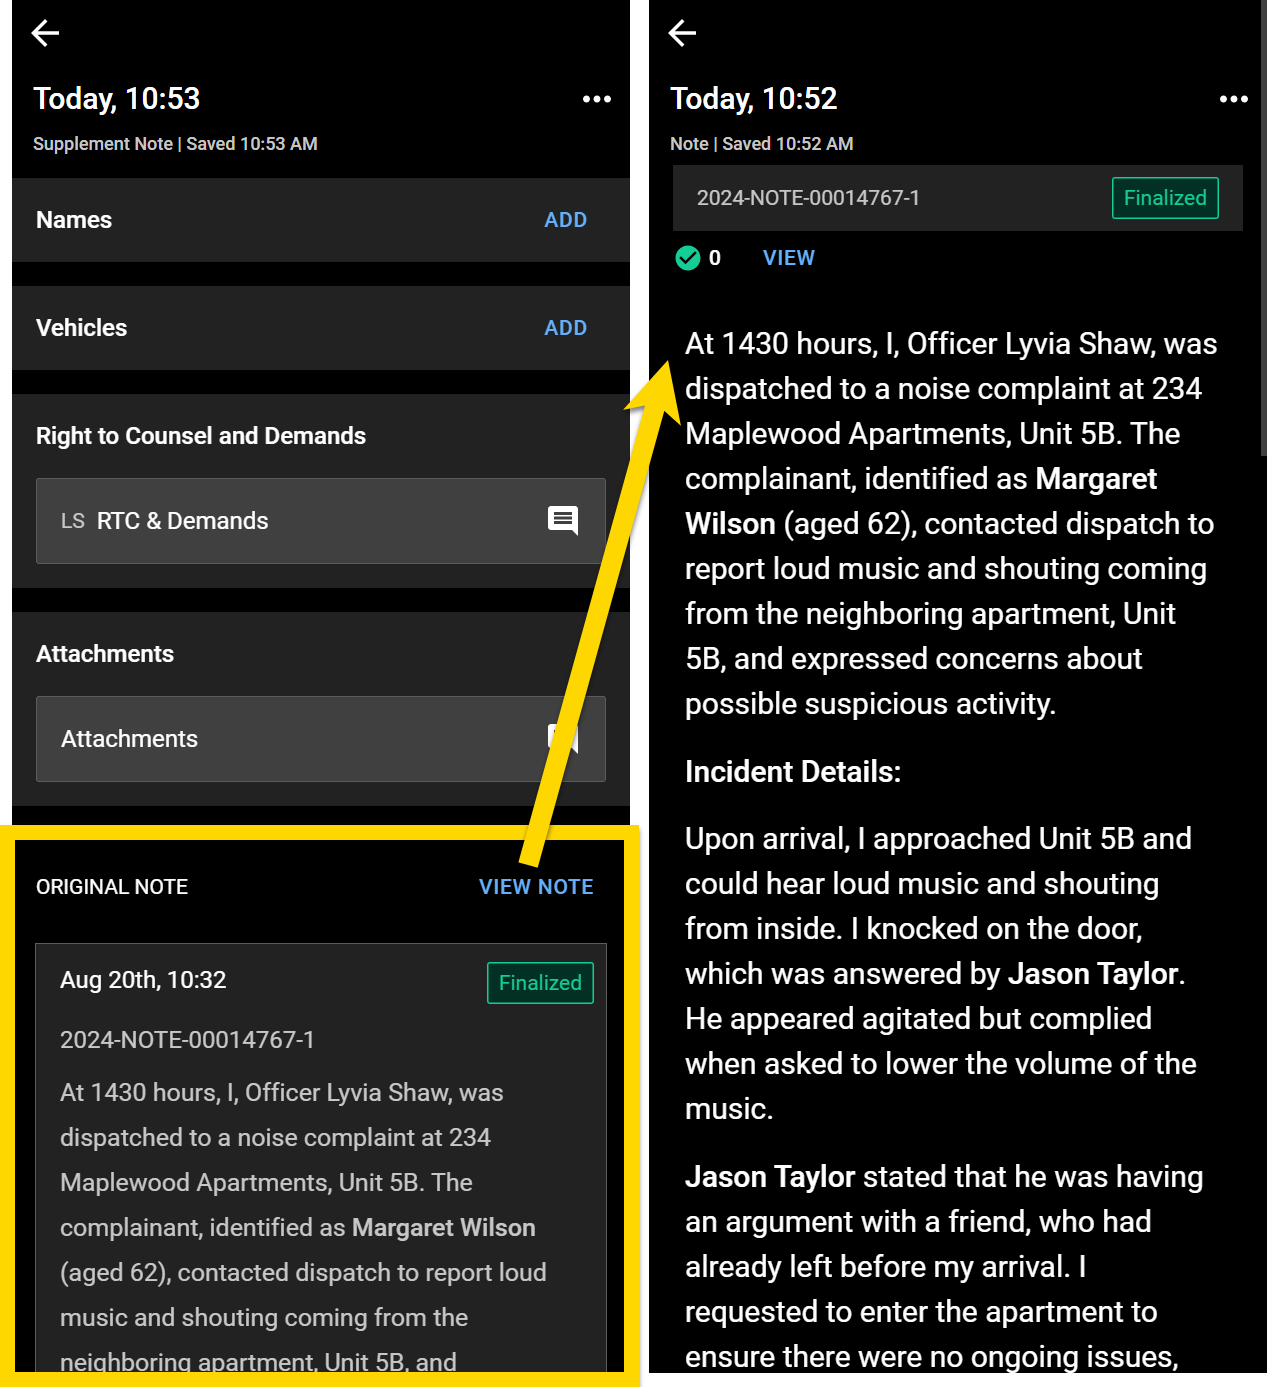
When opening a supplement note on a computer, you see the full note profile. Scroll down to the Notes reports section at the bottom of the page to see the original note, as well as all supplements created for it. The original note appears at the top of the list above any supplement notes that have been created.
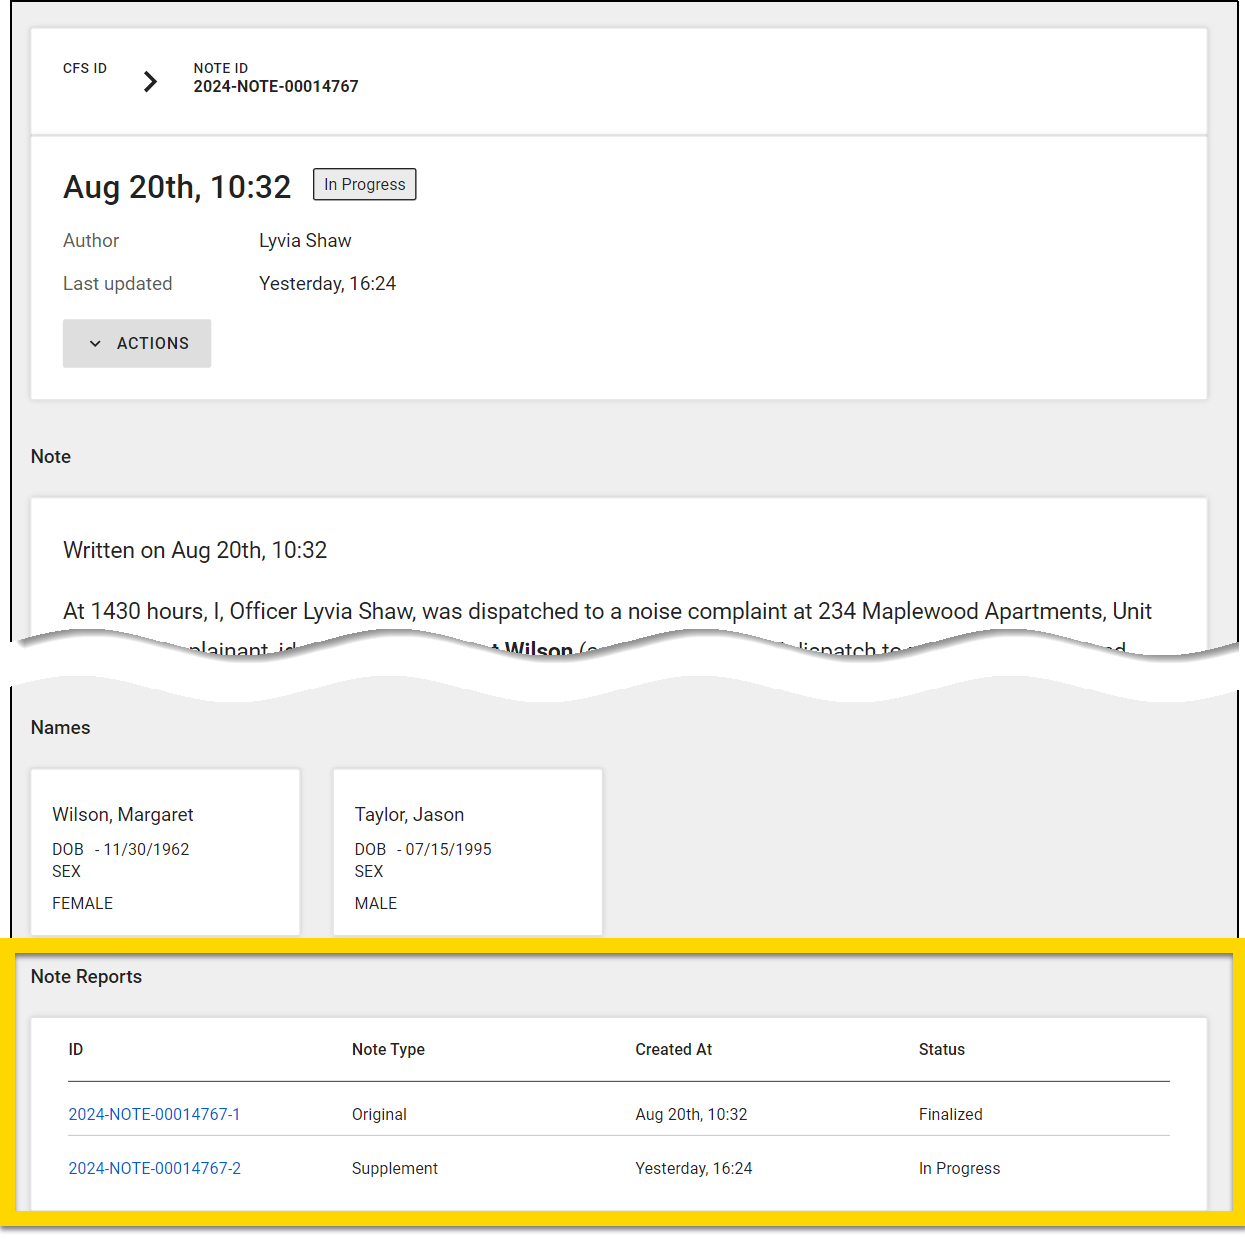
The image shows a computer interface displaying details of a note. At the top, the note ID and CFS ID are listed. At the bottom, the Note Reports section is highlighted in yellow, showing two entries: the original note created on August 20th and a supplement note created yesterday, marked as in progress.

Finalize notes

After you have finished adding all necessary information to your note, select Finalize (mobile) or Submit (computer) to finalize the note. (Finalization is not available when you are offline.)

Once finalized, you can no longer edit a note. However, if you later need to add or adjust the information in a note, you can add a supplement to the note.
The image shows a side-by-side comparison of a mobile app and a desktop version of a Notes interface. The left side displays the mobile app with a list of names, vehicles, and other note details, while the right side shows the desktop version with a detailed text editor for writing notes. A yellow-highlighted Finalize button is visible on both interfaces, indicating the option to complete the note.

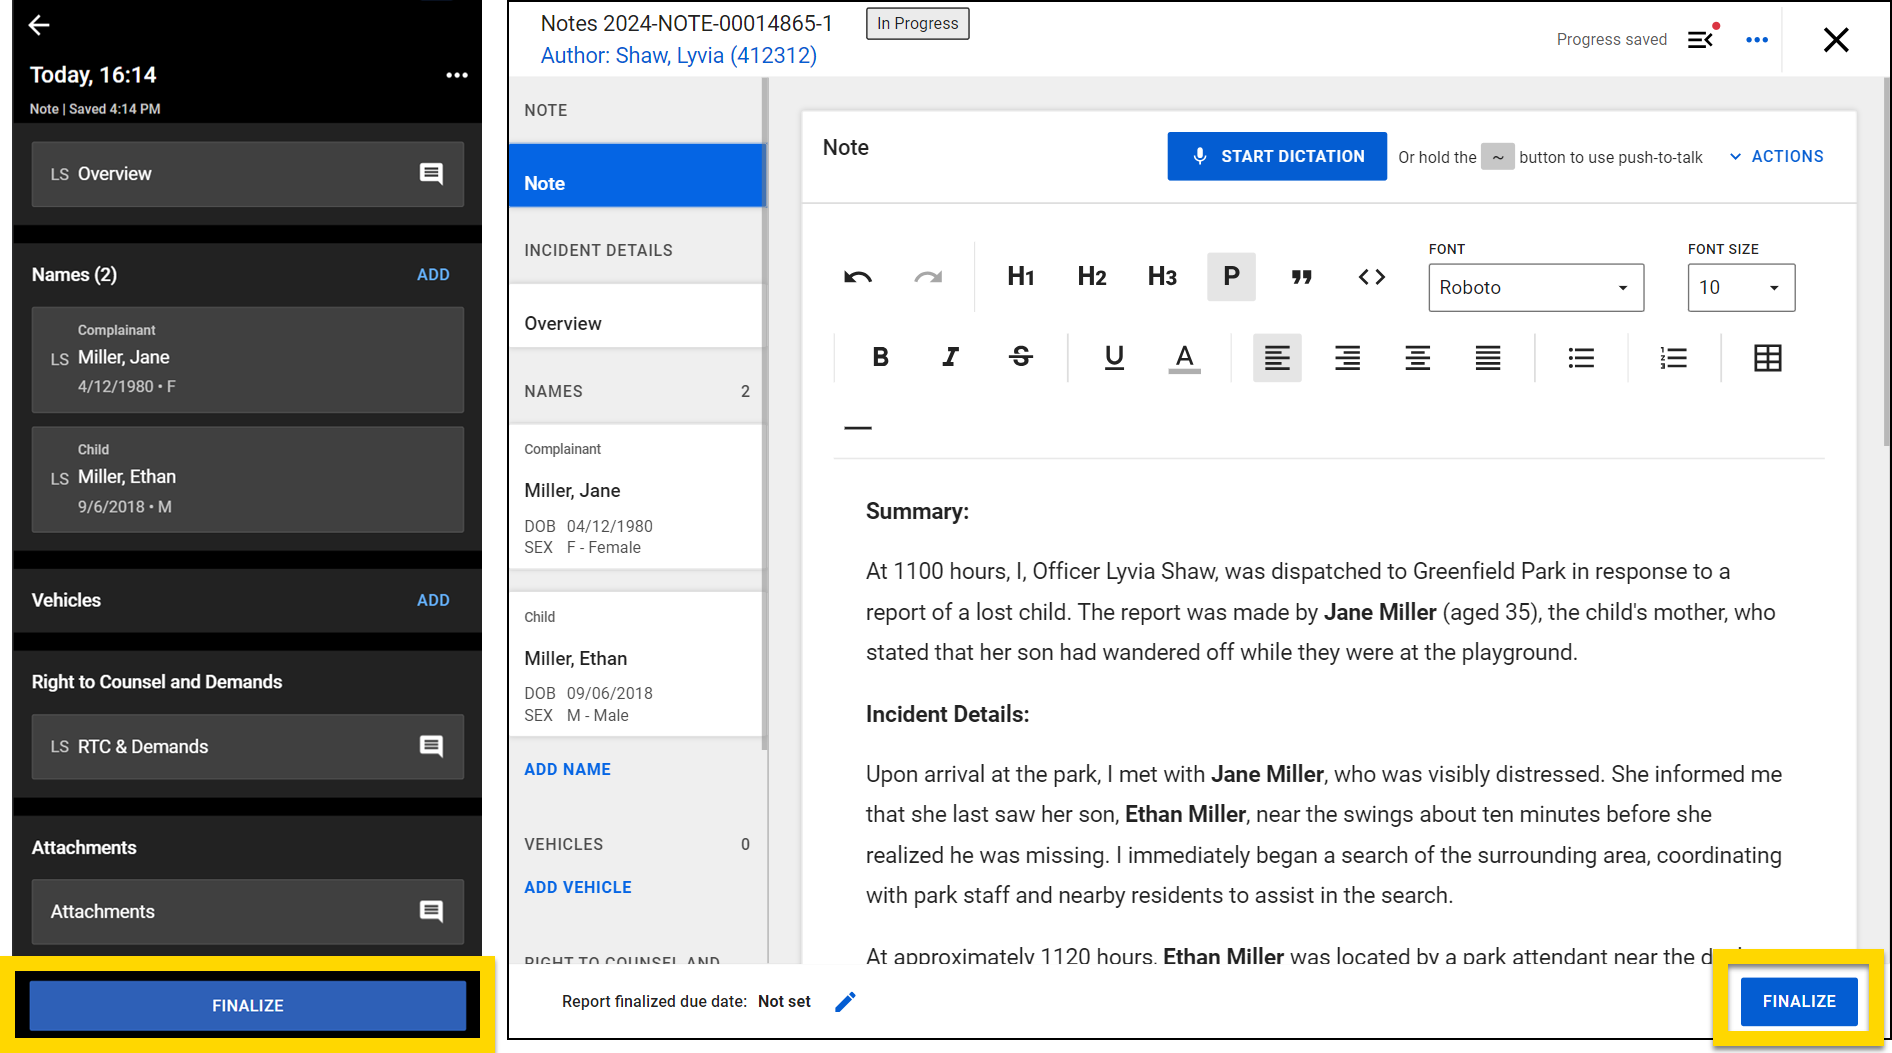
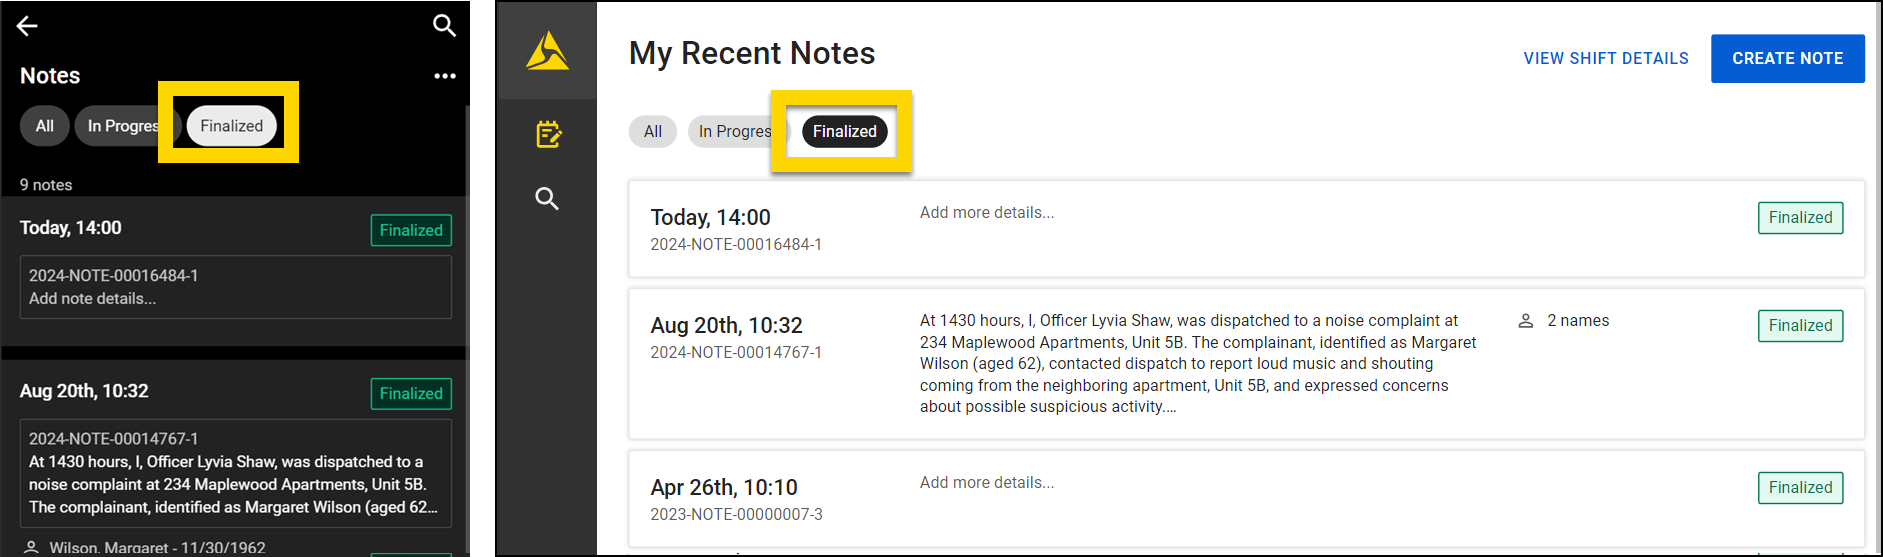
You can quickly find all of your finalized notes by selecting Finalized when viewing your list of all notes.
The image shows a side-by-side comparison of the mobile app and desktop versions of a Notes interface. The left side displays the mobile app, showing a list of notes with their timestamps and statuses, and a filter for finalized notes highlighted in yellow. The right side shows the desktop version with a similar list of notes, including summaries, timestamps, and statuses, with the finalized filter also highlighted.