Property Management
The Property Management tool in the Administrator Console lets you manage your organization's property features, including:
- Property locations
- Release notice letter template
- Property statuses
- Retention date defaults
- Label configuration
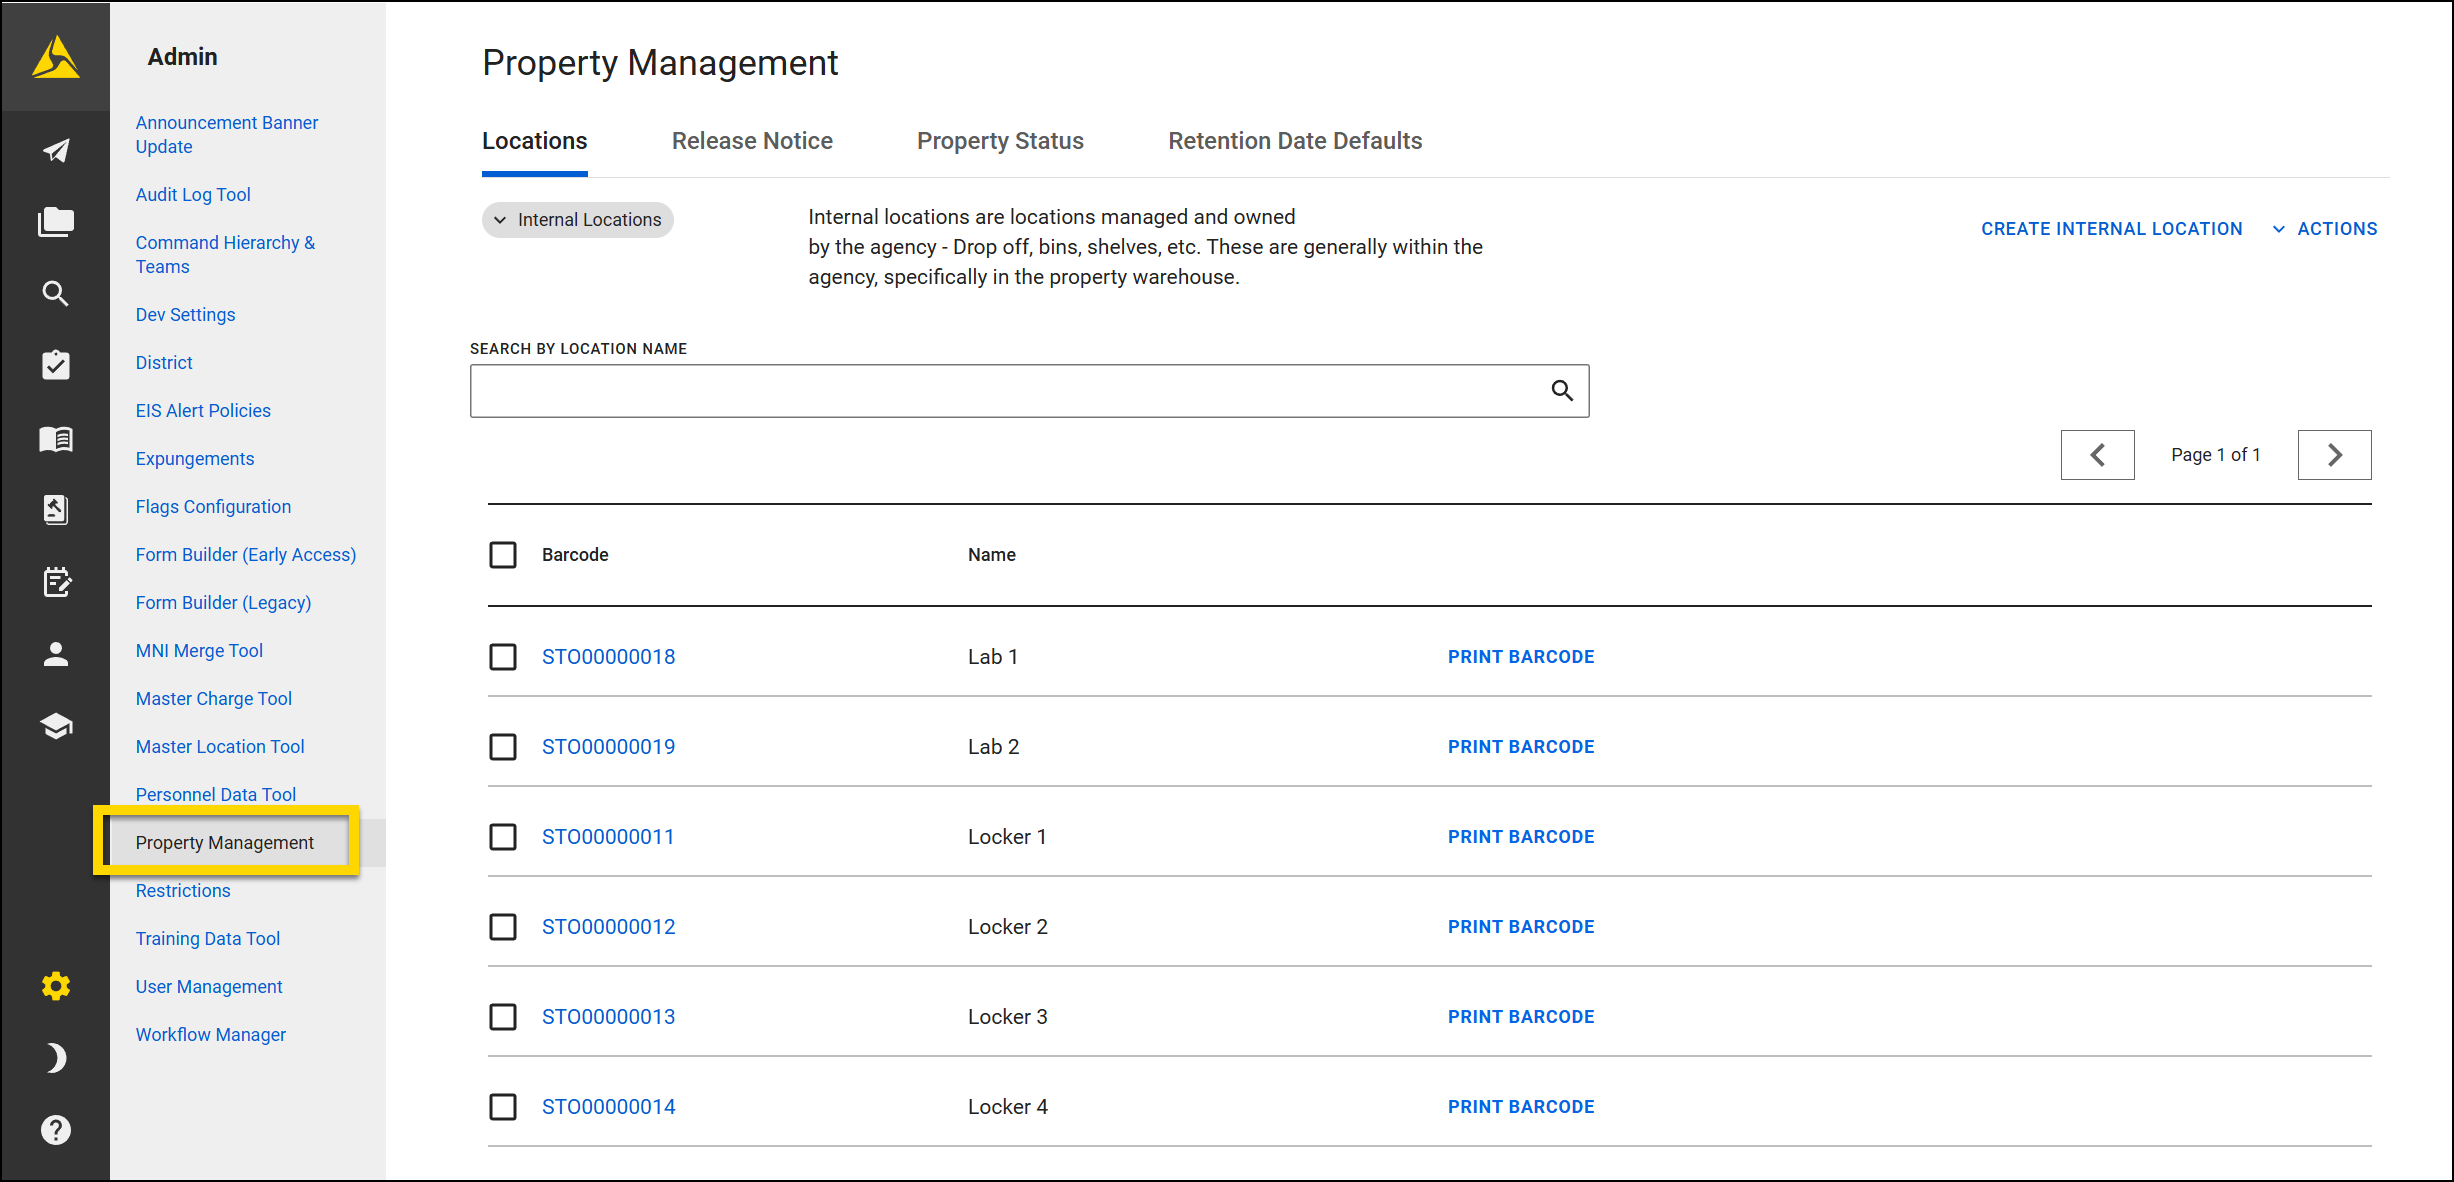
Locations
To view your organization's list of property locations, open the Property Management tool in the Administrator Console and switch to the Locations tab. From this page, you can:
- Print location barcodes
- Create new locations
- Edit existing locations
There are two types of property locations shown on this page:
- Internal locations are the locations managed and owned by the organization (drop off, bins, shelves, etc.). These are generally located within the organization, specifically in the property warehouse.
- External locations are third-party locations to which property is generally checked out(forensics lab, bloodwork lab, etc.). These are generally NOT located within the organization.
To switch between the two location types, select the gray Internal locations filter.
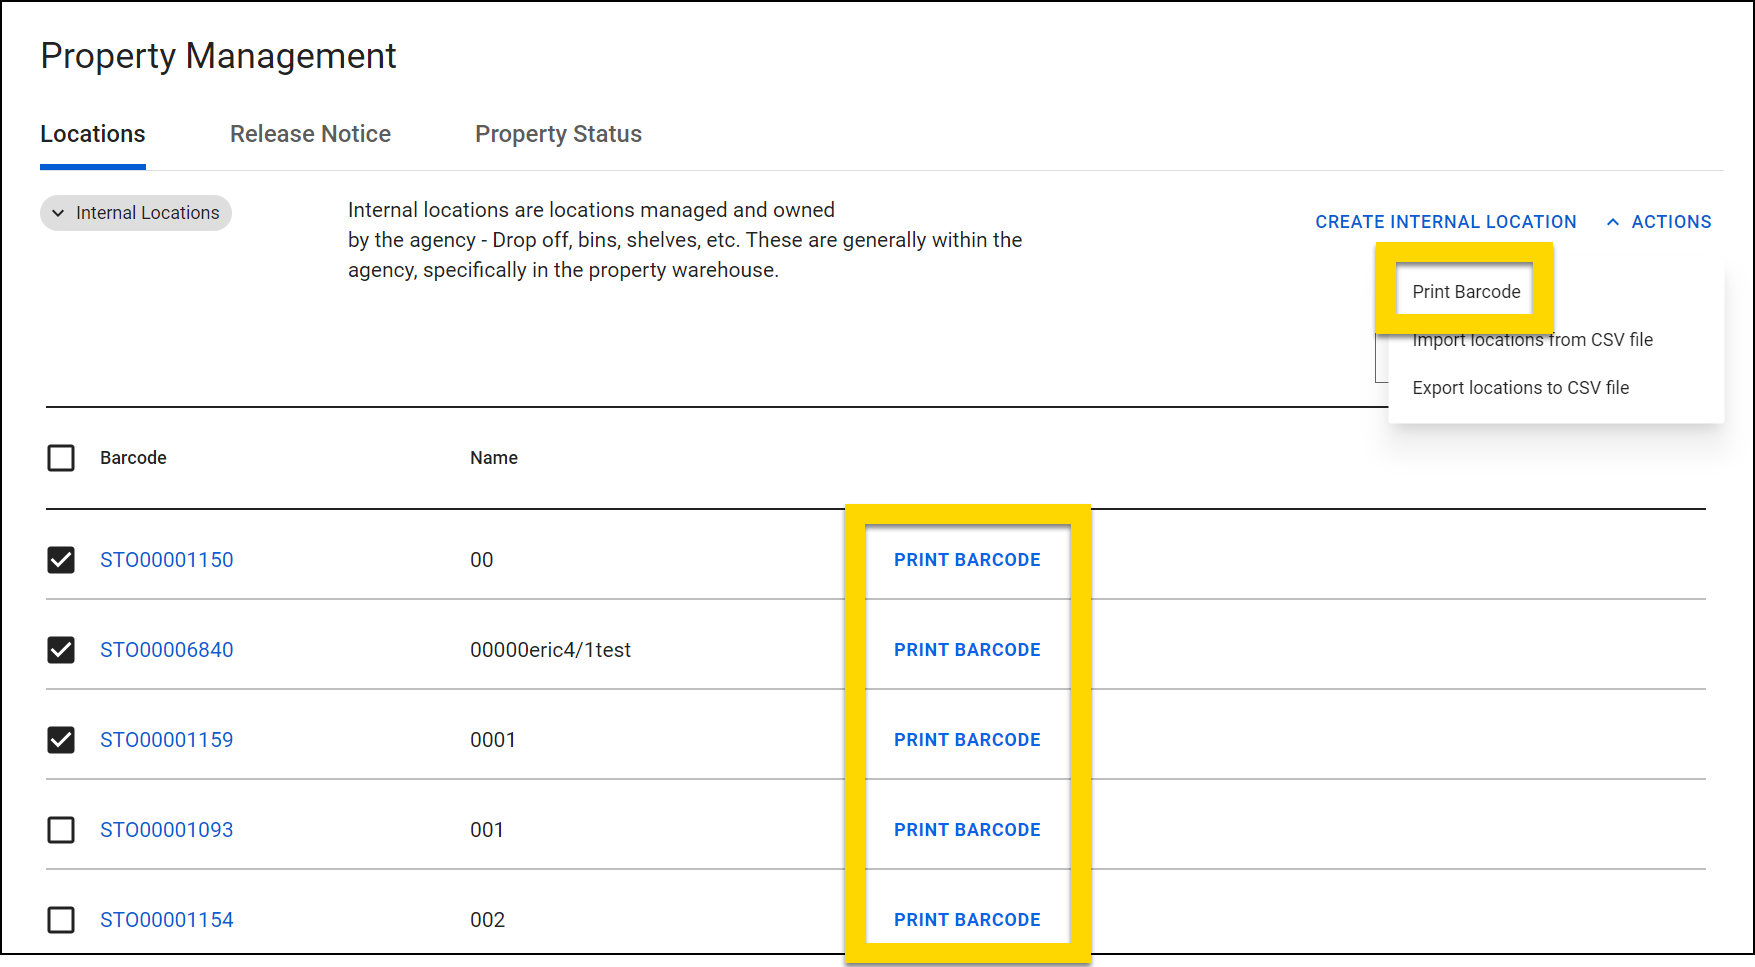
Print internal location barcodes
Select Print barcode to print a barcode for a single internal location. To print multiple barcodes at once, select the checkboxes beside multiple locations then Actions > Print barcode.
Barcodes can only be printed for internal locations.
You can choose between two options when printing multiple labels:
- Label printer: Prints each label individually. Select this option if you are printing labels using a printer that prints labels on individual, small label sheets.
- Standard printer: Prints labels on a standard page. Labels appear in a grid made of 2 columns and 5 rows. Select this option if you are printing labels onto a standard-size label page.
Create locations
Add a single location by selecting Create internal/external location and entering a name in the box that appears above the location list.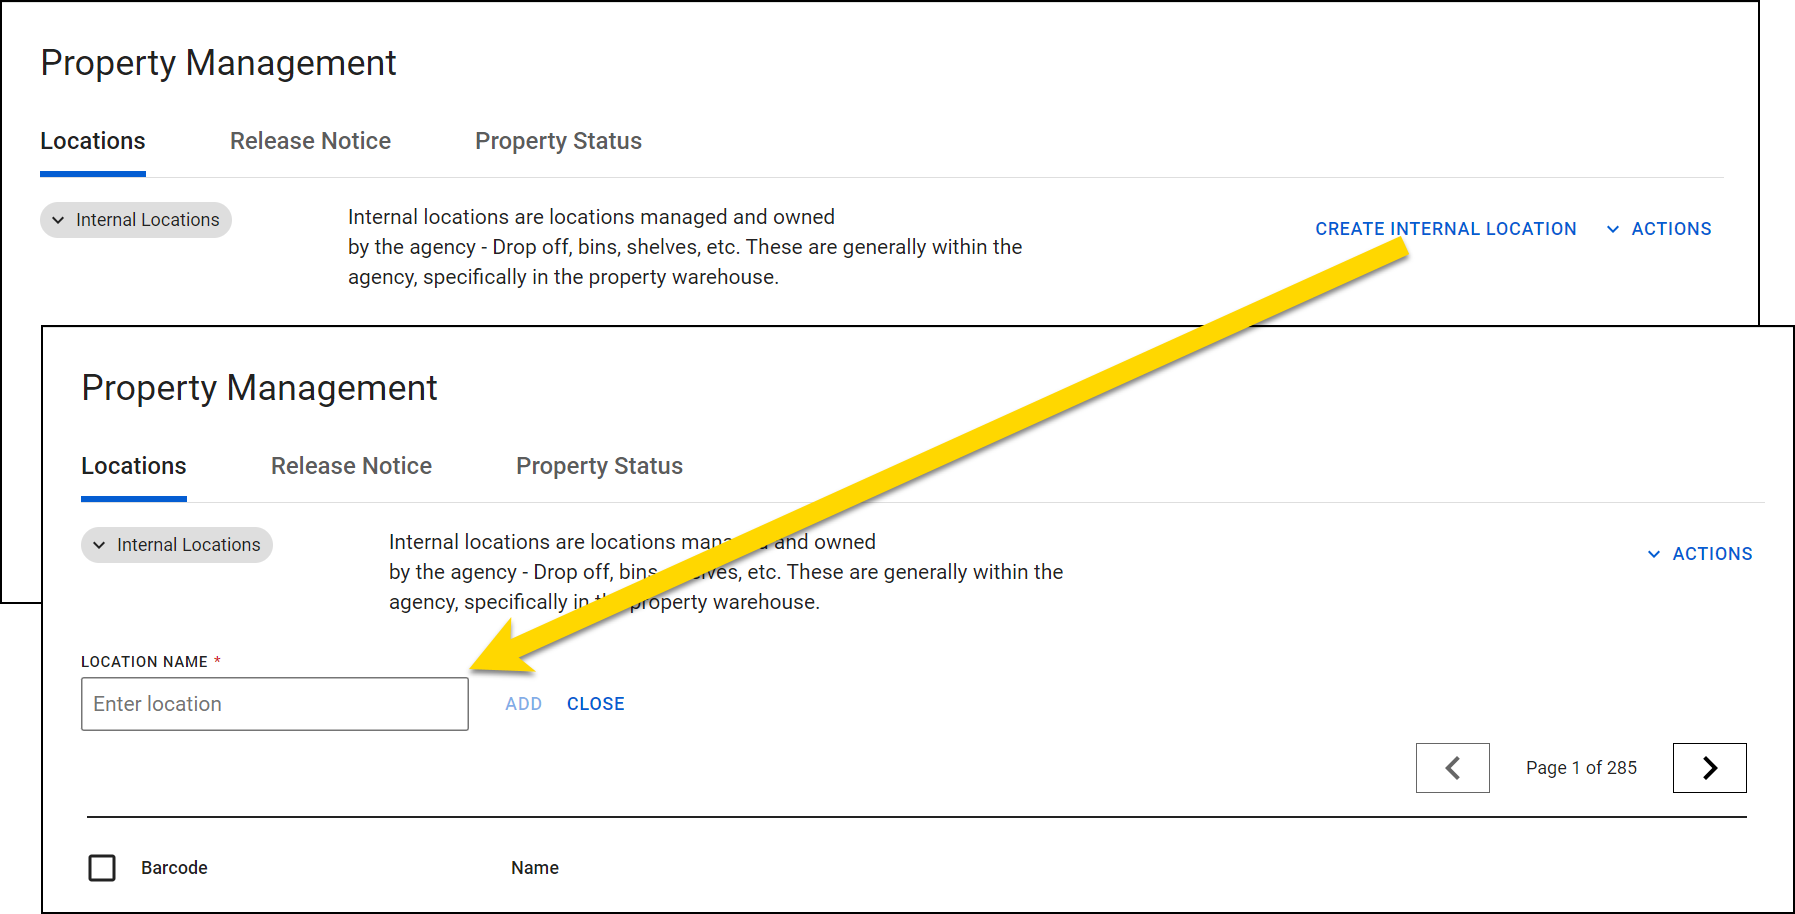
Add multiple locations by selecting Actions > Import locations from CSV file. Download the template file, provide a name for each new location, determine whether each location is internal or external (type), save the template, then import the file into the tool.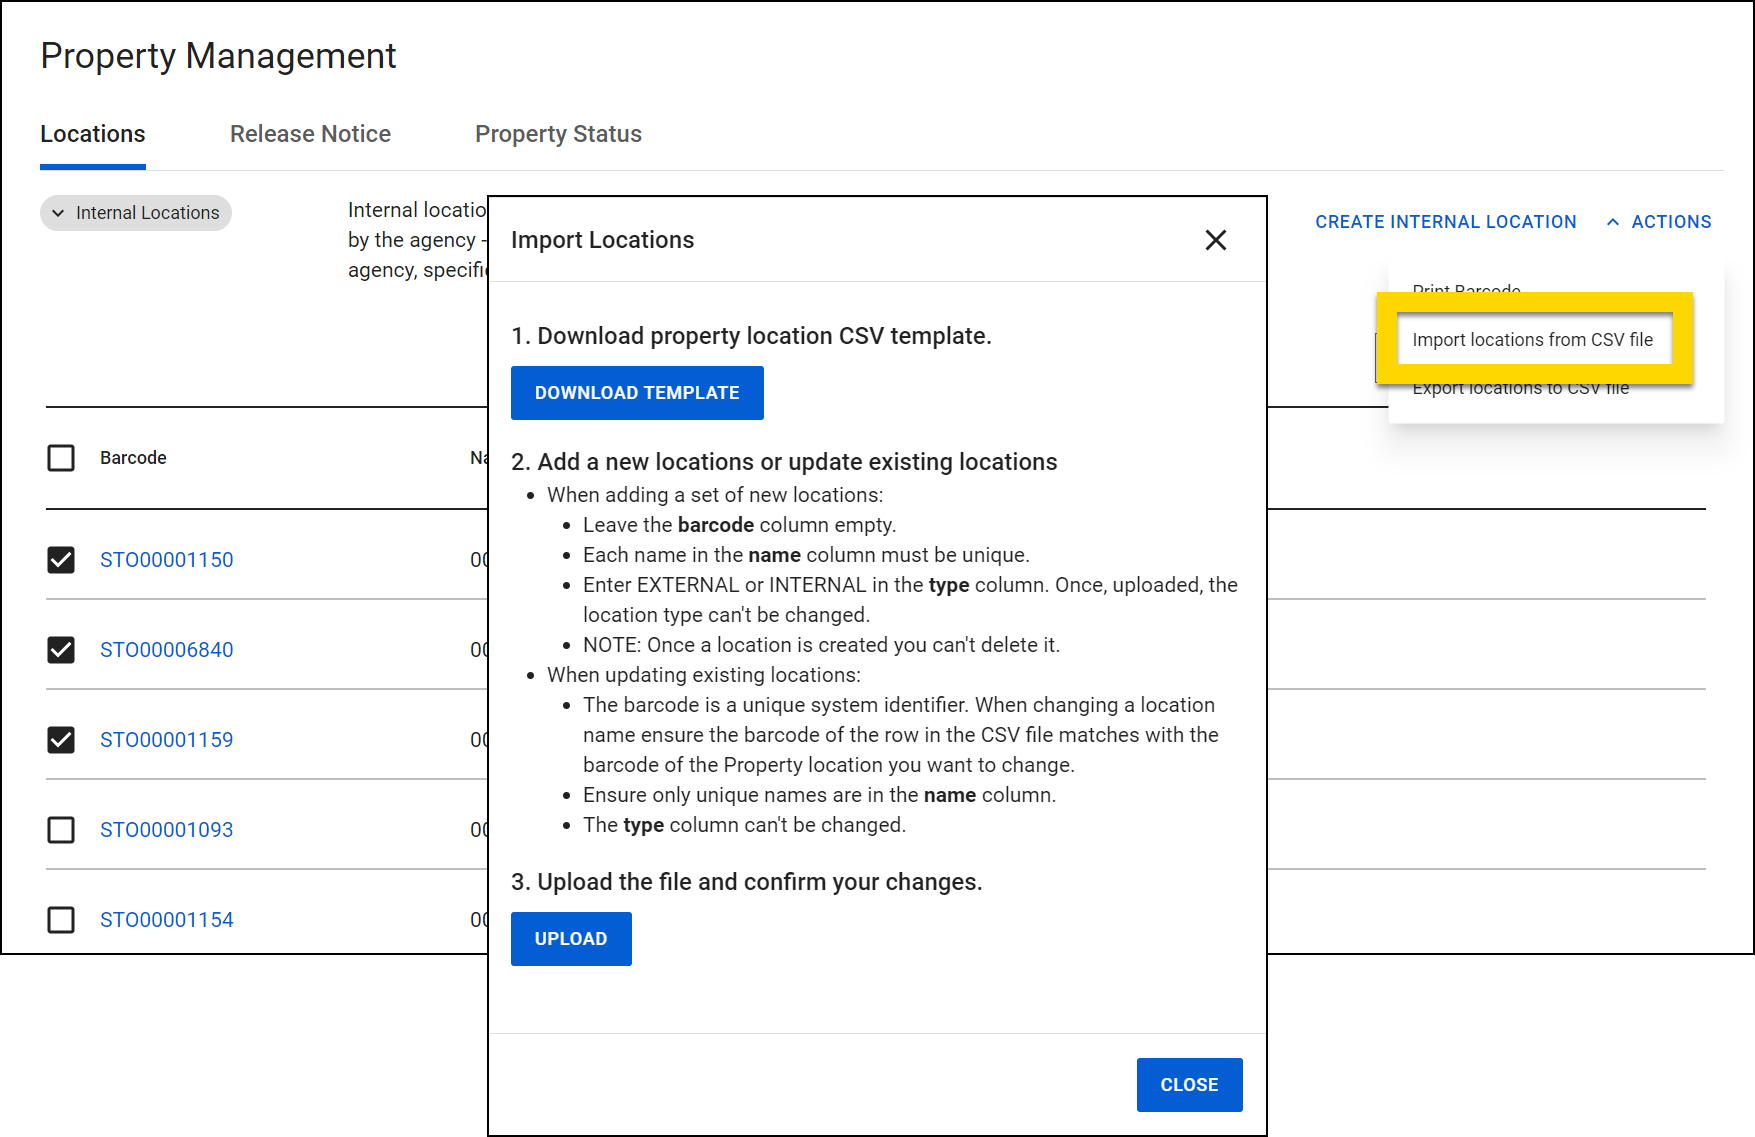
Once added, storage locations can't be deleted, although they can be edited.
A storage location only appears in the list of possible drop off locations in incident reports if the location name begins with "dropoff" (e.g., Dropoff Locker 1).
Edit locations
You can edit existing locations by taking these actions:
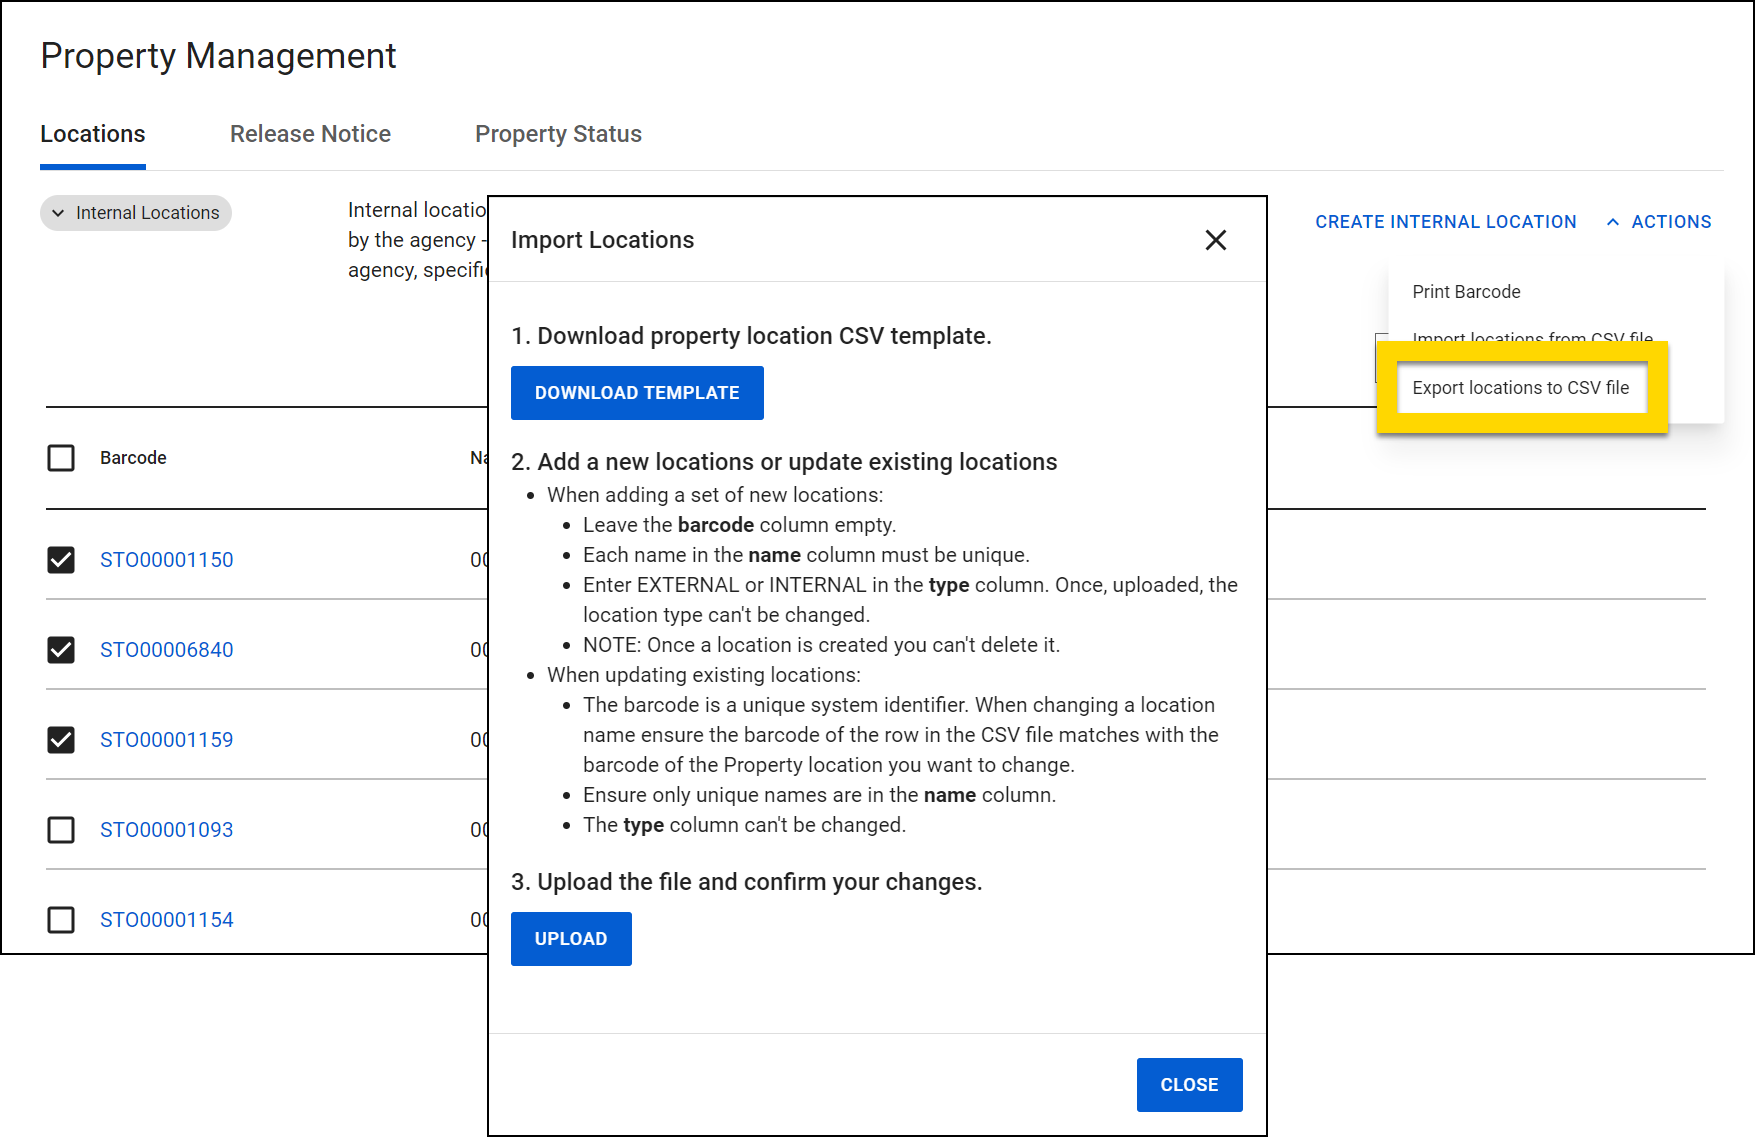
- Select Actions > Export locations to CSV file.
- Update the CSV file. Keep the following in mind as you make changes:
- The barcode is a unique system identifier. When changing a location name ensure the barcode of the row in the CSV file matches with the barcode of the Property location you want to change.
- Ensure only unique names are in the name column.
- The type column can't be changed.
- Save the CSV file after making your changes.
- Select Actions > Import locations from CSV file.
- Select your updated file.
Release notice
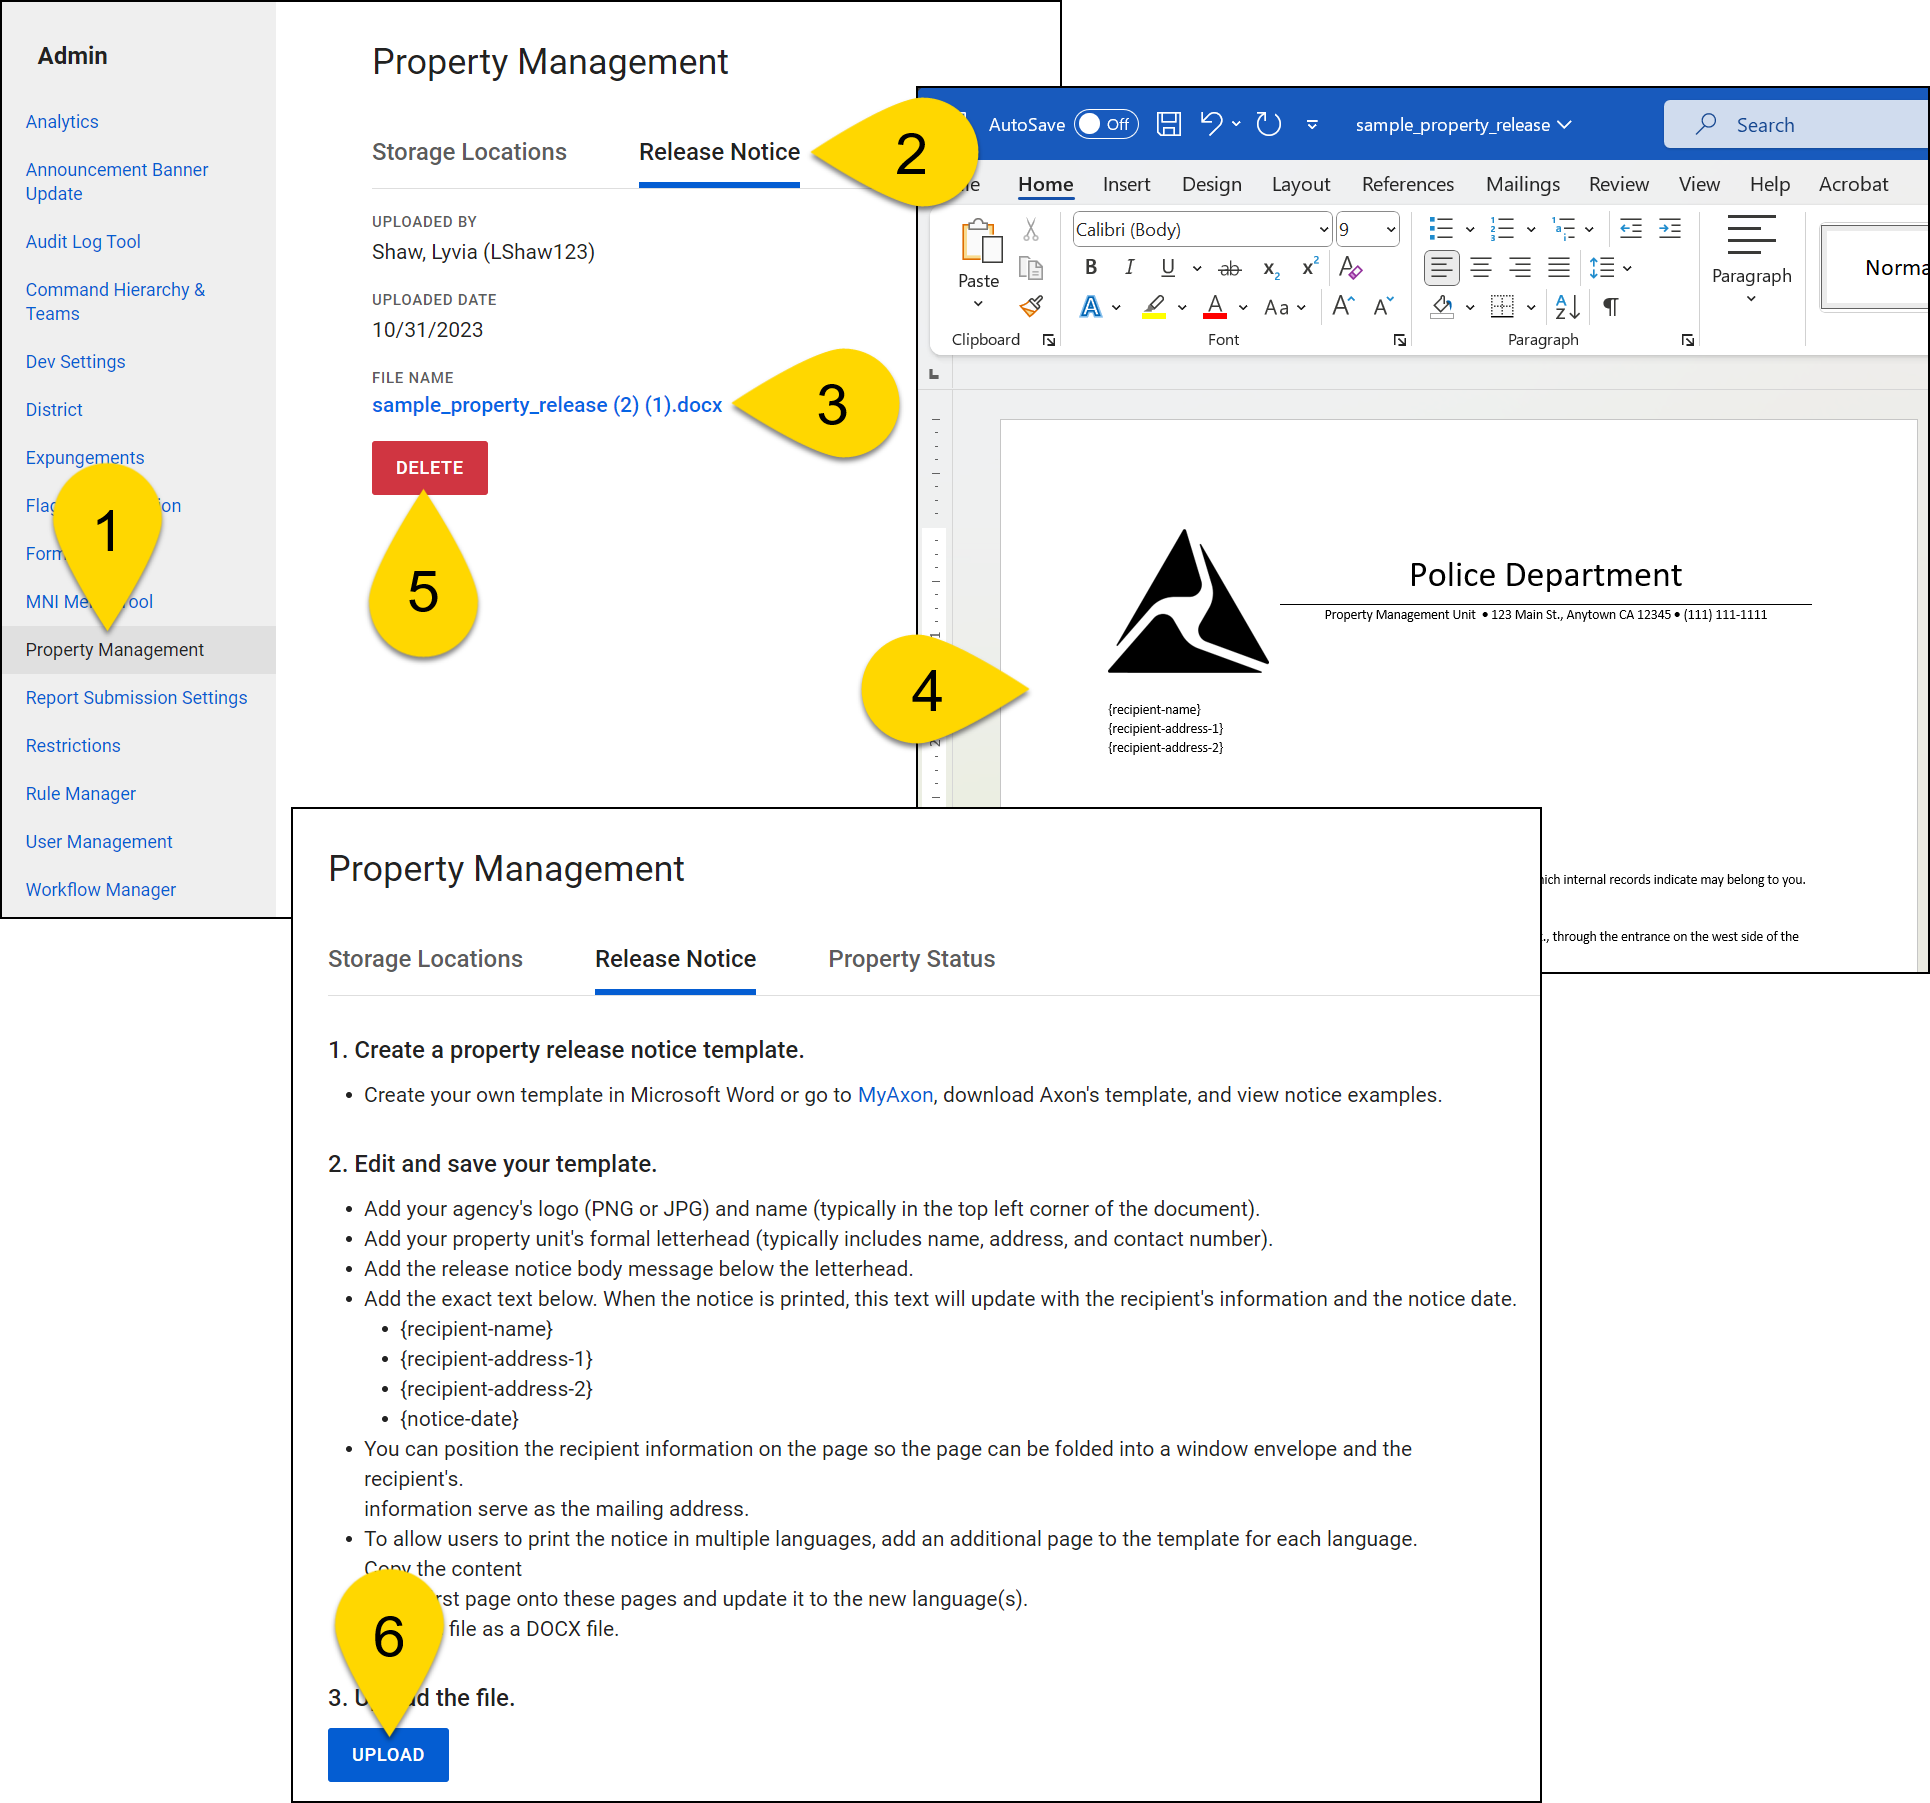
In Axon Records, users can create a property release notice letter to send to property owners when a piece of property that belongs to them is ready to be picked up.
Administrators can create and upload a release notice template in the Axon Records Administrator Console that is auto-filled with the recipient’s name and contact information when it is printed. This template can be adjusted to support multiple languages and changed at any time.
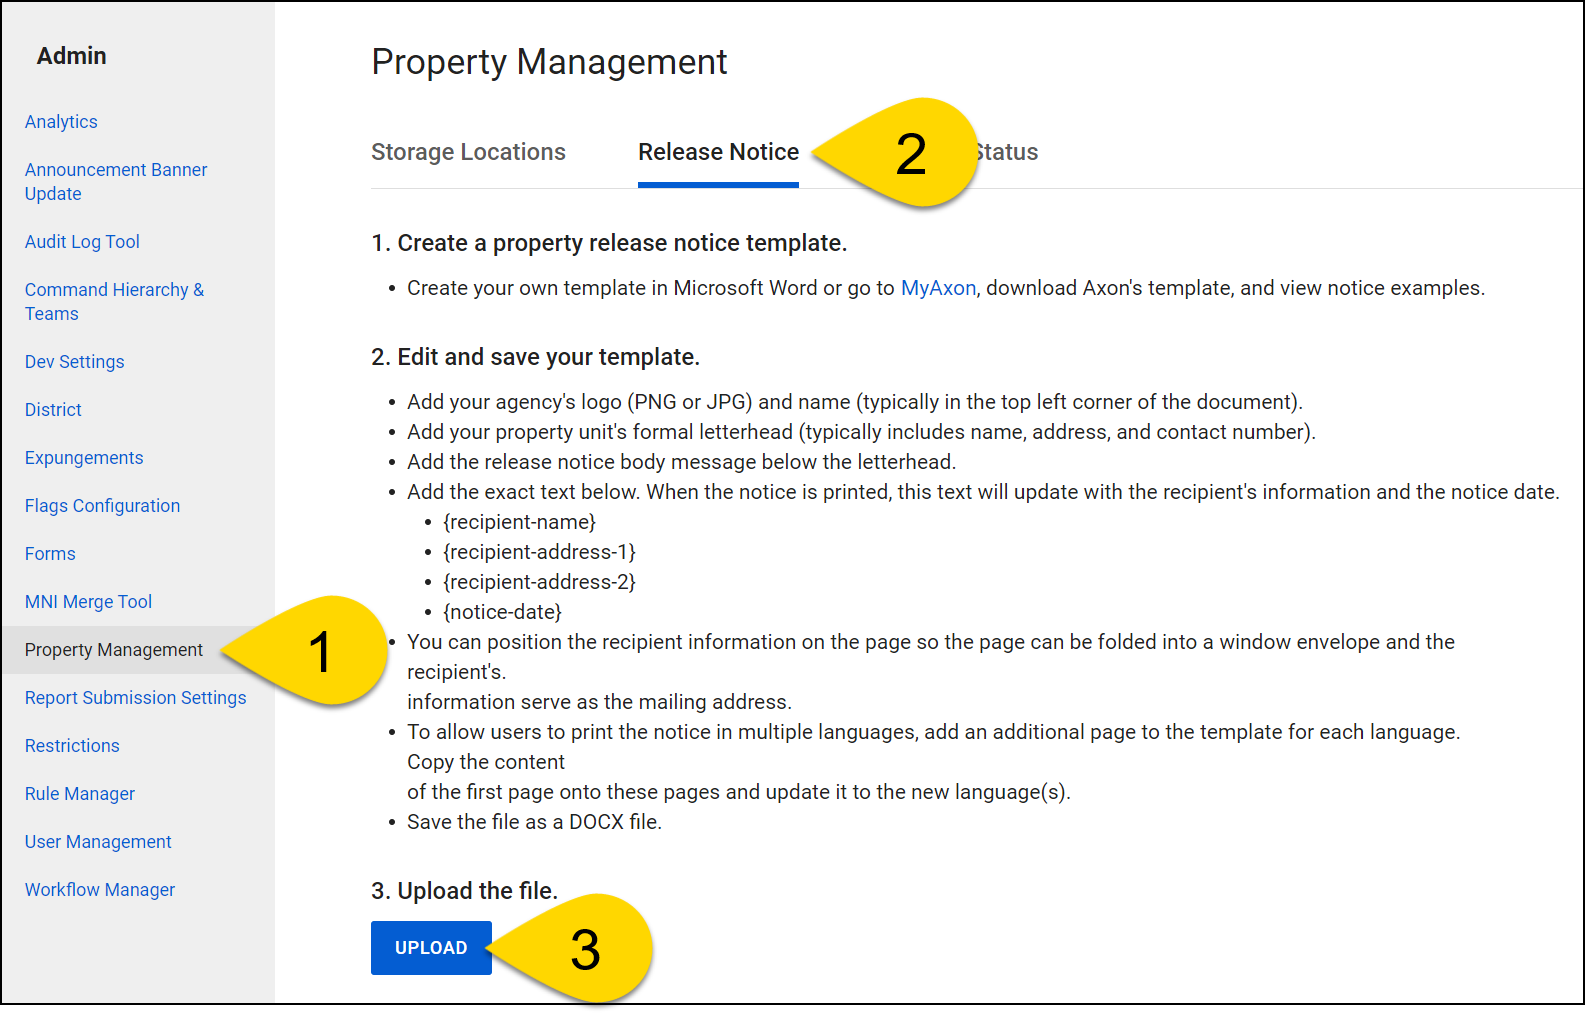
To access your organization's release notice template, open the Property Management tool in the Administrator Console and switch to the Release notice tab.
Create template
To create this notice, download and update this template with information specific to your organization.
After downloading the template, you can:
- Add your organization’s logo (PNG or JPG) and name (typically in the top left corner of the document).
- Add your property unit’s formal letterhead (typically includes name, address, and contact number).
- Add the release notice body message below the letterhead.
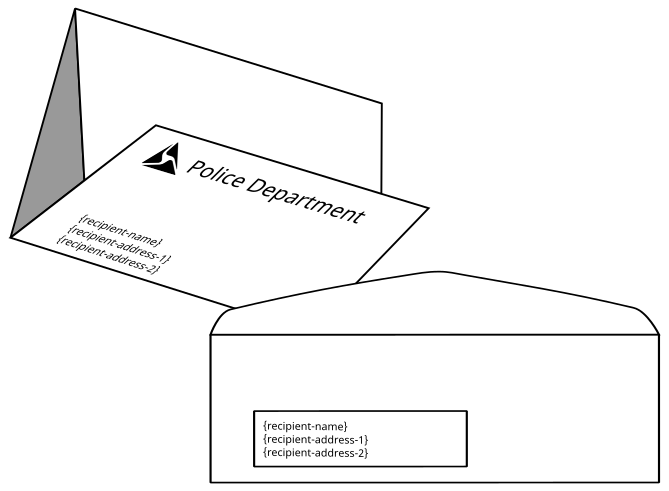
The template includes some text in curly brackets. When the notice is printed, this text will update with the recipient’s information and the notice date, so be sure not to change this text. You can, however, move this text so the page can be folded into a window envelope and the recipient’s information serve as the mailing address.
- {recipient-name}
- {recipient-address-1}
- {recipient-address-2}
- {notice-date}
- {incident-number}
Language support
To let users print the property notice in additional languages, add a page to the template, copy the contents of the first page to this new page (including the logo and header), and update the language accordingly. Repeat this process as many times as necessary for each additional language.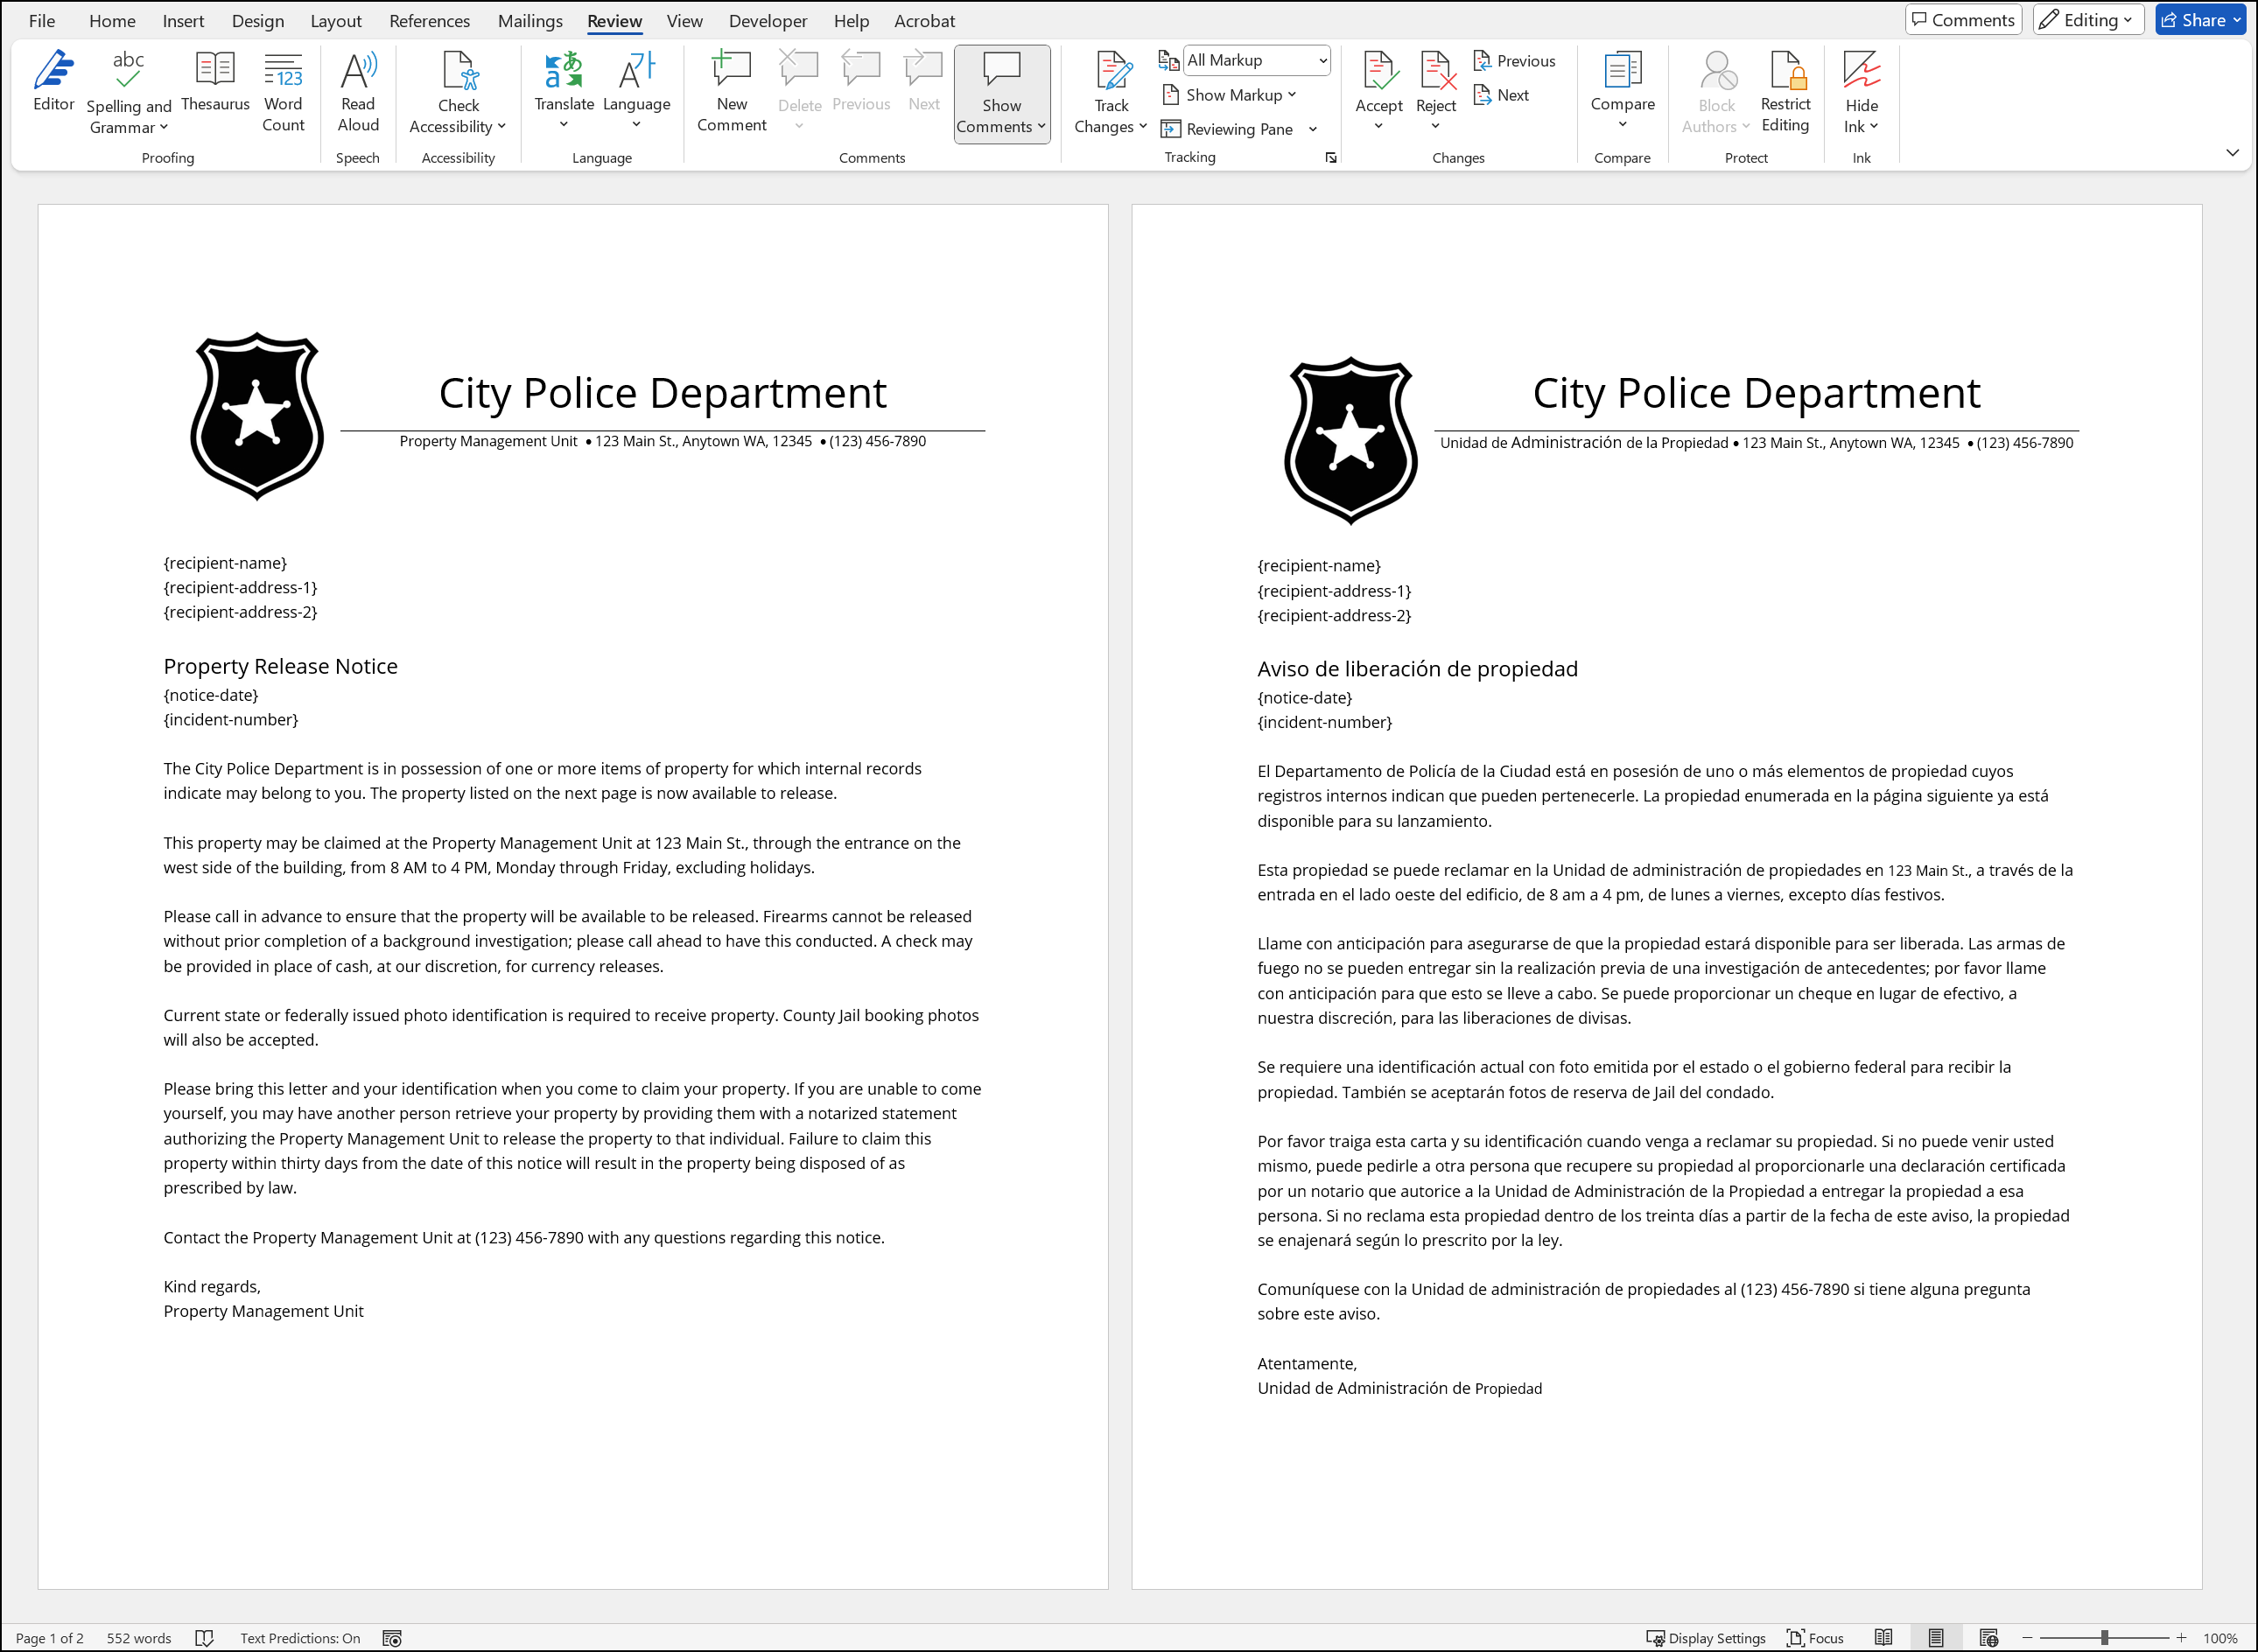
Upload template
To upload your release notice template:
- Open the Property Management tool in the Administrator Console.
- Switch to the Release notice tab.
- Select Upload.
Change template
If you later need to make changes to the release notice template:
- Open the Property Management tool in the Administrator Console.
- Switch to the Release Notice tab.
- Download the current release notice template to your computer by selecting the blue file name.
- Open the template file, make edits, and save it.
- Delete the current template that is currently uploaded.
- Select Upload and upload the newly updated template from your computer.
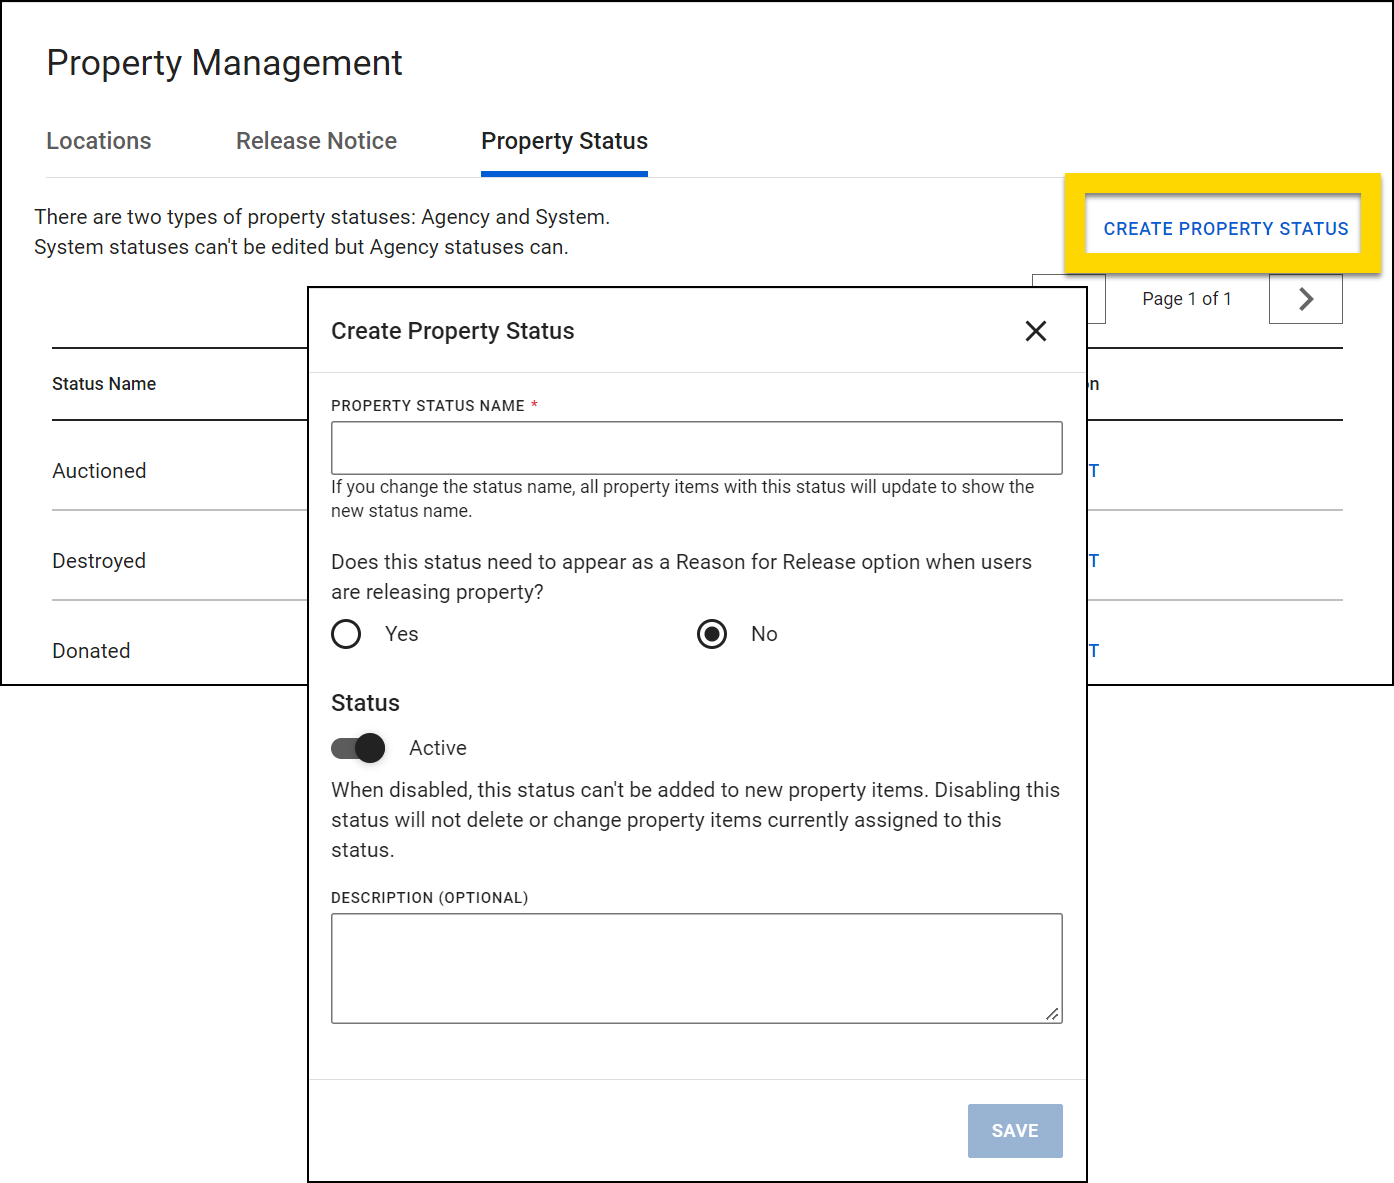
Property status
To view your organization's list of property statuses, open the Property Management tool in the Administrator Console and switch to the Property status tab. From this page, you can:
- Create new statuses
- Edit or deactivate existing statuses
There are two types of property statuses shown on this page:
- Agency: Custom property statuses that have been created for your organization. These can be edited or deactivated.
- System: Default statuses that can't be edited or deactivated.
Create statuses
To create a new property status, take these steps:
- On the Property status tab, select Create property status.
- Enter a name in the Property status name field.
- Indicate if the status appears as a Reason for Release option when users release property items.
- This option can't be changed later, so double-check that it is correct.
- Mark the status as Active or Inactive.
- Optionally add a status description.
- Select Save.
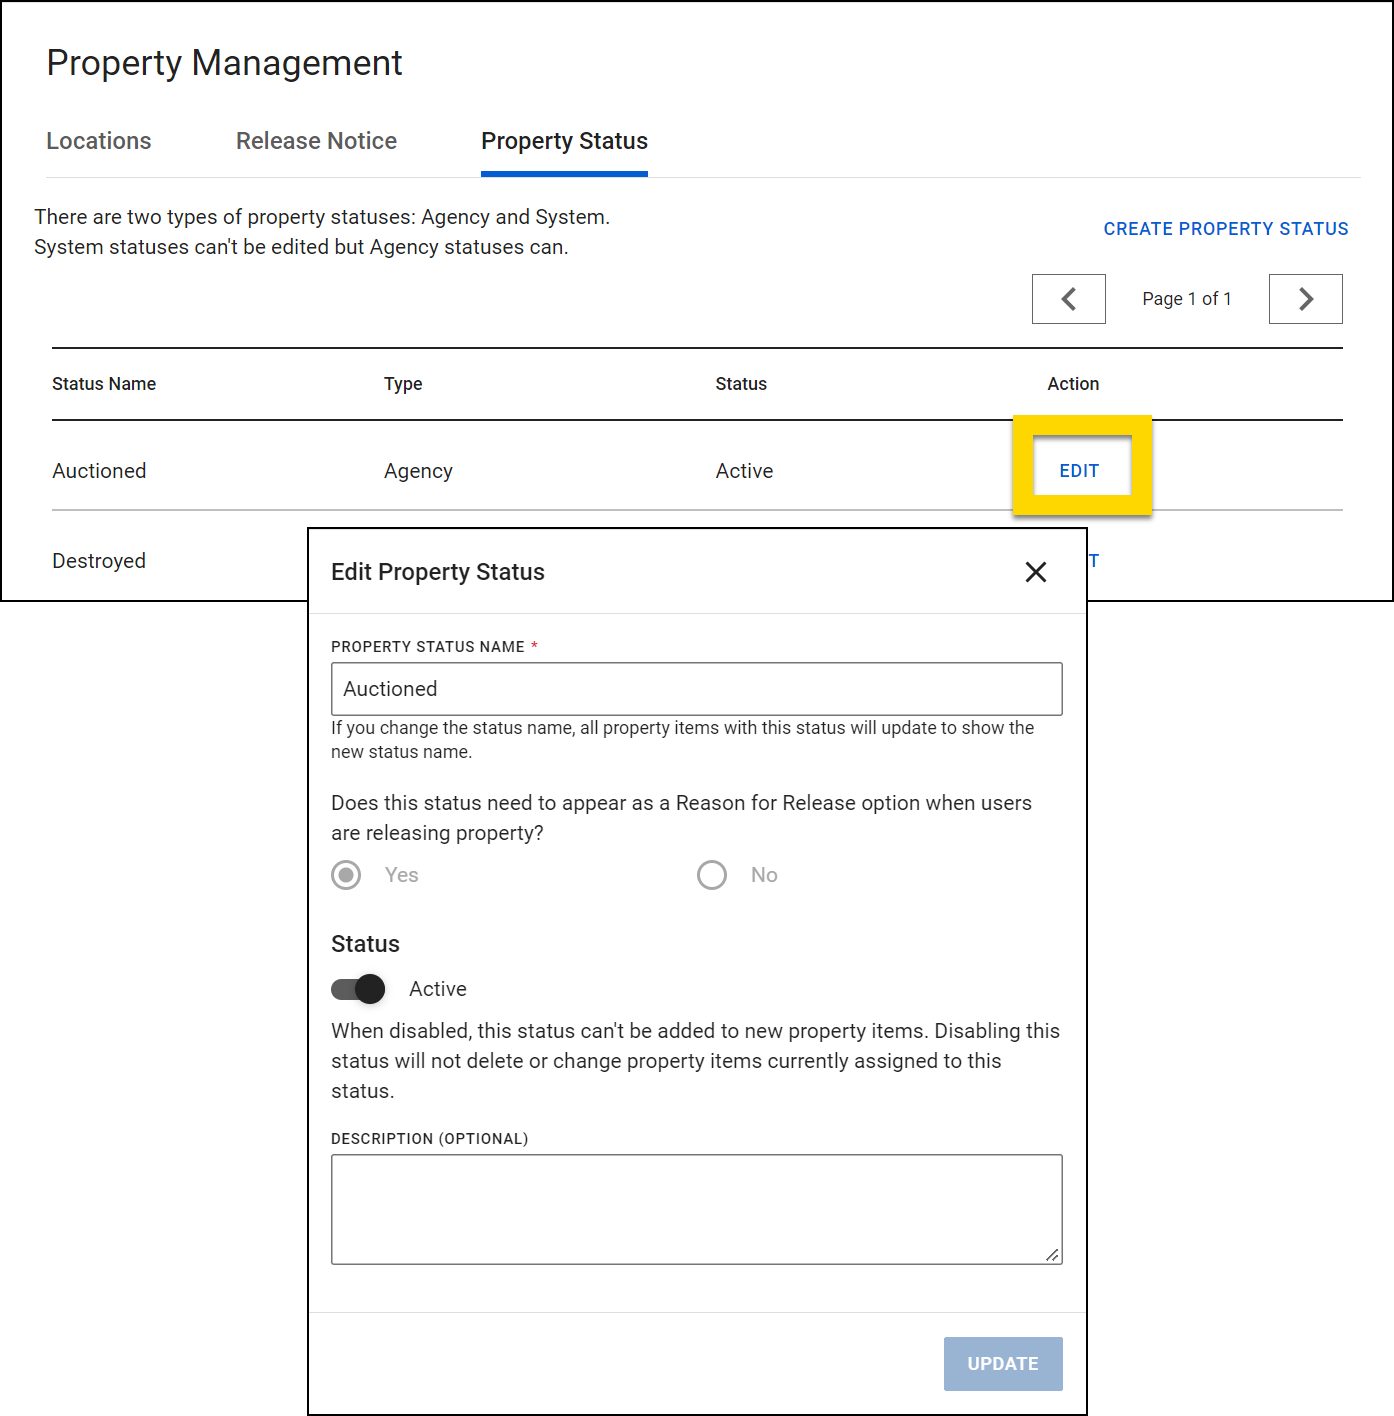
Edit statuses
To edit an Agency status, take these actions:
- Find the status in the list and select Edit.
- You can only edit Agency statuses, not System statuses.
- Adjust any of the settings, including:
- Name: If the name is changed, all property items currently assigned to that status will be updated to reflect the name change.
- Status: If you mark a status as Inactive, it can't be added to new property items. Disabling this status will not delete or change property items currently assigned to this status.
- Description
- After making changes, select Update.
Property statuses can't be deleted, but they can be marked as Inactive. Once inactivated, that status will no longer be seen by users and can't be added to property items.
Retention date defaults
Customize the default retention period for property items based on charge types and roles. By default, all property is set to 90 days, but you can modify these periods to meet your organization's specific requirements.
The charge information used in the Property Retention Defaults file comes from the Master Charge Table. If you need to add new charges to your system in addition to modifying retention dates, you should update the Master Charge Table first. After you update the retention dates, any new charges added to the Master Charge Table will default to 90 days.
Update retention periods
To update retention periods in the system, follow these steps:
- Open the Property Management section of the Administrator Console.
- Open the Retention date defaults tab.
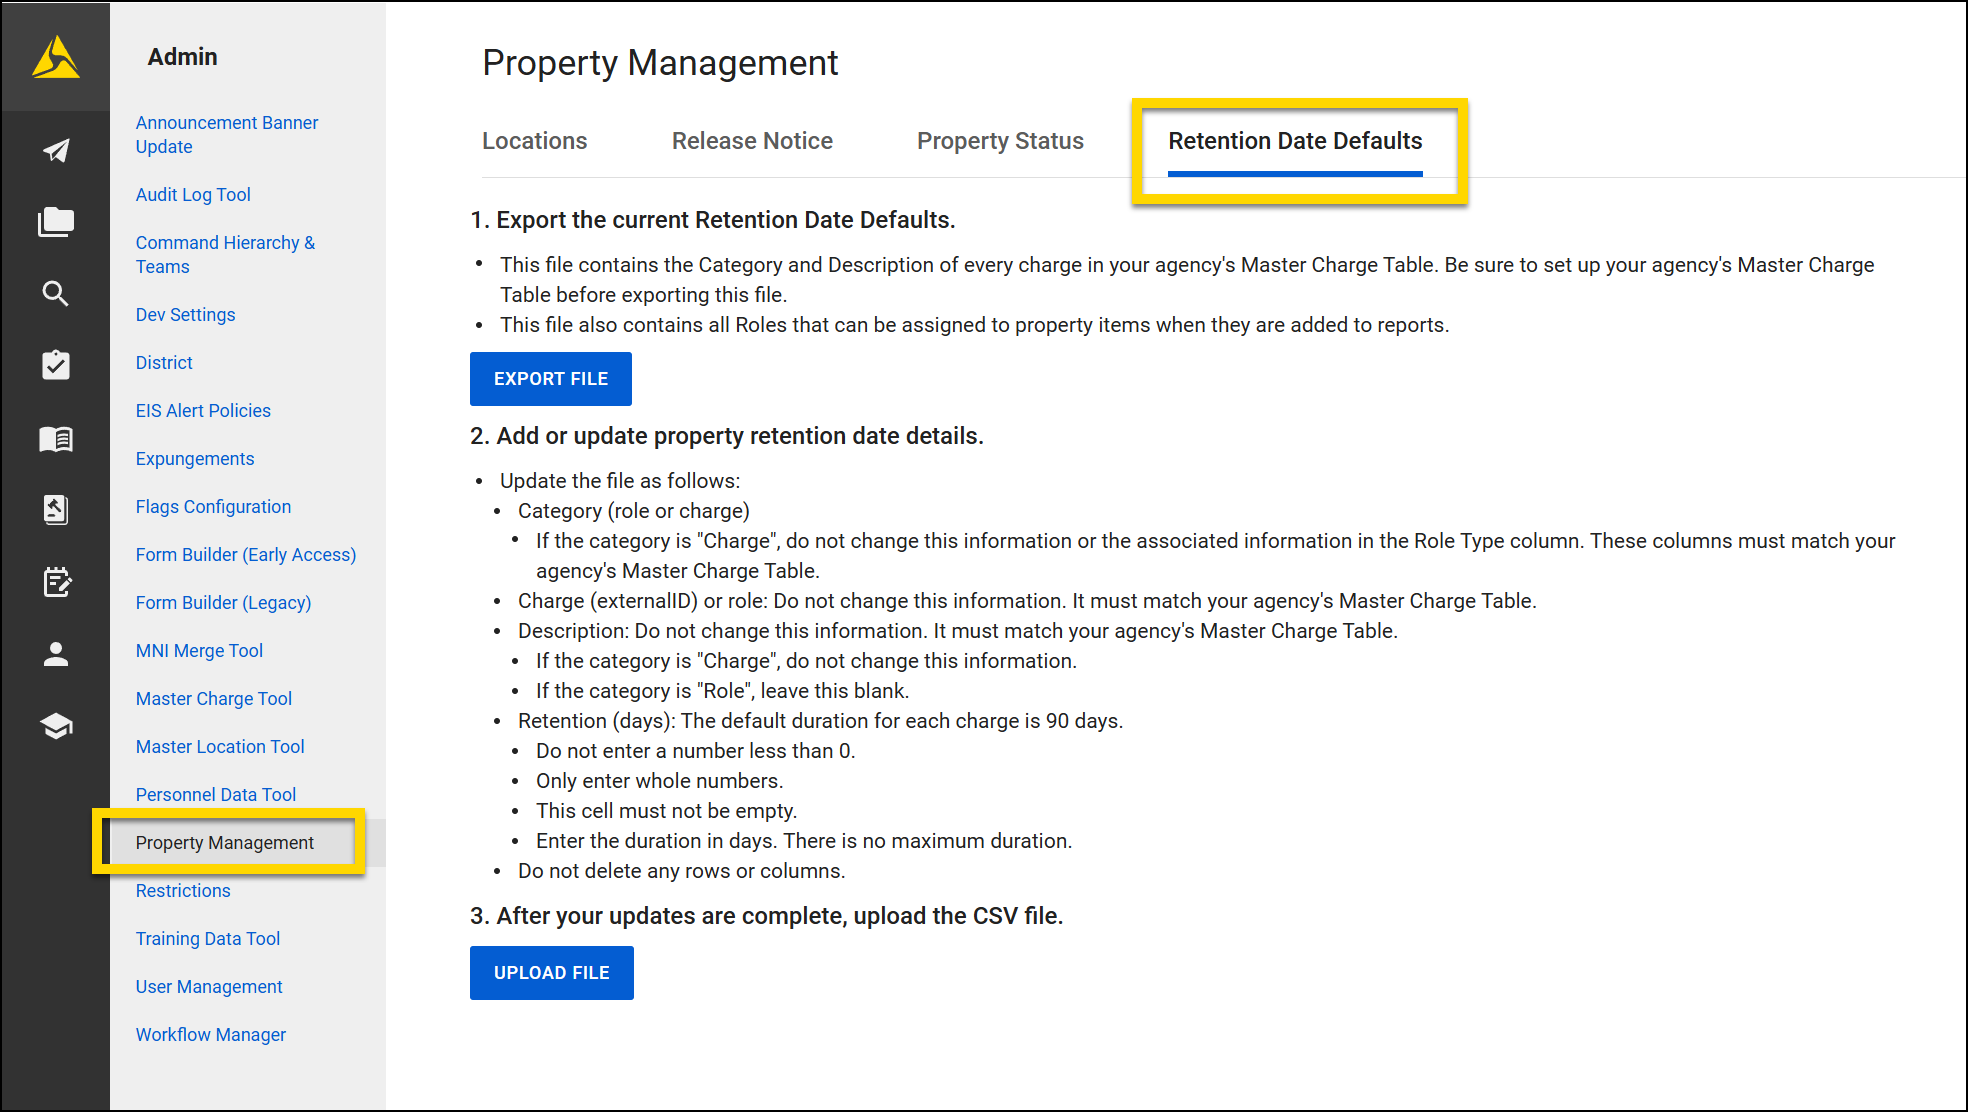
- Select the Export file button to download the current retention configuration template.
- Open the downloaded CSV file. You'll see four columns:
- Category (role or charge): Indicates whether the row is for a Role or Charge
- Charge (external ID) or role: Contains either the role name or charge external ID
- Description: Contains charge descriptions (empty for roles)
- Retention (days): Shows the number of days items must be retained
- Update the Retention (days) column for the specific charges needing a different retention period. Only use whole numbers when entering a date. Partial days are not allowed.
- Save the file after making your changes.
- Return to the Retention date defaults page and select the Upload file button.
- When the file browser window appears, locate and select the CSV file you just modified, then select Open (or the equivalent button in your browser) to upload the changes.
Important notes
- Never add or delete any columns or rows in the CSV file.
- All entries are validated during the upload process. If any values are invalid, the upload will fail.
- Any new charges or roles added to the system after you upload your new configuration will default to 90 days.
- When property items have multiple applicable retention periods (due to multiple roles or charges), the longest retention period will apply.
- Retention periods are calculated from the date items are submitted to Property.
- For container submissions, each property item within the container receives its own retention period based on its specific role and charge.
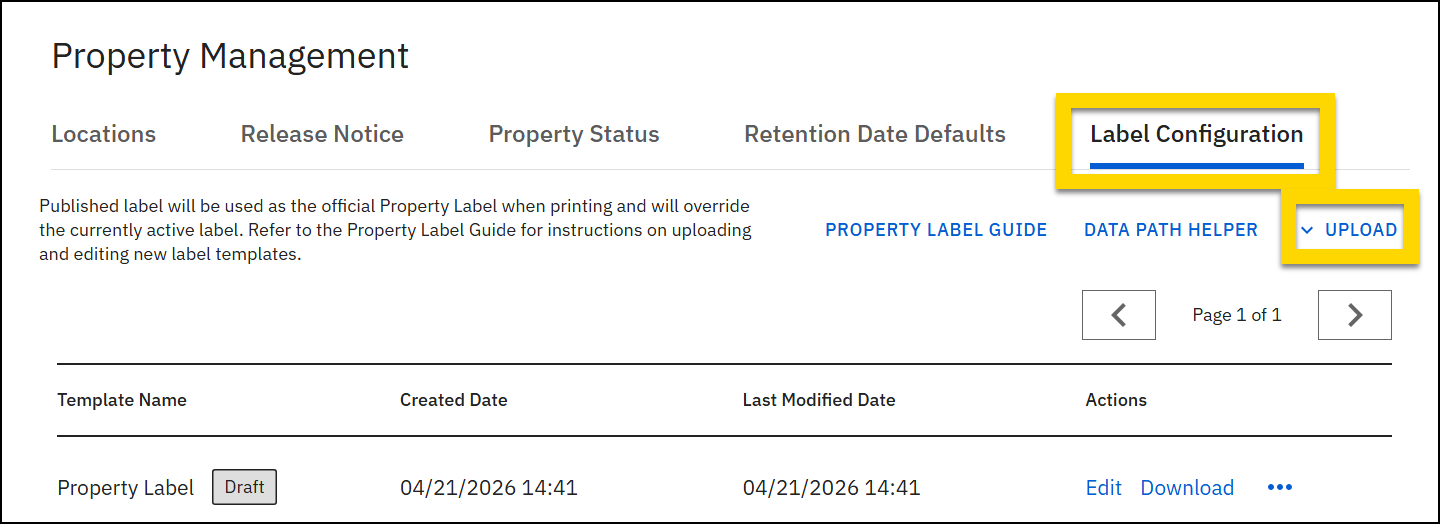
Label configuration
Use the Label configuration tab in the Property Management tool to create, upload, and manage property label template for your organization. Start with the default Axon property label or upload a custom PDF label template. After you map each field in the label to the correct field in your organization's reports, test print the label and publish it.
The Label configuration tab displays the template name, created date, last modified date, and options to edit or delete your organization's label template.
Until your organization configures and publishes a custom label, the default label will be used when users print property labels.
Create template
To create a label template for your organization, download one of the following label templates as a starting point for your organization's property label. These templates include common property fields (incident ID, item description, barcode, and condition). Use a PDF editor, such as Adobe Acrobat Pro, to customize the label for your organization.
Upload template
After configuring your label template PDF, upload it to the Property Management tool and map the fields in the template to the fields in your organization’s reports.
You can only have one property label template active at a time. Uploading a new template replaces the existing one.
- On the Label configuration tab, select Upload > PDF.
- Enter a name for your label template.
- Select Upload and choose the label template file on your computer.
- Select Next.
- On the Edit label PDF page, map fields from your organization’s reports to the fields on your label.
- This is the same mapping tool used to create regular print templates for reports. Property label templates use the same syntax supported in regular print templates.
- See the following topics for full instructions on using this mapping tool and the syntax it supports:
- To add a barcode to the template, select the field where the barcode should be printed and enter this mapping:
Copy
barcode(<form/us/properties/*/property/meta/friendlyId>) - To add a fragile or biohazard icon, use the icon operator.
- When your mapping is complete, use the Test print feature to verify that labels print as expected.
- Unlike with regular print templates, enter a Property ID rather than a Report ID to perform a test print.
- Select Publish to finalize your print template and allow users to print property labels.
- To pause your work and come back to it later, select the X button. A Draft label beside your template on the Label configuration tab indicates that the label hasn't been published yet.
If you save changes without publishing, the label remains in draft status. You must publish the label for users to print property labels that use the template.
Change template
If you later need to make changes to the label template:
- Open the Property Management tool in the Administrator Console.
- Open the Label configuration tab.
- If the fields that appear on the label template need to change, create a new label PDF and upload it by selecting Upload > PDF.
- Downloading and editing the existing template can be faster than creating a new one.
- If the label fields themselves don't need to change, and instead you only need to update which Axon report fields map to the fields on the property label, select Edit.
- On the Edit label PDF page, map fields from your organization’s reports to the fields on your label.
- See the following topics for full instructions on using this mapping tool and the syntax it supports: