Property actions
Property actions allow users to manage property items and containers as they move through intake, storage, release, and disposition. From checking items in or out to printing labels to updating responsible officers and managing chain of custody, these actions help ensure property is accurately tracked and documented at every stage.
The following additional property actions are documented separately:
Intake
Once an item or container is submitted to the Property Department from an incident report, it moves into Pre-check status. Submission may occur when a user submits a standard property item or container from the report, or when a vehicle is submitted as property from within the vehicle section of a report. Property Technicians can then perform an intake to move the item or container from Pre-check to In Storage. Once in storage, additional actions can be taken, including check in/out, print labels, release, etc.
Property Technicians can open items or containers that are in Pre-check status and assign the intake to other users or perform intake themselves.
Perform intake for property items that have been submitted to the Property department by selecting Actions > Intake in the following locations. Select the checkboxes beside one or more items to intake multiple items at the same time.
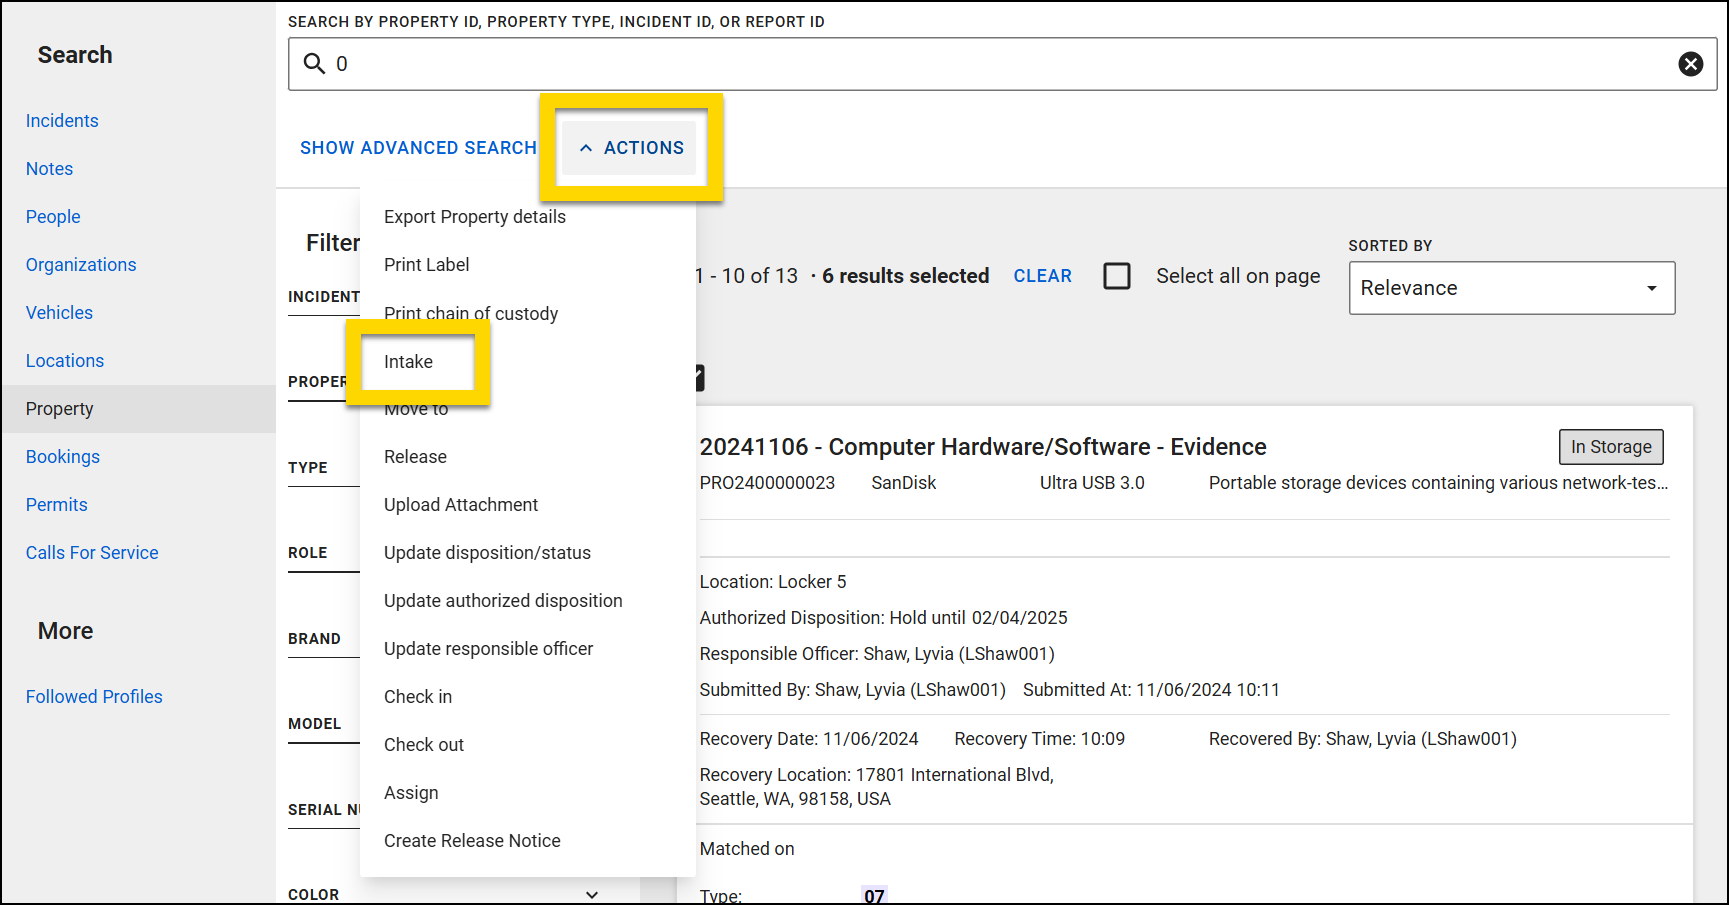
After selecting Actions > Intake, a window opens where you can:
- Select the Incident / Report ID link to view the report that contains the item.
- Select the Container ID to view the full container profile.
- Open the full property profile by selecting View Profile or the Property ID.
- View basic property information, including type, description, etc.
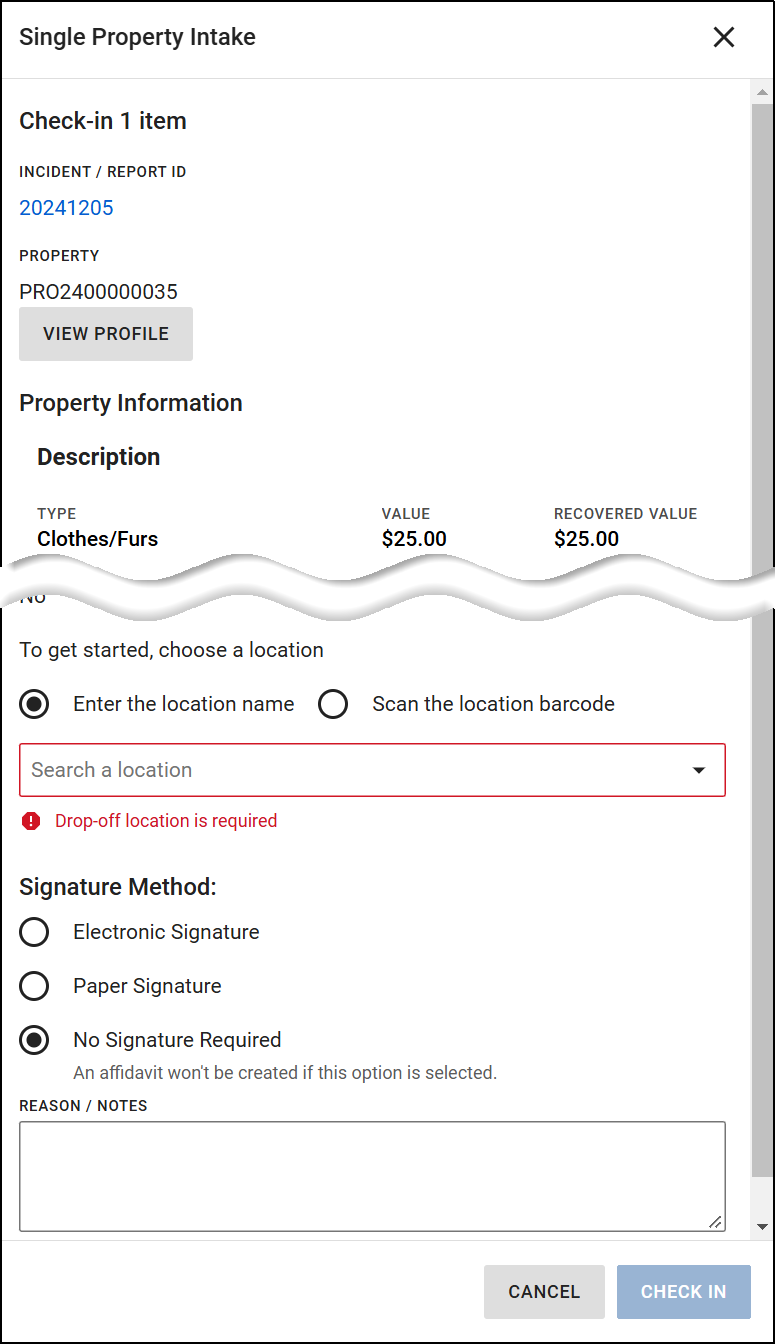
- Enter or scan a location to check the item into.
- Select a signature method, as required by your organization.
- Add reason/notes to the intake.
Intake assignment
Assign items and containers to other users to perform intake by selecting Actions > Assign in Property search. Select the checkboxes beside one or more items to assign multiple units at the same time. After selecting Actions > Assign, a window opens where you can enter a user's name to assign the items to them.
Once assigned to a user, their name appears on the search result preview. The Pre check assignment > Assigned to filter can then be used to quickly find items assigned to a specific user.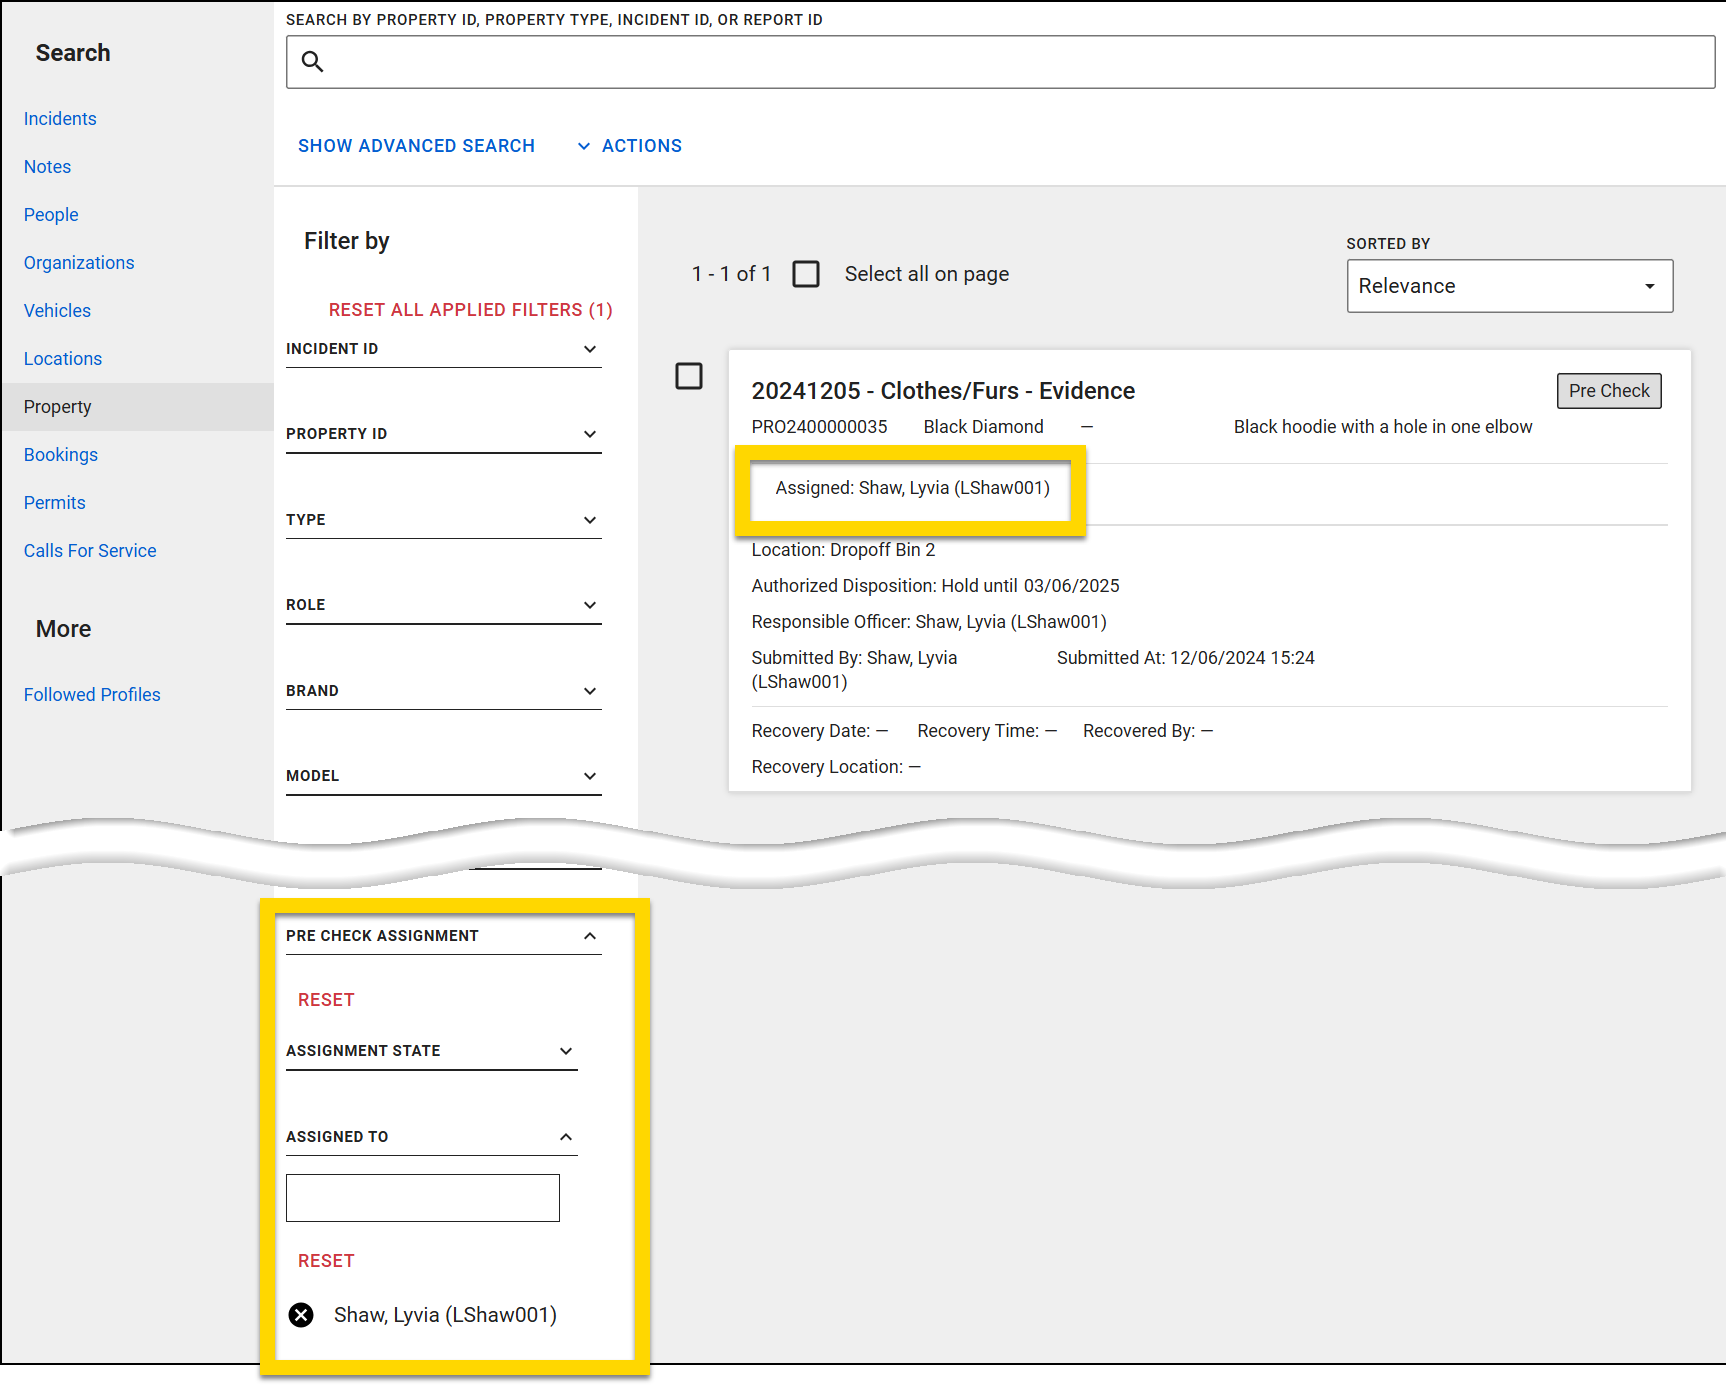
Print property labels
Property items can be configured for individual organizations, but generally, labels include the following information:
- Incident ID
- Property type
- Barcode and Property ID
- Role
- Description
- Submitting officer
Print property labels by selecting Actions > Print property labels in the following locations. Select the checkboxes beside one or more items to print labels for multiple items at the same time.
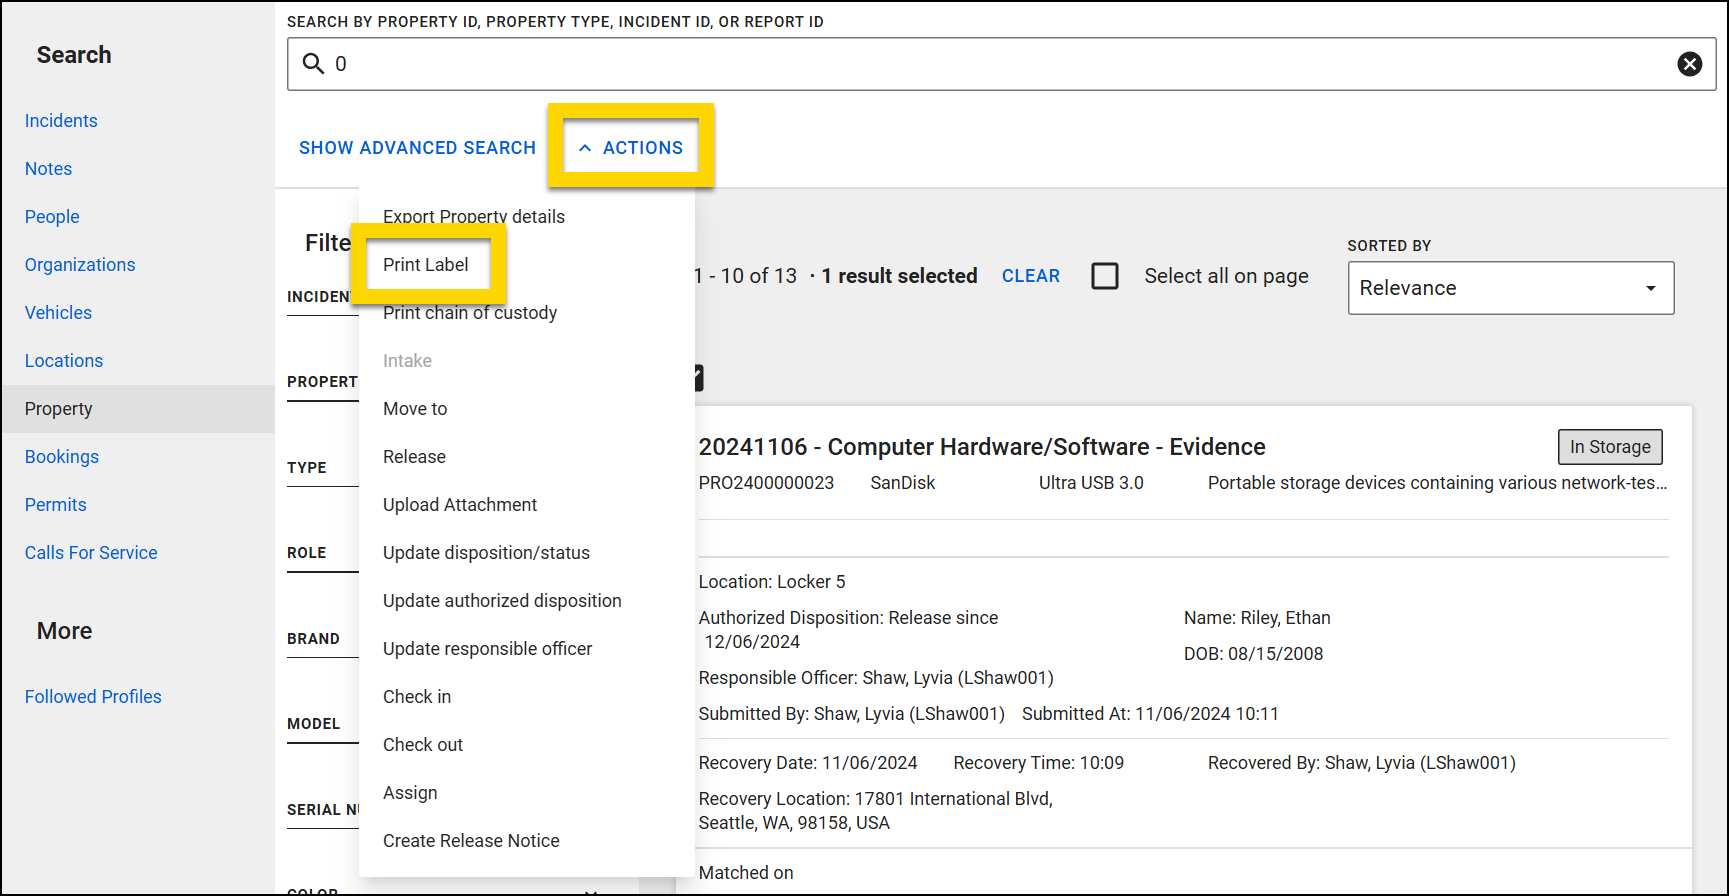
Property labels can only be printed for items that have been submitted to property. If you do not see a Print label option on a property item, this indicates that the item is not in police custody.
After selecting Actions > Print, a new browser tab opens where you can view and print the label. If you are printing multiple items, each item has a separate label, with one label per page.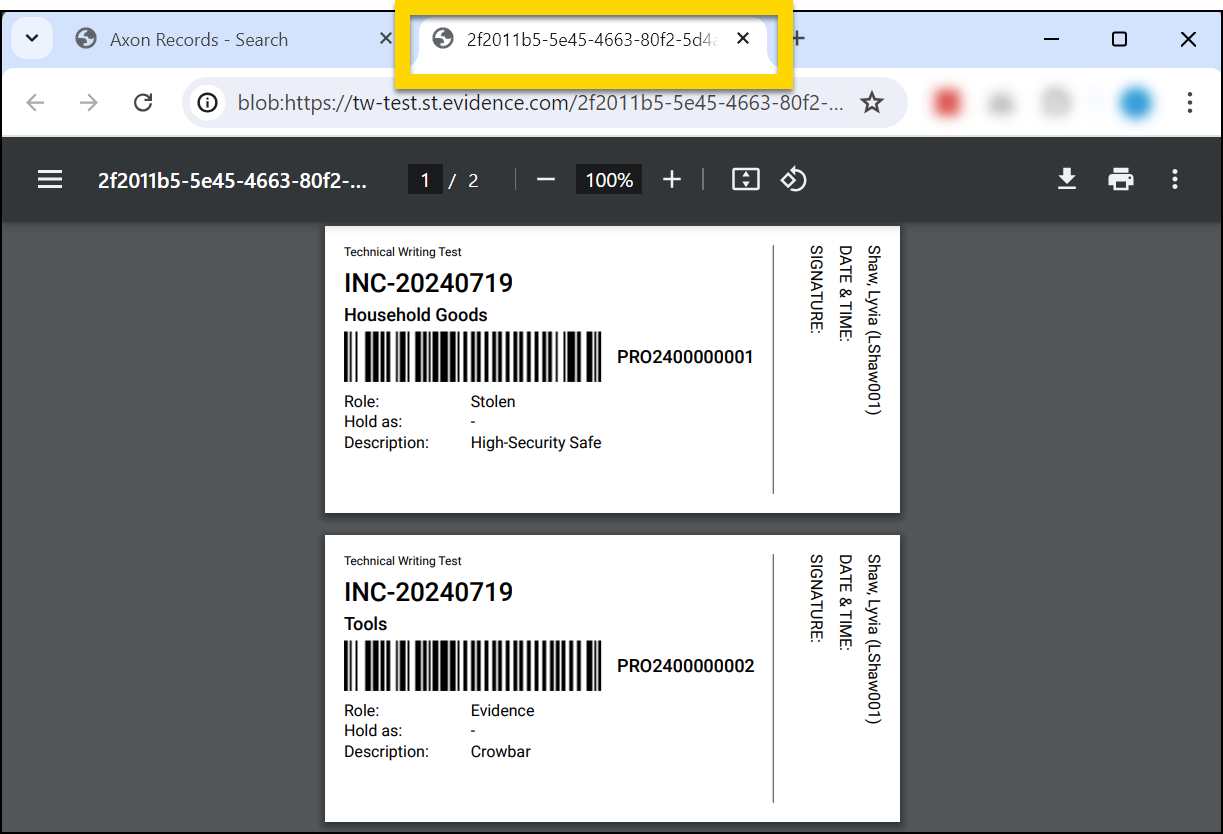
You can also print labels from the report containing the property item. To print all labels for a report, open the More actions [...] menu in the top header and select Print property labels.
If your organization follows the individual property management workflow, print a label for a single property item by taking these steps:
- Open the report to that item's section.
- Scroll down to the bottom.
- Select Print label.
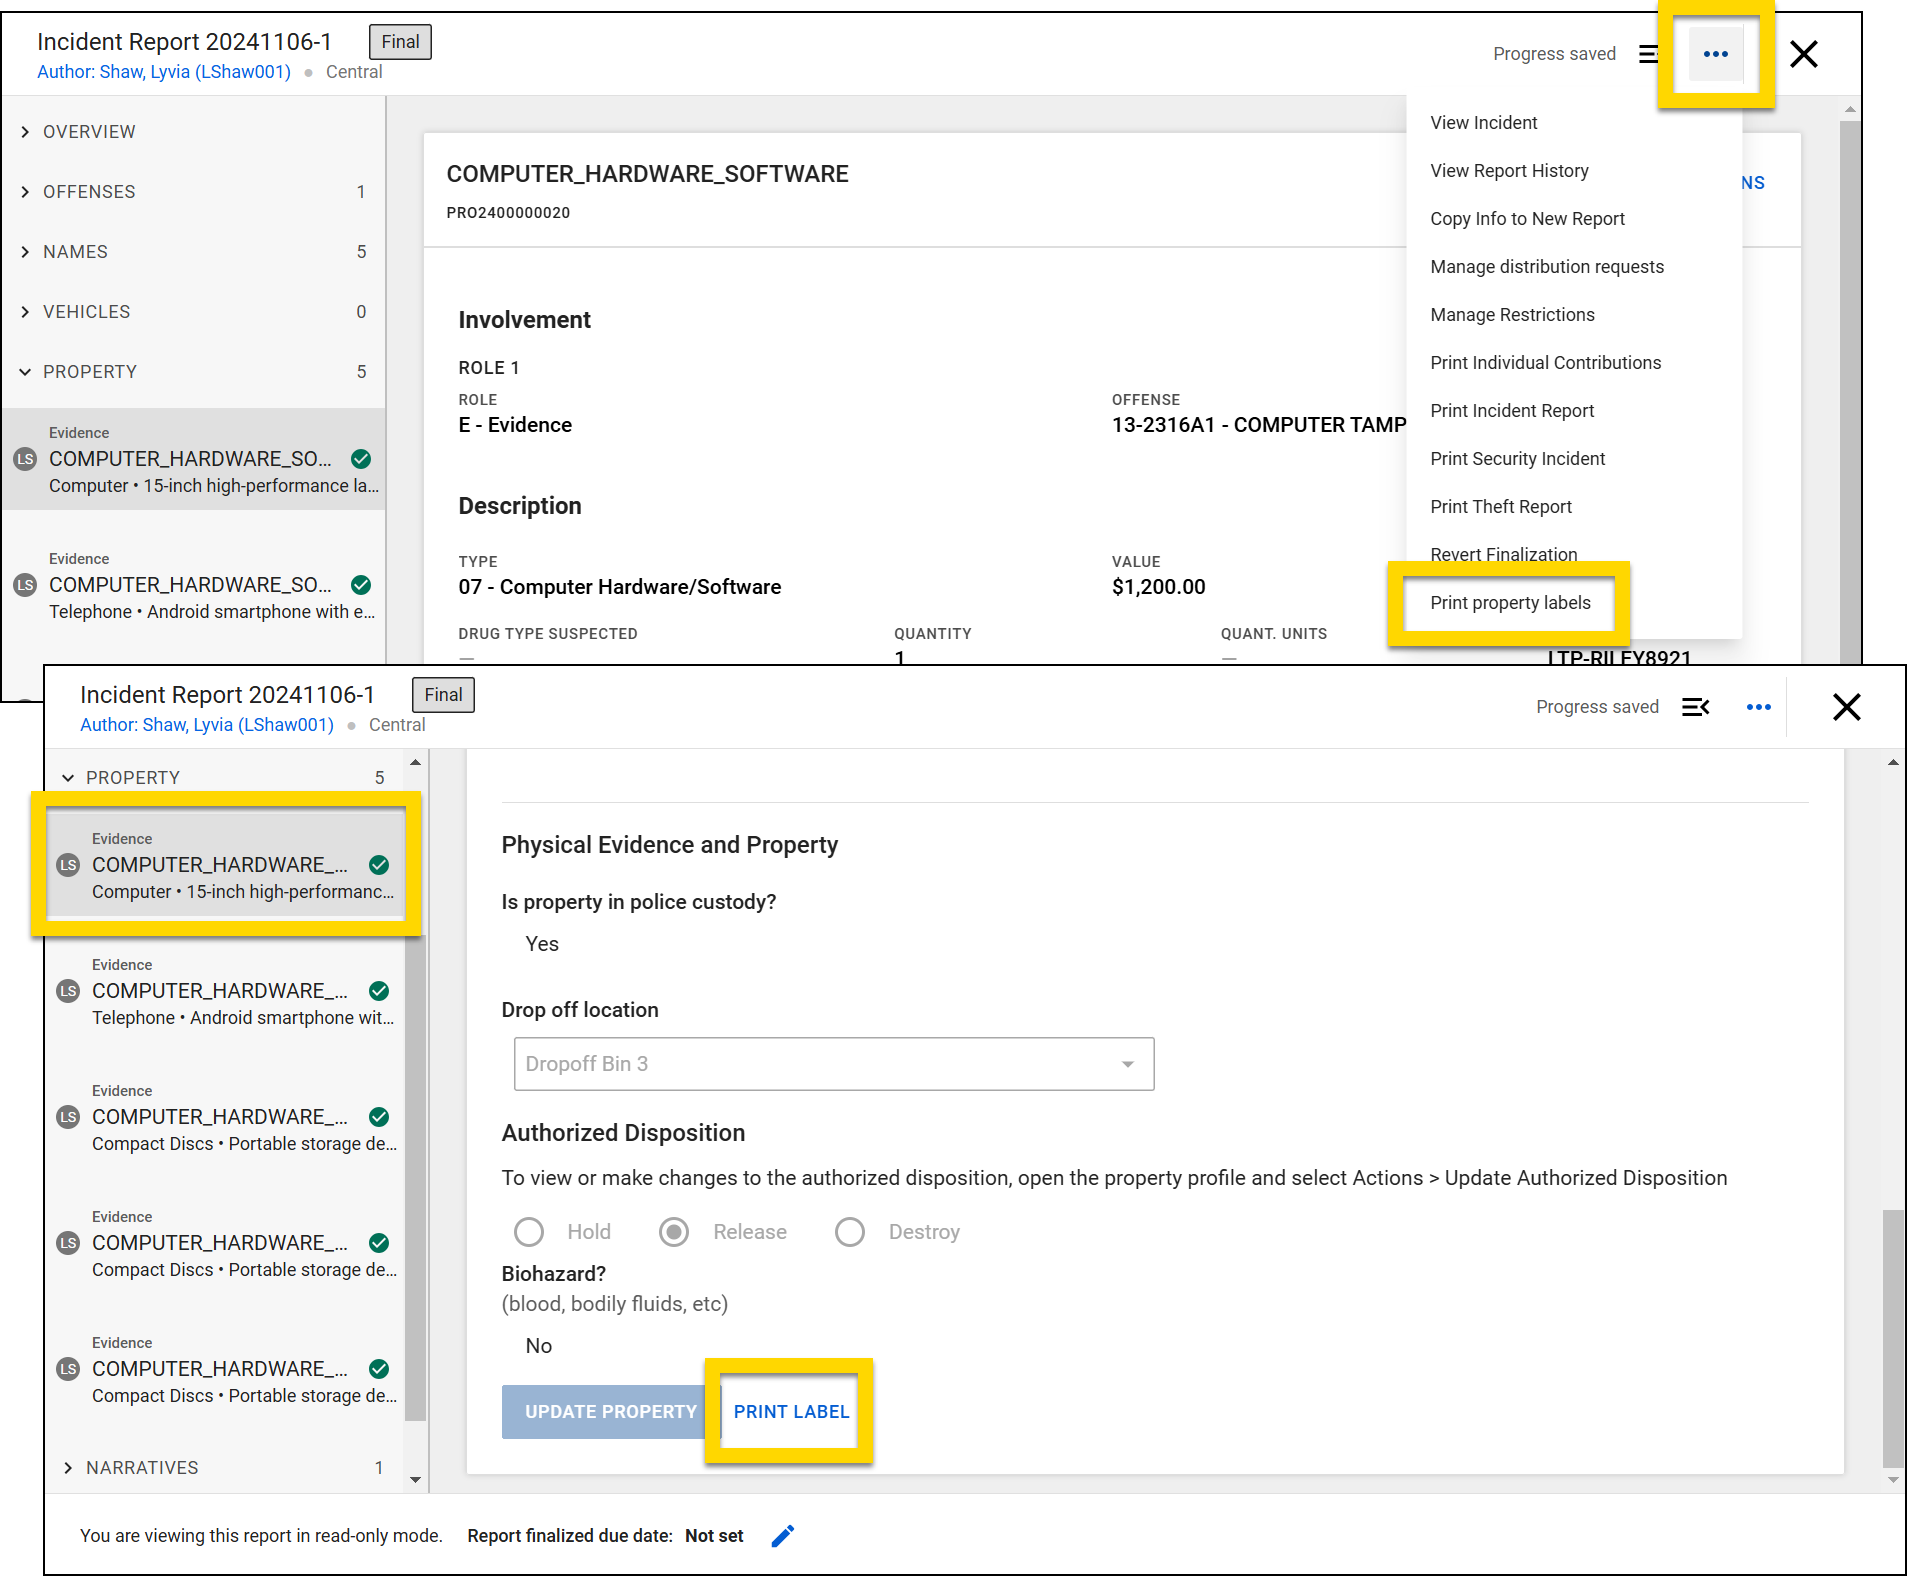
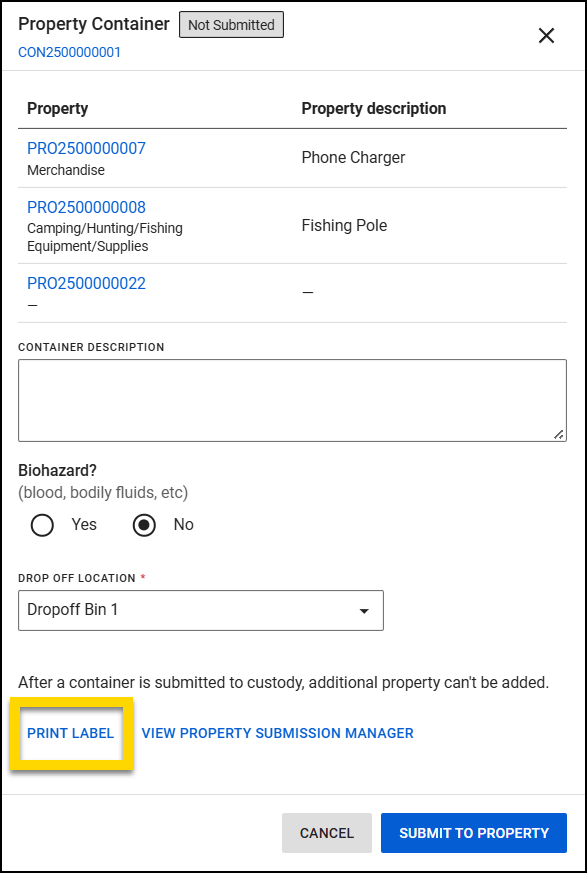
If your organization follows the container property management workflow, print a label for a single property item or container by taking these steps:
- Open the report to that item's section.
- Scroll down to the bottom.
- Select Manage property submission > Print label.
- If the item belongs to a container, a label for the container prints.
- If the item is not in a container, a label prints for that individual item.
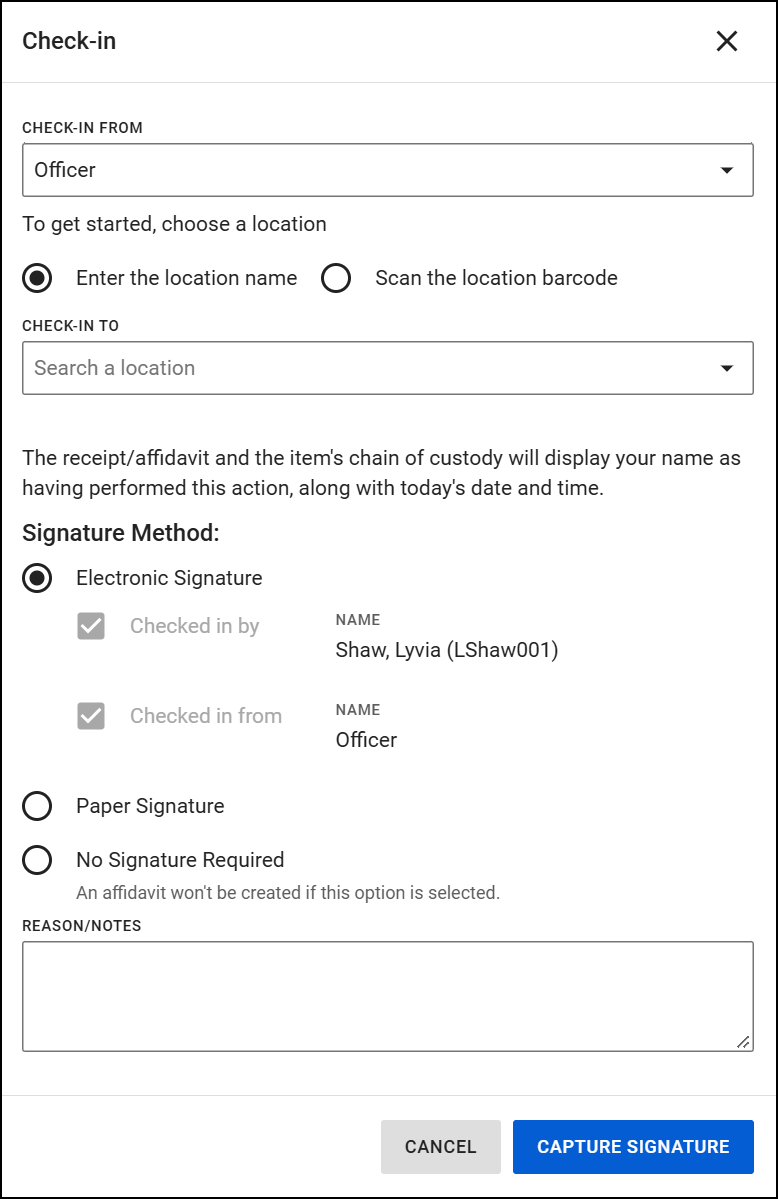
Check in/out
Check in or check out property items or containers by selecting Actions > Check in/out in the following locations. Select the checkboxes beside one or more items to check in or out multiple items at the same time.
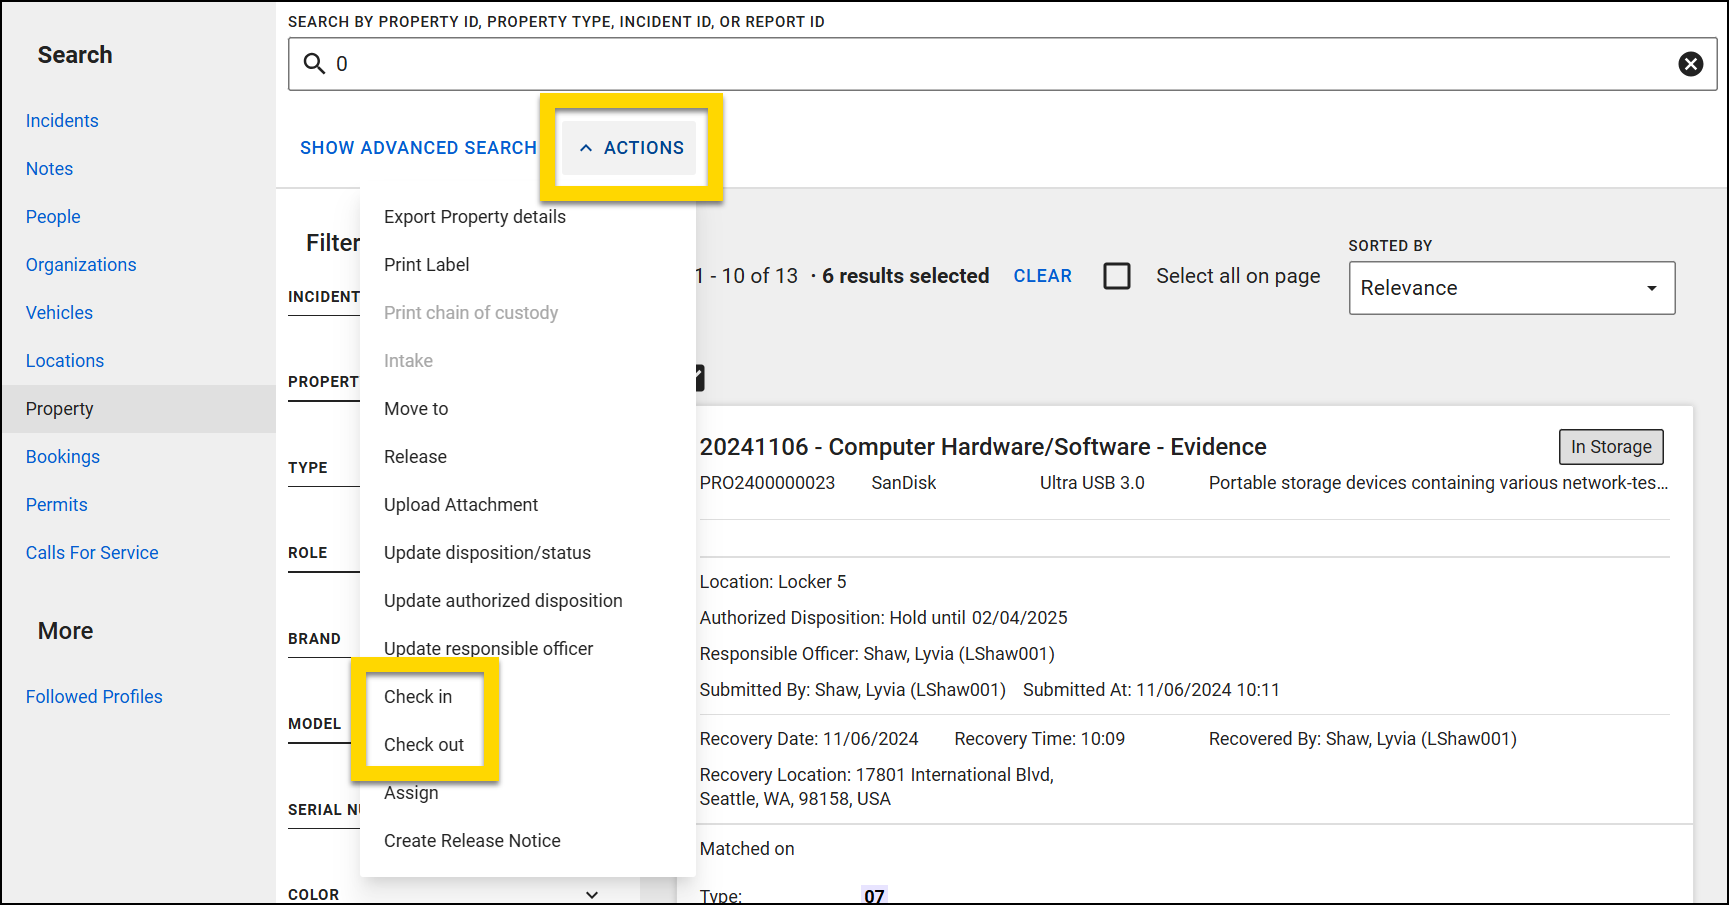
After selecting Actions > Check in/out, a window opens where you can enter:
- Who the item is being checked in from / out to
- The location the item is being checked in to (check in only)
- Signature method
- Reason/Notes
Move property location
Move property items and containers between locations by selecting Actions > Move to in the following places. Select the checkboxes beside one or more items to move multiple items at the same time.
- Property search
- Scan dashboard
- Property profile: The option to move a property item appears in the Location section on the property profile and not in the Actions menu.
- Container profile: The option to move a container appears in the Location section on the container profile and not in the Actions menu.
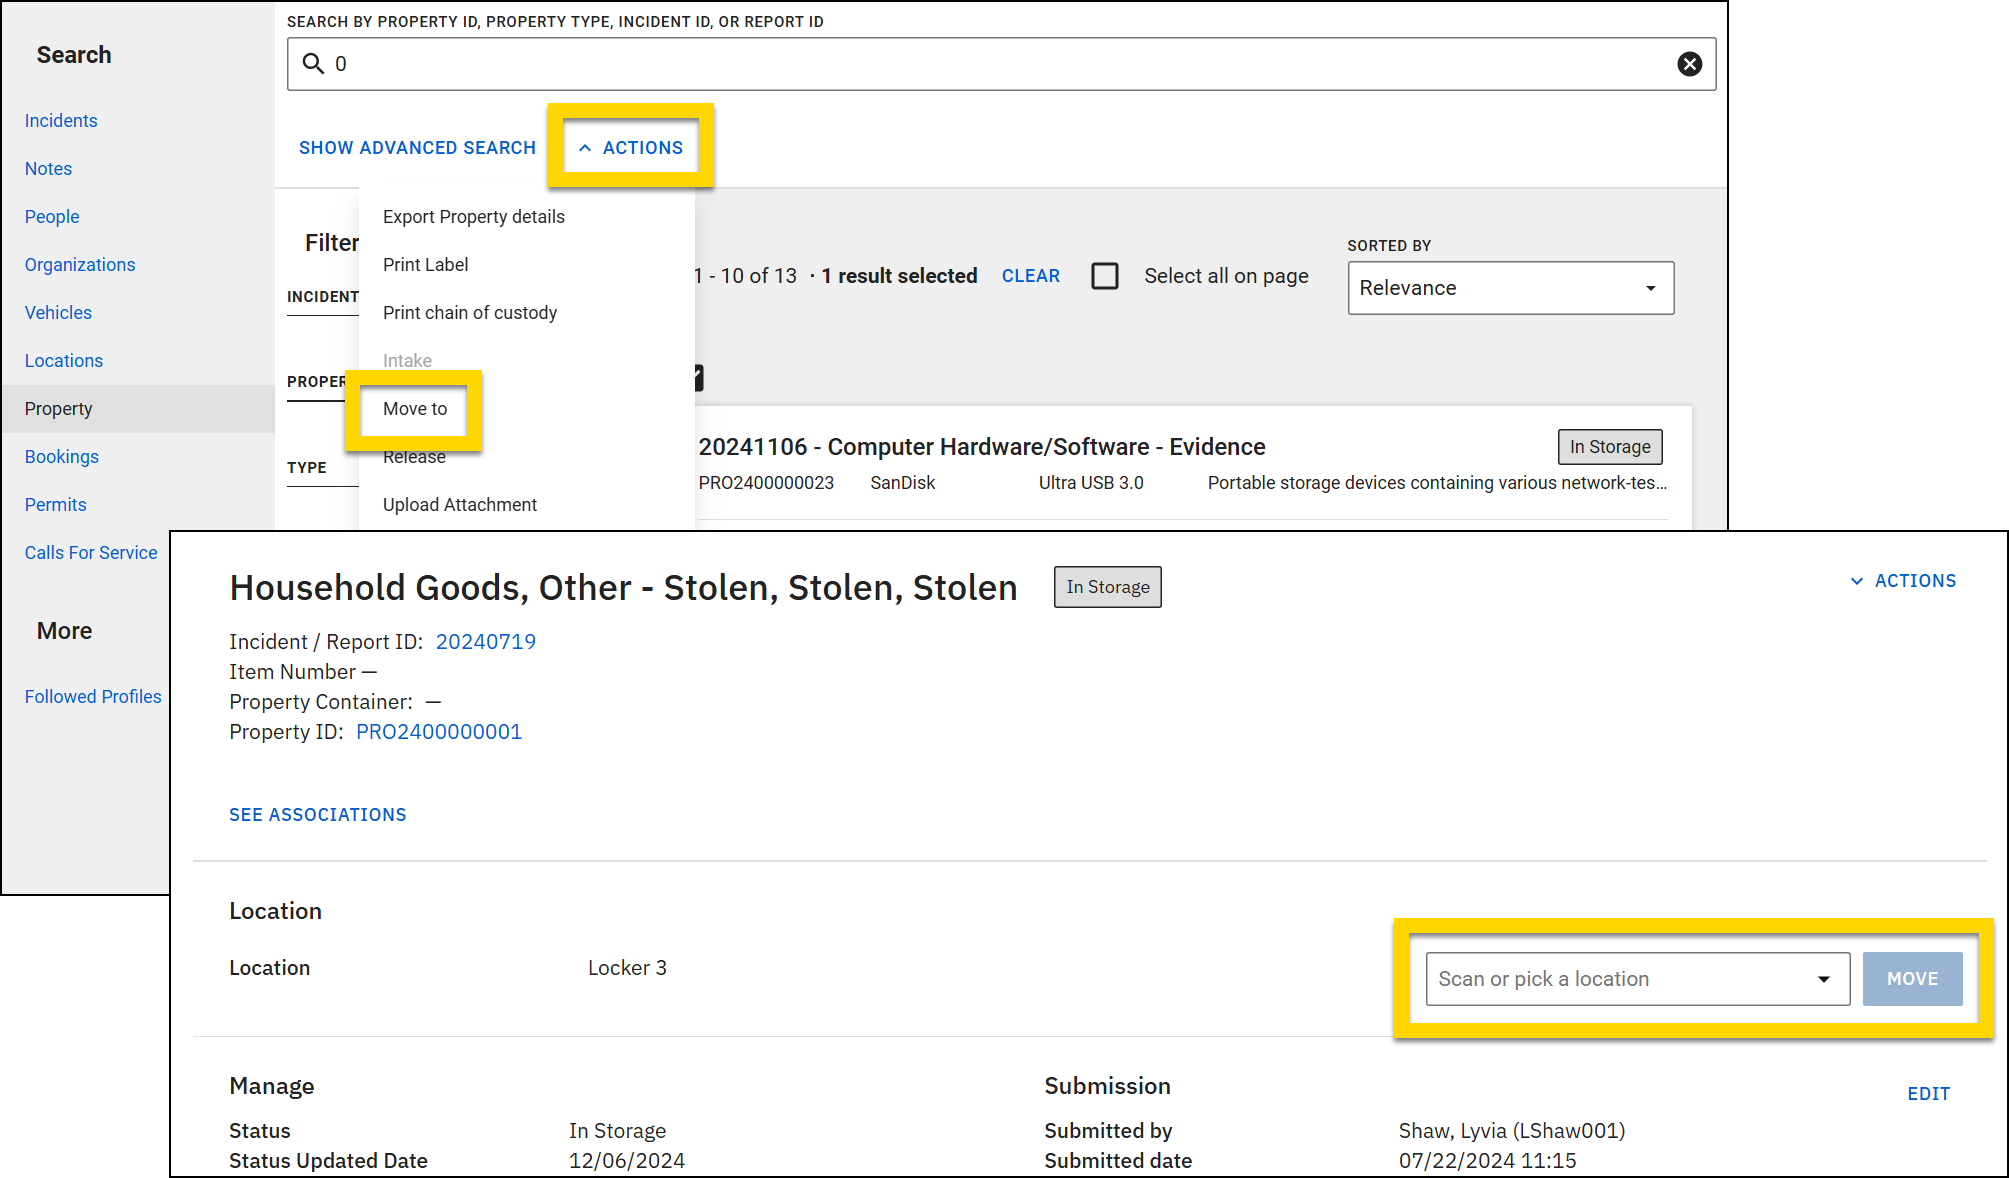
After selecting Actions > Move to, a window opens where you can either enter a Location ID or scan a location barcode. If your organization requires signatures, the Signature method options also appear. Select Save to save your changes.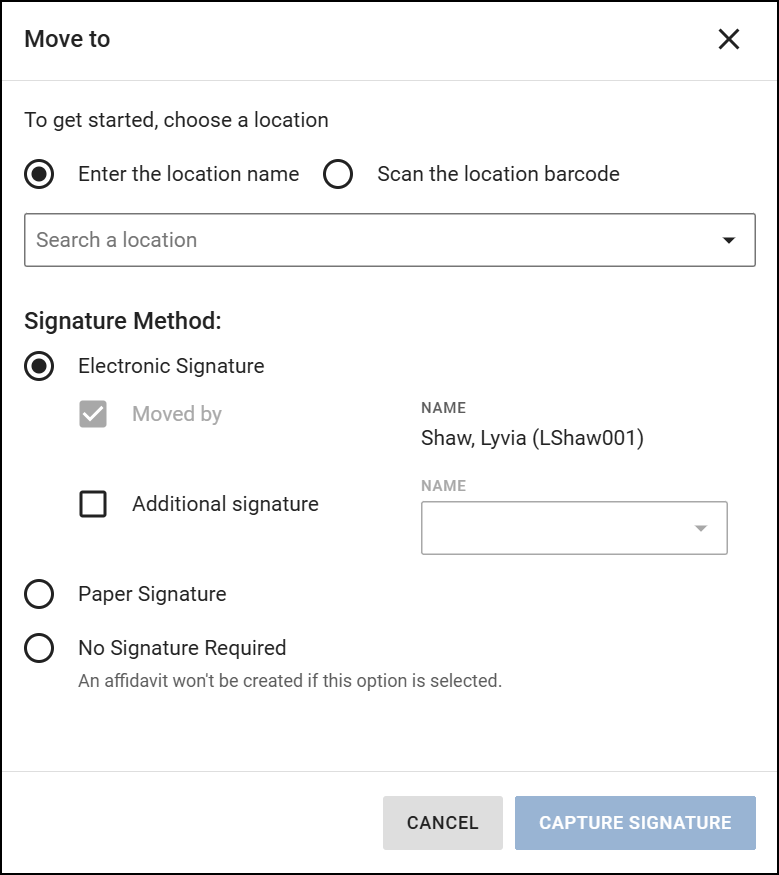
The organization's list of property locations can be managed from the Property Management tool in the Administrator Console.
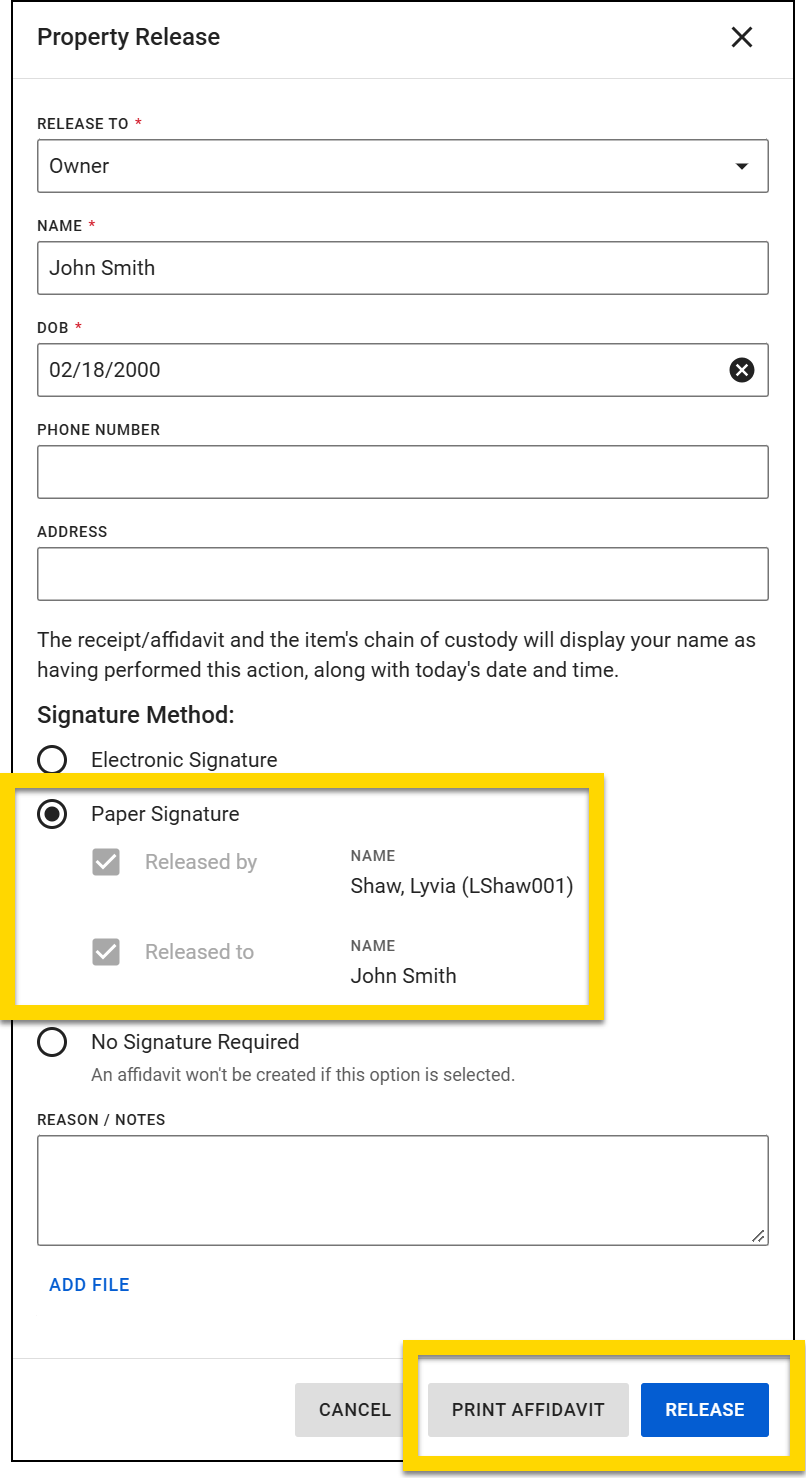
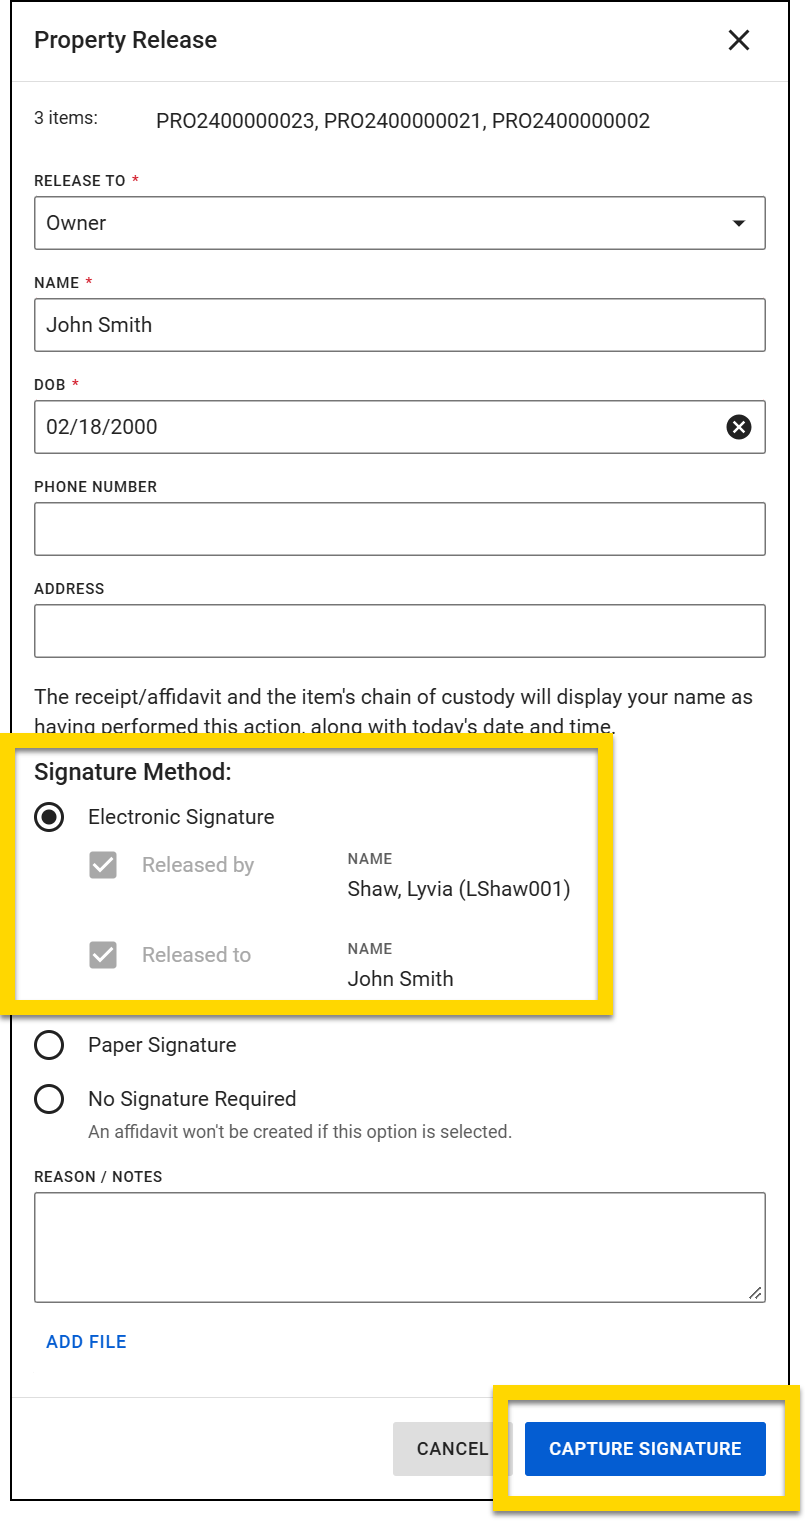
Release property
Release property items by selecting Actions > Release in the following locations. Select the checkboxes beside one or more items to release multiple items at the same time.
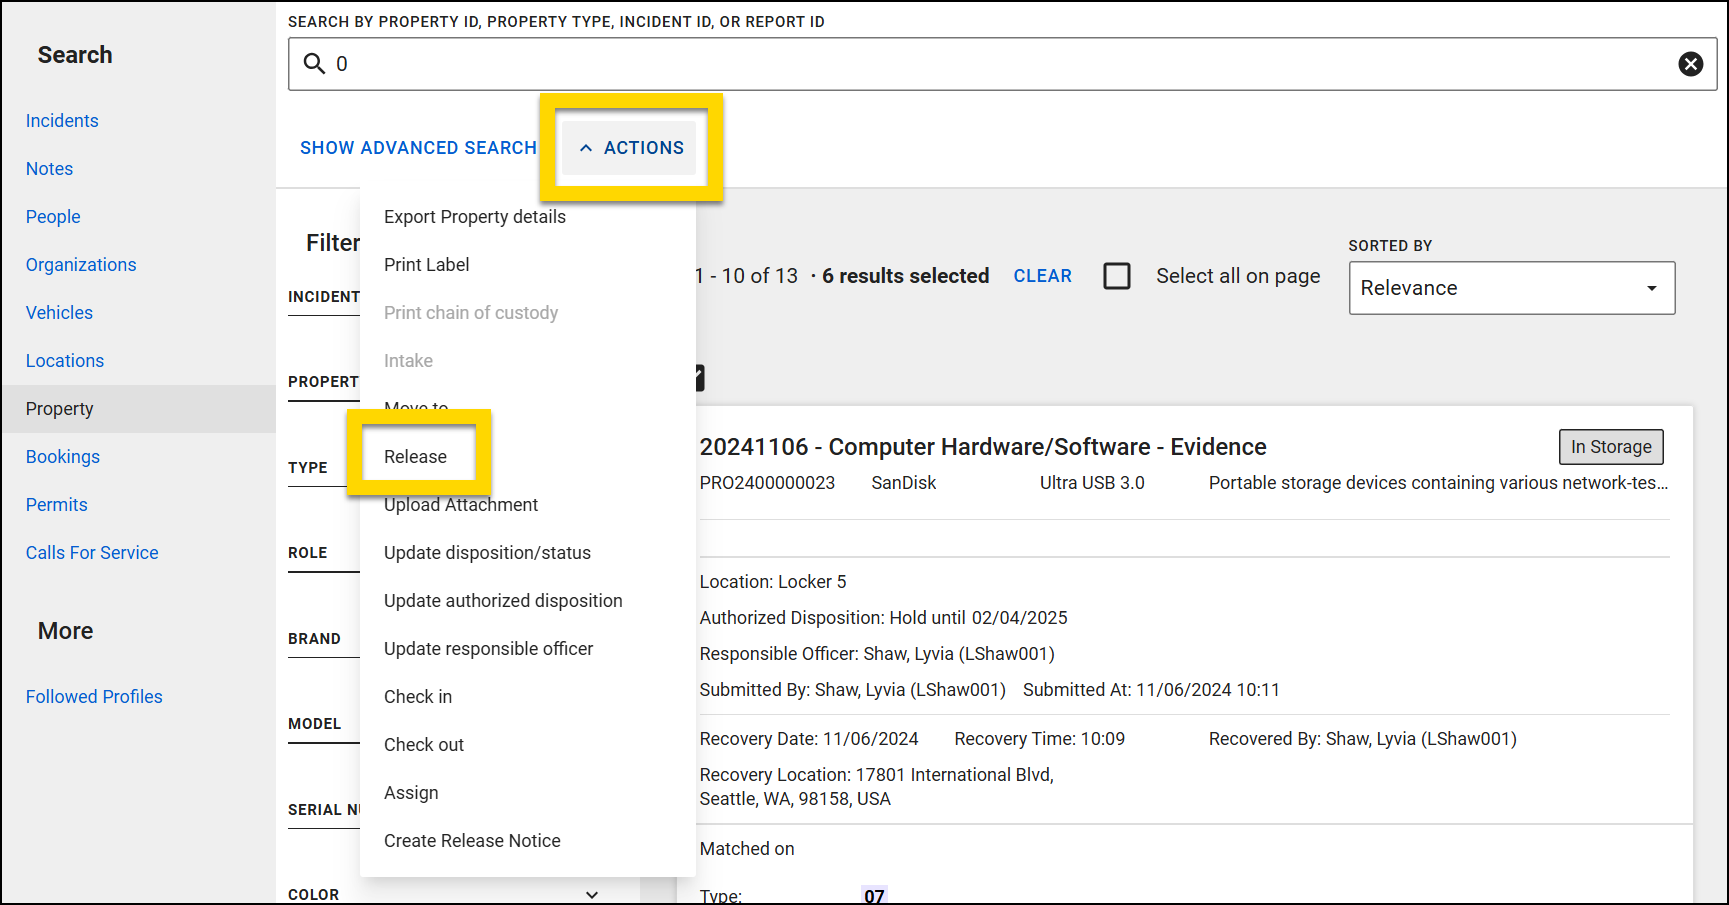
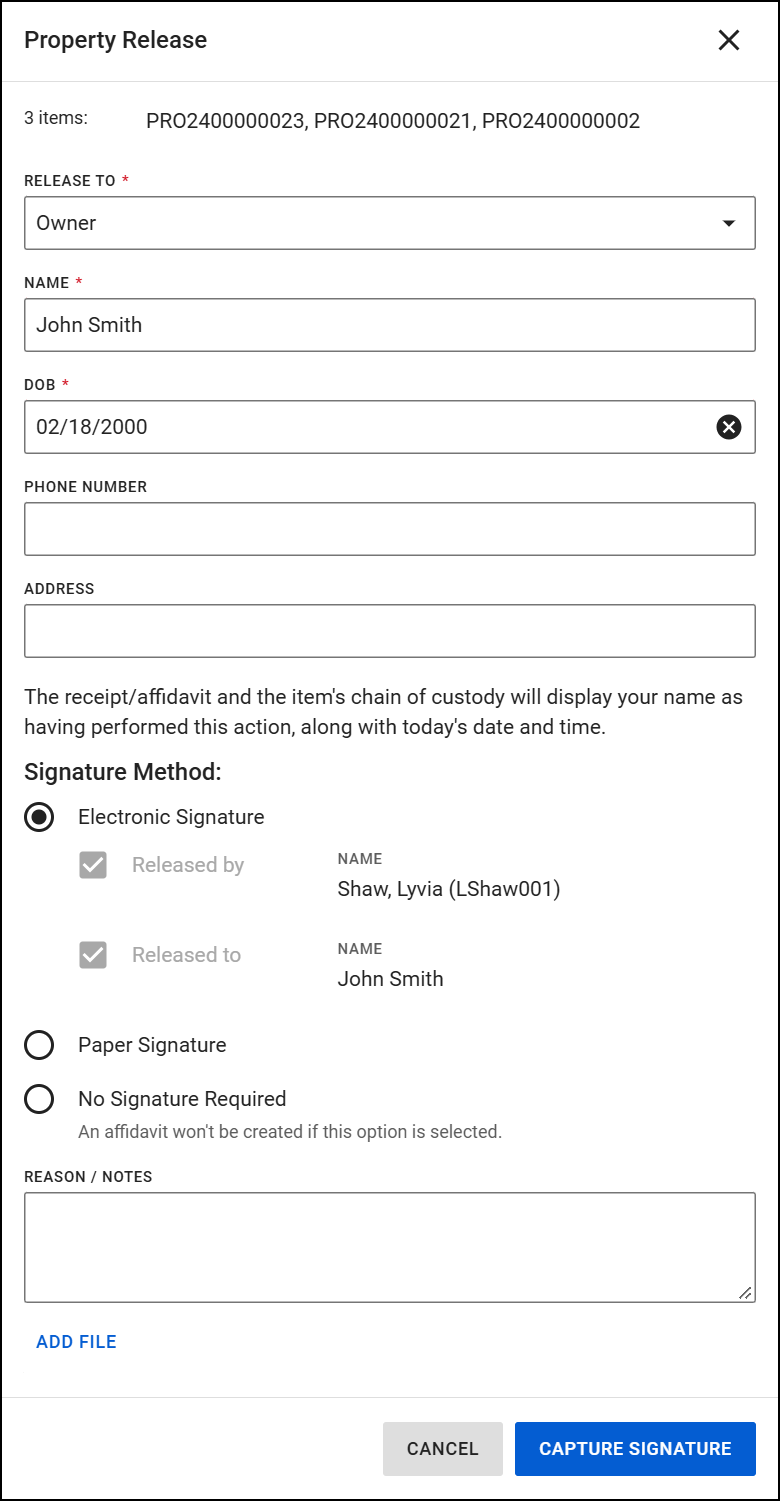
After selecting Actions > Release, a window opens where you can enter:
- Who the item is being released to, including name and contact information
- Reason for the release
- Item special characteristics (firearm, biohazard, etc.)
- Signature
- Notes
- File
Create a release notice letter
In Axon Records, you can create a release notice that can be mailed to a property owner notifying them that their property is ready to be picked up. The notice contains information about how to pick up the property, as well as a list of the property items that are ready to be picked up. This list includes the property description, ID, and barcode.
The notice template can be configured by administrators from the Property Management tool in the Administrator Console. This template can be configured to include multiple languages.
Release notices can be printed by selecting Actions > Create release notice in the following locations. Select the checkboxes beside one or more items to release multiple items at the same time.
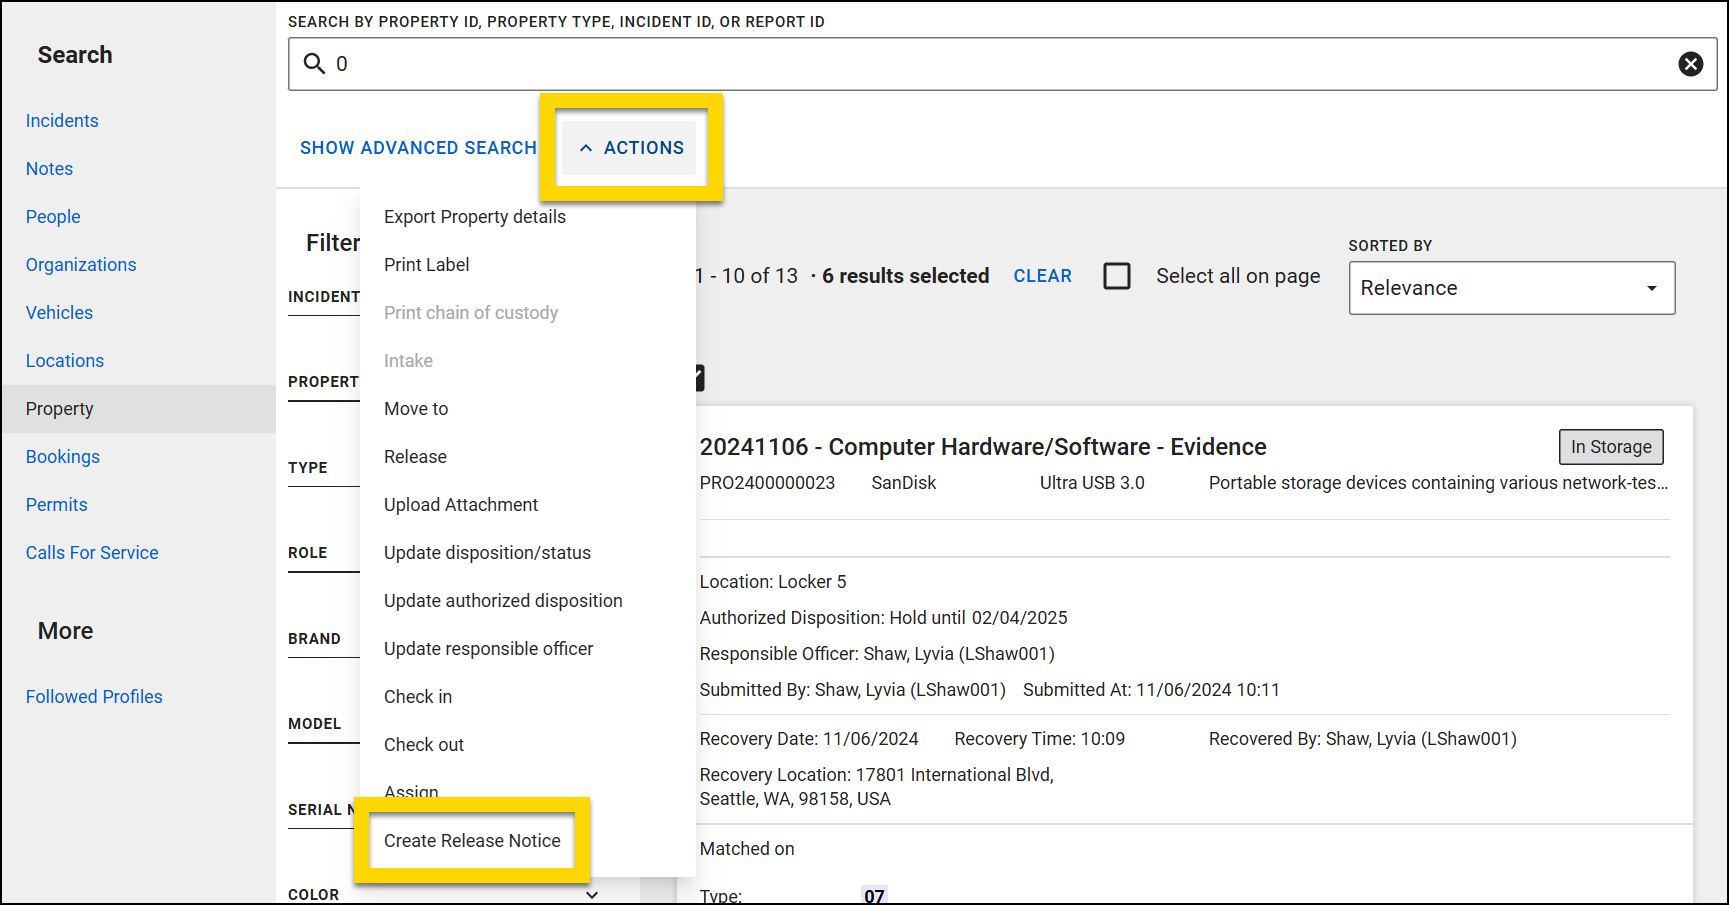
If you are creating a release notice for a container, after selecting Actions > Create release notice you can select one or all property items to be included in the release notice.
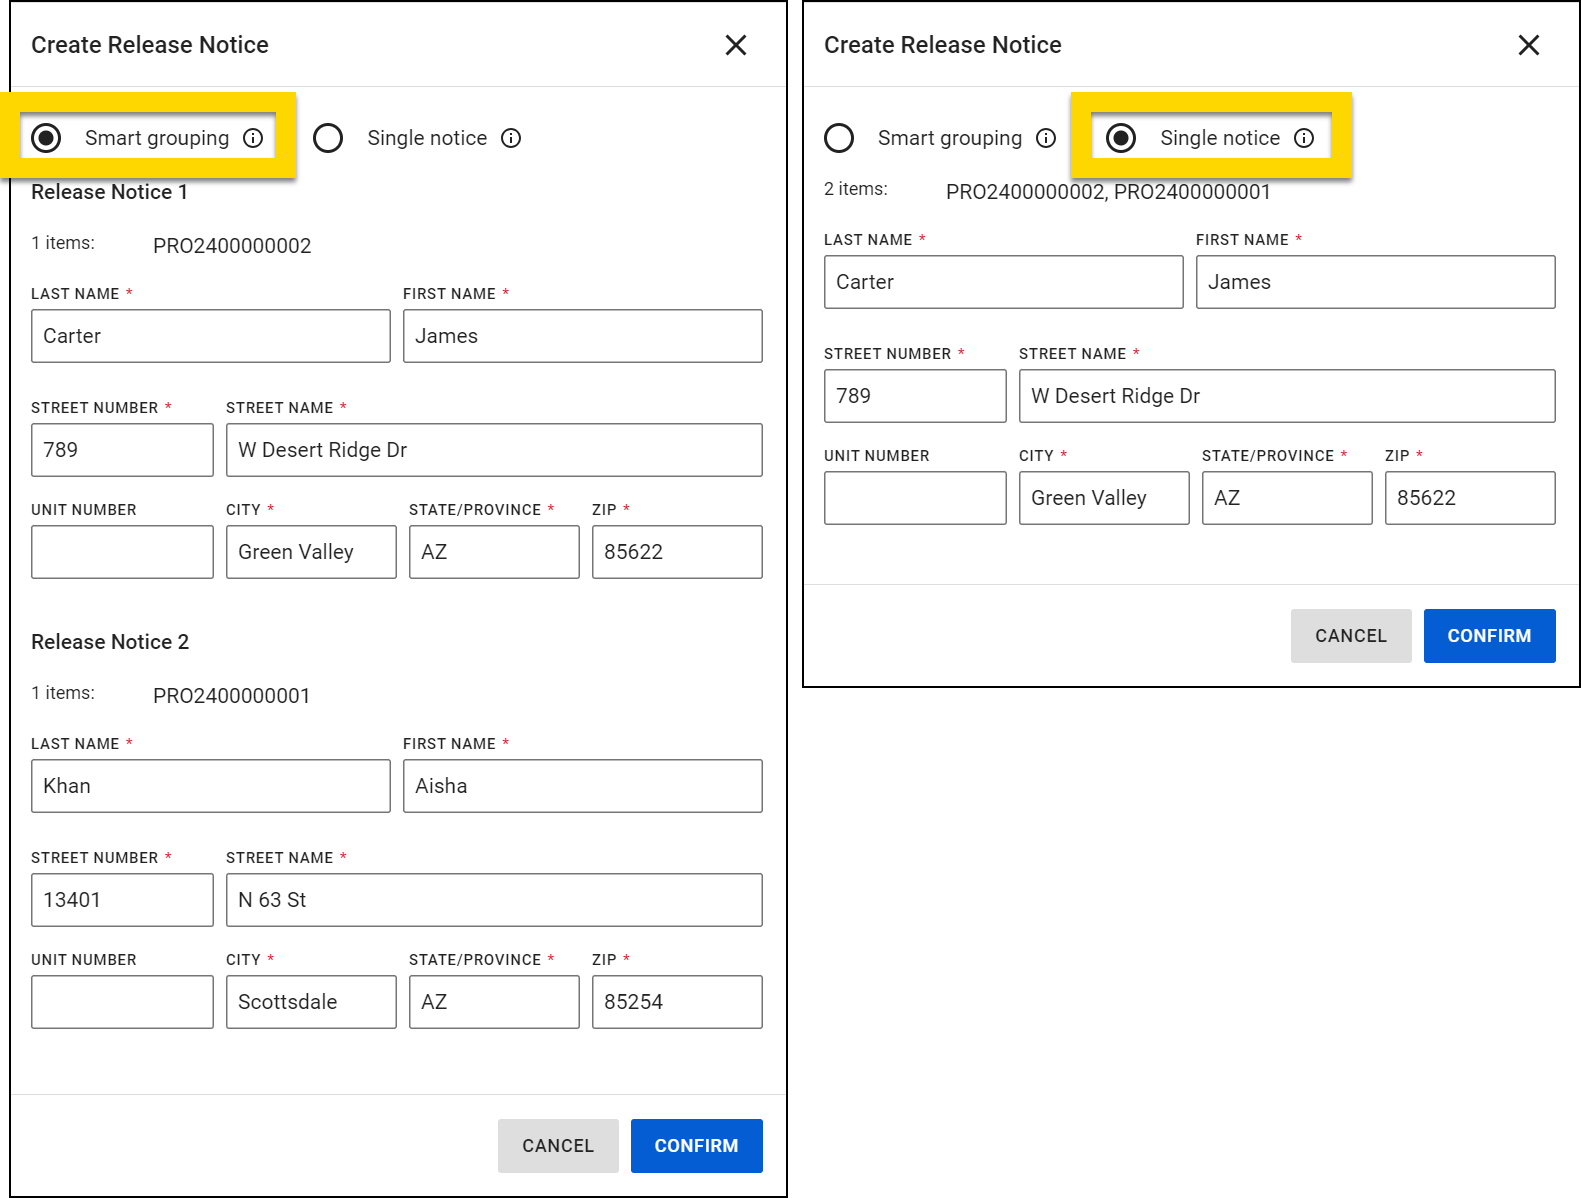
Enter the details of the person the letter will be sent to, including first name, last name, and address. If this contact information was added during an authorized disposition update, it will automatically appear in these fields.
If you are creating release notices for multiple property items, you can chose to group property items into one or more notices by using one of the two options:
- Smart grouping: When available, the recipient's address information is copied from authorized disposition updates. If the recipient details match (first name, last name, and address) for multiple property items, a single release notice will be generated for those items.
- If the items are being released to multiple people, you can enter information for each person. Multiple letters will be created, each containing the property item(s) associated with the indicated person and their contact information.
- Single notice: A single release notice is generated for all items. Enter recipient information manually.
- Like the Smart Grouping, if contact information was added during an authorized disposition update for at least one of the items, it will automatically appear in these fields.
When a release notice is created, it is added to the Media section in the property profile of each property item referenced in the letter. Selecting the release notice name opens Axon Evidence in a new tab where you can view and download the full letter at any time.
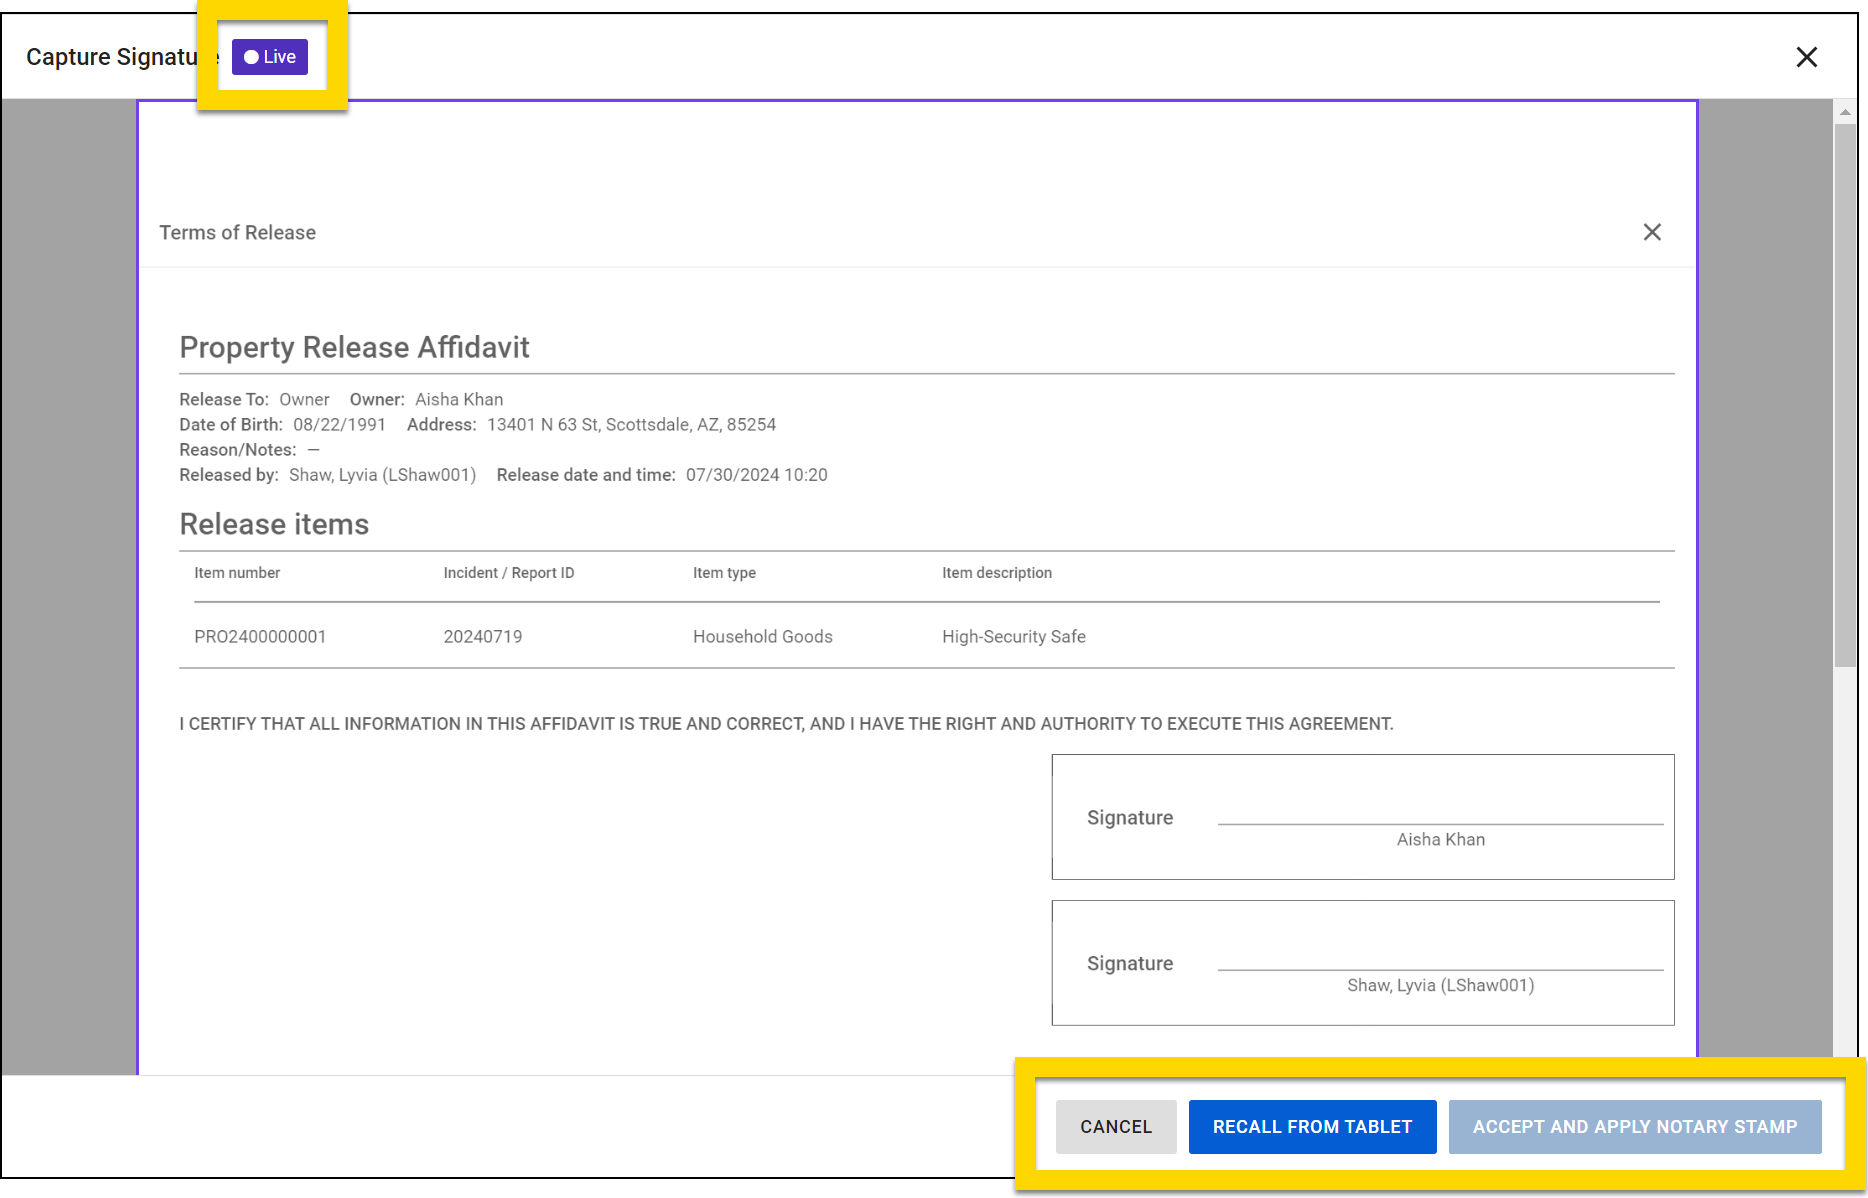
Notary stamp
Some agencies are configured to allow administrators to upload an image of a notary stamp to a user's profile. If that user releases property, instead of seeing Accept signature, they will see Accept and apply notary stamp. When this button is selected, the stamp is added to the release affidavit.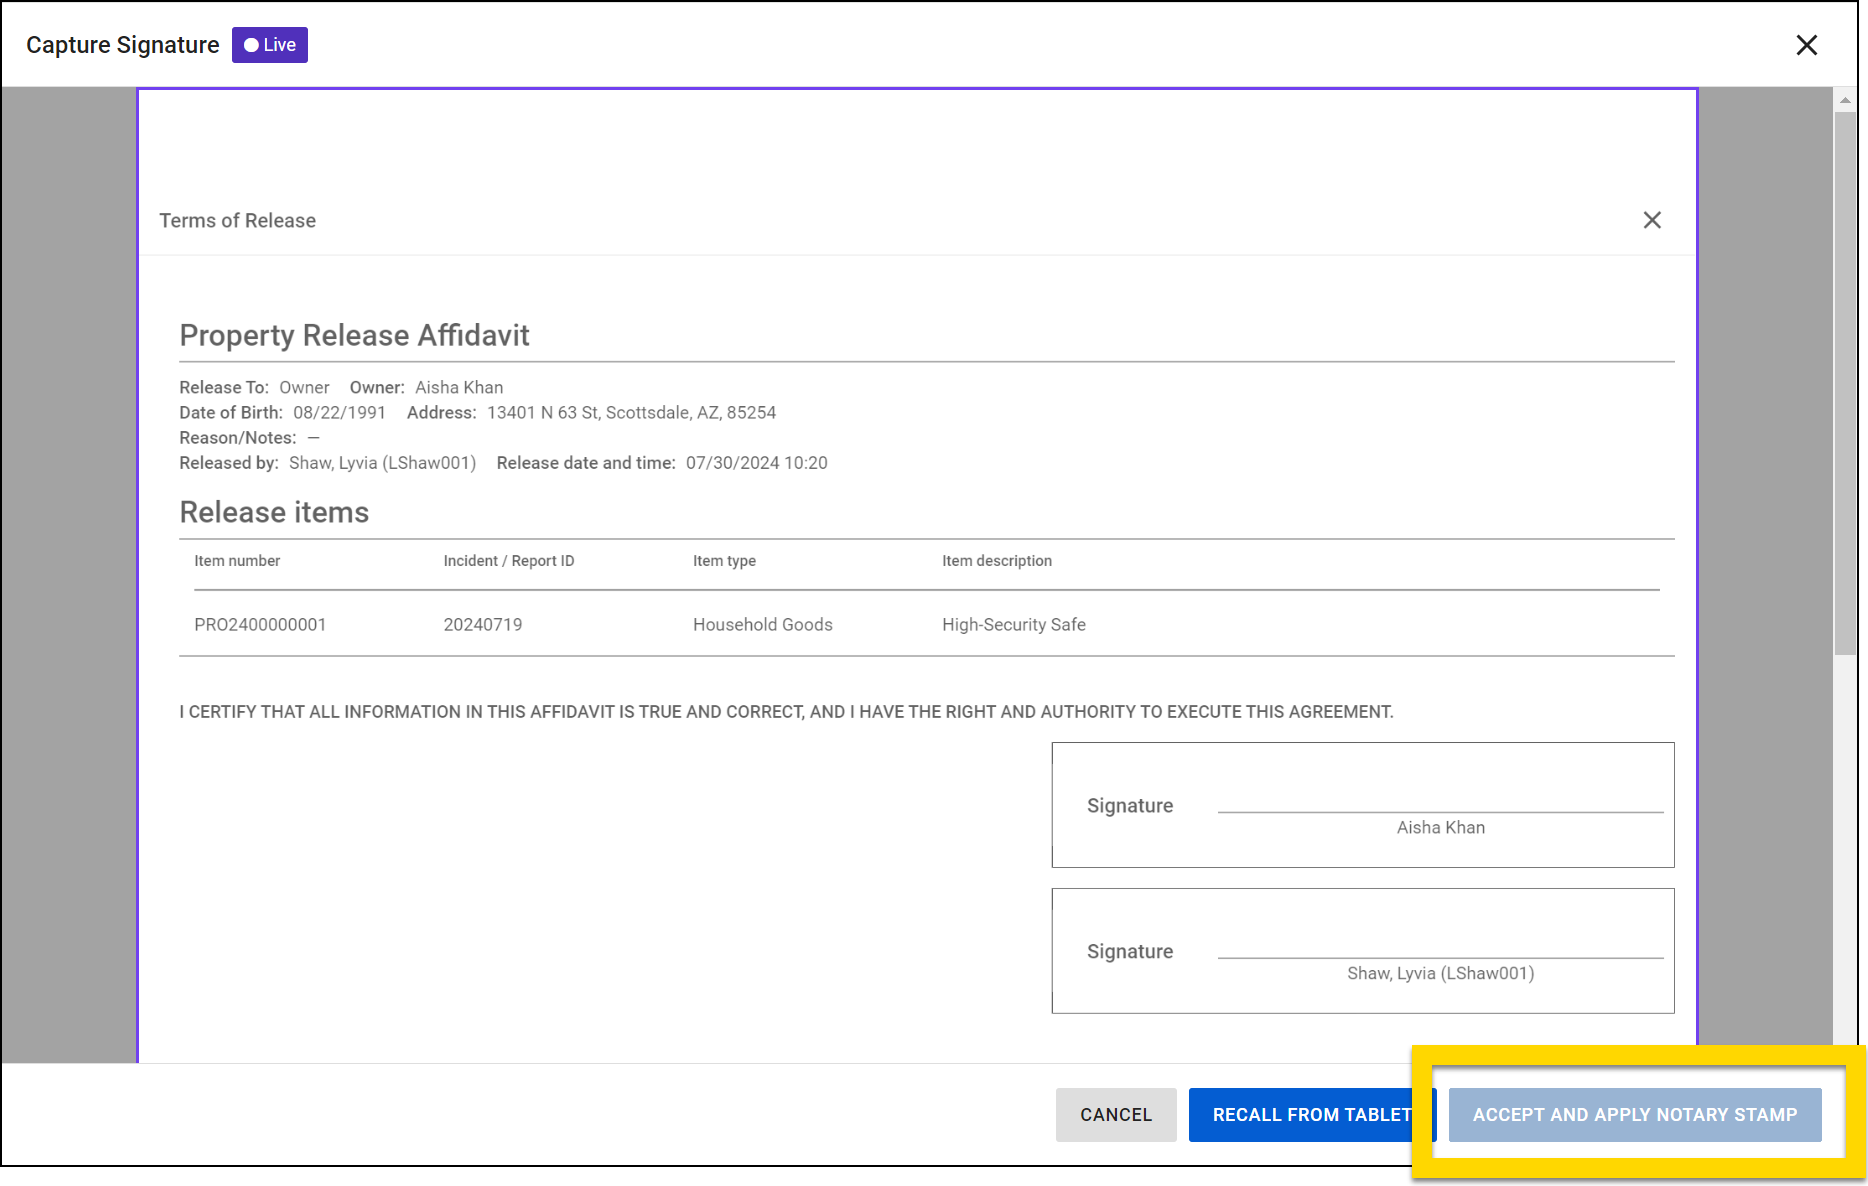
Manage property authorized disposition and disposition/status
An item's authorized disposition is managed by the user who is assigned as the item's responsible officer and indicates how an item should be managed by the Property Department (if it should be held, released, or destroyed). Based on this authorized disposition, property technicians can update the item's actual disposition/status and manage the item appropriately.
For example, if the primary officer on the incident updates the item's authorized disposition to Destroy, the property technicians can update the disposition/status to Ready to Destroy or Destroyed, as appropriate.
A property items' authorized disposition and disposition/status are displayed on search results and on the property profile:
Update authorized disposition
The responsible officer or users with additional privileges can update the authorized disposition for property items by selecting Actions > Update authorized disposition from the following locations. Select the checkboxes beside one or more items to update multiple items at the same time.
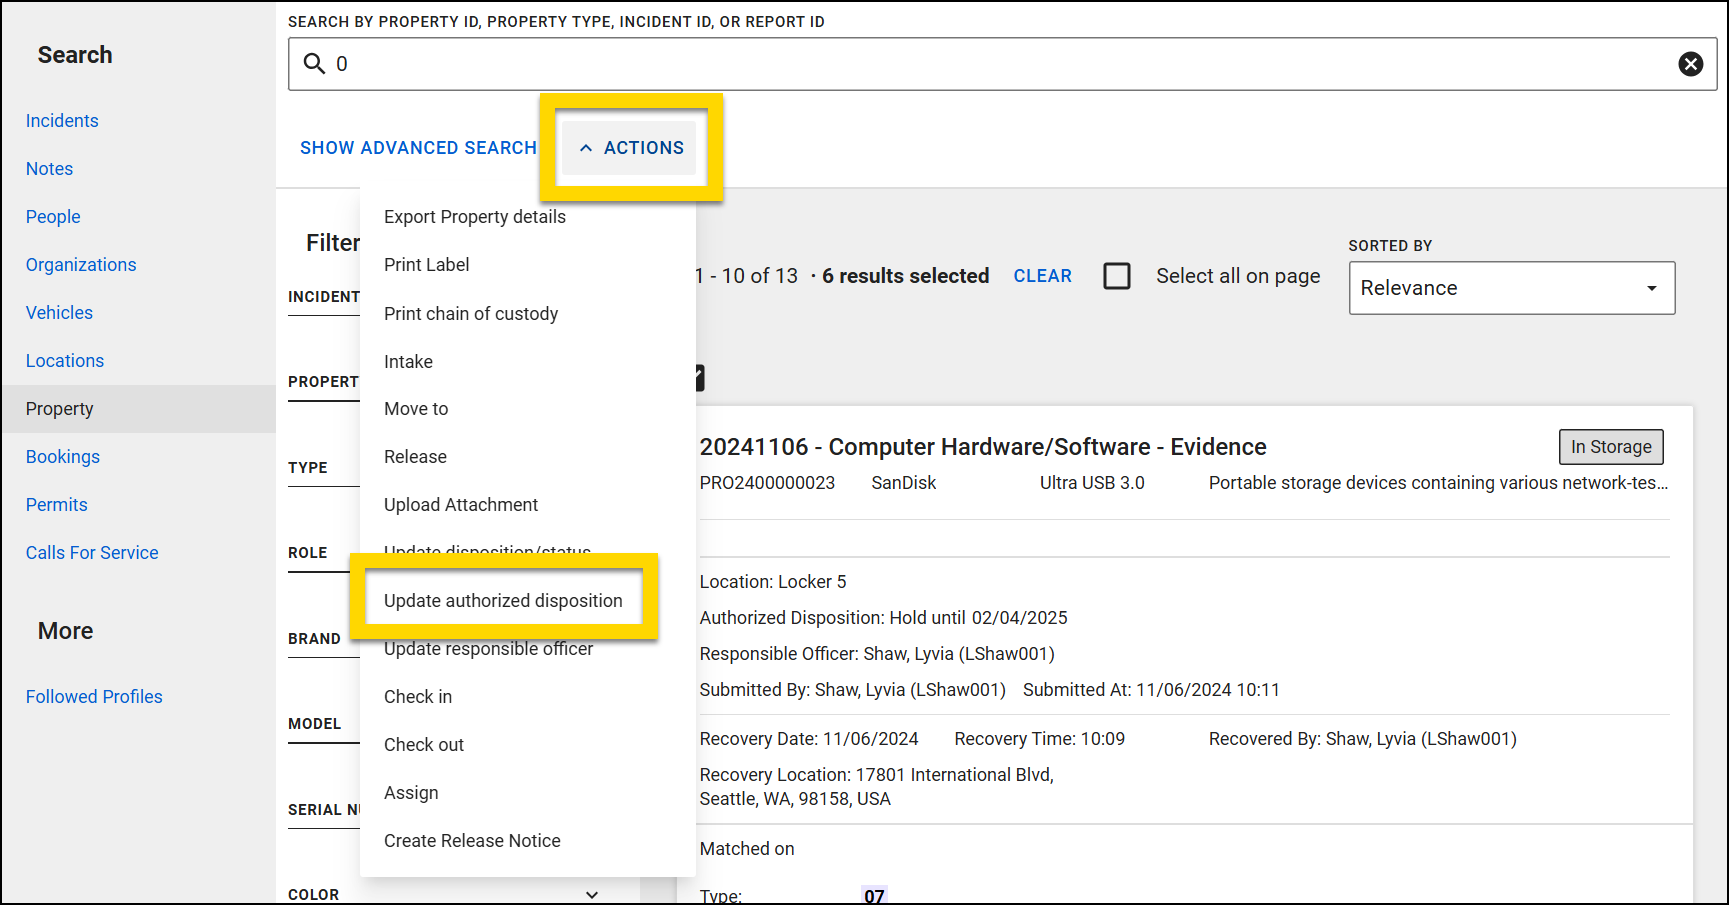
After selecting Actions > Update authorized disposition, a window opens where you can select from three options:
Hold
When updating the authorized disposition to Hold, you can adjust the authorizing person, hold reason, and person/organization the item is being held for. You can keep the current retention date or set a new one using one of the preset durations (90, 120, or 180 days) or users with additional privileges can set a date manually.
After updating the hold information and adding notes as needed, select Update disposition to save your changes.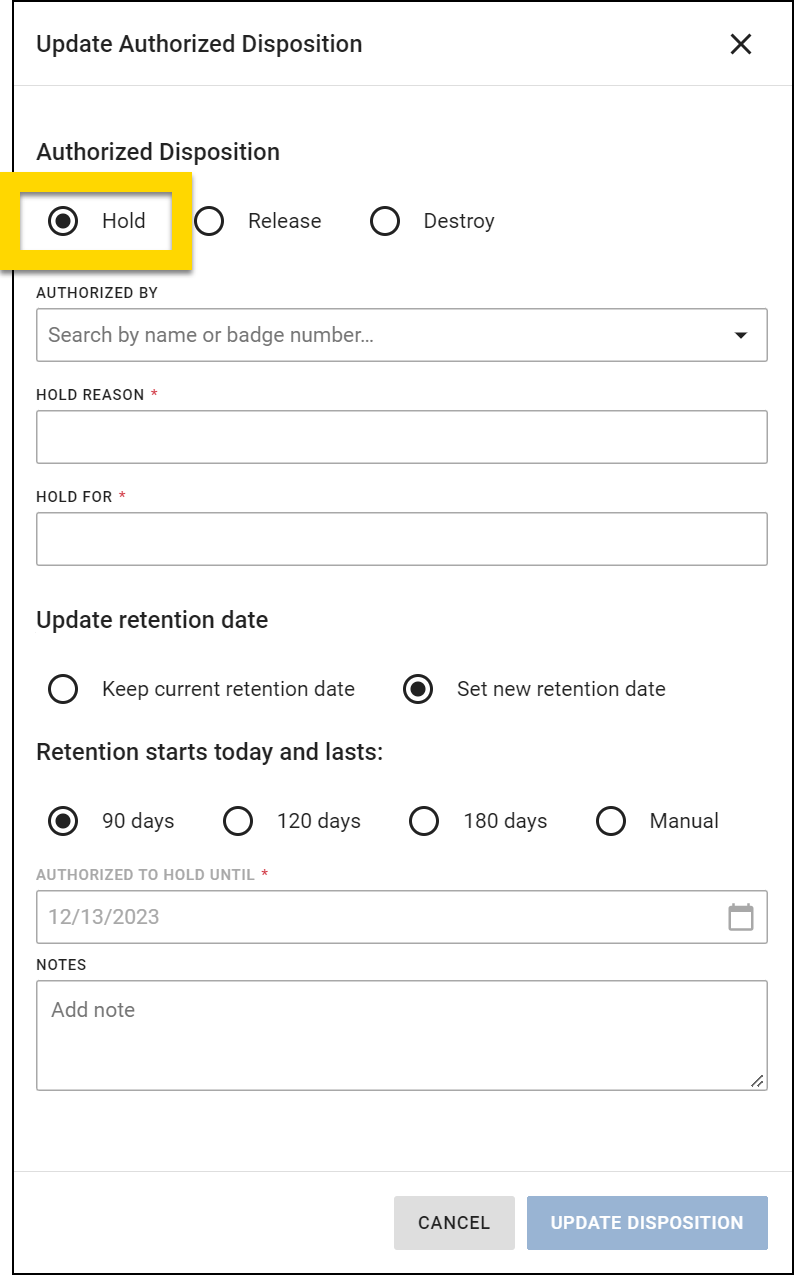
Release
When updating the authorized disposition to Release, you can adjust the authorizing person, release reason, and add contact information for the person the item is being released to in one of two ways:
- Manually add contact information.
- Choose a name from the Release contact information section, then select Import.
- Only the names of people who are added to the report will appear. The contact information from the person's profile will automatically populate the release form fields. You can then fill in any missing information required for the release.
- If their name does not appear in this section, select Enter contact information to manually add their contact information.
After updating the release information and adding notes as needed, select Update disposition to save your changes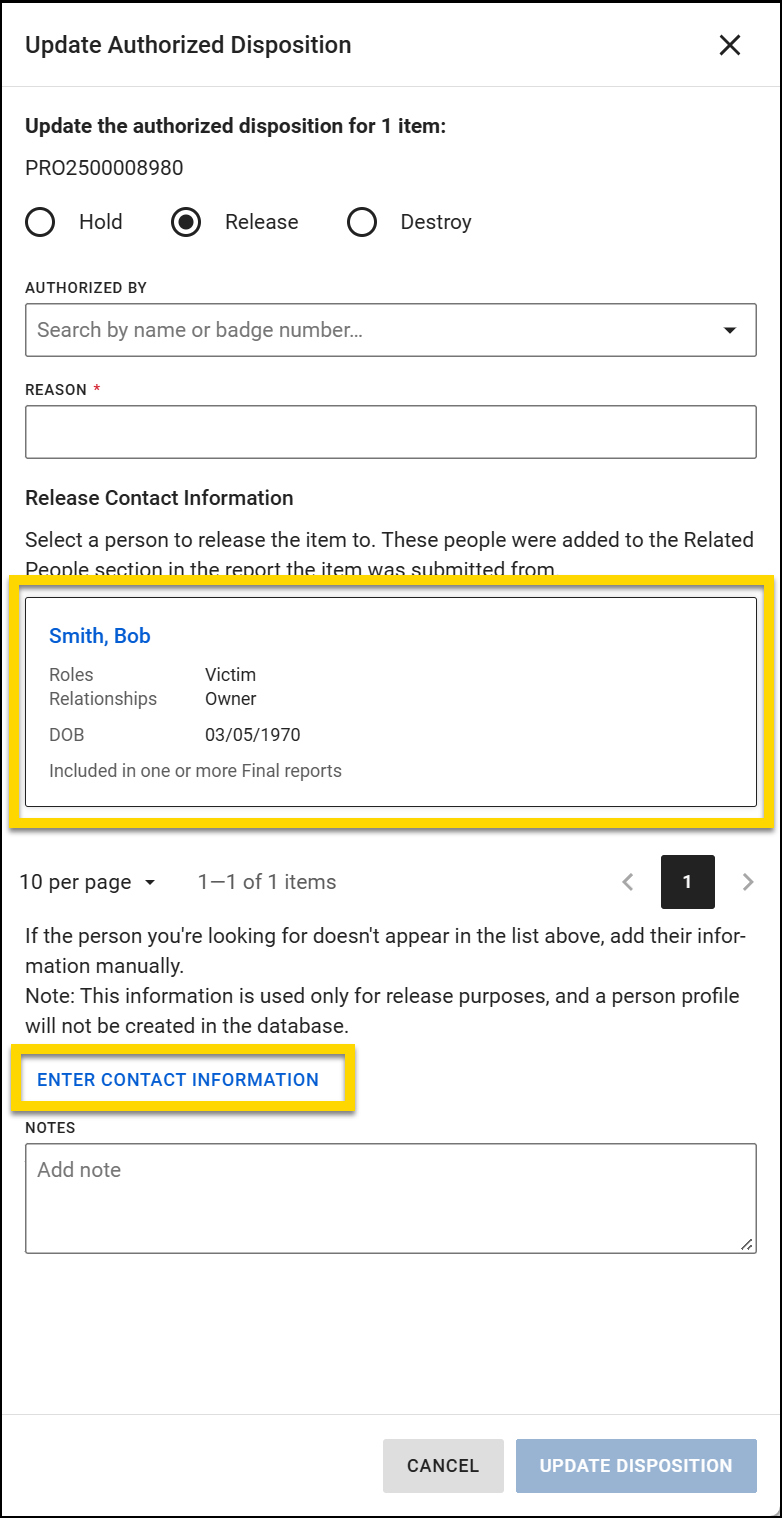
Changes made to contact information after importing only apply for this specific release and will not update the person's profile. To update the person's actual profile information, edit their information in the Names section of the report.
Destroy
When updating the authorized disposition to Destroy, you can adjust the authorizing person and destroy reason.
After updating the destroy information and adding notes as needed, select Update disposition to save your changes.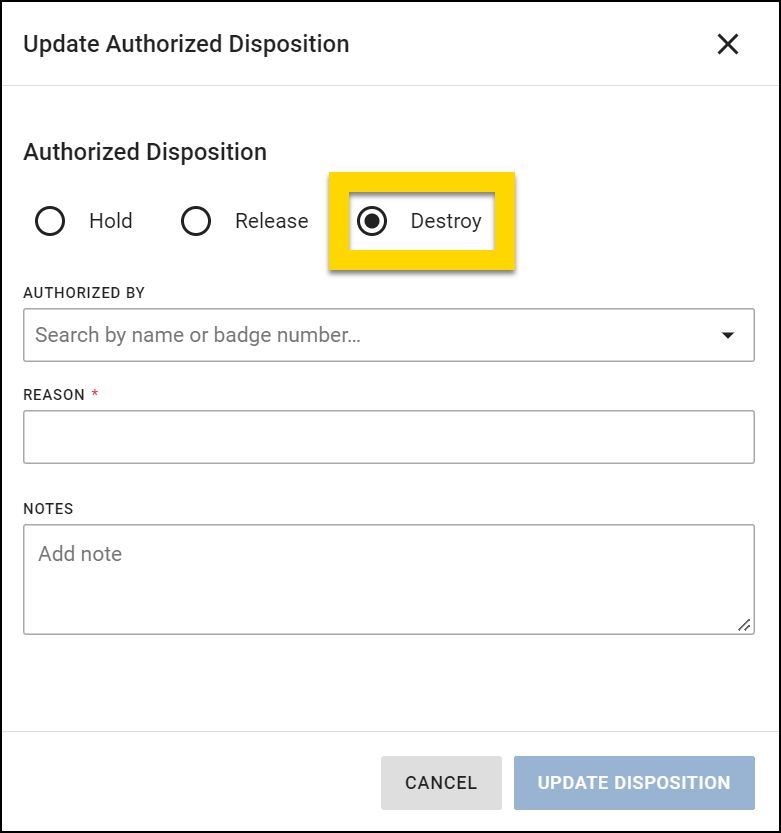
Update disposition/status
You can update the disposition/status for property items by selecting Actions > Update disposition/status from the following locations. Select the checkboxes beside one or more items to update multiple items at the same time.
- Property search
- Scan dashboard
- Tasks dashboard
- Property profile: Select Edit on the main profile page to update the item's disposition/status rather than opening the Actions menu.
- Container profile: Select Edit on the main profile page to update the item's disposition/status rather than opening the Actions menu.

Once you select Actions > Update disposition/status or Edit, a window opens where you can enter the new disposition/status and notes. If your organization requires signatures, the signature method options also appear. Select Save to save your changes.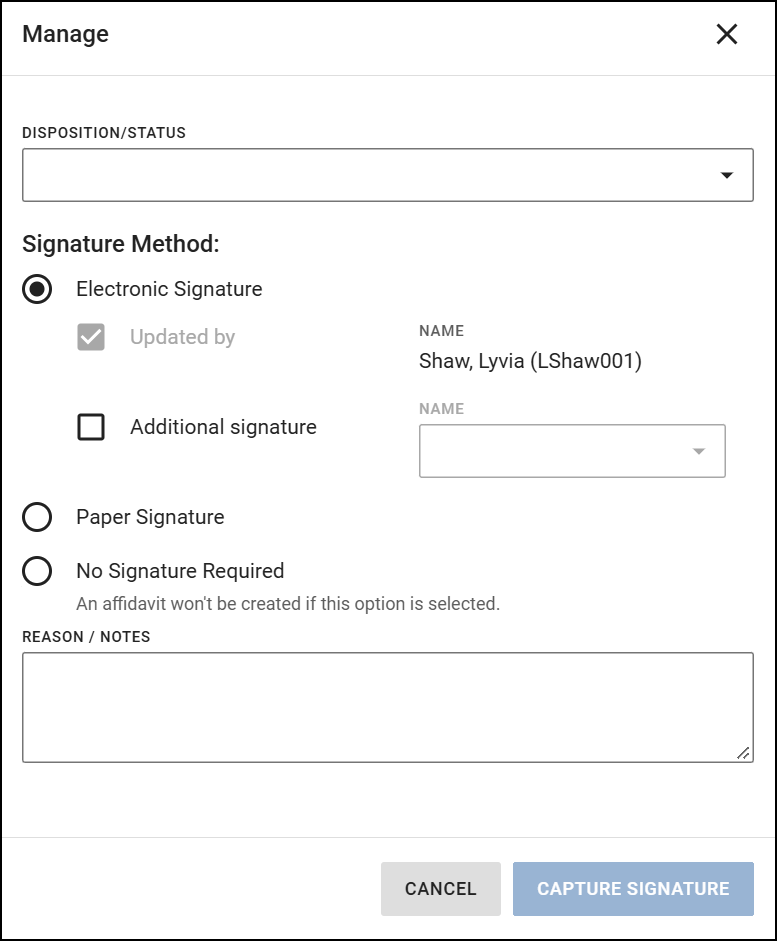
Manage responsible officer
A responsible officer is the person responsible for keeping the authorized disposition of a property item up to date. This is the only user who can update an item's authorized disposition, unless additional privileges are granted.
The responsible officer receives one email notification each day notifying them if the retention periods for any items they are responsible for are expiring in the next seven days or if the period has already expired. They can then update the retention period for these items as needed.
When an item is submitted to the Property department, the user who submitted it is assigned as the responsible officer. If a case is created for the incident, the responsible officer is re-assigned to the case’s lead detective. If the case is ever transferred or reassigned, the responsible officer is also reassigned.
The user assigned as a property item's responsible officer appears on the property profile, as well as on search result previews.
The following actions can be taken to manage the responsible officer for a property item:
- Update the responsible officer of a property item
- Search for all property items assigned to a responsible officer
Update responsible officer
Users can update the responsible officer for property items by selecting Actions > Update responsible officer from the following locations. Select the checkboxes beside one or more items to update multiple items at the same time.
- Property search
- Scan dashboard
- Incident/case profile
- Property profile
- Container profile: The responsible officer will be updated only for the property items within the container, as containers themselves do not have responsible officers.
A window opens where you can enter a user's name to assign the items to them.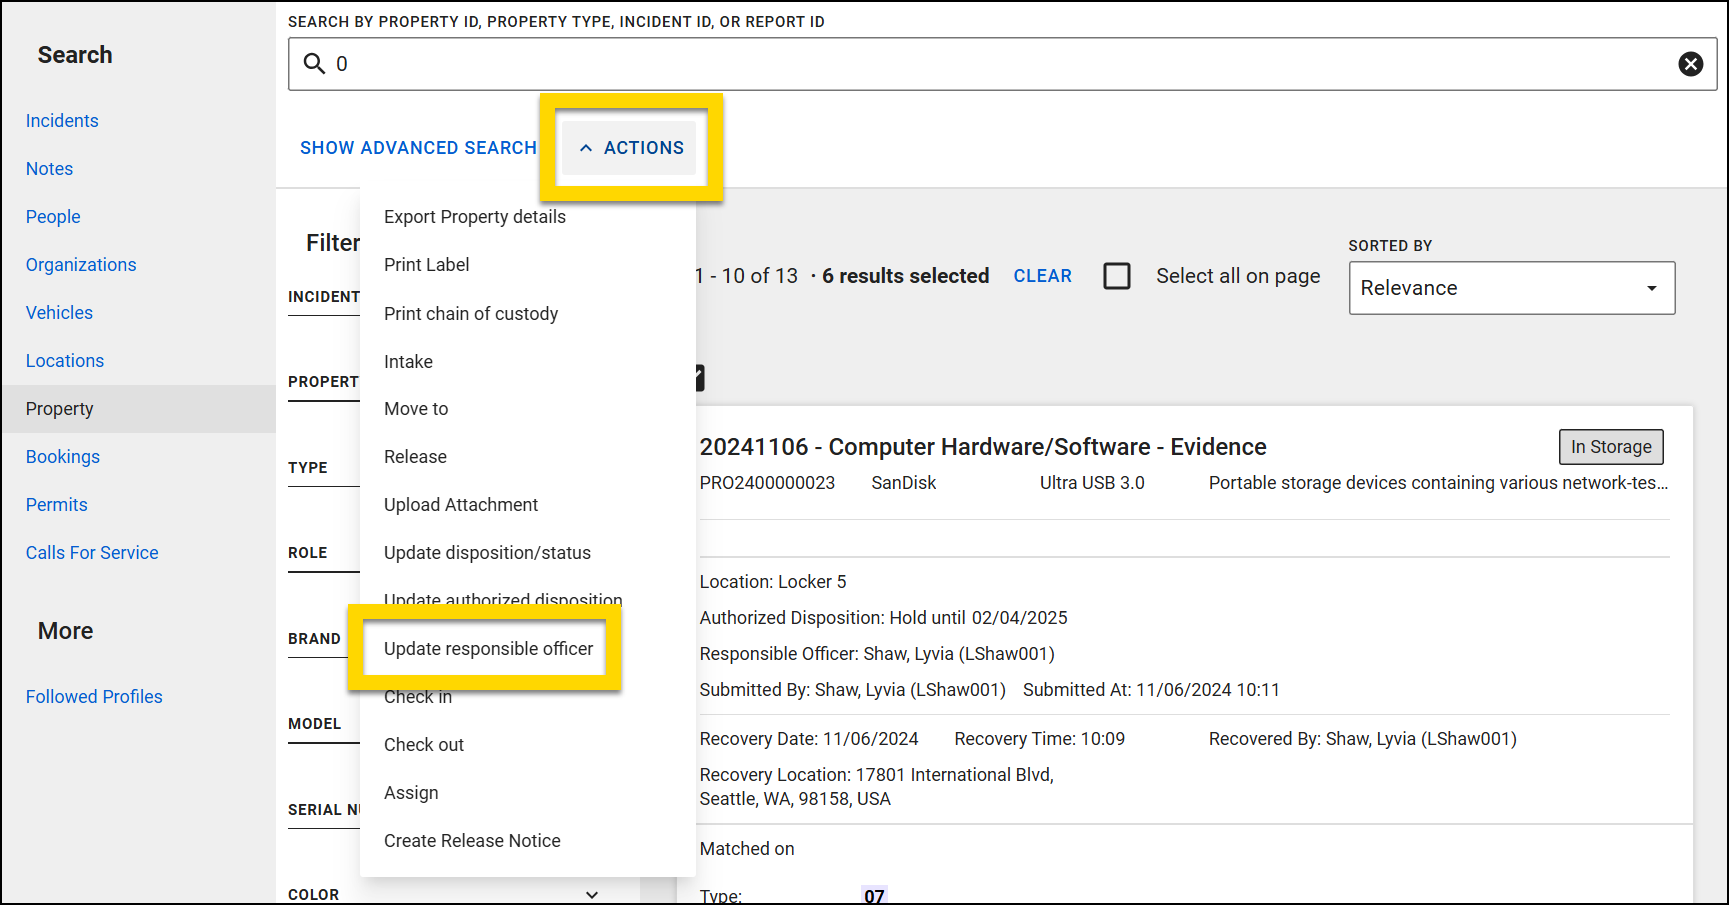
Responsible officer search
To find all properties assigned to a specific user, open Property Search and use the Responsible officer filter in Property search. You can then use the checkboxes and the options in the Actions menu to take actions on those items.
Upload attachments
Add files to a property item or container by selecting Actions > Upload attachment in the following locations. Select the checkboxes beside one or more items to add attachments to multiple items at the same time.
- Property search
- Scan dashboard
- Property profile
- Container profile
- During property release
- During release notice letter creation
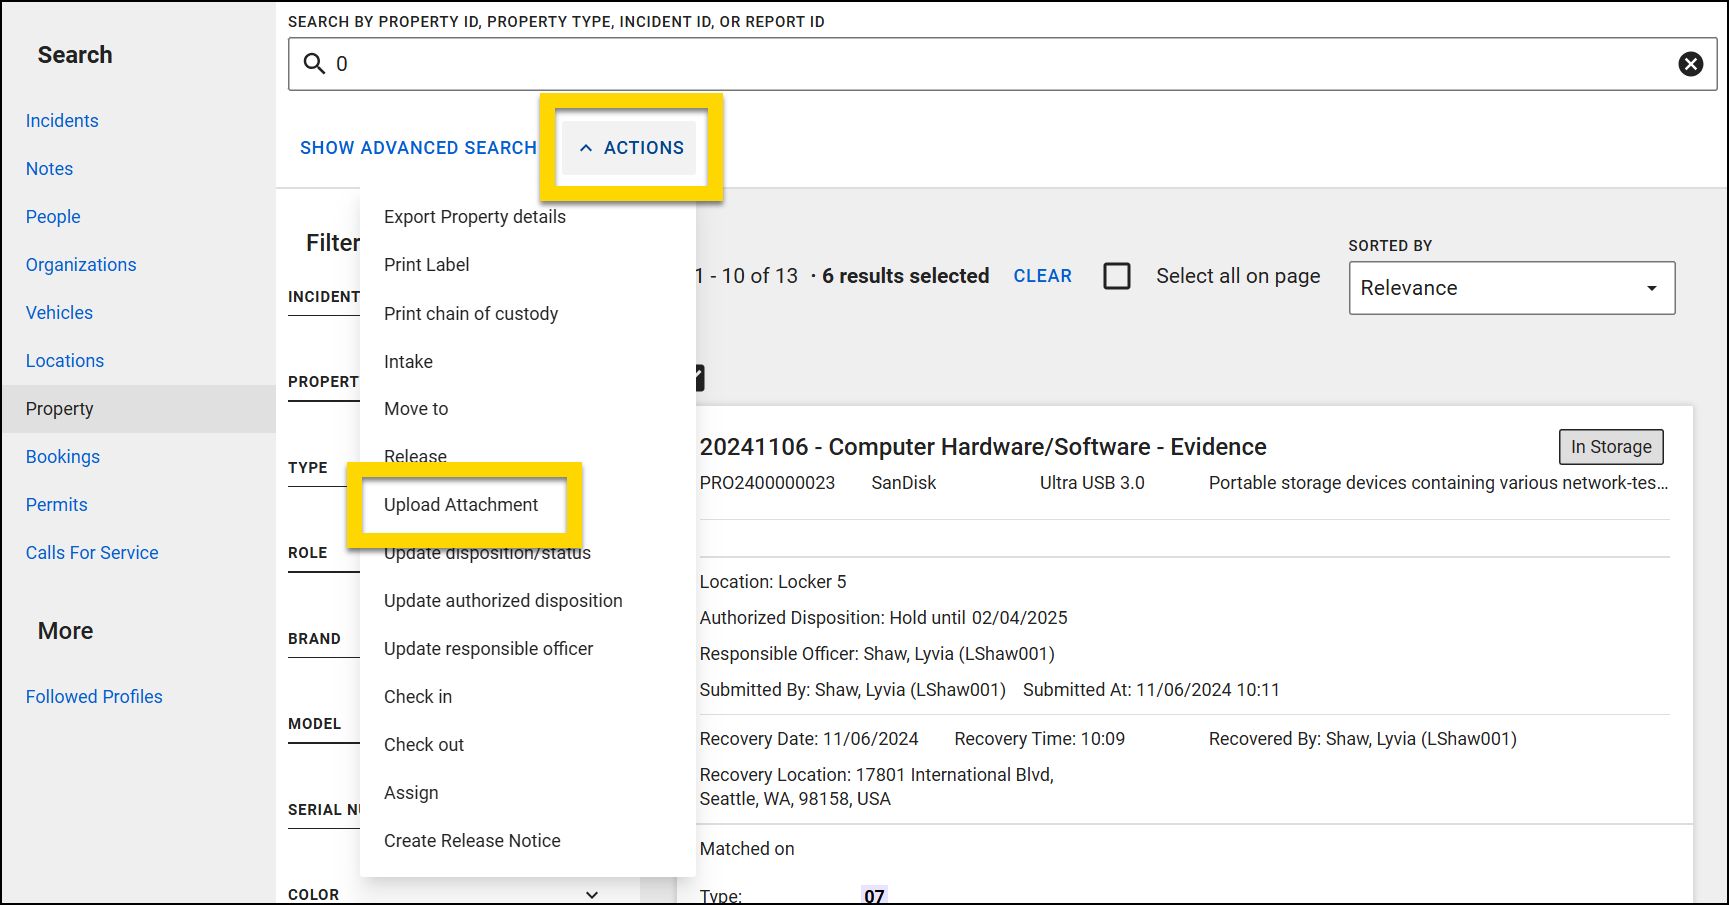
After selecting Actions > Upload attachment, a pane opens where you can select the file from your computer and optionally add a description.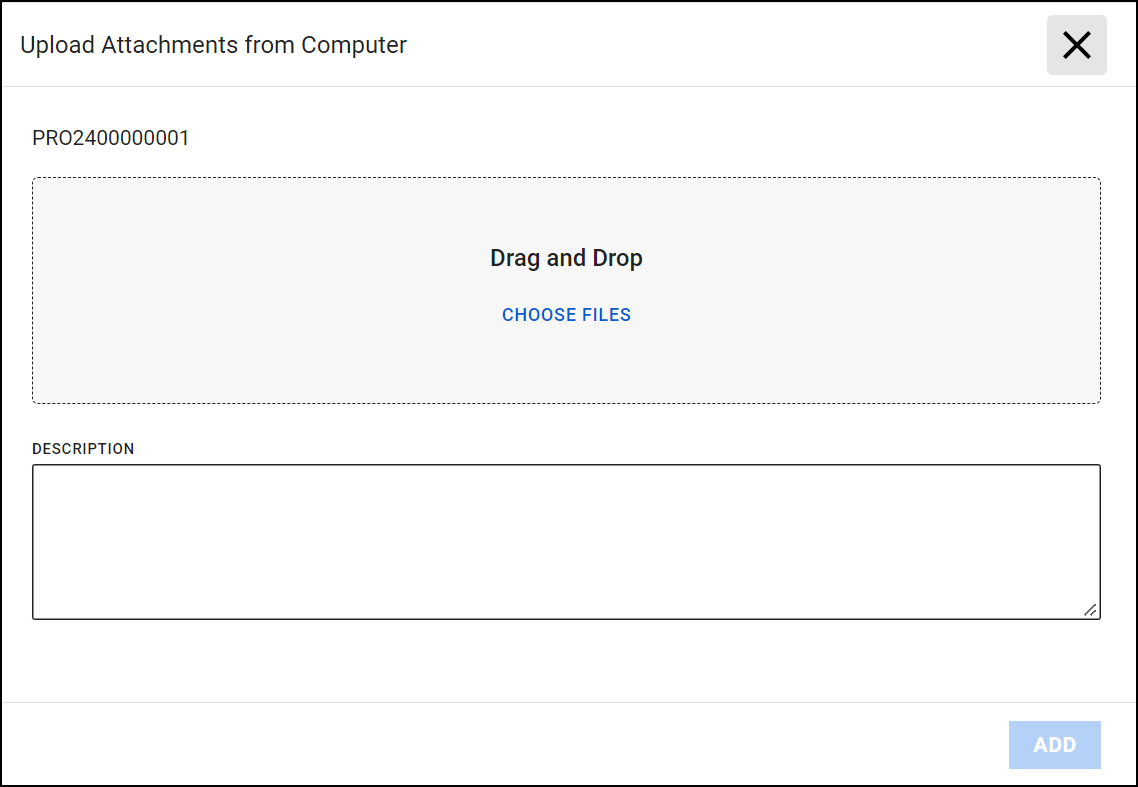
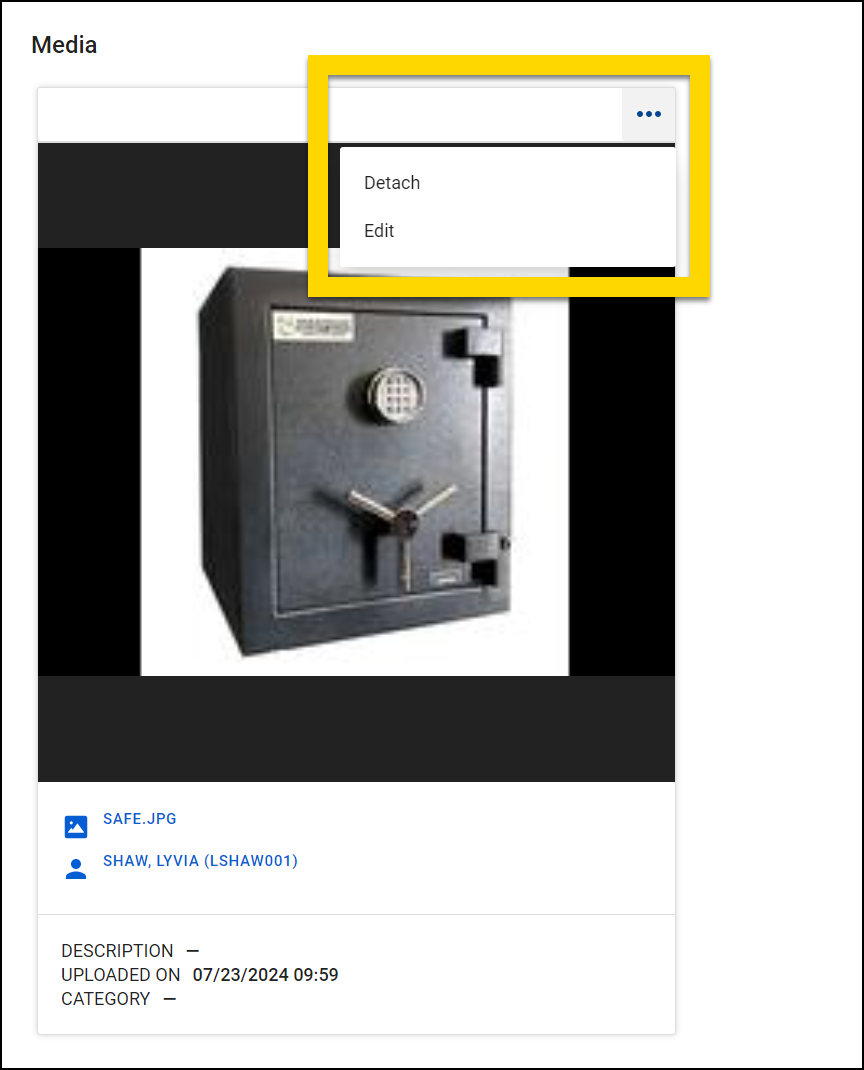
Uploaded files appear in the Media section of the property item or container profile. Selecting the file name opens Axon Evidence in a new tab.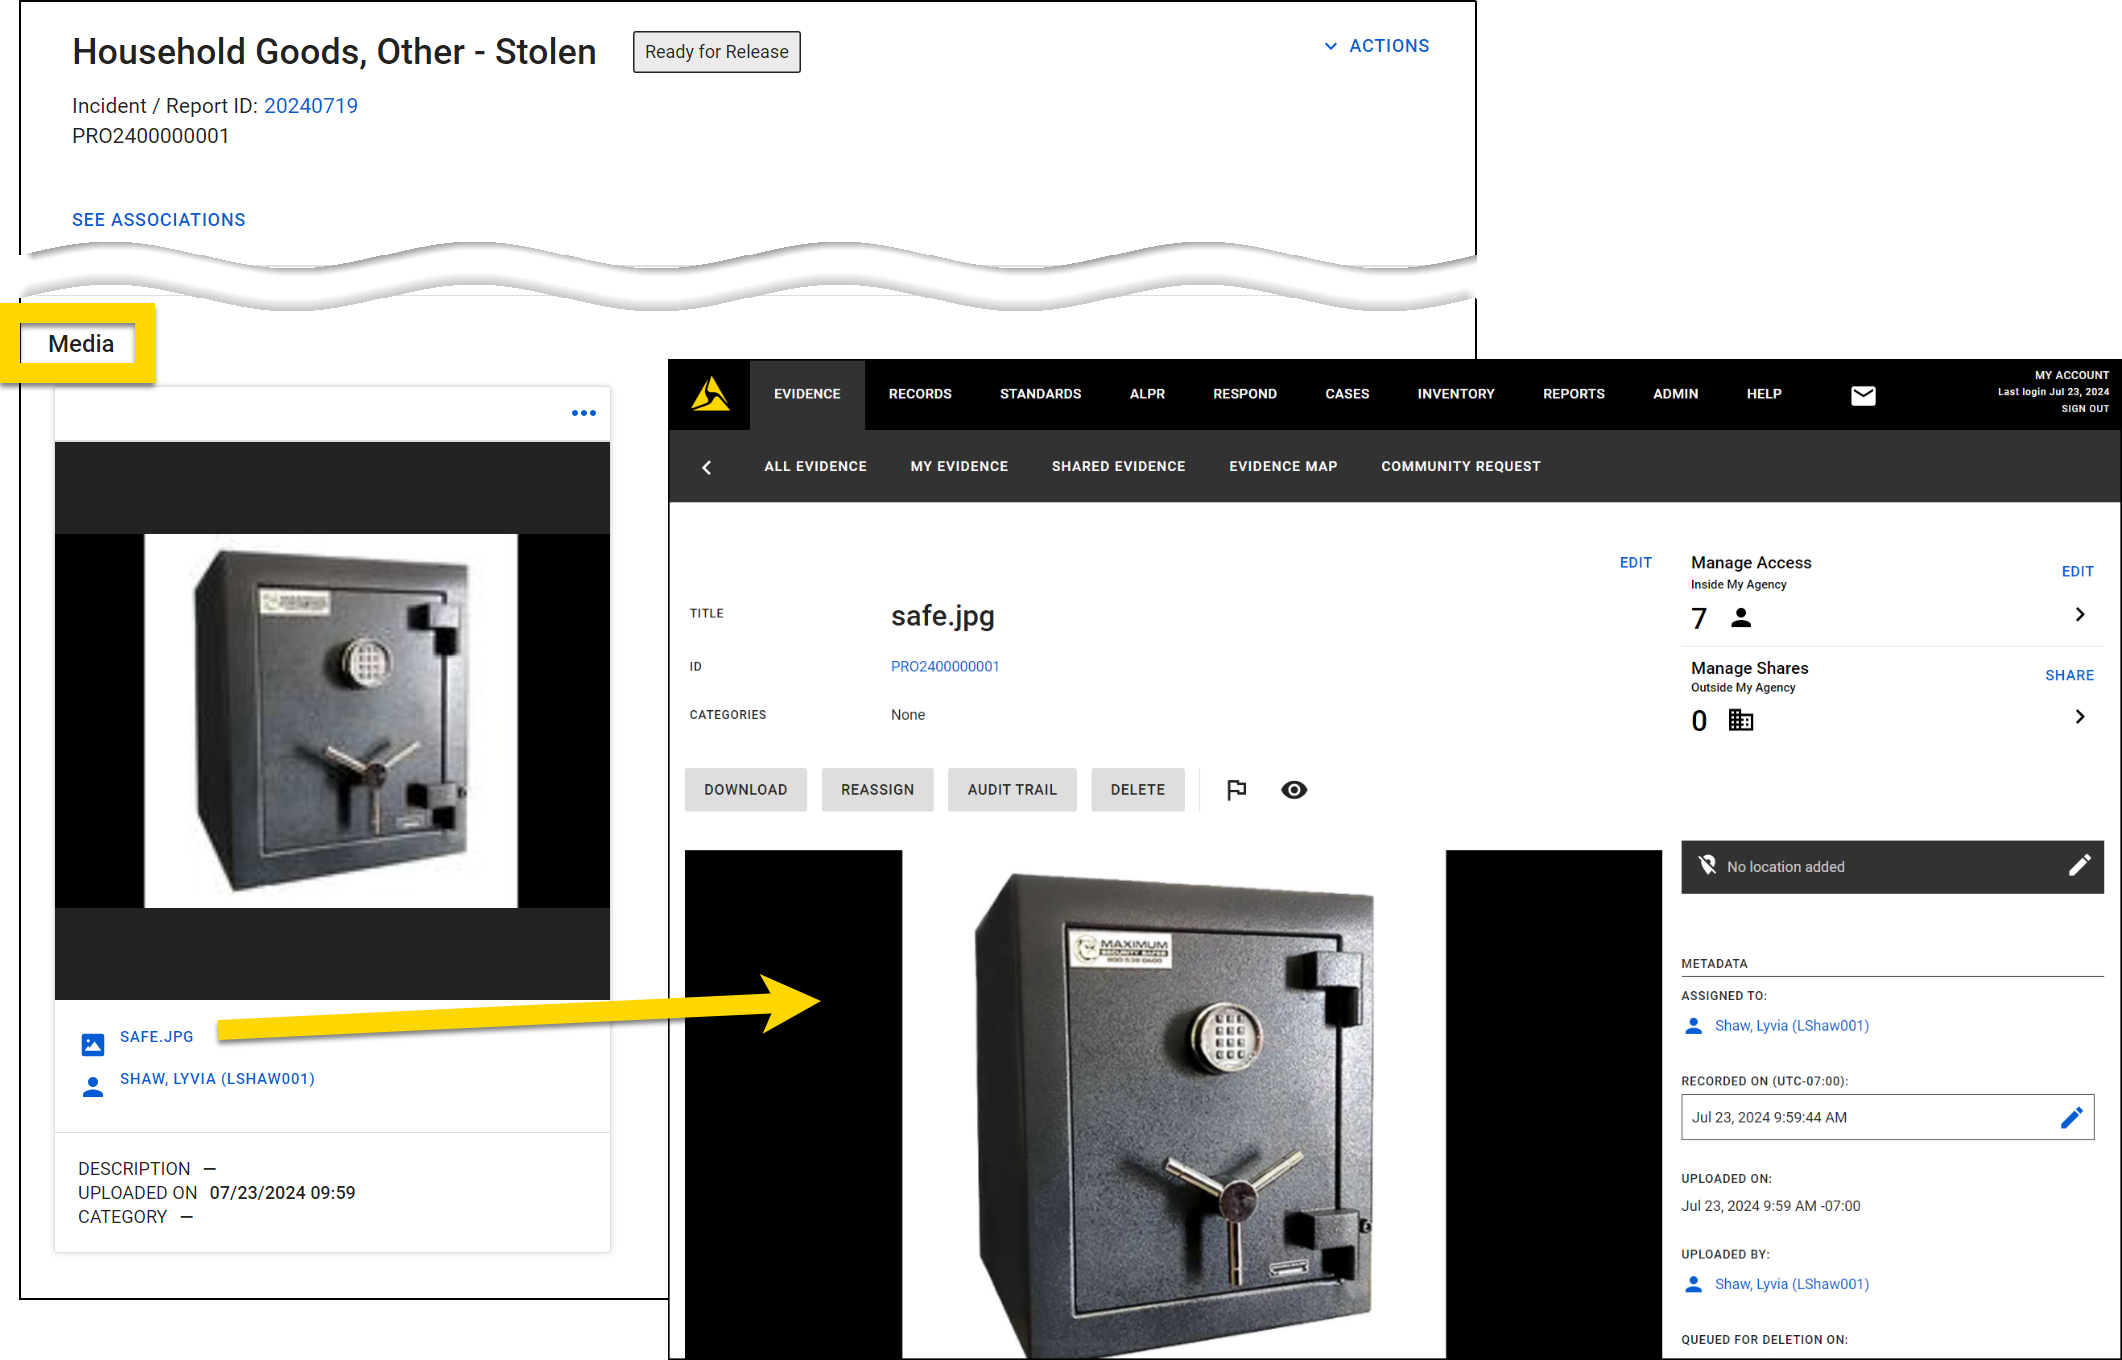
Select More actions [...] to take action on the item:
- Detach: Removes the association between the file and the property item or container, which removes the file from the property profile page. To delete the file, open it in Axon Evidence.
- Edit: Opens a pane where you can change the file name and description.
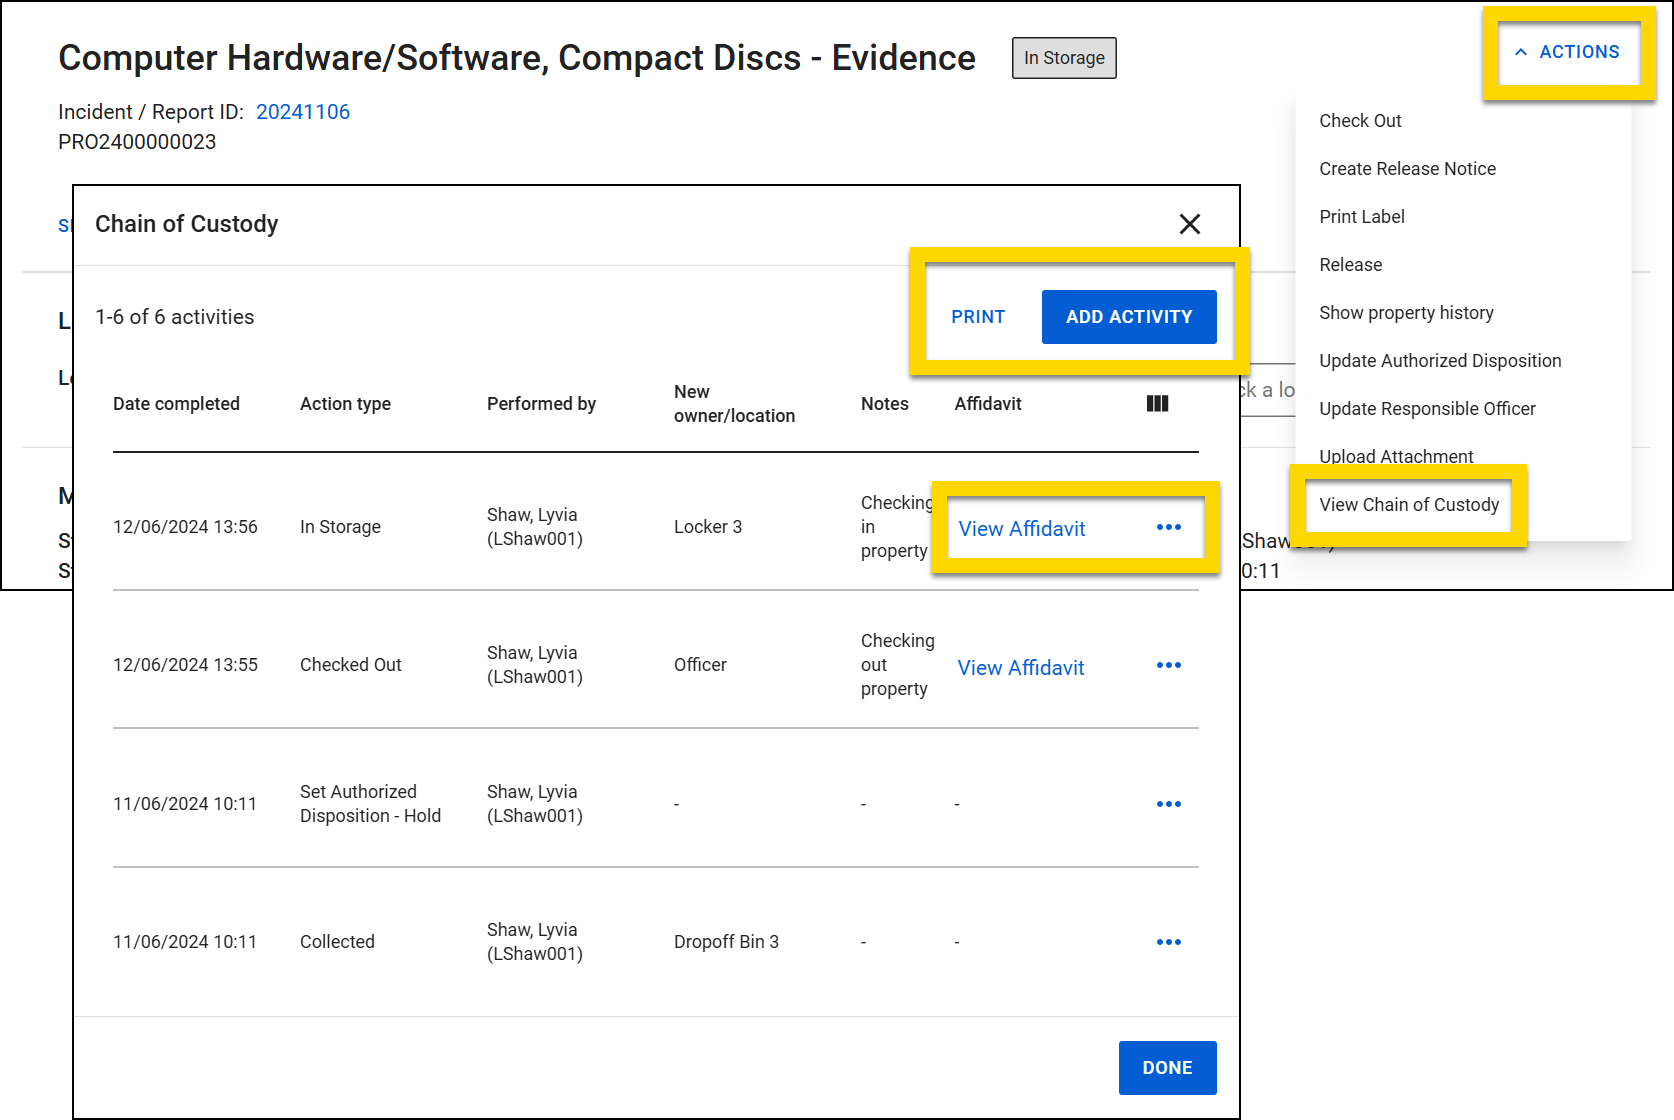
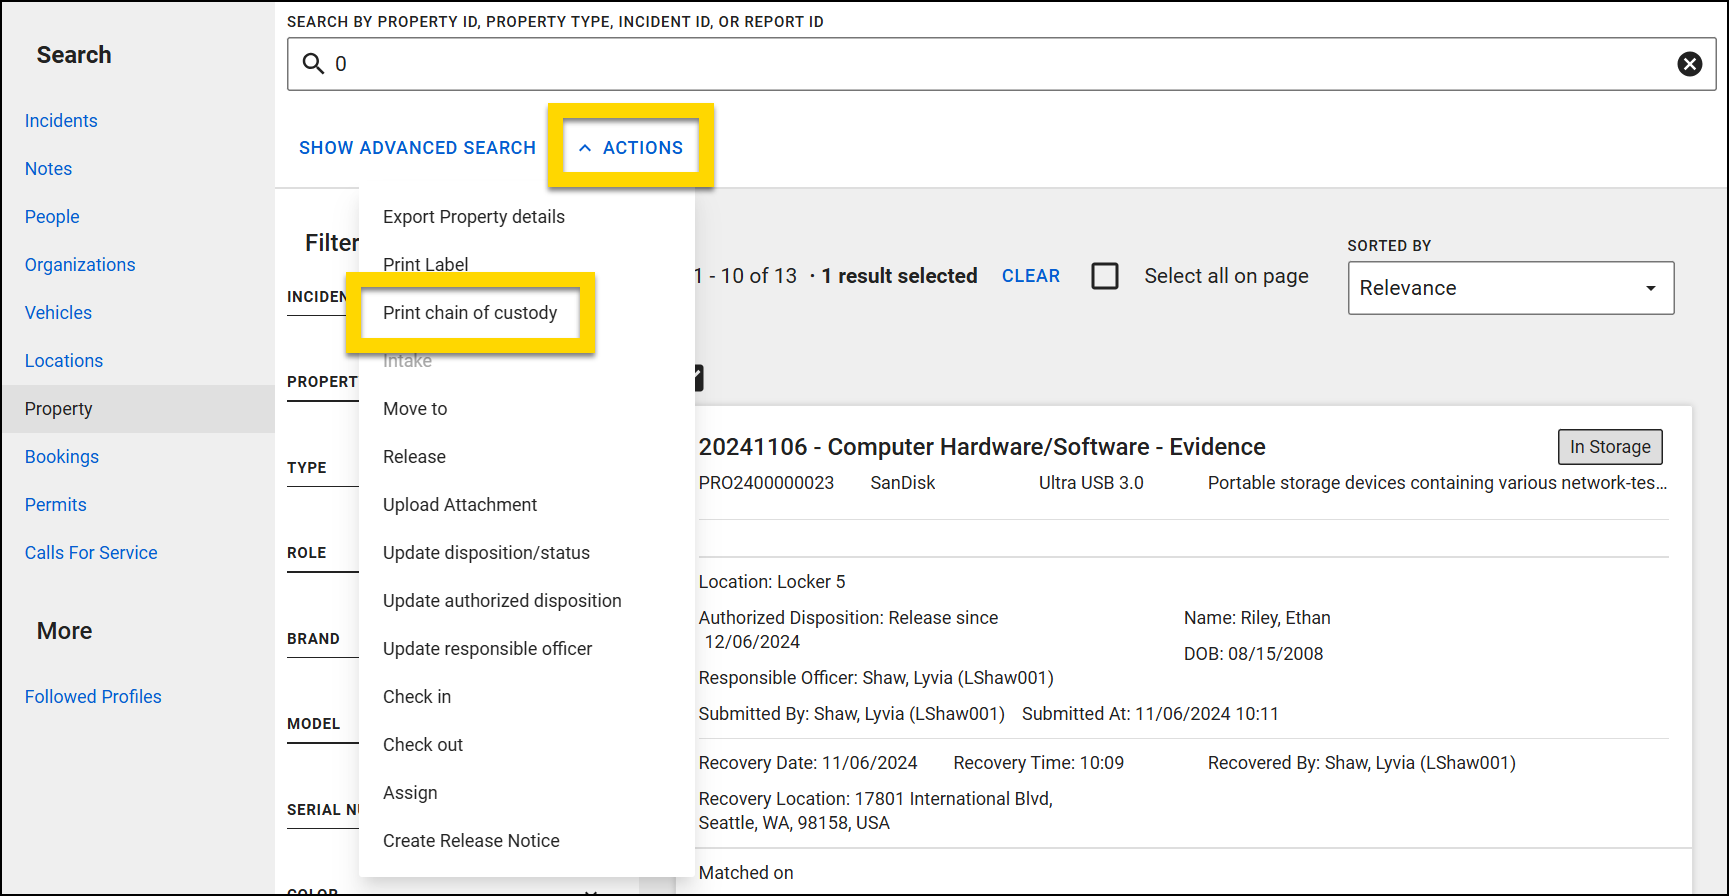
Manage chain of custody
To view the chain of custody for an item, open the item profile and select Actions > View chain of custody. For a container, open the container profile then navigate to the Chain of custody tab.
Select Add activity to add an activity to the chain of custody log. You can later delete such manually added activities from the log by selecting More Actions [...] > Delete.
You can only delete manually-created actions (actions created by selecting Add activity).
If an electronic signature was captured for an action, select View affidavit to open the file in a new Axon Evidence tab.
Select Print to open a PDF of the chain of custody in a new browser tab. This file includes all information about the property—such as type, value, and description—and all custody actions taken on the item. You can optionally select the Affidavits checkbox to include any signed affidavits in the file.
To print the chain of custody for multiple items, take these steps:
- Use Property search or Scan to find the items.
- Select the checkboxes for the items you want to print a chain of custody for.
- You can only print a chain of custody for items that have been submitted to Property and have an associated chain of custody.
- Select Actions > Print chain of custody or select Print from the Chain of custody tab for a container.
- Optionally select the Affidavits checkbox to include any signed affidavits in the printout for an item.
- The chain of custody opens in a new tab, with each item appearing on a separate page.
View property history
When viewing a property profile, select Actions > Show property history to see information about that item that has changed. When you select this option, any "old" information about the property appears below the current information. The date that information was added appears in brackets. Property information changes when the property is added to a report, its information is changed, and the report is finalized.
To instead view information about the item's chain of custody (check in/out history, release history, etc.), select View chain of custody from the Actions menu.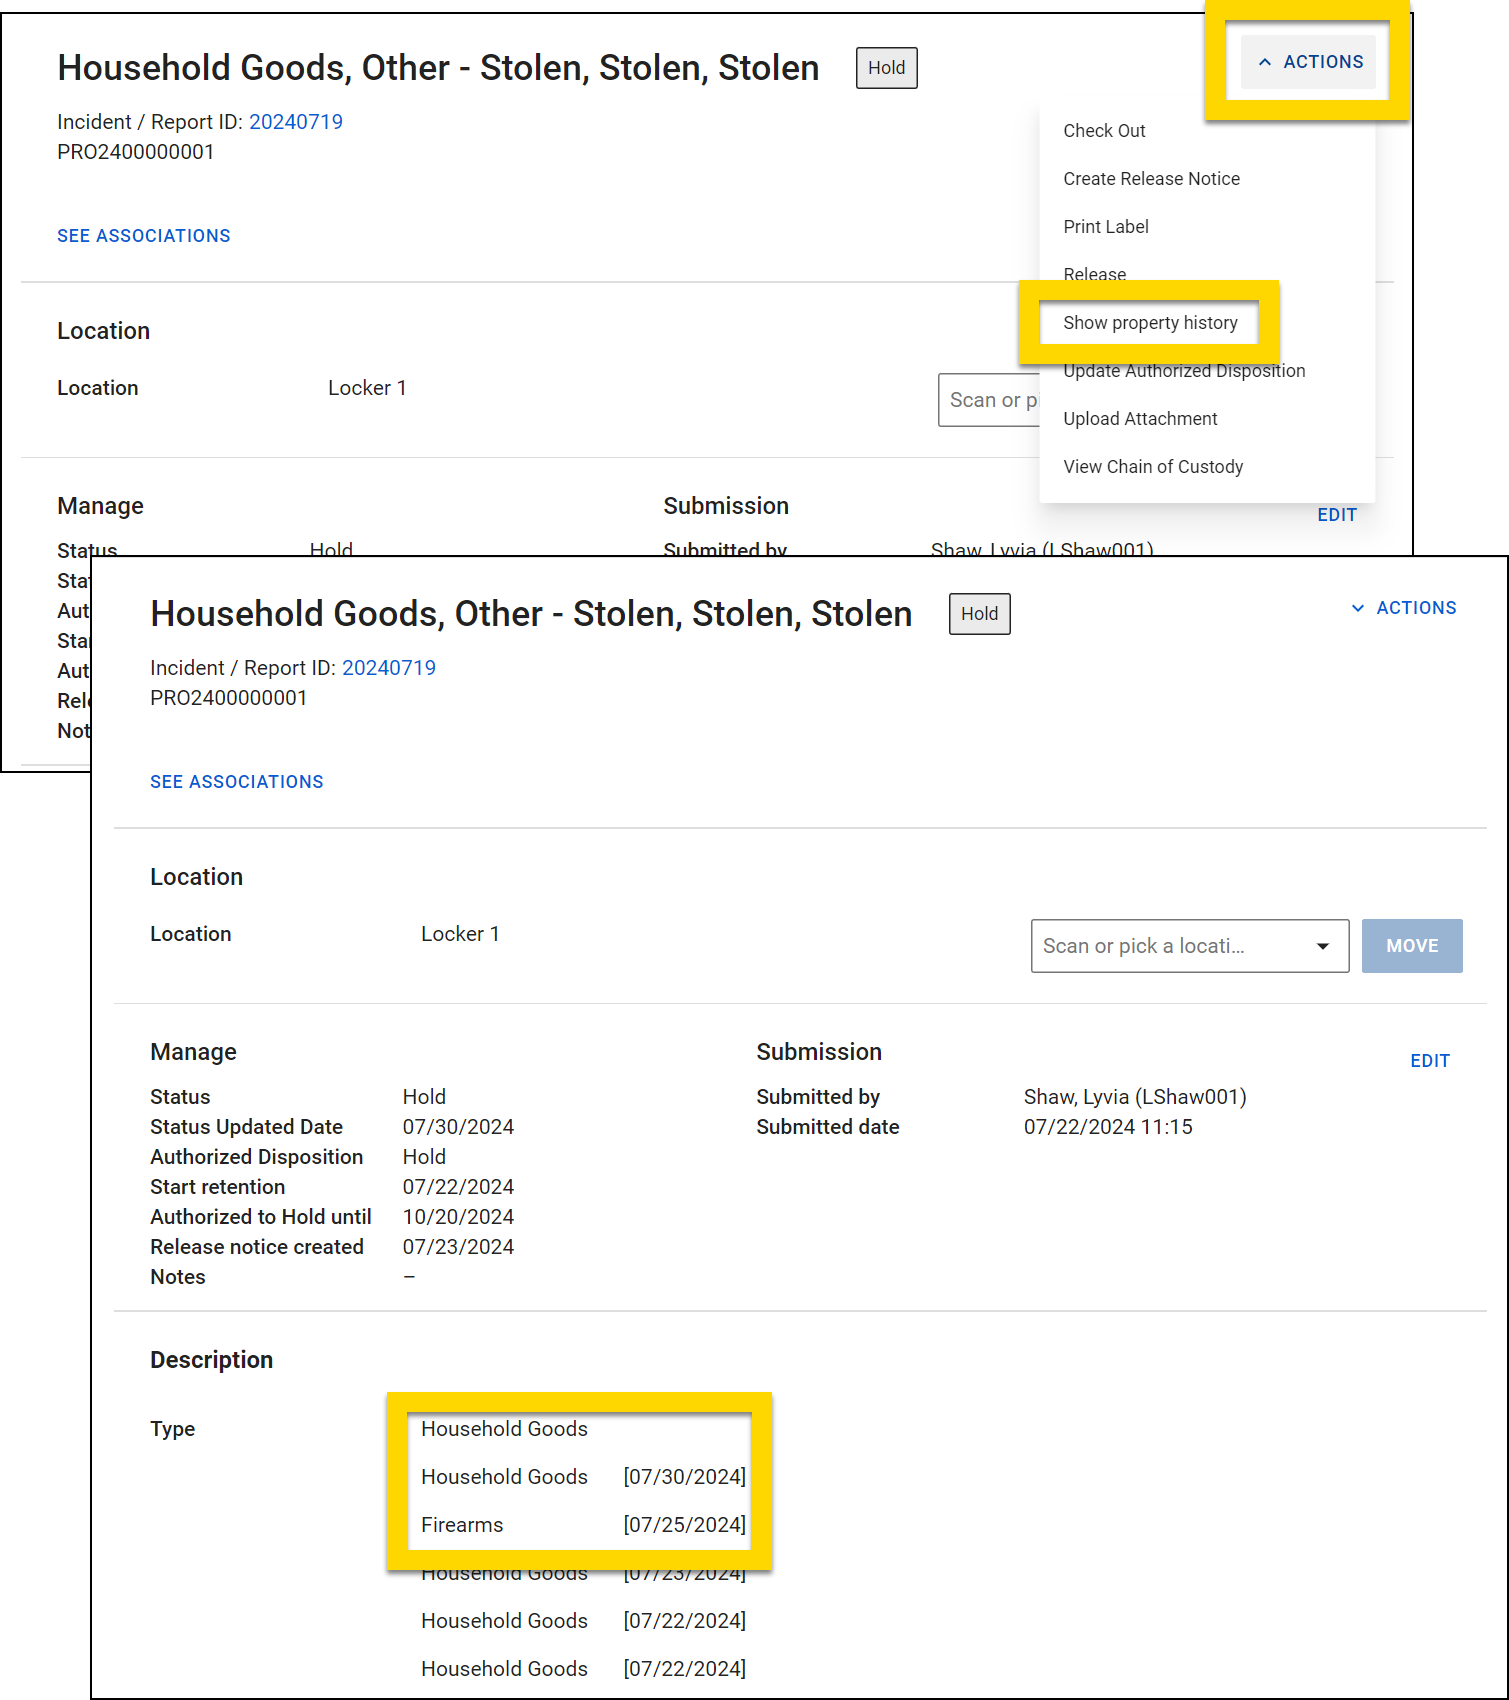
Capture property signatures
Signatures can be captured during any action taken on a property item or container (e.g., release, check in/out, etc.). These signatures can be captured electronically or on paper.
Electronic signatures
Currently, Axon Records supports the Topaz GemView signature pad for capturing electronic signatures. Once this pad has been set up, you can capture a signature electronically, by taking these steps:
- When releasing a property item or container or while checking it in or out, select Electronic signature in the Signature Method section.
- The Released by and Released to fields are automatically updated with the name of the user performing the release and the name entered in the release fields above.
- Select Capture signature.
- Review the signature preview page then select Send to signature tablet.
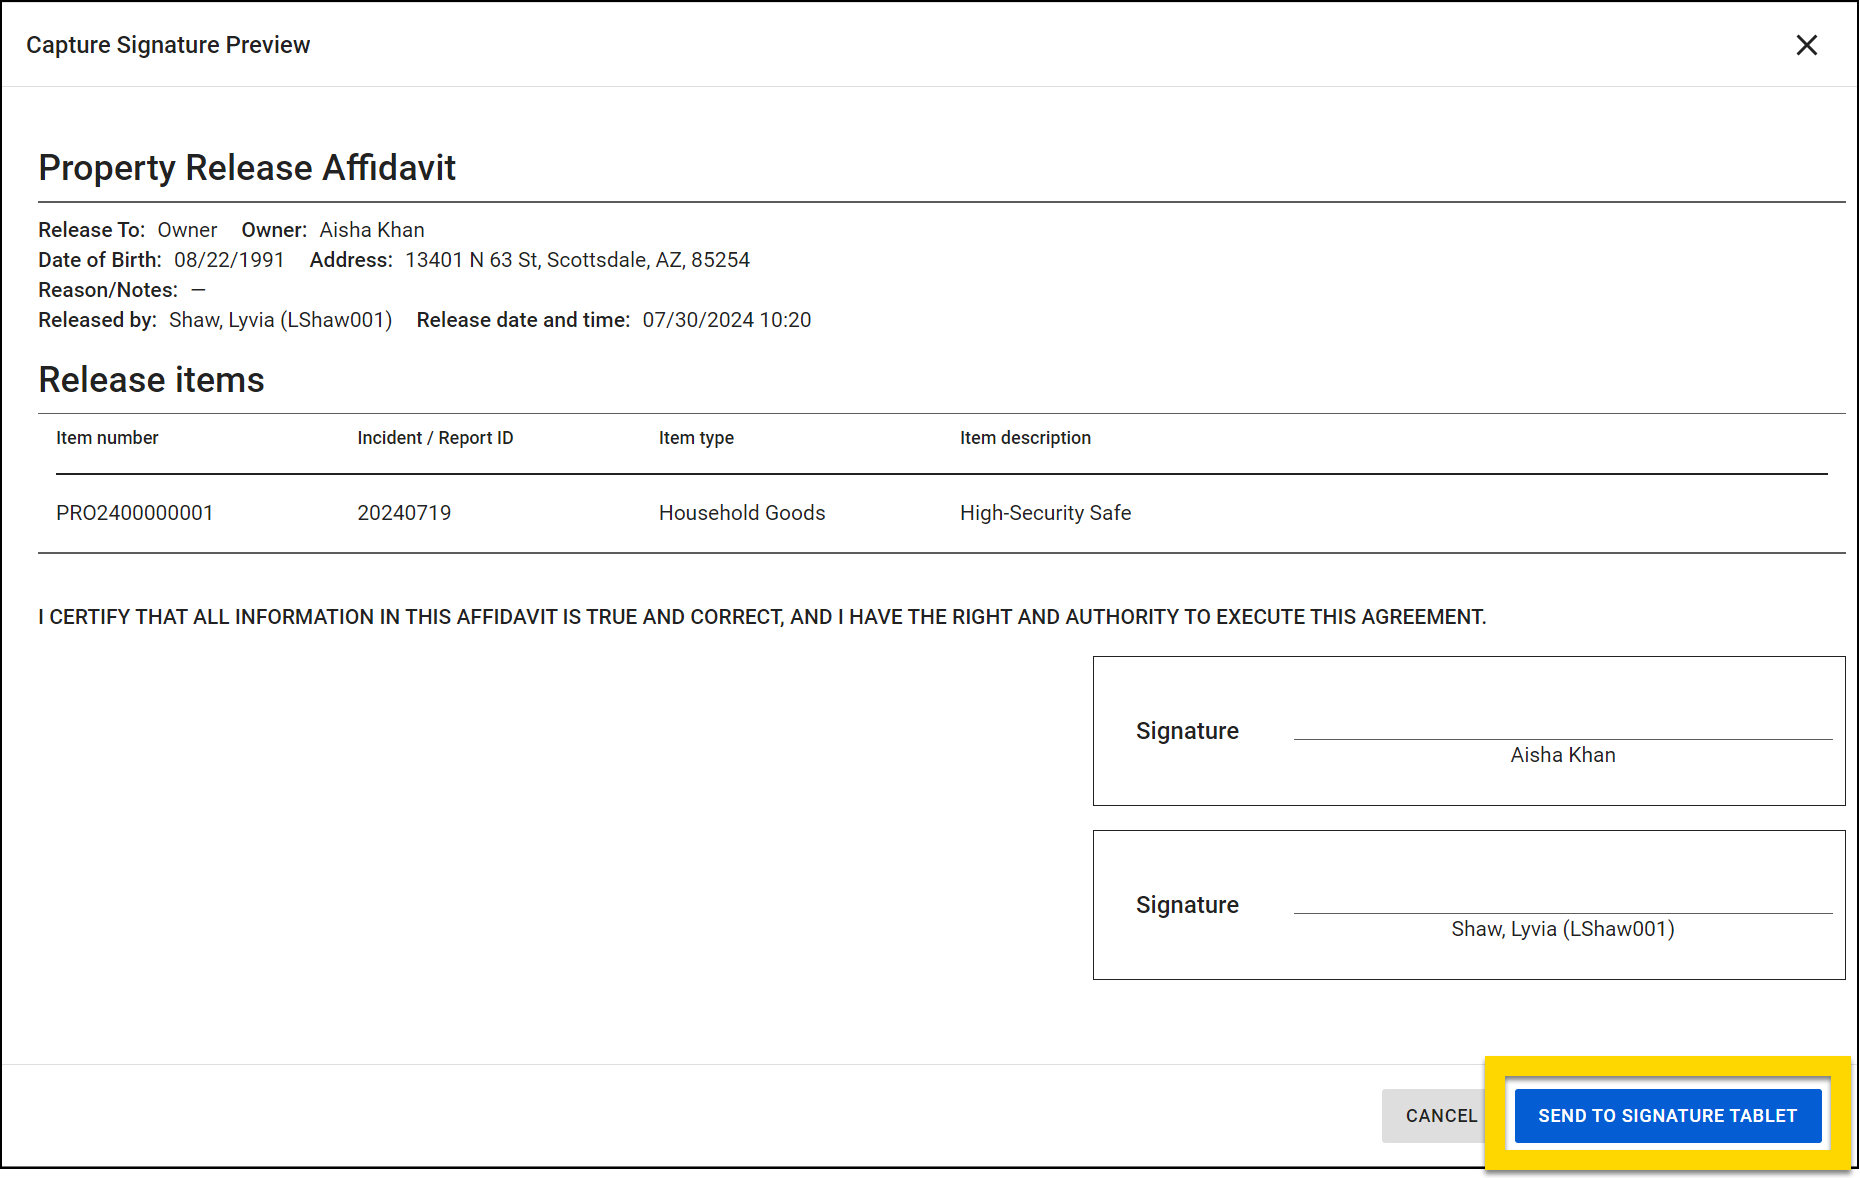
- Request that the person you are releasing or checking the property in/out to sign using the signature tablet and select Submit when they are finished.
- While the person is signing, you can view what they see on their signature pad (as signified by the Live label at the top of the screen. If you need to "pull back" the affidavit from the signature pad, select Recall from tablet.
- After the document is signed, select Accept signature.
- If your agency is configured to apply a notary stamp file to the signature during property release, you will instead see Accept and apply notary stamp.
- If your agency is configured to apply a notary stamp file to the signature during property release, you will instead see Accept and apply notary stamp.
- When the signature preview window closes, you can print a receipt then complete the release or check in/out process.
Tablet setup
To set up the Topaz GemView signature tablet, take these steps:
Install software
Use the links below to download and install the necessary software and drivers:
- Topaz SigPlus
- When installing the SigPlus software, you will see a list of signature pad models. Select GemView.
- Topaz SigPlusExtLite
- Before installing, uninstall any previous versions of the software that may already be installed.
- GemView drivers
- DisplayLink driver
- Must be installed for machines using Windows 7 or Windows 8.
After you have finished installation, restart your computer.
Install browser extension
In addition to the software and drivers, you should also install the Topaz SigPlusExtLite Google Chrome browser extension. After installing the extension, restart your browser.
Supported browsers and operating systems
Topaz SigPlusExtLite is supported on the Google Chrome 77 browser, and later, as installed on machines using Windows 7 and later (32-bit and 64-bit operating systems).
You must have .NET Framework 4.7.1 or higher available on your computer. To verify this:
- Open Command Line Prompt by pressing Windows + R then entering "cmd:.
- Run the following command:
reg query "HKLM\SOFTWARE\Microsoft\Net Framework Setup\NDP" /sConnect tablet
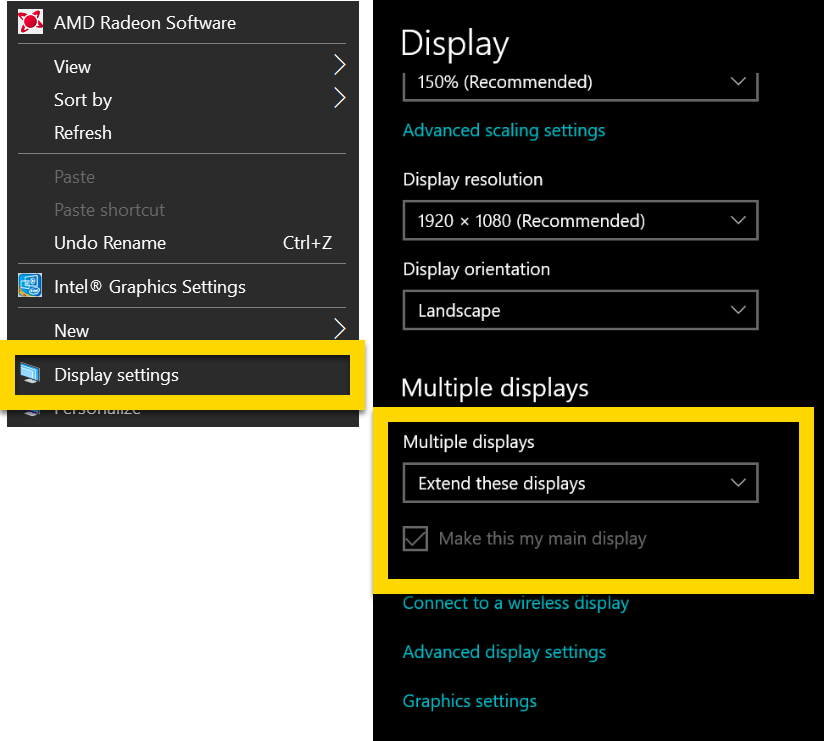
After all software is installed, you can connect the tablet to your computer using these steps:
- Connect the tablet to your computer using the two USB connections.
- On your computer, right-click on the desktop and select Display settings.
- Set the Multiple display setting to Extend these displays.
- Check the Make this my main display checkbox on the desktop display.
Verify Connection
Follow these steps to ensure the Topaz GemView tablet was installed correctly:
- In a browser, go to Topaz SigPlusExtLite Demo.
- Select Push tab to GemView screen.
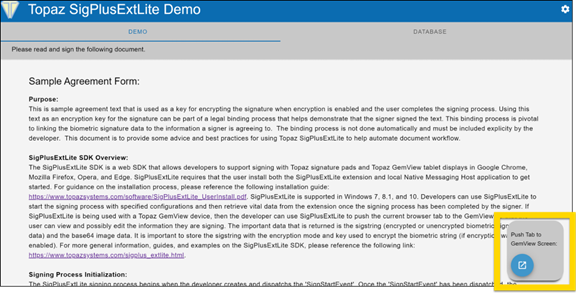
- Verify that the demo page appears on the Topaz GemView Tablet and select Sign to bring up the signing window.
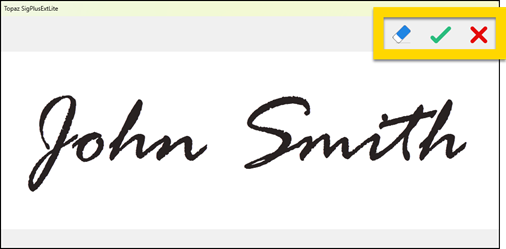
- Sign on your signature pad.
- To accept the signature, select the green checkmark icon.
- To clear the signing window and re-sign, select the eraser icon.
- To cancel, click the red cancel icon.
Paper signatures
To capture a signature on paper, take these steps:
- While releasing a property item or container or checking an item in or out, select Paper signature in the Signature Method section.
- The Released by and Released to fields are automatically updated with the name of the user performing the release and the name entered in the release fields above.
- Select Print affidavit to open the affidavit in a new tab. The affidavit can then be printed and signed.
- After capturing the paper signature, complete the release or check in/out process.