Cases
Cases manage the formal investigative workflow performed following an incident.Cases manage the formal investigative workflow performed following an event. Once created, a case serves as the central workspace for investigation management. Cases ensure accountability and structure, helping organizations move work from the initial incident report to its final outcome.
Cases enable organizations to:
- Assign responsibility to units and detectives
- Track progress through tasks
- Document findings
- Mange disposition and closure
Case management involves creating, assigning, and tracking cases from initial report through disposition while ensuring the right units and personnel are responsible for each step. It includes managing assignments, transfers, due dates, and workload distribution to support efficient investigations and oversight.
Cases and investigations
Cases and investigations have different features, which help determine when you should use a case or an investigation to manage your work. The table below outlines these features:
| Feature | Case | Investigation |
|---|---|---|
| Requires an incident report | Yes | No |
| Has a NIBRS disposition | Yes | No |
| Has an internal disposition | Yes | Yes |
| Can be automatically created from an incident | Yes | No |
| Has evidence integration (i.e., uploaded evidence is also uploaded to Axon Evidence, where it can be managed and shared) | Yes | Yes |
Create cases
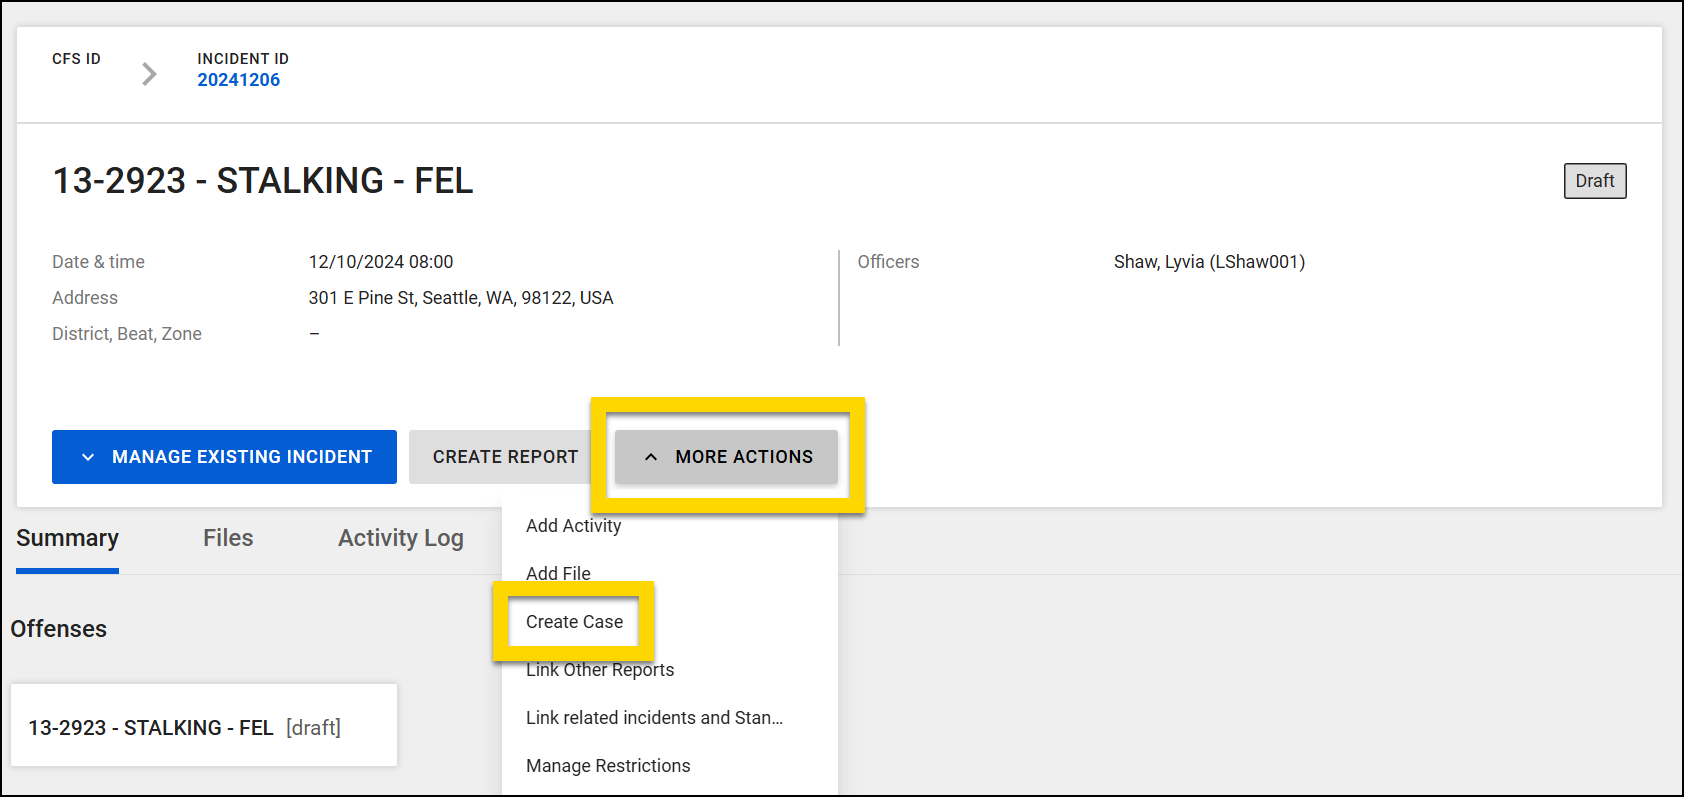
To create a case:
- Open an incident profile and select More actions > Create case.
- Assign the case to a primary unit and (optionally) a lead detective within that unit.
- The "Lead Detective" label is customizable and may appear differently across organizations.
- This user is assigned as the responsible officer for any property items associated with the case.
- Optionally, set a due date, mark the case as urgent, and select the comment icon to add routing notes.
- Some organizations are configured to allow cases to be assigned to a primary unit as well as one or more additional units.
- To assign additional units, select Assign additional unit after selecting a primary unit and lead detective.
- You can set unique due dates, priority level, and routing comments for each unit.
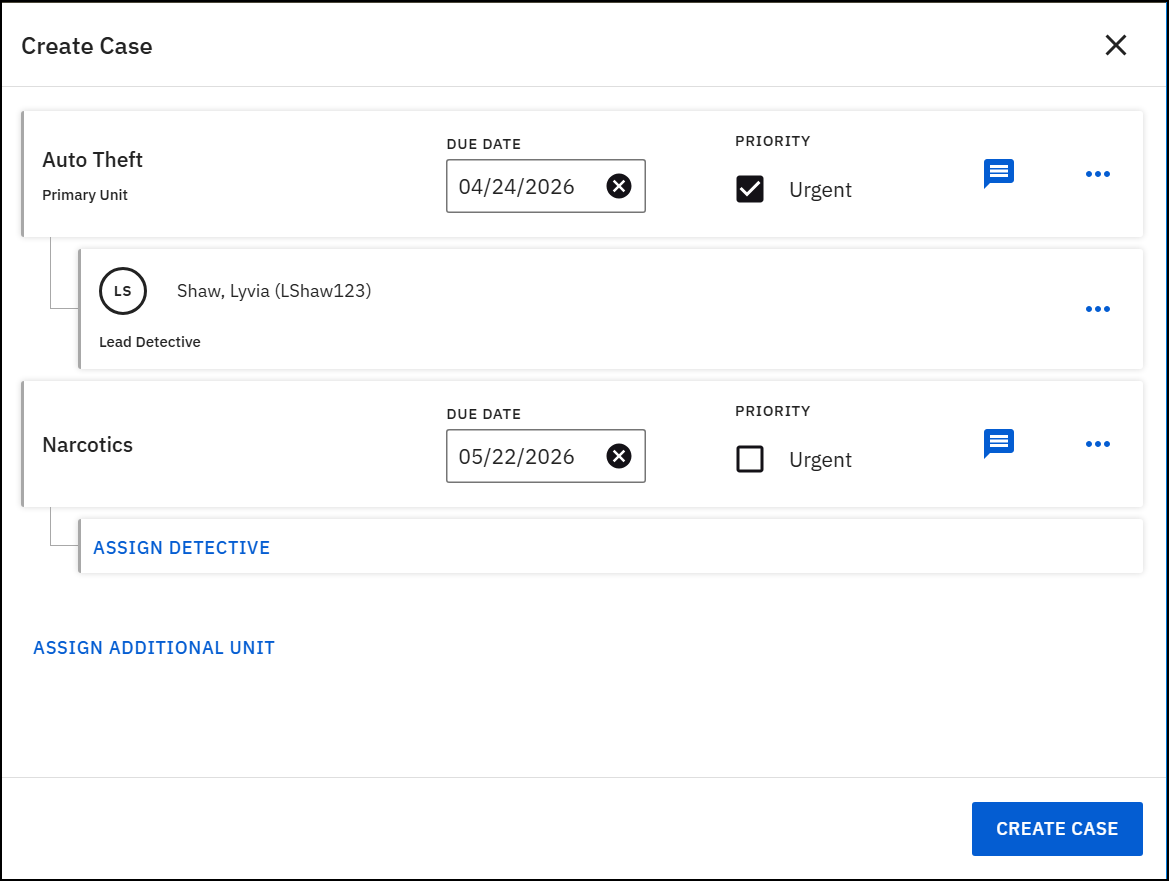
- Select Create case.
- Once the case is created, the profile changes into a case profile, which displays additional information and options.
- The NIBRS case disposition is set to None by default when a case is first created.
Auto-created cases
For many organizations, cases are created automatically from incident reports to ensure all qualifying incidents undergo a standardized investigative workflow without requiring manual intervention. If the case auto-create function is enabled for your organization, when a new incident report is created, a case is also automatically created and is routed to a unit inbox. The routing is determined by:
- Geography: Where did the incident occur, or what geography the incident report author is assigned to
- Shift: What time of day and shift detail did the incident occur, or what shift the incident author is assigned to
- Offense category: The category of the offense
- Offense: The specific offense code used in the incident report
- Case factor: A checkbox flag on the incident report
An automatically-created case is evaluated for the initial routing by the system. If the case needs to be transferred to a different inbox (unit), it must be manually done by a user.
For more information about auto-created cases and routing, contact your Axon representative.
Axon Records case management and Axon Evidence cases
If your organization has the integration between Axon Records Case Management and Axon Evidence Cases enabled, creating a case in Axon Records generates a corresponding case in Axon Evidence.
If your organization is also configured to automatically create a case for every incident report, the primary author of the incident report is set as the case owner in Axonn Evidence. When a lead detective assigned to the case in Axon Records, the Axon Evidence case owner is updated accordingly. If the lead detective is later updated, the Axo Evidence case owner is updated as well.
Files that are added to the case in either Axon Records or Axon Evidence appear in both applications.
Contact your Axon representative to have this integration configured for your organization.
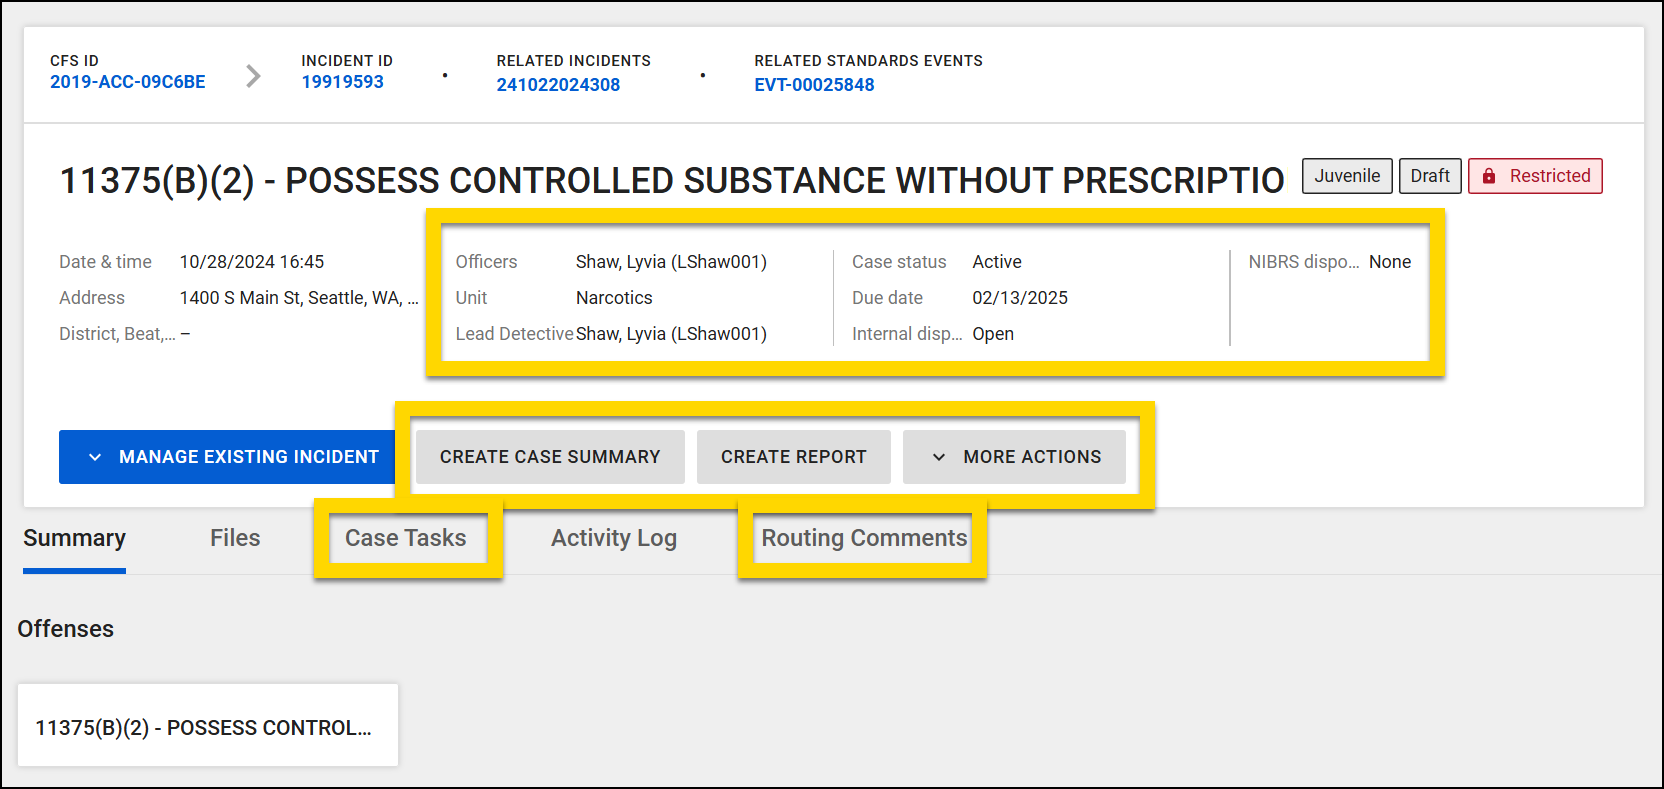
Case profiles
When a case is created for an incident, the incident profile becomes a case profile, which shows additional information and actions.
The case profile is the primary workspace for investigators. It consolidates all information related to the case--reports, tasks, evidence, activity history--in a single view. This unified view helps users manage and progress the investigation efficiently, including:
- View case details, including:
- Unit(s) the case is assigned to
- Lead detective(s) the case is assigned to
- Status (for each assigned unit)
- Internal disposition (for each assigned unit)
- NIBRS disposition
- Use the buttons to:
- Create or update the case summary
- Create case documents
- Take case-related actions from the More actions menu:
- View the new case-related tabs:
Some of these options may not appear to all users based on the privileges they have been assigned.
Summary tab
When a case is created, the Summary tab displays two additional sections:
- Case summary: This section appears at the top of the Summary tab. The case summary feature helps the Lead Detective assigned to the case keep an up-to-date summary of the case throughout the investigation.
- Case documents: Links to all case documents appear in this section. Select the Document ID in the Report column to open and view the document.
Update case assignments
To manage case assignments, a user must have the Triage privileges for all affected units (the unit(s) the case is currently assigned to, as well as the unit(s) the case will be assigned to).
To update a case's lead detective or unit assignment:
- Open the case profile.
- Select More actions > Update case assignment.
- To manage the case's unit assignments:
- Assign additional units
- To add an additional unit, select Assign additional unit and search for the unit name. Optionally, assign a lead detective for the unit.
- Unassign additional units
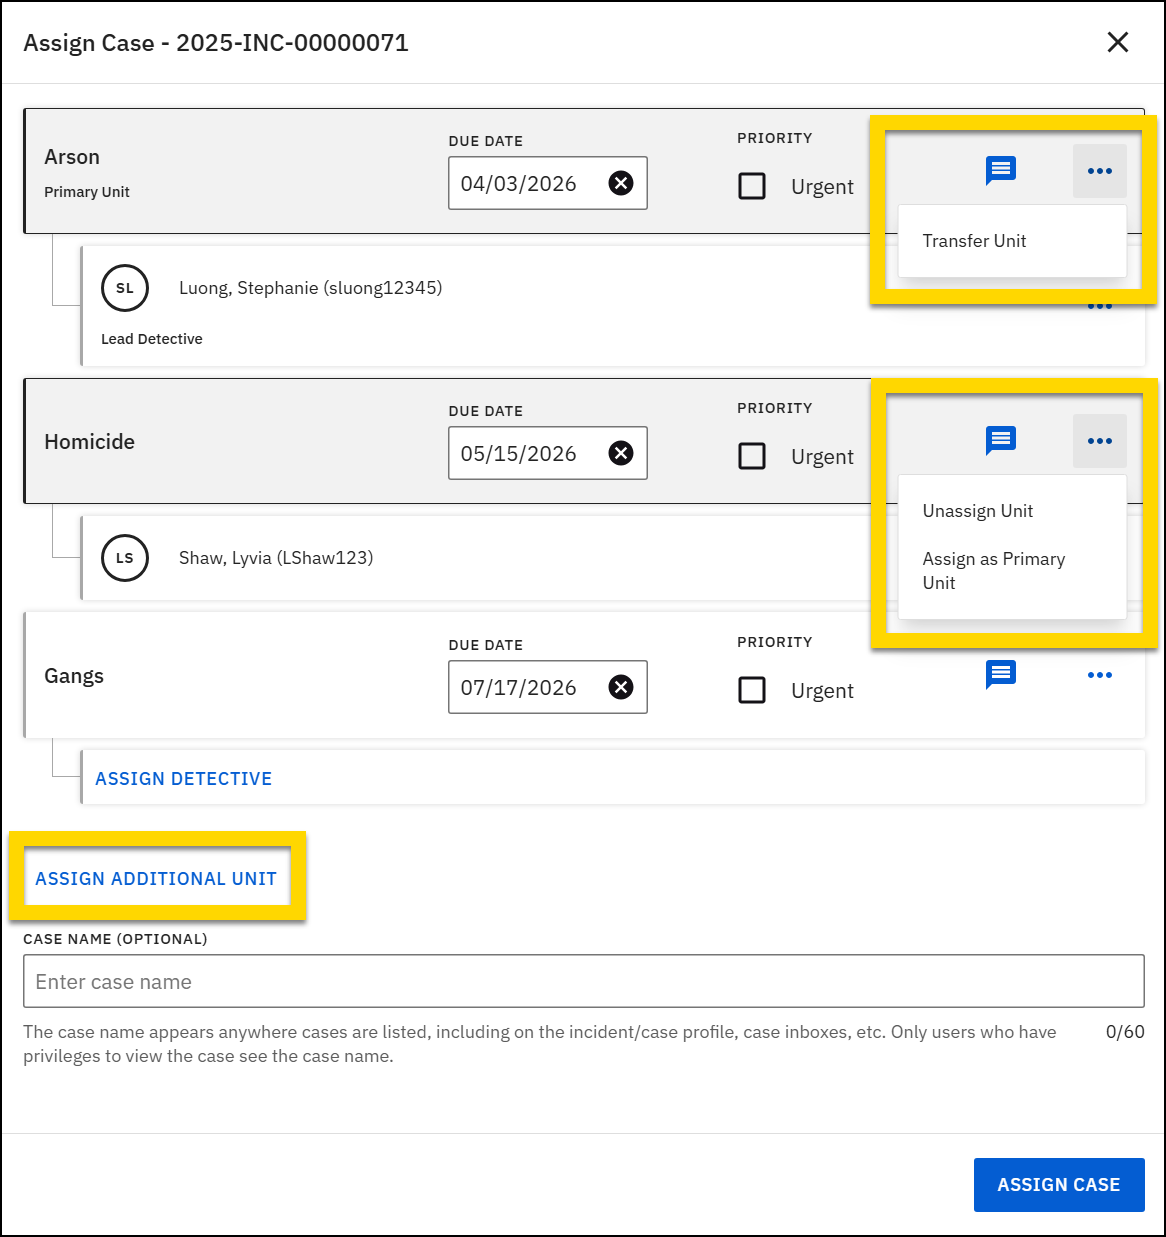
- To remove an additional unit, find the unit's row and select More actions [...] > Unassign unit.
- Change primary unit
- If the unit you want to make the primary unit is already assigned as an additional unit, find the unit's row and select More actions [...] > Assign as primary unit.
- If the unit you want to make the primary unit is not yet assigned, in the current primary unit row, select More actions [...] > Transfer unit and add the new unit.
- You can also reassign the case to a new primary unit by selecting More actions [...] > Transfer unit.
- Assign additional units
- To manage the case's lead detective assignments:
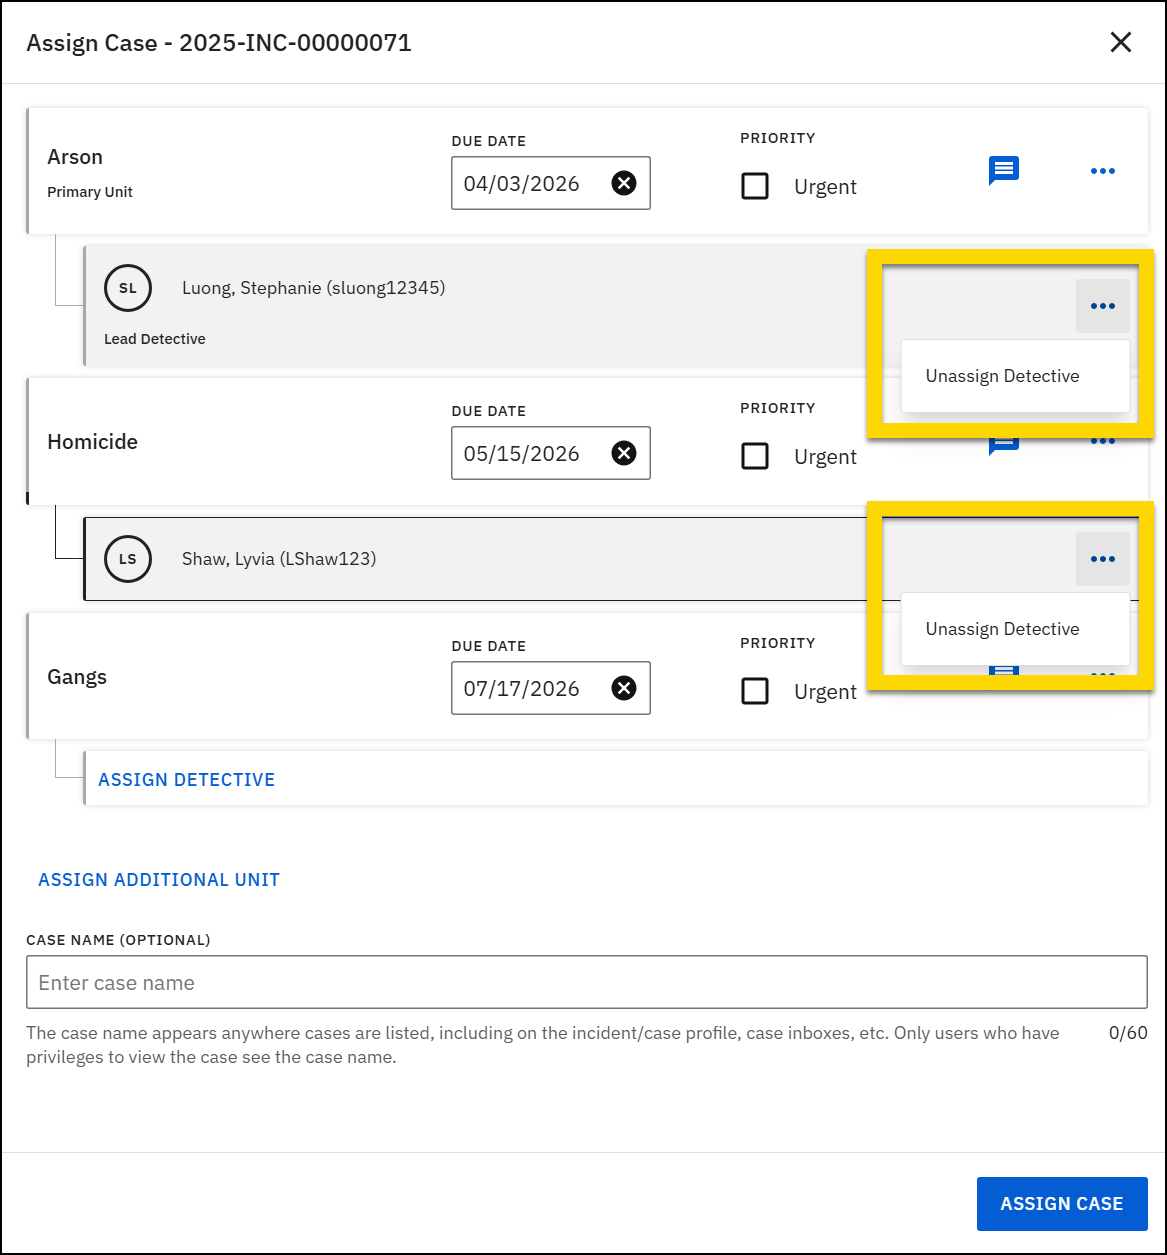
- To change the assigned lead detective for a given unit, in the detective's row, select More actions [...] > Unassign detective then search for and select a new lead detective.
You do not have to select a lead detective for a unit.
- To leave the lead detective unassigned in the primary unit, select More actions [...] > Unassign detective then Cancel.
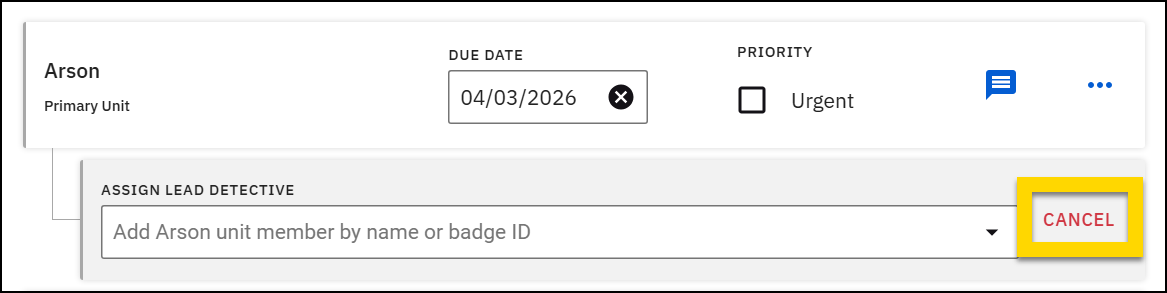
- To leave the lead detective unassigned in the primary unit, select More actions [...] > Unassign detective then Cancel.
- To add a new detective from a new unit, select Assign additional unit, select a unit, then add the lead detective.
- Optionally, set a due date, mark the case as urgent, and select the comment icon to add routing notes.
- You can adjust these items for each unit assigned to the case.
- Select Assign Case at the bottom of the screen to apply your changes.
Transfer primary unit
To transfer a case to a new primary unit, a user must have the Triage privileges for all affected units (the unit(s) the case is currently assigned to, as well as the unit(s) the case will be assigned to).
To transfer a case to a new primary unit:
- Cases can be transferred from two locations:
- On the case profile, select More actions > Transfer unit.
- When viewing a case from a case inbox in Detail view, select Transfer unit.
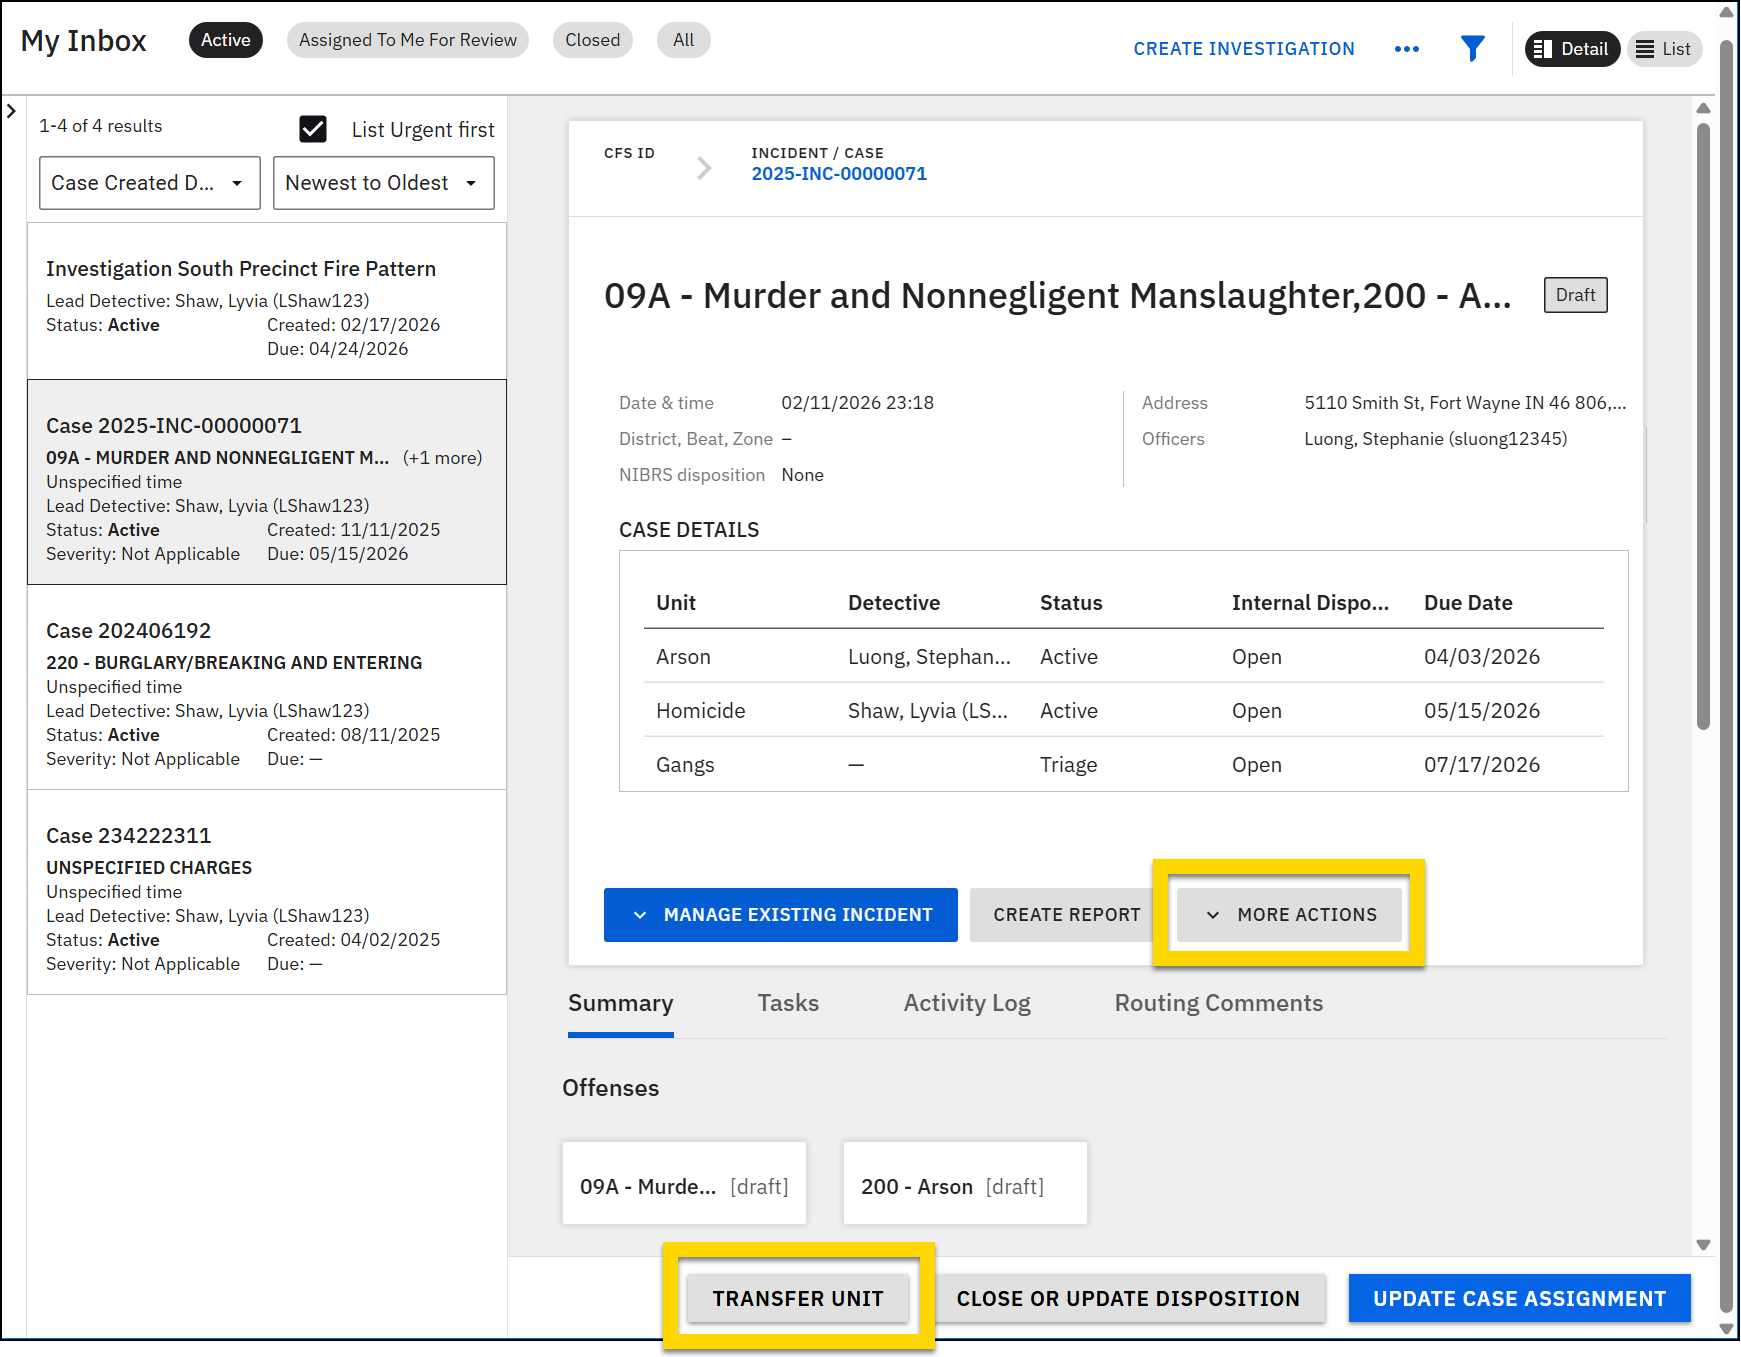
- Search for a new primary unit and lead detective.
Note
If the unit you want to make the primary unit is already assigned to the case as an additional unit, instead select More actions > Update case assignment and follow the steps above to adjust the primary unit assignment.
- Optionally, set a due date, mark the case as urgent, and select the comment icon to add routing notes.
- Select Transfer.
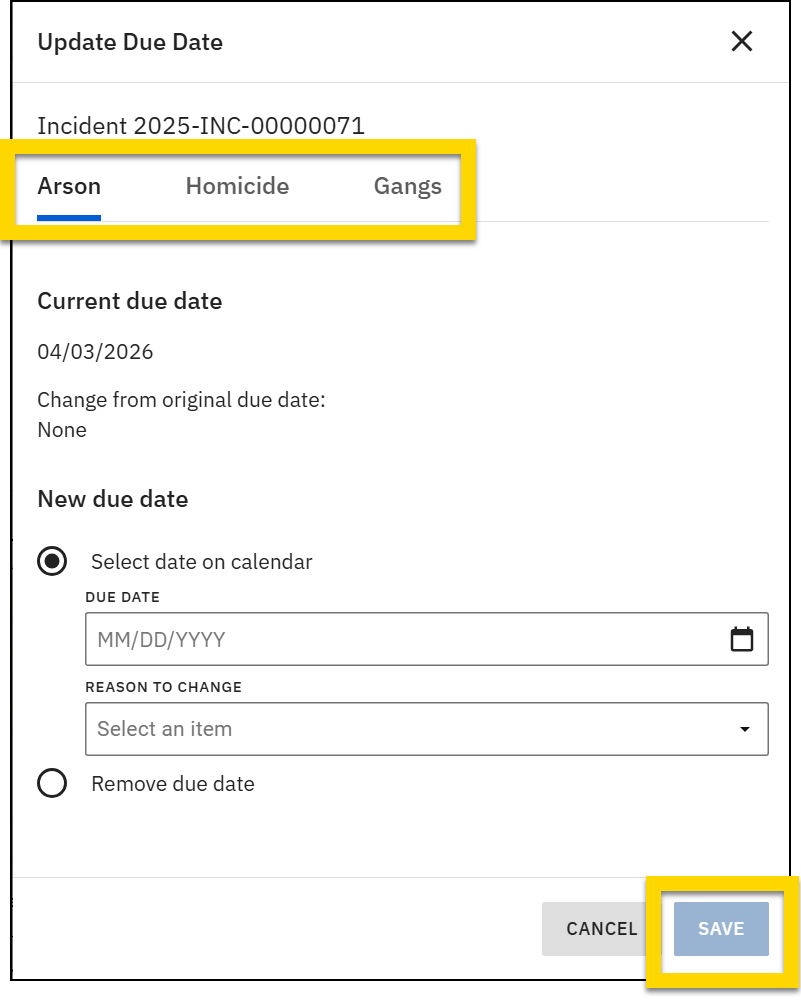
Update case due dates
Case due dates can be created for each case a unit is assigned to. To manage case due dates:
- Open the case profile.
- Select More actions > Update due date.
- Each unit assigned to the case appears as a tab.
- Adjust the due date for each unit as required and provide a change reason.
- After you make a change to each tab, select Save to apply your changes.
- If you update due dates for multiple units, be sure to select Save after you make a change on a tab before you move to the next one.
- If you update due dates for multiple units, be sure to select Save after you make a change on a tab before you move to the next one.
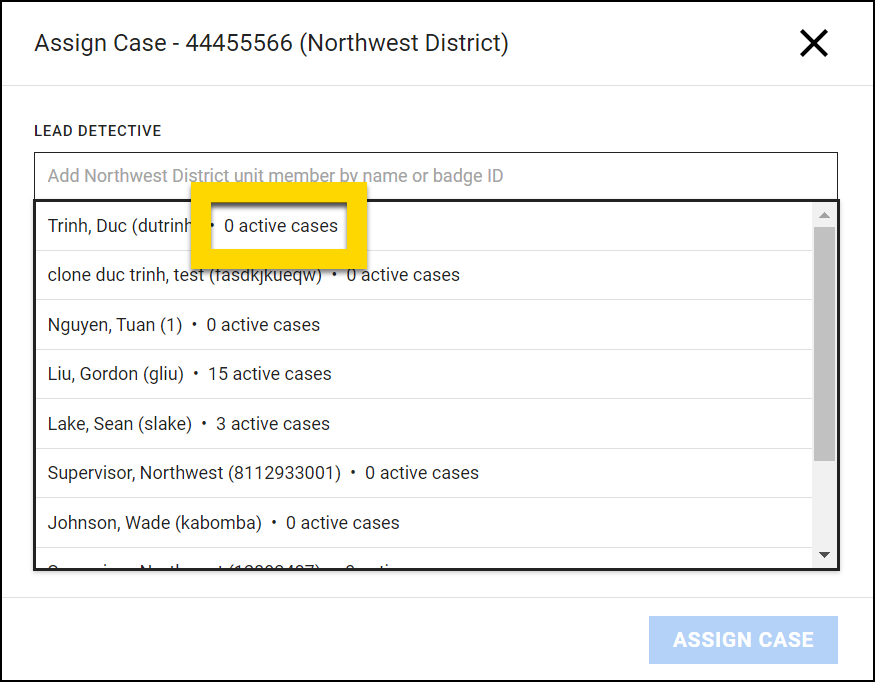
Caseload visualization
Caseload visualization gives a supervisor information to balance work more effectively when assigning investigations. When you assign a new investigation or transfer an existing investigation, the options in the Lead detective field display the number of active cases and investigations currently assigned to each detective in that unit.