NIBRS submissions: Automatic
An organization can be configured to automatically or manually generate and send NIBRS submissions to the state. This section explains how automatic NIBRS submissions work. See NIBRS submissions: Manual for an explanation of the manual submission process.
If your organization is configured to automatically generate and submit NIBRS submissions, the Compliance module contains an NIBRS Submissions inbox with two tabs: Rejected and All.
The name of this inbox is configurable and may vary among organizations.
Each report in the inbox contains the following options in its More actions [...] menu:
- View
- Revert finalization
- Create supplement
- Export submission
Rejected tab
Reports that were finalized, submitted to the state, then rejected appear on the Rejected tab. Use the filters to refine which reports are displayed:
- Report IDs
- Return codes
- Report created date
- Submission date
The following information is included for each report:
- Report ID: Select this hyperlink to open and view the report in Report Writer
- Labels in this column indicate If the report was submitted and later the finalization reverted or a supplement created.
- Occurrence date: The date the incident occurred (may be different from the report creation date)
- Report created date: The date the incident report was created (may be different from the occurrence date)
- Submission date: The date the report was finalized and submitted
- Author: The report author (or primary contributor)
- Status: The current status of the submission. On this tab, the only status that appears is Rejected, which indicates that the third-party system rejected the report. Return Codes are displayed indicating why the report was rejected.
- Return codes: If the submission was rejected, the return code is displayed.
- Return codes are specific to the third-party the report is submitted to.
- Select a return code to open a window that displays additional information.
All tab
The All tab contains all reports that have been or are in the process of submitting. Use the filters to refine which reports are displayed:
- Report IDs
- Return codes
- Status
- Report created date
- Submission date
The following information is included for each report:
- Report ID: Select this hyperlink to open and view the report in Report Writer
- Labels in this column indicate If the report was submitted and later the finalization reverted or a supplement created.
- Occurrence date: The date the incident occurred (may be different from the report creation date)
- Report created date: The date the incident report was created (may be different from the occurrence date)
- Submission date: The date the report was finalized and submitted
- Author: The report author (or primary contributor)
- Status: The current status of the submission. Statuses include:
- Submitting: The report is currently being submitted to the third-party system.
- Submitted: The report was received by the third-party system but not yet accepted or rejected.
- Accepted: The third-party system accepted the report.
- Rejected: The third-party system rejected the report. Return Codes are displayed indicating why the report was rejected.
- Submission failed: The submission failed due to a technical error.
- Contact your Axon representative for assistance if you see this status.
- Return codes: If the submission was rejected, the return code is displayed.
- Return codes are specific to the third-party the report is submitted to.
- Select a return code to open a window that displays additional information.
View report
You can view either the individual report that was submitted or the entire incident profile, which includes the original incident report and all other associated reports and files. To open these different views:
- Report ID: Opens the individual report in Report Writer
- More actions [...] > View: Opens the incident profile
Revert finalization
From within the Compliance module, you can revert the finalization of a report that was previously finalized and submitted. Reverting the report allows you to make changes immediately so it can be finalized again and automatically resubmitted to the state.
You may want to take this action if:
- The third-party system rejected the submission because of missing or invalid data.
- You notice an error in the report after it was finalized.
- You prefer to fix the issue yourself rather than creating a supplement for the reporting officer.
To revert the finalization of the report:
- Open the Compliance module and locate the report that needs to be corrected.
- Select More actions [...] > Revert finalized.
- Select an assignee.
- You can assign the report to yourself or to the officer who originally wrote it.
- Mark the task as urgent (optional), enter a note, and select Revert finalization.
- When the report is reverted:
- The report’s state changes from Finalized to Records Review and a Review Report task is routed to the My Tasks inbox of the assigned user.
- In the Compliance module, a Finalization reverted label appears below the submission's Report ID in the Report ID column.
If you assigned the report to yourself and you have the appropriate privileges, you can edit the report while it is in the Review state and then finalize it:
- Open the report.
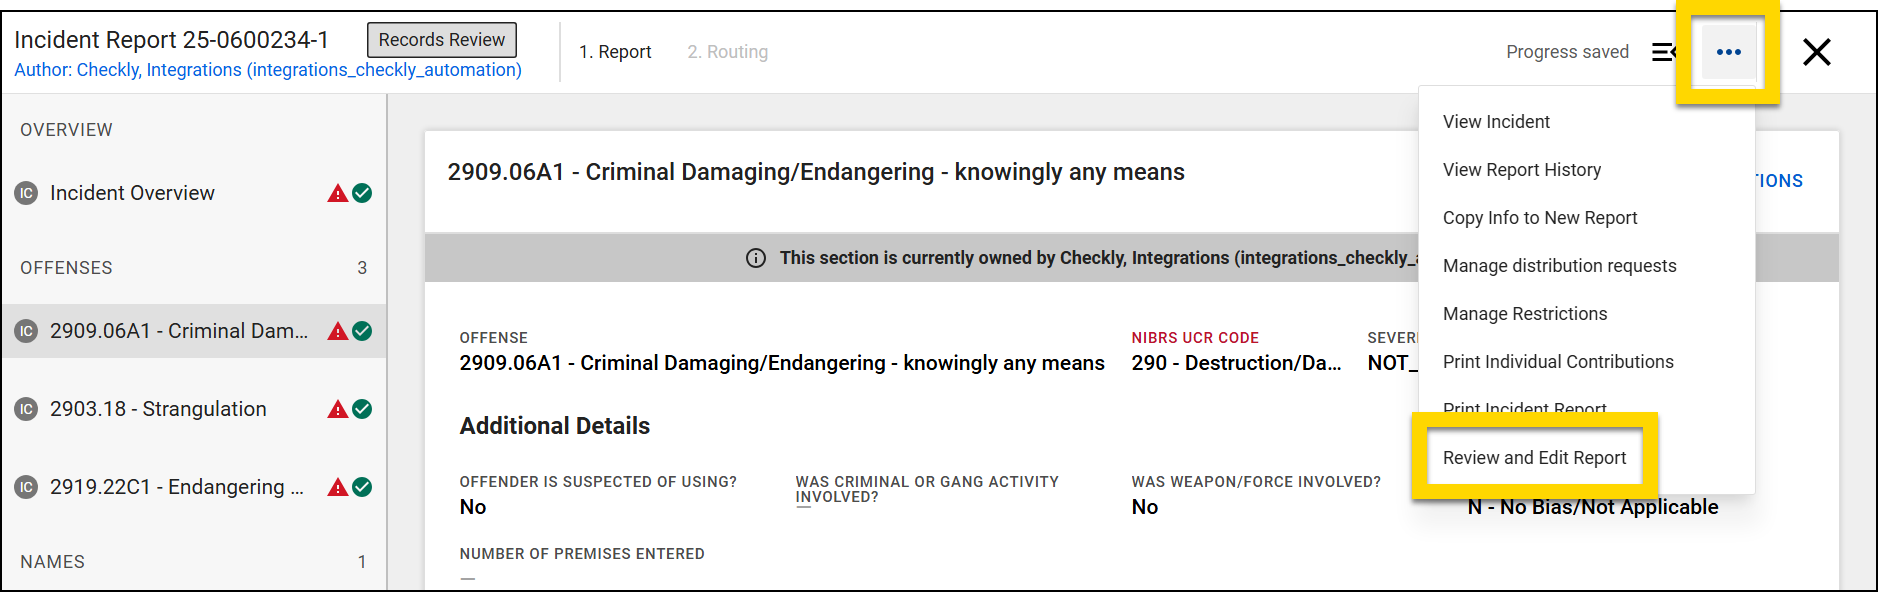
- Select More actions [...] > Review and edit.
- When editing another user's report, a gray banner at the top of the report indicates that "You are making changes on behalf of the user".
- You can make changes to any part of the report, and the changes will automatically save.
- Make the necessary changes and select Approve.
- When the report is finalized, it is added to the automatic submission queue and the status of the report in the Compliance module changes to Submitting.
Create supplement
From within the Compliance module, you can create a supplement for a report that was previously finalized and submitted. The original version of the report remains submitted, and when the new supplement is finalized, it is also submitted.
You may want to take this action if additional context or information is needed from the officer who originally wrote the report.
To create a supplement:
- Open the Compliance module and locate the report that needs to be corrected.
- Select More actions [...] > Create supplement.
- Select an assignee.
- Mark the task as urgent (optional), enter a note, and select Create supplement.
- When the supplement is created:
- A Write Supplement task is routed to the My Tasks inbox of the assigned user.
- In the Compliance module, a Supplement in progress label appears below the submission's Report ID in the Report ID column.
When the supplement is finalized, it is added to the automatic submission queue and the status of the report in the Compliance module changes to Submitting.
Export submission
The Export submission action lets you export a submission in XML format, which can be used for auditing, validation, or troubleshooting purposes.
View return codes
Return codes are responses provided by the third-party system that explain why the submission was rejected and returned. Because each third-party system defines its own return codes, formatting and content may vary.
To view return codes:
- Select a link in the Return codes column.
- The Return codes window opens, showing all codes associated with that submission in a scrollable list.
- Select Copy all to clipboard to copy all the codes to your computer's clipboard (to then paste them into another application like Word or a text editor).
- Select Download CSV to download the codes to a CSV file.


