Review, revise, and finalize reports
This topic explains how reports move through review, revision, and finalization workflows. These workflows include supervisor review, revising rejected reports, Records review and final approval. Additionally, once a report is finalized, users with specific privileges can revert it as necessary.
Review reports
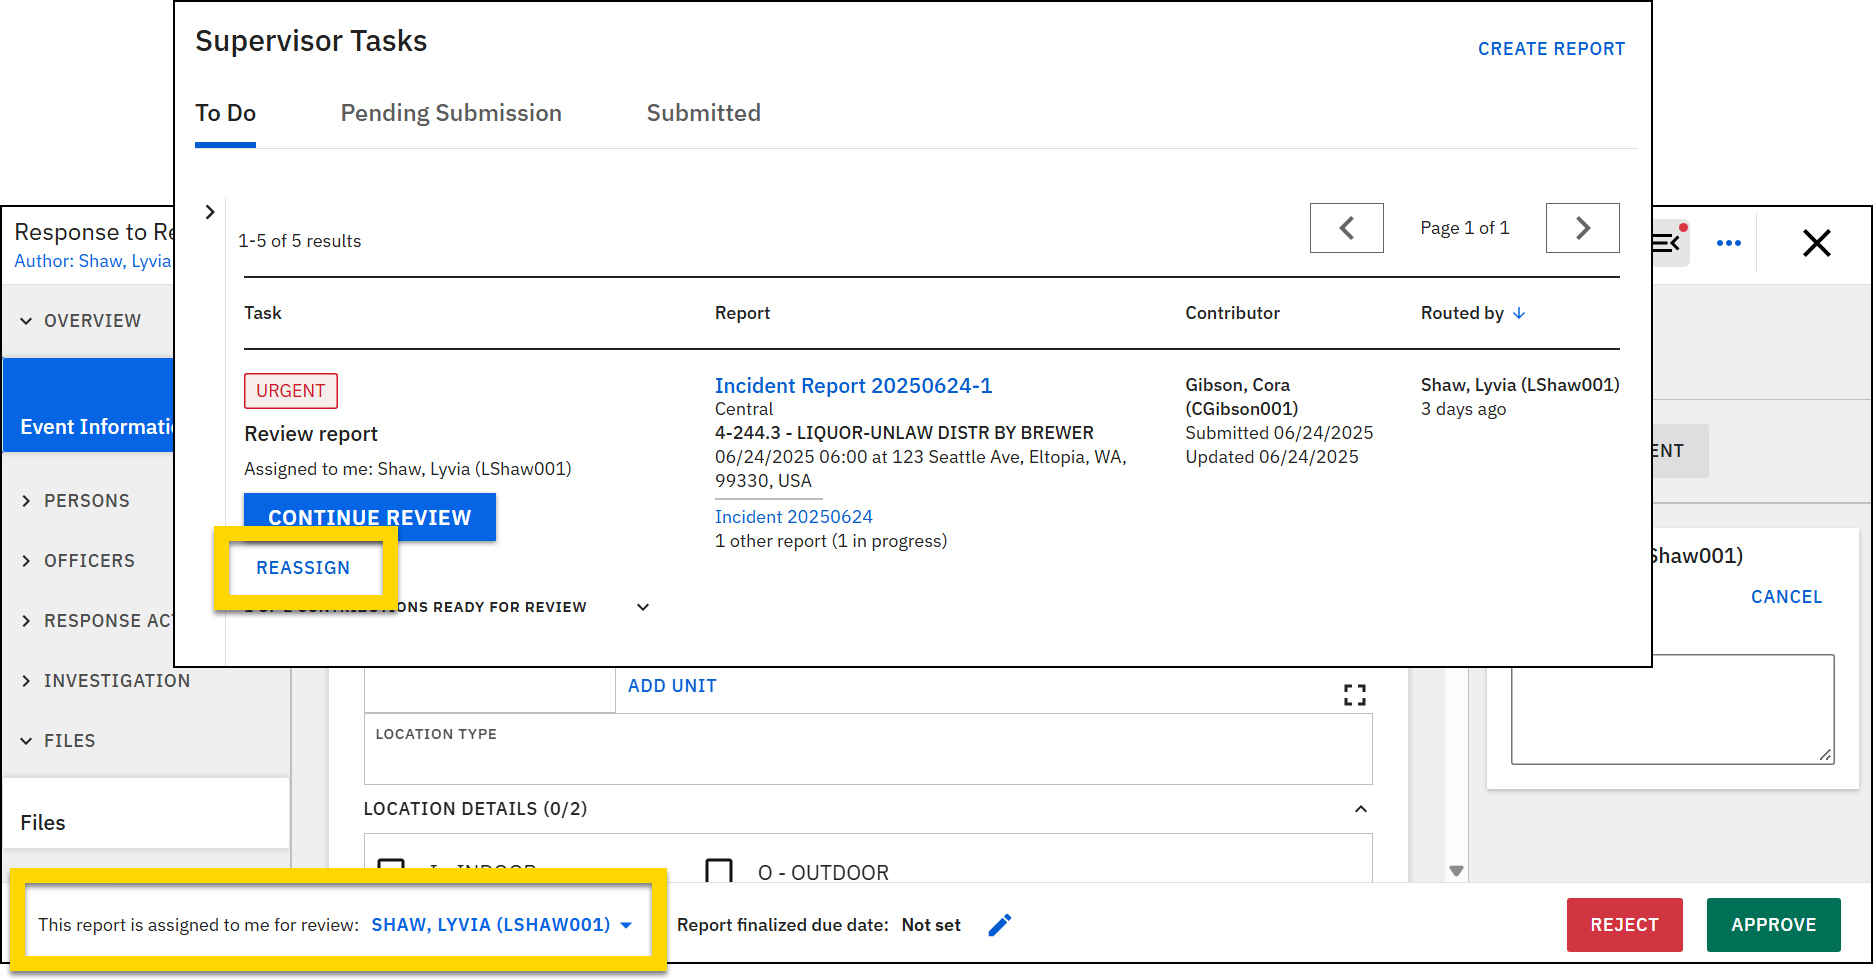
To review a report:
- Find the report to review:
- If you are already assigned as the reviewer, the task appears in your My Tasks inbox.
- If you are in another inbox, use the filters to find the task. If you are not yet assigned as the report reviewer, before beginning your review, you must assign yourself using the Assign/Reassign buttons on the task inbox or in the Report Writer footer.
- See the section below for more information about assigning multiple contributions of an incident report for review.
- Review the report, adding comments as needed using the sidebar.
- The comment is added to the section of the report you are currently viewing and will only appear when that section is open. Be sure to select the section of the report the comment applies to before you create it to ensure it is associated correctly.
- Users with the appropriate privileges can also edit a report while reviewing it by using the Review and edit option from the More actions [...] menu. This option is only available if the report is assigned to you for review.
- Being able to edit a report during the review process allows reviewers to make necessary changes without the inefficiency of sending the report back to the original author.
- When editing another user's contribution, a gray banner appears at the top of the report stating: "You are making changes on behalf of the user."
- You can make changes to any part of the report, and the changes will automatically save.
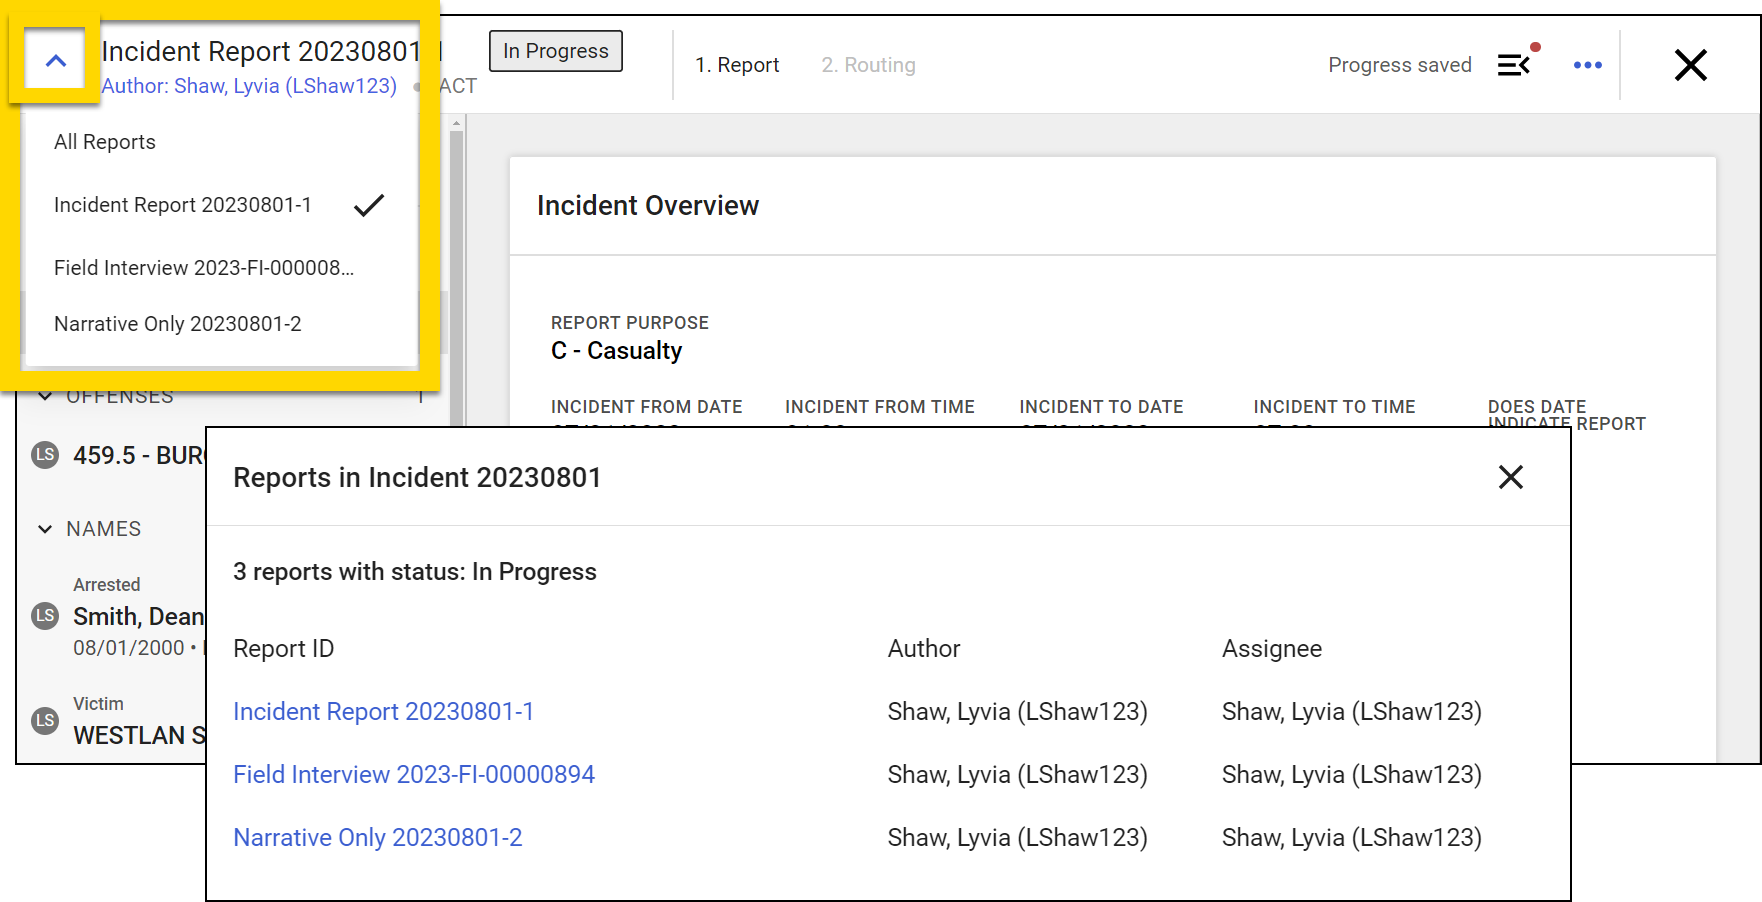
- If the report is associated with an incident, select the arrow in the top left to reveal a list of all reports included in that incident. Select a report name to open that report.
- When you are finished with your review, select Approve or Reject in the Report Writer footer.
- Add a routing note and mark if the task is urgent (as applicable.)
- Select either Reject to send the report back to the author for revision or Approve to either finalize the report or send it to the next step in the review process.
- When reviewing incident reports, the report is routed to the Records Tasks inbox for finalization.
Review incident reports
When reviewing an incident report, you must review the contributions of each user who contributed to the report (if multiple users contributed to the report) before submitting the report to the Records department for finalization.
When you begin your review, use the options in the Task column in the Supervisor Tasks inbox to assign your self to review the report. You can choose to review:
- All contributions that have been submitted for review
- A single contribution
The original contributor or other users can take over and edit contributions that are submitted for supervisor review. However, once a reviewer is assigned to review the contribution, it can no longer be edited.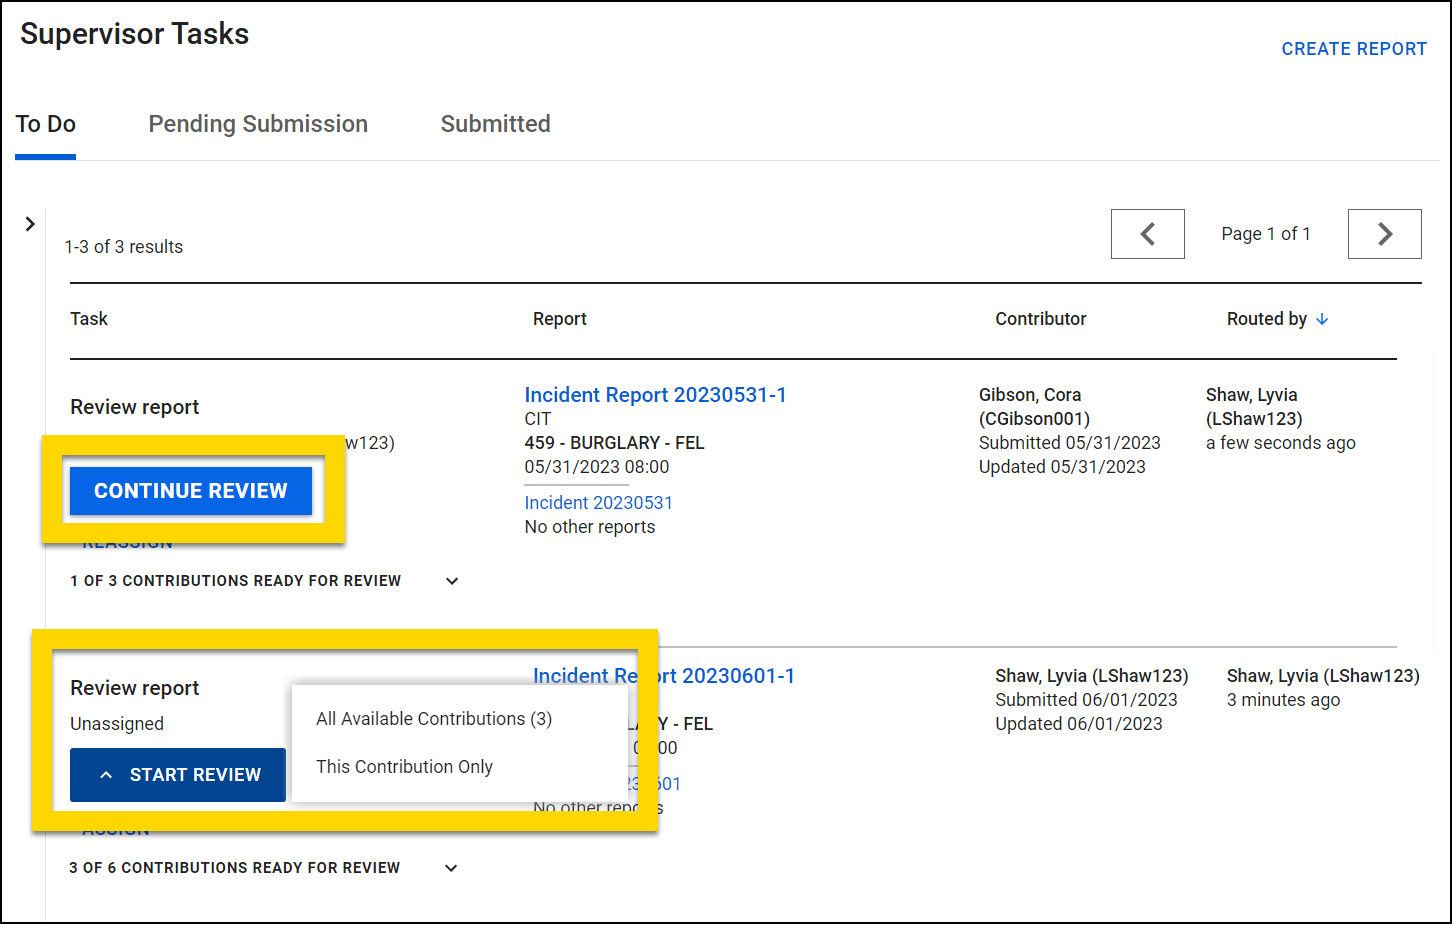
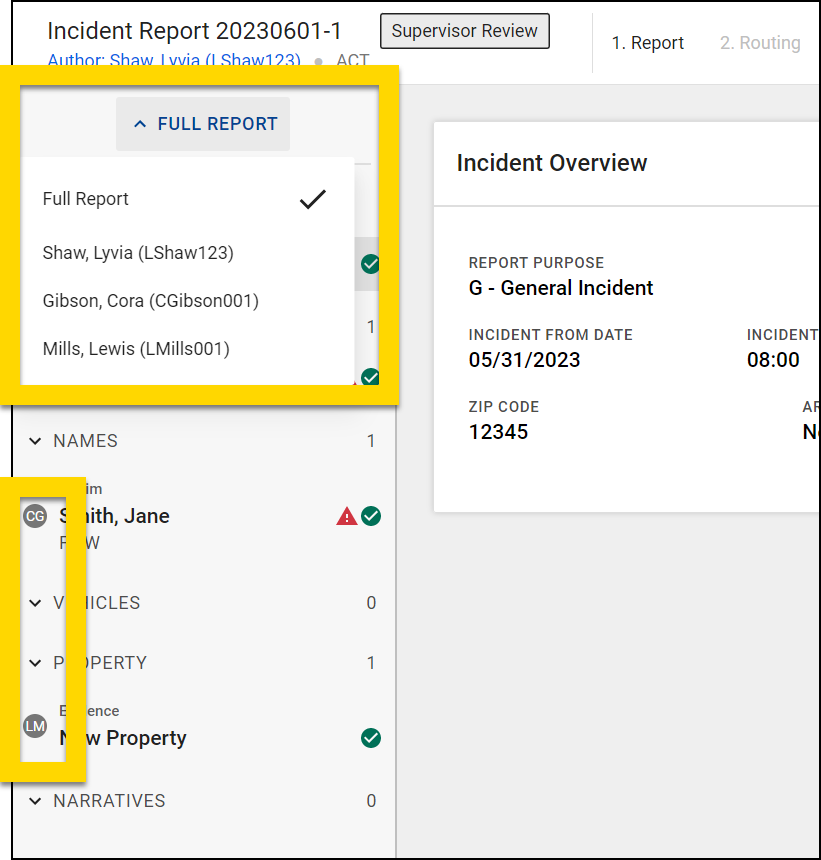
When reviewing a report with multiple contributions, use the drop-down menu in the top of the navigation menu in Report Writer to select a contributor and view only their contributions to the report. You can also review all contributions at the same time by selecting Full report.
- When viewing the full report, each section is labeled with the initials of the person who contributed it.
- If the report has a single contributor, the drop-down menu does not appear.
If the incident report has multiple contributions you want to approve:
- Use the drop-down menu at the top of the navigation menu to view the full report.
- Select Approve all my assigned contributions in the Report Writer footer.
- Each approved contribution is listed on the Routing screen.
If the report has multiple contributions, and you need to reject one or more, take these steps:
- Use the drop-down menu at the top of the navigation menu to view a specific contribution.
- Select Reject in the Report Writer footer.
- Add a routing note, mark if the task is urgent (if needed) and select Reject to send the report back to the author for revision.
- After rejecting the contribution, you'll return to the report where you can reject another contribution from the report menu or approve all remaining contributions.
Export incident reports for sharing
Some organizations are configured such that incident reports that are approved by a supervisor are automatically exported to Axon Evidence to enable faster, less manual sharing of reports. The feature can be configured to auto-export PDFs for all incident reports or only for incident reports that contain an arrest.
If this feature is set up for your organization, a message appears on the screen when a supervisor approves a report and routes it to Records review. The message indicates that the a PDF of the incident report is being exported to Axon Evidence.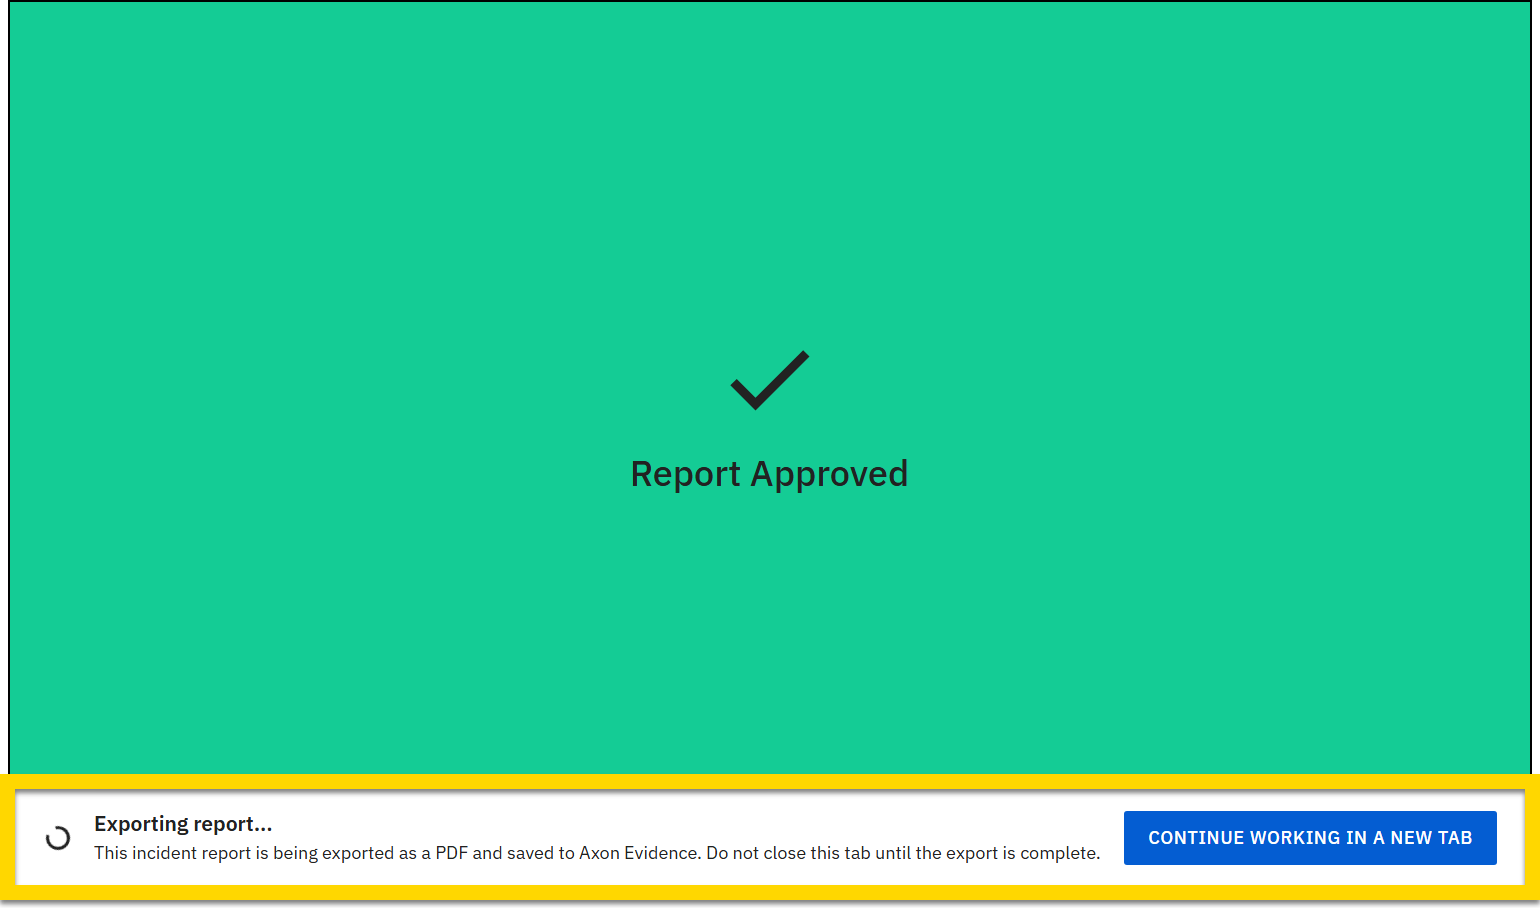
If a case has been created for the incident, the PDF is added to the case. If a case has not been created, the PDF is uploaded to Axon Evidence as a standalone piece of evidence, and the evidence owner is set to the primary author of the incident report. (The supervisor who approves the report appears in Axon Evidence as the user who uploaded the evidence.)
In Axon Records, the PDF is added to the Files tab of the incident or case profile. The PDF is added to a Documents subfolder on this tab. If a Documents subfolder has already been created for the incident or cases, the file is added to it. If one has not been created, a new Documents subfolder is created, and the PDF is added to it. Additionally, the Activity log tab records an activity of the file being added to the incident by the supervisor who approved the report.
If the incident report contains restricted information, the supervisor can choose how to export the PDF:
- Leave the Show restricted information checkbox unselected and select Export to export the PDF. Restricted information does NOT appear in the PDF. Instead [REDACTED] is printed where the restricted information would appear.
- Select the Show restricted information checkbox and select Export to export the PDF, including the restricted information.
- Select Not now to skip the PDF export. The incident report can be exported at any time using the Prepare documents for sharing feature.
If the evidence category in Axon Evidence for files uploaded from Axon Records is set to restricted, the exported PDF is marked as restricted evidence when it is uploaded to Axon Evidence, even if the report has not been restricted in Axon Records. If the report has been restricted in Axon Records, but the evidence category in Axon Evidence for uploads from Axon Records is NOT set to restricted, the uploaded file will not be restricted in Axon Evidence. In this case, apply a different evidence category that is restricted to the uploaded file to mark it as restricted.
Once the PDF has exported, you can share it with the appropriate partners. See the following topics for more information:
This video provides an overview of how supervisors can review incident reports that have been created using collaborative editing.
Revise reports
If a report you submitted is rejected by a reviewer, a Revise task is added to your My Tasks inbox.
You can add additional offenses, names, vehicles, property, narratives, and files when revising a report. You can also edit any information that already appears in the report (except for narratives submitted by other users). After making all requested changes, select Submit in the Report Writer footer to send the report back for a rereview.
You cannot edit (take over) a report section that was written by another contributor if that section is currently assigned to a supervisor for review. You can edit report sections you own until you submit them for review, even if other report sections written by other contributors are currently undergoing review.
Records review
Once all contributions to a report have been approved by the appropriate supervisors, a single task appears in the Records Tasks inbox to be approved and finalized or rejected and sent back for revision.
To perform a review:
- Find the report to review:
- If you are already assigned as the reviewer, the task appears in your My Tasks inbox.
- If you are in the Records Tasks inbox, you must first assign yourself to the task by selecting Assign in the Assignee column. The task moves to your My Tasks inbox (as well as to the Assigned tab of the Records Tasks inbox) where you can open the report and review it.
- If the report has multiple contributors, use the drop-down menu at the top of the navigation menu to select a contributor. You can also review all contributions by selecting Full report.
- When viewing the full report, each section is labeled with the initials of the person who contributed it.
- If the report has a single contributor, the drop-down menu does not appear.

- Review the report, adding comments as needed using the sidebar.
- The comment is added to the section of the report you are currently viewing and will only appear when that section is open. Be sure to select the section of the report the comment applies to before you create it to ensure it is associated correctly.
- The comment is added to the section of the report you are currently viewing and will only appear when that section is open. Be sure to select the section of the report the comment applies to before you create it to ensure it is associated correctly.
- Users with the appropriate privileges can also edit a report while reviewing it by using the Review and edit option from the More actions [...] menu. This option is only available if the report is assigned to you for review.
- Being able to edit a report during the review process allows reviewers to make necessary changes without the inefficiency of sending the report back to the original author.
- When editing another user's report, a gray banner at the top of the report indicates that "You are making changes on behalf of the user".
- You can make changes to any part of the report, and the changes will automatically save.
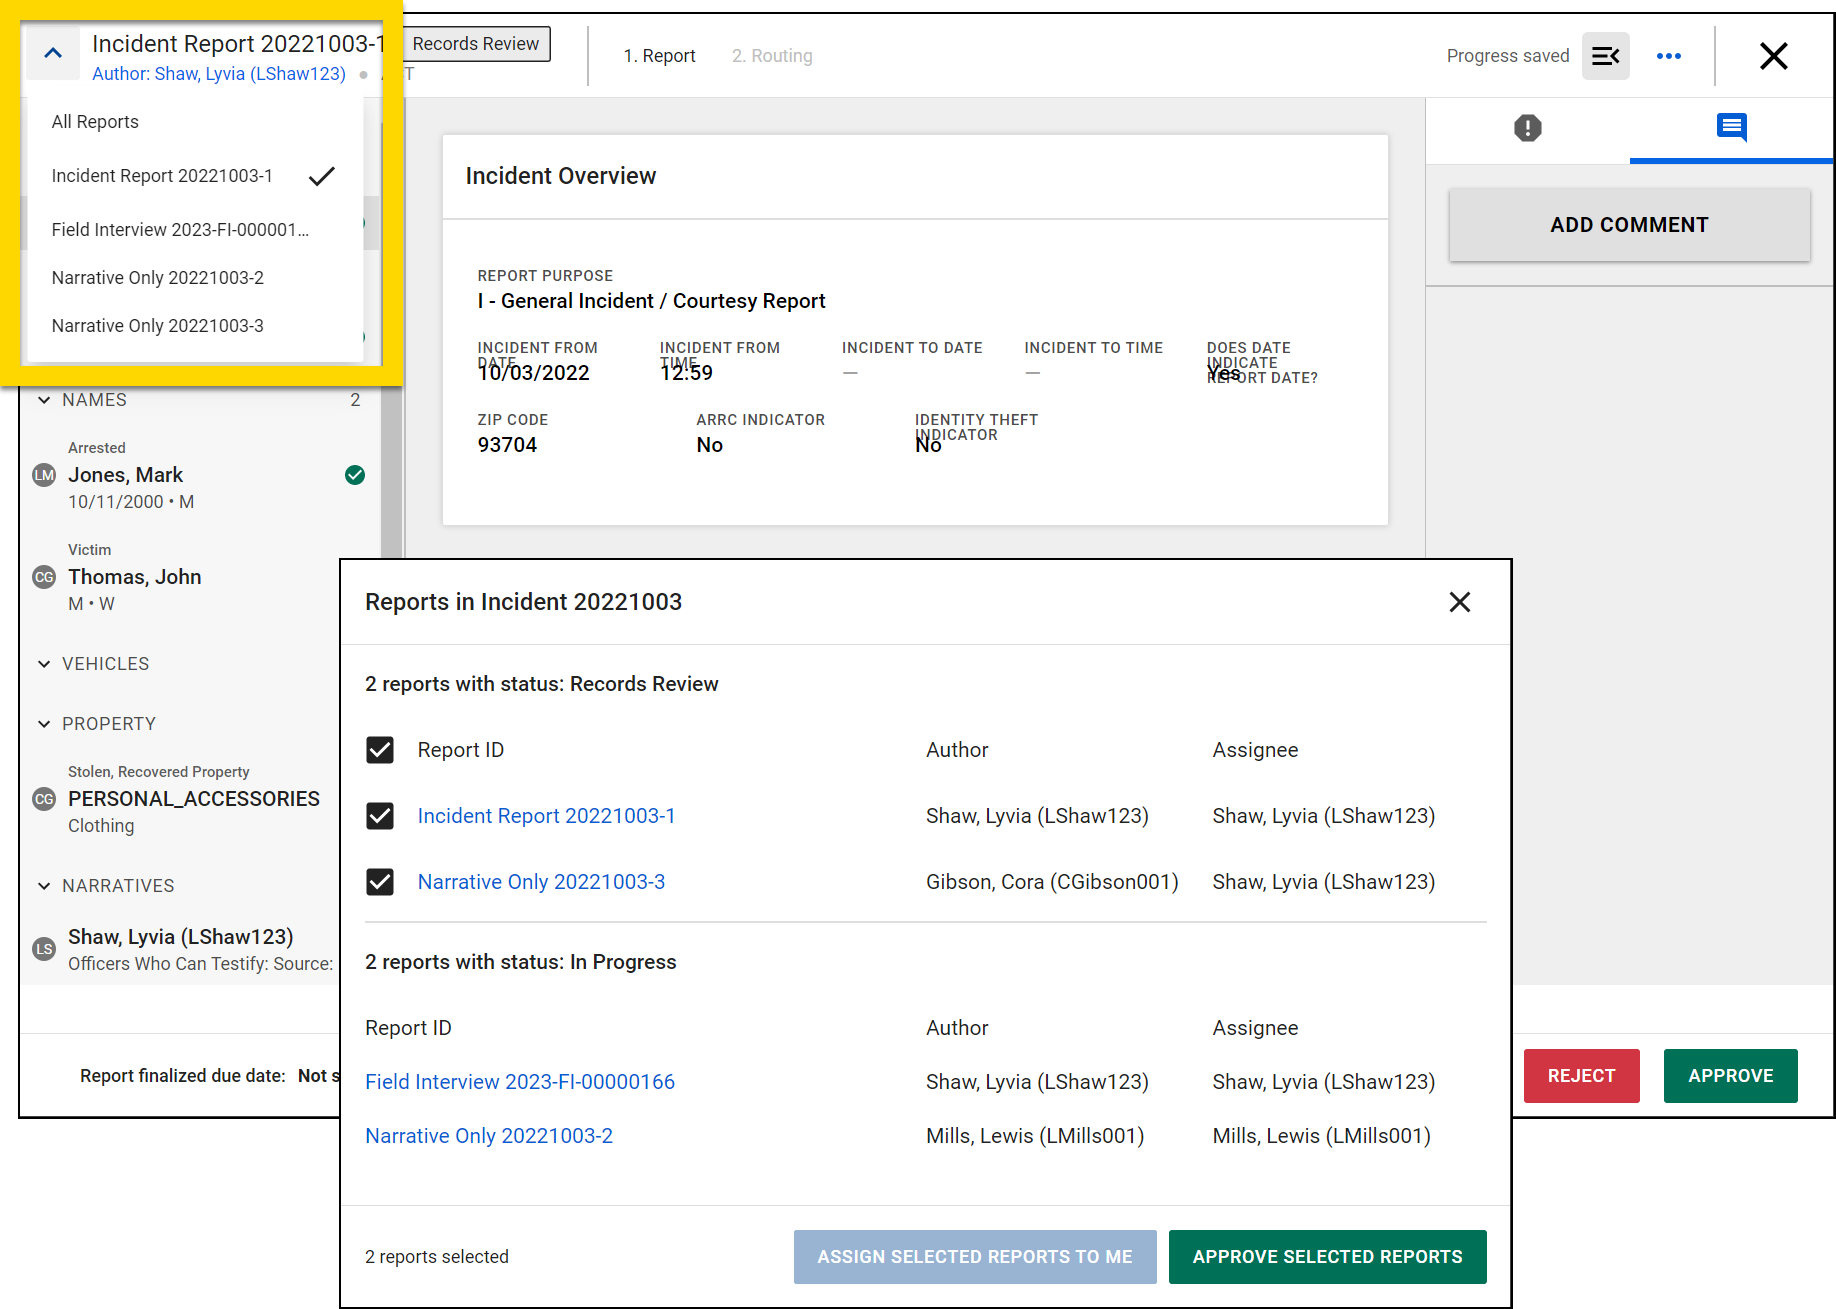
- While reviewing the report, select the arrow in the top left to reveal a list of all reports included in that incident.
- Select a report name to open that report.
- Reports from related incidents are not included in this list.
- Select All reports to see more information about each report, including:
- Status (In Progress includes reports that are currently in Supervisor Review)
- Author
- Assignee
- Use the checkboxes beside the reports in Records Review to bulk-assign those reports to yourself, or bulk-approve reports.
- When you are finished with your review, select Approve or Reject in the report footer.
- If you are rejecting a report that was written by multiple people, you must select which contribution(s) to reject, then select Continue.
- If a report is approved and finalized, users with the appropriate privileges can later revert the finalization as necessary.
- Add a routing note, mark if the task is urgent (if needed), and select either Reject to send the report back for revision or Approve to finalize the report.
This video provides an overview of how Records clerks can review incident reports that have been created using collaborative editing.
Revert finalized reports
After a report has been finalized, users with the appropriate privileges can revert the finalization. When this occurs, the report is returned to a Review state where it can again be reviewed and rejected for revisions as necessary.
To revert the finalization of a report:
- Select Revert finalization from one of two locations:
- The More actions [...] menu in the top right corner of Report Writer

- The More actions [...] menu for the report on the Recently completed tab of the Agency Tasks inbox
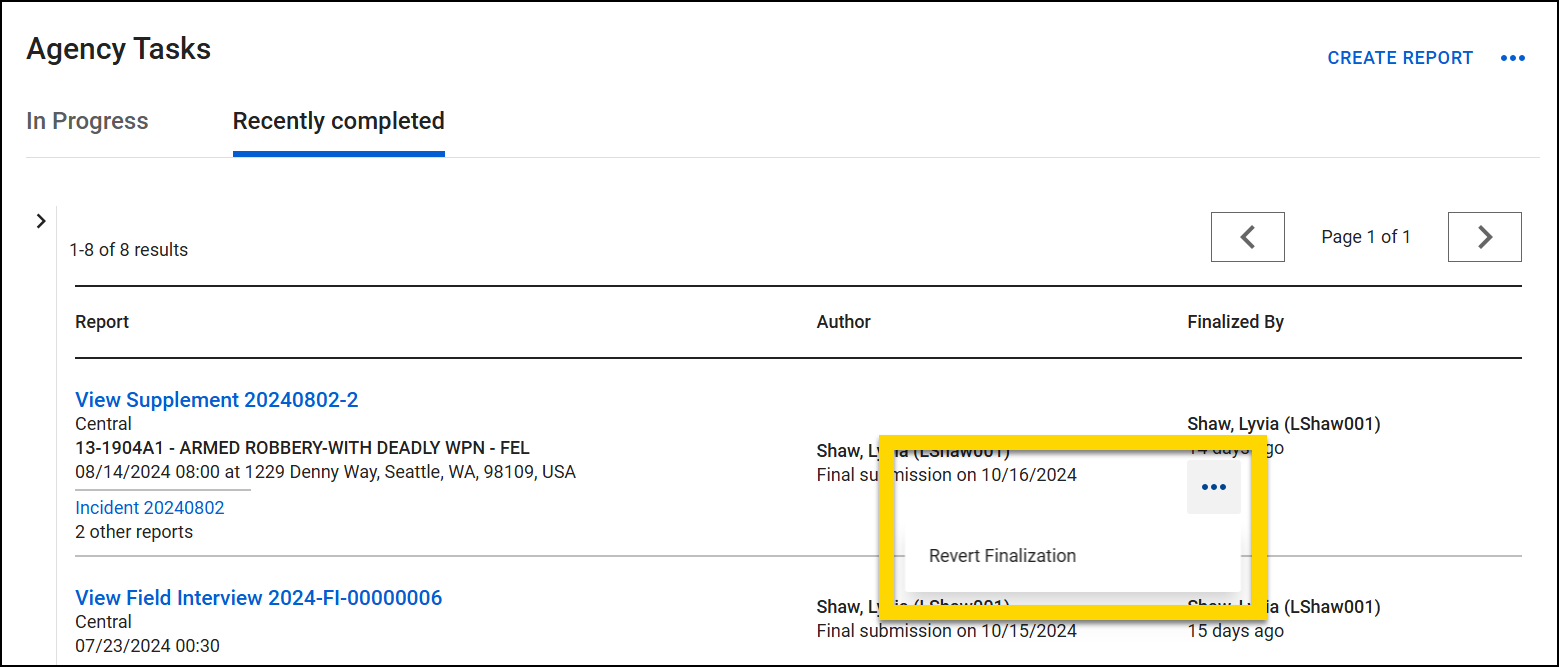
- The More actions [...] menu in the top right corner of Report Writer
- Assign who the report should be reviewed by.
- Add a note (required).
- Select Revert finalize.
When a report finalization is reverted, the report history shows when the finalization was reverted and who reverted it.
Revert finalized incident reports
When reverting a finalized incident report that contains multiple supplements, only the latest supplement is reverted. The previous supplements remain finalized, and none of the changes made to the reverted supplement are reflected in the previous supplements.
If an incident contains both an Incident Report and Narrative Only reports, you can revert finalize each of the Narrative Only reports individually. Narrative Only reports are different from incident report supplements and are independent of one another.
For example, the table below shows the reports contained in Incident ID 12345. The second column indicates which reports can be reverted.
|
Report ID |
Can be reverted? |
|---|---|
|
Incident Report 12345-01 |
No |
|
Supplement 12345-02 |
No |
|
Supplement 12345-03 |
No |
|
Narrative Only 12345-04 |
Yes |
|
Supplement 12345-05 |
Yes |
|
Narrative Only 12345-06 |
Yes |