Create and submit reports
This topic describes how to create, collaborate on, supplement, and submit reports. Specific workflows include creating incident and standalone reports, collaborative report editing, creating supplements, and submitting reports.
Create reports
To create a new report:
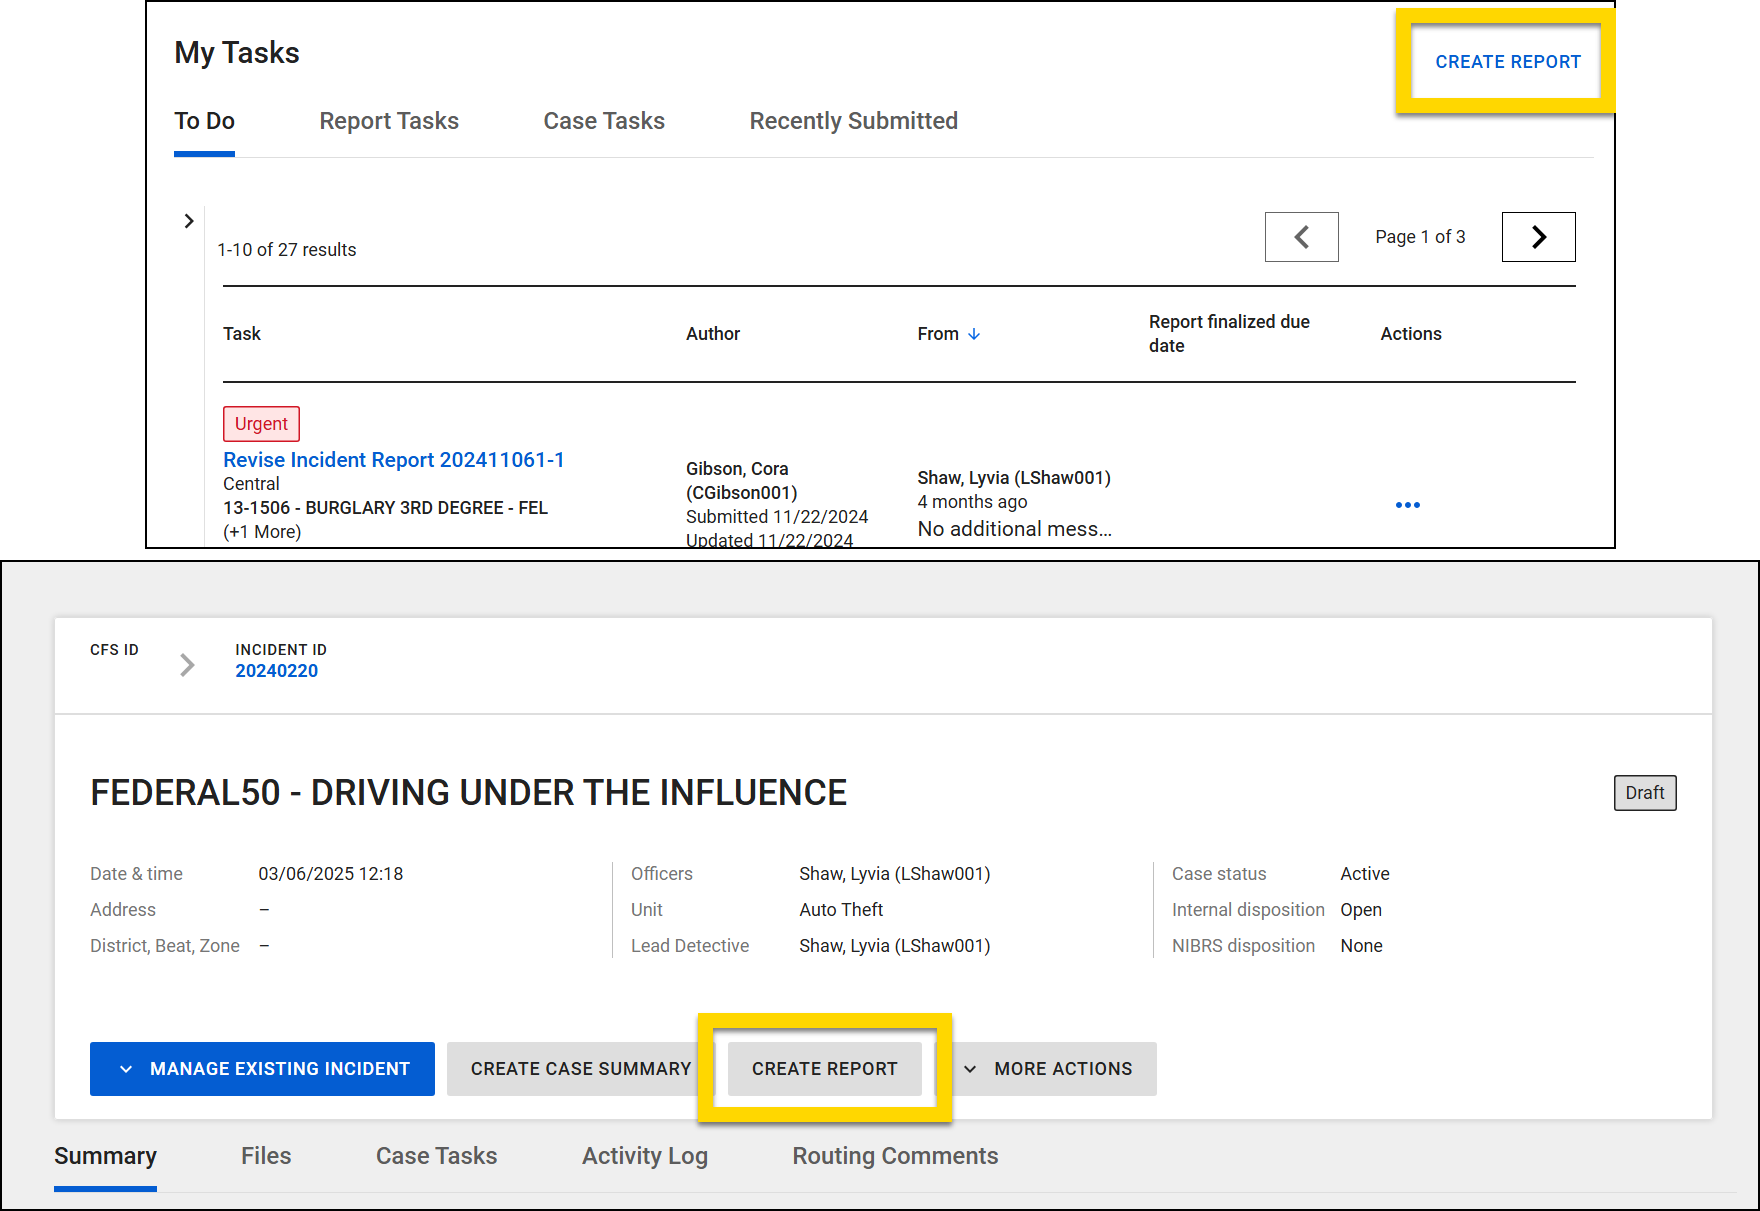
- Select Create report from the top right corner of any task inbox.
- You can create a new incident, which results in the creation of an incident profile, or you can create a standalone, non-incident report.
- Some organizations are configured such that when a CFS occurs, an incident is automatically created. In these cases, you do not need to create a new report and should instead update the one that was created automatically.
- To add a report to an existing incident or case, open the incident or case profile and select Create report.
- Select a report type.
- The following report types are available by default. Additional report types are created on an organization-by-organization basis, so you will see additional options in this menu:
- Incident Report (Update an existing incident or create a new one)
- Narrative Only
- Field Interview
- The following report types are available by default. Additional report types are created on an organization-by-organization basis, so you will see additional options in this menu:
- If your organization is configured to use custom names, you can optionally add a custom name for the report.
- You may be asked to enter an Incident ID to associate the new report to an existing incident.
- Users belonging to Command Hierarchy groups and/or teams with specific privileges can start a new incident report with a manually supplied Incident ID by selecting the Click here link at the bottom of the screen and entering the number in the field.
- After choosing a report type, select Create report to open Report Writer and add information to the report.
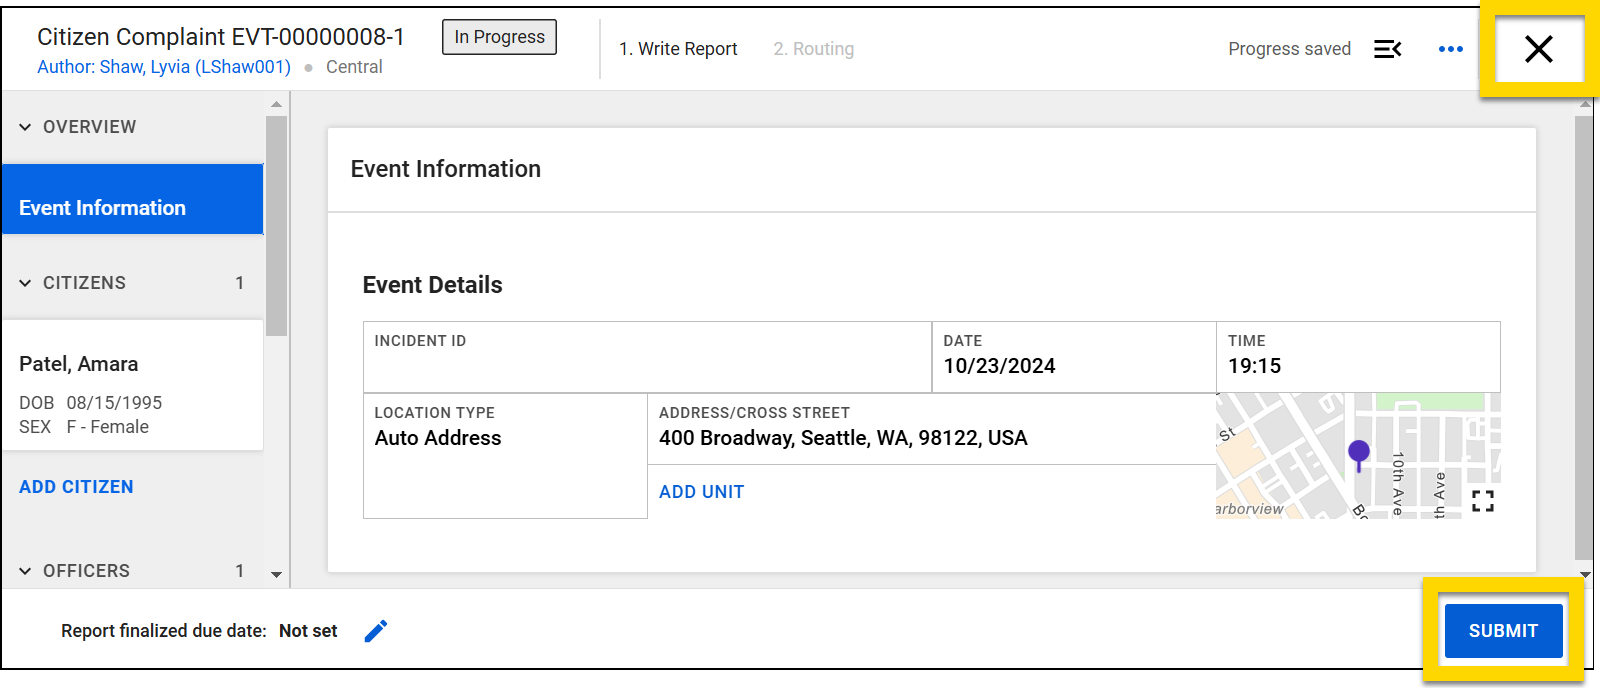
- When you have finished working on the report, select Submit to submit it for review.
- To close a report without submitting it, select the X in the upper right corner. You can come back to it later by selecting the Write report task from your My Tasks inbox.
- To close a report without submitting it, select the X in the upper right corner. You can come back to it later by selecting the Write report task from your My Tasks inbox.
If you create a new report by selecting Create report on an existing incident/case profile, you may see additional options:
- If your organization uses Axon Standards, you'll see a tab containing the available Standards reports.
- If your organization uses the Case Management module AND a case has been created for that incident, you'll see a section for the creation of case documents.
To add additional information to an incident report that has already been finalized by the Records department, you can create a supplement by opening the incident profile and selecting Manage existing incident > Edit incident.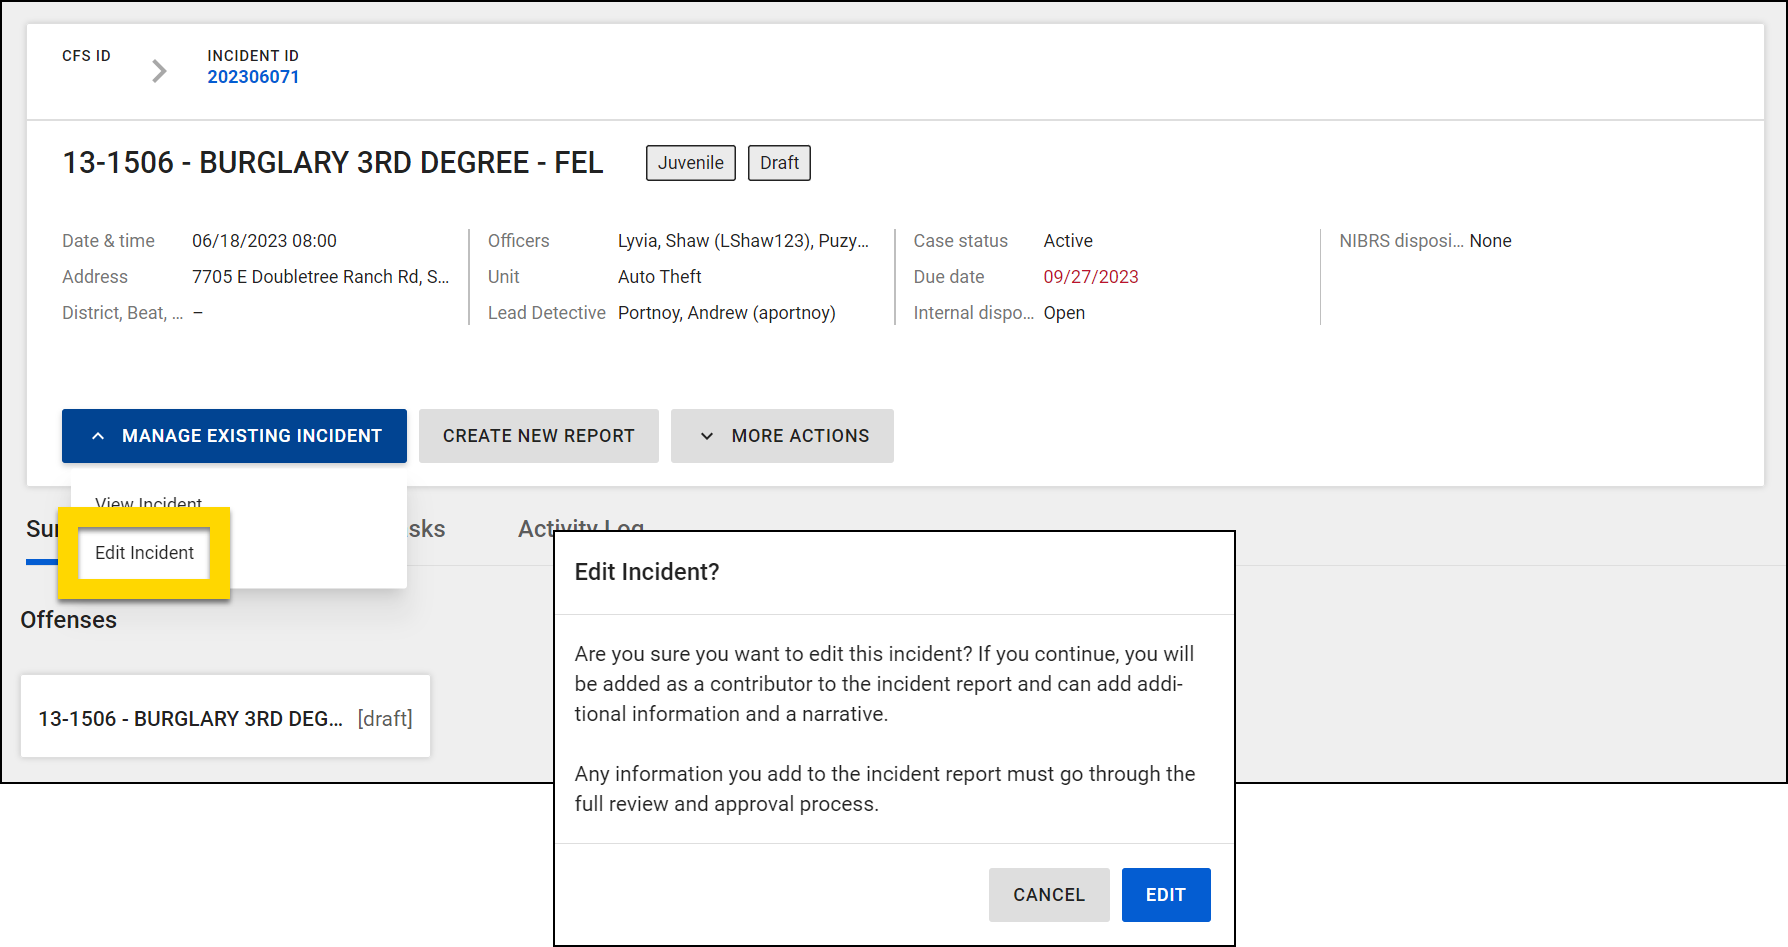
This video explains how to create an incident report.
Submit reports
To submit a report for review or finalization:
- Open the report in Report Writer.
- Select Submit at the bottom of the Report Writer screen.
- If the report must be prioritized for review, select the Mark urgent checkbox.
- In some workflows, the report can be finalized immediately and does not need to be submitted for review. In these cases, select Finalize at the bottom of the screen.
- If the report contains validation errors, the Routing page shows a warning. Return to the report to fix the errors by selecting Back or submit the report with errors by selecting Submit.
- Some organizations don't allow reports containing validation errors to be submitted. If this is the case for your organization, you will not be able to select Submit until you have resolved all errors.
- Select where the report should be routed for review.
- This option may not appear in some workflows.
- Add a routing note as necessary.
- Select Submit.
Submitted reports are removed from your My Tasks inbox and routed to the appropriate Review inbox. If the report is reviewed and rejected, it re-appears in the My Tasks inbox as a Revise task. After updating the report, you can resubmit the report for re-review. The supervisor will again approve or reject the report.
If the report belongs to a multi-step review workflow, a supervisor may submit the report for additional review. During the later review steps, a reviewer can still reject the report. If they do, the report is again returned to the original author for revision and re-submission.
Once a report is approved by the final reviewer, it becomes an official, final report.
Watch this video for an overview of how to submit an incident report.
Collaborative report editing
You can contribute to an incident report that another person has created but not yet finalized. All people contributing to the report can add information at the same time without blocking each others' work. In this way, instead of an incident containing multiple supplement reports, all information related to the incident is combined in one report and finalized as a single report. Each user can add their own narrative to a report but cannot edit another user's narrative. If additional documentation is required after the report has been finalized, additional supplement reports can be created and associated with the original incident report.
For example, if Officer Smith spoke with a victim at an incident scene, and Officer Mercer spoke with a witness at the same scene, both officers can add their information to a single incident report. Both of their contributions will combine to create the original report (Incident ID 12345-1). If Officer Smith needs to document additional information after the report has been finalized by the records clerks, he can create a supplemental report associated with the original report (Incident ID 12345-2).
You must have appropriate privileges related to a report you want to edit. If you can't access a report, contact your administrator.
When viewing a report's history (accessed through the report's More actions menu), use the Sorted by drop-down to view the workflow for the entire report, all contributors to the report, and the status of each contribution (In Progress, Submitted for Supervisor Review, or Approved Contribution):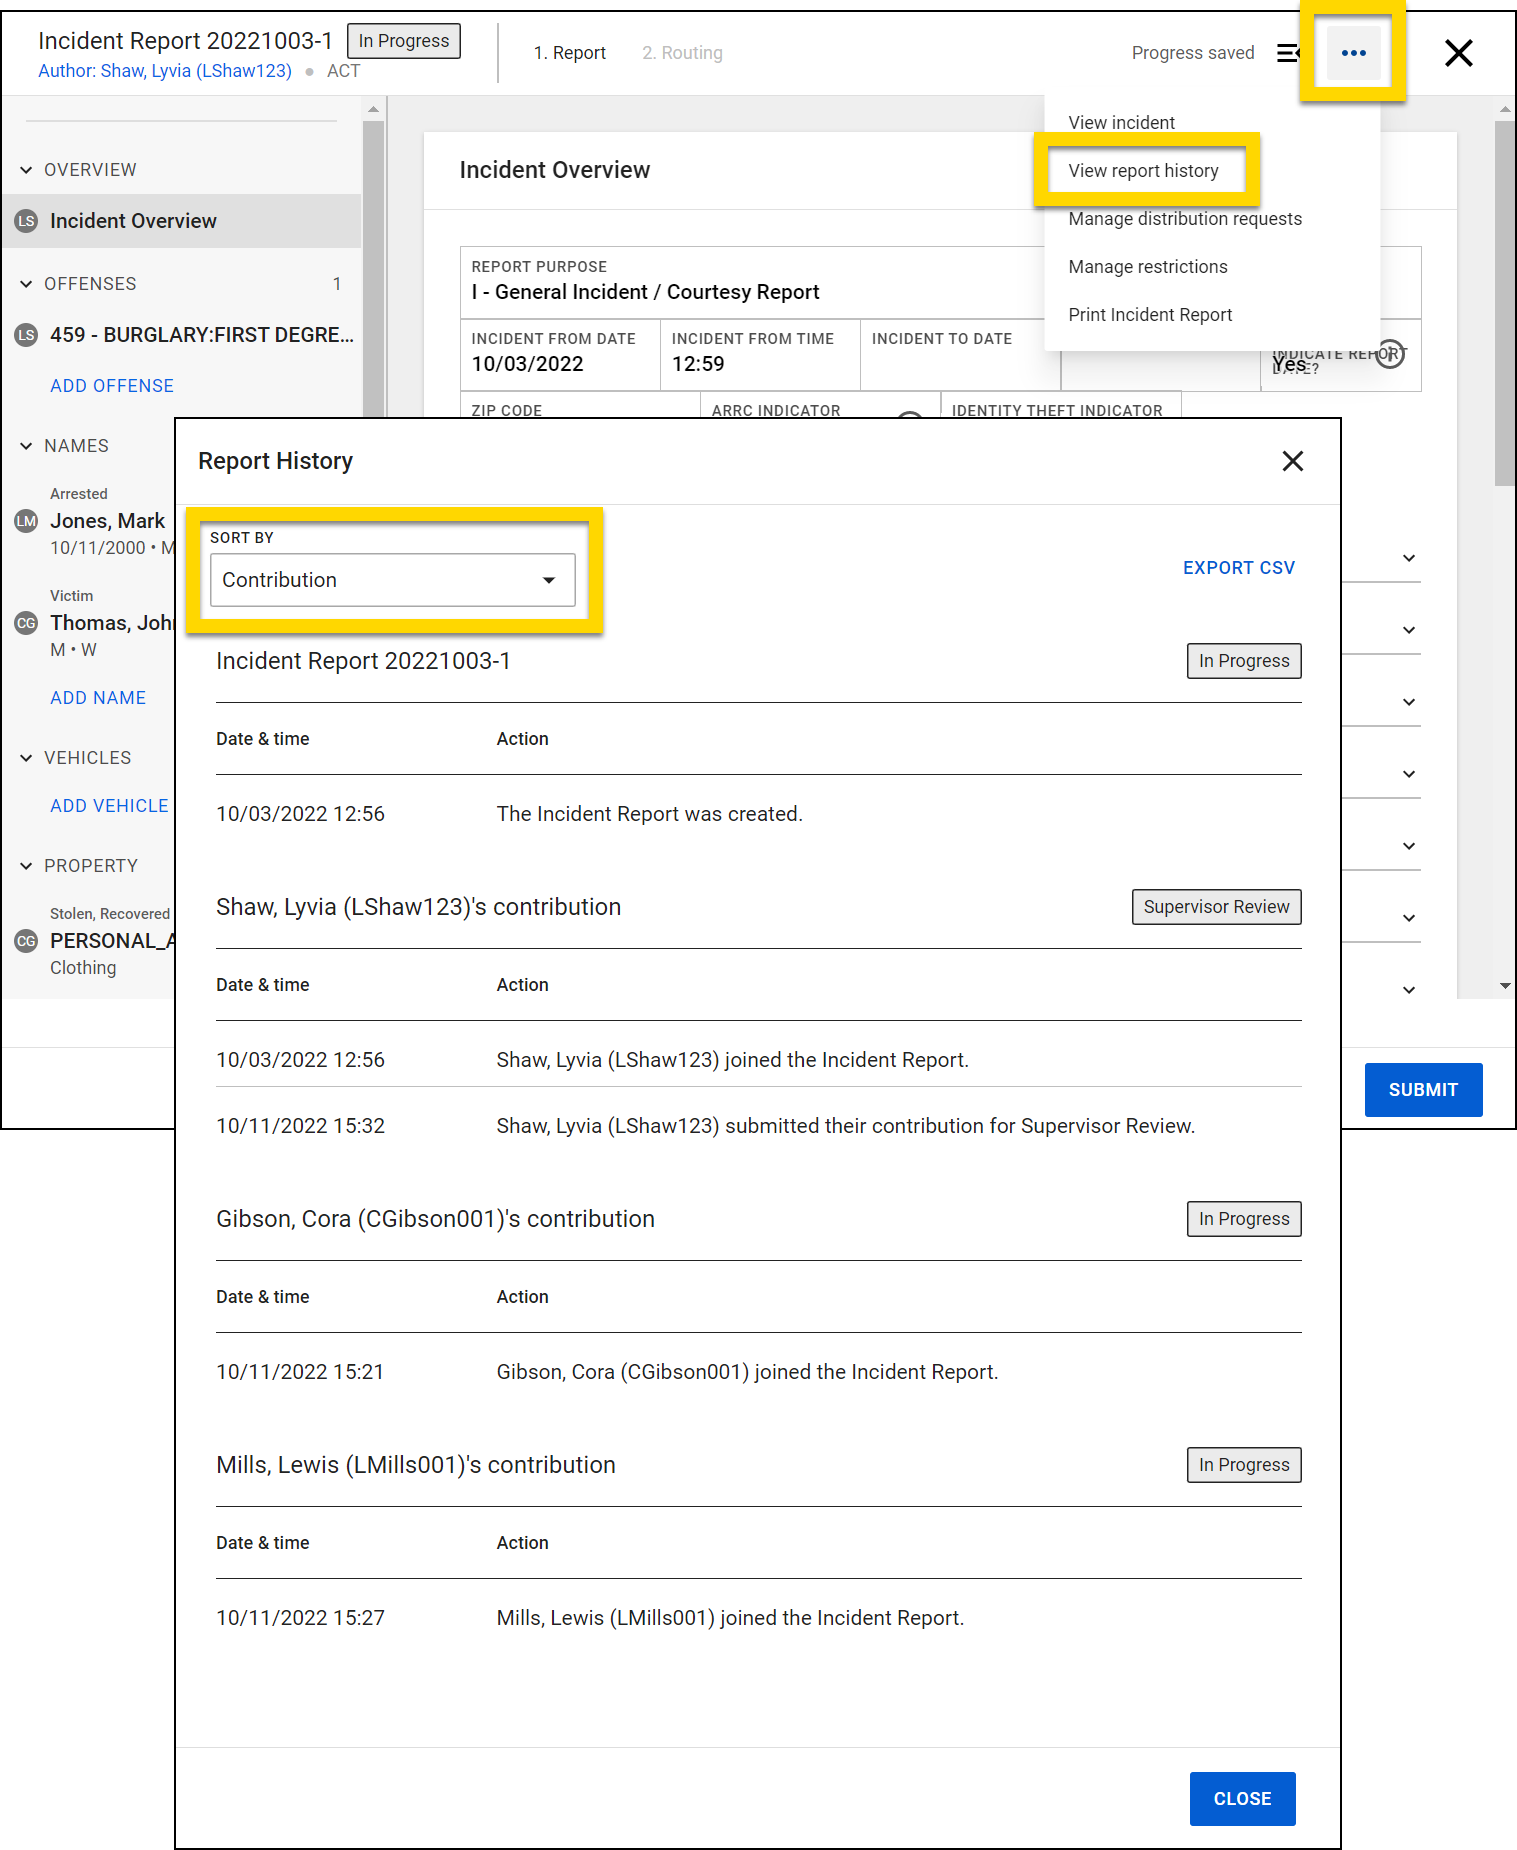
Contribute to a report
To contribute to a report created by another user:
- Search for the Incident ID of the report you want to work on and select the ID to open the incident profile.
- Select Manage existing incident > Edit incident then confirm that you want to become a contributor and update the original incident report.
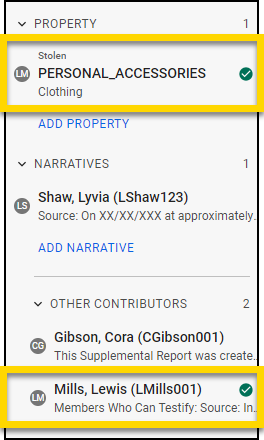
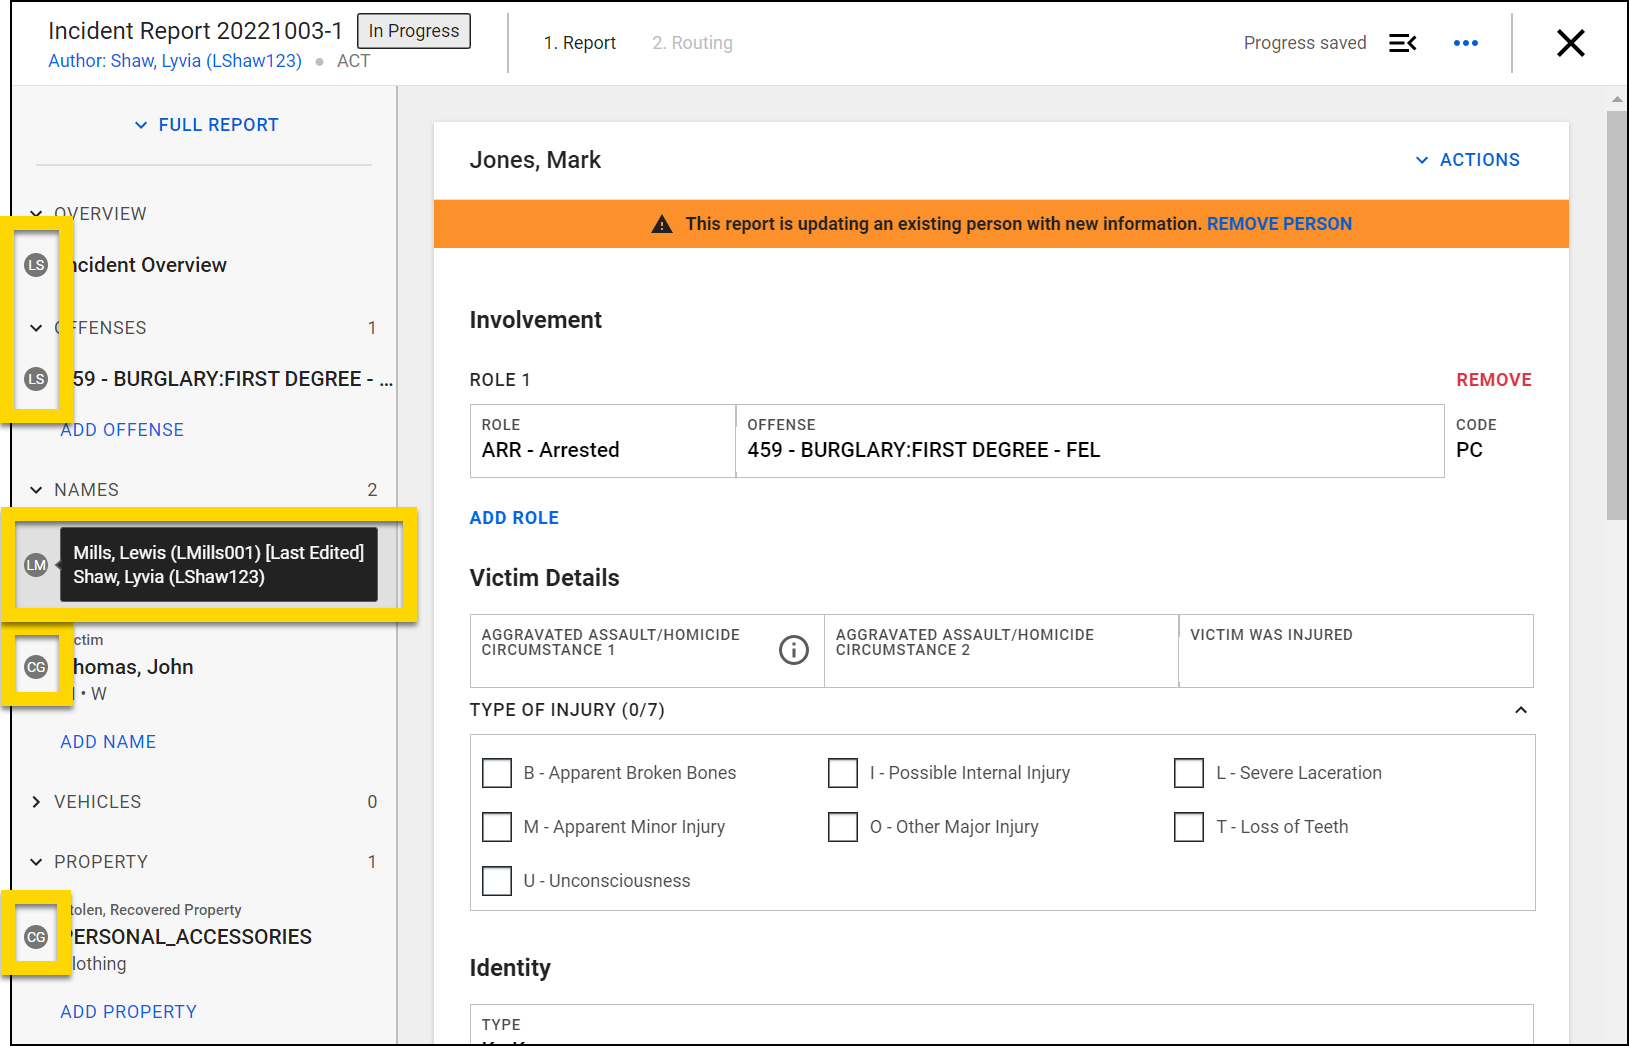
- Report Writer opens where each section of the report is labeled with the initials of the original author. Hover over the initials to reveal the full names of all contributors who edited that section, with the latest contributor shown at the top of the list.

- To add new information, such as a Name or Property, select Add in the appropriate section. Any information you add will be automatically saved.
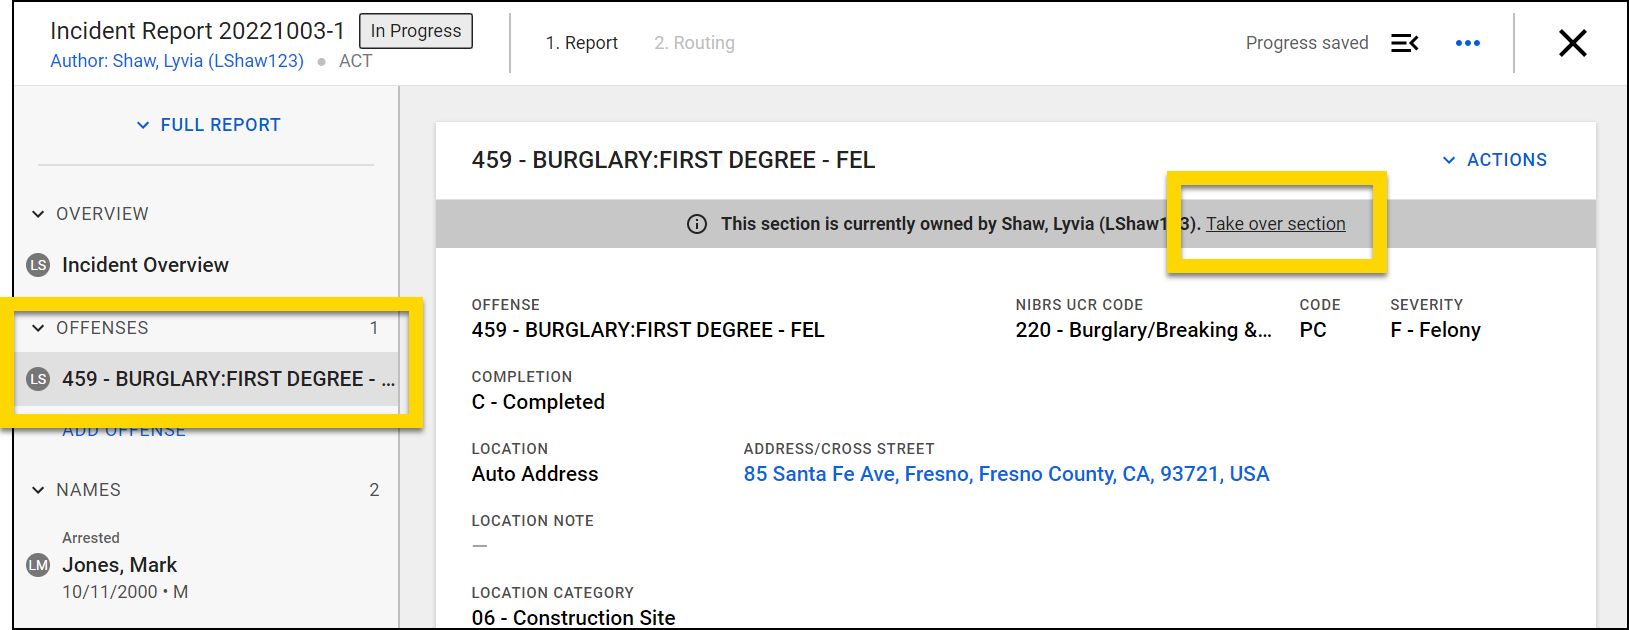
- To edit information, select a section. At the top you'll see which user owns that section. Select Take over section to edit.

Collaborative editing tips
- The previous user is not notified when their section is taken over.
- You cannot edit a narrative created by another user; you can only add additional narratives.
- You can edit report sections you own until you submit them for review, even if sections written by other users are still being written.
- The original contributor or other users can take over and edit contributions that are submitted for supervisor review. However, once a reviewer is assigned to review the contribution, it can no longer be edited. Once the report is submitted for Records Review, you can edit any report section.
Watch this video for an overview of collaborative editing for officers.
Watch this video for an overview of collaborative editing for supervisors.
Watch this video for an overview of collaborative editing for records clerks.
Create supplements
After an incident report has been finalized by the Records department, a supplement can be created that contains all information from the original report. This supplement can be edited to adjust, add, or remove information that appeared in the original report. After it is updated, the supplement is submitted and finalized using the same review process as the original incident report.
This supplement shares the same Report ID as the original Incident report, but the "-1" at the end of the ID increases by 1. For example, if a supplement is created for Incident 123456-1, the supplement's Report ID is 123456-2.
If more changes are needed after a supplement is finalized, additional supplements can be created. Each supplement contains all information contained in the previous supplement, and the Report ID increases by 1 for each supplement that is created. For example, in Incident 20240719, the Report IDs would appear as follows:
- 20240719-1: The original incident report
- 20240719-2: The first supplement that is created after the original incident report is finalized. When it is first created, this supplement contains all information from Report ID 20240719-1. It is updated to include an additional property item.
- 20240719-3: The second supplement that is created after the first supplement is finalized. This supplement contains all information from Report ID 20240719-2. It is updated to include information about the suspect's car that was recovered.
To create a supplement:
- Open the incident profile for the incident report you want to add a supplement to.
- Select Manage existing incident > Edit incident then confirm that you want to become a contributor.
- This is the same workflow you would follow if you were joining an unfinalized incident report as a contributor.
- If the report has not yet been finalized by the Records department when you select Edit Incident from the incident profile, you will instead join the original incident report as a contributor, and no supplement report is created.

- Report Writer opens and contains all the information from the original incident report. Each section is labeled with the initials of the original author. Hovering over the initials will reveal the full names of all contributors who edited that section, with the latest contributor identified at the top of the list.
- To add new information, such as a Name or Property, select Add in the appropriate section. Any information you add will be automatically saved.
- To edit information, select a section. At the top you'll see which user owns that section. Select Take over section to edit.
- Every supplement also contains an empty narrative section, which must be completed.
- After updating and adding content as necessary, you can submit the report. The supplement report will go through the same Supervisor review and Records review as the original incident report.
This new supplement, along with the narrative it contains appears on the incident profile as a supplement report.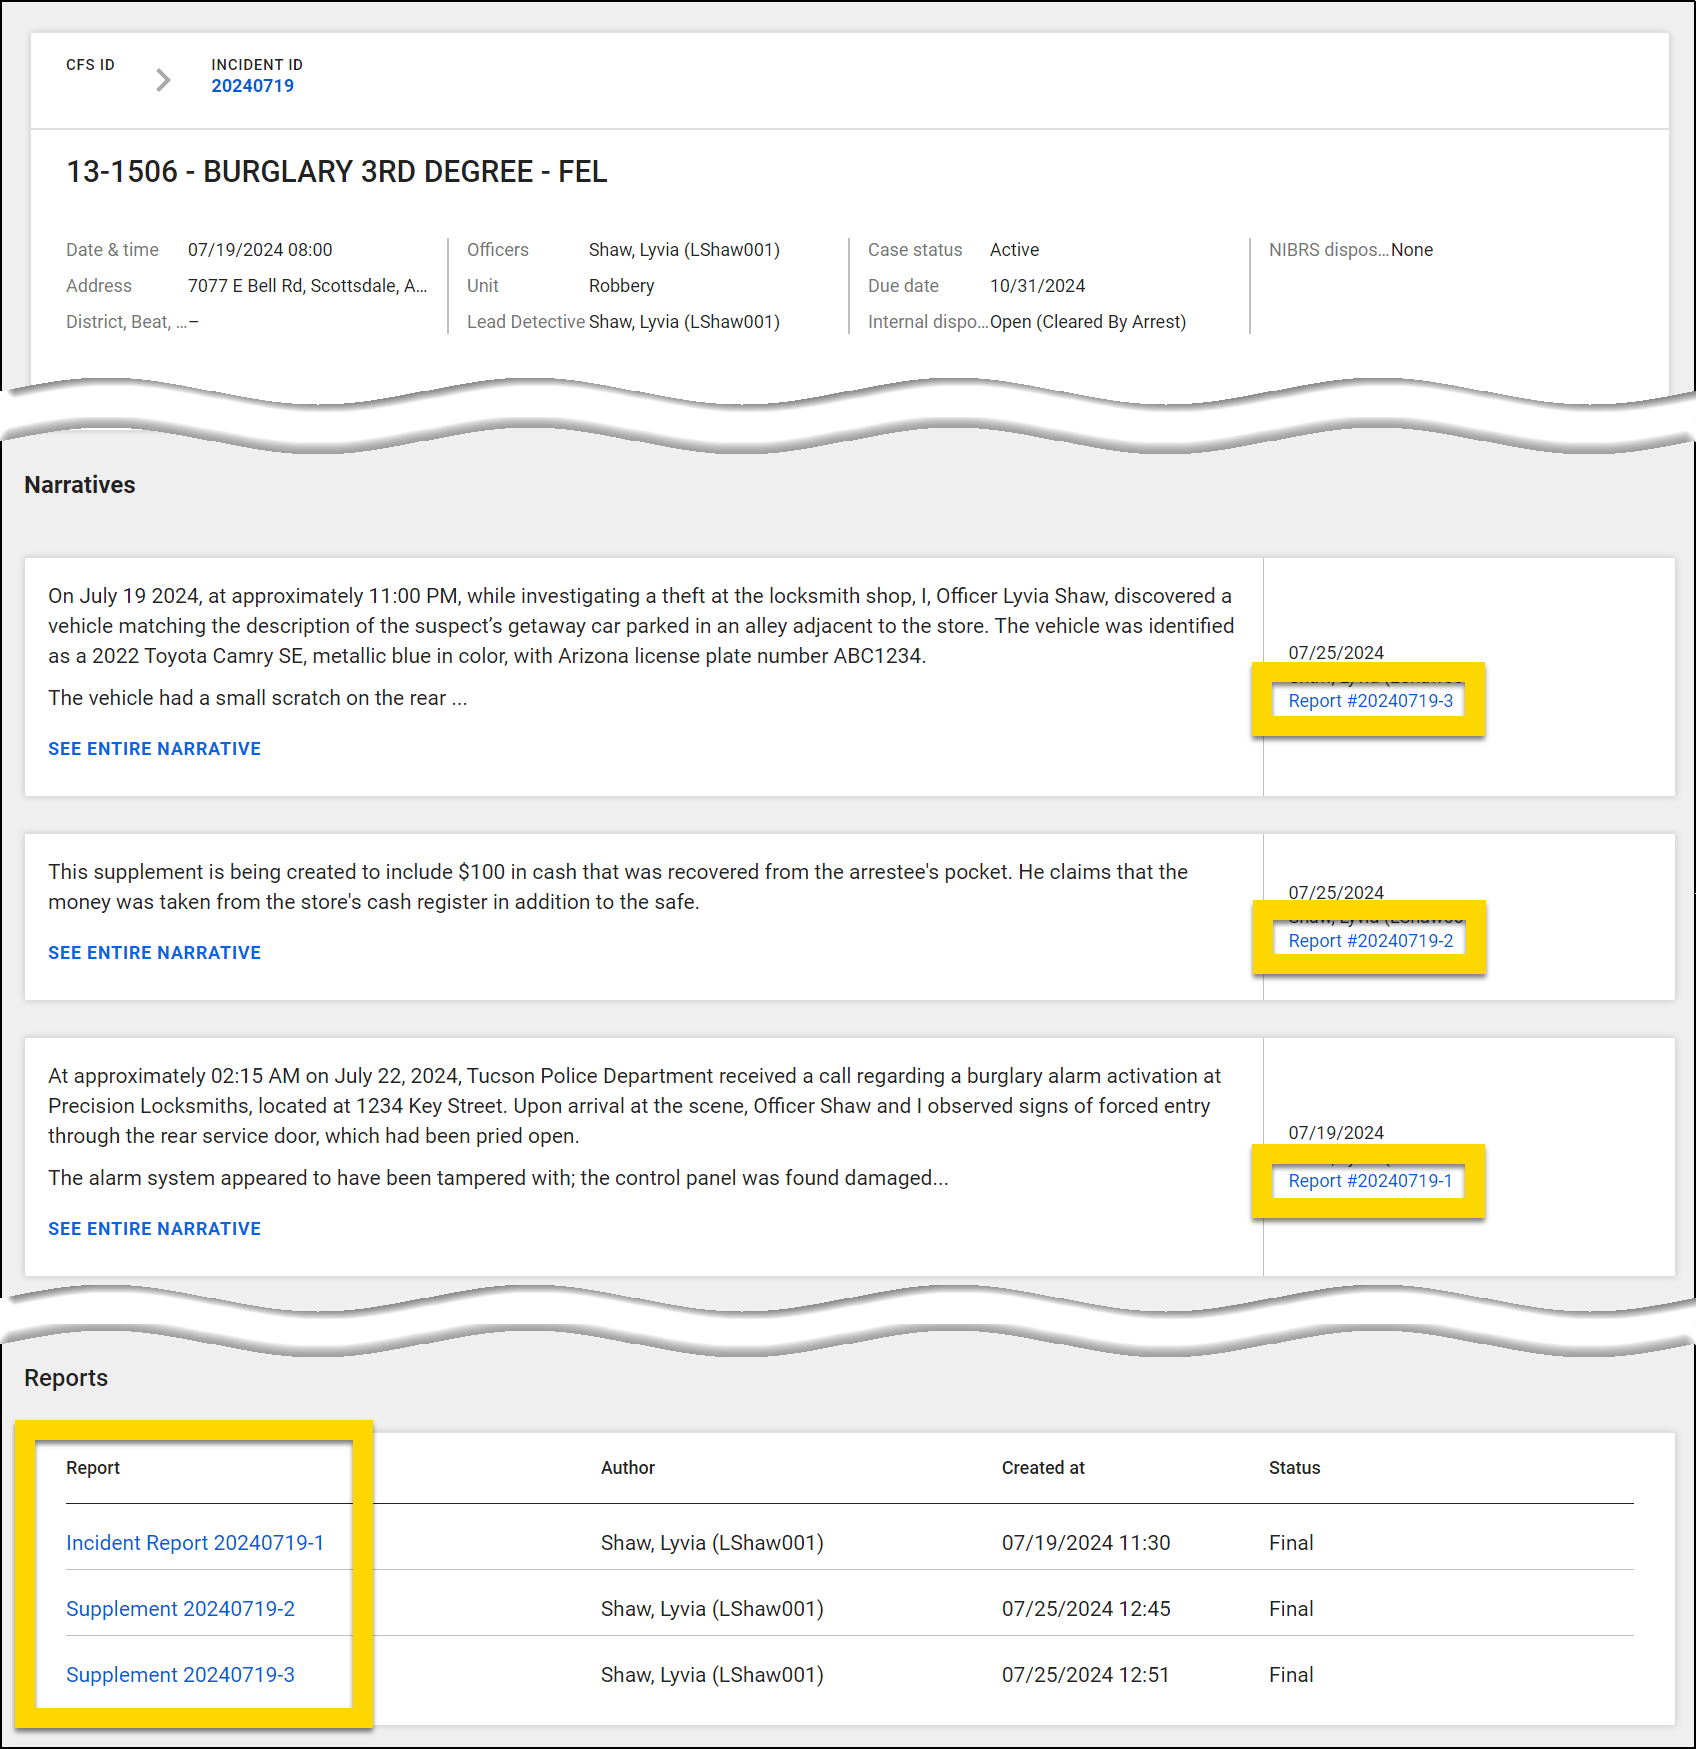
Submit collaborative reports
In Axon Records, incident reports can be edited simultaneously by multiple authors, who are called contributors. Contributors can submit their portions of the report (which are called contributions) for supervisor review without waiting for other contributors to finish their portions of the report. A supervisor can start reviewing the report even if not all users have completed their contributions.
For example, a report is being written by both Officer Shaw and Officer Mills. Once Officer Shaw submits her contribution, her supervisor can start reviewing it right away. The supervisor does not need to wait for Officer Mills to submit his contribution before beginning the review of Officer Shaw's contribution.
Once all contributions for an incident report have been approved by a supervisor, they are merged into a single report that is routed to Records Review for final approval.
The original contributor or other users can take over and edit contributions that are submitted for supervisor review. However, once a reviewer is assigned to review the contribution, it can no longer be edited.
This diagram shows the report submission and approval process with multiple contributors: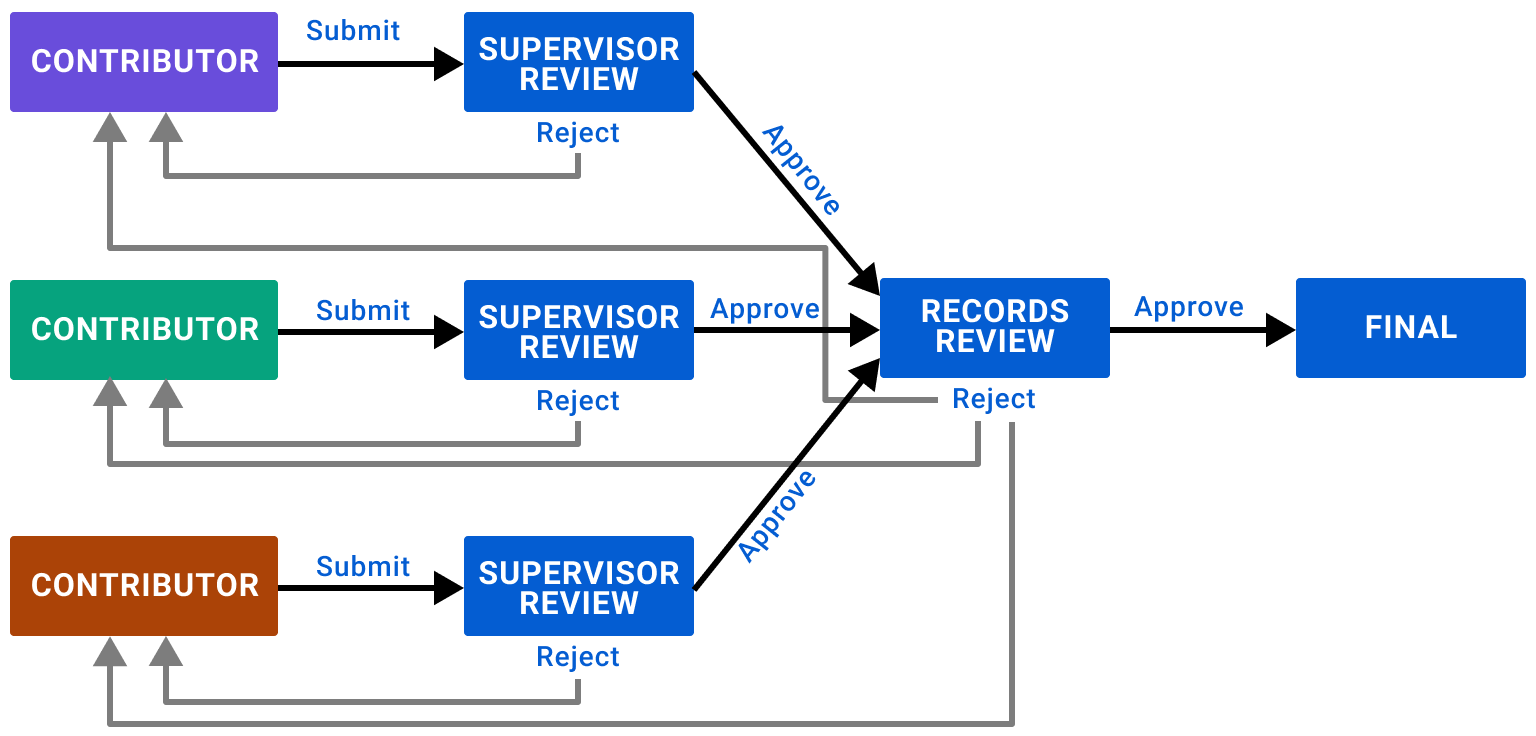
A contribution that has been reviewed and approved by a supervisor displays a green check mark. If there is no check mark, the section has not been reviewed or has been changed in a way that the contribution must go through the review process again.