Early Intervention System (EIS) Management
The EIS Management tool in the Administrator Console lets administrators create and manage the organization's alert policies and custom metrics.
Policies outline an acceptable threshold for each type of event (i.e., how many times an officer can be involved in each type of event). When officers cross that threshold, their supervisors receive an alert via email. Alerts and the subsequent actions taken after an alert is created are managed from the alert inboxes in the Early Intervention System module.
The EIS Management tool has two tabs:
- Alert Policies: Lists all policies that have been created by your organization.
- Alert policies can be based on reports or fields within reports (i.e., custom metrics).
- Custom Metrics: Lists all custom metrics that have been created by your organization.
- Custom Metrics are defined from specific fields within reports. Metrics can be added to alert policies, which determine when EIS alerts are sent.
Alert policies
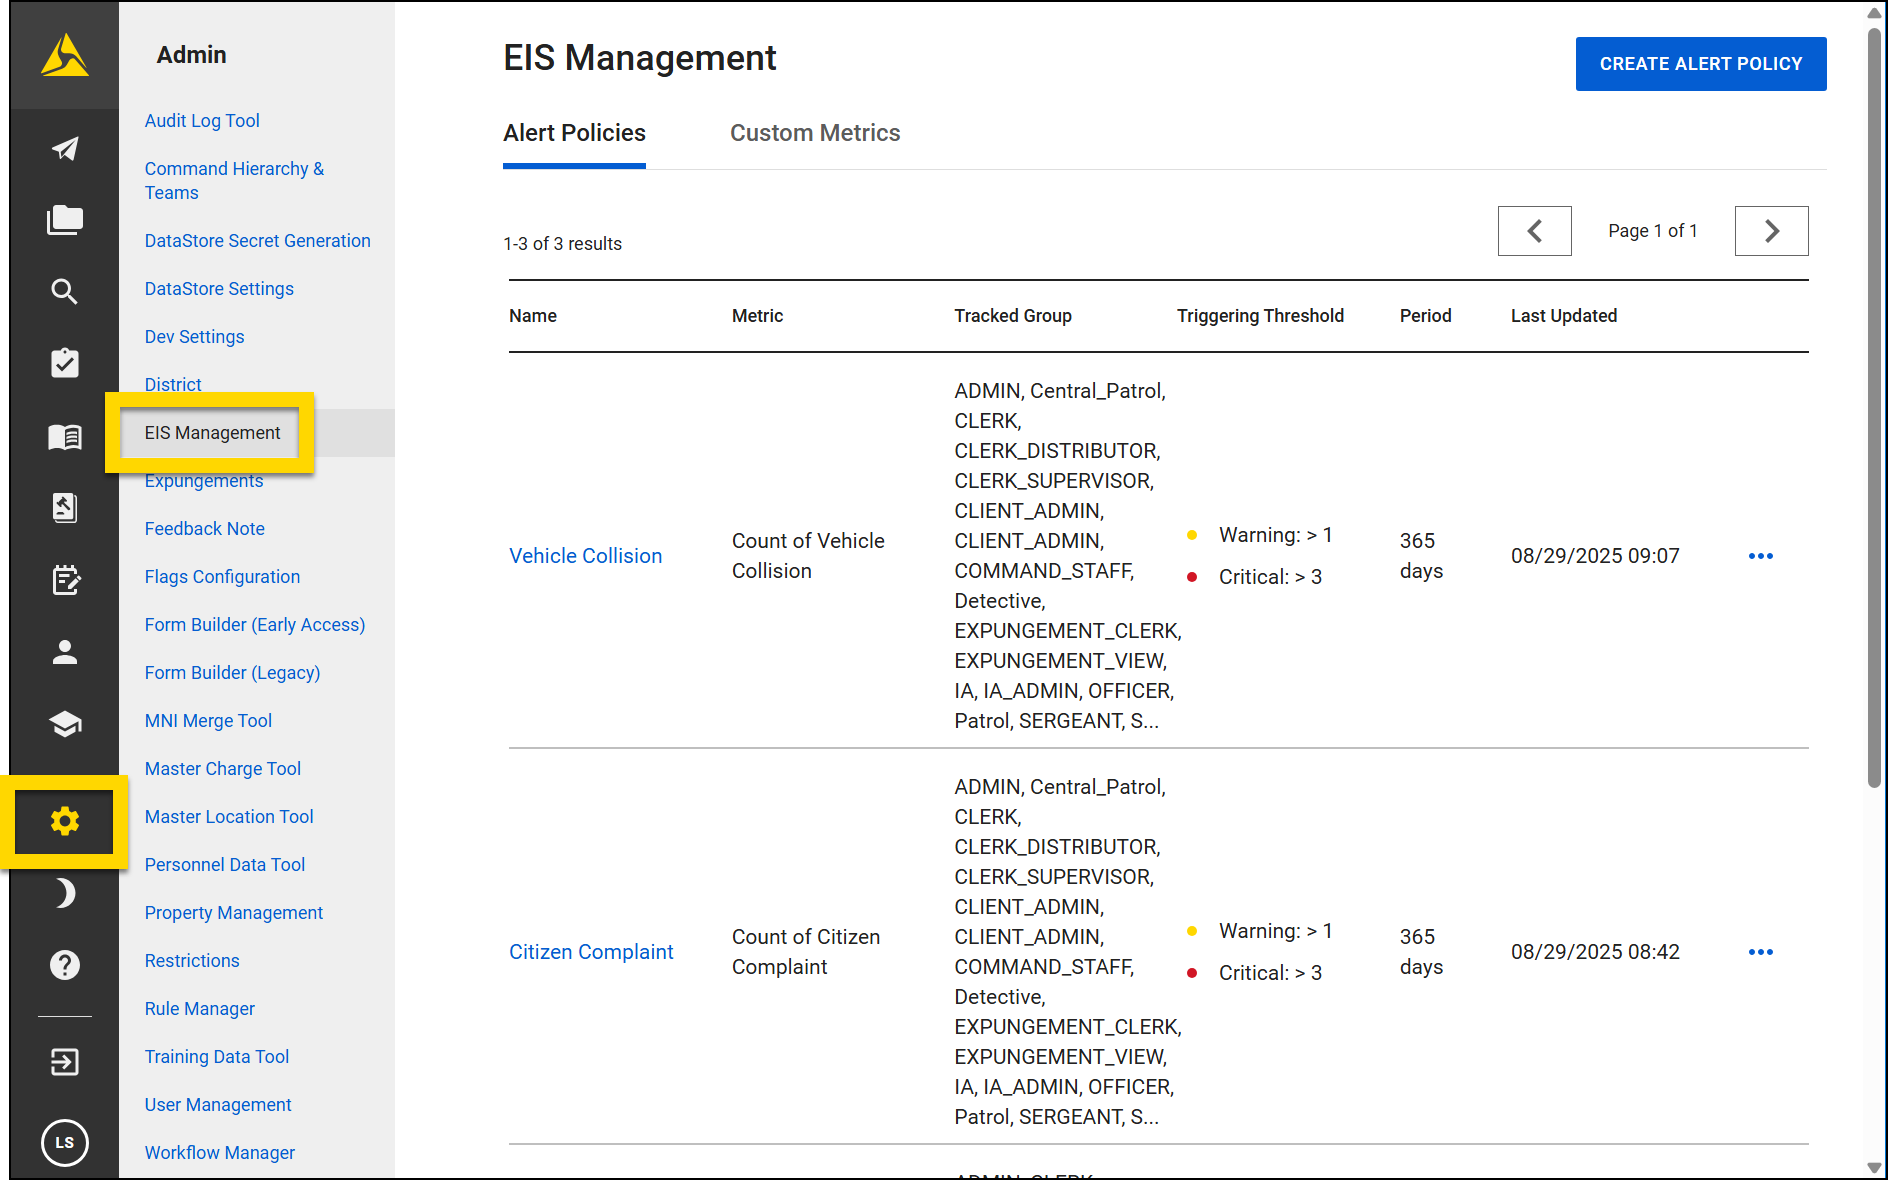
To manage your organization's Early Intervention System alert policies, open the EIS Management tool in the Administrator Console. When opened, this tool displays the Alert Policies tab, which lists all policies that have been created for your agency. Each policy displays the following information:
- Name: The policy identifier or name
- Metric: What is being counted and tracked in the policy (e.g., how many vehicle pursuits an officer is involved in)
- Tracked Group: Which individuals, Command Hierarchy groups, and/or teams are tracked by the policy
- Triggering Threshold: How many times an officer is involved in that type of event before an alert is triggered; policies can have both Warning (lower) and Critical (higher) thresholds
- Period: The metric timeframe (e.g., 90 days)
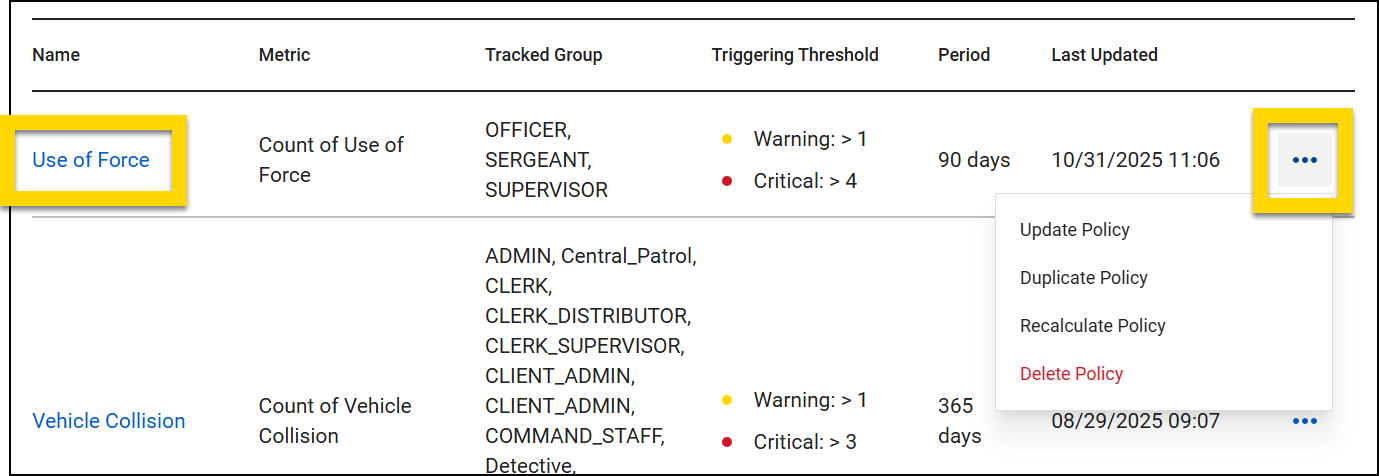
For example, your agency might have a policy related to use of force events:
- A Warning alert is triggered if an officer is involved in 1 or more use of force events within 90 days
- A Critical alert is triggered if an officer is involved in 4 or more use of force events within 90 days
This policy would appear as:
Select a policy name in the Name column to open a read-only view of the policy where you can see all details. Select More Actions [...] in any of the policy rows to:
- Update policy: Change the start date, tracked users, and alert destinations for an existing policy and recalculate to send new alerts as required.
- Duplicate policy: Duplicate an existing policy to use as a starting point rather than creating a brand-new one and edit it as necessary before publishing.
- Recalculate policy: Change the start date of an existing policy and recalculate to send new alerts as required.
- Delete policy: Deleting a policy will NOT delete any alerts that have already been sent as a result of that policy.
Create policies
To create a new policy, select Create Alert Policy and complete all the fields on each of the four subsequent screens:
- Alert details: Add the alert details, including name, metrics, time period, and thresholds.
- Tracked officers: Set which users, command hierarchy groups, and teams should be tracked by the policy.
- Alert destinations: Indicate which users, command hierarchy groups, and teams should receive alerts if a policy is triggered.
- Review and publish: Review the policy and publish.
As soon as you publish, the policy will appear in the list of policies on the Alert Polices tab and begin tracking reports, according to the dates specified on the Alert details page.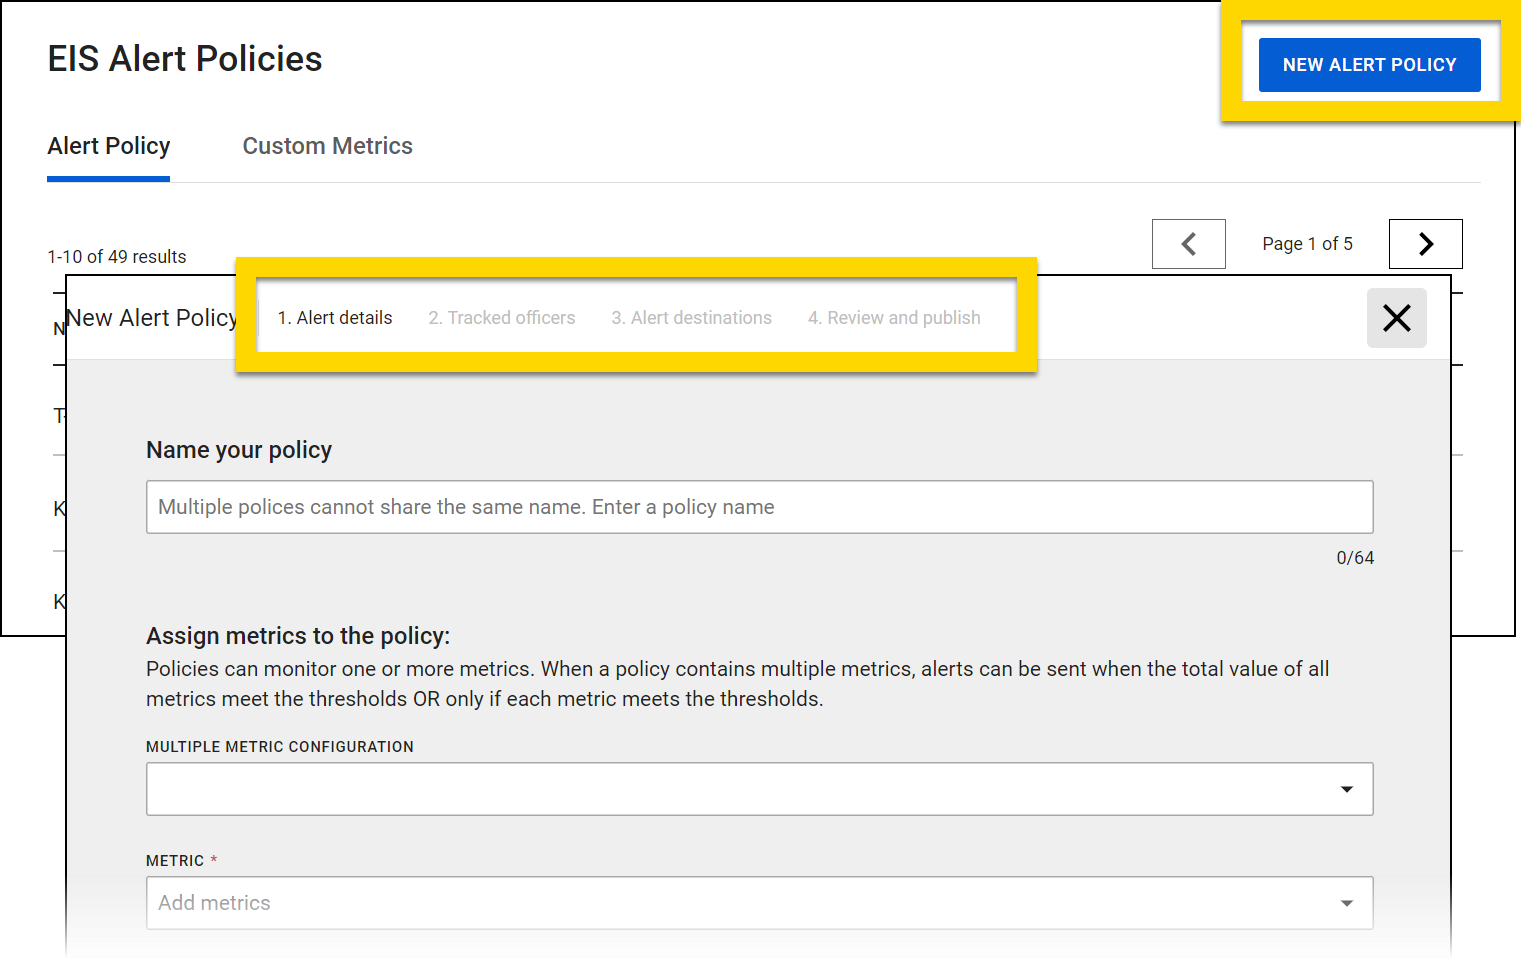
Alert details
Name
This first section of the Alert details page asks you to enter a policy name. This can't be the same as any other policy name currently in the system.
Assign metrics to the policy
This section lets you indicate which metrics the policy tracks and how occurrences are calculated. Policies can monitor one or more metrics. When a policy contains multiple metrics, alerts can be sent when the total value of all metrics meet the thresholds OR only if each metric meets the thresholds.
First, select an option in the Multiple Metric Configuration field:
- Single Metric: The policy contains a single metric. An alert is sent when the thresholds are met for this single metric.
- Multiple Metrics - Total Value: The policy contains multiple metrics. An alert is sent when the thresholds are met for the total value of all metrics.
- Multiple Metrics - All Conditions True: The policy contains multiple metrics. An alert is sent only if every metric in the policy meets the thresholds. All metrics must be associated with the same report type.
Depending on your selection in the Multiple Metric Configuration field, you can add one or multiple metrics to the Metric field. You can choose either default or custom metrics:
![]() Default metrics: Appear at the top of the list and are indicated by a form icon
Default metrics: Appear at the top of the list and are indicated by a form icon
- If a default metric is added to the policy, an alert is sent if that type of report is created more times than allowed by the policy thresholds during the policy's monitoring time period.
![]() Custom metrics: Appear in the second part of the list and are indicated by a field icon
Custom metrics: Appear in the second part of the list and are indicated by a field icon
- Custom metrics are defined from specific fields within reports. If a custom metric is added to the policy, an alert will be sent if a report with a field is filled out more times than allowed by the policy thresholds during the policy's monitoring time period.
- For more information, see Custom metrics.
Define the policy's time period
This section lets you set the timeframe during which the policy will be actively monitoring data. Alerts are sent if policy thresholds are met during this time.
There are three fields to complete in this section:
- Type. Options include:
- Rolling Time Frame: The policy will monitor reports during a repeating time frame.
- For example, if the period is 30 days, the policy will include all reports written during January 1–January 30, then January 2–January 31, then January 2–February 1, etc. These repeating time frames will continue as long as the policy is active in the system.
- Single Date Range: The policy will monitor reports during a single date range, beginning with the start date.
- For example, if the period is 30 days, the policy will only include reports that are created in the 30 days following the policy’s start date.
- Rolling Time Frame: The policy will monitor reports during a repeating time frame.
- Duration: The amount of time in the discrete or sliding window.
- Rolling Time Frame: Specify a number of days
- Single Date Range: Select month, quarter, or year.
- Start Date: The date the policy begins monitoring reports. This date can be in the past or future.
Set the policy thresholds
In this section, you can indicate how many times the metric(s) must be met during the policy time period in order for an alert to be sent. You can set both a Warning (low) and a Critical (high) threshold.
The condition is always set to Above, which means officers must exceed the number you put in the Warning and Low threshold fields. For example, entering 1 in the Warning threshold field and 2 in the Critical threshold field means that:
- A warning alert will trigger when an officer is involved in 2 occurrences of the policy metric(s).
- A critical alert will trigger when an officer is involved in 3 occurrences of the policy metric(s).
Tracked officers
Use the tabs and checkboxes to set which teams and Command Hierarchy groups the policy should track. After adding a user or group, select the arrow to expand the team/group and view all users assigned to it. If you add a team or group by mistake and need to remove it, select the X.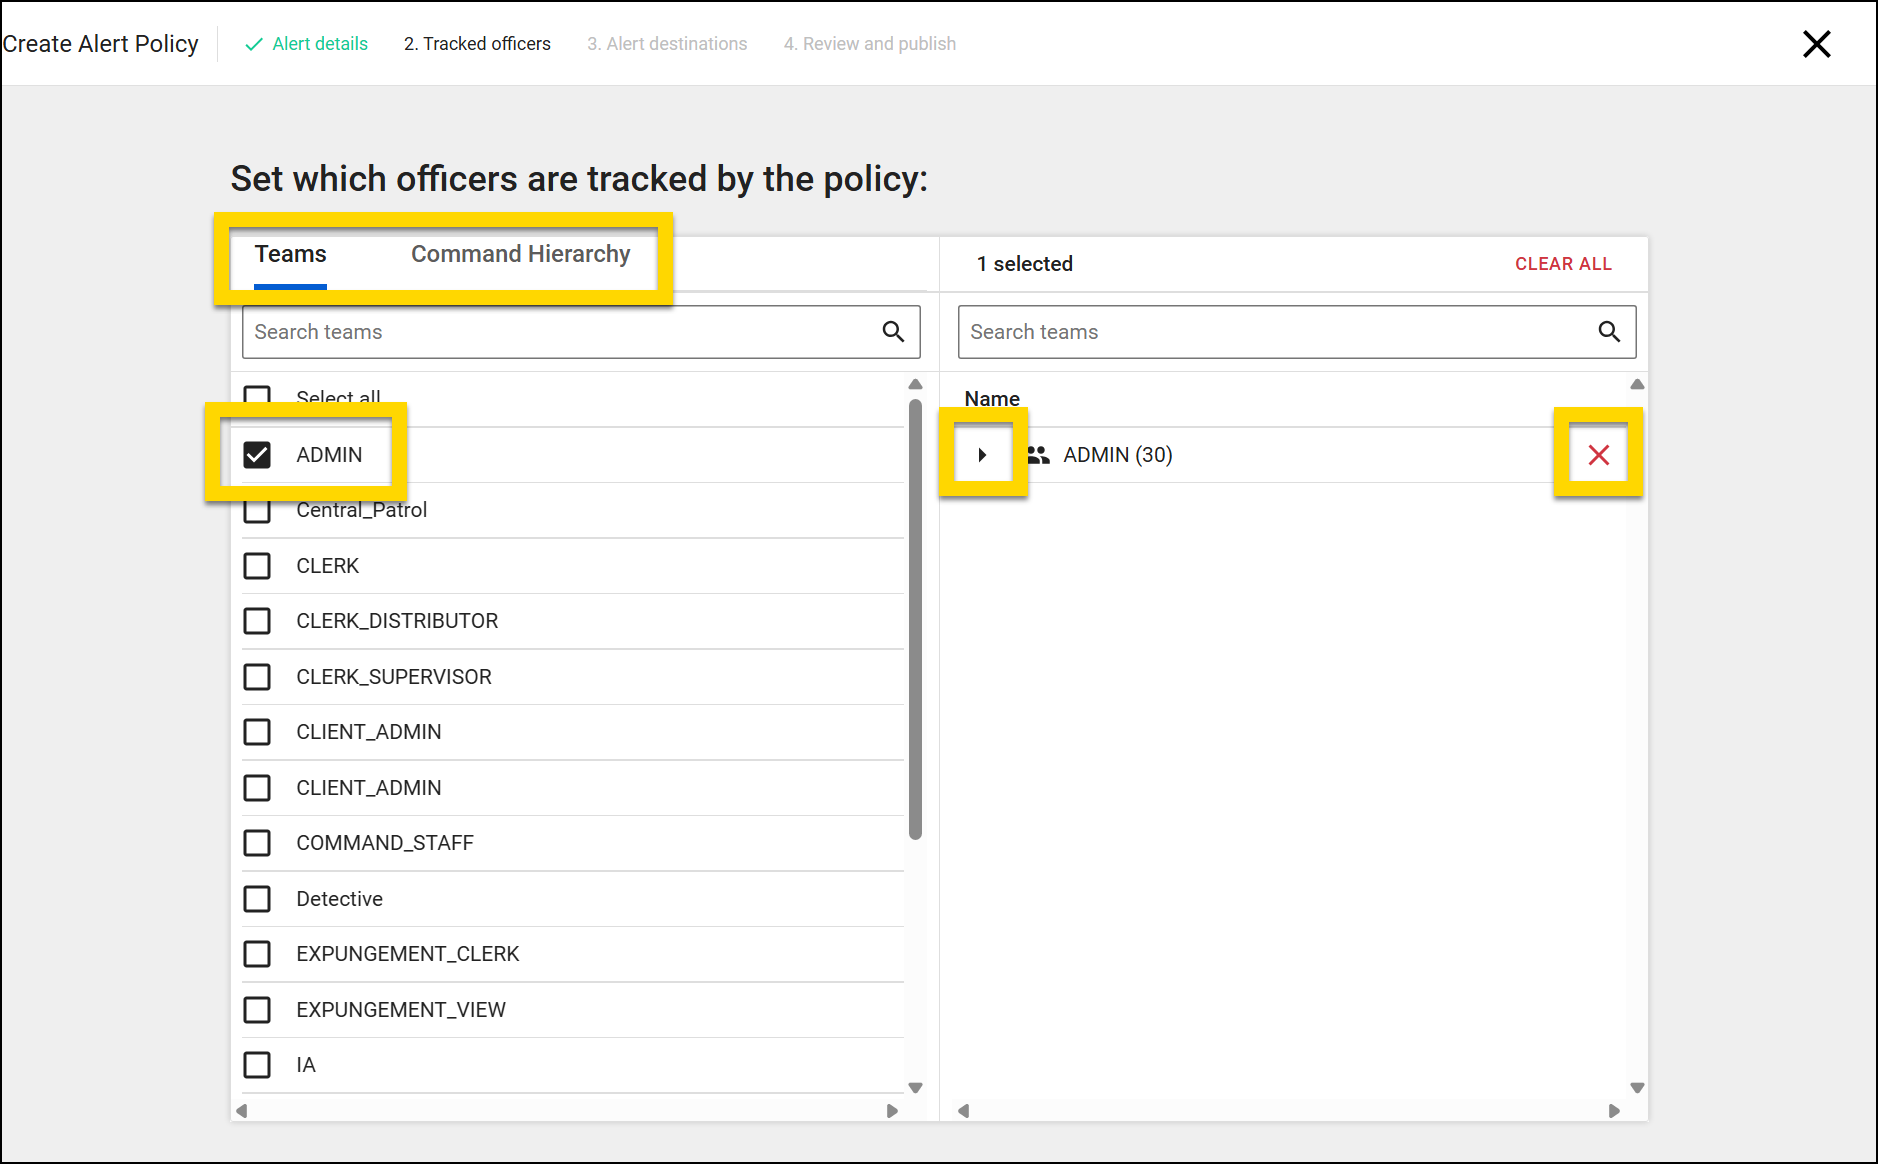
Alert destinations
Set which Command Hierarchy groups, teams, or individual users should receive an email when these alerts are triggered. Leave this field blank if you don’t want any emails sent when the alert is triggered. You can add multiple recipients and select the X to remove a recipient.
Alerts for all policies will appear in the Agency Alert inbox, regardless of the groups, teams, or users specified in this Recipients field.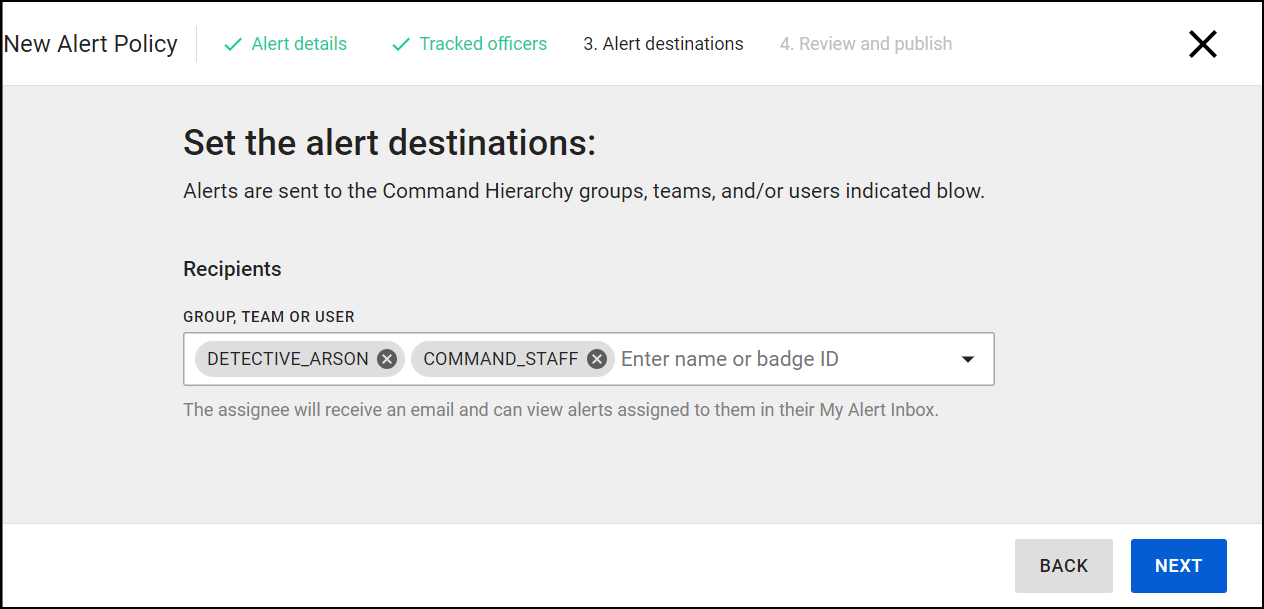
Review and publish
Review your policy. Select Back if you need to make any changes. Select Publish if all information is correct.
Once the policy is published, it will immediately begin reviewing and tracking your organization's reports, starting on the Start Date specified on the Alert details page.
Update policies
When updating a policy, you can edit the following items:
- Start date
- Tracked users
- Alert destinations
You are NOT able to update the following aspects of a policy. If you want to change these aspects of a policy, delete the policy and create a new one instead.
- Name
- Metrics
- Duration
- Thresholds
To update an existing policy:
- Select More Actions [...] > Update Policy in that policy's row on the EIS Policies tab.
- The Alert details screen is read-only, allowing you to view all details about the current policy.
- You are NOT able to update any of this information, but you will be able to update the policy start date in a later step.
- Change the tracked officers if desired and select Next.
- Change the alert destinations if desired and select Next.
- Set a new start date for the policy if desired and select Review Changes.
- The policy will review all reports starting on this date and generate alerts as appropriate.
- Review the summary of your changes. If everything looks correct, select Save and Start Recalculation.
- When you save, recalculation starts and alerts are generated immediately. This cannot be undone, so review your changes carefully before saving.
- When you save your changes, the policy recalculation begins.
- Reports for tracked officers are reviewed starting on the start date you specified (whether you left it as-is or changed it).
- New alerts are generated as required by the policy updates.
- If the original policy created an alert that is also required based on the policy updates, a duplicate alert is NOT sent.
- Existing alerts are altered or removed as required by the policy updates.
- Recalculation can take up to two minutes. You must leave the tab open while the policy recalculates.
- You can open a new tab and continue to work while you wait for recalculation to complete.
- You are NOT able to begin a recalculation on a second policy while the recalculation for the first policy is in progress. You must wait for the first recalculation to complete before starting a second one.
- If the recalculation is successful, a confirmation page summarizes when the recalculation started and completed, as well as any new or updated alerts that were generated.
Recalculate policies
To change a policy's start date only (and not the tracked officers or alert destinations:
- Select More Actions [...] > Update Policy in that policy's row on the EIS Policies tab.
- Set a new start date for the policy and select Review Changes.
- The policy will review all reports starting on this date and generate alerts as appropriate.
- Review the summary of your changes. If everything looks correct, select Save and Start Recalculation.
- When you save, recalculation starts and alerts are generated immediately. This cannot be undone, so review your changes carefully before saving.
- When you save your changes, the policy recalculation begins.
- Reports for tracked officers are reviewed starting on the start date you specified (whether you left it as-is or changed it).
- New alerts are generated as required by the policy updates.
- If the original policy created an alert that is also required based on the policy updates, a duplicate alert is NOT sent.
- Existing alerts are altered or removed as required by the policy updates.
- Recalculation can take up to two minutes. You must leave the tab open while the policy recalculates.
- You can open a new tab and continue to work while you wait for recalculation to complete.
- You are NOT able to begin a recalculation on a second policy while the recalculation for the first policy is in progress. You must wait for the first recalculation to complete before starting a second one.
- If the recalculation is successful, a confirmation page summarizes when the recalculation started and completed, as well as any new or updated alerts that were generated.
Custom metrics
Custom metrics are defined from specific fields within reports and can be added to alert policies, which determine when EIS alerts are sent.
To view your agency's custom metrics, open the Administrator Console, select EIS Alert Policies, and switch to the Custom Metrics tab.
Basic information about each metric is displayed in the table, including its name, the form it is associated with, the type of field that is used in the metric, and when it was created.
Select a metric name to view additional information about it.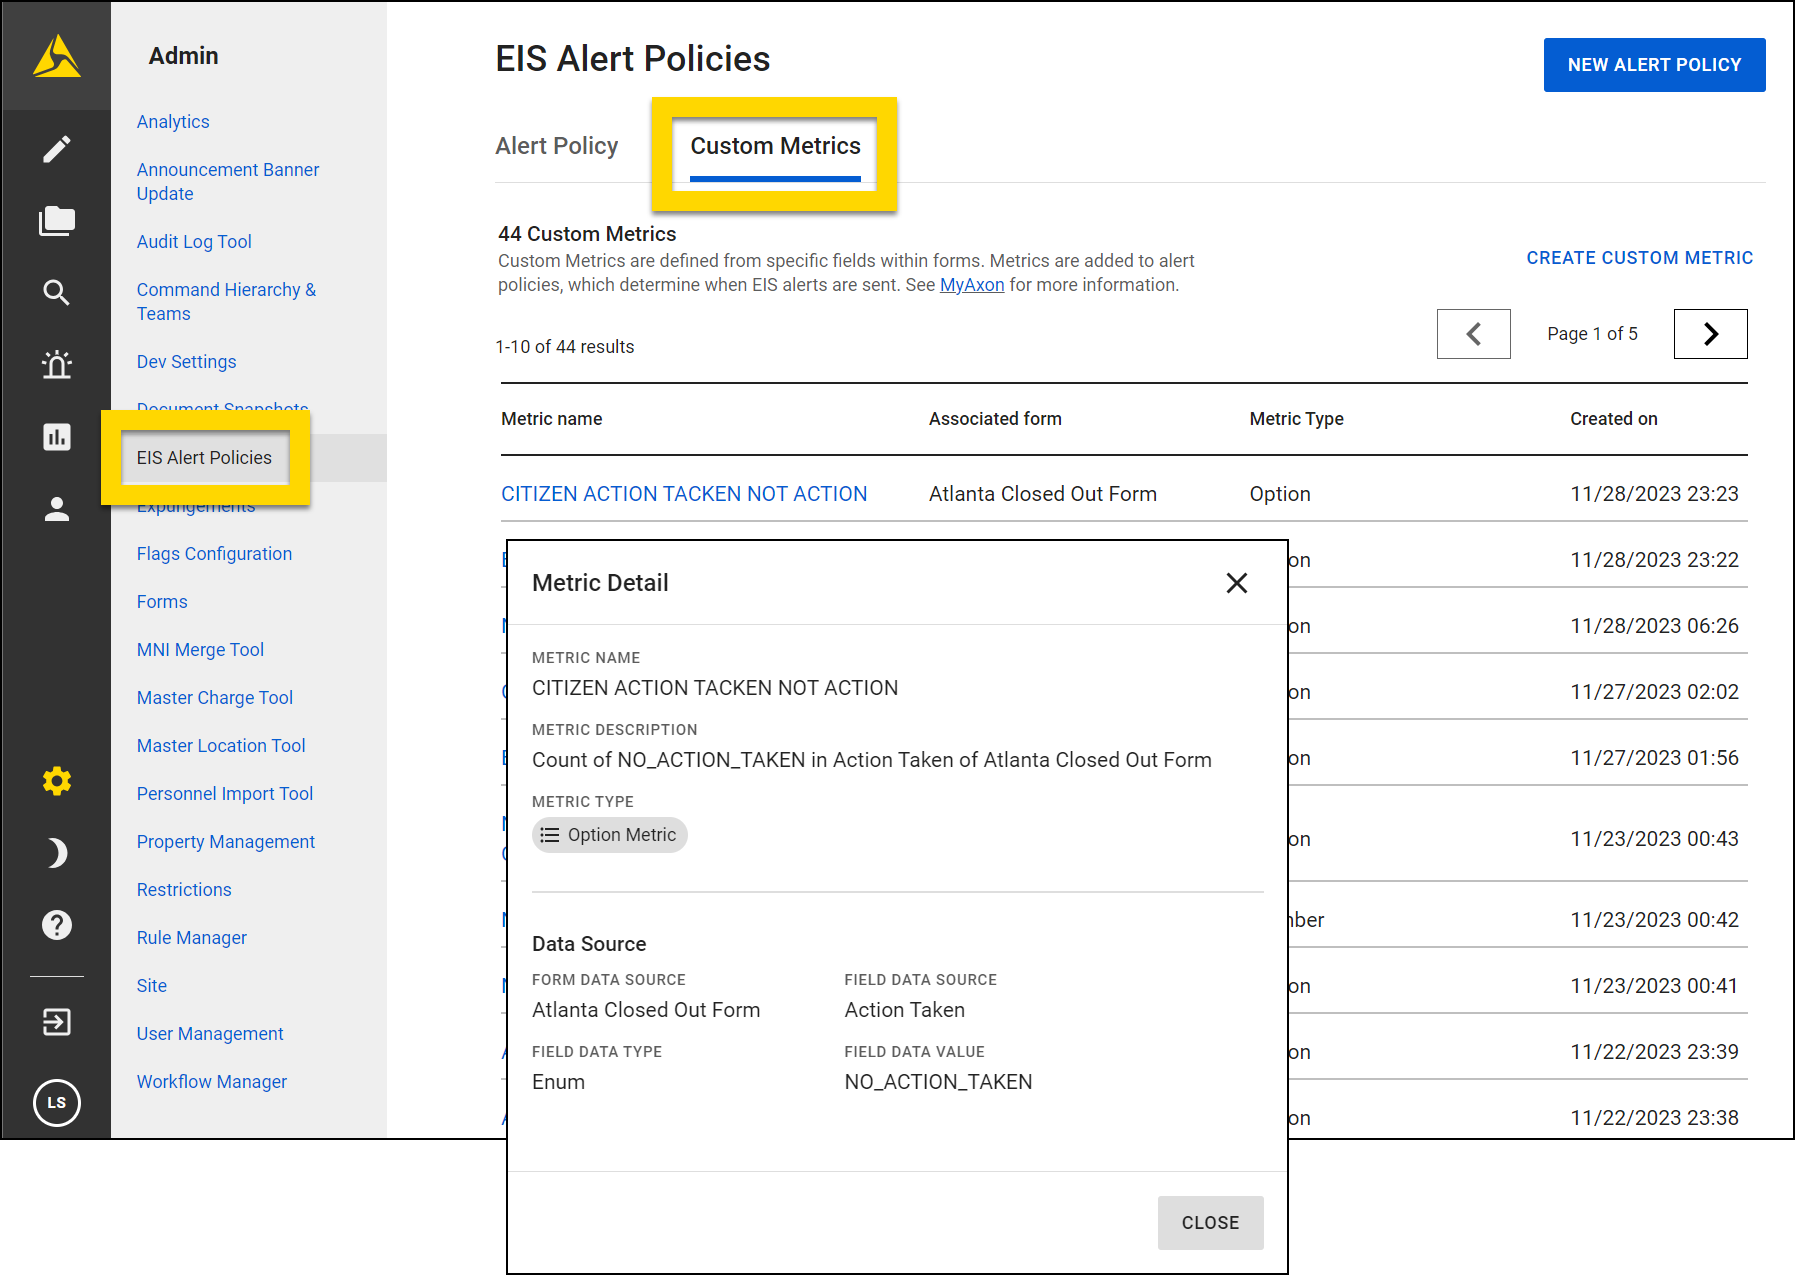
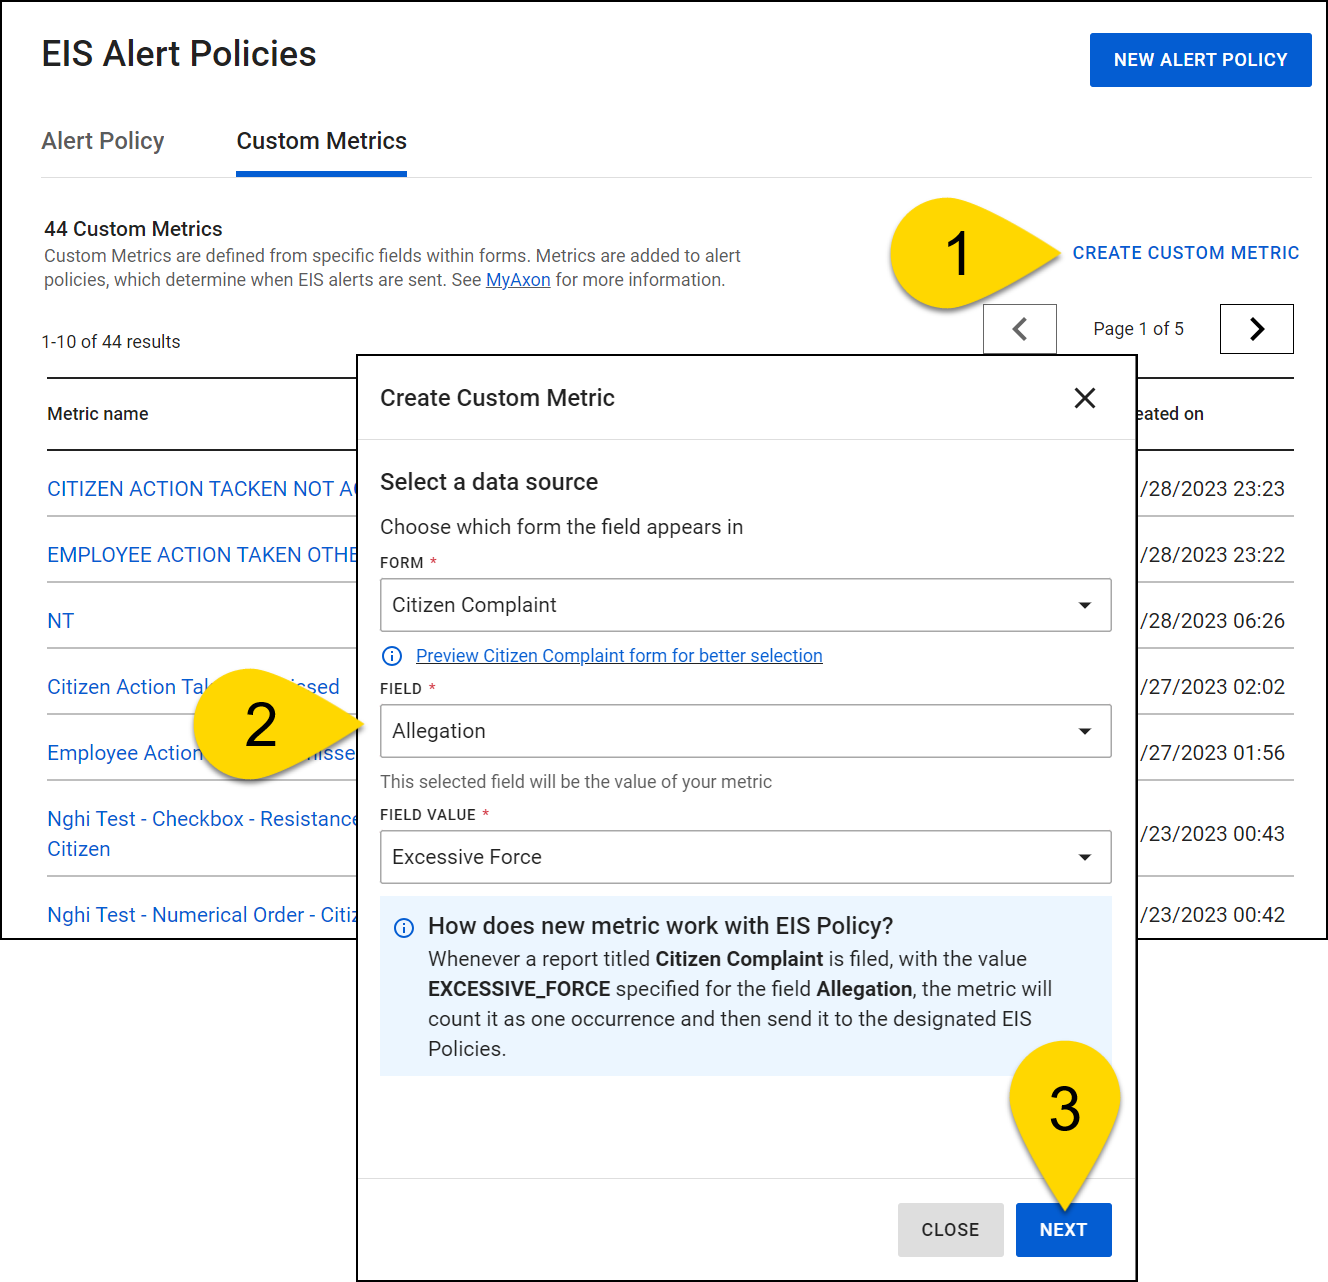
To create a custom metric:
- Select Create Custom Metric.
- Select the data source for the metric, including the report that contains the field, the field name, and the field value.
- For example, if you select Form: Citizen Complaint, Field: Allegation, and Field Value: Excessive Force, whenever a Citizen Complaint report is created and Excessive Force is selected in the Allegation field, it will count as one occurrence of this metric.
- Reports contain two different field types, option and number. Metric occurrences are calculated differently for each field type. For more information, see Field types.
- Select Next.
- Enter a metric name. Metric names must be unique to ensure the correct metric is added during alert policy creation.
- Select Next.
- Review the metric carefully. After a metric is created, it can't be edited or deleted.
- If all information is correct, select Create Metric.
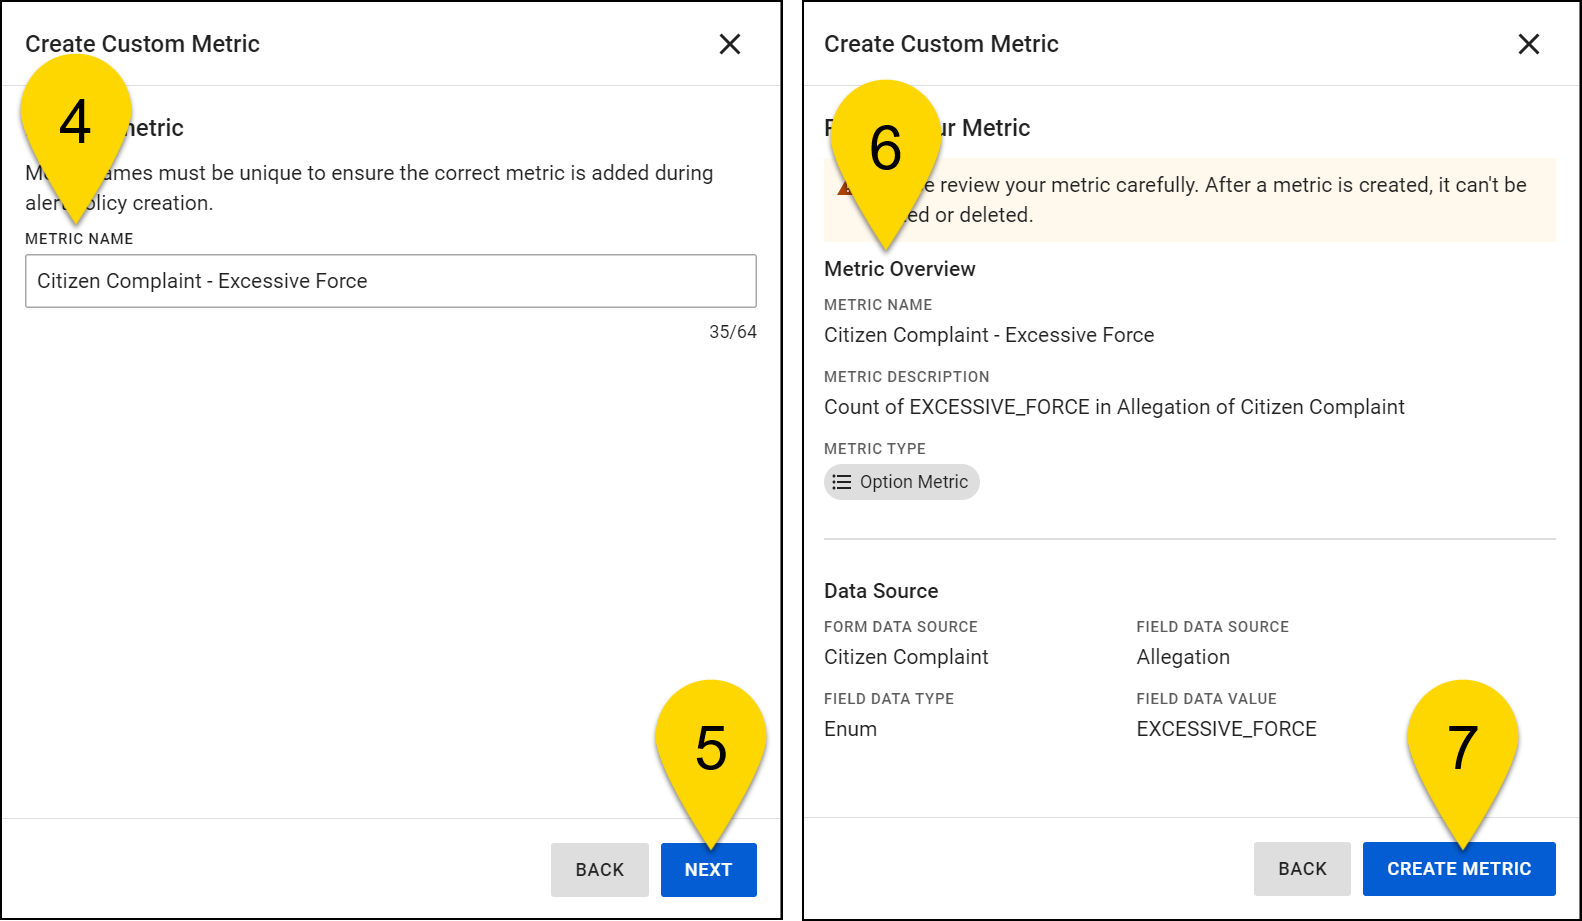
- The new metric will appear on the Custom Metrics tab and will appear in the list of available metrics during alert policy creation.
Field types
Reports contain two different field types, and metric occurrences are calculated differently for each field type.
Option
Option fields include dropdown menus or sets of checkboxes. When the field value indicated in the custom metric is selected for the field, the metric occurrence will be 1.
For example, the Allegation field in the Citizen Complain report is a dropdown menu that includes an Excessive Force option. If this option is selected in a report, and a custom metric is created tracking this field, one occurrence of the metric will be recorded for this field.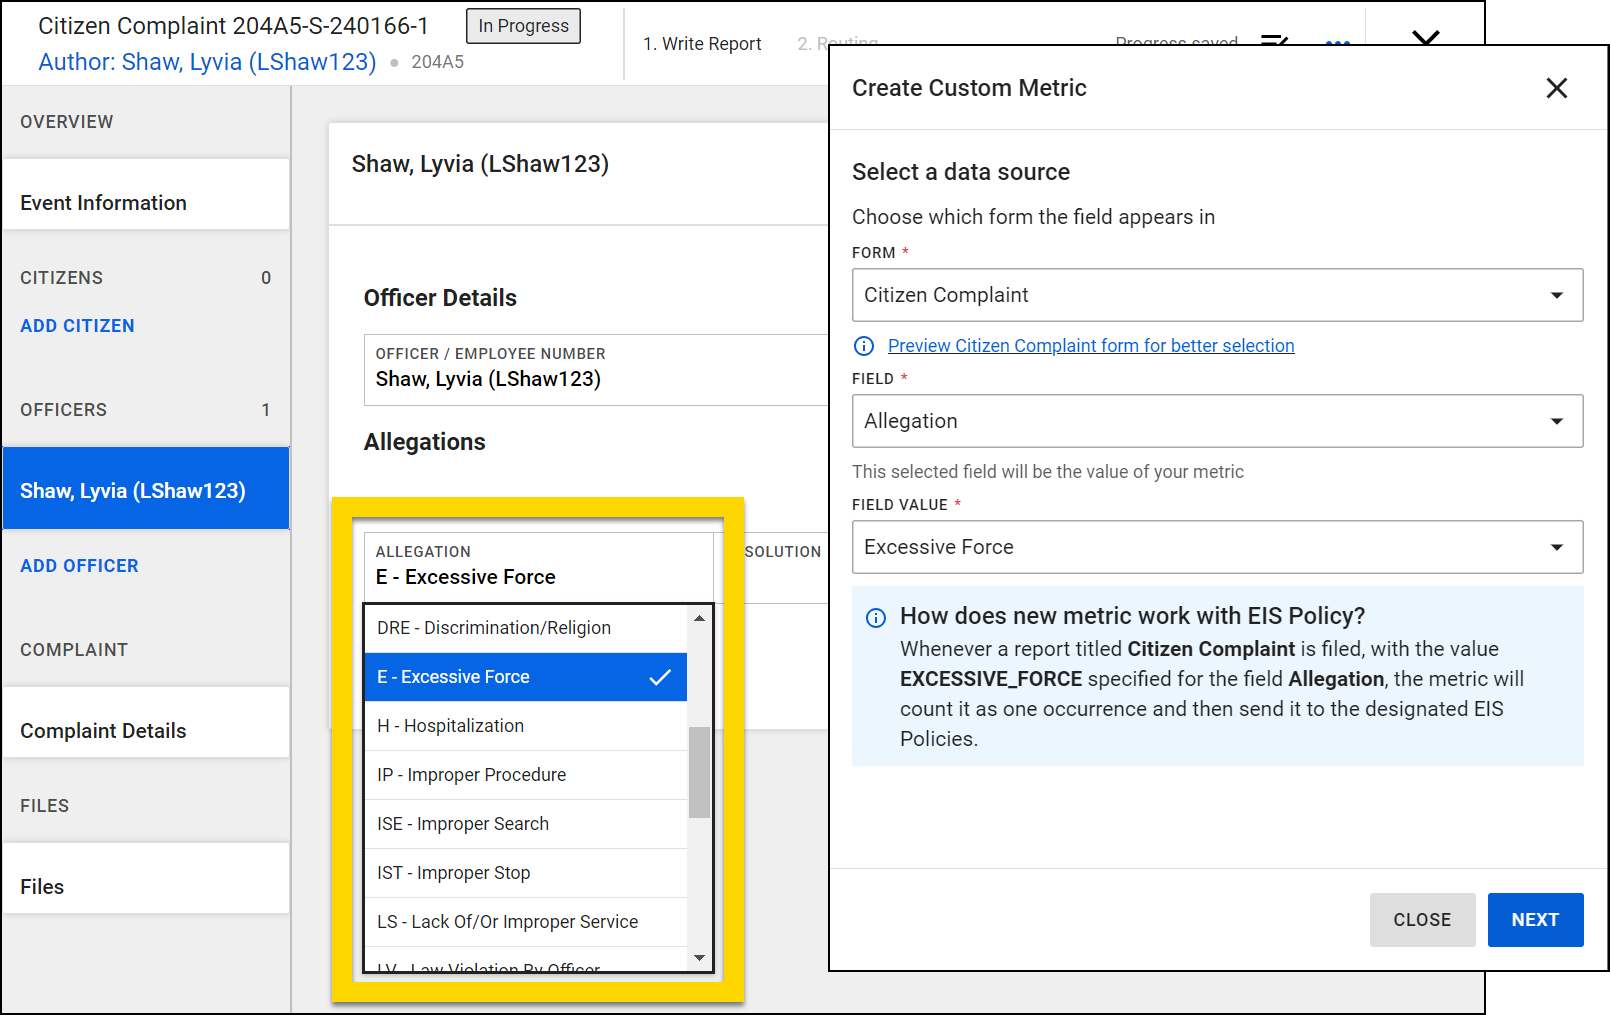
Similarly, the Resistance level section in the Response to Resistance report contains a set of checkboxes that include Defensive. If the Defensive checkbox is selected in a report, and a custom metric is created tracking this field, one occurrence of the metric will be recorded for this field.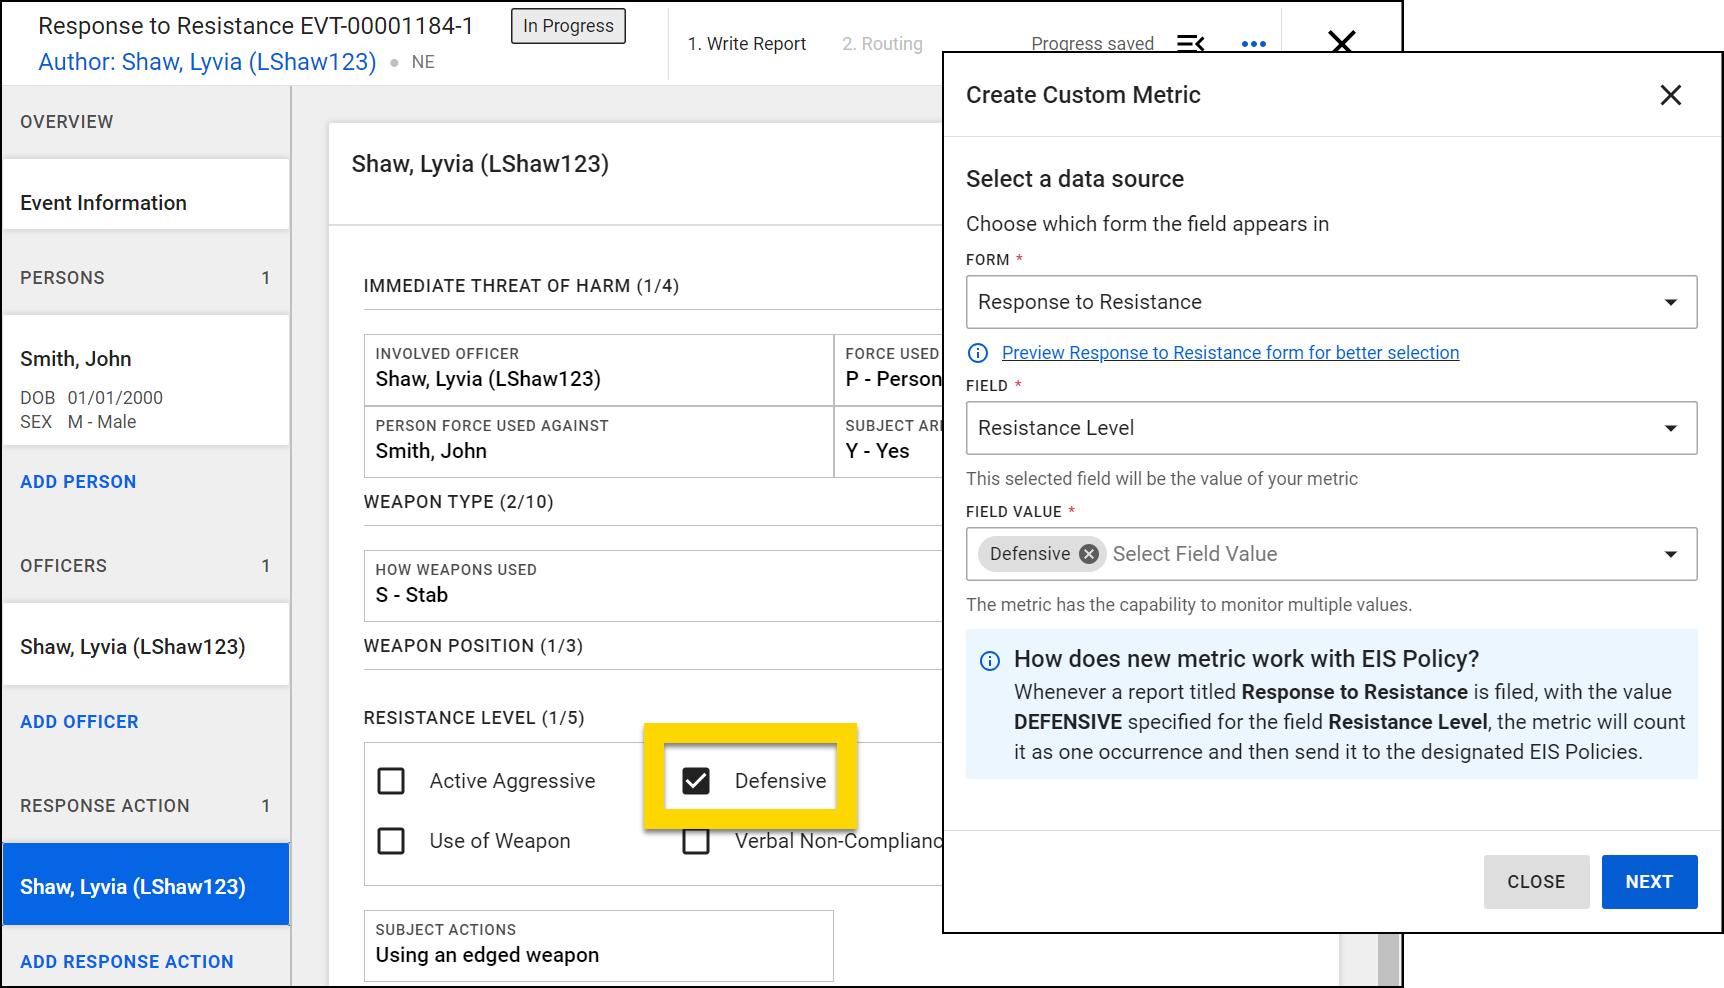
Number
Number fields are completed by entering a number in the field. The number entered in such fields becomes the number of occurrences for the metric.
For example, the Pursuit Distance (MI) field in the Vehicle Pursuit report lets users enter a number. If this report is created and "25" is entered in this field, and a custom metric is created tracking this field, the metric occurrence will be 25.