DOCX templates
The features explained in this article are only available for Axon employees and do not appear in Form Builder.
Contact your Axon representative if your organization needs new or updated print templates.
Agency templates are print templates that use custom layouts, as defined by a PDF or DOCX template, which is uploaded to Form Builder. PDF files are best for simple printouts that don’t require custom formatting. DOCX files are best for more complex printouts with complex formatting.
Follow these steps to create a new agency print template from a DOCX:
- Create a DOCX template.
- Upload DOCX template.
- Publish the form.
Create DOCX templates
Before uploading a DOCX template to Form Builder, you must first create that template using a MS Word. If your agency gave you a template, you can use that as a starting point for your mappings. Otherwise, you can use this downloadable template and update as appropriate for your agency’s needs.
When creating a DOCX template, keep the following in mind:
Use curly brackets to indicate data mappings
Text surrounded by curly brackets {} indicate data mappings, which are composed of references to metadata fields, Data Paths, or supported expressions.
When a report is printed using the DOCX template, all curly bracket mappings will be replaced with data that was entered into the report. Any text not surrounded by curly brackets {} will print exactly as it is entered on the template. See the DOCX Mappings section of this article for more information.
All syntax used in PDF templates can also be used in DOCX templates
See the DOCX Mappings section of this article for more information about how to create the template. See the Syntax Guide for the full list of supported syntax.
All text formatting will appear in the final printout
Text formatting (bold, italics, text color, text size, etc.) is preserved and will appear in the final printout. Mappings will also print as formatted in the template.
All spaces (line breaks and spaces between characters) in the DOCX template will be preserved.
If a mapping at the bottom of a page references report data that flows to multiple lines, the lines will flow to the bottom of the page and continue onto the next.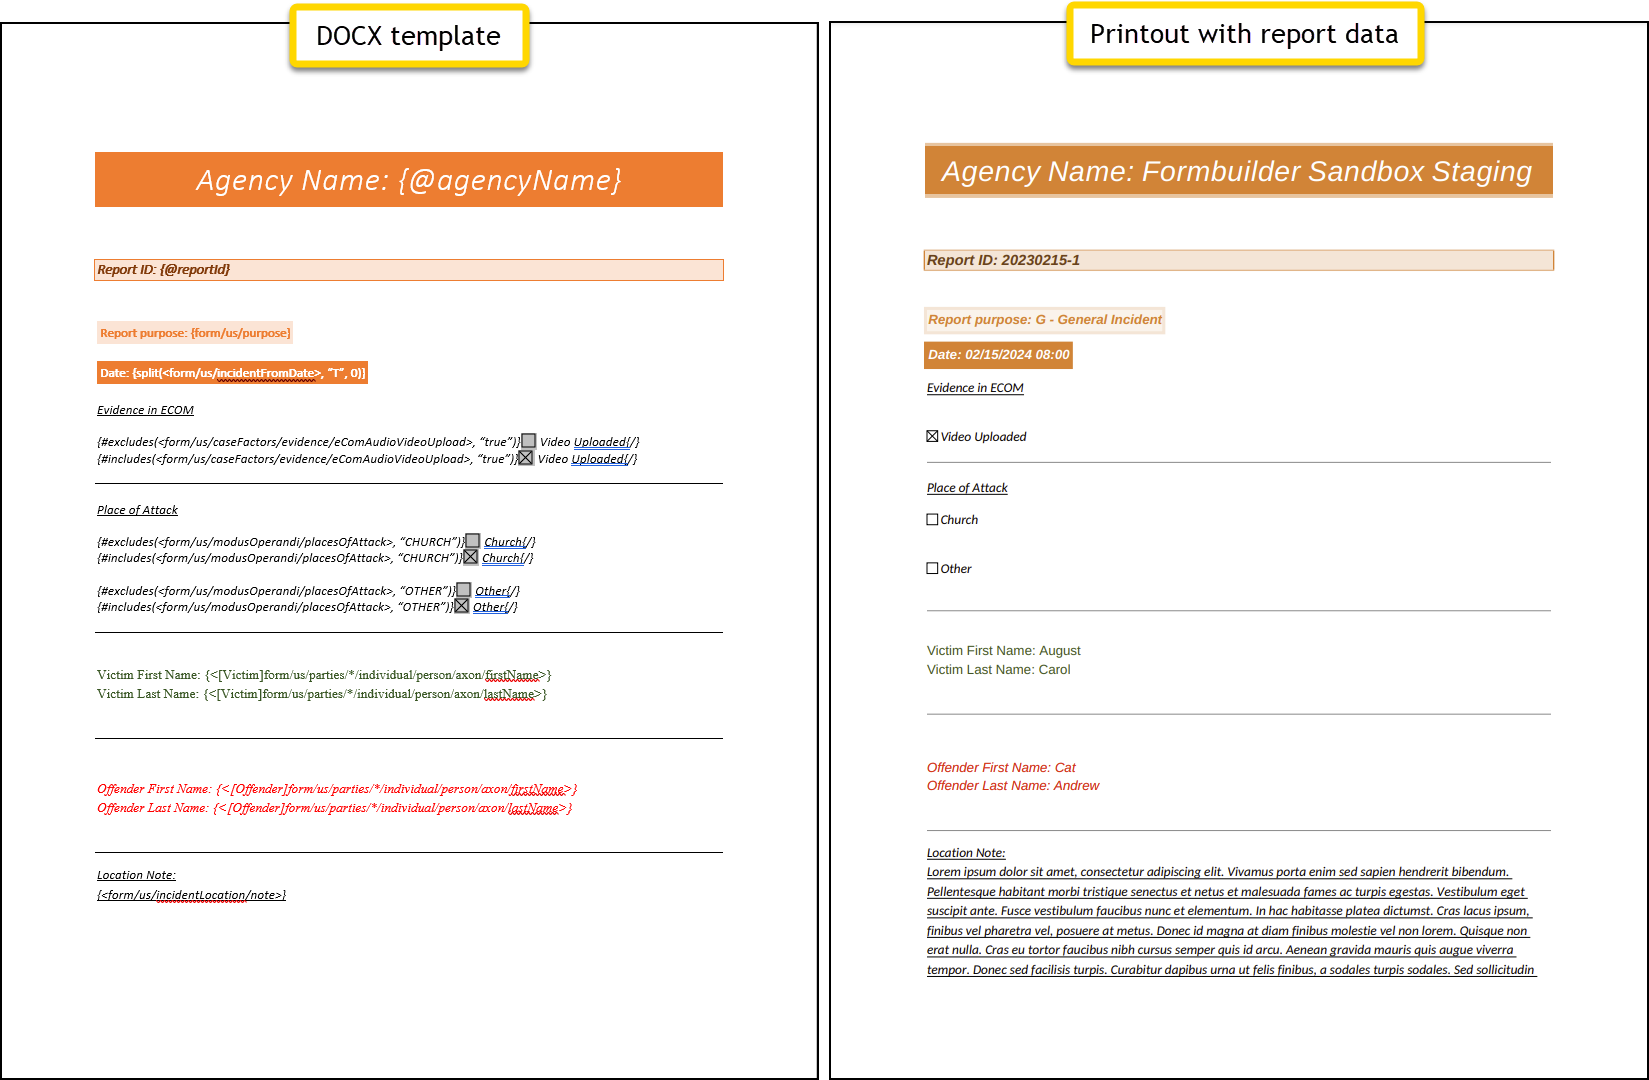
DOCX Templates result in PDF printouts
When an end user prints a report that is based on a DOCX template, the output is a PDF document that opens in a new browser tab. This PDF is not editable.
Once your DOCX template is created and formatted as desired, you can open Form Builder and upload it.
Upload DOCX templates
To upload a DOCX template:
- Open the Administrator Console by selecting the gear icon.
- Select Form Builder (Legacy).
- Go to the Records, Standards, or Subforms tab, depending on which form/subform and its associated print templates you want to view.
- Select the blue form name that is associated with the print templates you want to edit.
- When the form opens, select More actions [...] > Edit print templates.
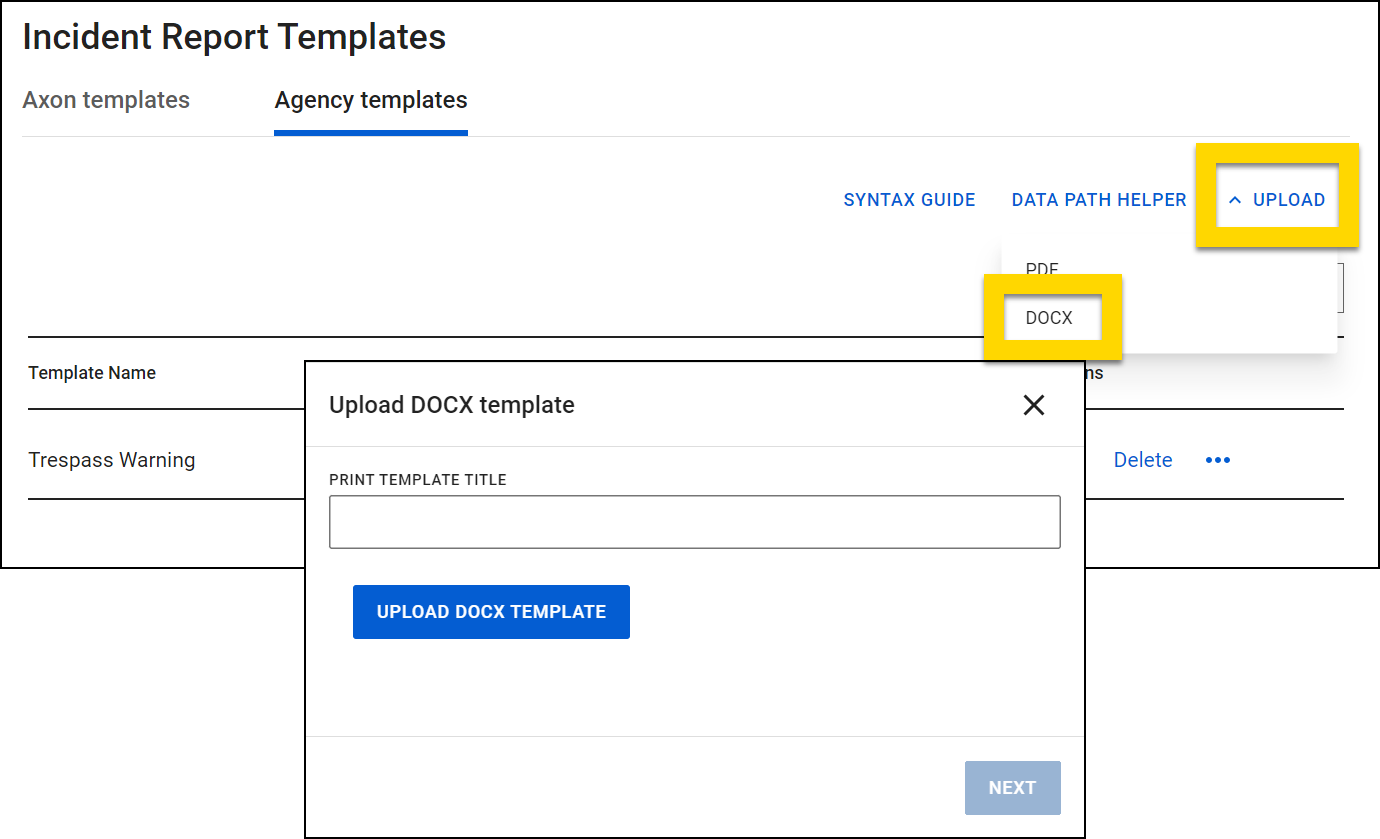
- Switch to the Axon templates tab.
- Select Upload > DOCX.
- Name the template, select Upload PDF, and select the PDF template file from your computer.
- Print template names must be unique; you cannot create multiple print templates for the same form that have the same name.
- Select Next.
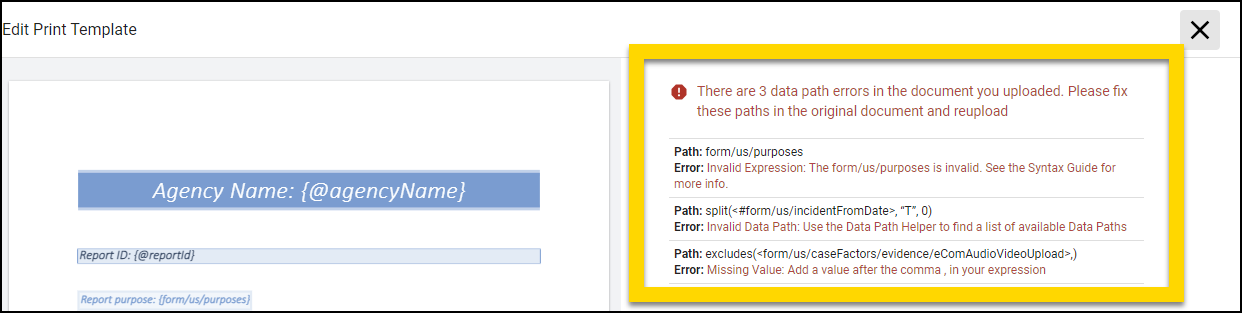
- If you made any errors when typing Data Paths or creating expressions, a list of errors will appear. You can’t fix these errors from within Form Builder. Instead, fix the errors in your DOCX template file, save it, and then re-upload it to Form Builder.
- Select an entity type for each mapping group you included in your template.
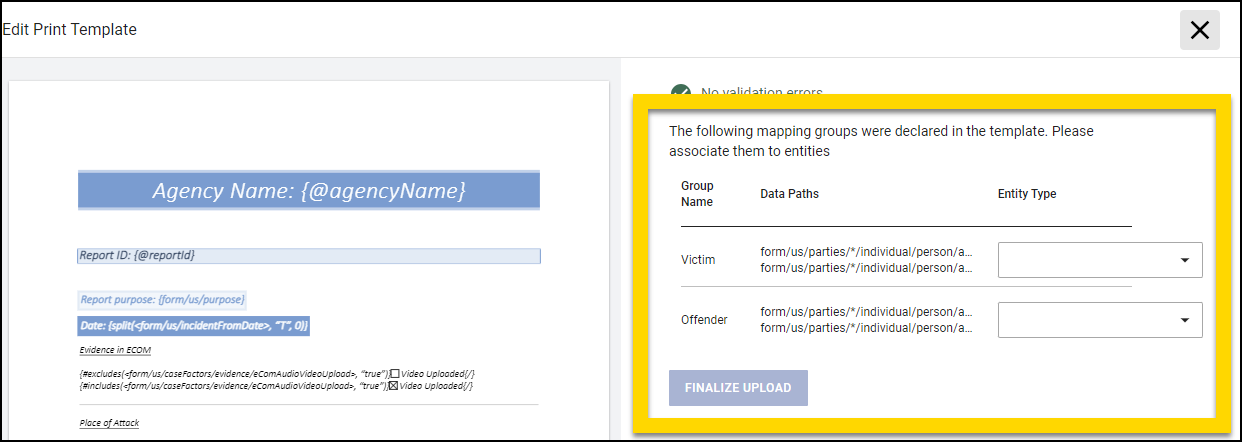
- To preview the template and make sure it prints as expected, select Test Print.
- Select Finalize upload if the template uploads without errors and is ready to be published.
If you later need to update a print template you have already uploaded, you can select More actions [...] .
Publish forms
Once you have finalized the upload of your DOCX template, take these steps:
- Select Go back to return to the form editing page.
- Select Publish form to publish the form associated with your template.

Edit templates
If you later need to update a print template you have already uploaded, find the template on the Agency templates tab and select Edit. When the Edit Print Template page loads, select Re-upload template and choose your updated template file.
DOCX Mappings
To indicate which fields in a report should print data to which fields in the print template, you must create mappings. Unlike PDF templates, mappings for DOCX templates are created in the template file itself rather than from within the Edit Template tool in Form Builder.
Mappings can incorporate the following elements:
- Metadata fields, data paths, and expressions
- Mapping groups
- Checkboxes
Metadata fields, data paths, and expressions
To directly print a metadata fields and or single data paths, enclose the mapping in curly brackets {}:
- Metadata mapping:
{@agencyName} - Data path mapping:
{form/us/purpose}
You can use expressions to manipulate report data into a desired format, the same as you would in PDF templates. Expressions added to DOCX templates should also be enclosed in curly brackets {}:
See the Syntax Guide for the full list of supported syntax for expressions.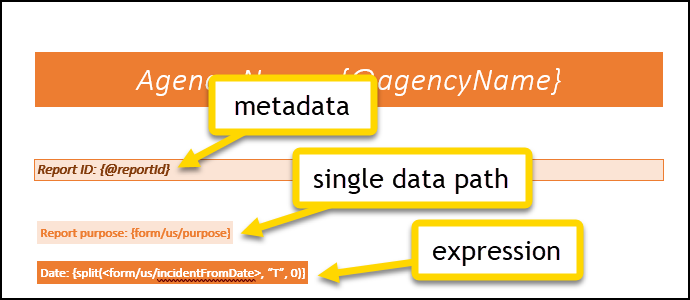
Header/Footer Mappings
Mappings within the DOCX template's header or footer will only work if the same mapping has been used elsewhere in the template. If such mapping doesn't exist, as a workaround, create the same mapping somewhere in the document and format it to be in white font and a very small font size. In this way, the mapping appears in the template but is "invisible".
Mapping groups
If the Data Path in your template is associated with an entity (e.g., person, vehicle, property), you should add additional text to indicate that the field is part of a mapping group. See Mapping groups for more information.
Checkboxes
To use checkboxes in DOCX templates:
- Follow the instructions in the contains/omits syntax guide to create two contains or omits expressions.
- Checkboxes in DOCX templates require two mappings per checkbox: one mapping indicates when the box should be checked and the other indicates when it should not be checked.
- The use of "true" and "false" in these mappings indicate whether the box should be checked or not.
- Enclose the expressions in curly brackets
{} - Add
#after the opening curly bracket{ - After the closing curly bracket, add the checkbox.
- After the checkbox, type a forward slash enclosed in curly brackets
{/}
Examples
If your printout includes the following mappings, it will print as pictured below:
{#contains(<form/us/caseFactors/evidence/eComAudioVideoUpload>, "false")}☐ Video Uploaded{/}{#contains(<form/us/caseFactors/evidence/eComAudioVideoUpload>, "true")}☑ Video Uploaded{/}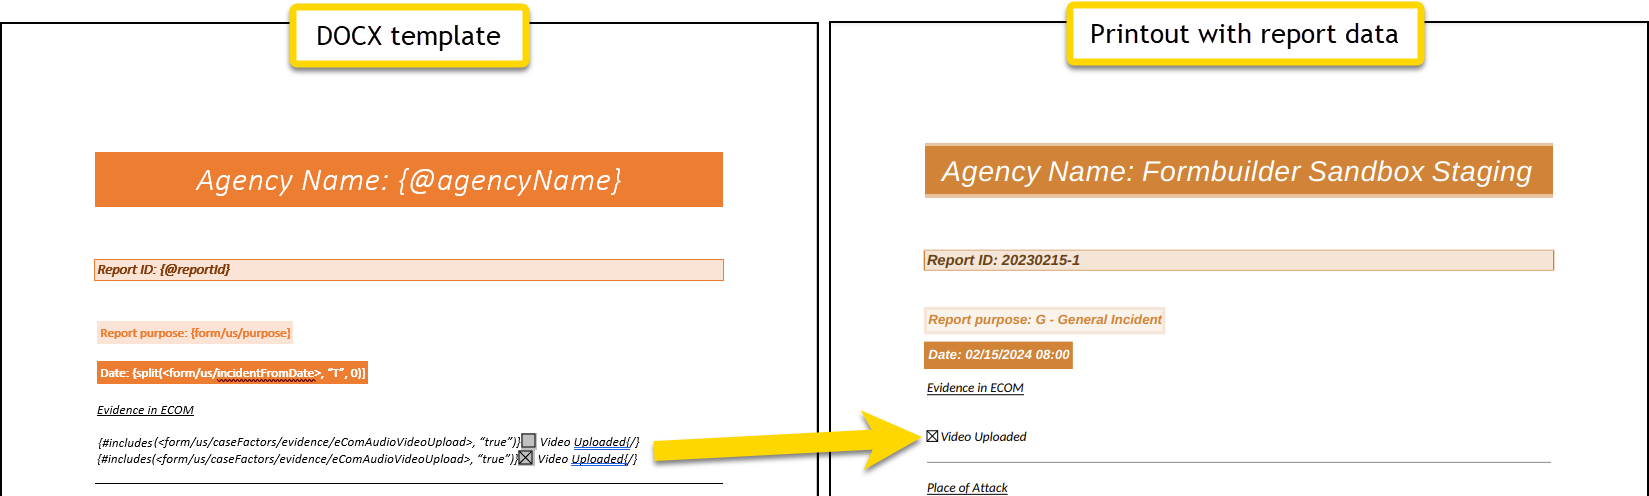
Extending this further, you would need four mappings to include, for example, a Male/Female checkbox pair in your template.
{#omits(<[Victim]form/us/parties/*/individual/person/axon/sex>, "M - Male")}☐ Male {/}{#contains(<[Victim]form/us/parties/*/individual/person/axon/sex>, "M - Male")}☑ Male {/}{#omits(<[Victim]form/us/parties/*/individual/person/axon/sex>, "F - Female")}☐ Male {/}{#contains(<[Victim]form/us/parties/*/individual/person/axon/sex>, "F - Female")}☑ Male {/}The checkboxes in these examples ☐ are for representation purposes only. DO NOT COPY PASTE THEM INTO YOUR TEMPLATE. Instead, follow the steps below to add a checkbox to Word.
Loops
To use checkboxes within loops, refer to the Loops section below.
Tables
Multiple checkboxes within a single table cell using includes/excludes expressions is not supported. The template will upload successfully but will not print. To make this work add a nested table within the cell where you want multiple conditions and hide the borders of the child table.
This downloadable template contains an example of a table nested within a table.
Add checkboxes in Microsoft Word
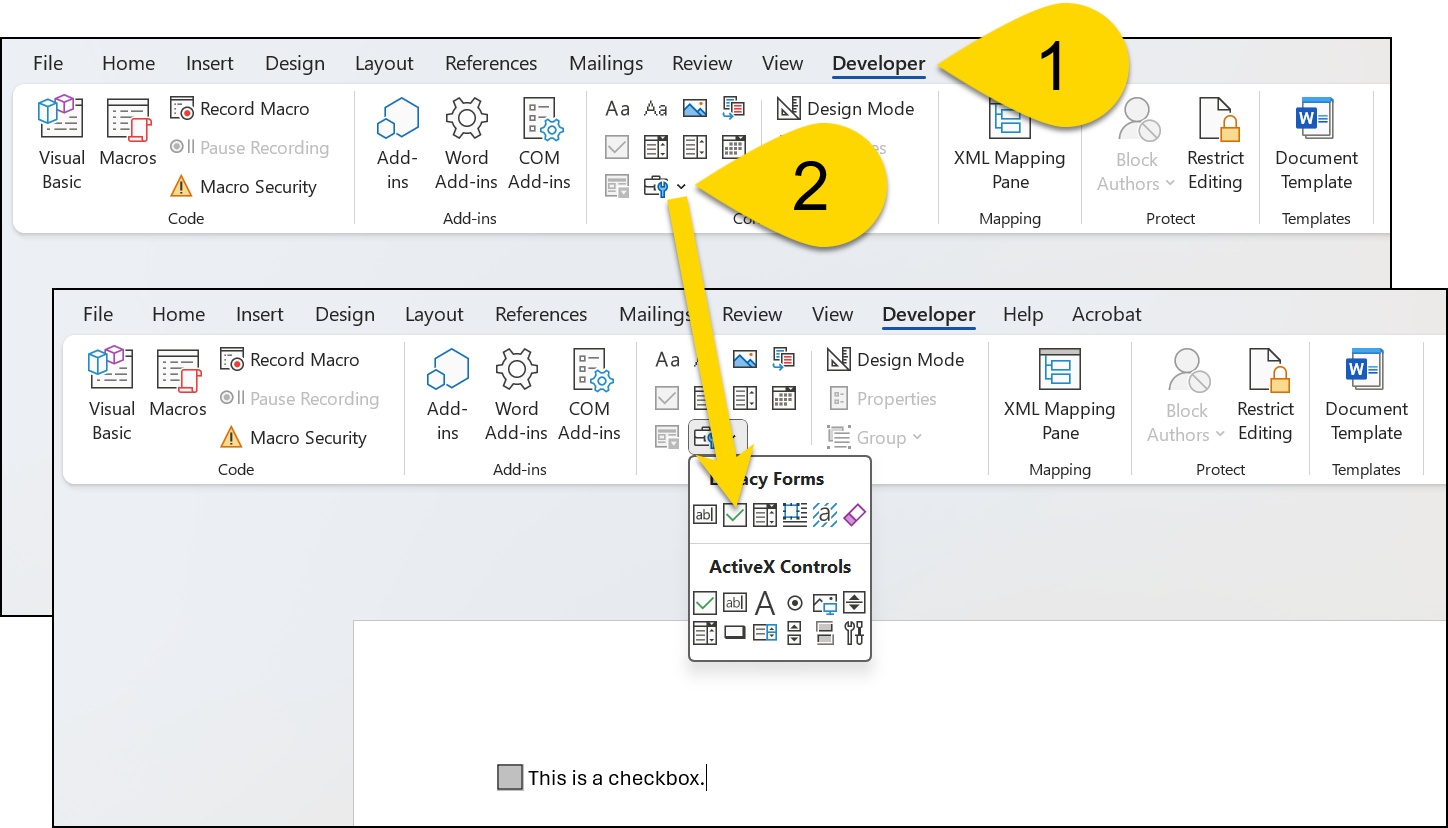
To add a checkbox in Microsoft Word:
- Switch to the Developer tab.
- In the Controls section, insert a checkbox.
- You may need to select the down arrow to reveal this option.
- You may need to select the down arrow to reveal this option.
Once inserted, you can mark a checkbox as checked:
- Double-click the check box.
- In the Default value section, select the Checked option.
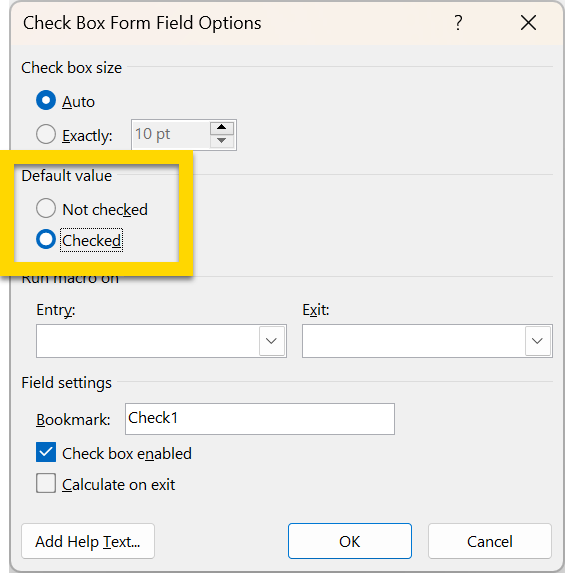
If an empty checkbox does not appear when you upload the template, make sure that the checkbox size is NOT set to Auto.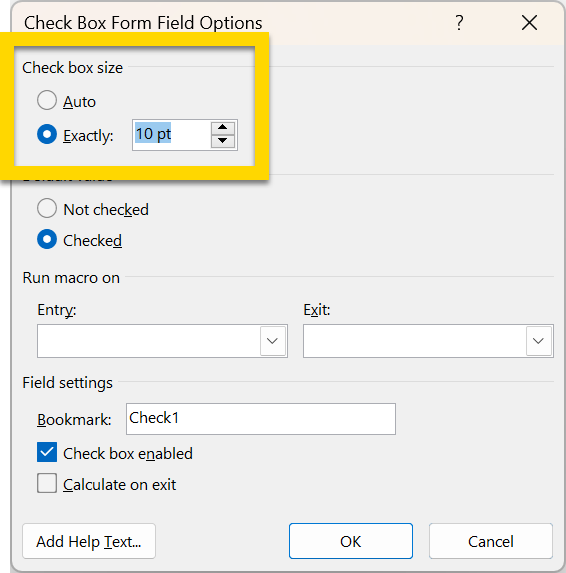
Loops
DOCX templates are reactive. This means that a printout can be as long as needed and fields can grow based on how much content they contain. As a result, you can create mappings called "loops", which process all items in the report and print certain fields for each "type" of item.
For example, a simple loop mapping would print the first and last names of each person in a report.
This downloadable template contains example mappings for all the various types of loops outlined in this section.
Simple loops
A simple loop is made up of one For operation and one or more Each operations.
The For operation indicates which type of information is processed in the loop. This operation is written as: for(<Data Path>). Only certain Data Paths can be used in For operations:
- Lists that contain an asterisk
*. - The asterisk indicates that multiple of those fields can appear in a report.
- For example, the Data Path
form/us/vehicles/*/vehicle/axon/typeindicates that the report can contain multiple vehicles. - Data Paths whose
renderAsproperty isFieldGrouporArrayField
When inserting a Data Path into a For operation, all text after the asterisk and the / preceding the asterisk should be removed. For example:
- Original Data Path:
form/us/parties/*/individual/person/axon/lastName - Shortened Data Path:
form/us/parties
Once the For operation's Data Path is identified, insert one or more Each operations to indicate which fields should be included in the printout. The Each operations are written as: each(<Data Path>).
For example, a simple loop that prints the first and last name for each person in a report would be mapped as:
{#for(<form/us/parties>)}
First Name: {each(<form/us/parties/*/individual/person/axon/firstName>)}
Last Name: {each(<form/us/parties/*/individual/person/axon/lastName>)}
{/}
In this loop, note that
- Every For and Each operation is enclosed in curly brackets
{}. - Any text that does not appear inside curly brackets will be printed as-is in the printout. In this case, the text to be printed as-is includes:
- First Name:
- Last Name:
- A
#appears after the opening curly bracket in the For operation. - A
{/}tag appears after the final Each operation, indicating the end of the loop.
Additional operations can be used within the Each operation.
For example, to print the full name of each person on a single line rather than their first and last names on second lines you would use a Concat operation inside the Each operation:
{#for(<form/us/parties>)}
Full Name: {each(concat(<form/us/parties/*/individual/person/axon/firstName>, " " ,
<form/us/parties/*/individual/person/axon/lastName>))}
{/}
Another example of using operations within an Each operation is to print the name of each author who contributed a narrative to a report, as well as the submission dates and times of each narrative.
{#for(<form/us/narratives>)}
Narrative author: {each(pick(<form/us/narratives/*/narrative >, "@author"))}
Narrative submission date/time: {each(pick(<form/us/narratives/*/narrative >, "@submittedAt"))}
Narrative:
{each(<form/us/narratives/*/narrative/axon/content>)}
{/}
Nested loops
DOCX templates can contain loops within loops. These are called nested loops. For example, a nested loop mapping would print all charges (loop 1) for all people (loop 2) in a report.
To print this kind of information, you would use a For operation inside another For operation. As explained above, the Data Paths used in For operations must be lists or have RenderAs properties that are FieldGroup or ArrayField.
For example, a nested loop that prints the first name, last name, and charges for each person in the report would be mapped as:
{#for(<form/us/parties>)}
First Name: {each(<form/us/parties/*/individual/person/axon/firstName>)}
Last Name: {each(<form/us/parties/*/individual/person/axon/lastName>)}
Charges: {#for(<form/us/parties/*/individual/person/@rels/PersonToArrest/0/@otherEntity/axon/charges>)}
{each(<form/us/parties/*/individual/person/@rels/PersonToArrest/0/@otherEntity/axon/charges/*/charge>)}
{/}
{/}
In this loop, note that:
- The Data Path in the inner loop (the inner For operation) starts the same as the Data Path in the outer loop (the outer For operation). When these Data Paths match, it indicates that the nested loop belongs to (is a child of) the outer loop. When you upload the DOCX template into Form Builder, you will see a validation error if this requirement is not met.
- Inner loop:
form/us/parties/*/individual/person/@rels/PersonToArrest/0/@otherEntity/axon/charges - Outer loop:
form/us/parties
- Inner loop:
- The Data Path for the Each operation in the inner loop has 2 asterisks, but the Data Paths for the outer loop each only have 1 asterisk
- Each operation in the inner loop:
form/us/parties/*/individual/person/@rels/PersonToArrest/0/@otherEntity/axon/charges/*/charge - Each operation in the outer loop:
form/us/parties/*/individual/person/axon/firstName - Loops operate over lists, and each asterisk refers to a list of items. This can help keep track when nesting loops. Each loop "deeper" should contain an additional asterisk
- Loop 1 contains 0 asterisks, loop 2 contains 1 asterisk, and so on.
- The Each operation used inside a For operation should contain an additional asterisk. So the Each operation in Loop 1 contains 1 asterisk, the Each operation in Loop 2 contains 2 asterisks, and so on.
- Each operation in the inner loop:
Filtered loops
When creating DOCX templates, you can set certain conditions for your loops to filter the items contained in the loop. For example, a conditional loop would print all people in a report where the role of the person is not victim.
To create these conditional filters, add Skip and Only operations to your loops:
- Skip operation: Skips any items that meet the filter criteria
- Only operations: Only include the items that meet the filter criteria
Skip and Only operations require at least three inputs:
- A data path or an expression
- The comparison to be performed. Use one of the supported comparators listed below.
- The value to compare against
Comparators
The following comparators can be used when creating print templates.
Greater than: gt
This comparator compares the value entered in a Data Path or the result of an expression against another value to see if the Data Path/expression is greater than the provided value.
Less than: lt
This comparator compares the value entered in a Data Path or the result of an expression against another value to see if the Data Path/expression is less than the provided value.
Equals: is
This comparator compares the value entered in a Data Path or the result of an expression against a provided value to see if they are equal (or the same).
Not equals: isnot
This comparator compares the value entered in a Data Path or the result of an expression against a provided value to see if they are NOT equal (or different).
Includes: has
This comparator compares the value entered in a Data Path or the result of an expression against another value to see if the Data Path/expression includes (or has) the provided value.
Excludes: hasnot
This comparator compares the value entered in a Data Path or the result of an expression against another value to see if the Data Path/expression excludes (or does not have) the provided value.
In: in
This comparator checks the value entered in a Data Path or the result of an expression against a list of items to see if any items in the list match the Data Path or expression. The provided list of items must be written using the default separator between items (;;).
In: notin
This comparator checks the value entered in a Data Path or the result of an expression against a list of items to see if any items in the list do NOT match the Data Path or expression. The provided list of items must be written using the default separator between items (;;).
Cross: xo
This comparator splits the value entered in a Data Path or the result of an expression into a list. The comparator also splits a provided list of items into a second list. The two lists are then compared to one another to see if there is any overlap between both lists. The provided list of items must be written using the default separator between items(;;).
Non-cross: notxo
This comparator splits the value entered in a Data Path or the result of an expression into a list. The comparator also splits a provided list of items into a second list. The two lists are then compared to one another to see if there is NOT any overlap between both lists. The provided list of items must be written using the default separator between items(;;)
Which comparator to use?
When creating Skip, Only, and Compute expressions, it can be challenging to determine which comparator to use. For these expressions, Input 2 is always the comparator. The illustration below explains how Inputs 1 and 3 determine which comparator you should use: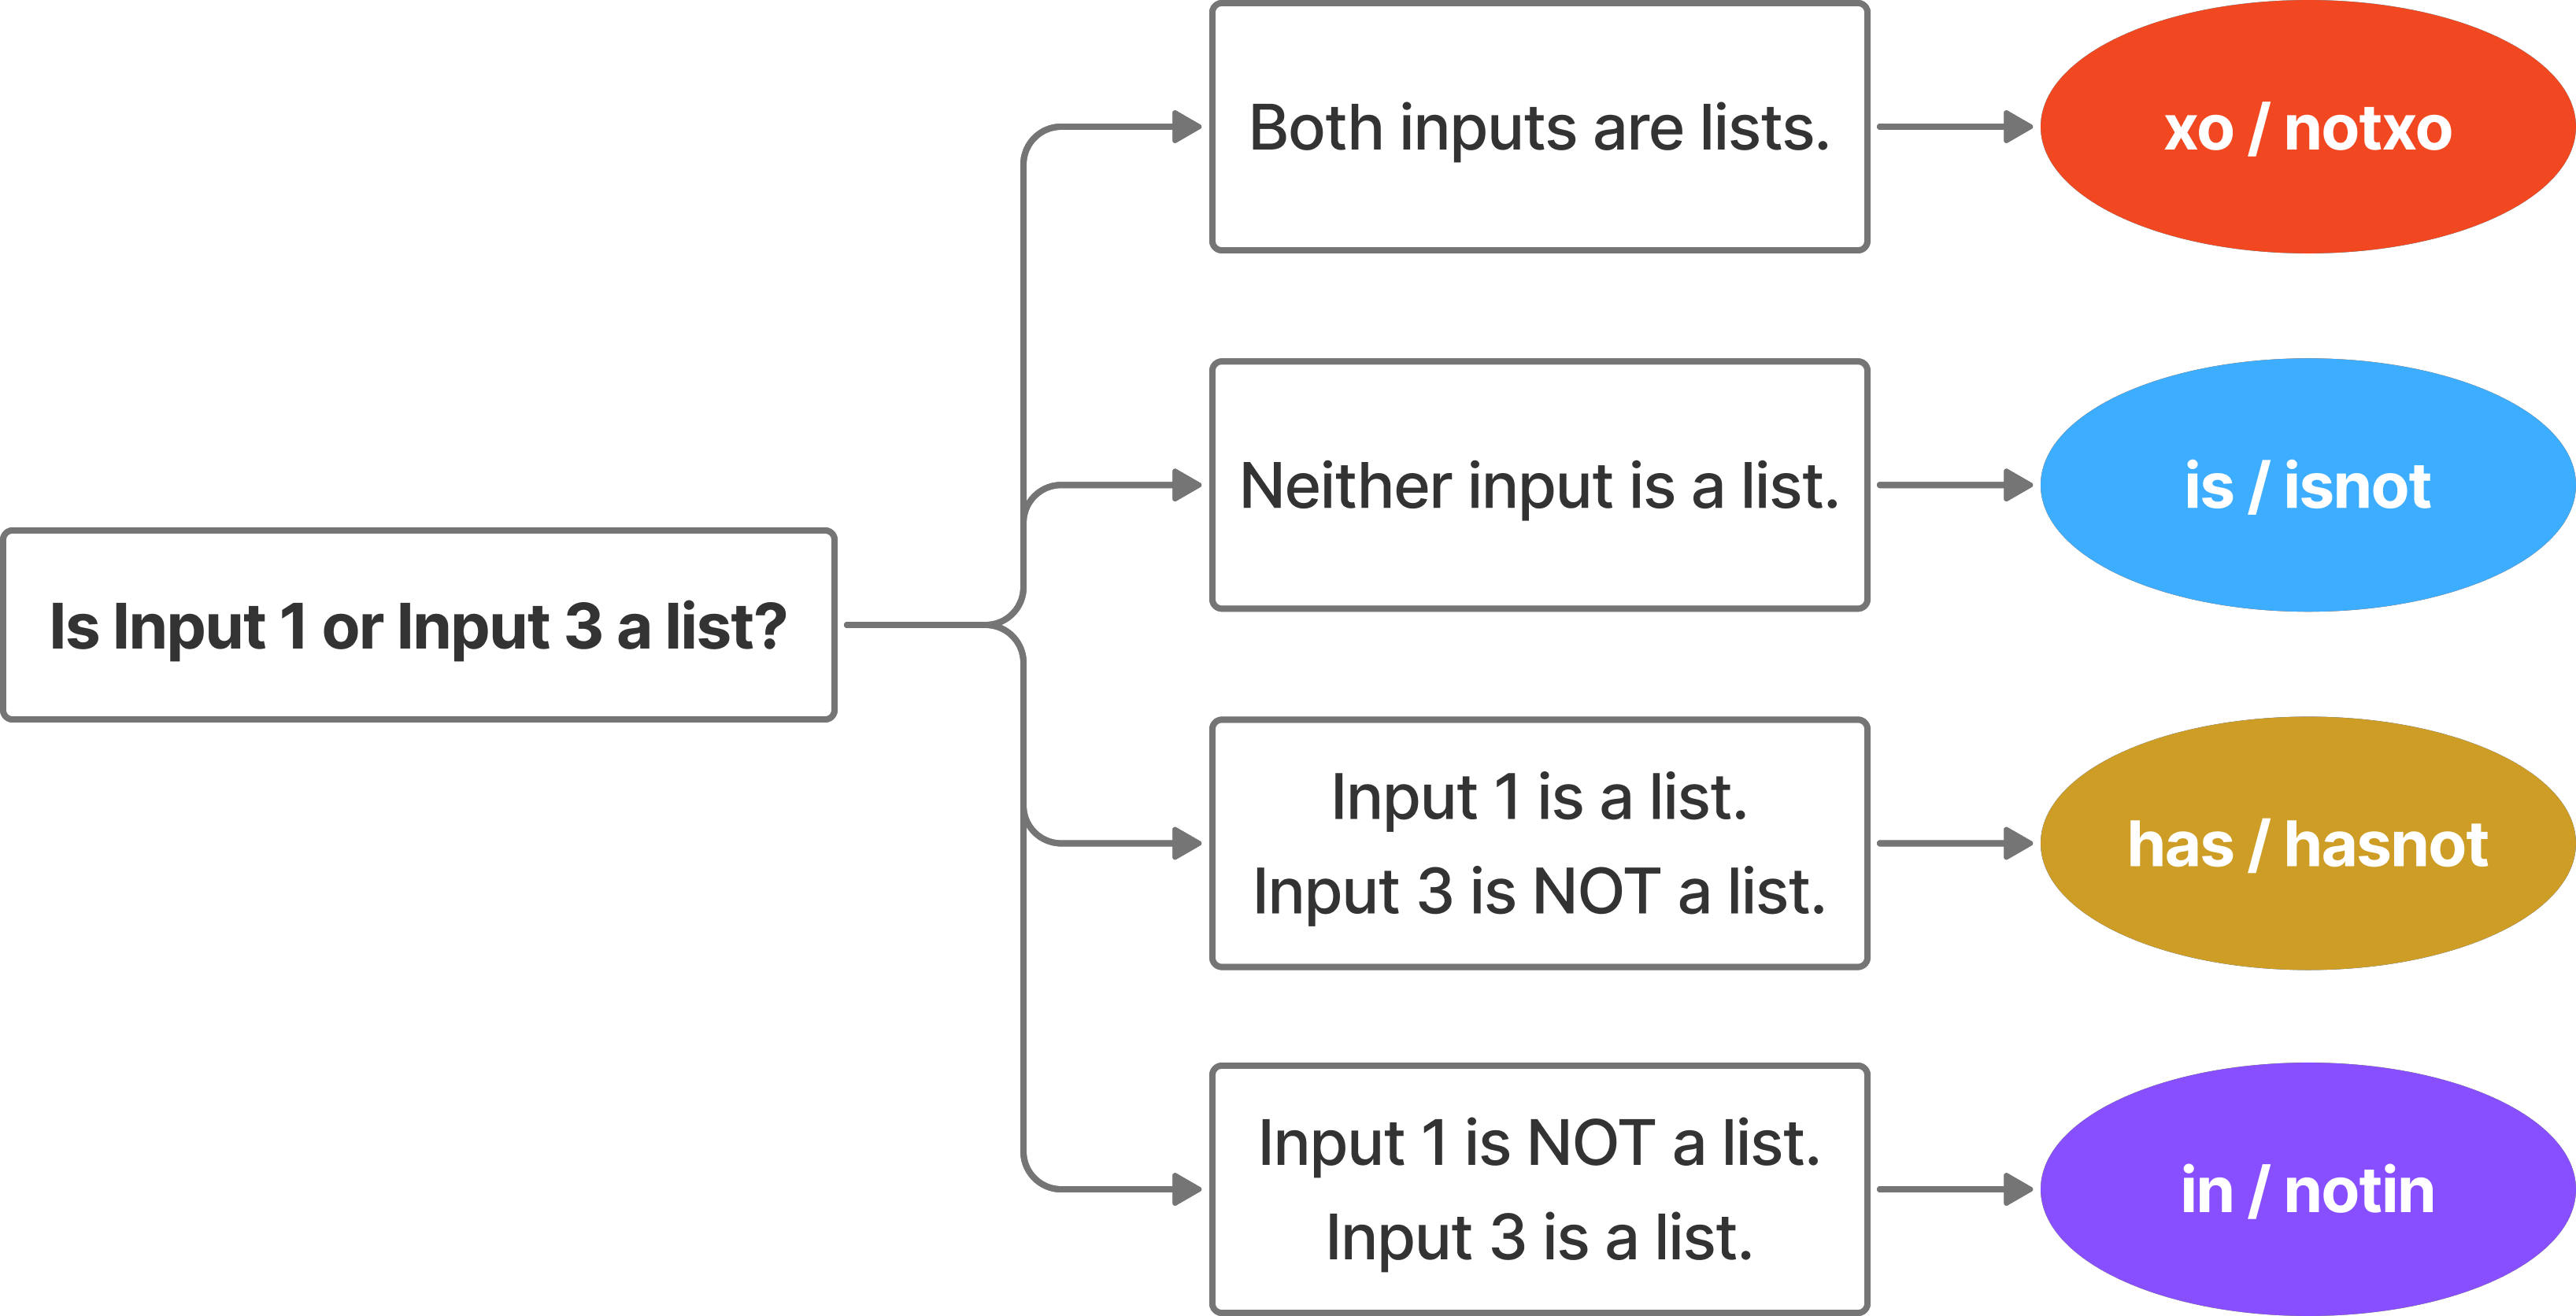
Examples
- To omit any vehicle in a list that is black in color, you would use the following Skip operation:
skip(<form/us/vehicles/*/vehicle/axon/color>, "is", "black") - To omit any vehicle in a list that is black or red in color, you would use the following Skip operation:
skip(<form/us/vehicles/*/vehicle/axon/color>, "in", "black;;red") - To only print black vehicles, you would use the following Only operation:
only(<form/us/vehicles/*/vehicle/axon/color>, "is", "black")
Once you've determined your conditions, you can add the Skip and Only operations to your loop. For example, a loop that prints the first and last name of any people in the report who do NOT have a first role of Victim would be mapped as:
{#for(<form/us/parties>,
skip(<form/us/parties/*/individual/person/@rels/PersonToOffense/0/axon/involvement>, "is", "VICTIM"))}
First Name: {each(<form/us/parties/*/individual/person/axon/firstName>)}
Last Name: {each(<form/us/parties/*/individual/person/axon/lastName>)}
{/}
In this loop, note that:
- The Skip operation is included in the For operation.
- A comma appears after the closing angle bracket
>of the For Data Path and before the start of the Skip operation - The closing curly bracket
}of the For operation appears at the end of the Skip operation. - This example filters based on the person’s role. However, because a person can have multiple roles, this template indicates that only the first role should be considered. (This is indicated by the Data Path containing a 0 instead of an asterisk.)
You can use multiple Skip or Only operations within a loop, but you can't use both the Skip and Only operations inside the same loop.
Conditions can also be applied to nested loops. For example, a conditional nested loop would print all charges for all people in a report where the role of the person is Offender and the charge count is greater than 5.
For more examples of expressions that use comparators, see the Compute section in the syntax guide. (Note that these examples use the syntax required for PDF print templates and would need to be updated according to the instructions in this article to work in DOCX print templates.)
Filter using multiple properties
To filter across multiple properties (such as role), use the All operation in addition to the has and hasnot comparators. The has and hasnot comparators are different from the Contains and Omits operators. Comparators are one of the three required inputs for Skip and Or operations. These comparators indicate whether an item should be included or excluded from the loop.
Example
- To create a loop that prints the first and last name of all people in the report who do NOT have a role of Victim, you would use the following mapping:
{#for(<form/us/parties>,
skip(all(<form/us/parties/*/individual/person/@rels/PersonToOffense/*/axon/involvement>), “has”, “VICTIM”))}
First Name: {each(<form/us/parties/*/individual/person/axon/firstName>)}
Last Name: {each(<form/us/parties/*/individual/person/axon/lastName>)}
{/}
In this loop, note that:
- The All operation indicates that the loop should consider all people in the report.
- This example considers all roles, as indicated by the second asterisk in the Data Path
(form/us/parties/*/individual/person/@rels/PersonToOffense/*/axon/involvement) - The
hascomparator indicates that any person should be skipped if their Role is Victim.
Filter using multiple conditions
You can use multiple conditions within an expression. There are two ways to do this.
AND Conditions
An AND condition indicates that data should only be included or skipped if ALL of the conditions are met. To create an AND condition, add two different comparators to a single Skip or Only operation.
Example
- To omit any vehicle made between 2000 and 2020, you would use the following Skip operation:
skip(<form/us/vehicles/*/vehicle/axon/year>, "gt", 2000), <form/us/vehicles/*/vehicle/axon/year>, "lt", 2020)
OR Conditions
An OR condition indicates that data should be included or skipped if ANY of the conditions are met. To create an OR condition, use two operations with the same comparator.
Example
- To omit any vehicle that is either black or newer than 2020, use the following Skip operations:
skip(<form/us/vehicles/*/vehicle/axon/color>, "is", "black"), skip(<form/us/vehicles/*/vehicle/axon/color>, "gt", "2000")
Loops with checkboxes
To use checkboxes within loops, the following mapping would be used:
{#for(<form/us/parties>)}
{#each(contains(<form/us/parties/*/individual/person/axon/type>, "U - Unknown"))} ☑ Unknown{/}
{#each(omits(<form/us/parties/*/individual/person/axon/type>, "U - Unknown"))} ☐ Unknown{/}
{/}
In this loop, note that:
- The
#appears before the Each operation and not before the Contains or Omits operations. - As a general rule,
#should always appear right after the opening curly brace{and not in the middle of an expression.
Loops with mapping groups
In DOCX templates, you can use loops in combination with mapping groups to print data from fields that are associated with an entity.
For example, to print all charges for the offender, you would use the following mapping:
{#for(<[Offender]form/us/parties/*/individual/person/@rels/PersonToArrest/0/@otherEntity/axon/charges>)}
Charge: {each(<[Offender]form/us/parties/*/individual/person/@rels/PersonToArrest/0/@otherEntity/axon/charges/*/charge>)}
Count: {each(<[Offender]form/us/parties/*/individual/person/@rels/PersonToArrest/0/@otherEntity/axon/charges/*/counts>)}
{/}
In this mapping, note that:
- A single loop is used to indicate that the charges should be printed for the offender.
- When a user prints the report using the DOCX template, they can select which person in the report is the offender, and only charges for that person will be included in the printout.
- The mapping group is indicated by
[Offender]and is added to the For and Each operations. - When uploading a DOCX template that contains mapping groups inside a loop, you must select the entity type for the mapping group.
- You can apply filters to loops within mapping groups just as you would to any other loop using the Skip and Only operations.
Tips and guidance
- Use
forandeachoperations. - Enclose each operation in curly brackets
{}. - Add
#after the opening curly brace that appears at the start of the For operation. - Use the
{/}tag to end a loop. - This downloadable template contains example mappings for all the various types of loops outlined in this article.
- The opening and closing tags for loops must be balanced. For each opening
{#tag in the loop, there should be a corresponding closing{/}. - To add a page break after each entry in the loop, add the break BEFORE the closing loop tag
{/}. - If you upload the DOCX template successfully into Form Builder, start a test incident, and see the spinning wheel of death (infinite loading), that means you did not close a loop with a
{/}somewhere. - You shouldn't need to create the exact same loop multiple times in most circumstances. If you find yourself using the same For operation multiple times, your template could probably be simplified.
How many loops?
There is a big difference between using a single loop vs multiple loops. For example say your report has two people: John Doe and Bruce Lee.
The following mapping, which contains two loops, will print:
John
Bruce
Doe
Lee
{#for(<form/us/parties>)}
{each(<form/us/parties/*/individual/person/axon/firstName>)}
{/}
{#for(<form/us/parties>)}
{each(<form/us/parties/*/individual/person/axon/lastName>)}
{/}
However, the following mapping which contains a single nested loop, will print:
John
Doe
Bruce
Lee
{#for(<form/us/parties>)}
{each(<form/us/parties/*/individual/person/axon/firstName>)}
{each(<form/us/parties/*/individual/person/axon/lastName>)}
{/}
When two loops are used, the mapping indicates that:
- The loop runs across John Doe and prints his first name: John.
- The loop runs across Bruce Lee and prints his first name: Bruce.
- The loop runs across John Doe and prints his last name: Doe.
- The loop runs across Bruce Lee and prints his last name: Lee.
If you instead use a single loop, the mapping indicates that:
- The loop runs across John Doe and prints his first name, John, then prints his last name, Doe.
- The loop runs across Bruce Lee and prints his first name, Bruce, then prints his last name, Lee.
Font support
To include additional fonts in a DOCX template, you can embed the fonts into the template file before uploading the file into Form Builder.
Note that embedding a font in a DOCX template does not guarantee it will upload to Form Builder correctly. It's crucial to test print templates once they have been uploaded to ensure they print as desired.
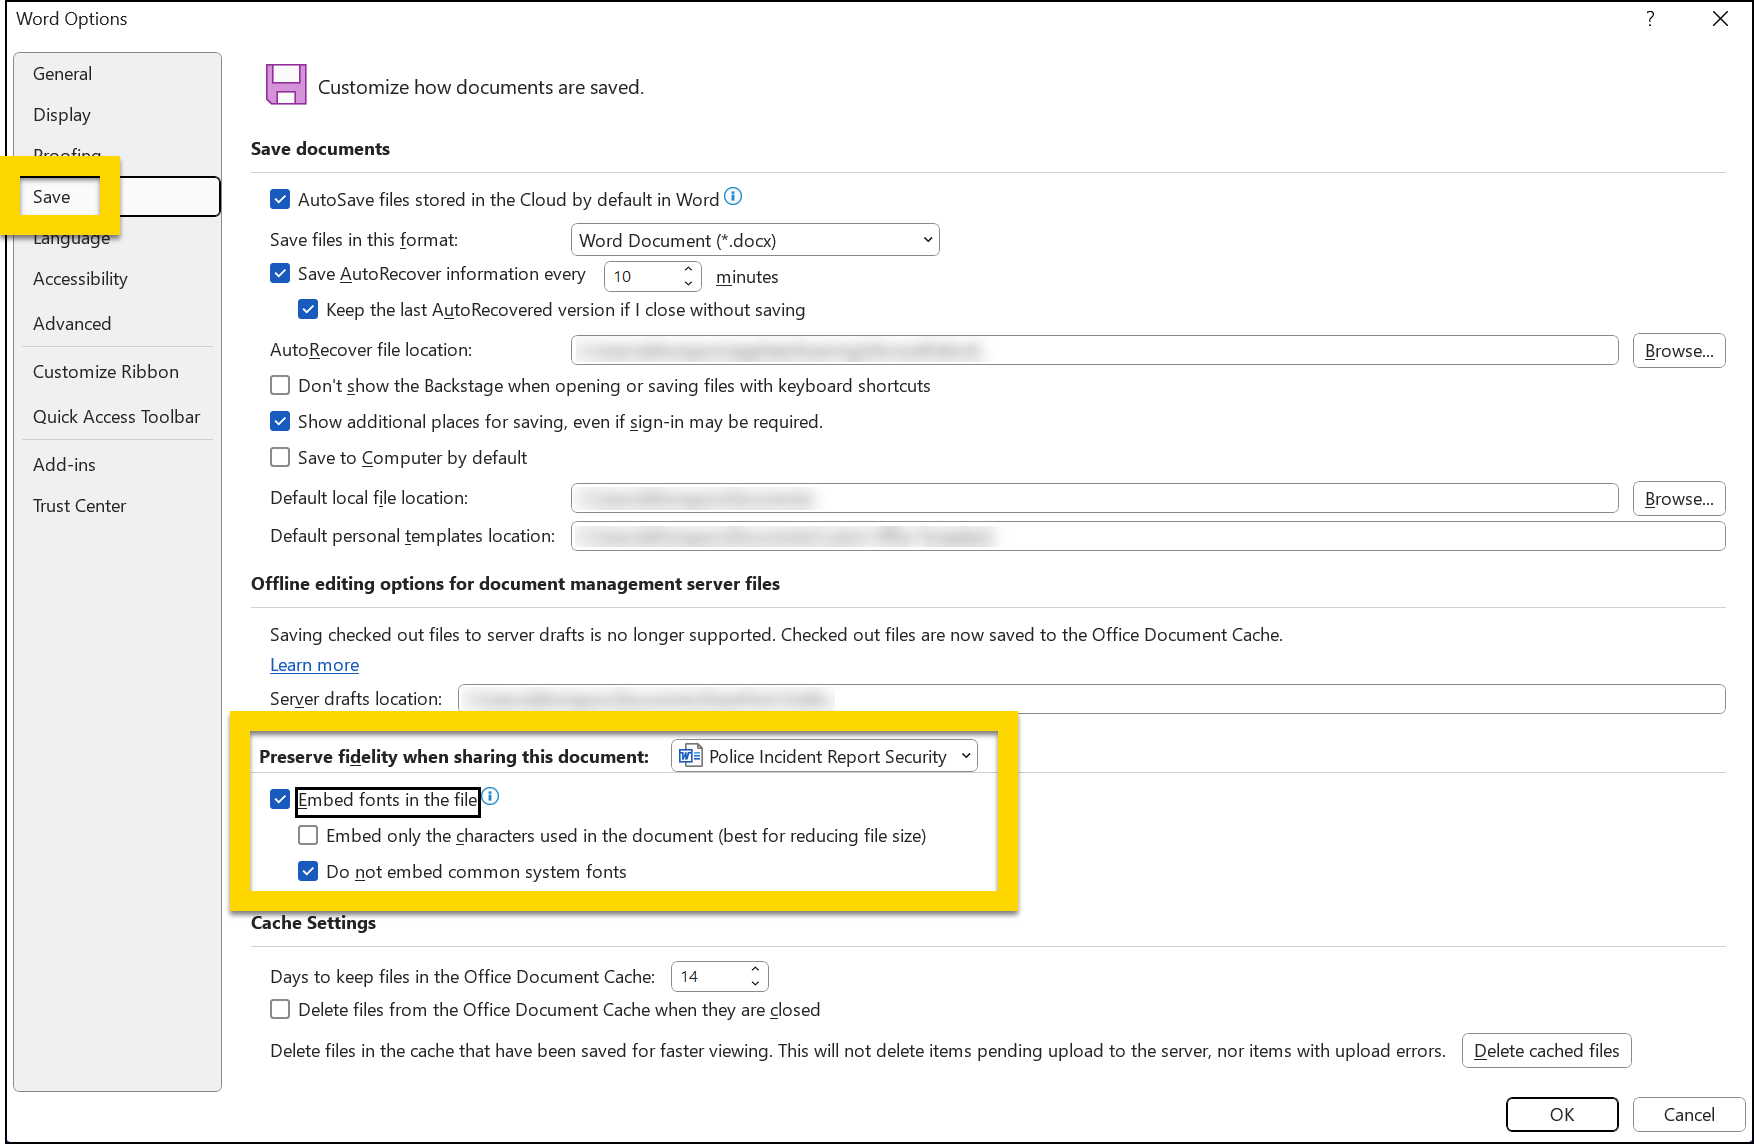
To embed fonts in a DOCX:
- Create the DOCX template and apply fonts as desired.
- Open the document's File > Options > Save menu and select the Embed fonts in the file checkbox.
- The full steps for embedding fonts in a DOCX template can be found in the Microsoft Word hep documentation.
- Upload the DOCX template to Form Builder.
- Test printing using the template on multiple different computers to ensure reports print as desired.
- Publish the form associated with the print template.