Print templates
The features explained in this article are only available for Axon employees and do not appear in Form Builder.
Contact your Axon representative if your organization needs new or updated print templates.
In Axon Records and Axon Standards, there are three types of print templates users can choose between when printing a report. A print template determines which information from the report will be included in the printout, and how that printout is formatted.
There are three different types of print templates:
- Default templates
- Axon templates
- Agency templates
Default templates
A default template is automatically created for every report type.
When a user is viewing a report in Report Writer, in the More actions [...] menu, the default template appears as the first print option: Print [Form name]. This default template includes every field in the report and follows an Axon-defined formatting, as shown below.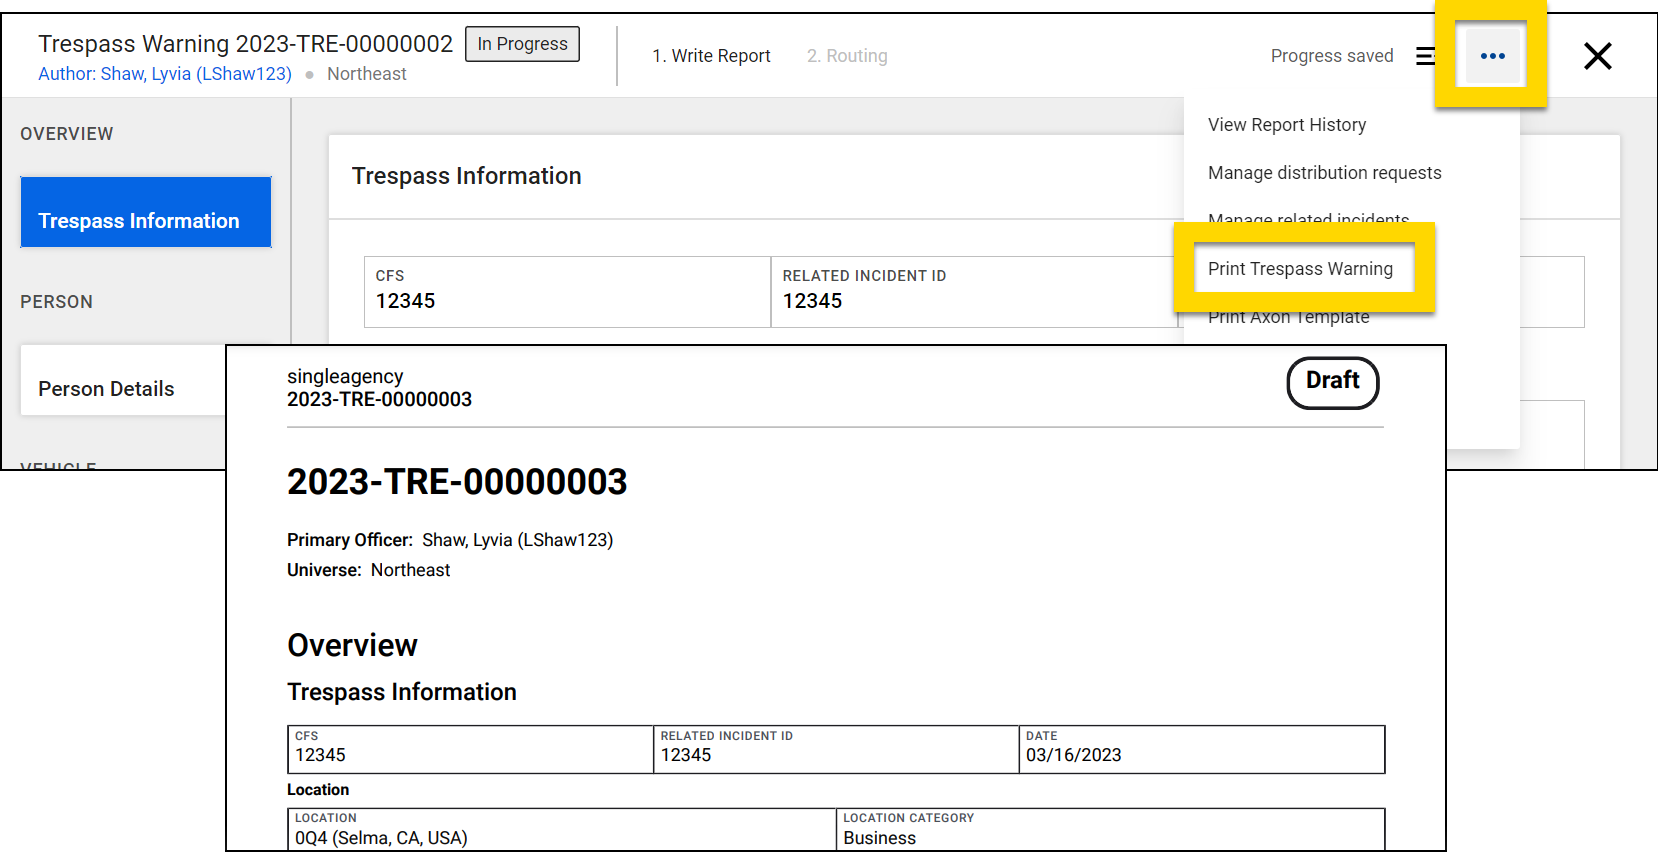
Some edits can be made to the default print template using direct JSON editing.
Axon templates
You can use the print template tool in Form Builder to create Axon templates, which are based on the default template and print with the same Axon-defined formatting. When you create an Axon template, you use the default template as a starting point and remove fields to prevent every report field from appearing in the report printout. You cannot add new fields to Axon templates.
For example, in the image below, the CFS and Related Incident ID fields have been removed from the printout, leaving only the Date field (compared to the image in the previous section).
When a user is viewing a report in Report Writer, the name assigned to the template in Form Builder appears in the More actions [...] menu.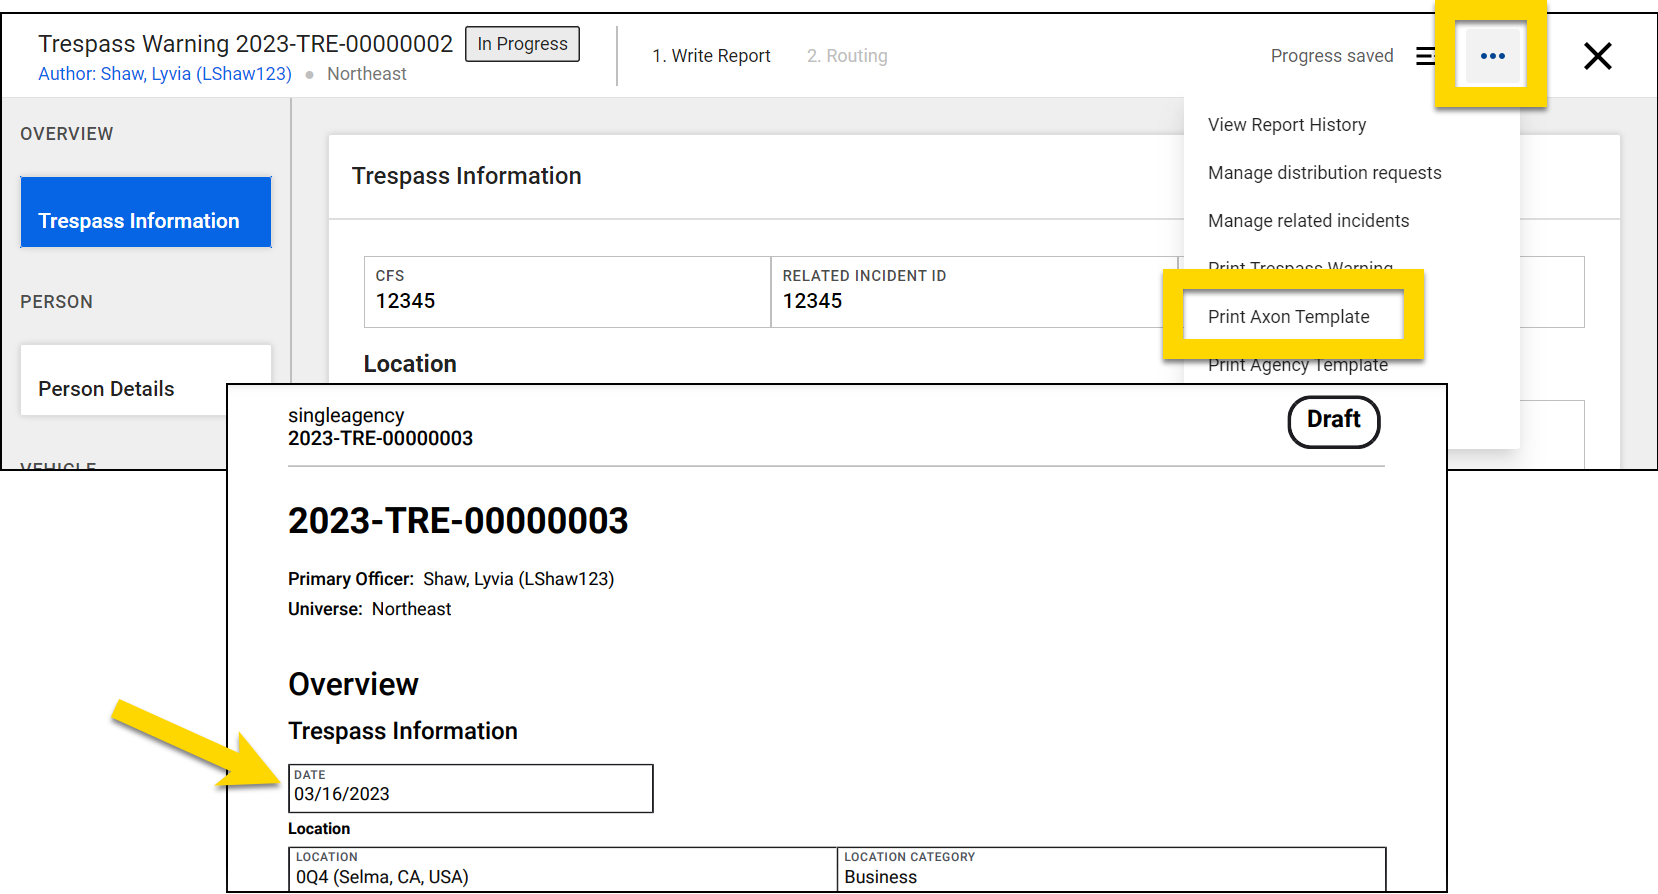
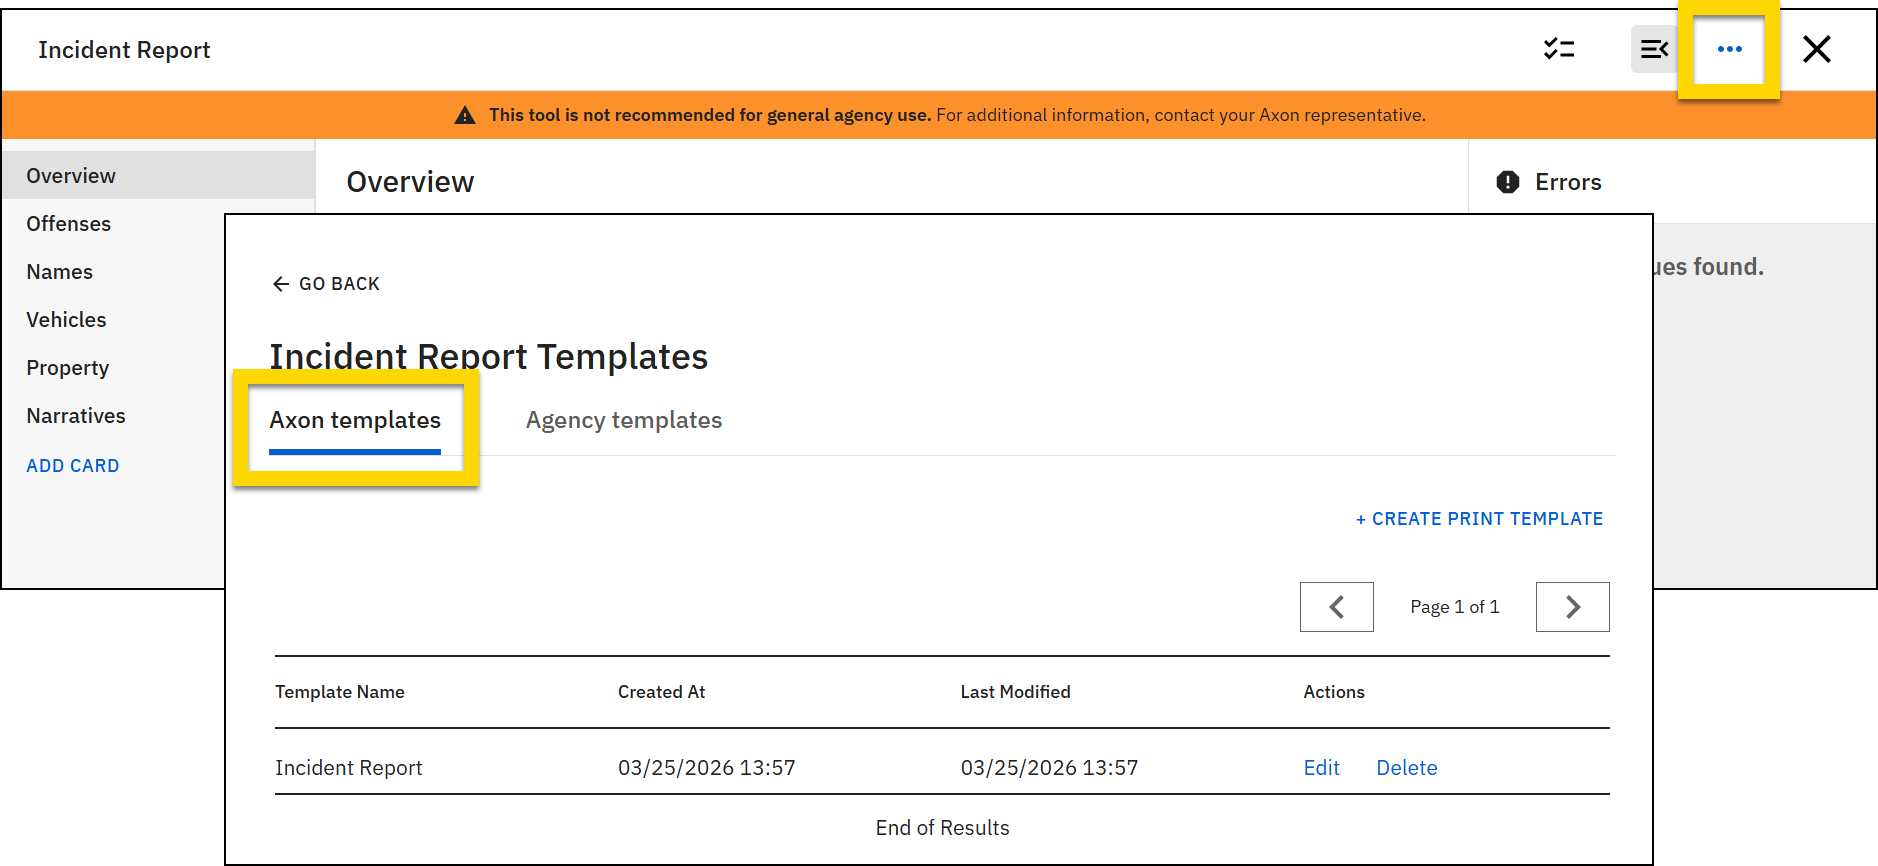
To manage a form or subform's Axon templates:
- Open the Administrator Console by selecting the gear icon.
- Select Form Builder (Legacy).
- Go to the Records, Standards, or Subforms tab, depending on which form/subform and its associated print templates you want to view.
- Select the blue form name that is associated with the print templates you want to edit.
- When the form opens, select More actions [...] > Edit print templates.
- The page opens to the Axon templates tab. From this screen, you can create new templates, edit existing templates, or delete existing templates.
Create new templates
To create a new Axon print template:
- On the Axon templates tab, select Create print template.
- Enter a name for the template and select Next.
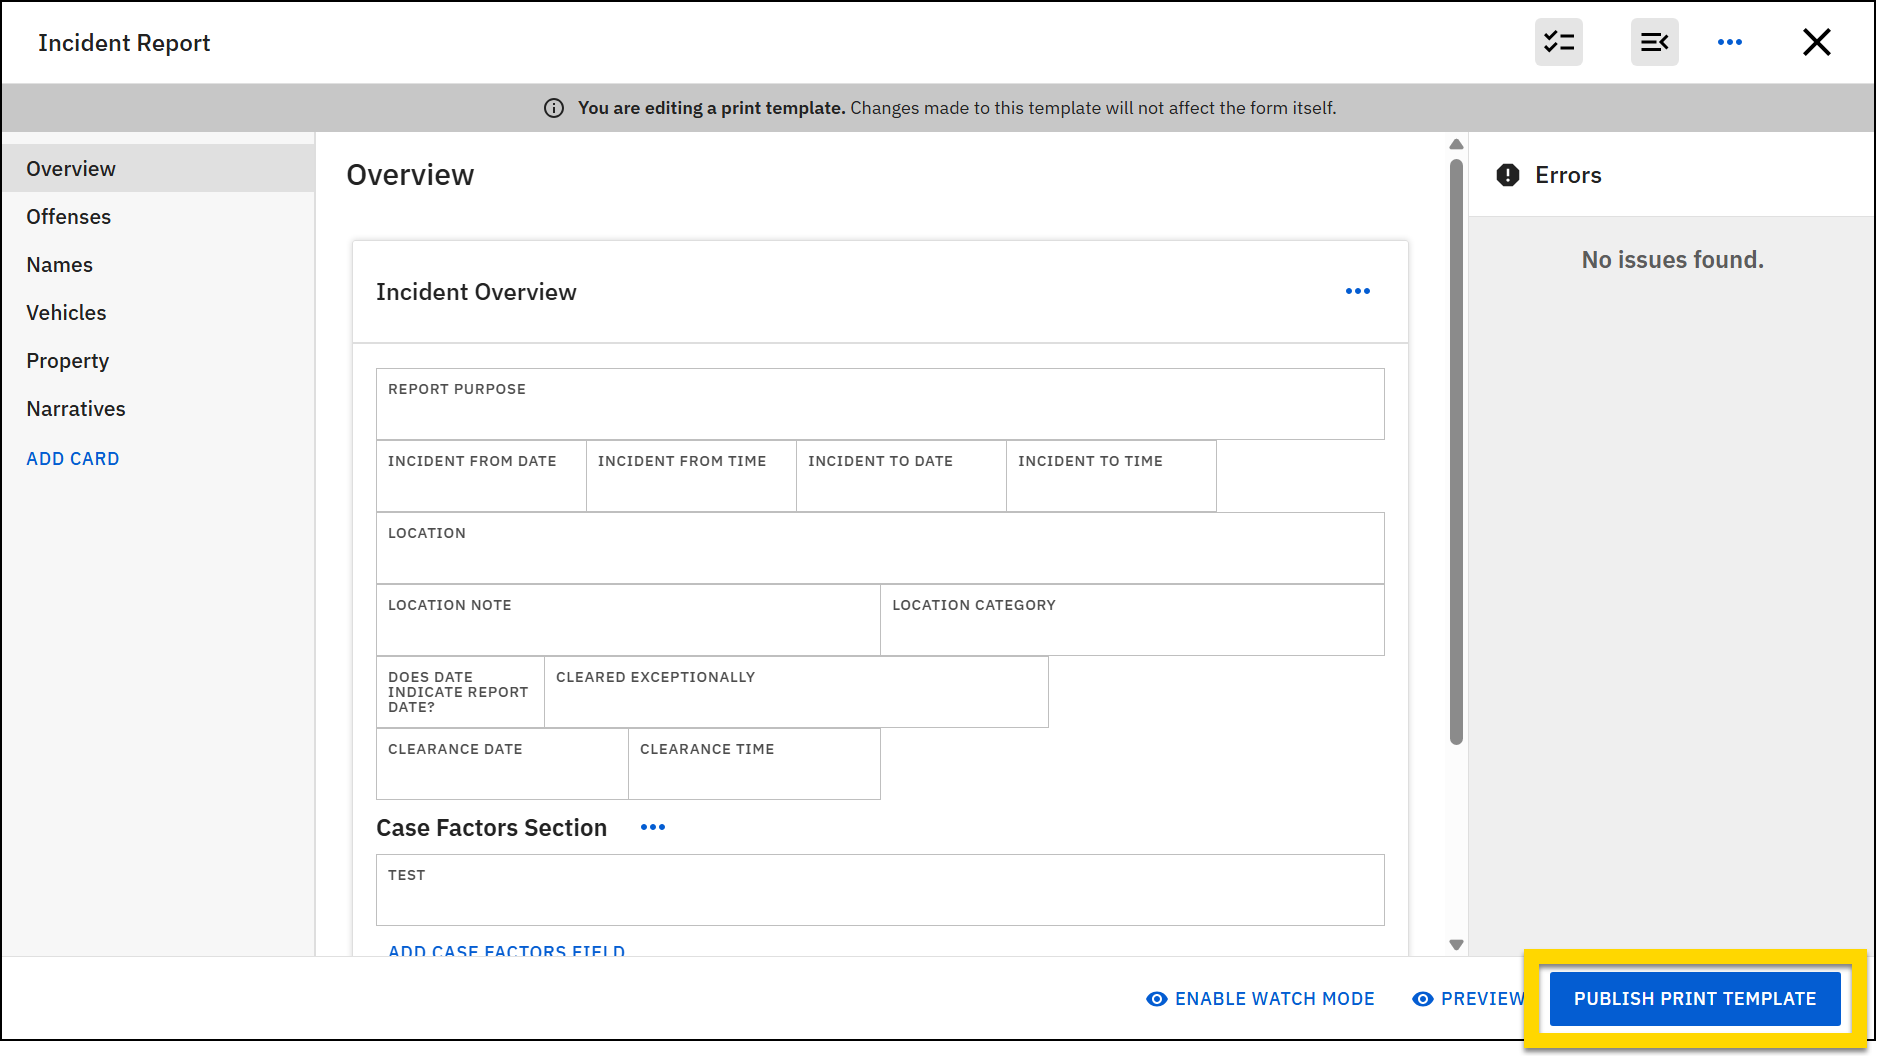
- The new print template will open, and it will look exactly like the original form it is based on. Edit the template as desired.
- Select Publish to publish the print template and make it available for users to select when they are printing reports.
- If a report is in progress while you update one of its print templates or add a new print template, the template updates and/or new templates will NOT appear for the in-progress report.
- If a report is in progress while you update one of its print templates or add a new print template, the template updates and/or new templates will NOT appear for the in-progress report.
Edit templates
To edit an Axon print template, find the form on the Axon templates tab and select Edit. When the print template opens, you can remove sections or fields to prevent those items from appearing when the report is printed.
Even though you can edit or add new fields to the form, these changes will NOT appear in the printout. To edit or add fields to the form, open the form itself and make your changes.
After making all changes, select Publish to make that version of the template available to users when they are printing reports.
See JSON Print Template Editing for information about edits that can be made to an Axon print template by directly editing the form's JSON.
Compact printing
Select More actions [...] > Enable Compact Printing to turn on compact printing, which removes the borders around fields. The field name is printed in bold, and data entered in that field appears in regular text.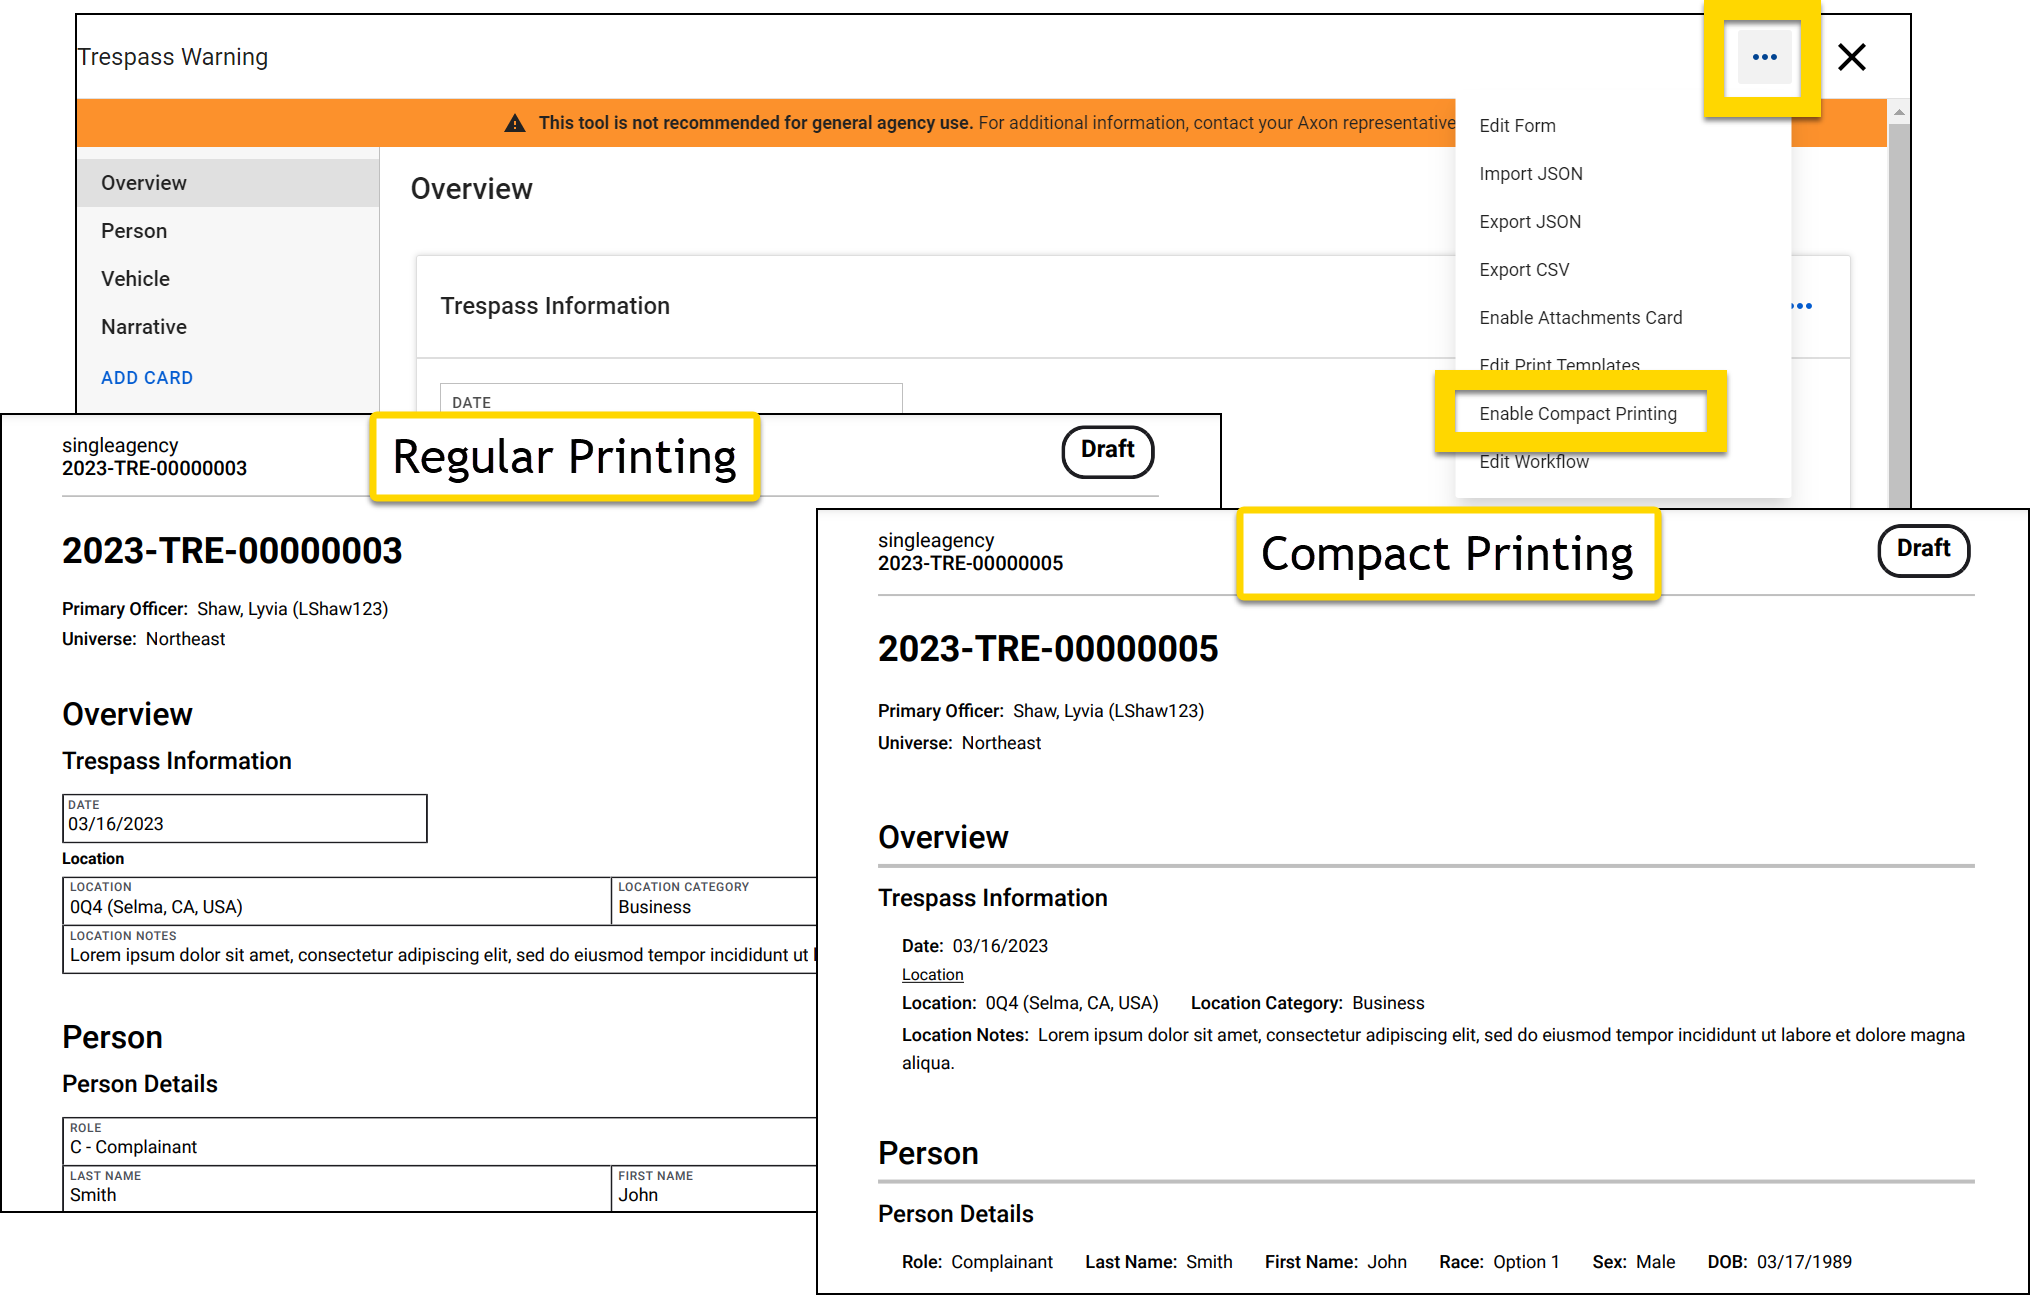
Delete templates
To delete an Axon print template, find the form on the Axon templates tab and select Delete. Once a template is deleted, it will no longer appear in a report's More actions [...] menu as a print option.
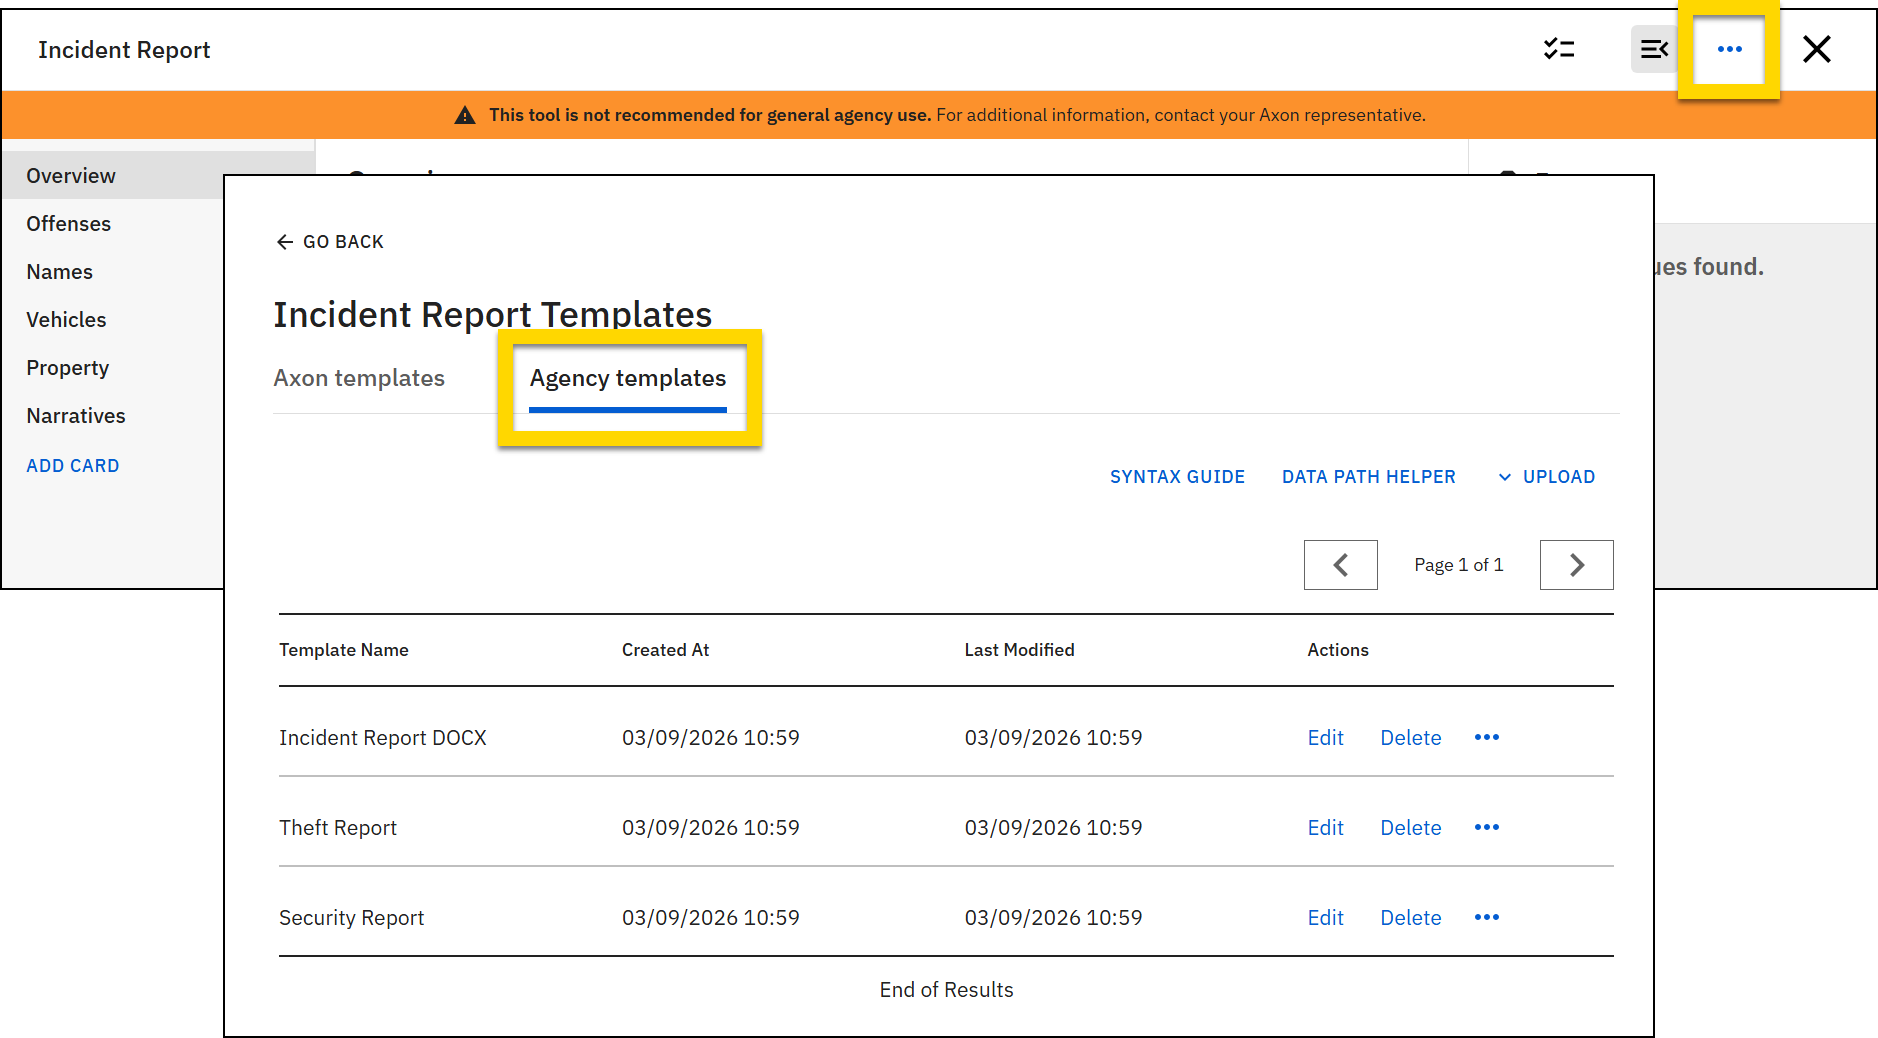
Agency templates
You can use the print template tool in Form Builder to create agency templates with custom formatting.
Agency templates are print templates that use custom layouts, as defined by a PDF or DOCX template, which is uploaded to Form Builder. PDF files are best for simple printouts that don’t require custom formatting. DOCX files are best for more complex printouts with complex formatting.
As with Axon templates, when a user is viewing a report in Report Writer, the name assigned to the template in Form Builder appears in the More actions [...] menu.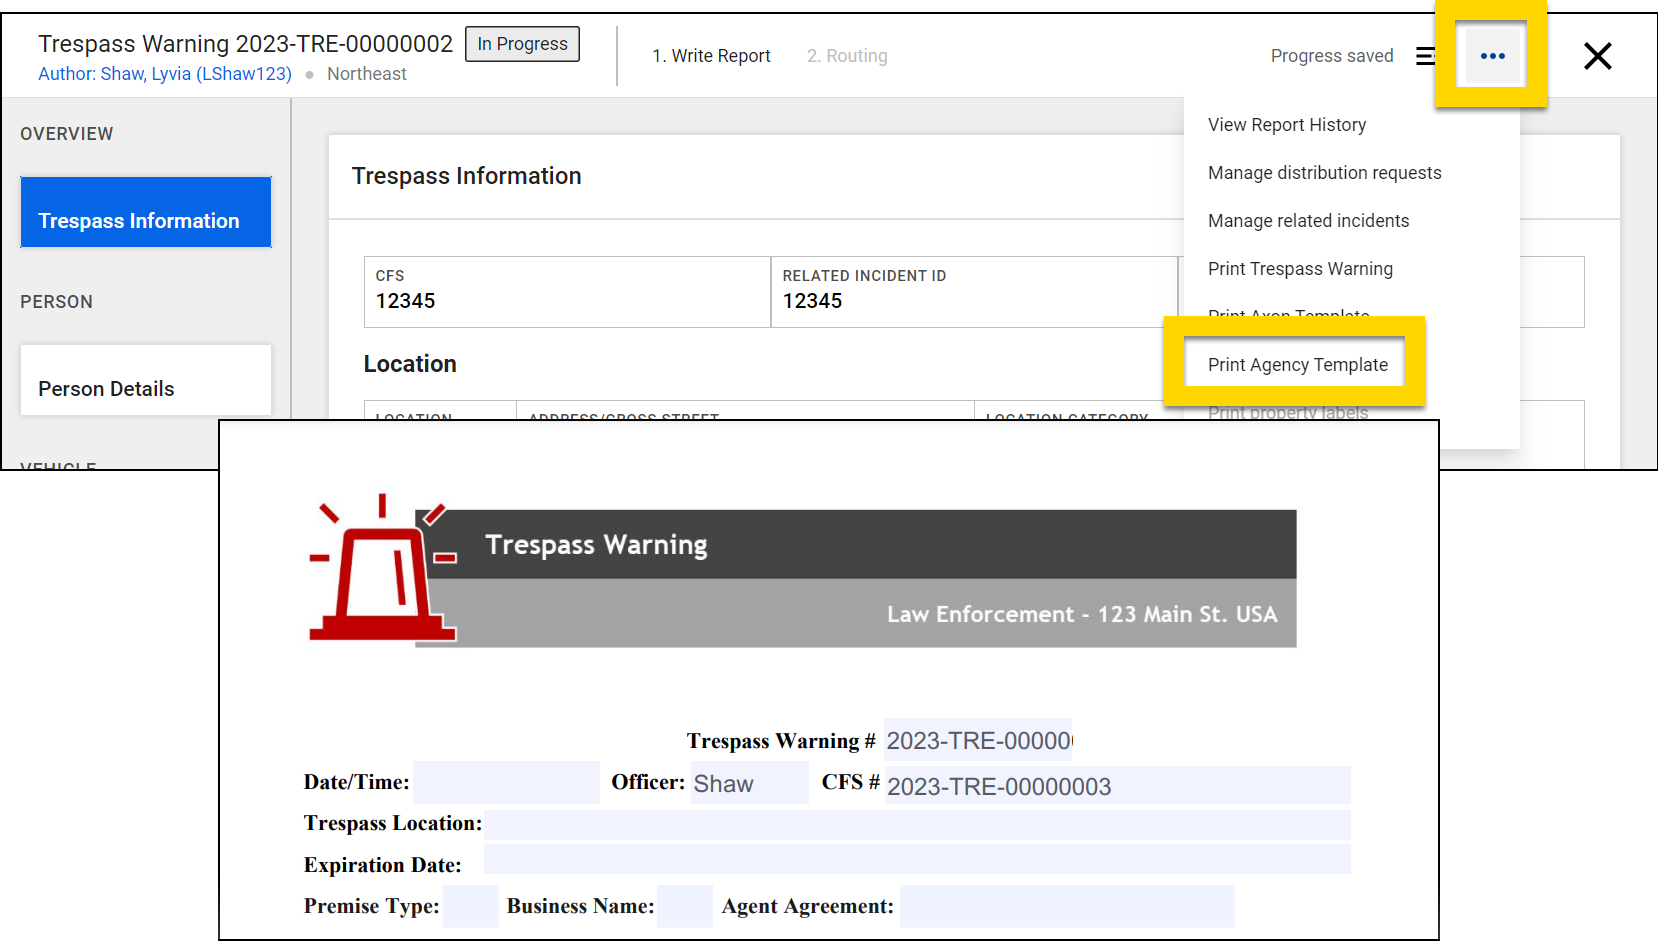
To manage a form or subform's Agency templates:
- Open the Administrator Console by selecting the gear icon.
- Select Forms.
- Go to the Records, Standards, or Subforms tab, depending on which form/subform and its associated print templates you want to view.
- Select the blue form name that is associated with the print templates you want to edit.
- When the form opens, select More actions [...] > Edit print templates.
- Switch to the Agency templates tab to take any of the following actions:
- Open the Syntax Guide.
- Open the Data Path Helper.
- Upload PDF or DOCX templates.
- Edit, delete, or download existing templates.
Mapping groups
Reports contain some fields that are grouped together by entity type (e.g., person, vehicle, property). Multiple entities can be added to a report, and as a result, these entity fields may appear multiple times in the report. For example, a report allows users to add multiple people to a report. As a result, the report will contain multiple First Name, Middle Name, and Last Name fields. When a user prints a report that contains entities, they must select which specific entity's information they want to include in their printout.
For example, a report contains multiple fields for an offender (first name, last name, middle name, age, height, etc.). When a user prints the report, they are asked to select a person from the report. When they print, the template fields will fill with data associated with that person.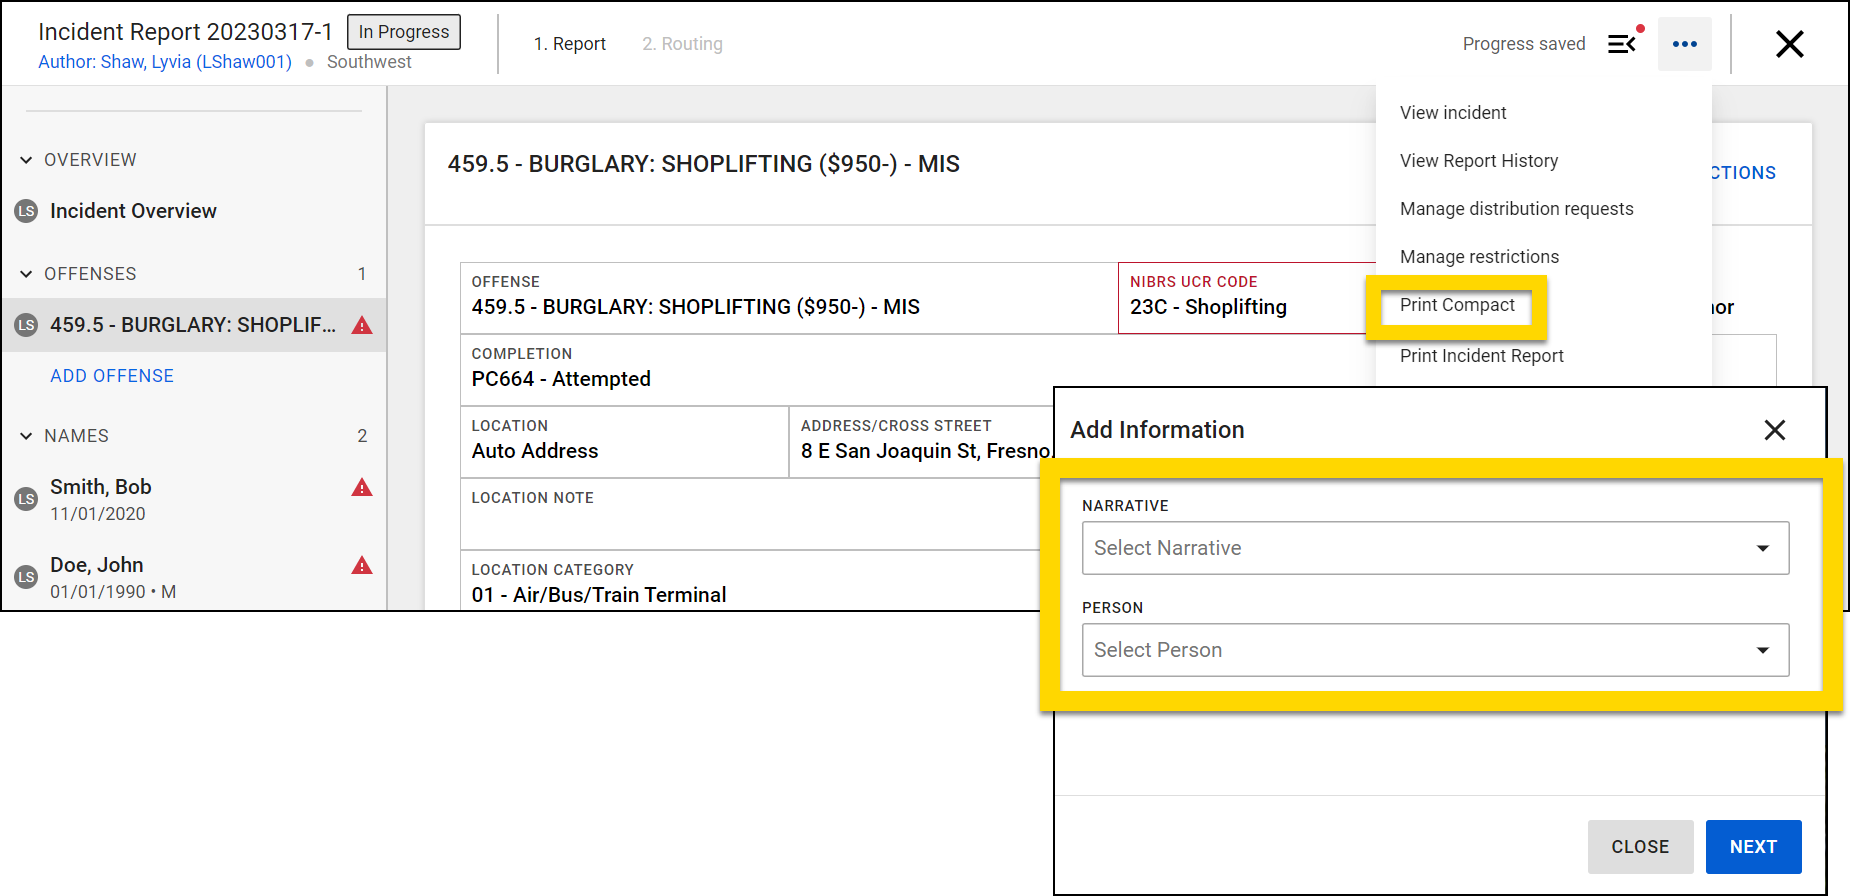
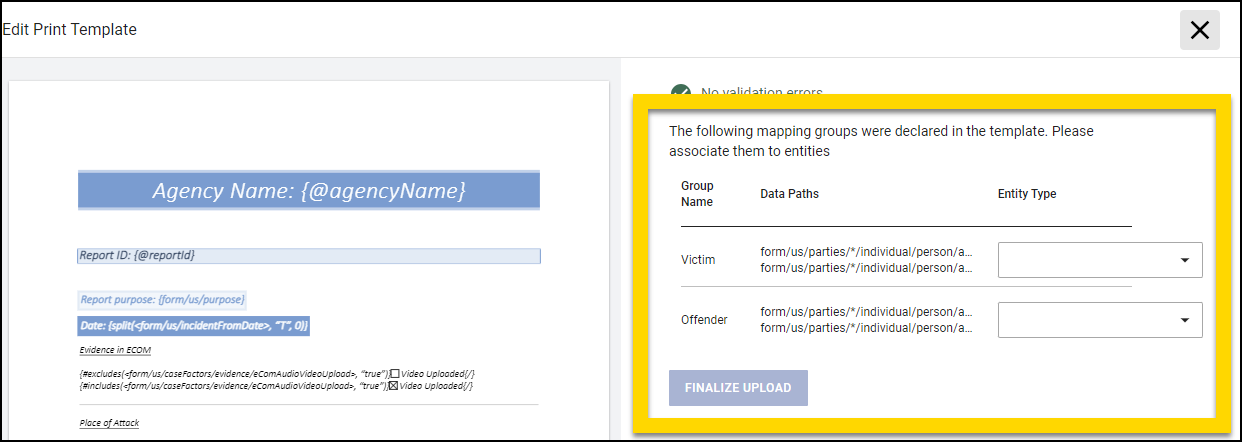
When creating print templates, you must create a mapping group for each entity type that appears in the report. Once these groups are created, you must then add each of those entity's fields to that entity's mapping group.
Create mapping groups
To create a mapping group:
- Follow the steps to upload a PDF or DOCX template.
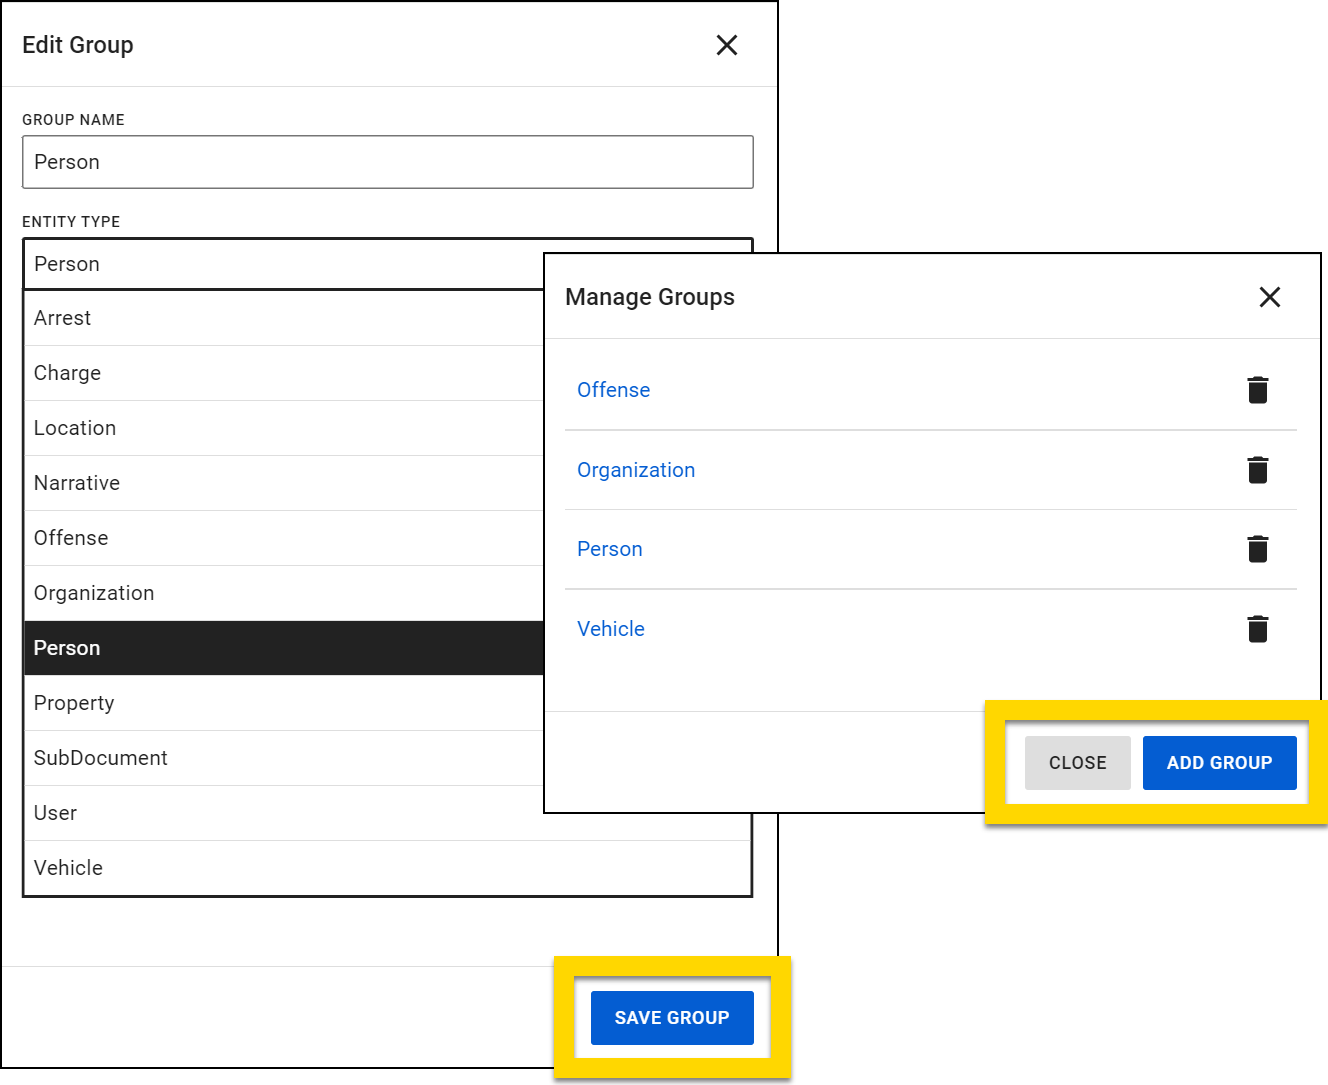
- On the Edit Print Template page, select Manage groups > Add group.
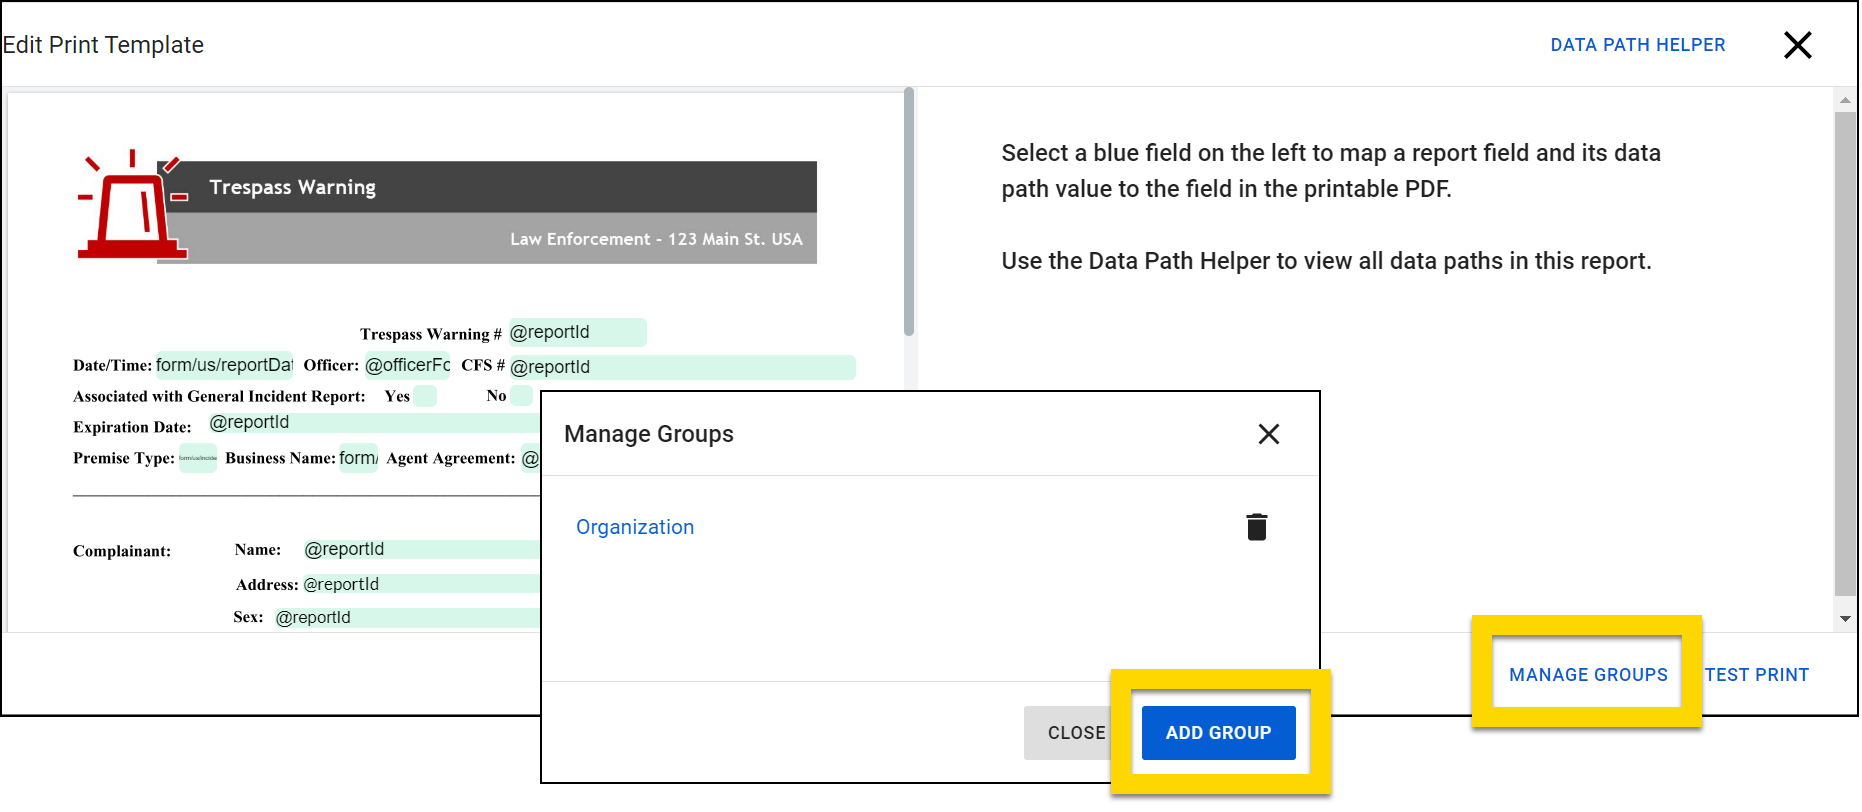
- Enter a group name. This name should be descriptive because it will appear when a user prints a report.
- Choose an entity type. This selection limits the options that appear when a user selects the from dropdown menus when printing a report.
- For example, if you select Person as the entity type, users will only see people's names when they are printing the report, rather than people, vehicles, property, etc.
- Select Save group.
- Select Add group again to add additional groups.
- Close the Manage Groups window once all necessary groups have been added.
You can also create groups while mapping PDF fields by selecting Create group or selecting New group from an Add to group menu.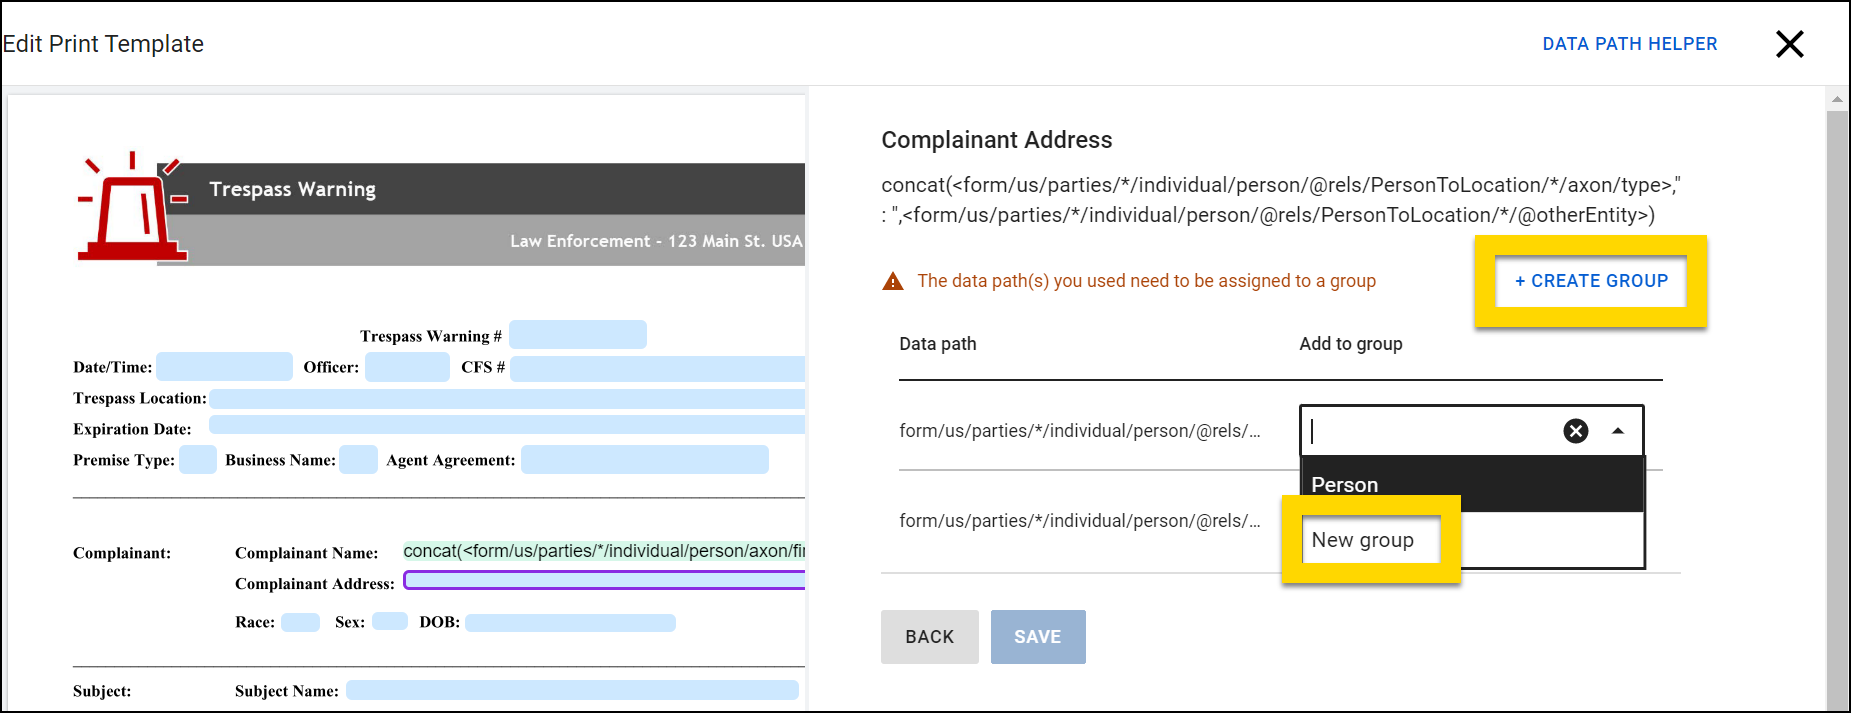
Add fields to mapping groups
When creating your PDF mappings, if the Data Path you enter in the Field data path(s) field is associated with an entity (e.g., person, vehicle, property), you will be asked to add them to a mapping group. You can add them to an existing group or create a new one.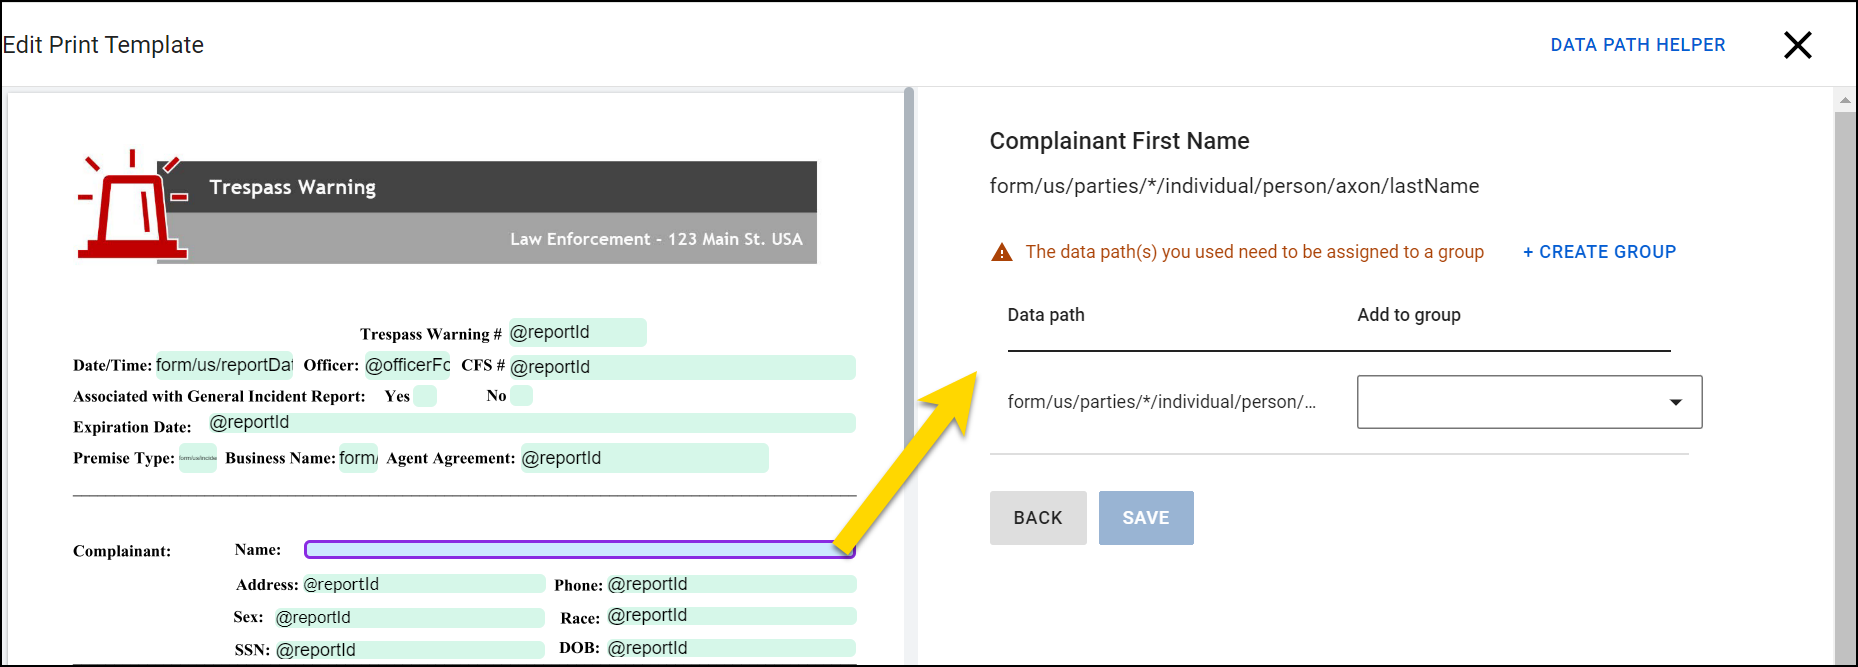
When creating a DOCX print template, you can both create a mapping group within the DOCX template and associate a template field with this mapping. To do this:
- In the DOCX template, enclose the data path in curly brackets
{}AND angle brackets<>. - Add the mapping group name after the opening angle bracket
<. - Enclose this mapping group name in square brackets
[].- e.g. mapping group in DOCX:Copy
{<[Victim]form/us/parties/*/individual/person/axon/firstName>}
- e.g. mapping group in DOCX:
- When you upload the template into Form Builder, you will be asked to select an entity type for each mapping group in the template.
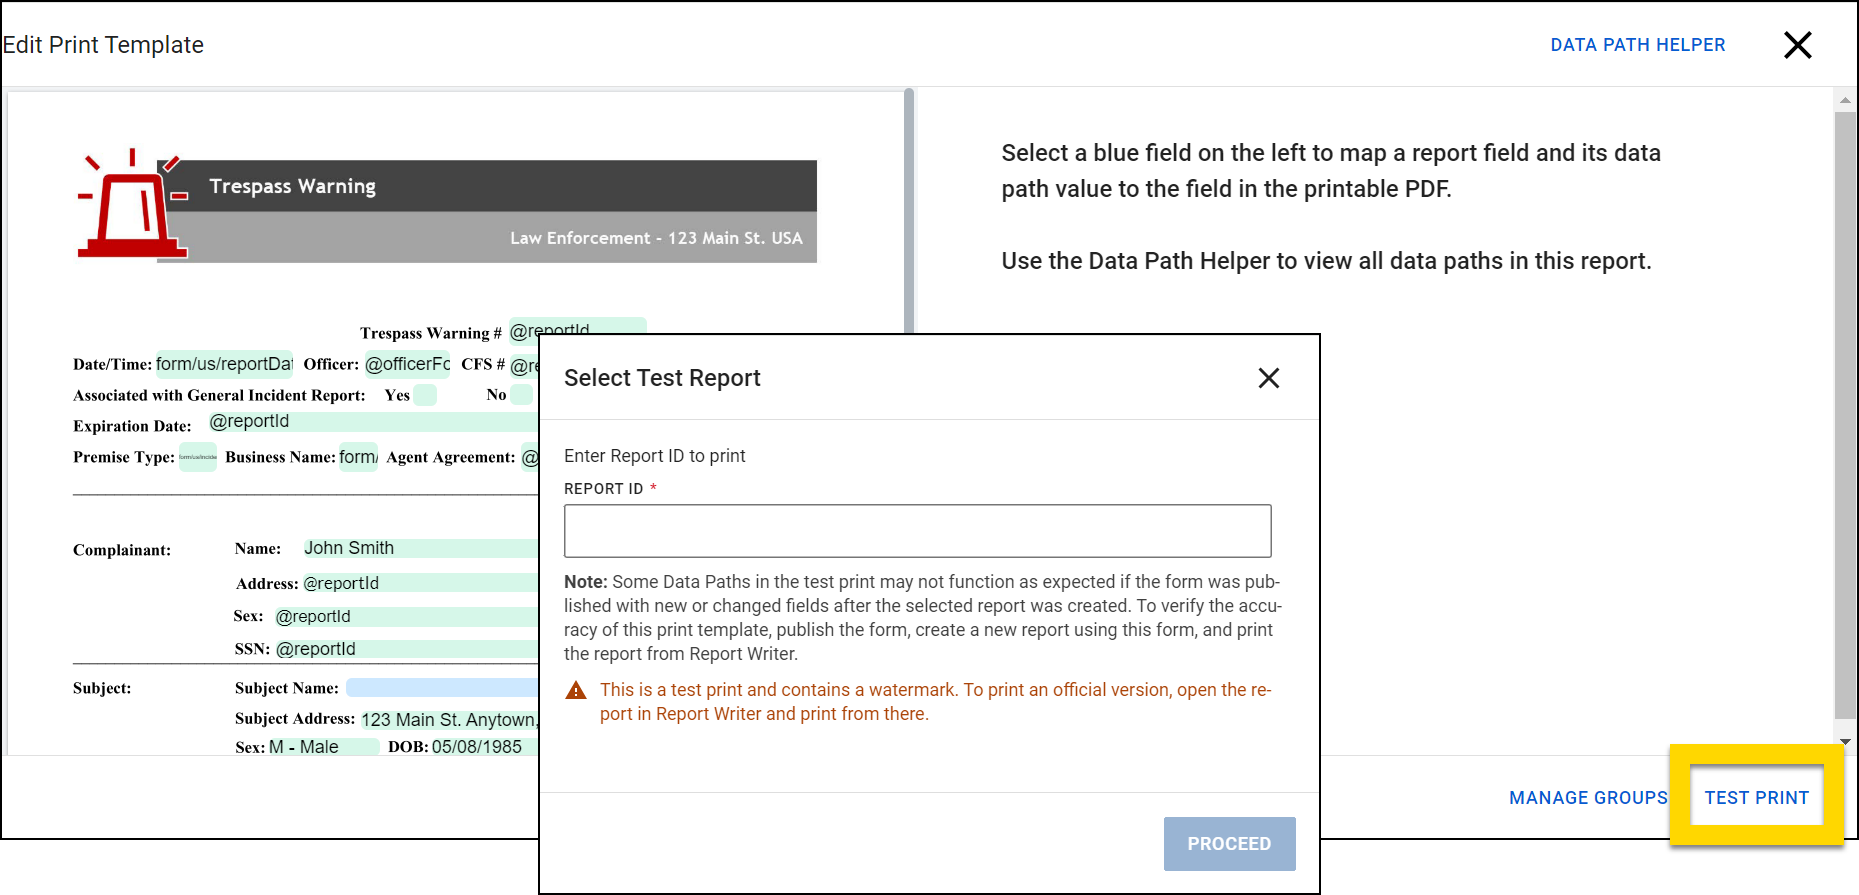
Test printing
After uploading a PDF or DOCX print template and adding its mappings, you can easily perform a print test to ensure that all formatting and data mapping works as expected. In this way, you can ensure that your print template is set up correctly before publishing it where it can be selected by users when they are printing reports.
To perform a print test, take these steps:
- Follow the steps to upload a PDF or DOCX template.
- After adding all mappings, select Test print.
- Enter the Report ID of an existing report.
- Some Data Paths in the test print may not function as expected if the form was published with new or changed fields after the selected report was created. To verify the accuracy of a print template, publish the form, create a new report using the form, and print the report from Report Writer.
- Select Proceed.
- The test print will open in a new browser tab where you can review it.
- The test print contains a watermark. To print an official version, open the report in Report Writer and print from there
- The test print contains a watermark. To print an official version, open the report in Report Writer and print from there
JSON print template editing
Some print template edits currently can't be accomplished in Form Builder. Instead, you can export the form's JSON, update the JSON as needed, and import the code.
Edits made directly to the form's JSON can often break the form and prevent you from re-publishing. Whenever possible, avoid editing the form's JSON to avoid this problem
To export, update, and import a form's JSON, take these steps:
- Open the Administrator Console by selecting the gear icon.
- Select Forms.
- Go to the Records, Standards, or Subforms tab, depending on which form/subform and its associated print templates you want to view.
- Select the blue form name that is associated with the print templates you want to edit.
- Select More actions [...] > Edit print templates.
- Select Edit on a print template you want to update.
- Select More actions [...] > Export JSON.
- Open the downloaded file on your computer, make the necessary changes, and save the file.
- Return to the form in Form Builder and select More actions [...] > Import JSON.
The following print template edits can be accomplished by directly editing the form's JSON:
- Turn compact printing on or off for default templates
- Prevent text overlapping in checkbox options
- Force page breaks for fields with variable heights
Compact printing
The default print template can be set to print with compact printing by directly editing the form's JSON. The following snippet can be added after title or id line in the form's JSON, as well as to each card on the form: "compact": true,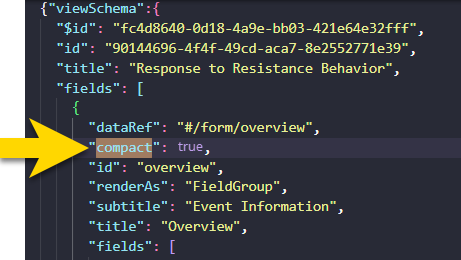
Text overlapping
When using non-compact printing, if your checkbox options are lengthy text strings (e.g., contain multiple sentences, force line breaks, etc.), you can add an Option Size to the field’s JSON that will prevent the checkbox text from overlapping with other form elements.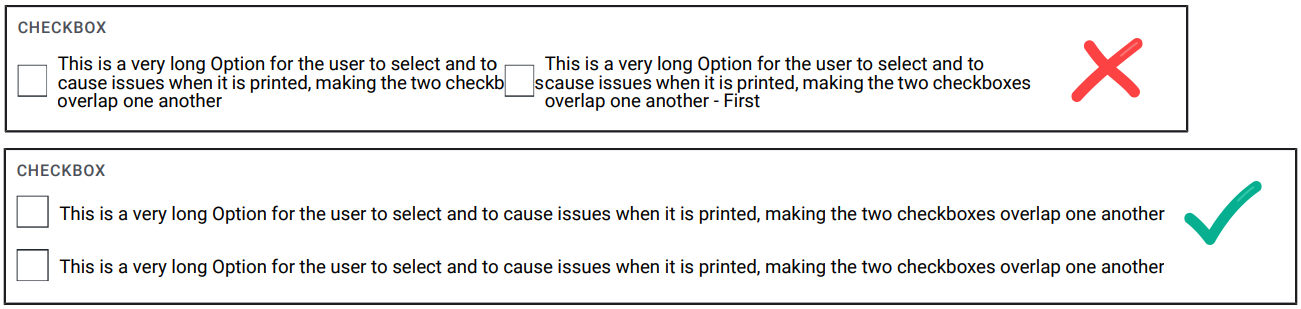
To control checkbox option size, add the following under the JSON for "fields":
{
"renderAs": "CheckboxArray",
"optionSize": 12,
"title": "Checkbox"
}
The option size values are the same as the size/field width values that are used when you create a regular form, which allow you to indicate how much horizontal space a field takes up. You can include any value from 1 to 12, with 12 indicating the full width of the print template. See Field widths for more information.
Page breaks
Sometimes, text from fields whose heights are variable, such as text or array fields, is printed over the printout’s footer text. To fix this, insert the following JSON above the field where you want the page break to occur:
{
"renderAs": "Offset"
}