Syntax guide
The features explained in this article are only available for Axon employees and do not appear in Form Builder.
Contact your Axon representative if your organization needs new or updated print templates.
When creating mappings for print templates, you can use specific syntax to transform the data that has been entered into your Axon Records and Axon Standards reports into an appropriate format for your printouts.
Definitions
- Data Path: A reference to the data that has been entered into a specific field in a report
- Each report field has a unique Data Path.
- Expression: Also called "operations." An expression is made up of operators (commands) and operands (inputs).
-
Take, for example, a basic mathematical expression:
1 + 1 = 2-
This expression is made up of two inputs, an operator, and a result.
1(input)+(operator)1(input)= 2(result)
-
This expression is made up of two inputs, an operator, and a result.
- In the same way, the expressions used in print templates contain operators and inputs:
-
Take, for example, a basic mathematical expression:
- String: A sequence of characters
- These characters can be letters, numbers, or symbols.
- Metadata: Fields that are automatically generated when a report is created (e.g., Report created date/time, agency name, etc.).
- Metadata appears in the Metadata section of the Data Path Helper.
General guidelines
- Data Paths are enclosed in angle brackets
< > -
Strings are enclosed in double quotations
" "- When using a number, do not enclose it in special characters.
-
To include a special character inside a string, use the corresponding HTML URL encoding for that character:
< > ( ) { } , " @ #- A list of standard HTML codes for special characters can be found here.
- Separate multiple inputs in an expression with commas
, - Metadata Paths start with the at symbol
@. This symbol must be included in syntax. - For advanced usage, nest expressions within one another.
- You can use the following expressions:
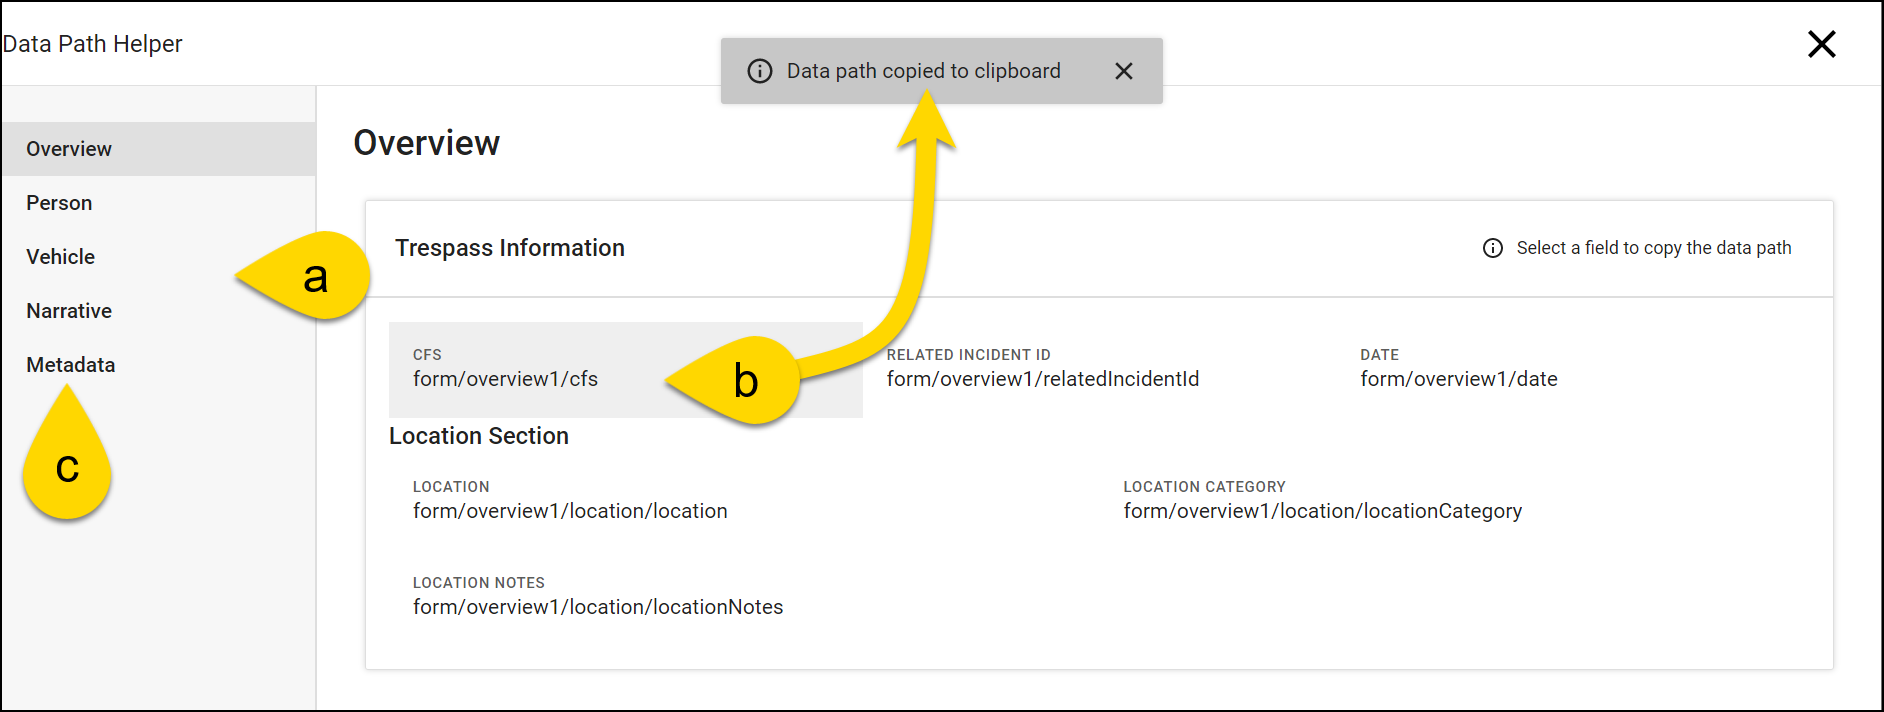
Data Path helper
A Data Path is a reference to the data that has been entered into a specific field in a report. Each report field has a unique Data Path.
The Data Path Helper can be accessed from the Agency templates tab or from within the Edit print template tool. Select Data Path helper to open this tool in a new browser tab.
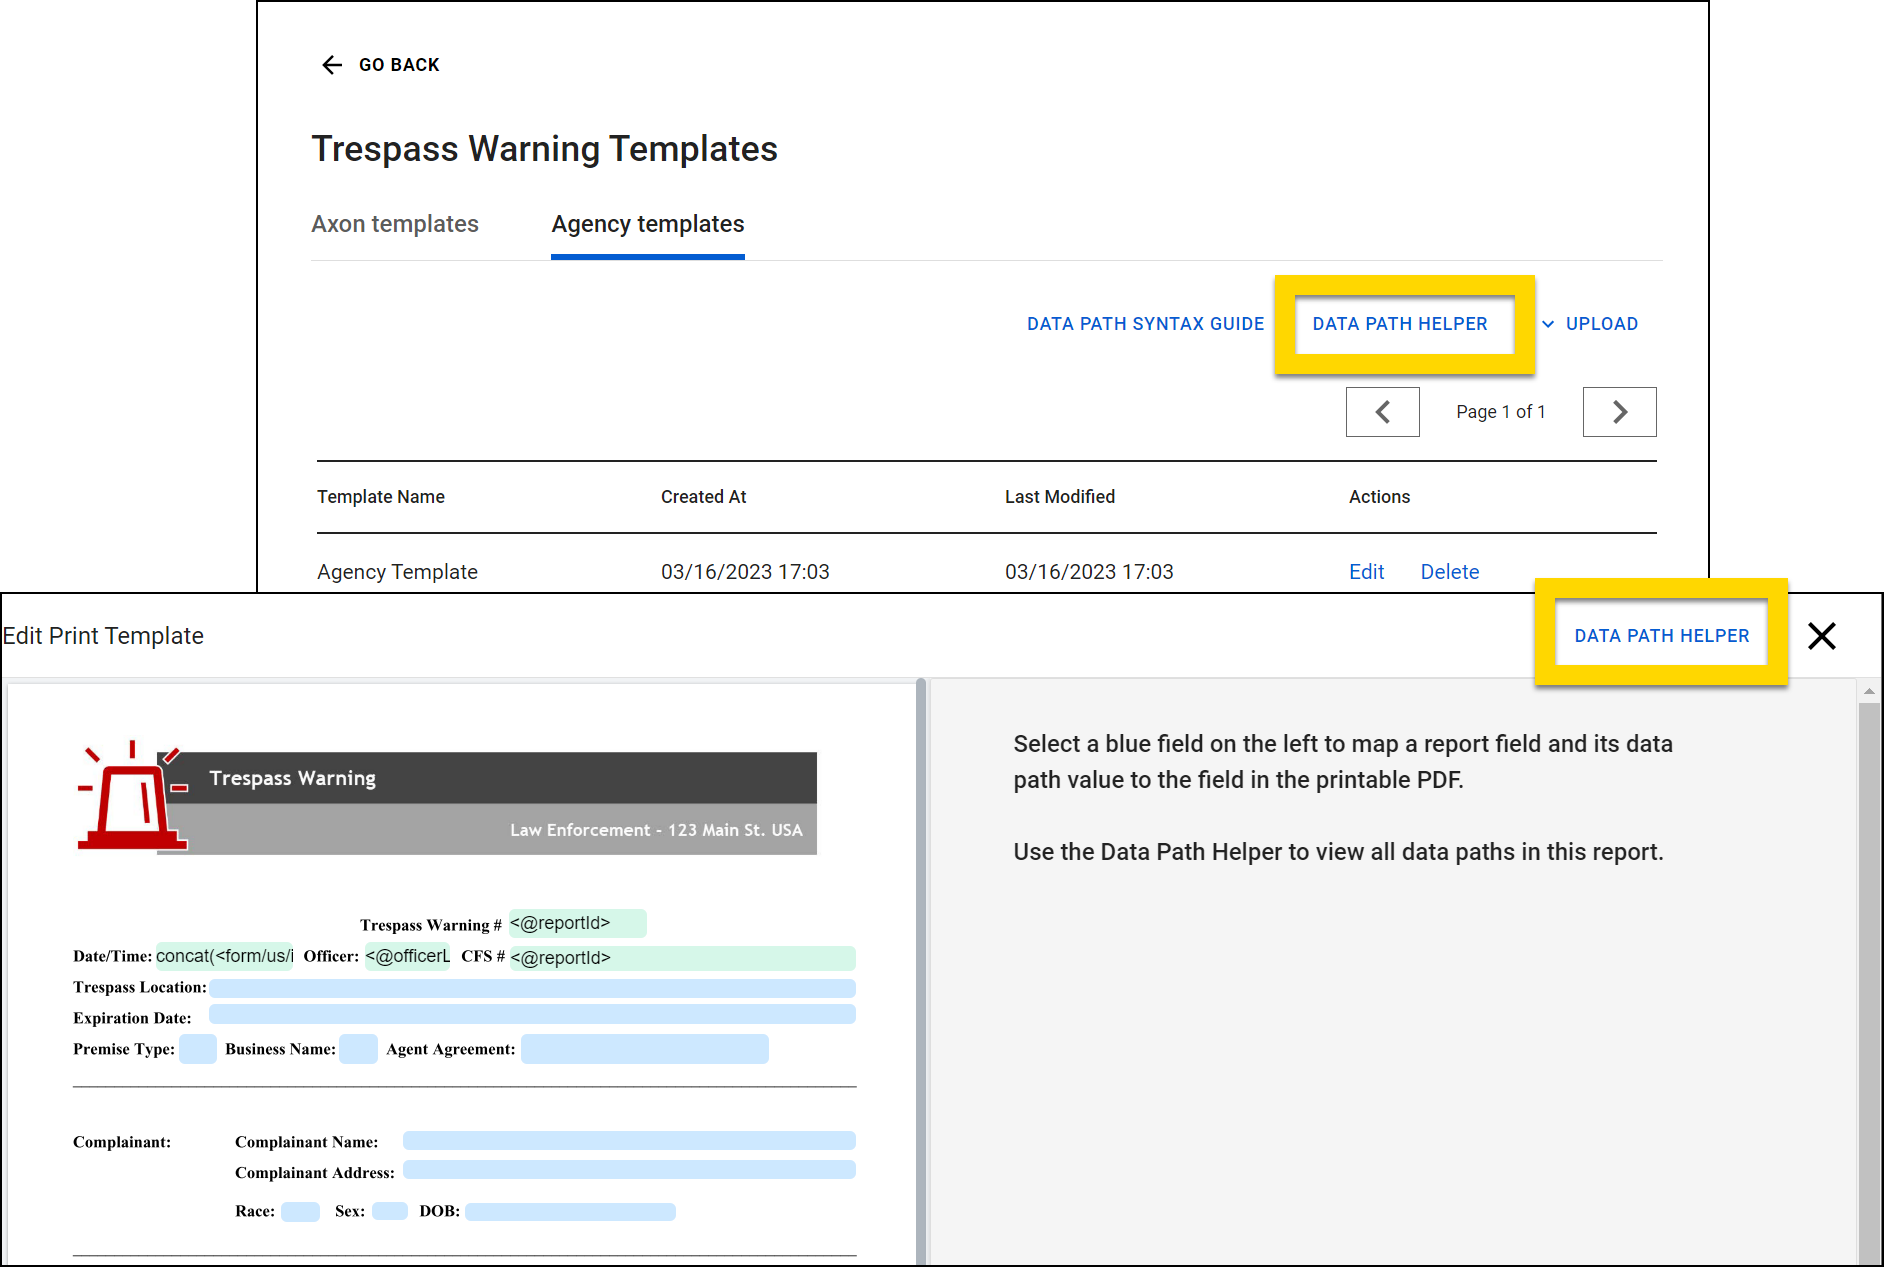
This helper displays all Data Paths for the report associated with the print template. Its layout is similar to the report itself, allowing you to quickly find the Data Path for a specific field:
- Select the headings on the left to jump between sections of the report.
- Select a field to copy that Data Path to your computer’s clipboard.
- The Metadata section contains all fields that are automatically generated when a report is created (e.g., Report created date/time, agency name, etc.).
It can be helpful to open the Data Path Helper in one browser window and the Edit print template tool in another to quickly and easily complete a template mapping.
All
An all expression lets you print all items in a list or use list items to mark checkboxes in a printout. For example, an all expression would let you print all roles that have been assigned to a person.
Lists
To print all entries in a list as a line of text, use: all(Data Path, Separator).
- Input 1: Data Path for the list
-
Input 2 (OPTIONAL): A separator printed in between items in the list, such as a space or a comma.
- If you do not provide this input, two semicolons (
;;) print in between each of the list items.
- If you do not provide this input, two semicolons (
Use a pick expression as a third optional input in an all expression to print a specific property for each item in a list. This is useful when the default rendering combines multiple properties and you only want one of the properties printed (such as enum options printing "shortCode - description"). Use "@VALUE" as the first input in the pick expression:
- Input 1: Data Path for the list
-
Input 2 (OPTIONAL): A separator printed in between items in the list, such as a space or a comma.
- If you do not provide this input, two semicolons (
;;) print in between each of the list items.
- If you do not provide this input, two semicolons (
- Input 3: Pick expression with the following inputs:
"@VALUE""Property Name"
Checkboxes
To mark a checkbox if a certain item appears in a list, use a combination of the contains and all expressions: contains(all(Data Path),"List item").
Similarly, you can combine omits and all expressions to mark a checkbox if a value does NOT appear in a list: omits(all(Data Path),"List item").
- Input 1 (all expression): Data Path for the list
- Input 2 (contains/omits expression): The list value that must / must not appear in the report for the checkbox to be marked.
You must use the all expression in combination with the contains/omits expressions when you want the expression to review all items in a list. If you use the contains/omits expression alone, you can only interact with a single dropdown menu.
Examples
List example 1
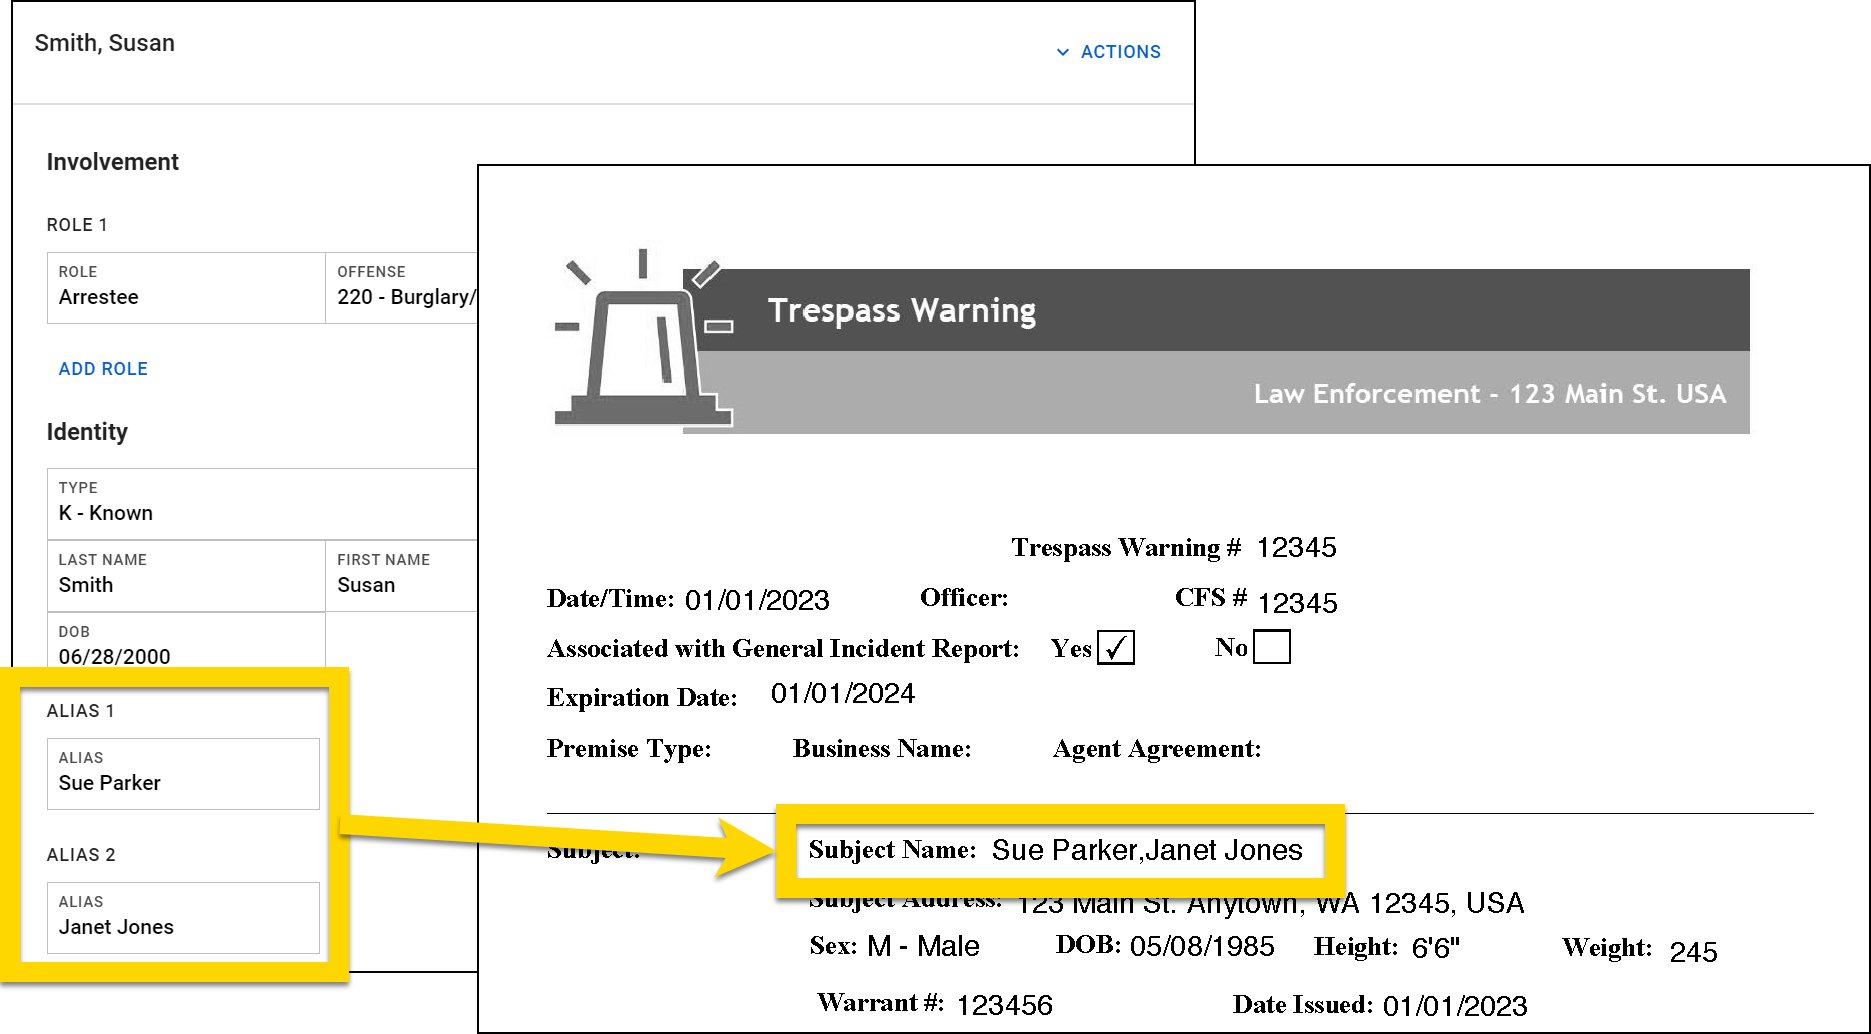
To print all of a person's aliases:
- Expression:
Copy
all(<form/us/parties/*/individual/person/axon/aliases*/>,"%2C") - Inputs:
<form/us/parties/*/individual/person/axon/aliases*/>"%2C"
- Result: Sue Parker,Janet Jones
List example 2
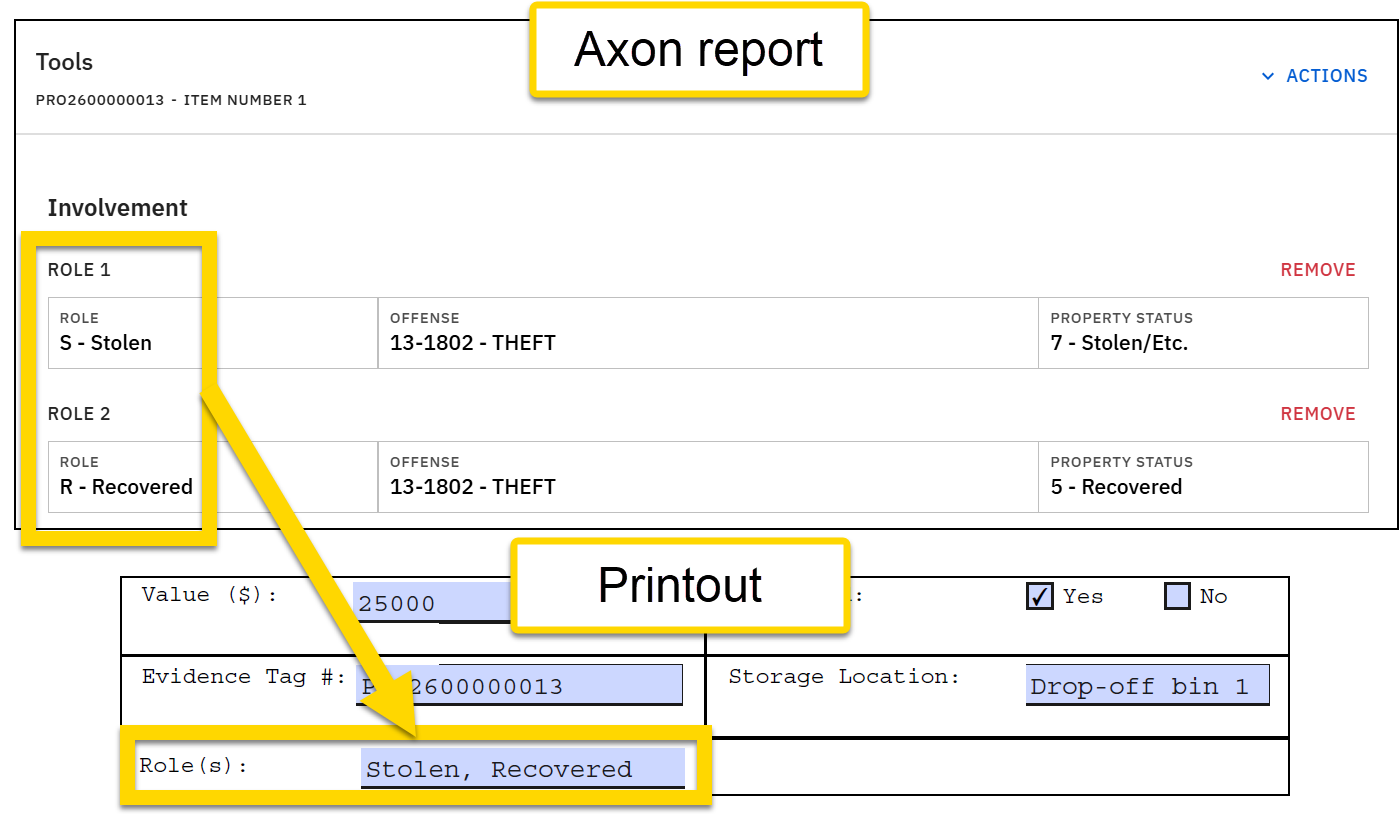
To print all roles for a property item:
- Expression:
Copy
all(<form/us/properties/*/property/@rels/PropertyToOffense/*/axon/involvement> , " %2C ", pick("@VALUE", "description")) - Inputs:
<form/us/properties/*/property/@rels/PropertyToOffense/*/axon/involvement>"%2C "- Pick expression composed of two inputs:
"@VALUE""description"
- Result: Stolen, Recovered
Checkbox example
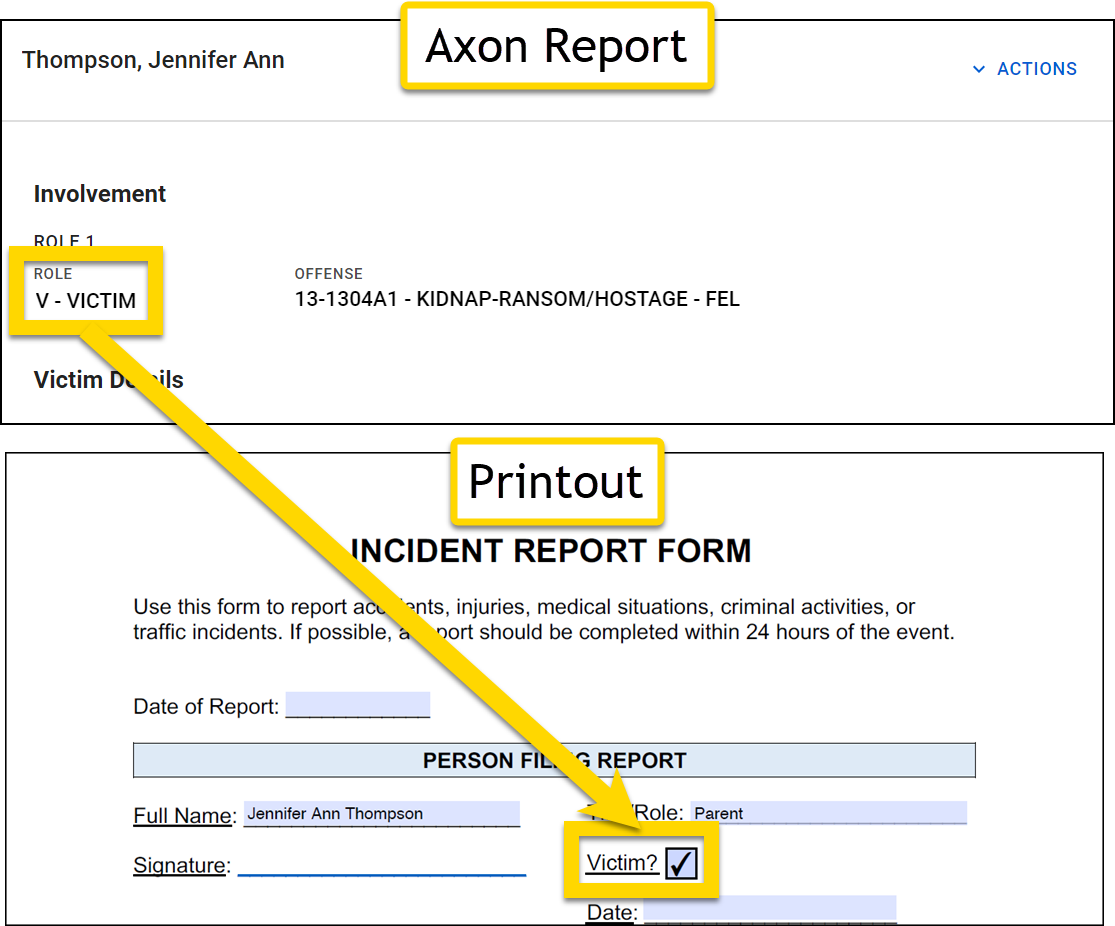
To check a box if any of the roles for a person is "Victim":
- Expression:
Copy
contains(all(<form/us/parties/*/individual/person/@rels/PersonToOffense/*/axon/involvement>), "VICTIM") - Inputs:
-
An all expression composed of one input:
<form/us/parties/*/individual/person/@rels/PersonToOffense/*/axon/involvement>
"VICTIM"
-
An all expression composed of one input:
- Result:
Compute
To check a checkbox in a report based on the value entered in a report field, use: compute(Data Path or expression, Comparator, Value to compare against). You can also use this expression to print "true" or "false" in a text box in the printout.
- Input 1: A Data Path or expression
- Input 2: The comparison to be performed. Use one of the supported comparators listed below.
-
Input 3: The value to compare Input 1 against. This can be one of the following:
- String
- Another expression
- Another Data Path
-
@VALUE (checks if the field has been filled out or if it is empty; must be formatted in all caps)
- This input only works with
hasandhasnotcomparators.
- This input only works with
Comparators
The following comparators can be used when creating print templates.
Greater than: gt
This comparator compares the value entered in a Data Path or the result of an expression against another value to see if the Data Path/expression is greater than the provided value.
Less than: lt
This comparator compares the value entered in a Data Path or the result of an expression against another value to see if the Data Path/expression is less than the provided value.
Equals: is
This comparator compares the value entered in a Data Path or the result of an expression against a provided value to see if they are equal (or the same).
Not equals: isnot
This comparator compares the value entered in a Data Path or the result of an expression against a provided value to see if they are NOT equal (or different).
Includes: has
This comparator compares the value entered in a Data Path or the result of an expression against another value to see if the Data Path/expression includes (or has) the provided value.
Excludes: hasnot
This comparator compares the value entered in a Data Path or the result of an expression against another value to see if the Data Path/expression excludes (or does not have) the provided value.
In: in
This comparator checks the value entered in a Data Path or the result of an expression against a list of items to see if any items in the list match the Data Path or expression. The provided list of items must be written using the default separator between items (;;).
In: notin
This comparator checks the value entered in a Data Path or the result of an expression against a list of items to see if any items in the list do NOT match the Data Path or expression. The provided list of items must be written using the default separator between items (;;).
Cross: xo
This comparator splits the value entered in a Data Path or the result of an expression into a list. The comparator also splits a provided list of items into a second list. The two lists are then compared to one another to see if there is any overlap between both lists. The provided list of items must be written using the default separator between items(;;).
Non-cross: notxo
This comparator splits the value entered in a Data Path or the result of an expression into a list. The comparator also splits a provided list of items into a second list. The two lists are then compared to one another to see if there is NOT any overlap between both lists. The provided list of items must be written using the default separator between items(;;)
Which comparator to use?
When creating Skip, Only, and Compute expressions, it can be challenging to determine which comparator to use. For these expressions, Input 2 is always the comparator. The illustration below explains how Inputs 1 and 3 determine which comparator you should use: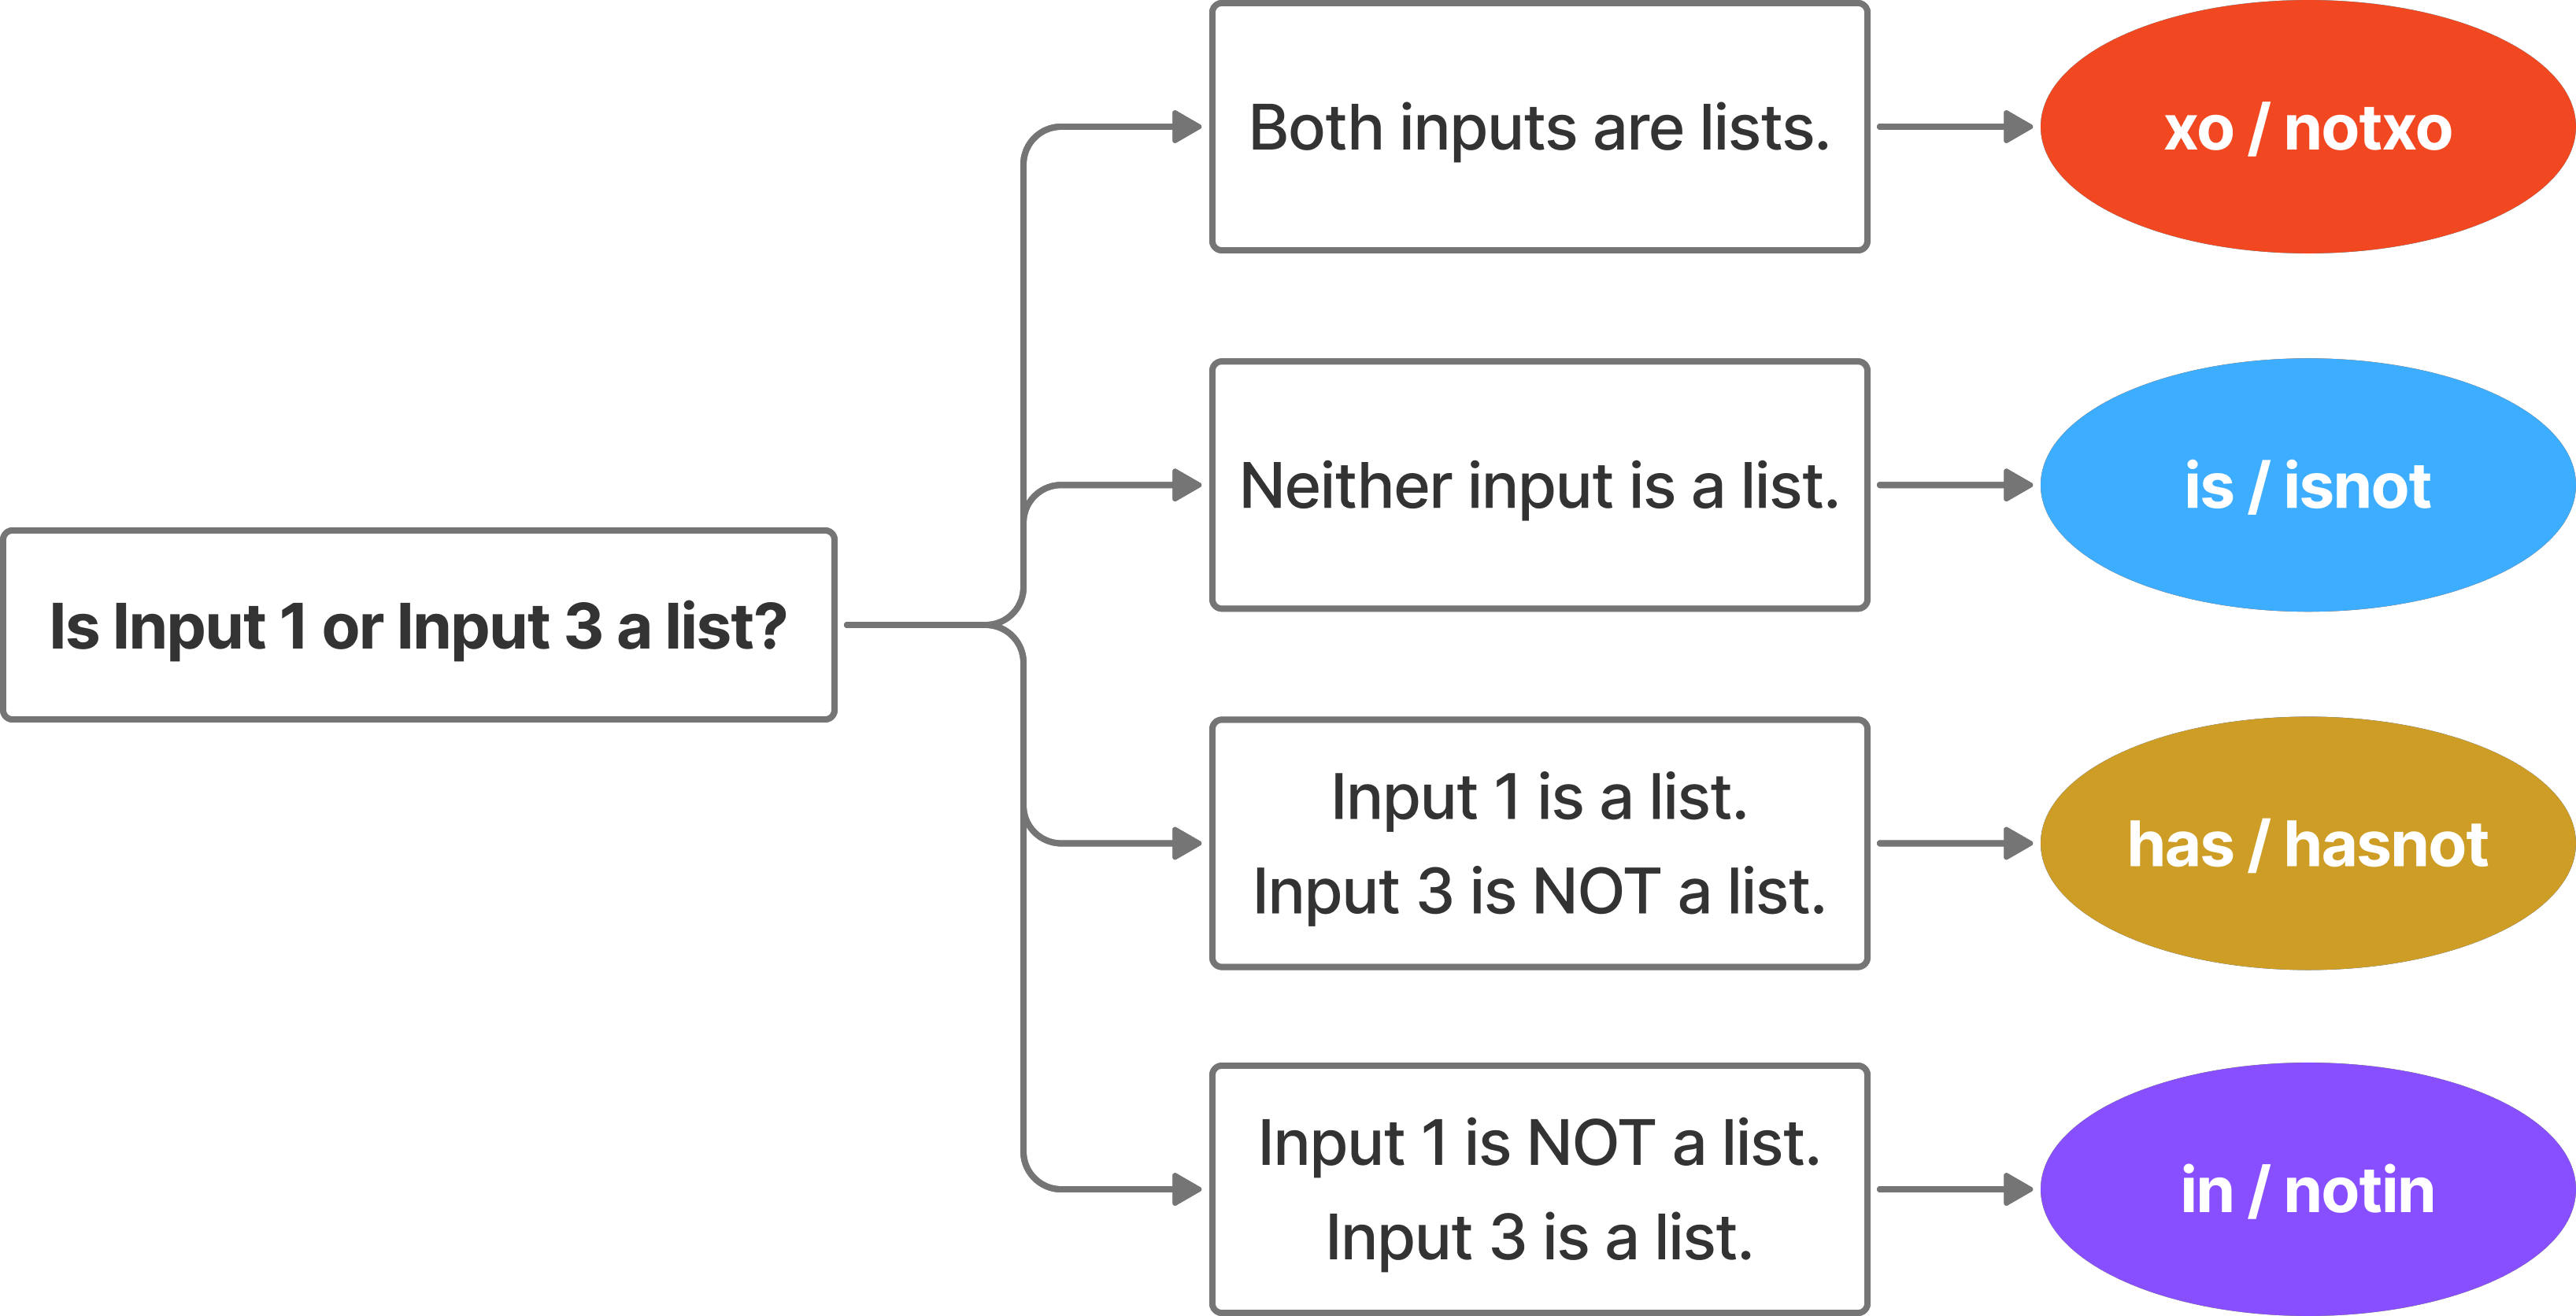
Examples
Example 1
To mark a box in the printout if a person added to the report is under 18:
- Report data: Age field is set to 14
- Expression:
Copy
compute(<form/us/parties/*/individual/person/axon/age>,"lt", "18") - Inputs:
<form/us/parties/*/individual/person/axon/age>"lt""18"
- Result: A marked checkbox
- This operation looks at the information entered in the Age field and marks the checkbox because the number, 14, is less than 18.
- This operation looks at the information entered in the Age field and marks the checkbox because the number, 14, is less than 18.
Example 2
To mark a box in the printout if the Arrest type field contains data:
- Report data: Arrest type field is set to "T - Taken Into Custody"
- Expression:
Copy
compute(<form/us/parties/*/individual/person/@rels/PersonToArrest/0/@otherEntity/axon/arrestType>,"has", "@VALUE") - Inputs:
<form/us/parties/*/individual/person/@rels/PersonToArrest/0/@otherEntity/axon/arrestType>"has"@VALUE
- Result: A marked checkbox
- This operation looks at the information entered in the Arrest type field and marks the checkbox because the field has been filled out.
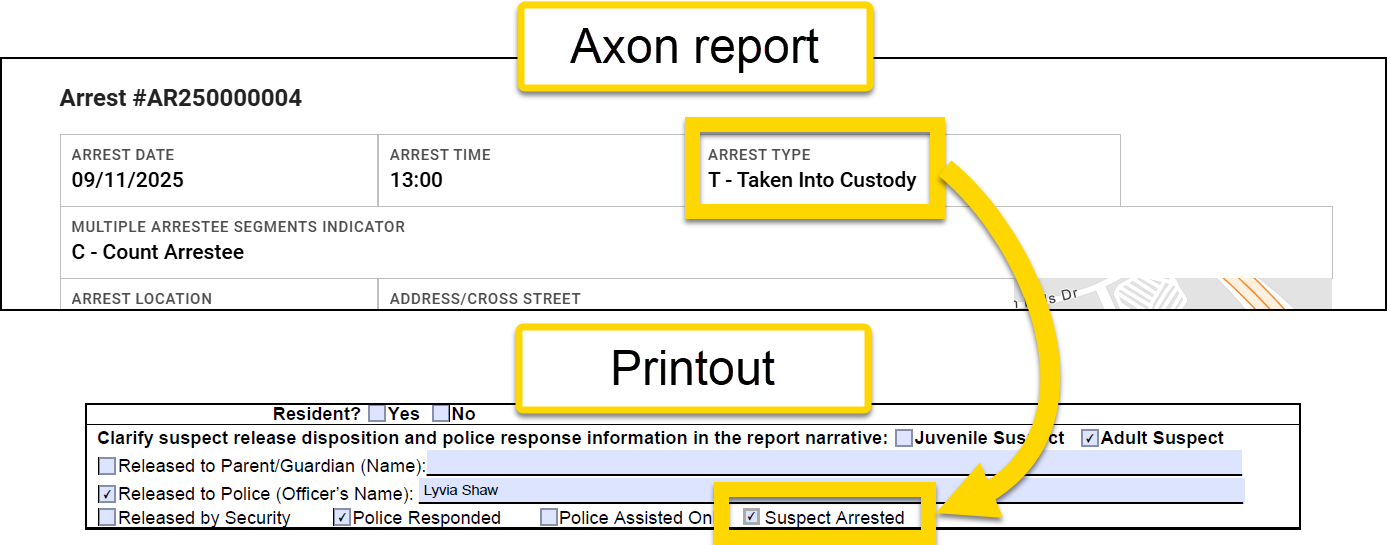
- This operation looks at the information entered in the Arrest type field and marks the checkbox because the field has been filled out.
Example 3
To mark a box in the printout if the report creation date is not the same as the incident occurrence date:
- Report data: Incident from date field is set to 12/10/2024, and the report creation date is 12/12/2024
- Expression:
Copy
compute(<form/us/incidentFromDate>, "isnot", @day) - Inputs:
<form/us/incidentFromDate>"isnot"@day
- Result: A marked checkbox
- This operation looks at the report creation date (12/12/2024) and compares it to the Incident from date field (12/10/2024) and marks the No checkbox in the printout.
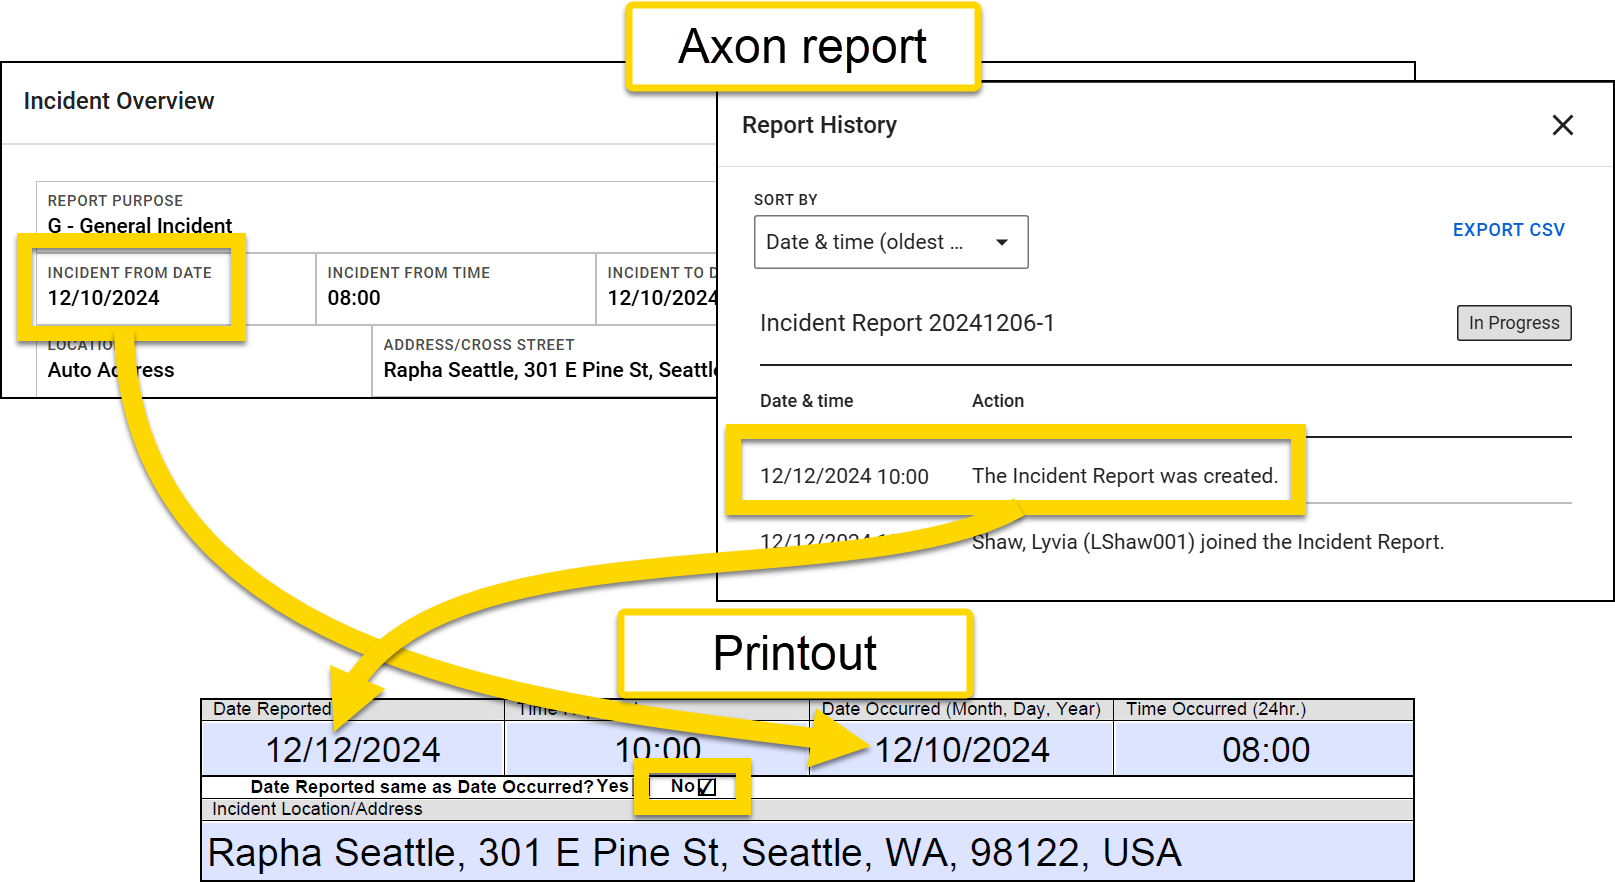
- This operation looks at the report creation date (12/12/2024) and compares it to the Incident from date field (12/10/2024) and marks the No checkbox in the printout.
Example 4
To mark a box in the printout if a specific offense appears in the Offense field:
- Report data: Offense field is set to 13-1802 - THEFT
- Expression:
Copy
compute(pick(<form/us/offenses/*/offense/@rels/OffenseToCharge/0/@otherEntity>, "shortDescription"), "is", "FALSE RPT VEH THEFT") - Inputs:
-
A pick expression that checks for the offense's short description, composed of two inputs:
<form/us/offenses/*/offense/@rels/OffenseToCharge/0/@otherEntity>"shortDescription"
"is""FALSE RPT VEH THEFT"
-
A pick expression that checks for the offense's short description, composed of two inputs:
- Result: A marked checkbox
- This operation looks at the information entered in the Offense field and only marks the checkbox if the FALSE RPT VEH THEFT offense appears.
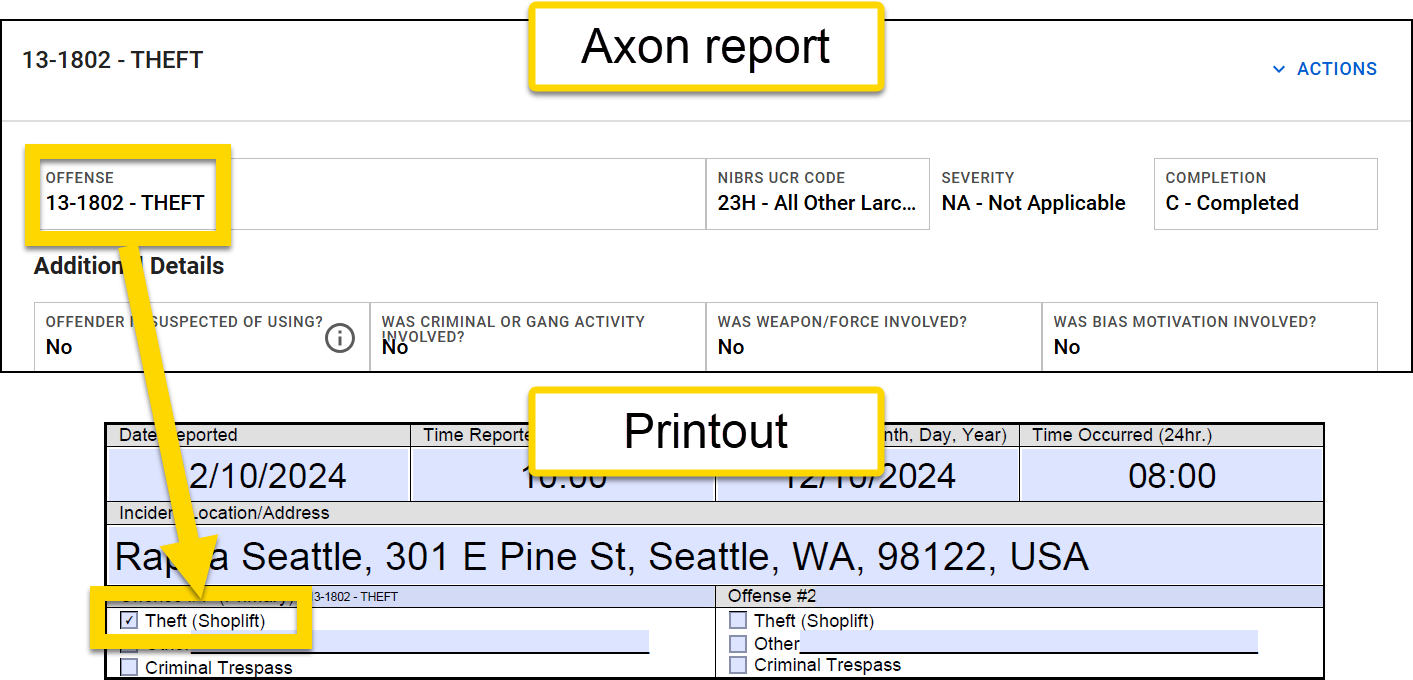
- This operation looks at the information entered in the Offense field and only marks the checkbox if the FALSE RPT VEH THEFT offense appears.
Example 5
To mark a School checkbox in the printout if the Location category field is set to School-College/University or School-Elementary/Secondary:
- Report Data: Location category is set to School-College/University
- Expression:
Copy
compute(<form/us/incidentLocation/type>, "in", "SCHOOL_ELEMENTARY_SECONDARY;;SCHOOL_COLLEGE_UNIVERSITY") - Inputs:
<form/us/incidentLocation/typ>"in""SCHOOL_ELEMENTARY_SECONDARY;;SCHOOL_COLLEGE_UNIVERSITY"- Because the Data Path in this expression is a dropdown field, the strings in this third input must match the actual values for the options in the dropdown field. If this expression referenced a checkbox field, actual values would also be required for this third input.
- Because the Data Path in this expression is a dropdown field, the strings in this third input must match the actual values for the options in the dropdown field. If this expression referenced a checkbox field, actual values would also be required for this third input.
- Result: A marked checkbox
- This operation looks at the information entered in the Location category field and marks the School checkbox because the field is set to School-College/University.
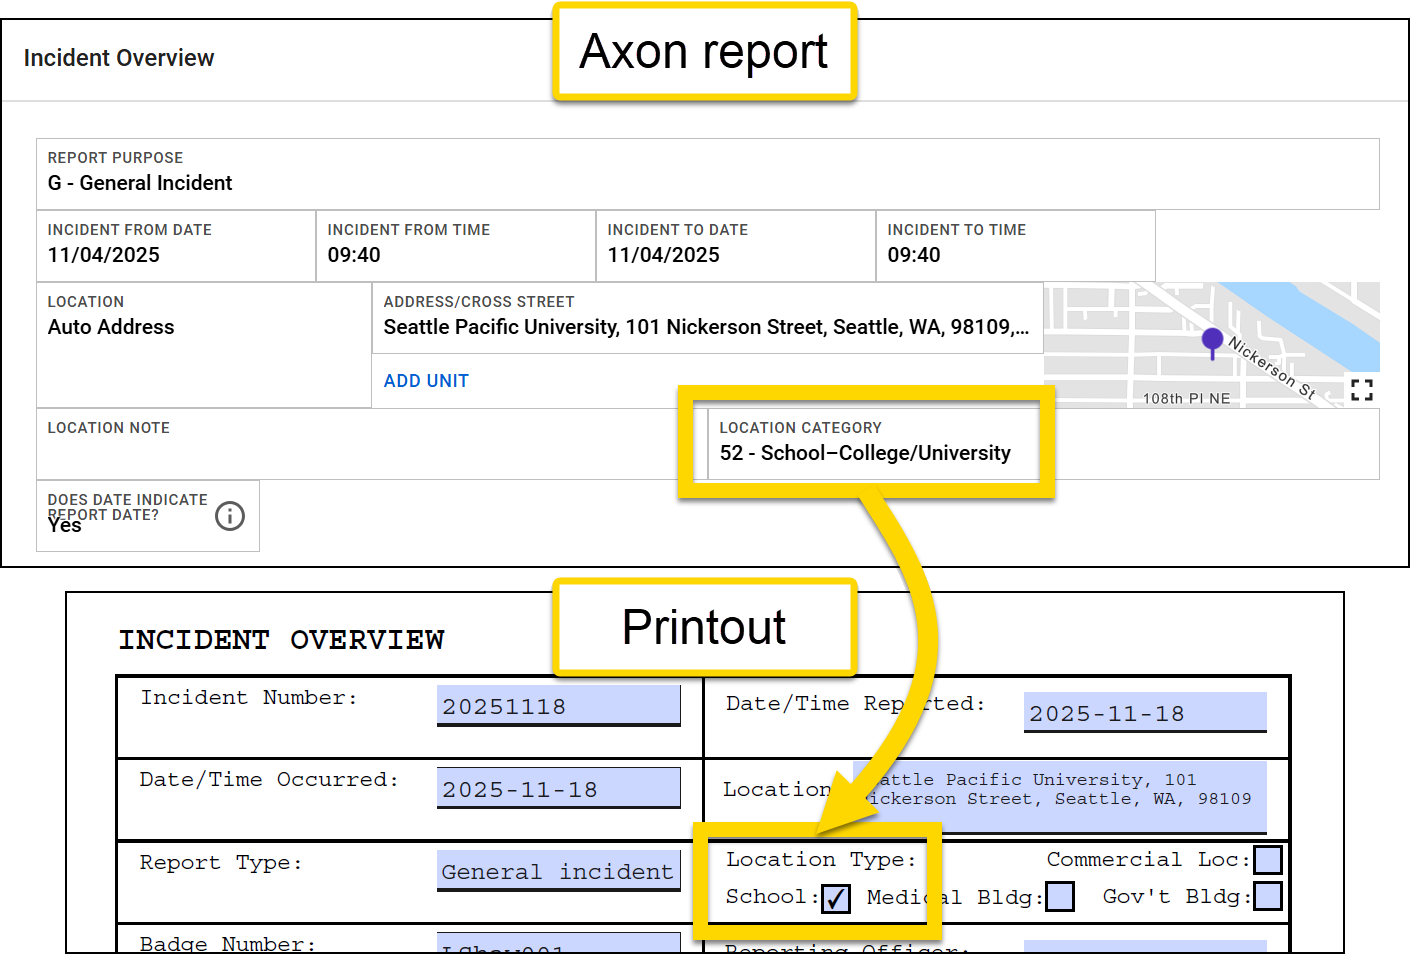
- This operation looks at the information entered in the Location category field and marks the School checkbox because the field is set to School-College/University.
Example 6
To mark a box in the printout if any of a person's roles is Offender or Arrestee:
- Report Data: A person is added to the report with two roles: Offender and Victim.
- Expression:
Copy
compute(all(<form/us/parties/*/individual/person/@rels/PersonToOffense/*/axon/involvement>), "xo", "ARRESTEE;;OFFENDER") - Inputs:
-
An all expression that checks each alias entered for every person in a report.
<form/us/parties/*/individual/person/@rels/PersonToOffense/*/axon/involvement>
"xo""ARRESTEE;;OFFENDER"- Because the Data Path in this expression is a dropdown field, the strings in this third input must match the actual values for the options in the dropdown field. If this expression referenced a checkbox field, actual values would also be required for this third input.
-
An all expression that checks each alias entered for every person in a report.
- Result: A marked checkbox
- This operation looks at the person's roles and marks the checkbox because one role is Offender.

- This operation looks at the person's roles and marks the checkbox because one role is Offender.
Concat
To map inputs from multiple fields in a report to a single field on a the printout, use: concat(Input 1, Input 2, Input 3, etc.). You can use three different types of inputs:
Data Paths
The simplest form of concatenation is to combine data from multiple fields into a single field without introducing any separation between the data inputs.
Strings
To separate the data inputs, you can use an additional input. The character(s) used to separate concatenated fields can be made up of any character type, as long is it is enclosed in double quotation marks.
Expressions
One or more of the inputs can be a another full expression.
Examples
Data Path example
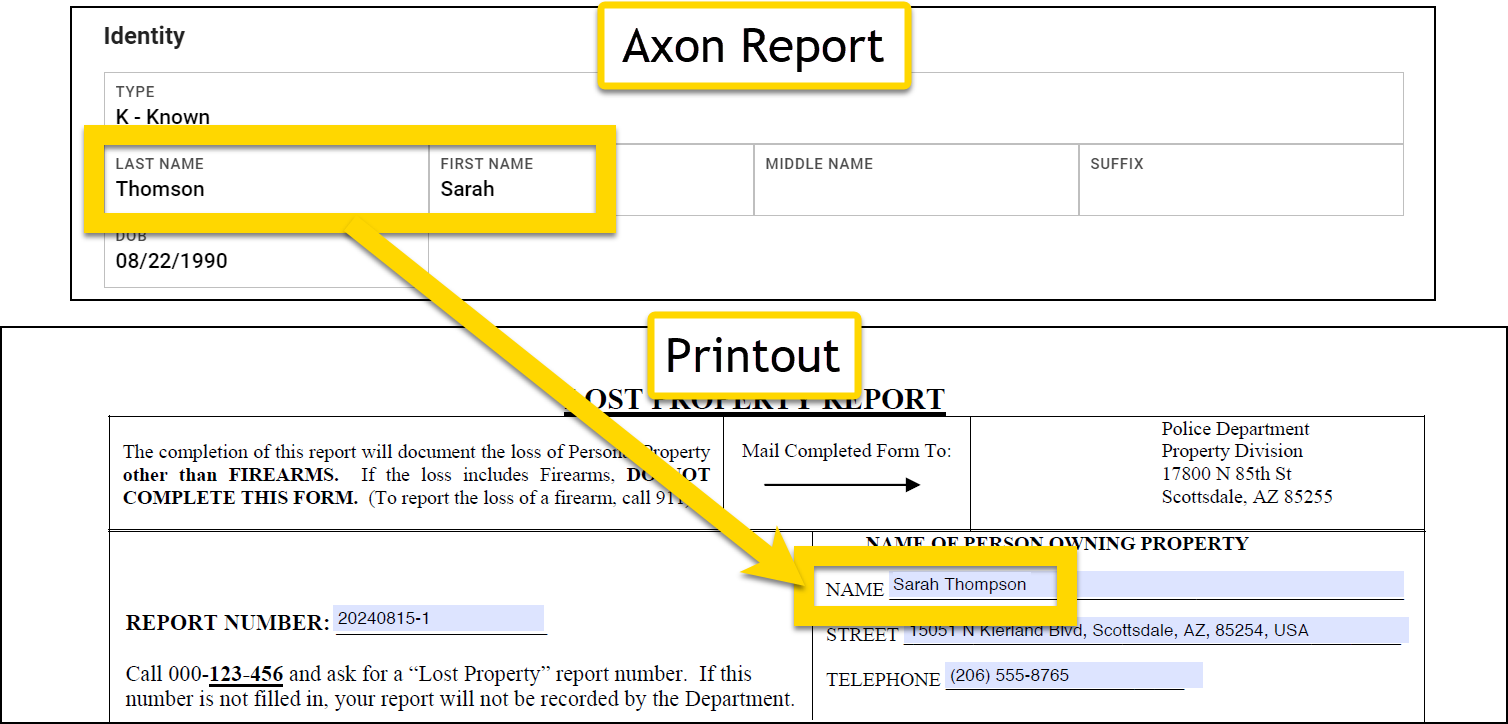
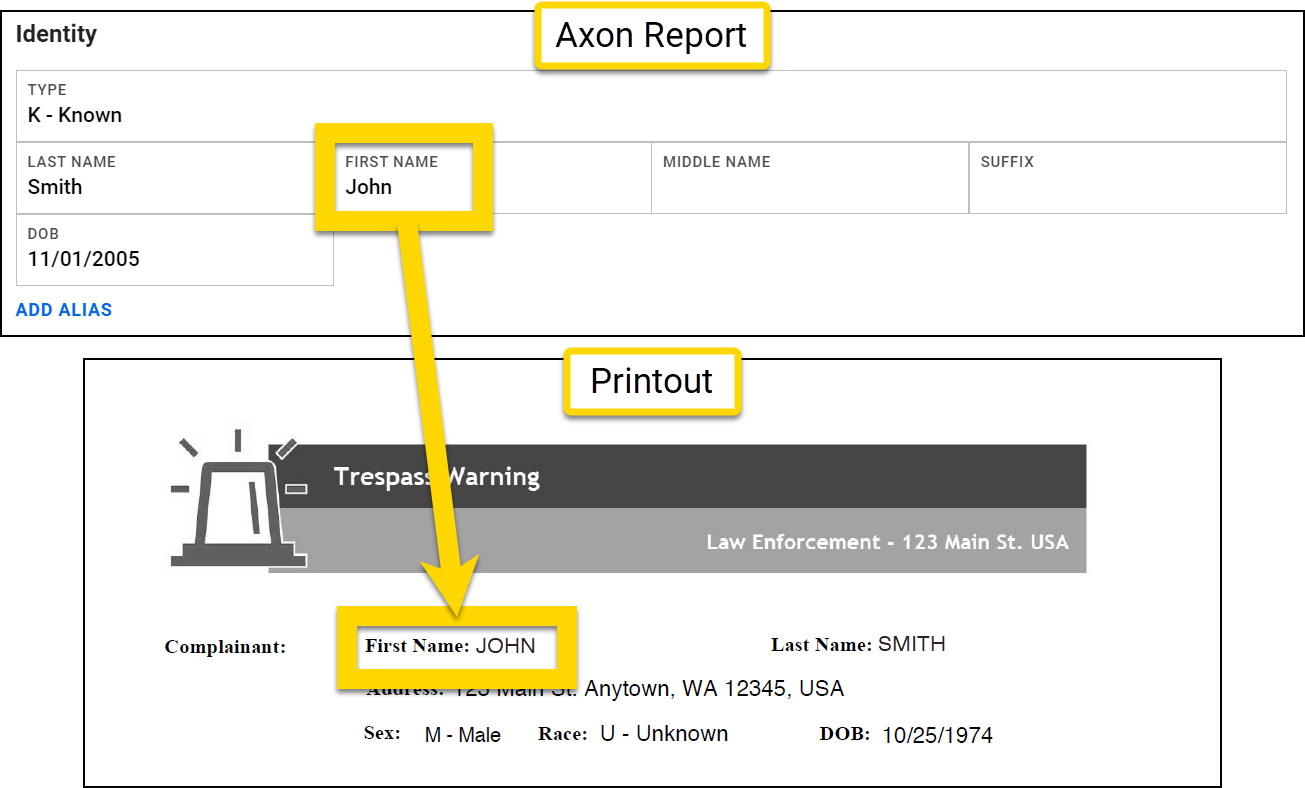
To map the first and last name of a person (names appear in two different fields) to a single field in a printout:
- Original data:
- Field 1: Thomson
- Field 2: Sarah
- Expression:
Copy
concat(<form/us/firstName>,<form/us/lastName>) - Inputs:
<form/us/firstName><form/us/lastName>
- Result: SarahThomson

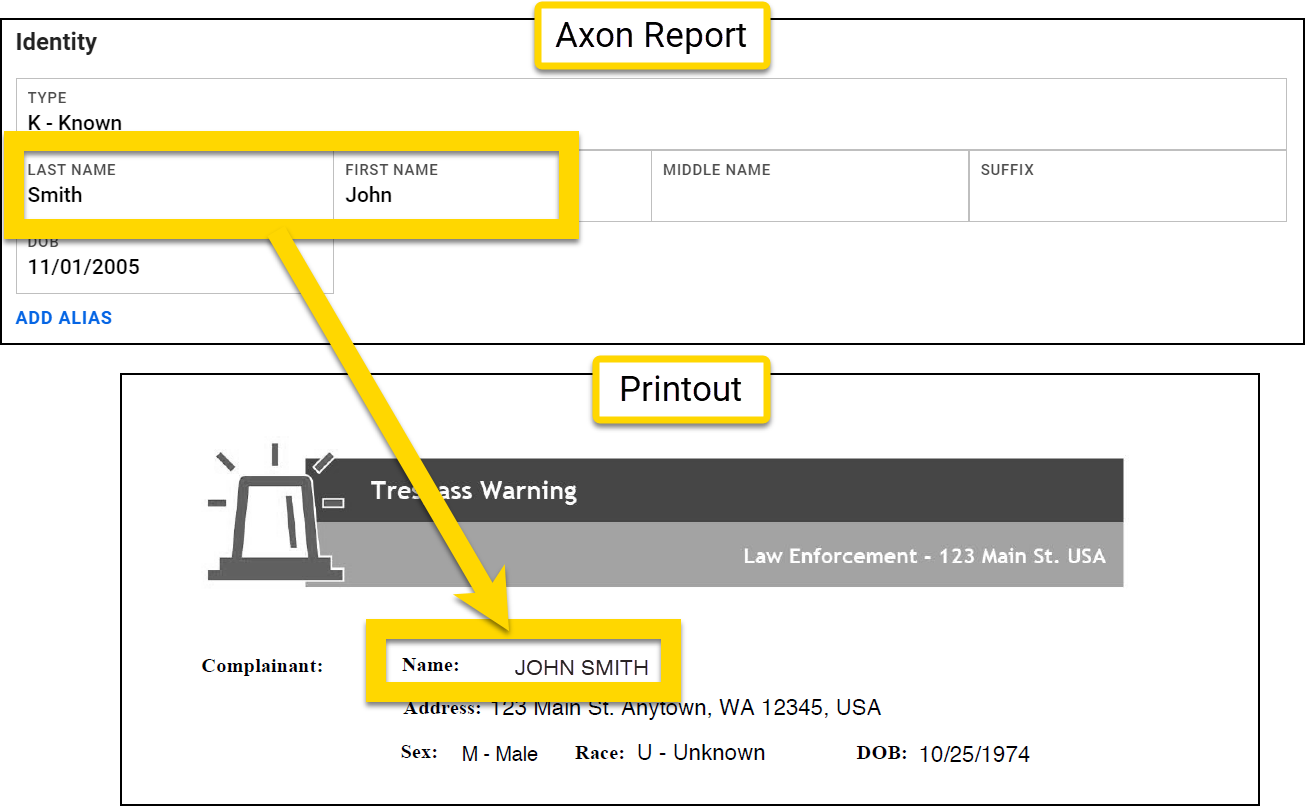
String example 1
To insert a space in the printout between a person's first and last name, add an additional input of " " (double quotation space double quotation) to your expression. This input should appear between the Data Path inputs for the first and last name fields.
- Original data:
- Field 1: Thomson
- Field 2: Sarah
- Expression:
Copy
concat(<form/us/firstName>," ",<form/us/lastName>) - Inputs:
<form/us/firstName>" "<form/us/lastName>
- Result: Sarah Thomson
String example 2
To insert a special character (such as a comma) between a person's first and last name, use the HTML code rather than the character itself.
- Original data:
- Field 1: Thomson
- Field 2: Sarah
- Expression:
Copy
concat(<form/us/firstName>,"%2C ",<form/us/lastName>) - Inputs:
<form/us/lastName>"%2C "- Note that the HTML code is used for the comma (,). A list of standard HTML codes for special characters can be found online.
- This input includes a space after the comma's HTML code to separate the inputs by both a comma and a space.
<form/us/firstName>
- Result: Thomson, Sarah

Expression example 1
Use a split expression as an input to include a portion of the information that appears in a field alongside the data from another field.
- Original data:
- Field 1: 06 - Clothes/Furs
- Field 2: A woman’s short-sleeve blouse with a floral pattern, made of lightweight cotton fabric, featuring a button-down front.
- Expression:
Copy
concat(split(<form/us/properties/*/property/axon/type>," - ",1)," - ",<form/us/properties/*/property/axon/description>) - Inputs:
-
A split expression composed of three inputs:
<form/us/properties/*/property/axon/type>" - "1
" - "<form/us/properties/*/property/axon/description>
-
A split expression composed of three inputs:
- Result: Clothes/Furs - A woman’s short-sleeve blouse with a floral pattern, made of lightweight cotton fabric, featuring a button-down front.
- The first portion of the result includes a split part of the first field (Clothes/Furs). The second portion of the result includes the property item's description. The two parts of the result are separated by a space, a hyphen, and a space.
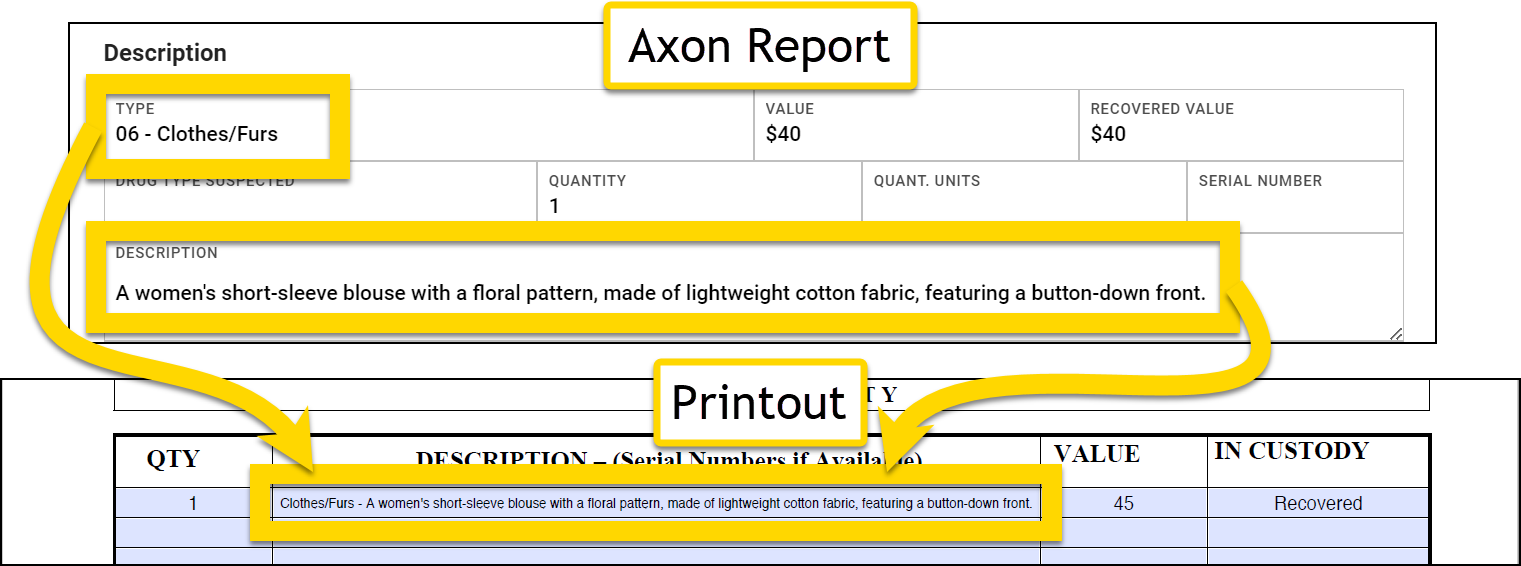
- The first portion of the result includes a split part of the first field (Clothes/Furs). The second portion of the result includes the property item's description. The two parts of the result are separated by a space, a hyphen, and a space.
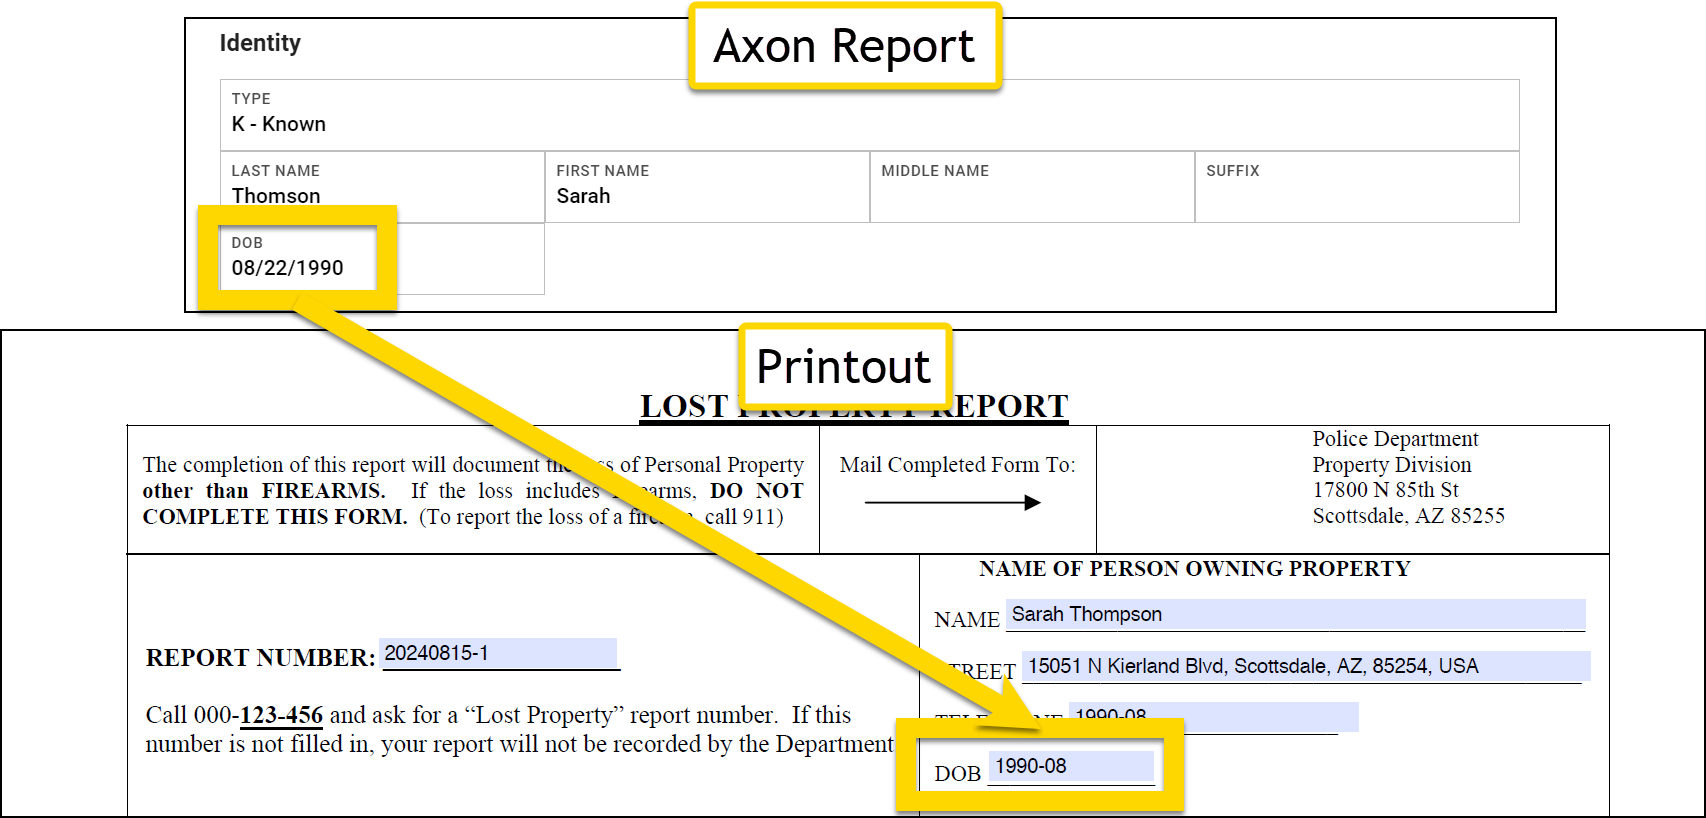
Expression example 2
You can use the same Data Path multiple times in an expression. For example, to reformat the order in which dates are shown, use two split expressions to extract the data portions and use a concat expression to put them back together in a different order:
- Original data: 08/22/1990
- Expression:
Copy
concat(split(<form/us/parties/*/individual/person/axon/birthdate>,"/",2),"-", split(<form/us/parties/*/individual/person/axon/birthdate>,"/",1)) - Inputs:
-
A split expression composed of three inputs:
<form/us/parties/*/individual/person/axon/birthdate>"/"2
"-"-
Another split expression composed of three inputs:
<form/us/parties/*/individual/person/axon/birthdate>"/"0
-
A split expression composed of three inputs:
- Result: 1990-08
-
The data in this field is composed of three parts (month, day, and year). Each part is separated by a forward slash.
- The first part, as indicated by the split index of 0, is 08, and the third part, as indicated by the split index of 2, is 1990.
- These two parts are rejoined using the concat operation. The third part (year) of the original field appears first, followed by a hyphen, followed by the first part (month) of the original field.
-
The data in this field is composed of three parts (month, day, and year). Each part is separated by a forward slash.
Contains and omits
To check if a string is present in a field and indicate this in the printout, use a contains expression. To do the opposite (check if a string is NOT present in a field), use an omits expression.
The contains and omits expressions can include Data Paths for the following field types:
- Checkboxes
- Dropdowns
- Text fields
When mapping checkbox fields, verify that the checkbox properties in your PDF or DOCX print template file are set correctly.
To check a box in a printout if a checkbox or dropdown option is selected in a report, or if a string appears in a field, use: contains(Data Path, Present String).
To check a box in a printout if a checkbox or dropdown option is NOT selected in a report, or if a string appears in a field, use: omits(Data Path, Present String).
-
Data Path: The Data Path for the field you are checking
- The Data Path can be for any field type, not just a checkbox field.
-
Present string: The value of the checkbox or dropdown option
- The string must be an exact match for the actual value of the option. Partial matches are not supported. To find this value, see Actual values.
- The string should be enclosed in double quotations (
" ").
If you use the contains operation to map a checkbox in the report to a text field in the printout, the printout will display "true" if the string is present in the report field. If the string is NOT present in the report field, the printout will display "false". Since this behavior could be confusing to people viewing the printout, it's recommended that this operation only be used to map checkboxes in the report to checkboxes in the printout.
Examples
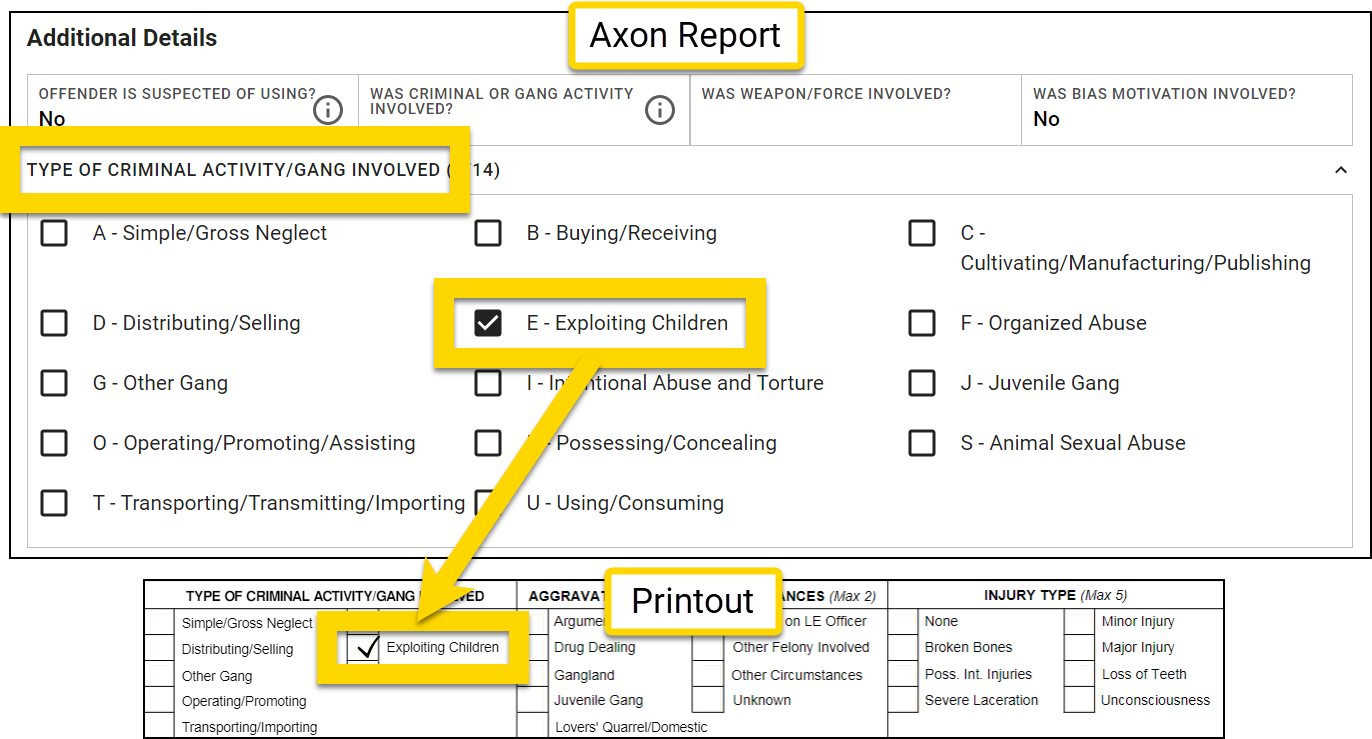
Checkbox example 1
To map a checked report checkbox to a checked printout checkbox:
- Expression:
Copy
contains(<form/us/offenses/*/offense/axon/nibrsCriminalGangActivityInvolved>,"EXPLOITING_CHILDREN") - Inputs:
<form/us/offenses/*/offense/axon/nibrsCriminalGangActivityInvolved>"EXPLOITING_CHILDREN"
- Result:
Checkbox example 2
To map an UNchecked report checkbox to a checked printout checkbox:
- Expression:
Copy
omits(<form/us/offenses/*/offense/axon/wasOffenderSuspectedOfUsing>,"COMPUTER_EQUIPMENT") - Inputs:
<form/us/offenses/*/offense/axon/wasOffenderSuspectedOfUsing>"COMPUTER_EQUIPMENT"
- Result:

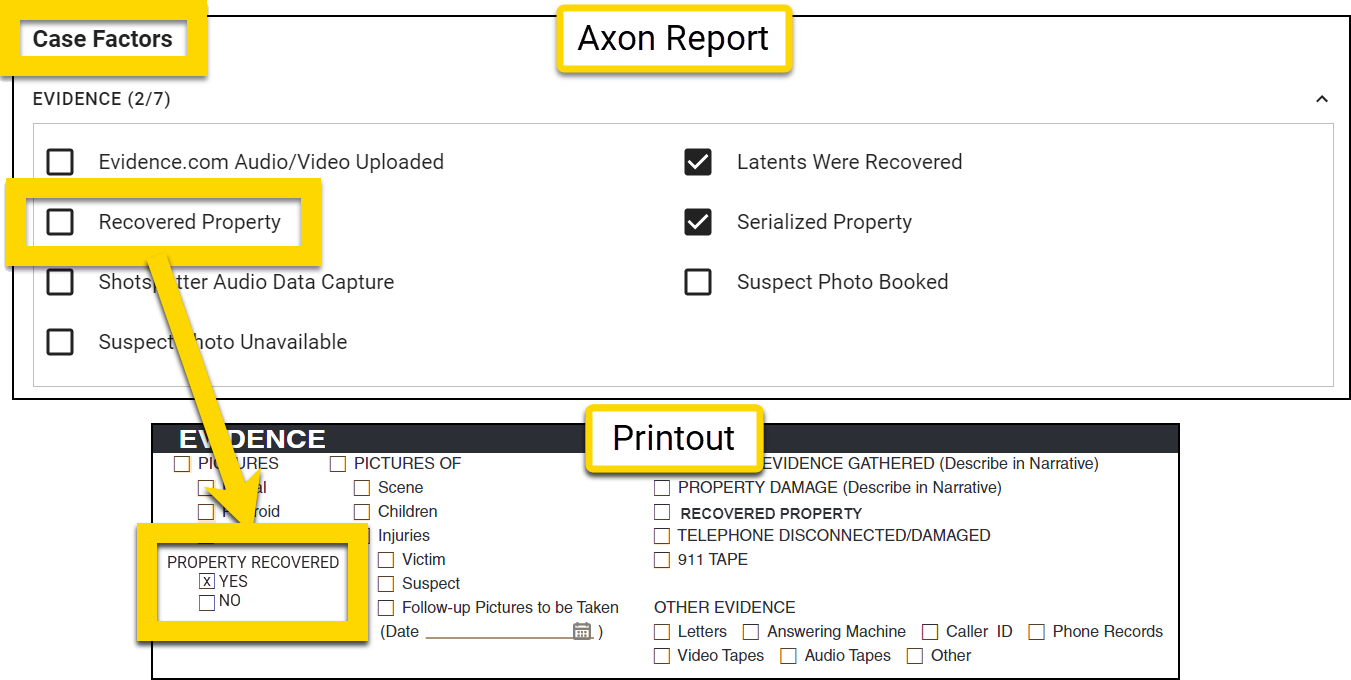
Checkbox example 3
To map one report checkbox to two printout checkboxes:
- Expression for the Yes checkbox:
Copy
contains(<form/us/caseFactors/evidence/recoveredProperty>,"true") - Inputs:
<form/us/caseFactors/evidence/recoveredProperty>"true"
- Expression for the No checkbox:
Copy
contains(<form/us/caseFactors/evidence/recoveredProperty>,"false") - Inputs:
<form/us/caseFactors/evidence/recoveredProperty>"false"
- Result:
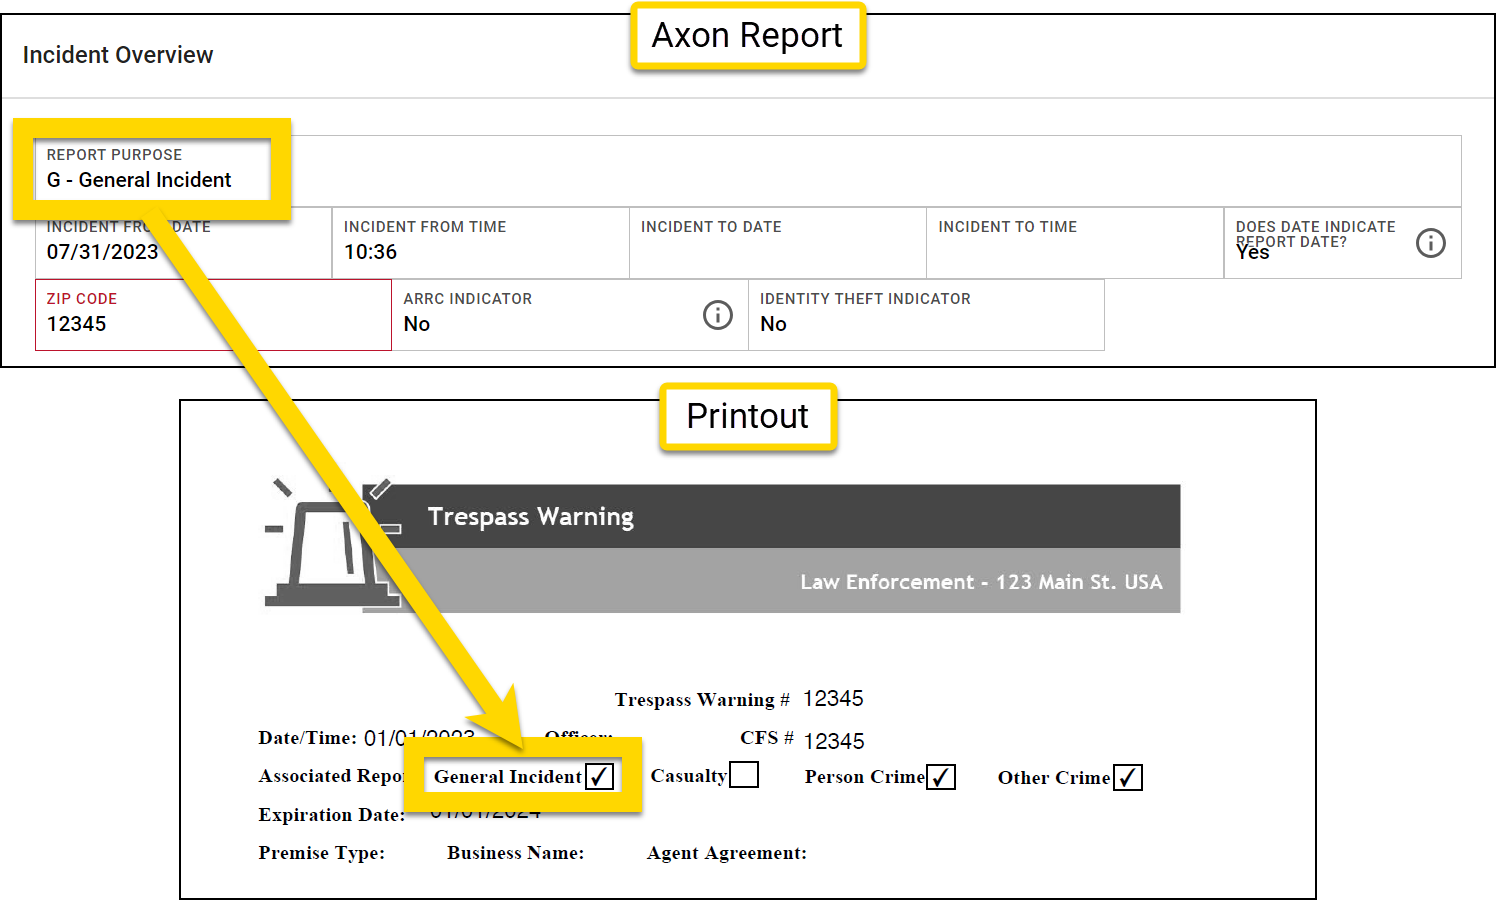
Dropdown example 1
To map selected a dropdown option to a checked printout checkbox:
- Expression:
Copy
contains(<form/us/purpose>,"GENERAL_INCIDENT") - Inputs:
<form/us/purpose>"GENERAL_INCIDENT"
- Result:
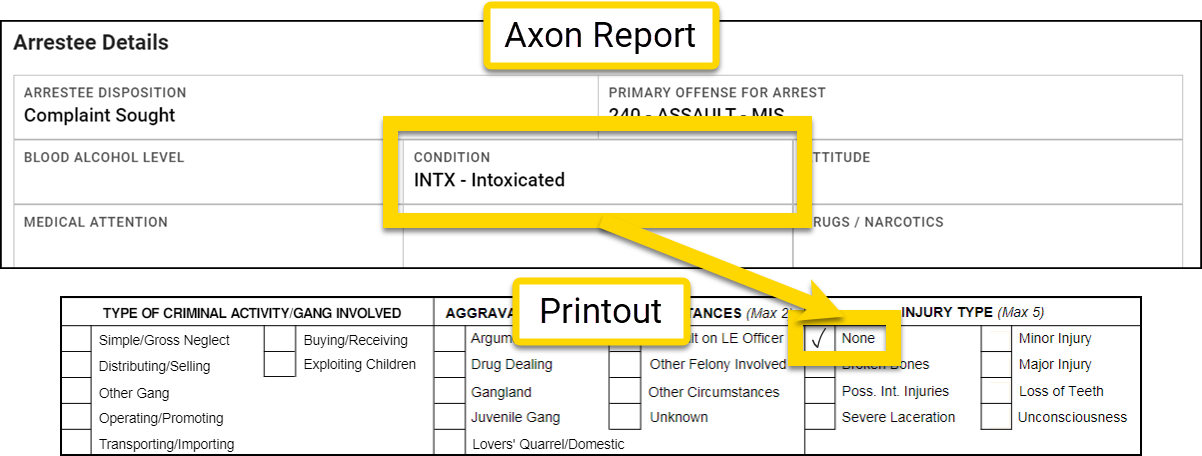
Dropdown example 2
To map an UNselected a dropdown option to a checked printout checkbox:
- Expression:
Copy
omits(<form/us/parties/*/individual/person/@rels/PersonToArrest/0/@otherEntity/axon/condition>,"INJURED") - Inputs:
<form/us/parties/*/individual/person/@rels/PersonToArrest/0/@otherEntity/axon/condition>"INJURED"
- Result:
Text field example 1
To map a field containing a specific string to a checked printout checkbox:
- Expression:
Copy
contains(<form/us/properties/*/property/@rels/PropertyToOffense/*/axon/propertyStatus>,"RETURN_TO_OWNER") - Inputs:
<form/us/properties/*/property/@rels/PropertyToOffense/*/axon/propertyStatus>"RETURN_TO_OWNER"
- Result:

Text field example 2
To map a field NOT containing a specific string to a checked printout checkbox:
- Expression:
Copy
omits(<form/us/properties/*/property/@rels/PropertyToOffense/*/axon/propertyStatus>,"LEFT_AT_SCENE") - Inputs:
<form/us/properties/*/property/@rels/PropertyToOffense/*/axon/propertyStatus>"LEFT_AT_SCENE"
- Result:

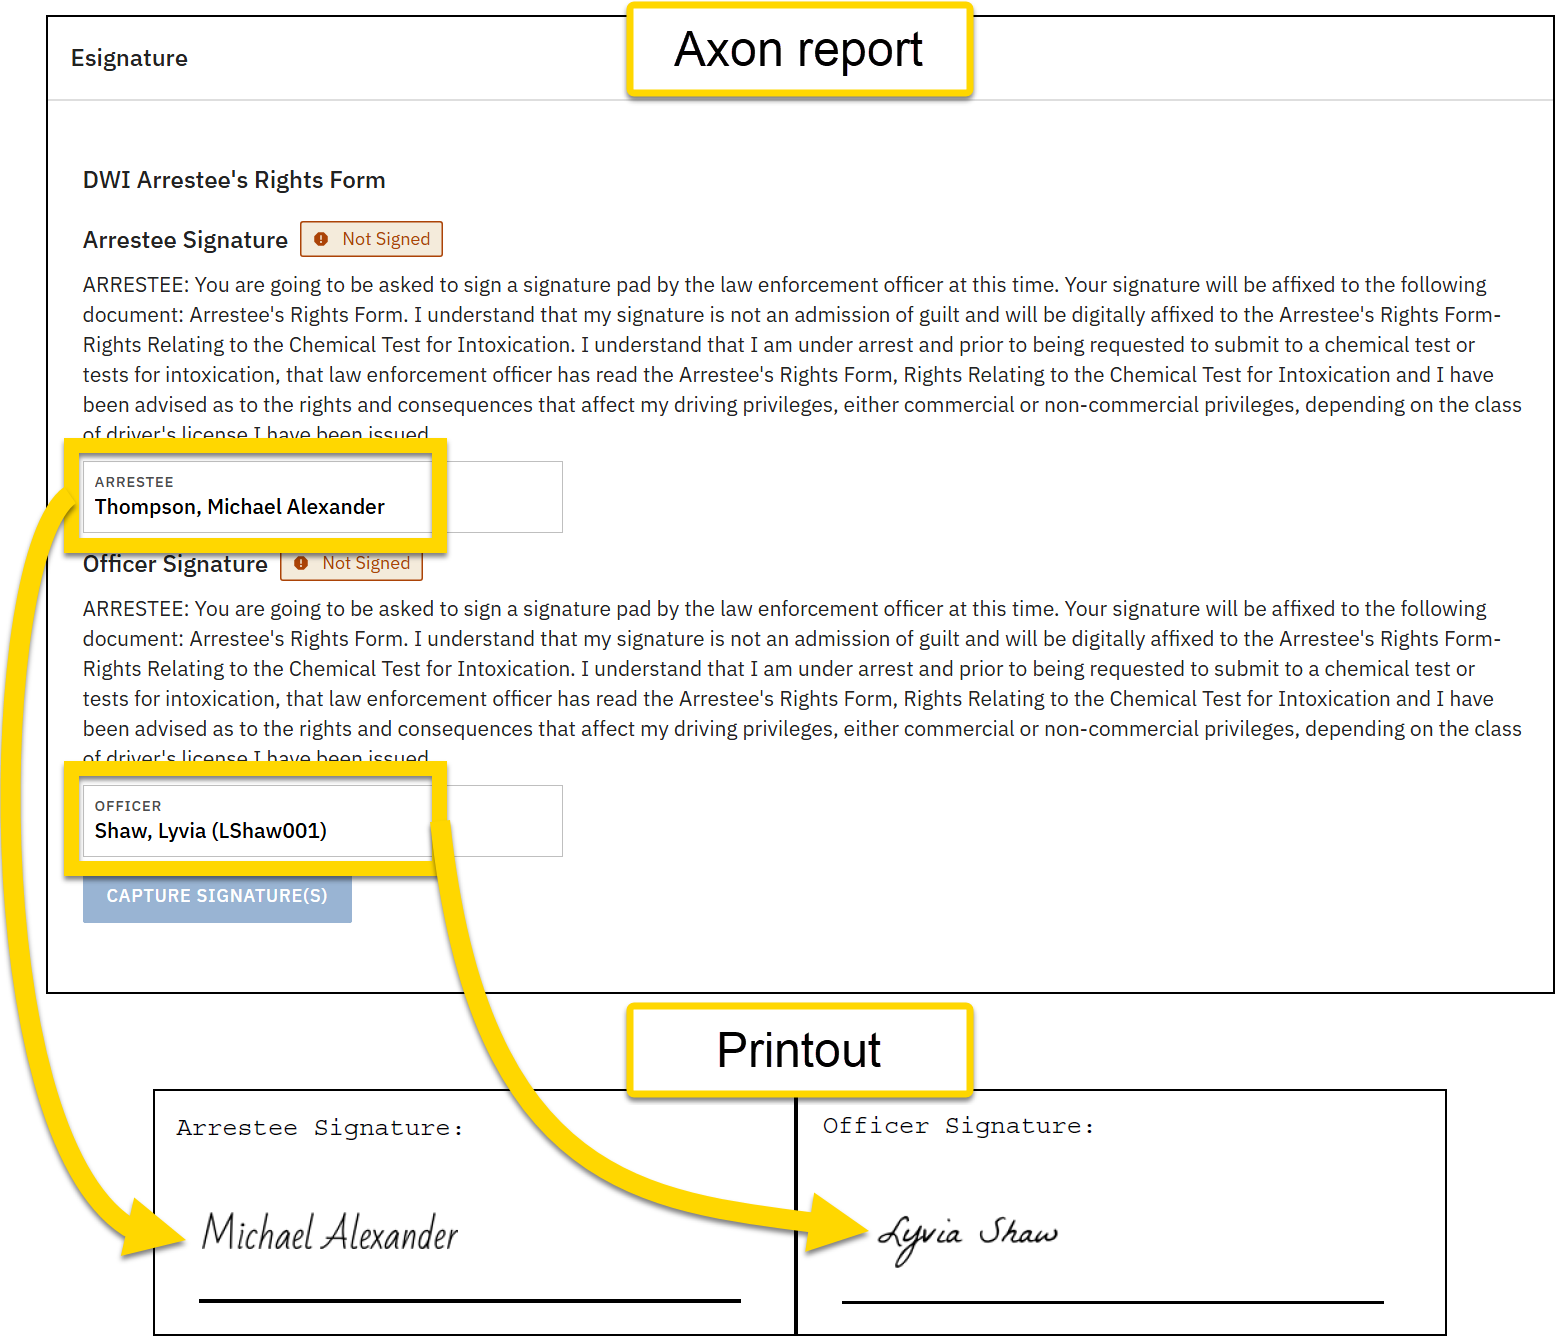
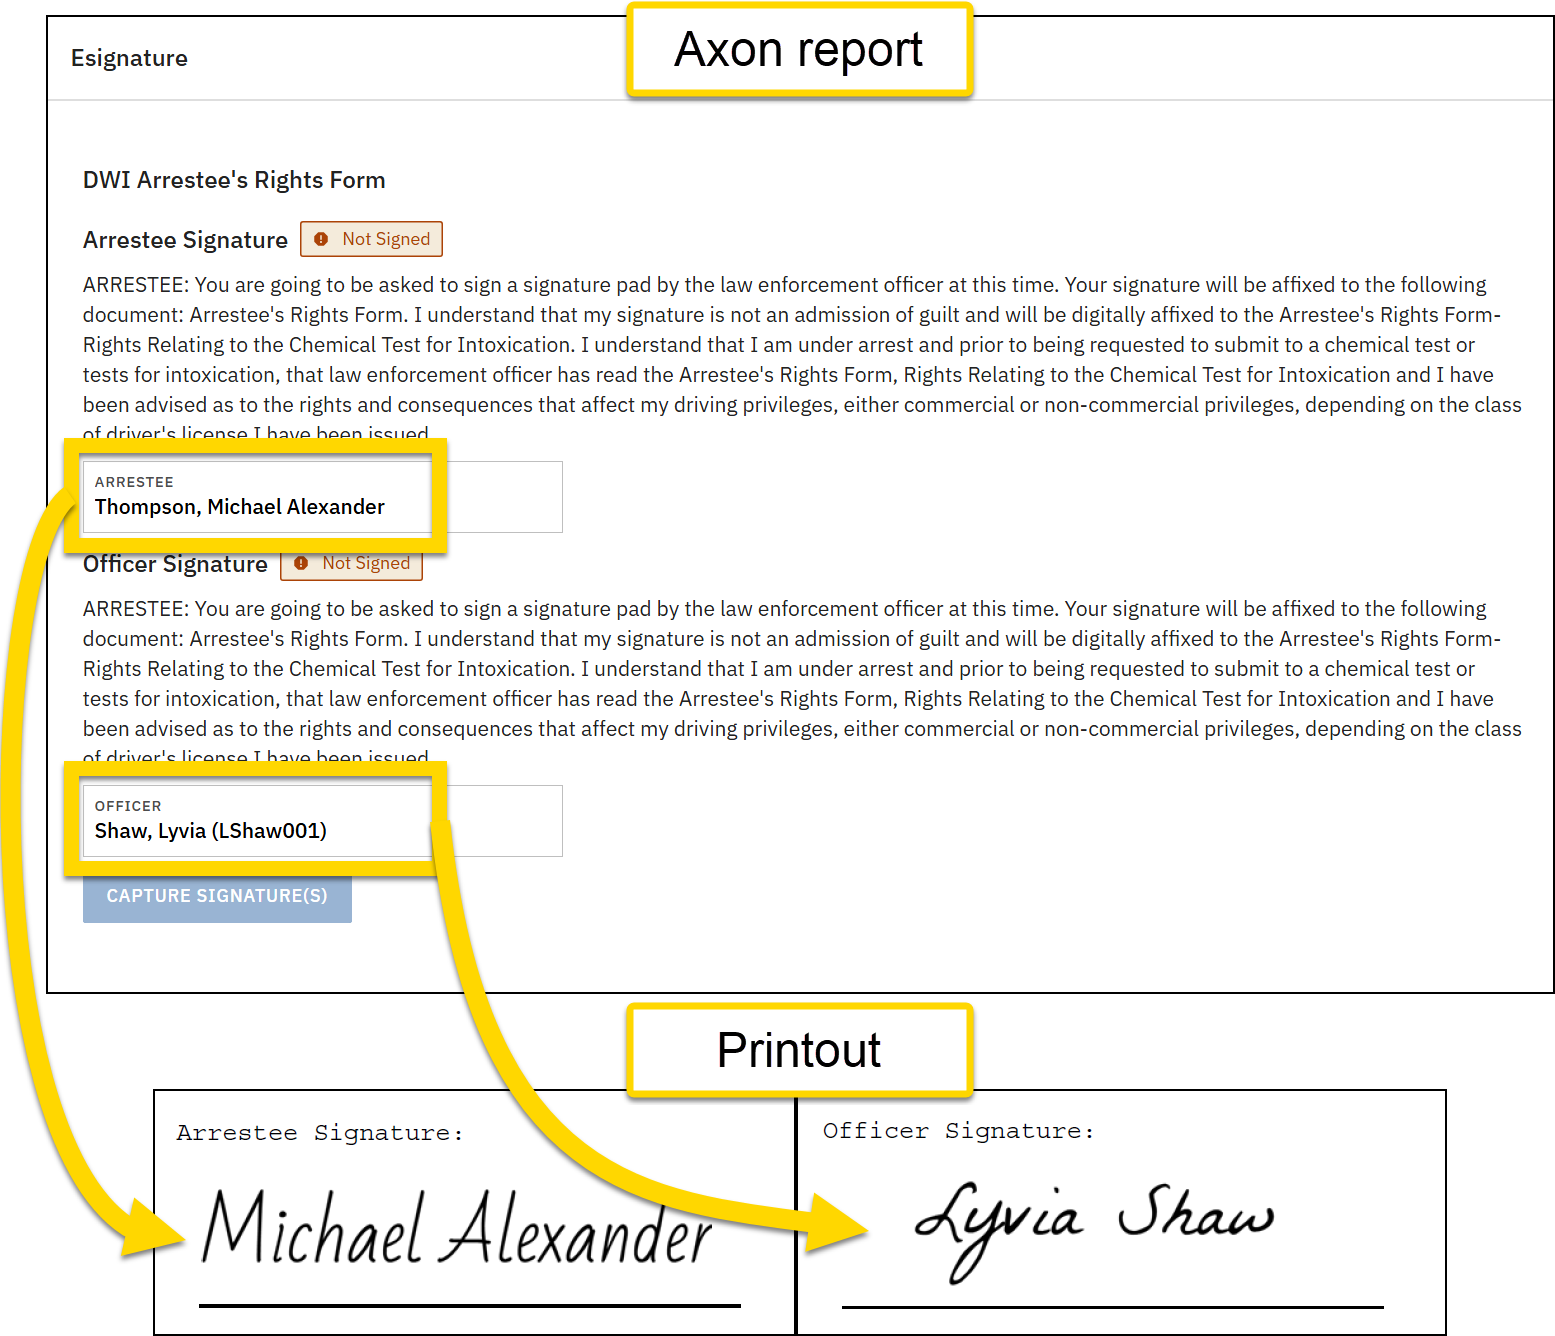
Esign
To print the image of an electronic signature that has been captured in an esignature field, use the esign expression. This expression must be formatted differently depending on whether it is used in PDF or DOCX print templates.
PDF print templates
In PDF templates, use the following syntax: esign(Data Path).
-
Input 1: Data Path
- This Data Path must be for an esignature field.
In the PDF template, the field you are mapping the Axon Records or Axon Standards signature field to must be a signature field rather than a text or image field. If you used Adobe to create the PDF, the signature field type must be Digital signature and not E-signature or E-signature block.
DOCX print templates
In DOCX templates, use the following syntax: {esign(Data Path, Optional Width)}.
-
Input 1: Data Path
- This Data Path must be for an esignature field.
-
Input 2: Optional Width
- The width input must be a number, which corresponds to the desired image width in pixels.
- The height is automatically set to half of the indicated width.
- If a width is not provided, the image prints with a width of 200px and a height of 100px.
Examples
Example 1
To print a signature in a PDF print template at the default width of 200px:
- Report data: A signature has been added to a report
- Expression:
Copy
esign(<form/us/eSign/eSignDoc/arresteeSignature>) - Inputs:
<form/us/person/acknowledgement>
- Result: Signature image added to the printout at a width of 200px
Example 2
To print a signature in a DOCX print template at a width of 400px:
- Report data: A signature has been added to a report
- Expression:
Copy
{esign(<form/us/eSign/eSignDoc/arresteeSignature>, 400)} - Inputs:
<form/us/person/acknowledgement>400
- Result: Signature image added to the printout at a width of 400px
Extract
When adding a list field to a print template, that data must first be extracted from the list. To do this, use: extract(Data Path). This expression supports a single Data Path as an input.
After adding a list Data Path to a print template, you must also add the Data Path to a group, signifying which entity the field refers to (person, vehicle, etc.).
Examples
Example 1
To print a person's drivers license number:
- Expression:
Copy
extract(<form/us/parties/*/individual/person/axon/identityDocuments/*/driverLicense/number>) - Result: WDL87654321T
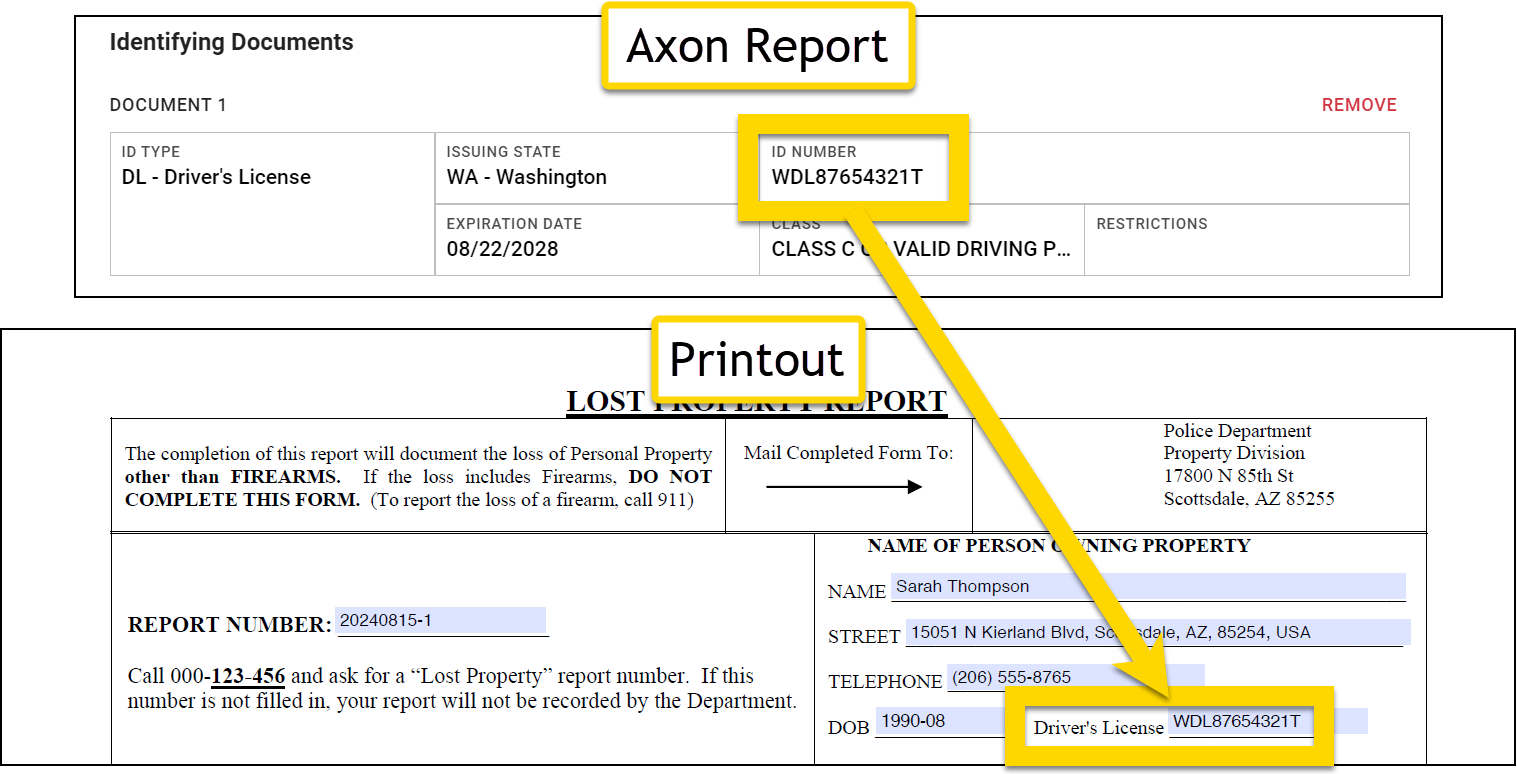
Match vs. extract
The match and extract expressions are similar, but the extract operator works on a single Data Path. For example, when mapping identifying documents, you can be fairly certain that there will be only one SSN. The Extract expression lets you extract that item and add it to the print template.
On the other hand, for a field like phone number or address, there may be multiple entries, but the Data Paths for all of them are exactly the same. The match expression lets you pull out a specific value from the report, such as home address or mobile phone number.
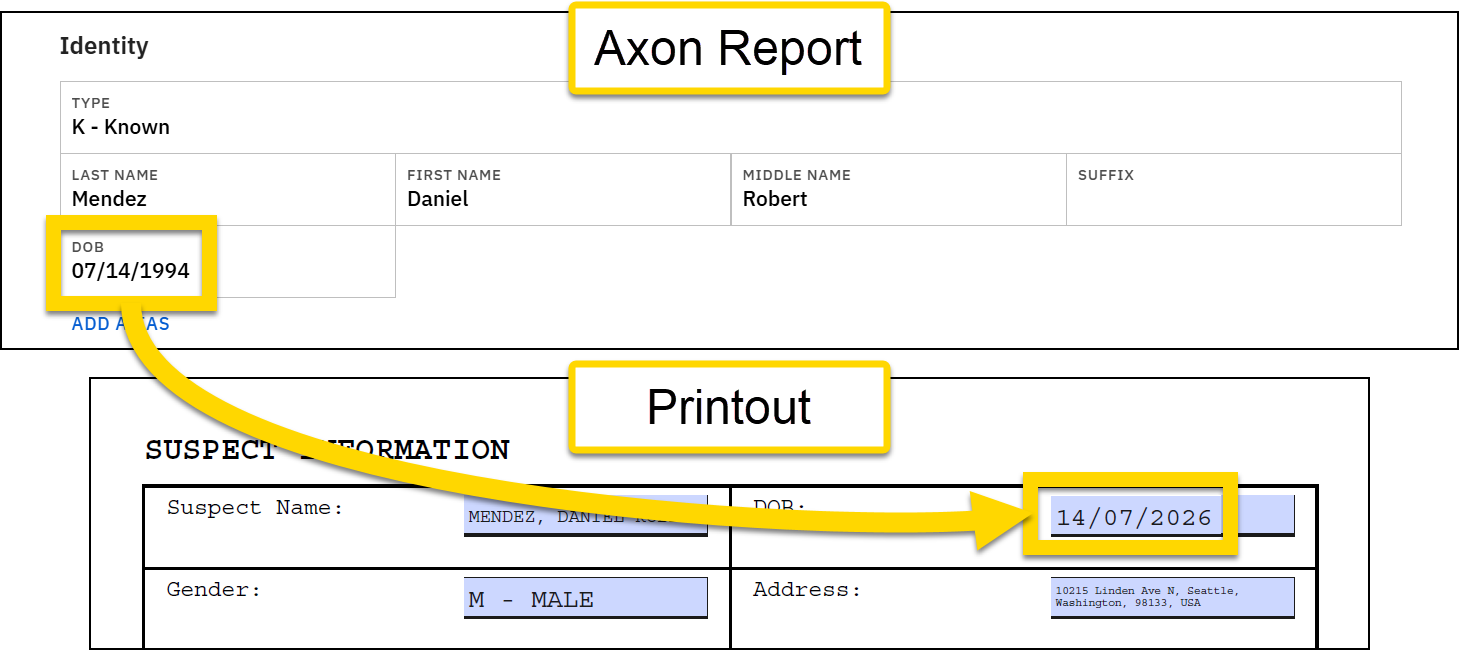
FormatDT
To display a date, time, or date/time field in a specific format, use: formatDT(Data Path, Format String).
- Input 1: The Data Path for the date, time, or date/time field
-
Input 2: An optional format string that specifies how the data should be displayed
- Enclose the format string in quotations (as you do for any string).
-
To include a special character inside a string, use the corresponding HTML URL encoding for that character:
< > ( ) { } , " @ #- A list of standard HTML codes for special characters can be found here.
Default formatting
If you do not enter a format string, date and time fields print as follows:
-
Date/time fields:
MM/DD/YYYY hh:mm A dddd(e.g., 01/01/2026 02:00 PM Thursday)- Date/time fields are "two-in-one" fields that are inserted in Form Builder using the Date & time field type.
-
Date-only fields:
MM/DD/YYYY(e.g., 01/01/2026)- Date-only fields are inserted in Form Builder using the Date field type.
-
Time-only fields:
hh:mm A dddd(e.g., 02:00 PM Thursday)- Time-only fields are inserted in Form Builder using the Time field type.
Common format strings
The following format strings are used most often. See the moment.js format documentation for a complete list of valid format strings.
- Year: YYYY (2023), YY (23)
- Month: MM (01-12), MMM (Jan), MMMM (January)
- Day: DD (01-31), D (1-31), dddd (Monday), ddd (Mon)
- Hour: HH (00-23, 24-hour), hh (01-12, 12-hour)
- Minute: mm (00-59)
- Second: ss (00-59)
- AM/PM: A (AM/PM), a (am/pm)
Examples
Example 1
To print a date of birth in DD/MM/YYYY format:
- Original data: 07/14/1994
- Expression:
Copy
formatDT(<form/us/parties/*/individual/person/axon/birthdate>, "DD%2FMM%2FYYYY") - Inputs:
<form/us/parties/*/individual/person/axon/birthdate>"DD%2FMM%2FYYYY"
- Result: 14/07/1994
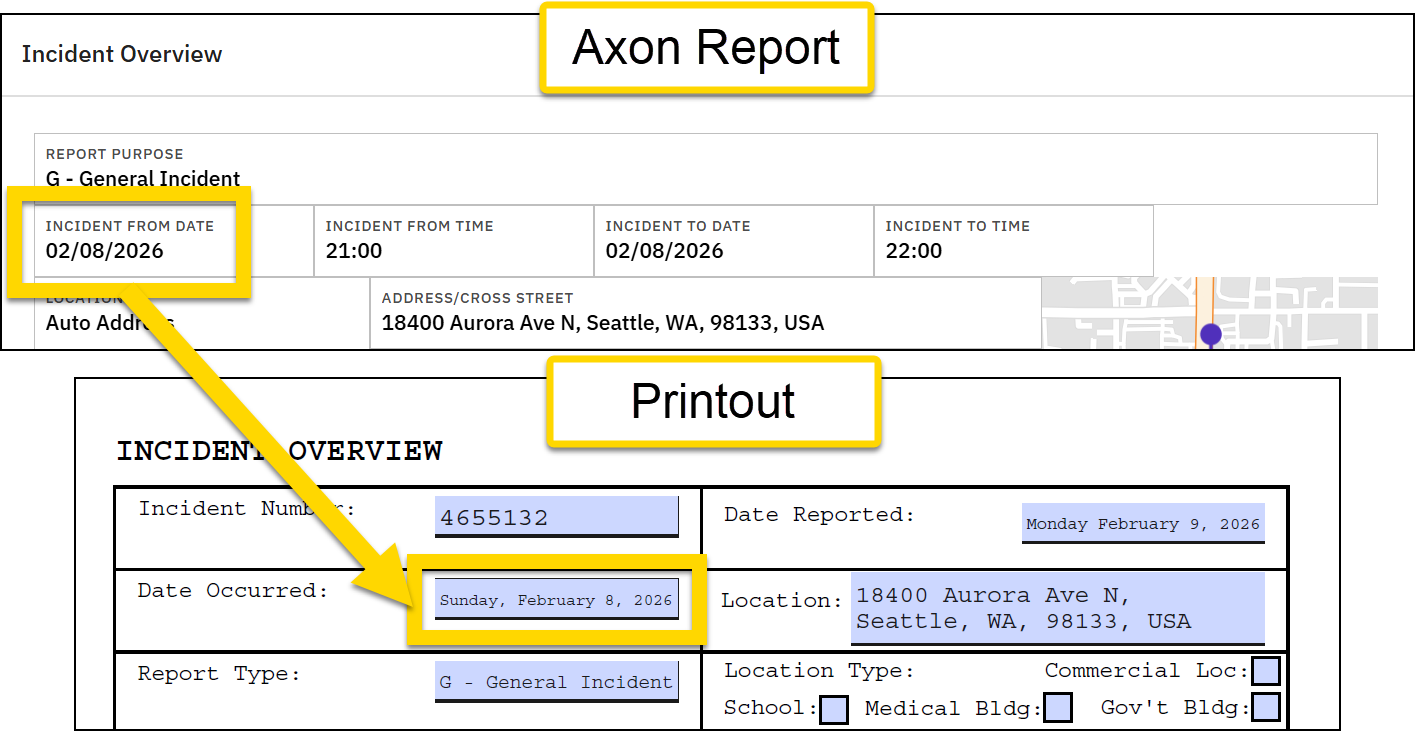
Example 2
To print the incident date with the full day and full month spelled out:
- Original data:
- Date: 02/08/2026
- Time: 21:00
- Expression:
Copy
formatDT(<form/us/incidentFromDate>, "dddd%2C MMMM D%2C YYYY") - Inputs:
<form/us/incidentFromDate>"dddd%2C MMMM D%2C YYYY"
- Result: Sunday, February 8, 2026
Example 3
To print the incident time in 24-hour format:
- Original data: 21:00
- Expression:
Copy
formatDT(<form/us/incidentFromDate>, "HH:mm") - Inputs:
<form/us/incidentFromDate>"HH:mm"
- Result: 21:00
- Note that the default time format is 12-hour, so if you did not use the format string, the time would print as "09:00 PM".

- Note that the default time format is 12-hour, so if you did not use the format string, the time would print as "09:00 PM".
Icon
The icon expression lets you print a fragile or biohazard icon. This expression is used mainly in property label template mappings. To print one of these icons, use: icon(Keyword) or icon(Keyword, Data Path).
- Input 1: The keyword for the icon. Supported keywords include "biohazard" and "fragile"
- Input 2: An optional input that checks for a Data Path or expression and only prints the icon if the Data Path is not empty or if the expression resolves to be true.
Examples
Example 1
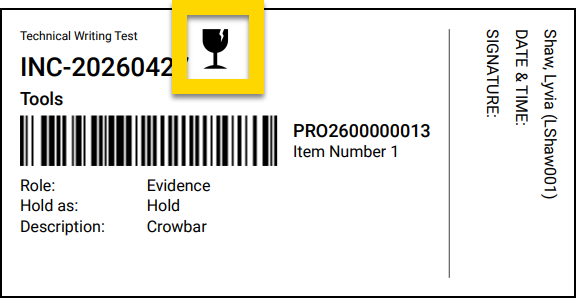
To always print a fragile icon:
- Expression:
Copy
icon("fragile") - Inputs:
"fragile"
- Result: fragile icon
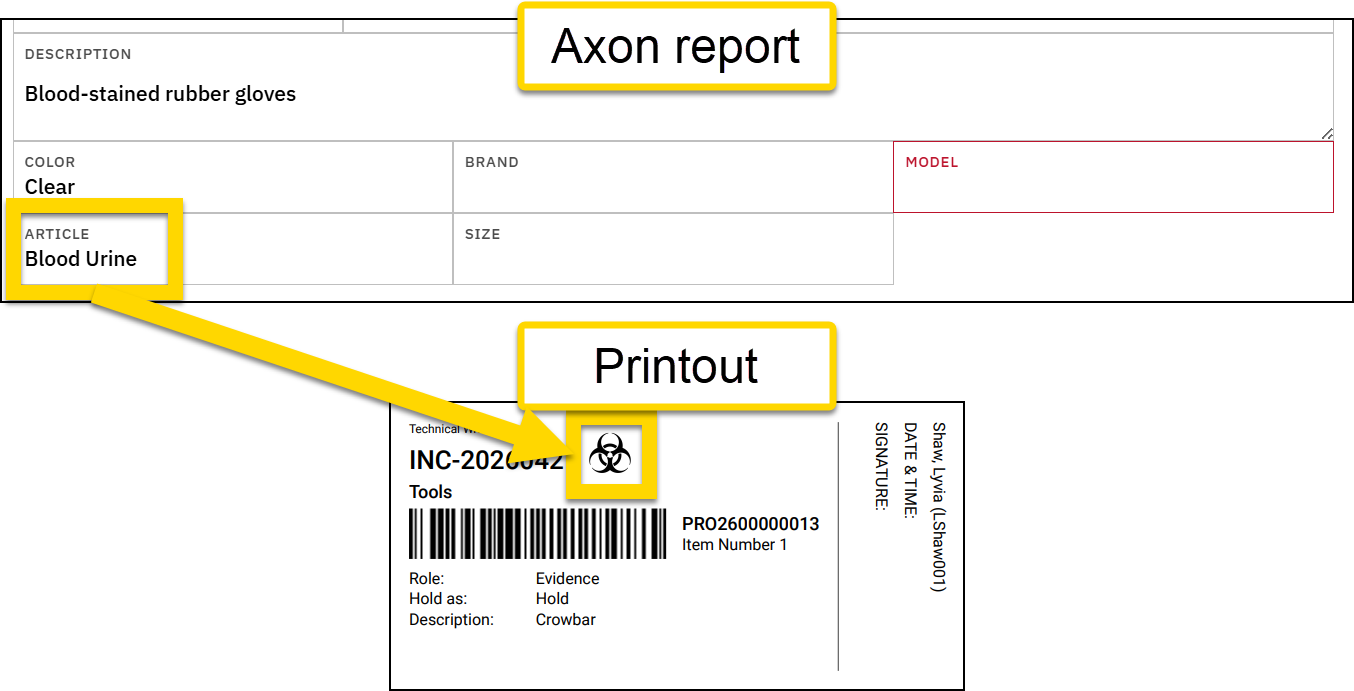
Example 2
To print a biohazard icon if the Article field is set to Blood Urine:
- Expression:
Copy
icon("biohazard", contains(<form/us/properties/*/property/axon/article>, "BLOOD")) - Inputs:
"biohazard"- A contains expression composed of two inputs:
<form/us/properties/*/property/axon/article>"BLOOD"
- Result: biohazard icon
Lowercase and uppercase
The lowercase and uppercase expressions let you adjust the character case of data that is entered into a report.
To lowercase all characters in a field, use: lower(Input). To uppercase all characters in a field, use: upper(Input).
These expressions accept a single input, which can be a Data Path or an expression.
Examples
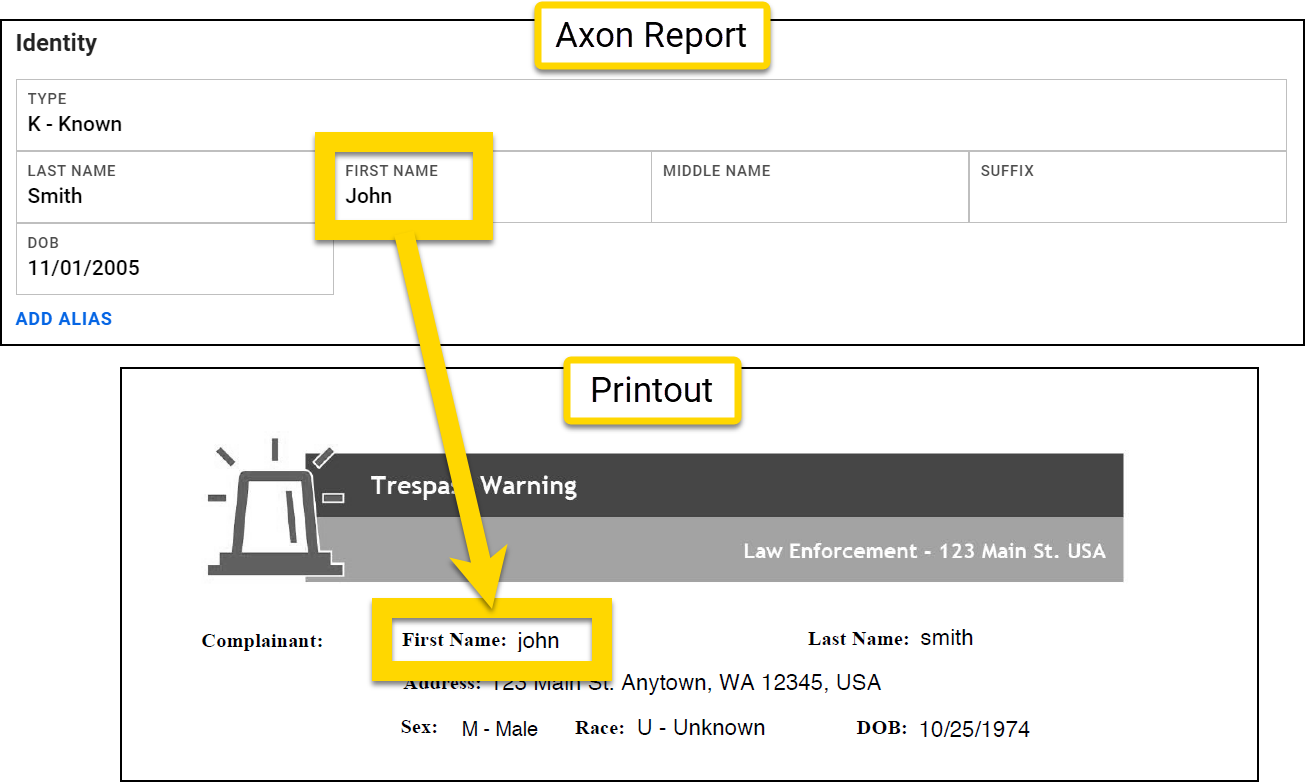
Lowercase example 1
To lowercase all letters in a person's name:
- Original data: John
- Expression:
Copy
lower(<form/us/firstName>) - Inputs:
<form/us/firstName>
- Result: john
Lowercase example 2
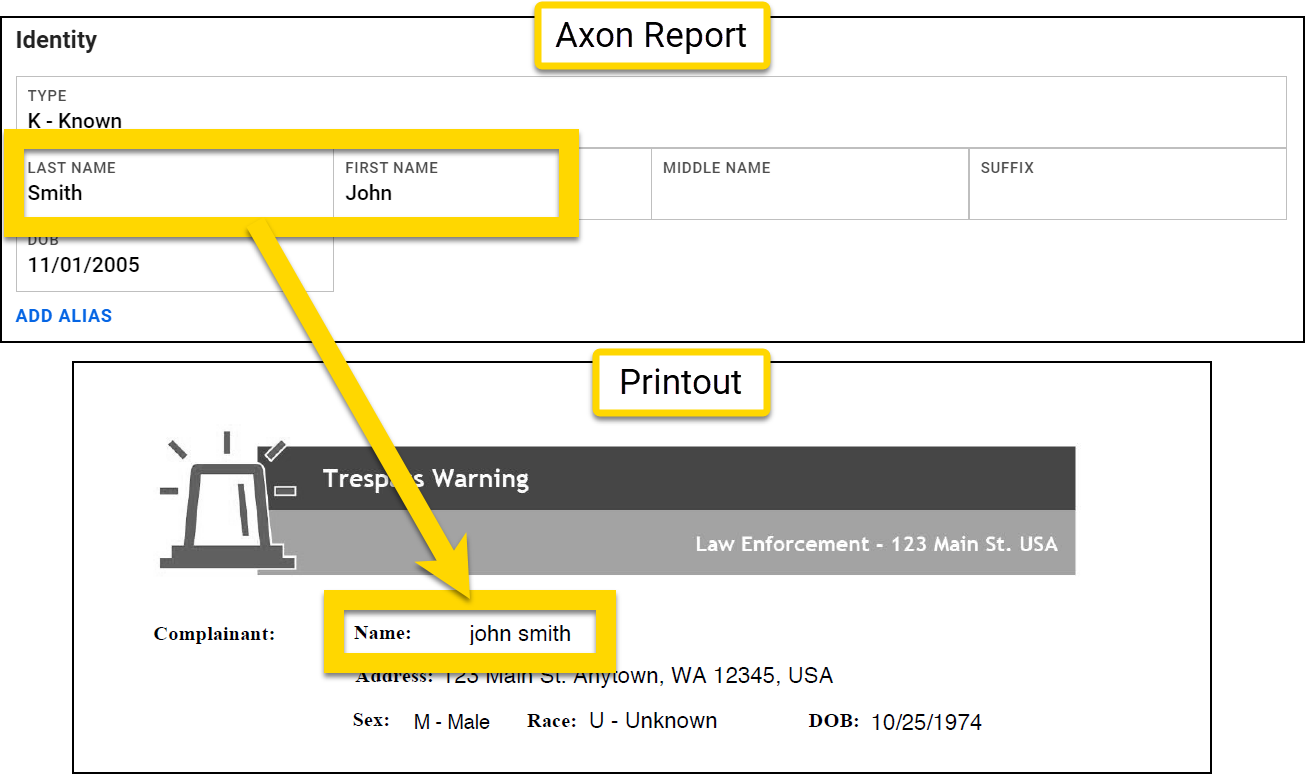
To lowercase an entire expression:
- Original data:
- Field 1: Smith
- Field 2: John
- Expression:
Copy
lower(concat(<form/us/firstName>, " ", <form/us/lastName>)) - Inputs:
-
A concat expression composed of three inputs:
<form/us/firstName>" "<form/us/lastName>
-
A concat expression composed of three inputs:
- Result: john smith
Uppercase example 1
To uppercase all letters in a person's name:
- Original data: John
- Expression:
Copy
upper(<form/us/firstName>) - Inputs:
<form/us/firstName>
- Result: JOHN
Uppercase example 2
To uppercase an entire expression:
- Original data:
- Field 1: Smith
- Field 2: John
- Expression:
Copy
upper(concat(<form/us/firstName>, " ", <form/us/lastName>)) - Inputs:
-
A concat expression composed of three inputs:
<form/us/firstName>" "<form/us/lastName>
-
A concat expression composed of three inputs:
- Result: JOHN SMITH
Match
To pull an item from a list that matches a specified string and map it to a print template, use: match(Data Path, Match String, Data Path).
- Input 1: The Data Path for a property in the list field on which the match operation will be performed
-
Input 2: The string value used to find a specific item from the list
- This string must be an exact match (although not case sensitive).
- Input 3: The Data Path from the matched object that will be printed
Both Data Paths must refer to the same object, such as a phone number or marking. You can tell that the Data Paths refer to the same object if the first parts of the Data Paths match:
form/us/person/phoneNumbers/*/typeform/us/person/phoneNumbers/*/value
Examples
Example 1
To print a person's home phone number:
- Expression:
Copy
match(<form/us/parties/*/individual/person/axon/contact/phoneNumbers/*/type>,"HOME",<form/us/parties/*/individual/person/axon/contact/phoneNumbers/*/value>) - Inputs:
<form/us/parties/*/individual/person/axon/contact/phoneNumbers/*/type>"HOME"<form/us/parties/*/individual/person/axon/contact/phoneNumbers/*/value>
- Result: (303) 123-4567
- This expression looks at the list of phone numbers and only prints the phone number that is listed as the "HOME" number.
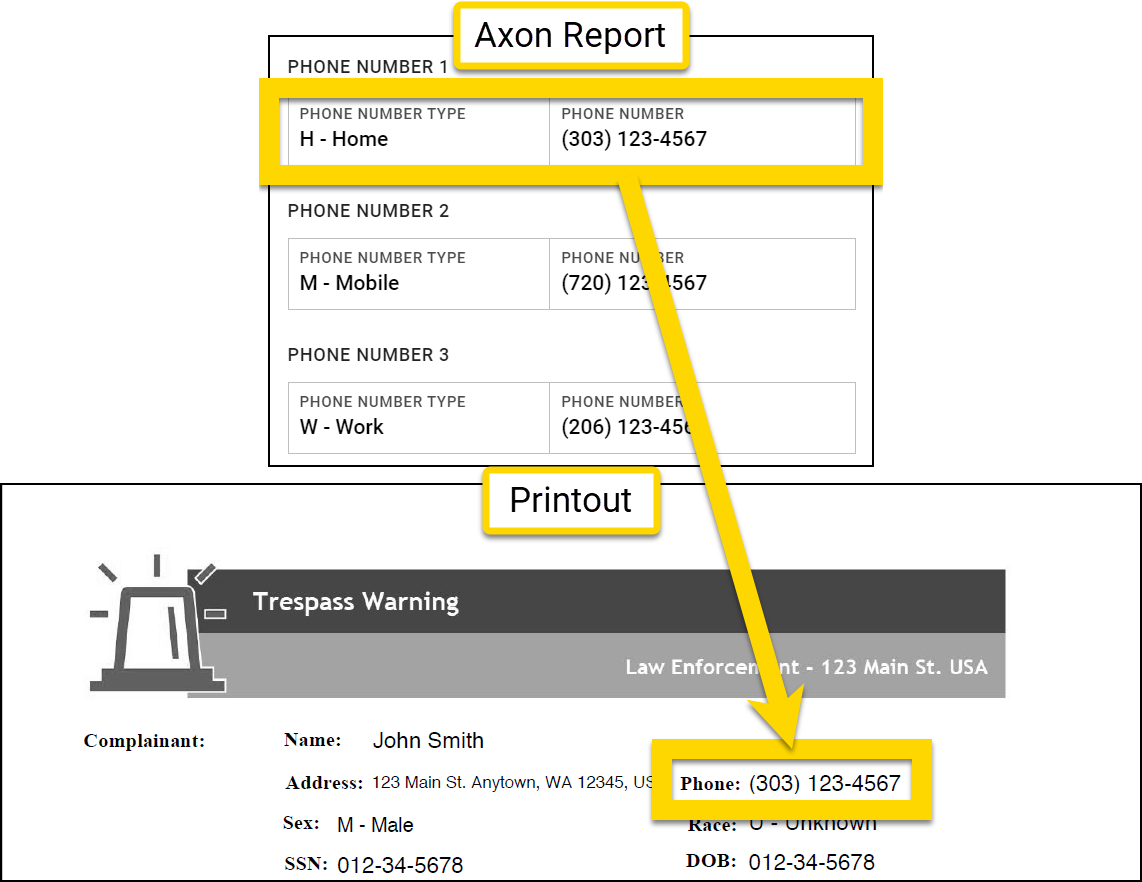
- This expression looks at the list of phone numbers and only prints the phone number that is listed as the "HOME" number.
Example 2
To print a warrant number for a specific charge:
- Expression:
Copy
match(<form/us/parties/*/individual/person/@rels/PersonToArrest/0/@otherEntity/axon/charges/*/charge>,"13-1506 - Burglary 3rd Degree - FEL", <form/us/parties/*/individual/person/@rels/PersonToArrest/0/@otherEntity/axon/charges/*/warrantNumber>)
- Inputs:
<form/us/parties/*/individual/person/@rels/PersonToArrest/0/@otherEntity/axon/charges/*/charge>"13-1506 - Burglary 3rd Degree - FEL"<form/us/parties/*/individual/person/@rels/PersonToArrest/0/@otherEntity/axon/charges/*/warrantNumber>
- Result: 123456
- This expression looks for the Warrant number associated with the Burglary charge.
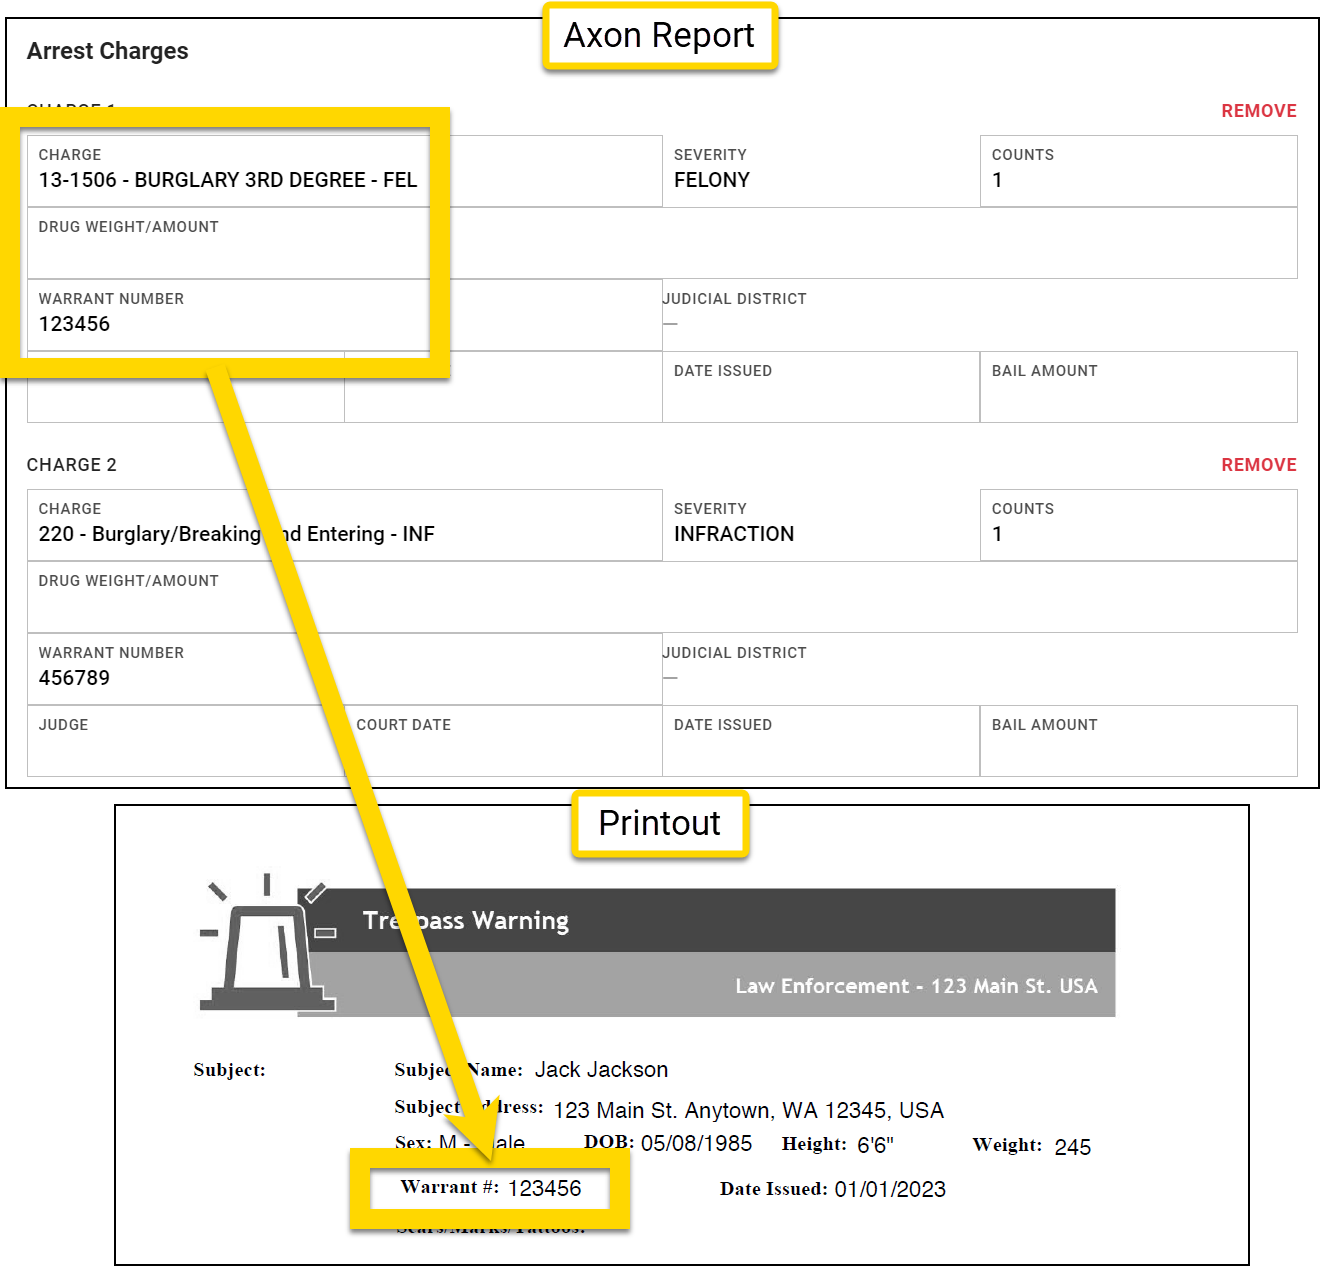
- This expression looks for the Warrant number associated with the Burglary charge.
Match vs. extract
The match and extract expressions are similar, but the extract operator works on a single Data Path. For example, when mapping identifying documents, you can be fairly certain that there will be only one SSN. The Extract expression lets you extract that item and add it to the print template.
On the other hand, for a field like phone number or address, there may be multiple entries, but the Data Paths for all of them are exactly the same. The match expression lets you pull out a specific value from the report, such as home address or mobile phone number.
MatchAll
To print every matching item from a list, use: matchAll(Data Path, Match String, Data Path, Separator).
- Input 1: The Data Path for a property in the List field on which the matchAll operation will be performed
-
Input 2: The string value used to match against
- This string must be an exact match (although not case sensitive).
- Input 3: The Data Path for the field from the matched object that will be printed.
- Input 4 (OPTIONAL): A separator printed in between items in the list, such as a space or a comma.
- If you do not provide this input, two semicolons (
;;) print in between each of the list items.
- If you do not provide this input, two semicolons (
Both Data Paths must refer to the same object, such as a phone number or marking. You can tell that the Data Paths refer to the same object if the first parts of the Data Paths match:
form/us/person/phoneNumbers/*/typeform/us/person/phoneNumbers/*/value
Examples
Example 1
To print all of a person's home phone numbers:
- Expression:
Copy
matchall(<form/us/parties/*/individual/person/axon/contact/phoneNumbers/*/type>, "HOME", <form/us/parties/*/individual/person/axon/contact/phoneNumbers/*/value>) - Inputs:
<form/us/parties/*/individual/person/axon/contact/phoneNumbers/*/type>"HOME"<form/us/parties/*/individual/person/axon/contact/phoneNumbers/*/value>
- Result: 303 123 4567;;303 987 6543
- This operation looks at the list of phone numbers and prints all home phone numbers, inserting
;;in between each.
- This operation looks at the list of phone numbers and prints all home phone numbers, inserting
Example 2
To print all of a person's home phone numbers, separating each by a space, a vertical line, and a space:
- Expression:
Copy
matchall(<form/us/parties/*/individual/person/axon/contact/phoneNumbers/*/type>, "HOME", <form/us/parties/*/individual/person/axon/contact/phoneNumbers/*/value>, " %7C ") - Inputs:
<form/us/parties/*/individual/person/axon/contact/phoneNumbers/*/type>"HOME"<form/us/parties/*/individual/person/axon/contact/phoneNumbers/*/value>" %7C "
- Result: 303 123 4567 | 303 987 6543
- This operation looks at the list of phone numbers and prints all home phone numbers, inserting
|in between each.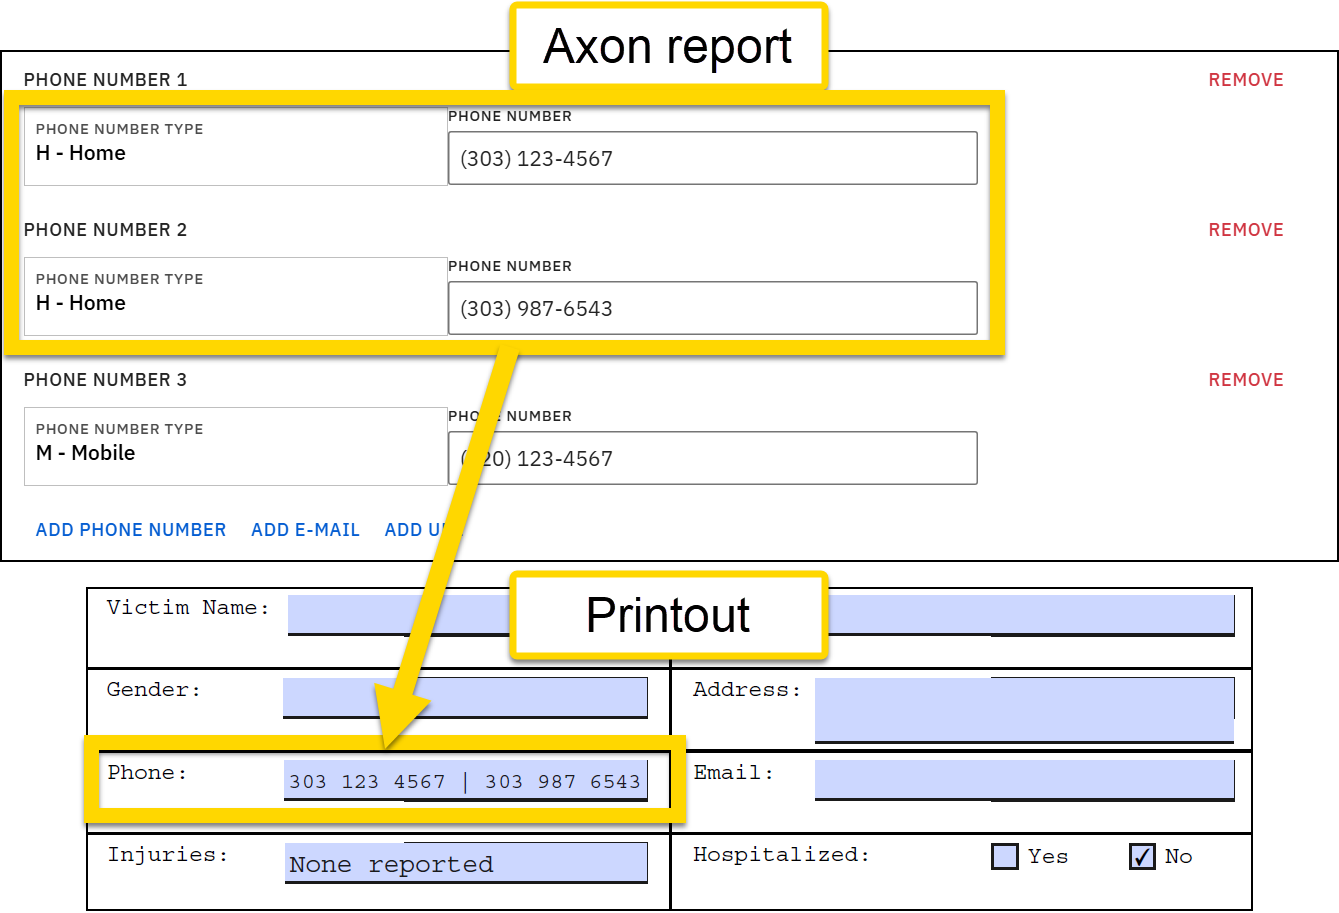
- This operation looks at the list of phone numbers and prints all home phone numbers, inserting
Pick
Use a pick expression to print a specific property for an entity or enum option. This expression lets you print more information that is typically provided by the default format.
When printing properties for an entity, you can print a friendly ID or other data related to a specific entity. (See the entity shape files for the list of available properties.) To do this, use: pick(Data Path,"property name").
- Input 1: The Data Path for an entity in the report (location, vehicle, etc.)
- Input 2: The property associated with that entity that you want to print
When printing properties for an enum option, you can print either the description or shortCode. To do this, use: pick(Data Path,"property name").
- Input 1: The Data Path for an enum field in the report (dropdown menu, checkbox group, etc.)
- Input 2: The property associated with that entity that you want to print. Options include "description" and "shortCode".
Examples
Example 1
To print the alias or common name of a location:
- Original data: J.Jill, 15051 N Kierland Blvd, Scottsdale, AZ, 85254, USA
- Expression:
Copy
pick(<form/us/incidentLocation/location>,"aliases") - Inputs:
<form/us/incidentLocation>"aliases"
- Result: J. Jill
- The location alias is "picked out" of the field and shown in the printout.
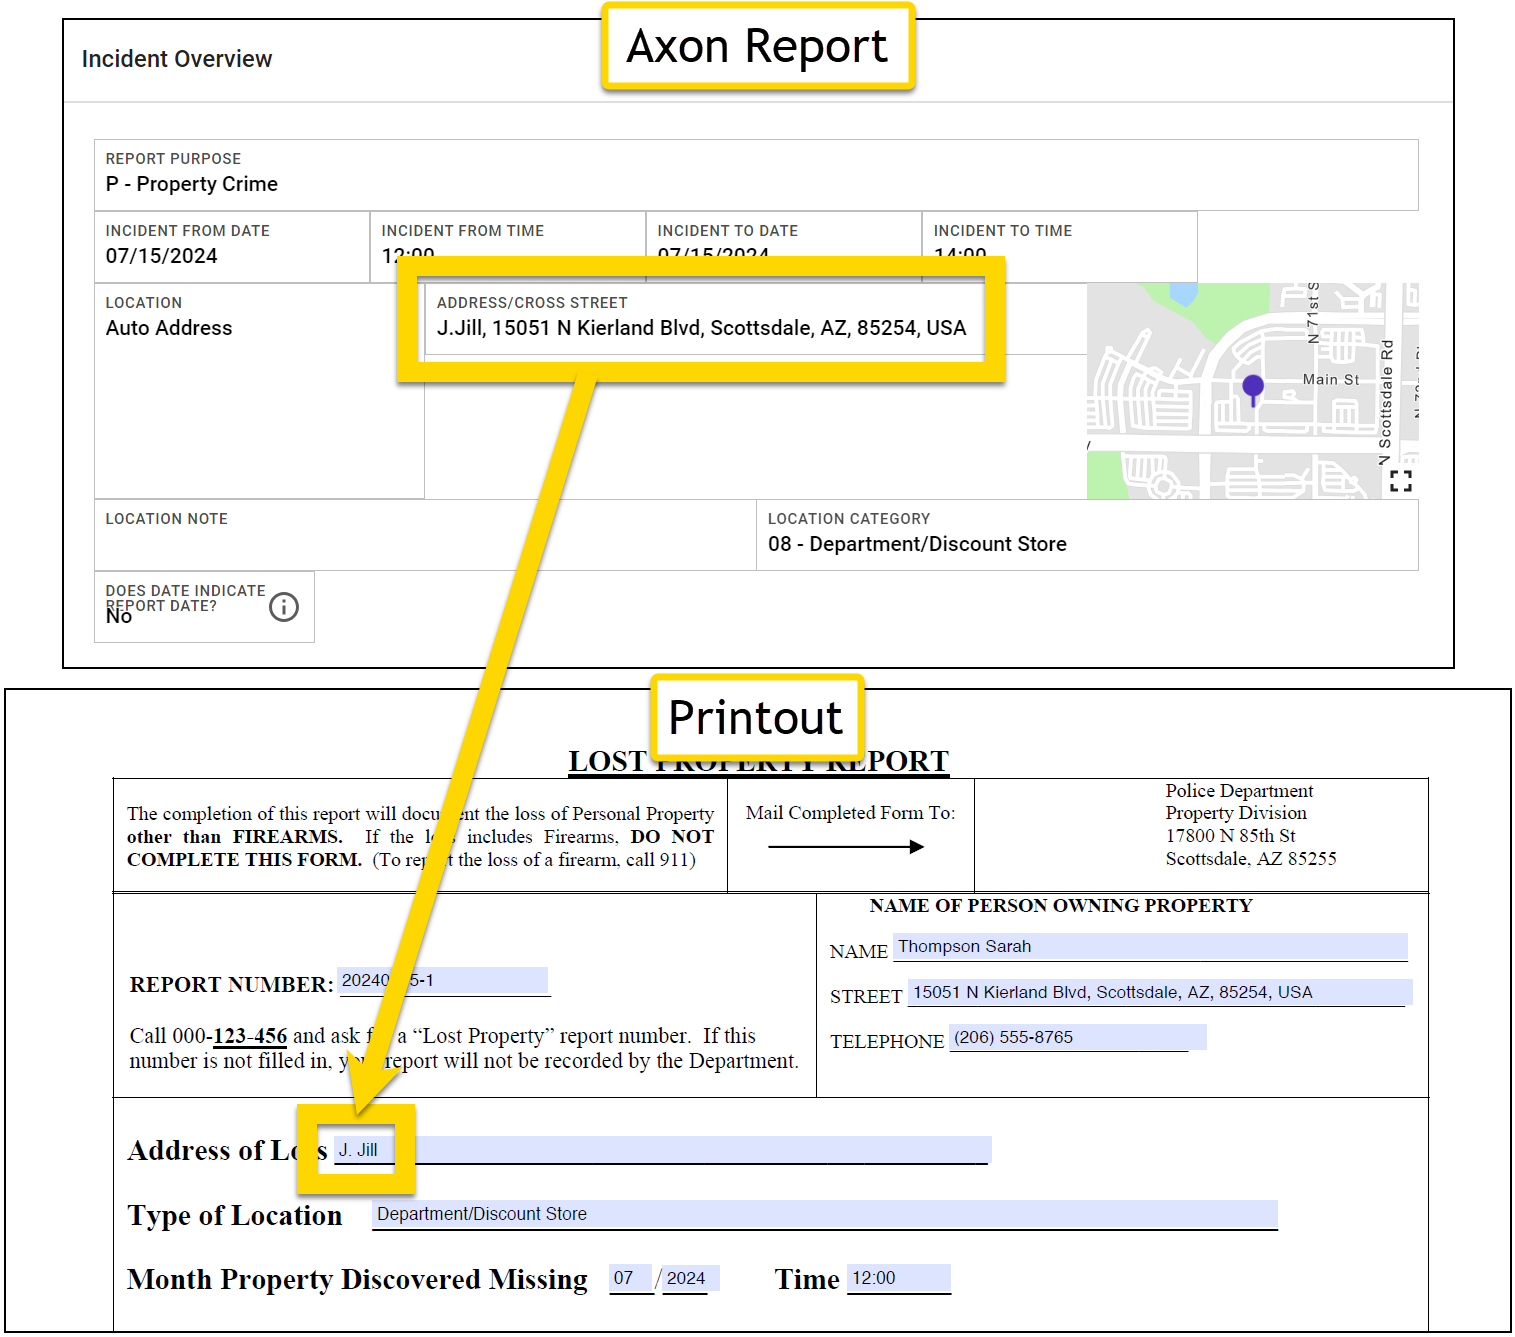
- The location alias is "picked out" of the field and shown in the printout.
Example 2
The pick expression can appear inside another expression, as with all other operations. To print a location's alias in addition to its address:
- Original data: J.Jill, 15051 N Kierland Blvd, Scottsdale, AZ, 85254, USA
- Expression:
Copy
concat(pick(<form/us/incidentLocation/location>, "aliases"),"%2C ",<form/us/incidentLocation/location>) - Inputs:
-
A pick expression composed of two inputs:
<form/us/incidentLocation/location>"aliases"
"%2C "- Note that the HTML code is used for the comma (,). A list of standard HTML codes for special characters can be found online.
<form/us/incidentLocation/location>
-
A pick expression composed of two inputs:
- Result: J.Jill, 15051 N Kierland Blvd, Scottsdale, AZ, 85254, USA
- The location alias is "picked out" of the field and shown in the printout. The concat expression also shows the full location address.
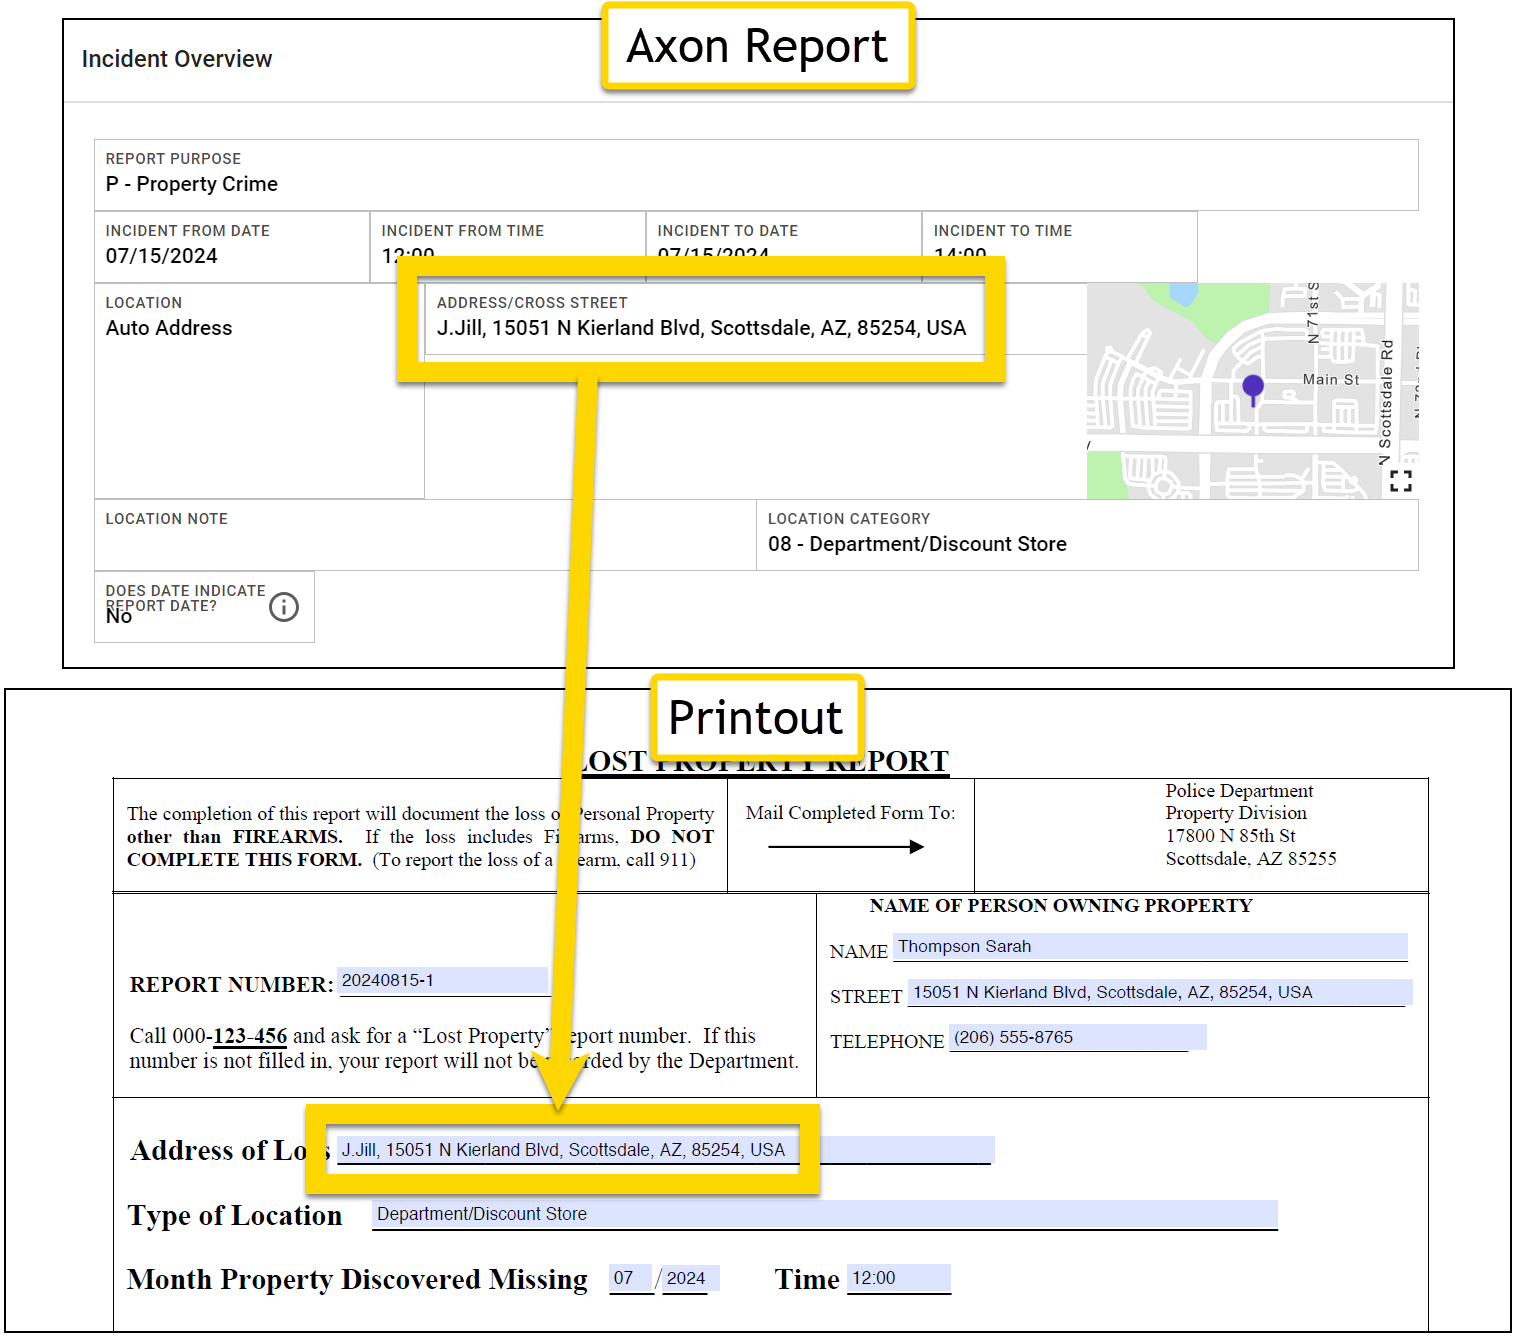
- The location alias is "picked out" of the field and shown in the printout. The concat expression also shows the full location address.
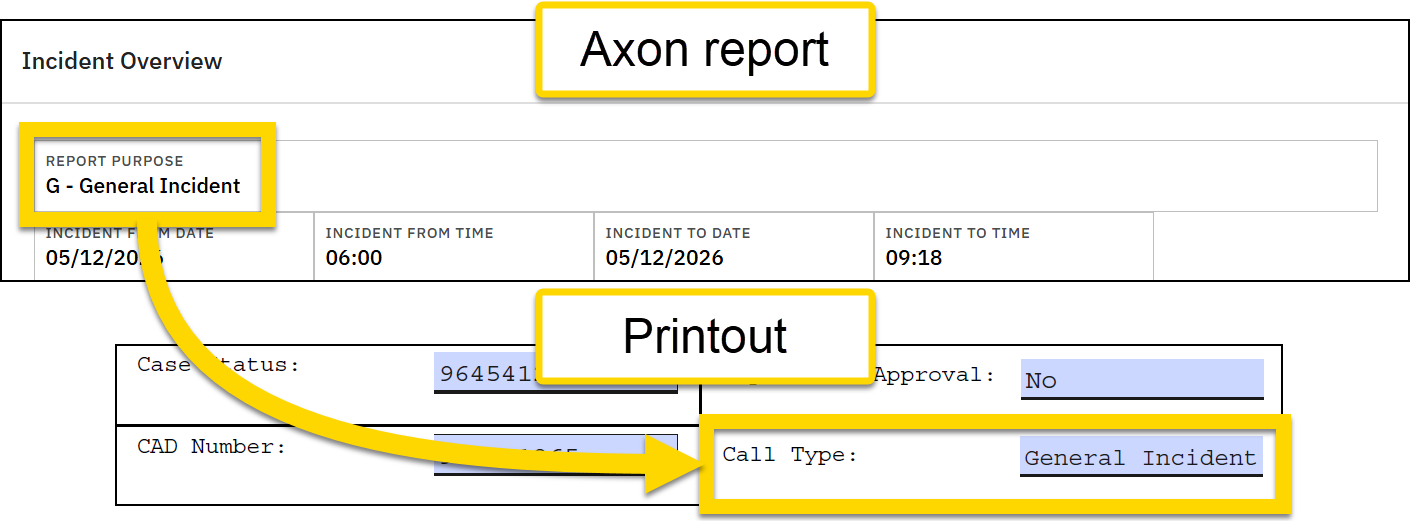
Example 3
To print the description only from the Report purpose field (excluding the short code):
- Original data: G - General Incident
- Expression:
Copy
pick(<form/us/purpose>, "description") - Inputs:
<form/us/purpose>"description"
- Result: General Incident
Friendly IDs and entity-specific metadata
A Friendly ID is generated for many items in Axon Records and Axon Standards. This ID is a string of letters and numbers that is easily referenced. Other metadata specific to an entity is generated, such as a narrative's author and the narrative's submission date and time.
Friendly IDs and entity-specific metadata can be printed using a Pick operation: pick(Data Path,"@friendlyID").
Because Friendly IDs and entity-specific metadata are associated with a specific entity (e.g., a specific narrative or a specific property item), a PDF template can only print the information for that specific entity. To print Friendly IDs or entity-specific metadata for all of that entity type in a report (e.g., all narratives or all property items), create a DOCX template and use loop expressions.
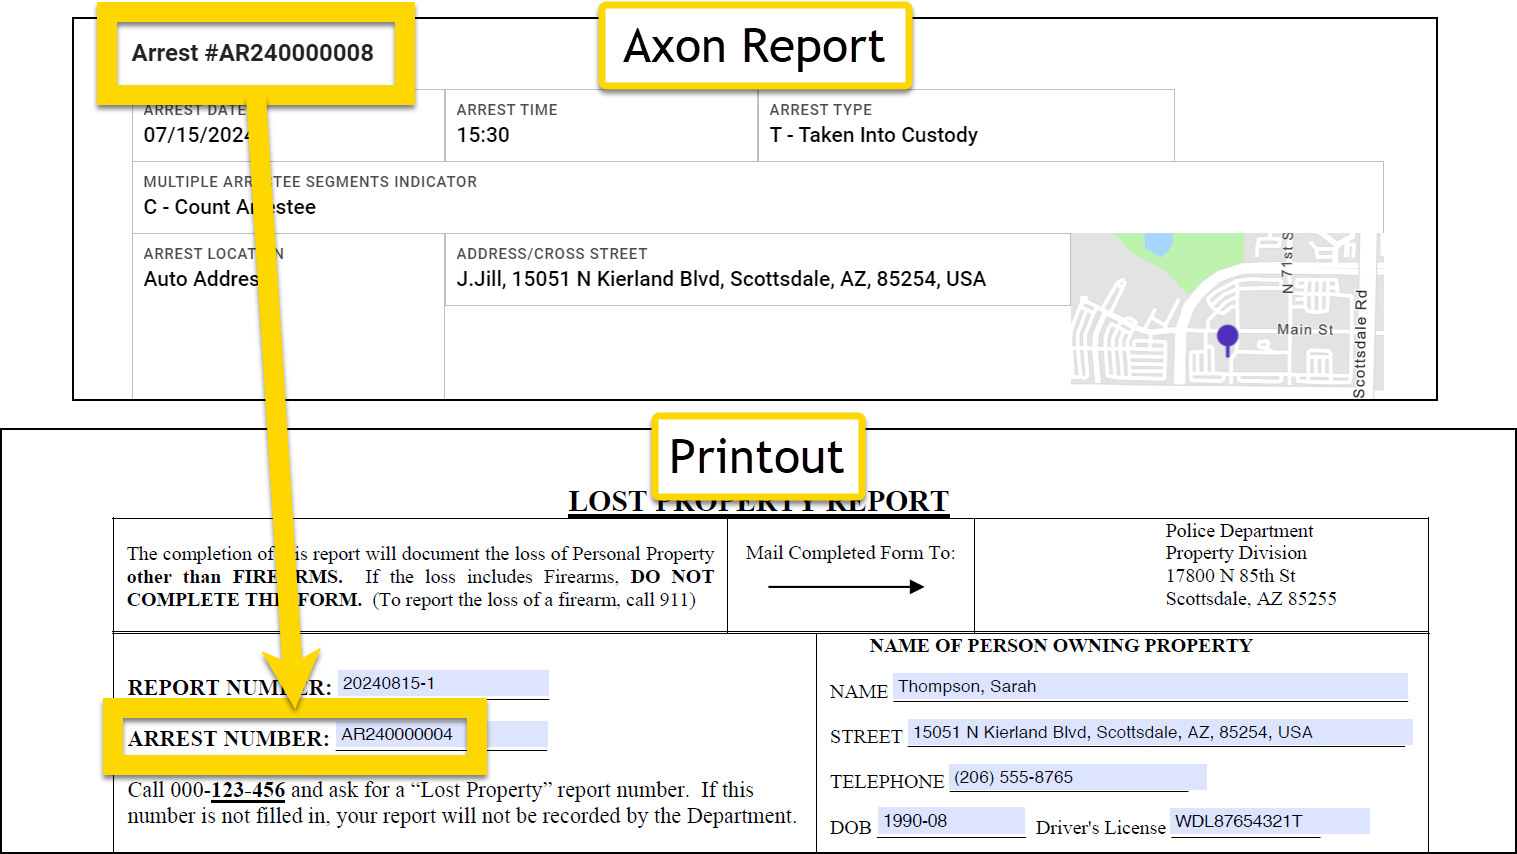
Arrest ID example
Before creating the expression, first determine a valid Data Path for the Arrest ID:
- Open the Names section in the Data Path Helper.
- Scroll down to the Arrest subform section.
-
Copy the data path for any field in the arrest subform and remove the last part of the path starting with
/axon.- For example, take the data path for the Arrest time field and remove
/axon/arrestTime:(form/us/parties/*/individual/person/@rels/PersonToArrest/0/@otherEntity/axon/arrestTime
- For example, take the data path for the Arrest time field and remove
After determining the valid Data Path, you can print the Friendly ID for an arrest:
- Expression:
Copy
pick(<form/us/parties/*/individual/person/@rels/PersonToArrest/0/@otherEntity>,"@friendlyID") - Inputs
<form/us/parties/*/individual/person/@rels/PersonToArrest/0/@otherEntity>"@friendlyID"
- Result: AR240000004
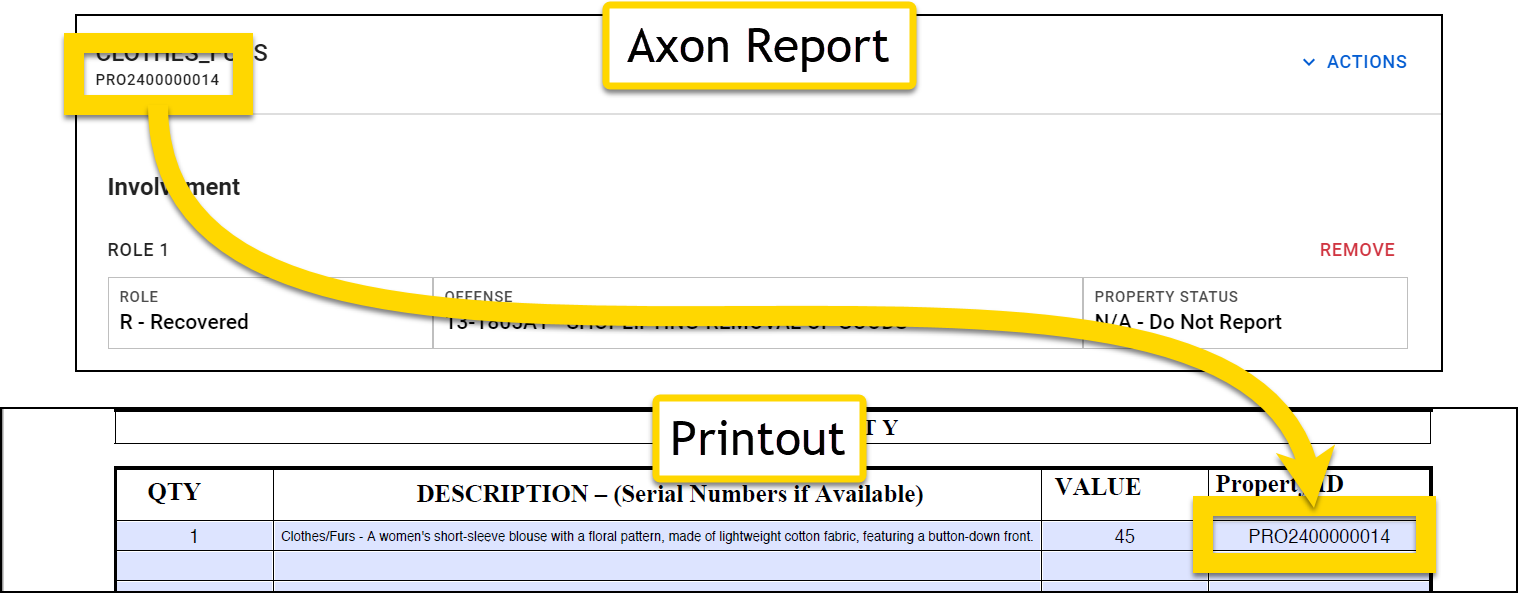
Property ID example
Before creating the expression, first determine a valid Data Path for the Property ID:
- Open the Property section in the Data Path Helper.
-
Copy the data path for any field and remove the last part of the path starting with
/axon.- For example, take the data path for the Property Type field and remove
/axon/type:form/us/properties/*/property/axon/type
- For example, take the data path for the Property Type field and remove
After determining the valid Data Path, you can print the Friendly ID for the property:
- Expression:
Copy
pick(<form/us/properties/*/property>,"@friendlyId") - Inputs
<form/us/properties/*/property>"@friendlyID"
- Result: PRO2400000014
Narrative author example
Before creating the expression, you should first determine a valid Data Path for the narrative:
- Open the Narrative section in the Data Path Helper.
- Copy the narrative data path remove the last part of the path starting with
/axon:form/us/narratives/*/narrative/axon/content.
After determining the valid Data Path, you can print the narrative author's name:
- Expression:
Copy
pick(<form/us/narratives/*/narrative>, "@author") - Inputs
<form/us/narratives/*/narrative>"@author"
- Result: Cora Gibson, (CGibson001)

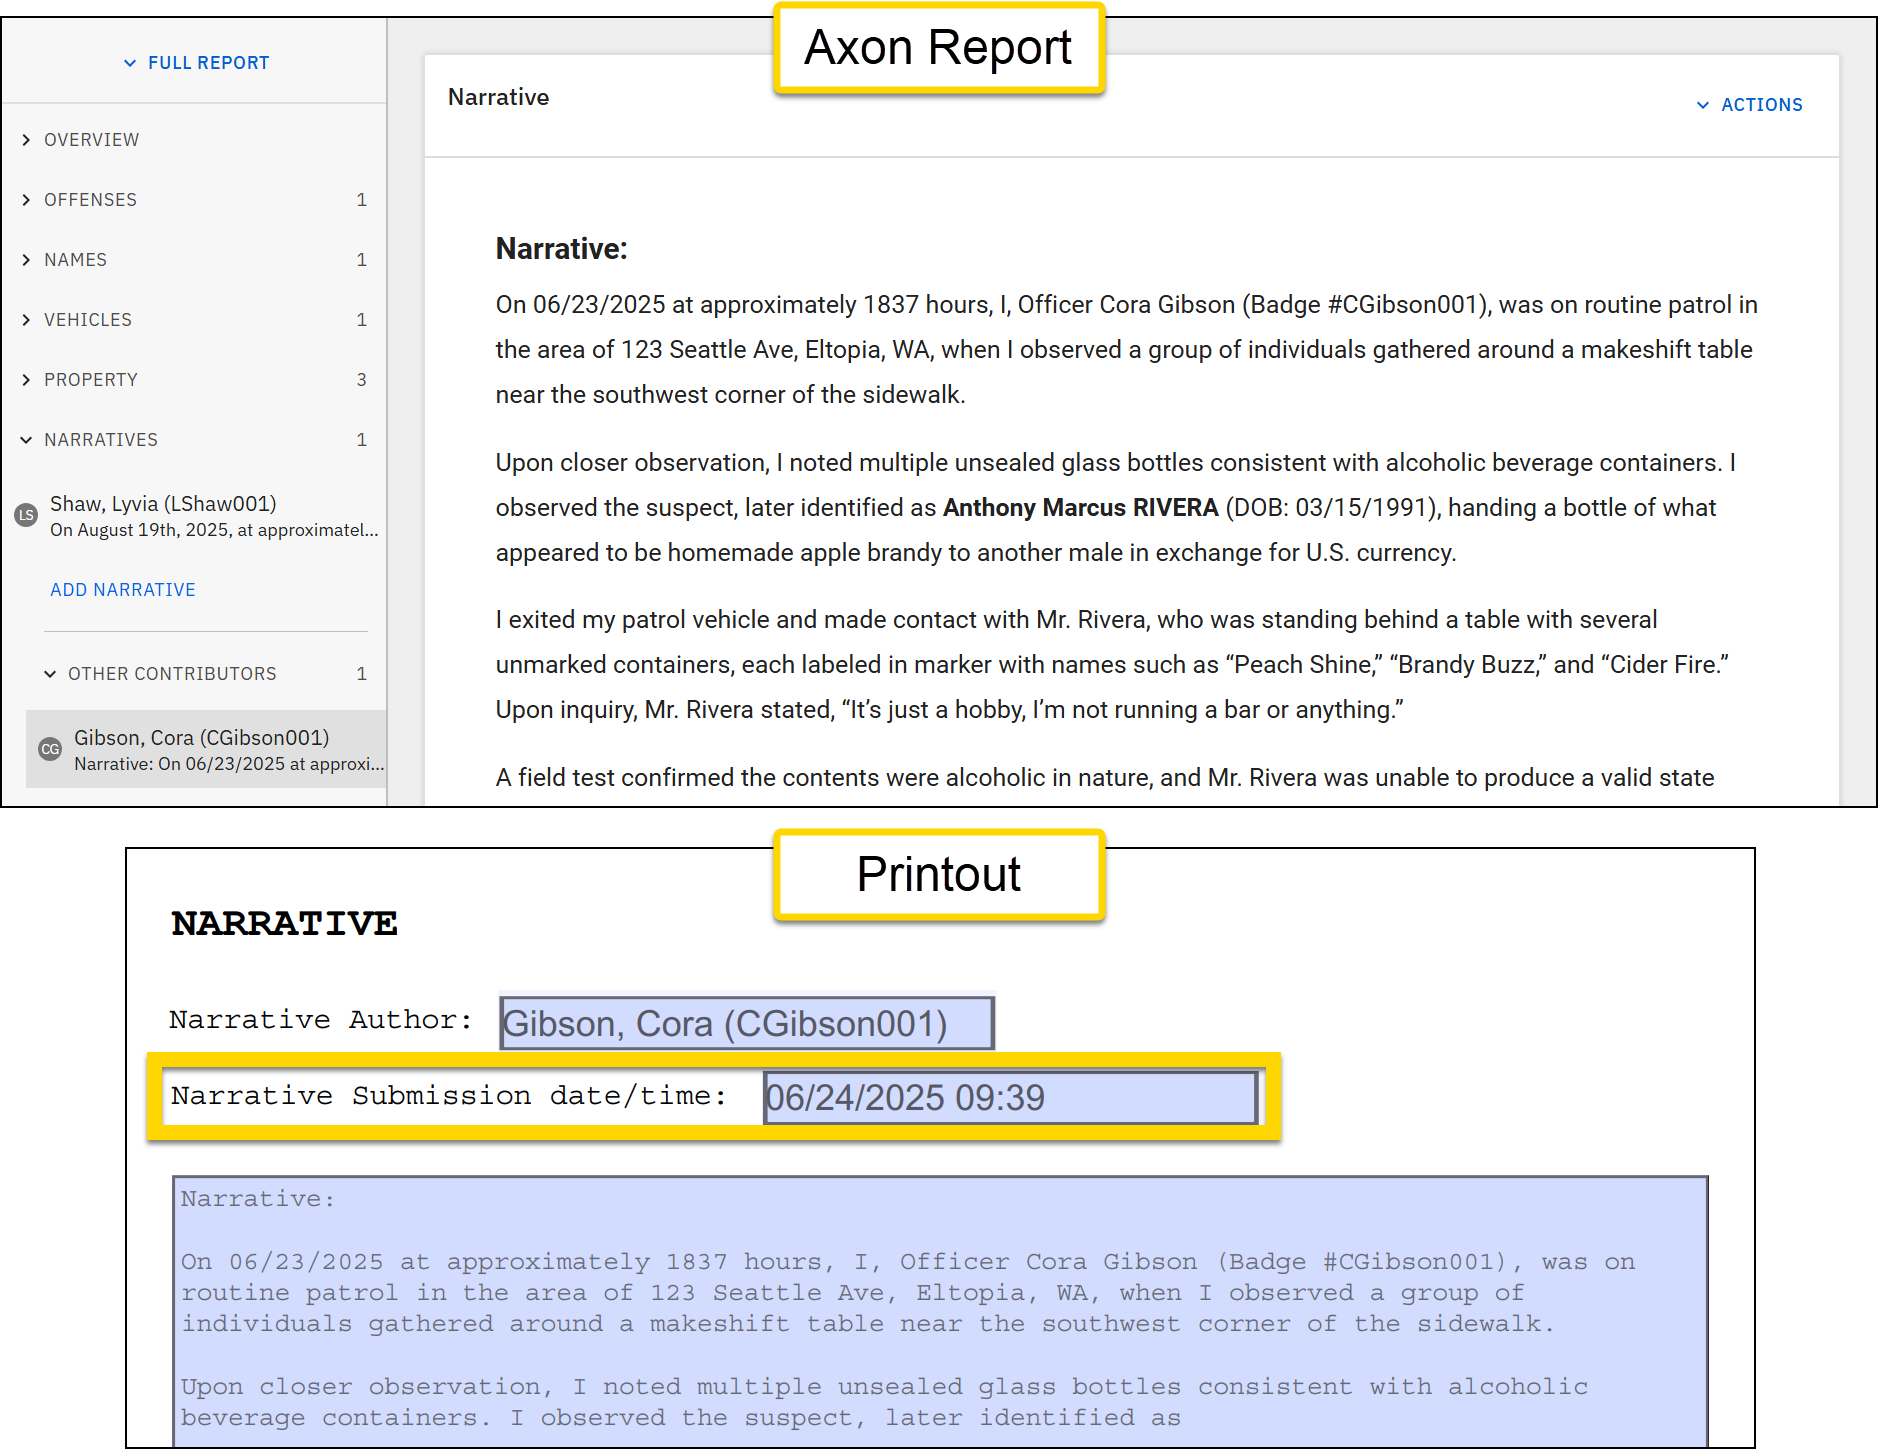
Narrative submission date and time
Before creating the expression, first determine a valid Data Path for the narrative:
- Open the Narrative section in the Data Path Helper.
- Copy the narrative data path remove the last part of the path starting with
/axon:form/us/narratives/*/narrative/axon/content.
After determining the valid Data Path, you can print the narrative submission date and time:
- Expression:
Copy
pick(<form/us/narratives/*/narrative>, "@submittedAt") - Inputs
<form/us/narratives/*/narrative>"@submittedAt"
- Result: Cora Gibson, (CGibson001)
Resolve
To print one of two values in a printout based on the value provided in a report field, use: resolve(Data Path or Expression, Value if True, Value if False).
- Input 1: A Data Path or expression
- Input 2: The value to be printed if the first input results in "true"
- Input 3: The value to be printed if the first input results in "false"
Examples
Example 1
To print "offense committed" if the Offense field is filled out, and to print "no offense" if the field is not filled out:
- Report data: The Offense field is set to 13-2923 - STALKING - FEL
- Expression:
Copy
resolve(<form/us/offenses/*/offense/@rels/OffenseToCharge/0/@otherEntity>, "Offense committed", "No offense") - Inputs:
<form/us/offenses/*/offense/@rels/OffenseToCharge/0/@otherEntity>"Offense committed""No offense"
- Result: Offense committed
- This operation looks at the Offense field, and because it has been filled out, the printout includes "Offense committed".
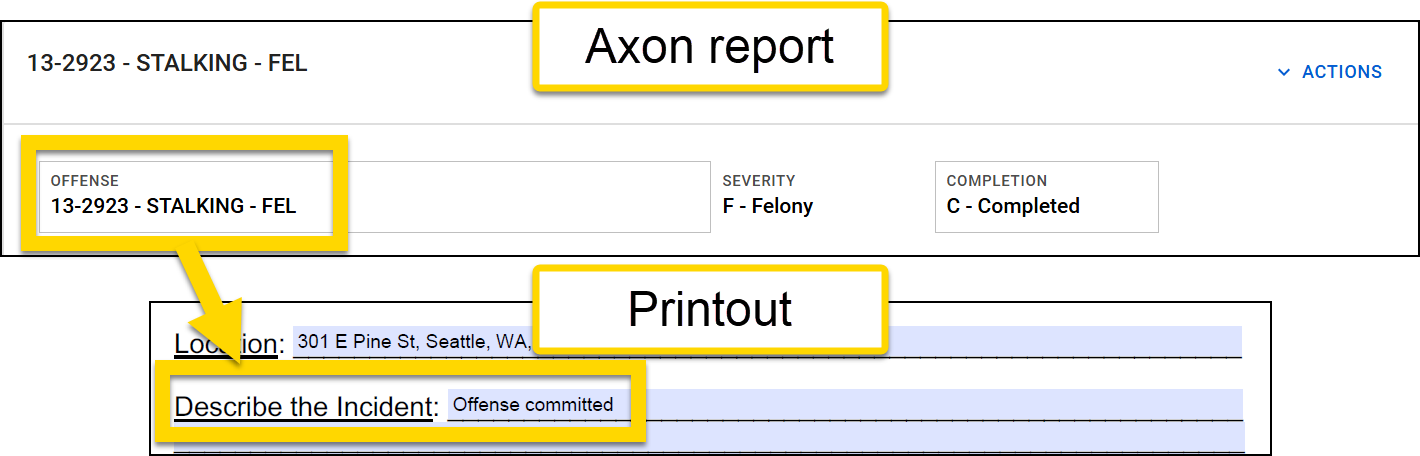
- This operation looks at the Offense field, and because it has been filled out, the printout includes "Offense committed".
Example 2
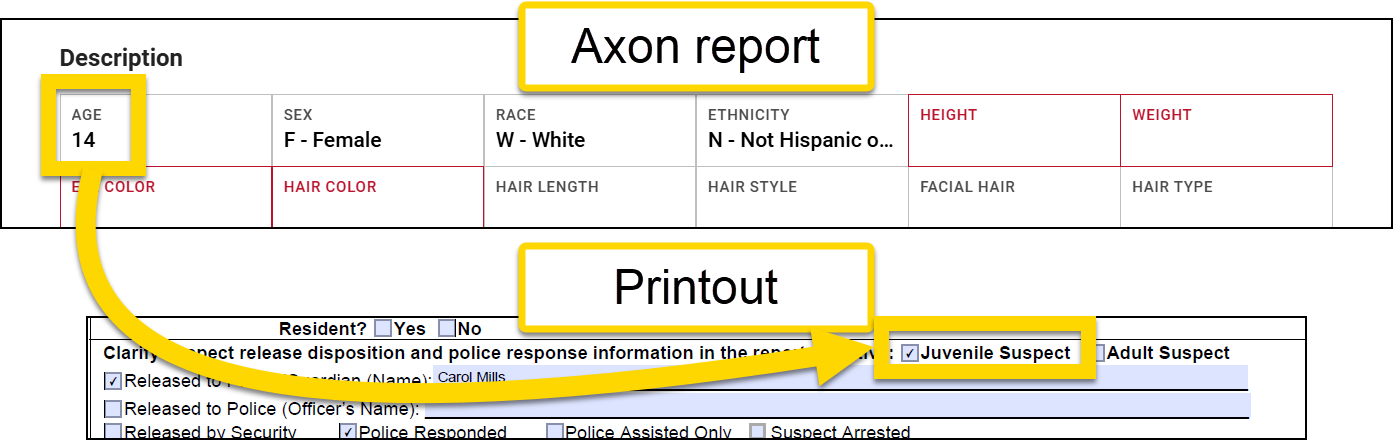
To print "Juvenile Court" if the Age field is less than 18, and to print "Municipal Court " if the field is greater than 18:
- Report data: The Age field is set to 14
- Expression:
Copy
resolve(compute(<form/us/parties/*/individual/person/axon/age>,"lt", 18), "Juvenile Court", "Municipal Court") - Inputs:
-
A compute expression composed of three inputs:
form/us/parties/*/individual/person/axon/age>"lt"18
"Juvenile Court""Municipal Court"
-
A compute expression composed of three inputs:
- Result: Juvenile Court
- This expression looks at the information entered in the Age field and because the number, 14, is less than 18 prints "Juvenile Court".
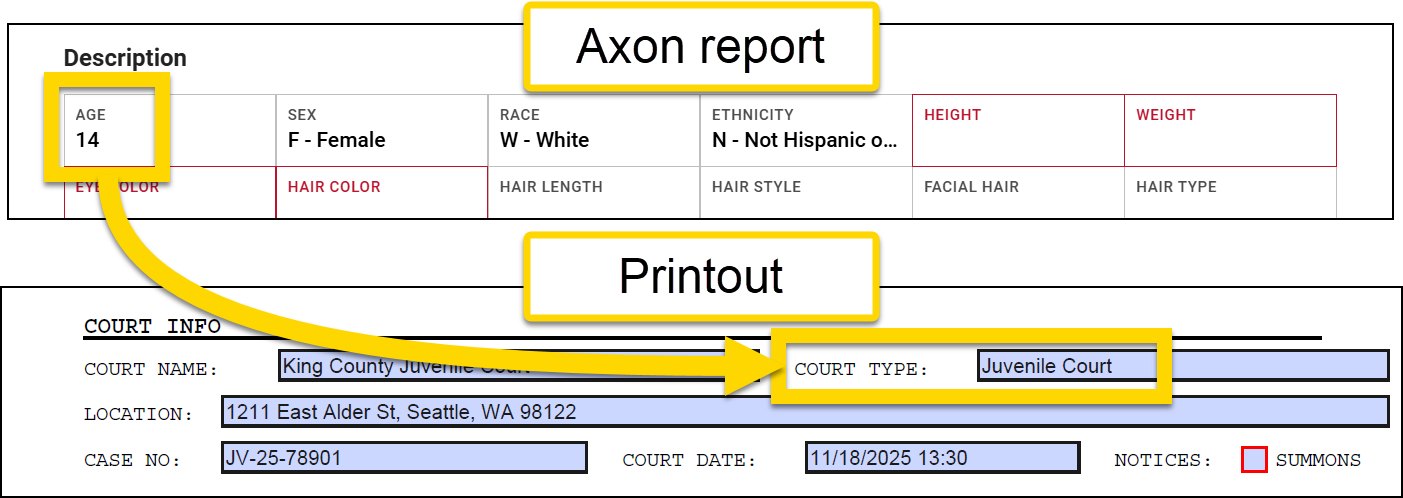
- This expression looks at the information entered in the Age field and because the number, 14, is less than 18 prints "Juvenile Court".
Example 3
To check a "Juvenile Court" checkbox if the Age field is less than 18:
- Report data: The Age field is set to 16
- Expression:
Copy
resolve(compute(<form/us/parties/*/individual/person/axon/age>,"lt", 18), "true", "false") - Inputs:
-
A compute expression composed of four inputs:
form/us/parties/*/individual/person/axon/age>"lt"18"true""false"
-
A compute expression composed of four inputs:
- Result: A selected Juvenile Court checkbox
- This expression looks at the information entered in the Age field and because the number, 16, is less than 18 prints a check in the Juvenile Court checkbox.
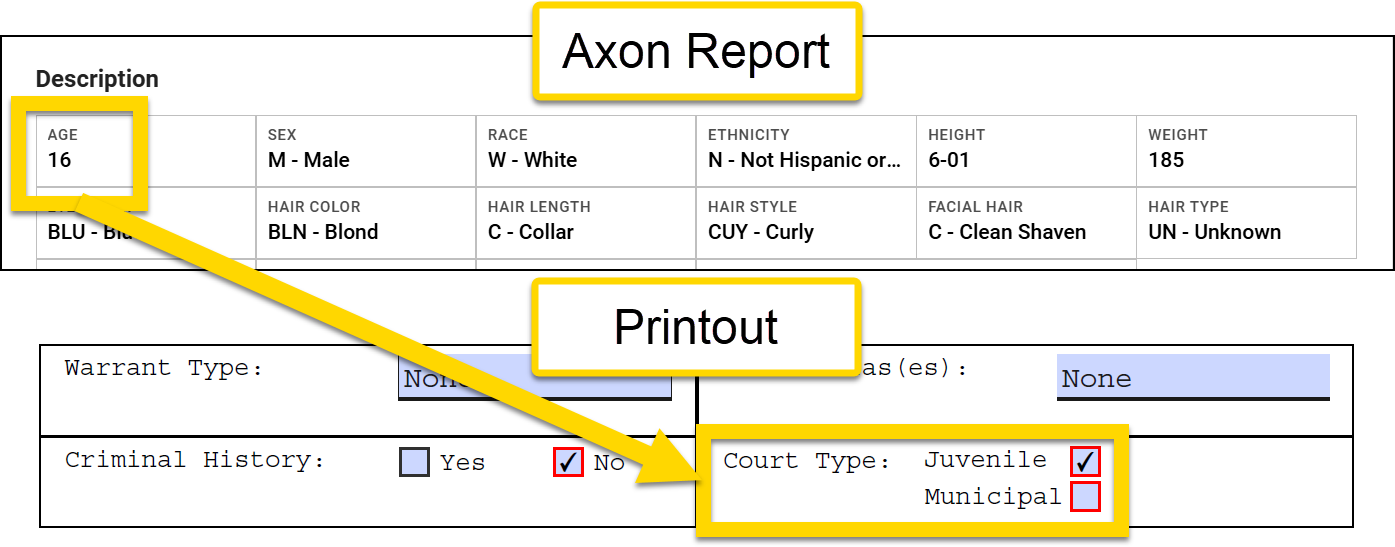
- This expression looks at the information entered in the Age field and because the number, 16, is less than 18 prints a check in the Juvenile Court checkbox.
Example 4
To check a Victim/Suspect checkbox if the Role field is set to either Victim or Suspect:
- Report data: The Role field is set to Victim
- Expression:
Copy
resolve(contains(<form/us/parties/*/individual/person/@rels/PersonToOffense/0/axon/involvement>, "VICTIM"), "true", contains(<form/us/parties/*/individual/person/@rels/PersonToOffense/0/axon/involvement>, "SUSPECT"))
- Inputs:
-
A contains expression composed of two inputs:
<form/us/parties/*/individual/person/@rels/PersonToOffense/0/axon/involvement>"VICTIM"
"true"-
Another contains expression composed of two inputs:
<form/us/parties/*/individual/person/@rels/PersonToOffense/0/axon/involvement>"SUSPECT"
-
A contains expression composed of two inputs:
- Result: A selected Victim/Suspect checkbox
- This expression looks at the information entered in the Role field and because the information is "Victim", the Victim/Suspect checkbox is selected.
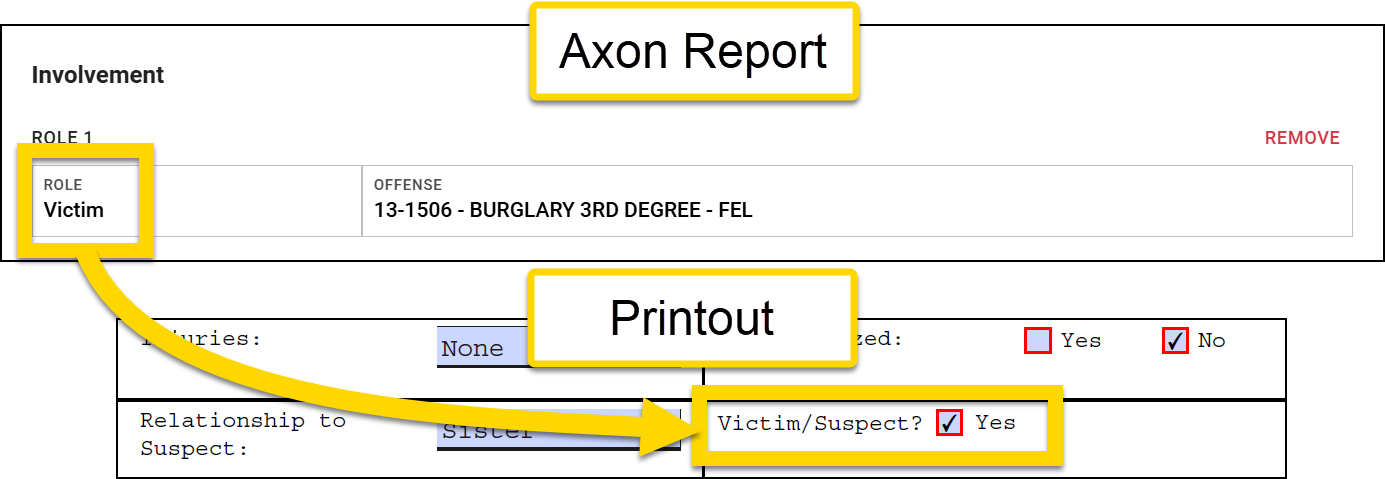
- This expression looks at the information entered in the Role field and because the information is "Victim", the Victim/Suspect checkbox is selected.
Example 5
To print a person's employer name if the person's age is over 18, or if the person's age is under 18, print their school name and grade level:
- Report data: The Age field is set to 16, the School field is set to Ballard High School, and the Grade field is set to Junior
- Expression:
Copy
resolve(compute(<form/us/people/*/person/axon/age>, "gt", 18), <form/us/people/*/person/axon/employer>, concat(<form/us/people/*/person/school>, resolve(compute(<form/us/people/*/person/gradeLevel>, "has", "@VALUE"), concat(" ", "Grade - ", <form/us/people/*/person/gradeLevel>)))) - Inputs:
-
A compute expression composed of three inputs:
<form/us/people/*/person/axon/age>"gt"18
<form/us/people/*/person/axon/employer>-
A concat expression composed of three inputs:
<form/us/people/*/person/school>-
A resolve expression composed of a compute expression, which has three inputs:
<form/us/people/*/person/gradeLevel>"has""@VALUE"
-
The final input in this concat expression is another concat expression, which has three inputs:
" ""Grade - "<form/us/people/*/person/gradeLevel>
-
A compute expression composed of three inputs:
- Result: Ballard High School Grade - Junior
- This expression looks at the information entered in the Age field and because the number, 16, is less than 18 prints "Ballard High School Grade - Junior" in the Employer/School field.
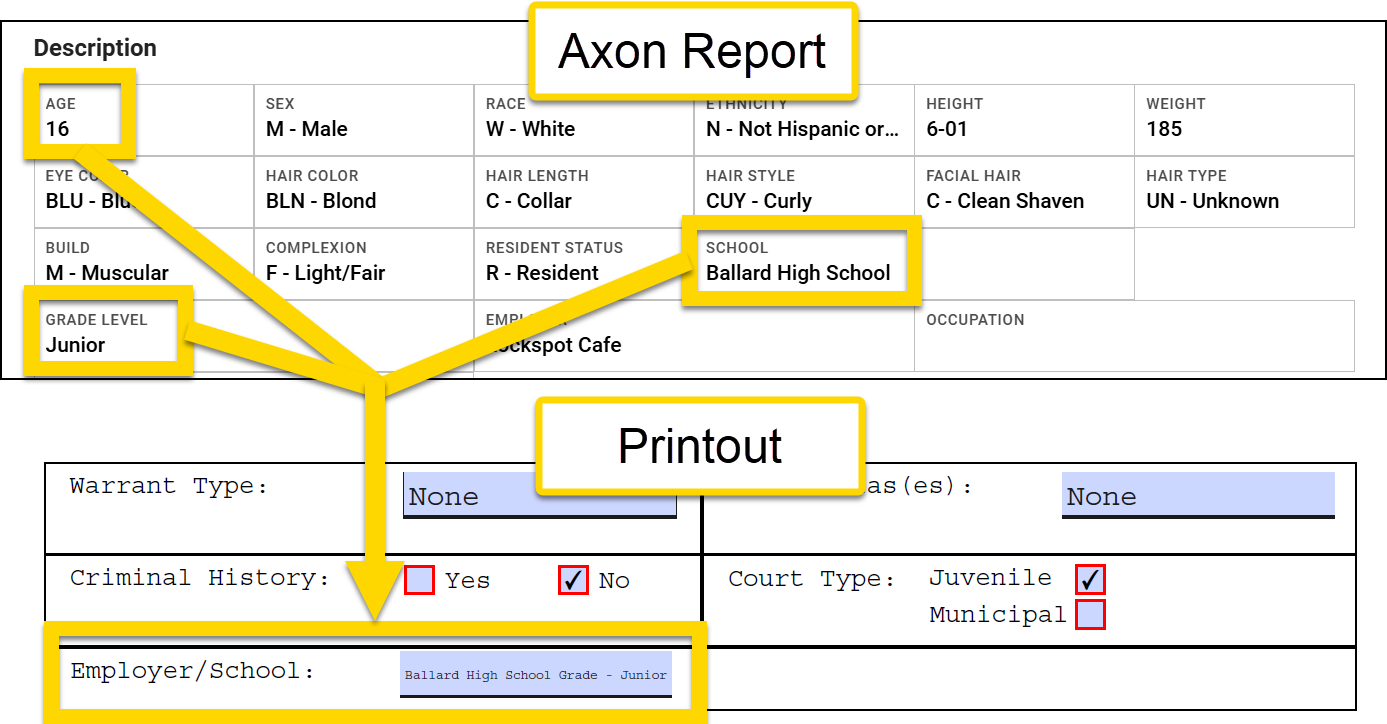
- This expression looks at the information entered in the Age field and because the number, 16, is less than 18 prints "Ballard High School Grade - Junior" in the Employer/School field.
Slice
To print a portion of the data entered in a field, use: slice(Data Path, Slice Index) or slice(Data Path, Start Index, End Index).
If you include two inputs in your expression, you can include either the starting or ending portion of the data from a field:
- Input 1: The Data Path for the field you want to split
-
Input 2: The Slice Index is starting or ending character at which the slice will occur.
- If the digit is positive, the slice counts from the start of the string.
- If the digit is negative, the slice counts back from the end of the string.
If you include three inputs in your expression, you can include a middle portion of the data entered in a field:
- Input 1: The Data Path for the field you want to split
- Input 2: The Start Index is starting character at which the slice will occur.
- Input 3: The End Index is ending character at which the slice will occur.
To use this operation for list fields, such as SSN, you must use it in combination with either an extract or match expression:
slice(extract(Data Path), Slice Index)orslice(extract(Data Path), Start Index, End Index)match(Data Path, Match String, Data Path)
Examples
Example 1
To print the last four digits of a person's social security number, use a combination of a slice and extract expression:
- Original data: 123-45-6789
- Expression:
Copy
slice(extract(<form/us/parties/*/individual/person/axon/identityDocuments/*/ssn/number>),-4) - Inputs:
-
An extract expression composed of one input:
<form/us/parties/*/individual/person/axon/identityDocuments/*/ssn/number>
-4
-
An extract expression composed of one input:
- Result: 6789
- The extract expression selects the SSN from the Identifying Documents list. From there, the slice expression begins at the end of the field and returns the final four digits of the SSN.
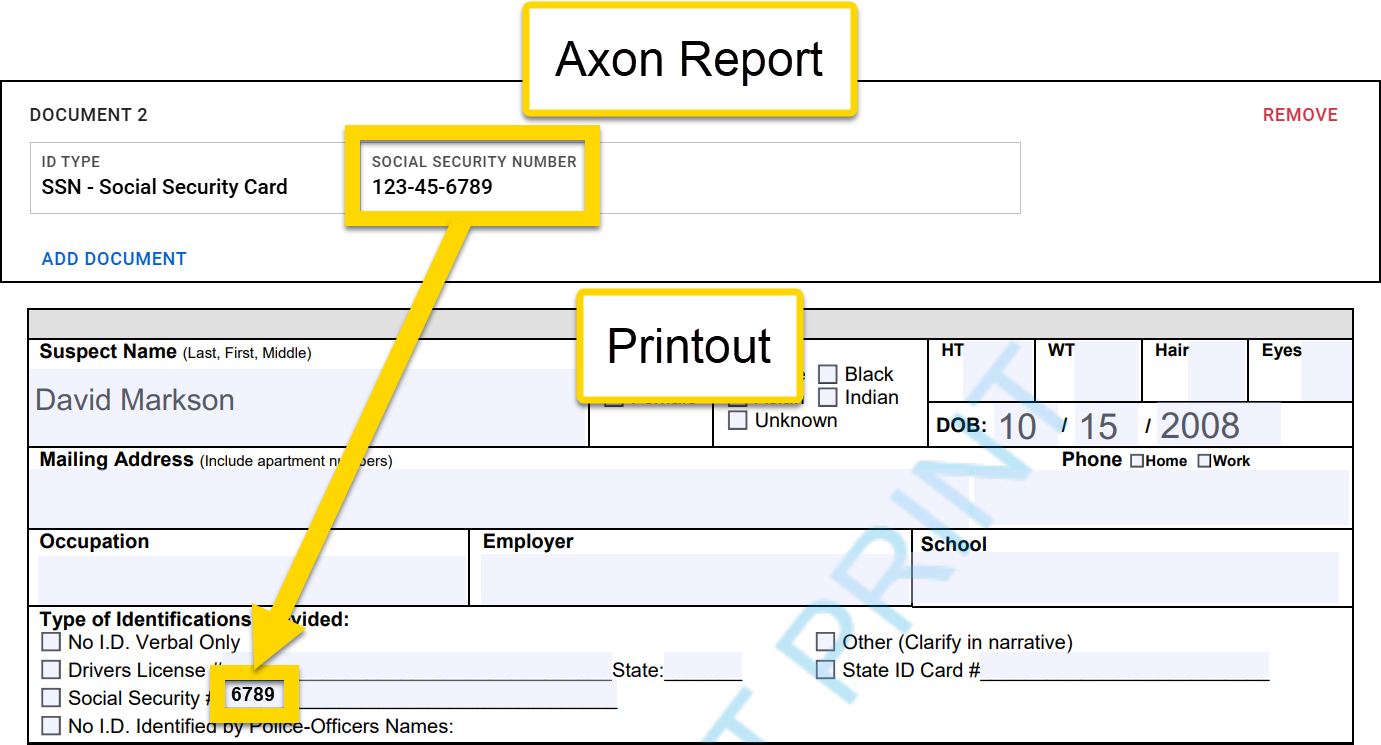
- The extract expression selects the SSN from the Identifying Documents list. From there, the slice expression begins at the end of the field and returns the final four digits of the SSN.
Example 2
To print the first character of a person's sex:
- Original data: F - Female
- Expression:
Copy
slice(<form/us/parties/*/individual/person/axon/sex>,1) - Inputs:
<form/us/parties/*/individual/person/axon/sex>1
- Result: F
- The slice expression begins at the start of the field and returns the first character.
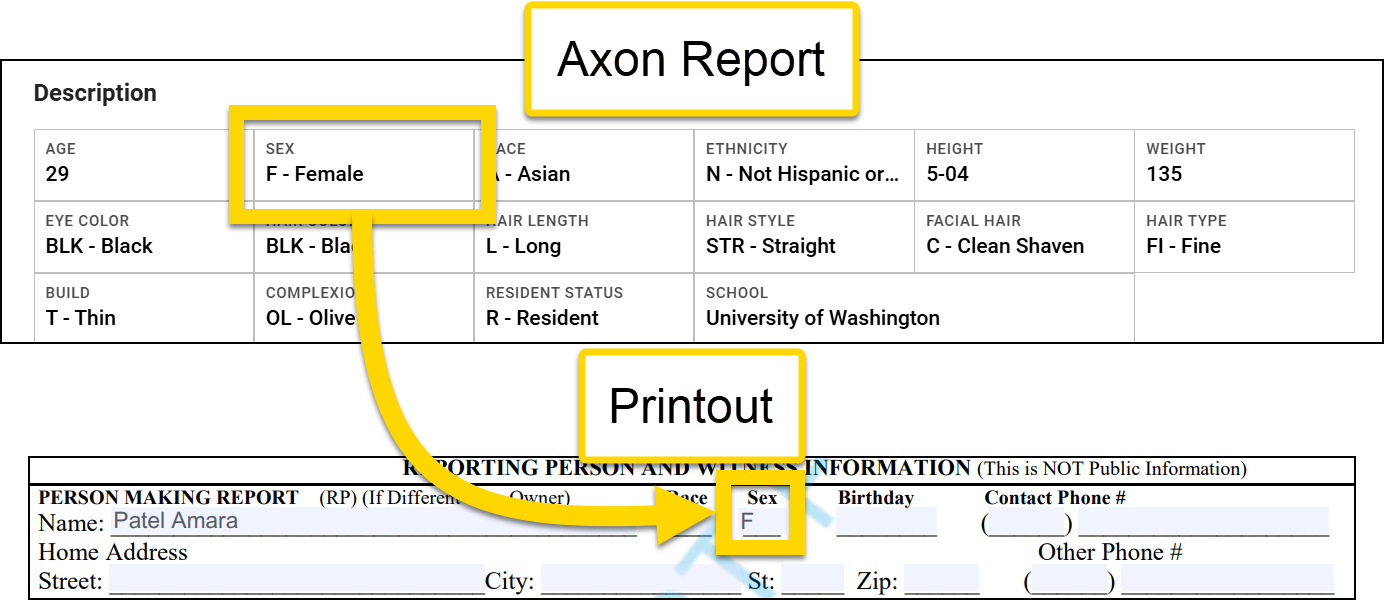
- The slice expression begins at the start of the field and returns the first character.
Example 3
To print the day only in a person's date of birth:
- Original data: 10/15/2008
- Expression:
Copy
slice(<form/us/parties/*/individual/person/axon/birthdate>,3,5) - Inputs:
<form/us/parties/*/individual/person/axon/birthdate>3- 5
- Result: 15
- The slice expression begins at the start of the field and ignores the first three digits. It then starts printing digits until it reaches the End Index of five. All remaining digits are not printed.
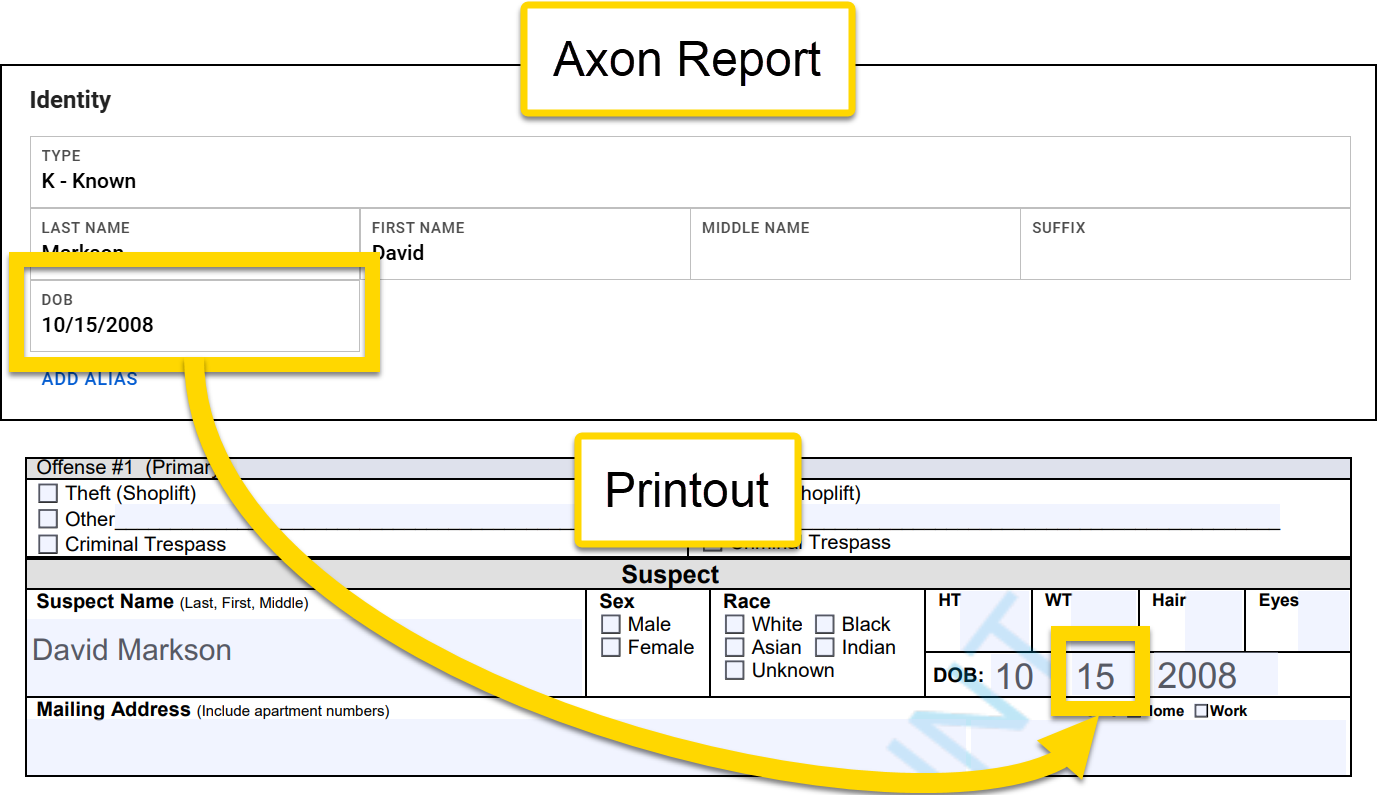
- The slice expression begins at the start of the field and ignores the first three digits. It then starts printing digits until it reaches the End Index of five. All remaining digits are not printed.
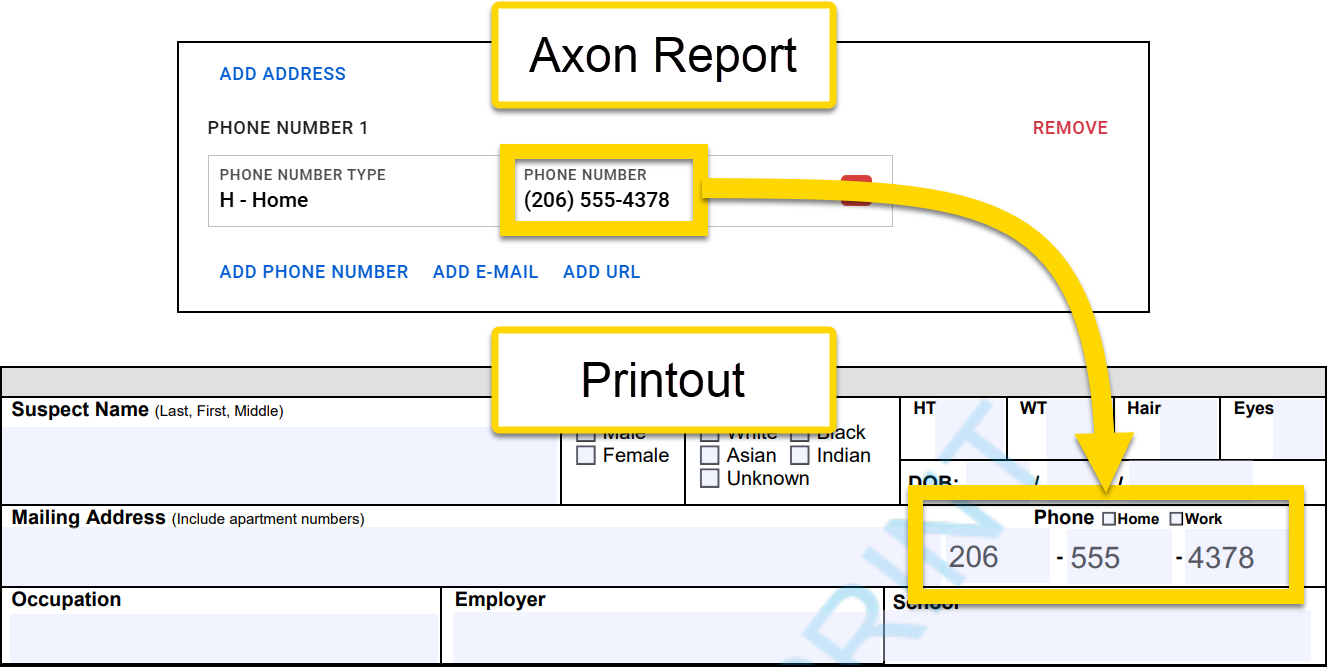
Example 4
To split a phone number into three separate fields, use three slice + match expressions:
- Original data: (206) 555-4378
- Expressions
Copy
slice(match(<form/us/parties/*/individual/person/axon/contact/phoneNumbers/*/type>,"HOME",<form/us/parties/*/individual/person/axon/contact/phoneNumbers/*/value>),1,4)

slice(match(<form/us/parties/*/individual/person/axon/contact/phoneNumbers/*/type>,"HOME",<form/us/parties/*/individual/person/axon/contact/phoneNumbers/*/value>),6,9)

slice(match(<form/us/parties/*/individual/person/axon/contact/phoneNumbers/*/type>,"HOME",<form/us/parties/*/individual/person/axon/contact/phoneNumbers/*/value>),-4) - Result: The match expression selects the Home phone number from the Phone numbers list. From there, the three slice expressions split the phone number into the three fields, leaving out the parentheses for the area code.
Split
To split an input (use a portion of a field from the report), use: split(<Data Path>, "Split Character/s", Split Index).
- Input 1: The Data Path for the field you want to split
-
Input 2: The Split Character is the character at which the split will occur (enclosed in double quotation marks).
- This character could be a hyphen, a space, a colon, etc. The type of character depends on the options available for that specific field.
- The split character is not included in the result.
-
To use a special character as the split character, use the corresponding HTML URL encoding for that character.:
< > ( ) { } , " @ #- A list of standard HTML codes for special characters can be found here.
-
Input 3: The Split Index is a number indicating which value from the resulting split should be used
- The first value is indicated by 0, not 1. See the example below.
Examples
Example 1
To map only the incident month to a field in a printout:
- Original data: 07/18/2024
- Expression:
Copy
split(<form/us/incidentFromDate>,"/",0) - Inputs:
<form/us/incidentFromDate>" /"0
- Result: 07
- The data in this field is composed of three parts (07, 15, and 2024). Each part is separated by a forward slash. The first part, as indicated by the split index of
0, is 07.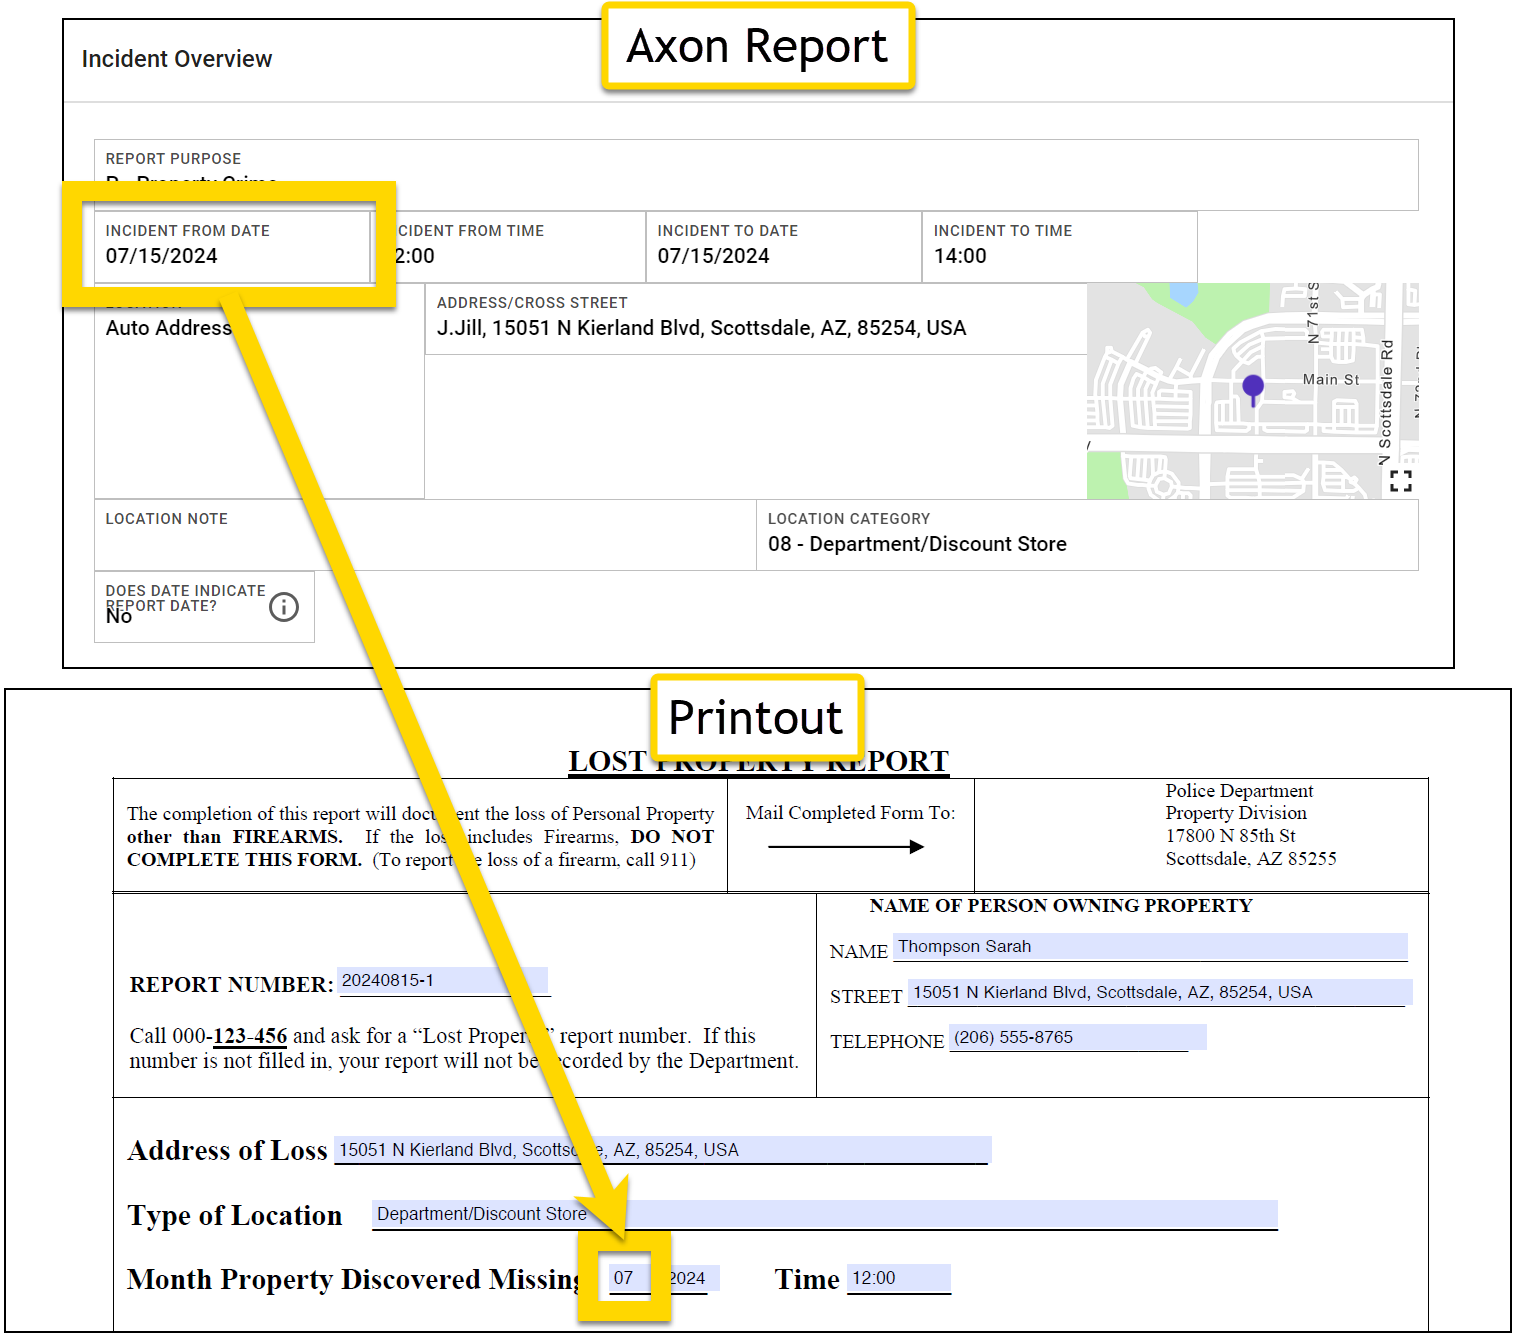
- The data in this field is composed of three parts (07, 15, and 2024). Each part is separated by a forward slash. The first part, as indicated by the split index of
Example 2
To map only the location type (and not the shortcode) to a field in a printout:
- Original data: 08 - Department/Discount Store
- Expression:
Copy
split(<form/us/incidentLocation/type>," - ",1) - Inputs:
<form/us/incidentLocation/type>" - "1
- Result: Department/Discount Store
- The data in this field is composed of two parts (08 and Department/Discount Store). The two parts are separated by a space, a hyphen, and a space. The second part, as indicated by the split index of
1, is Department/Discount Store.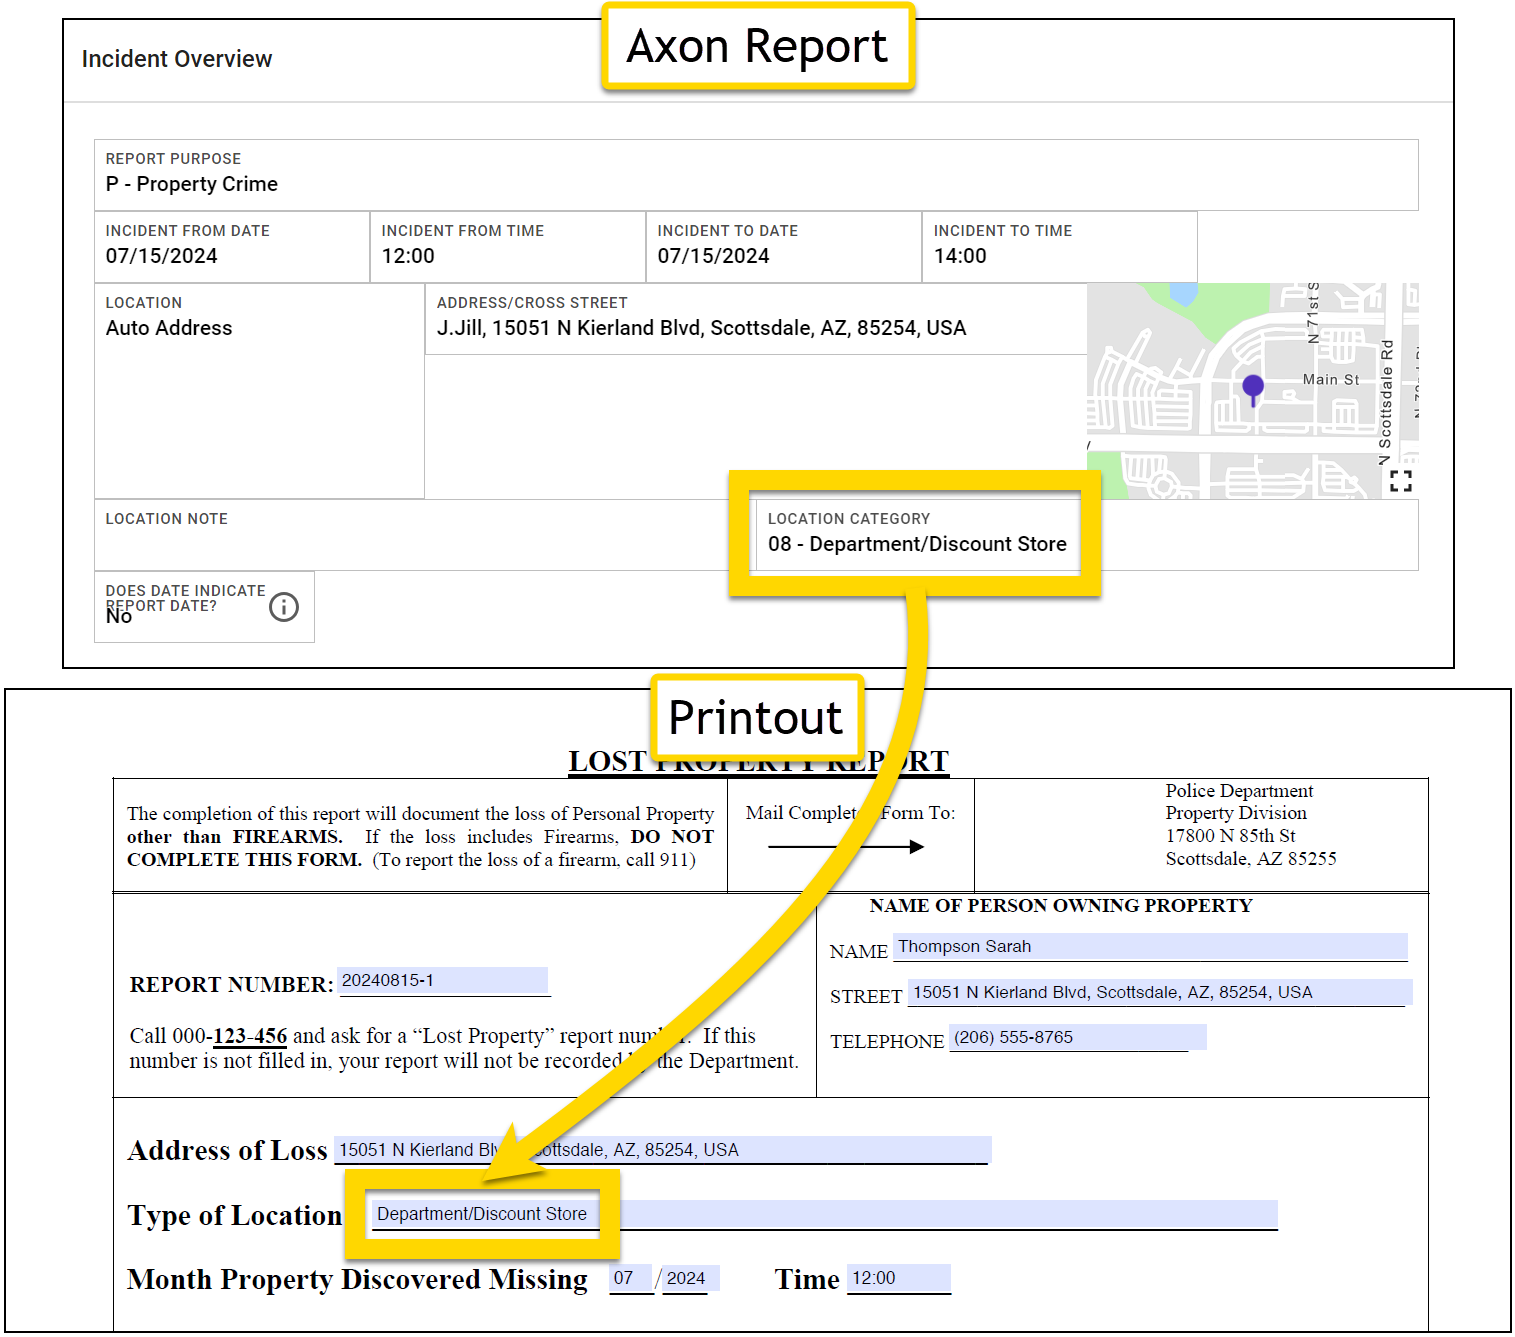
- The data in this field is composed of two parts (08 and Department/Discount Store). The two parts are separated by a space, a hyphen, and a space. The second part, as indicated by the split index of
Example 3
To map only an officer's badge ID to a field in a printout:
- Original data: 08 - Department/Discount Store
- Expression:
Copy
split(<form/officers/*/officer>,"%2c",0) - Inputs:
<form/officers/*/officer>"%2c"- 0
- Result: Mills
- The data in this field is composed of two parts (Mills and Lewis (LMills001)). The two parts are separated by a comma. The first part, as indicated by the split index of 0, is Mills.
- Note that the HTML code is used as the second input to indicate the comma:
%2c.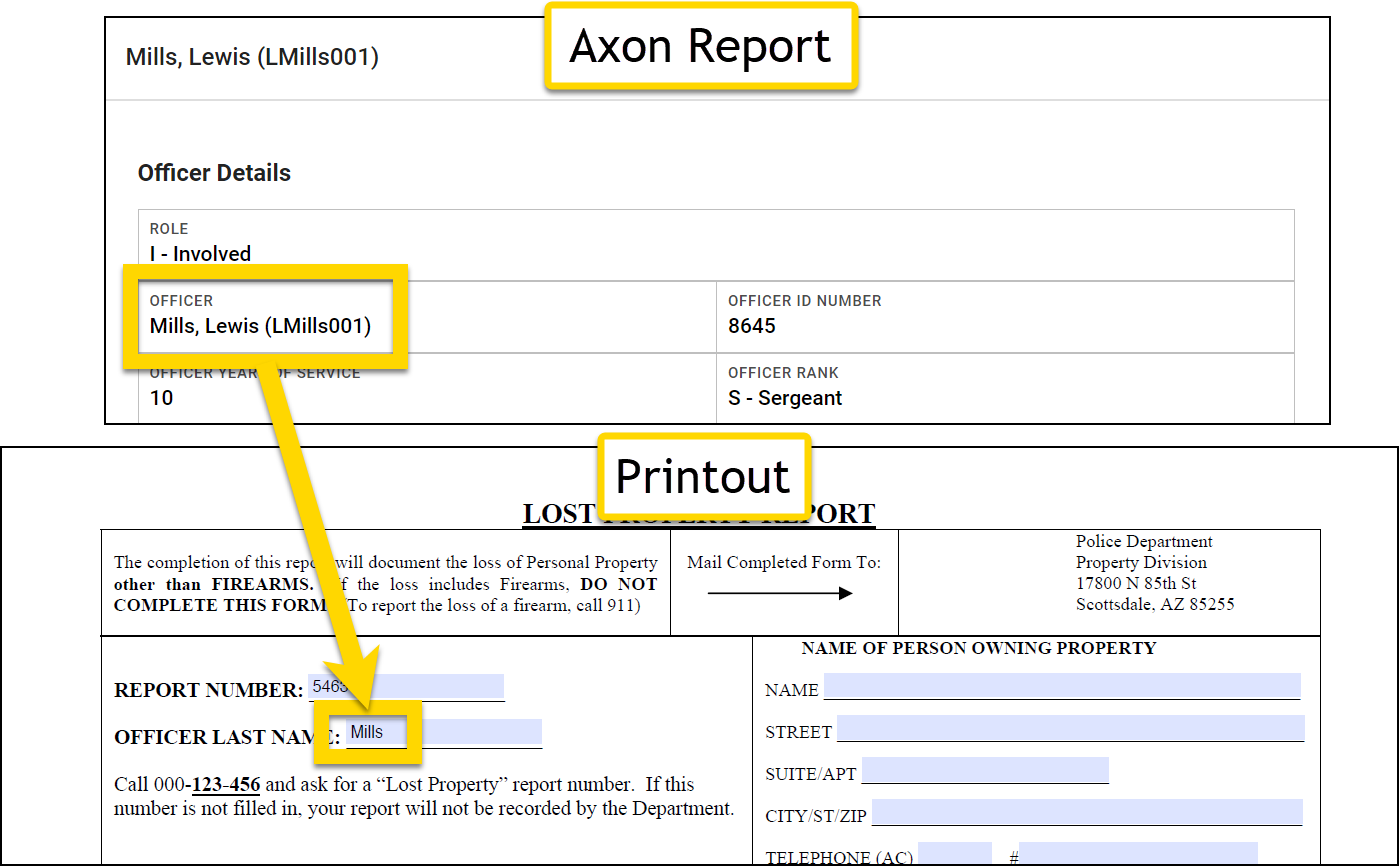
Actual values
A checkbox or dropdown option actual value is generally different from the option's description, which is displayed in the form. The actual value is generally formatted in all caps with an underscore ( _ ) in between words.
There are several methods you can use to find the actual value of a checkbox/dropdown option:
- Method 1: Open the form in Form Builder (dropdown options only)
- Method 2: Download the form's JSON
- Method 2: Map and test print
Method 1: Open the form in Form Builder
This method can only be used to find the values of dropdown options.
- Open the form in Form Builder.
- Find the dropdown menu and select Edit.
- Find the value of the option you want to reference in your mapping.
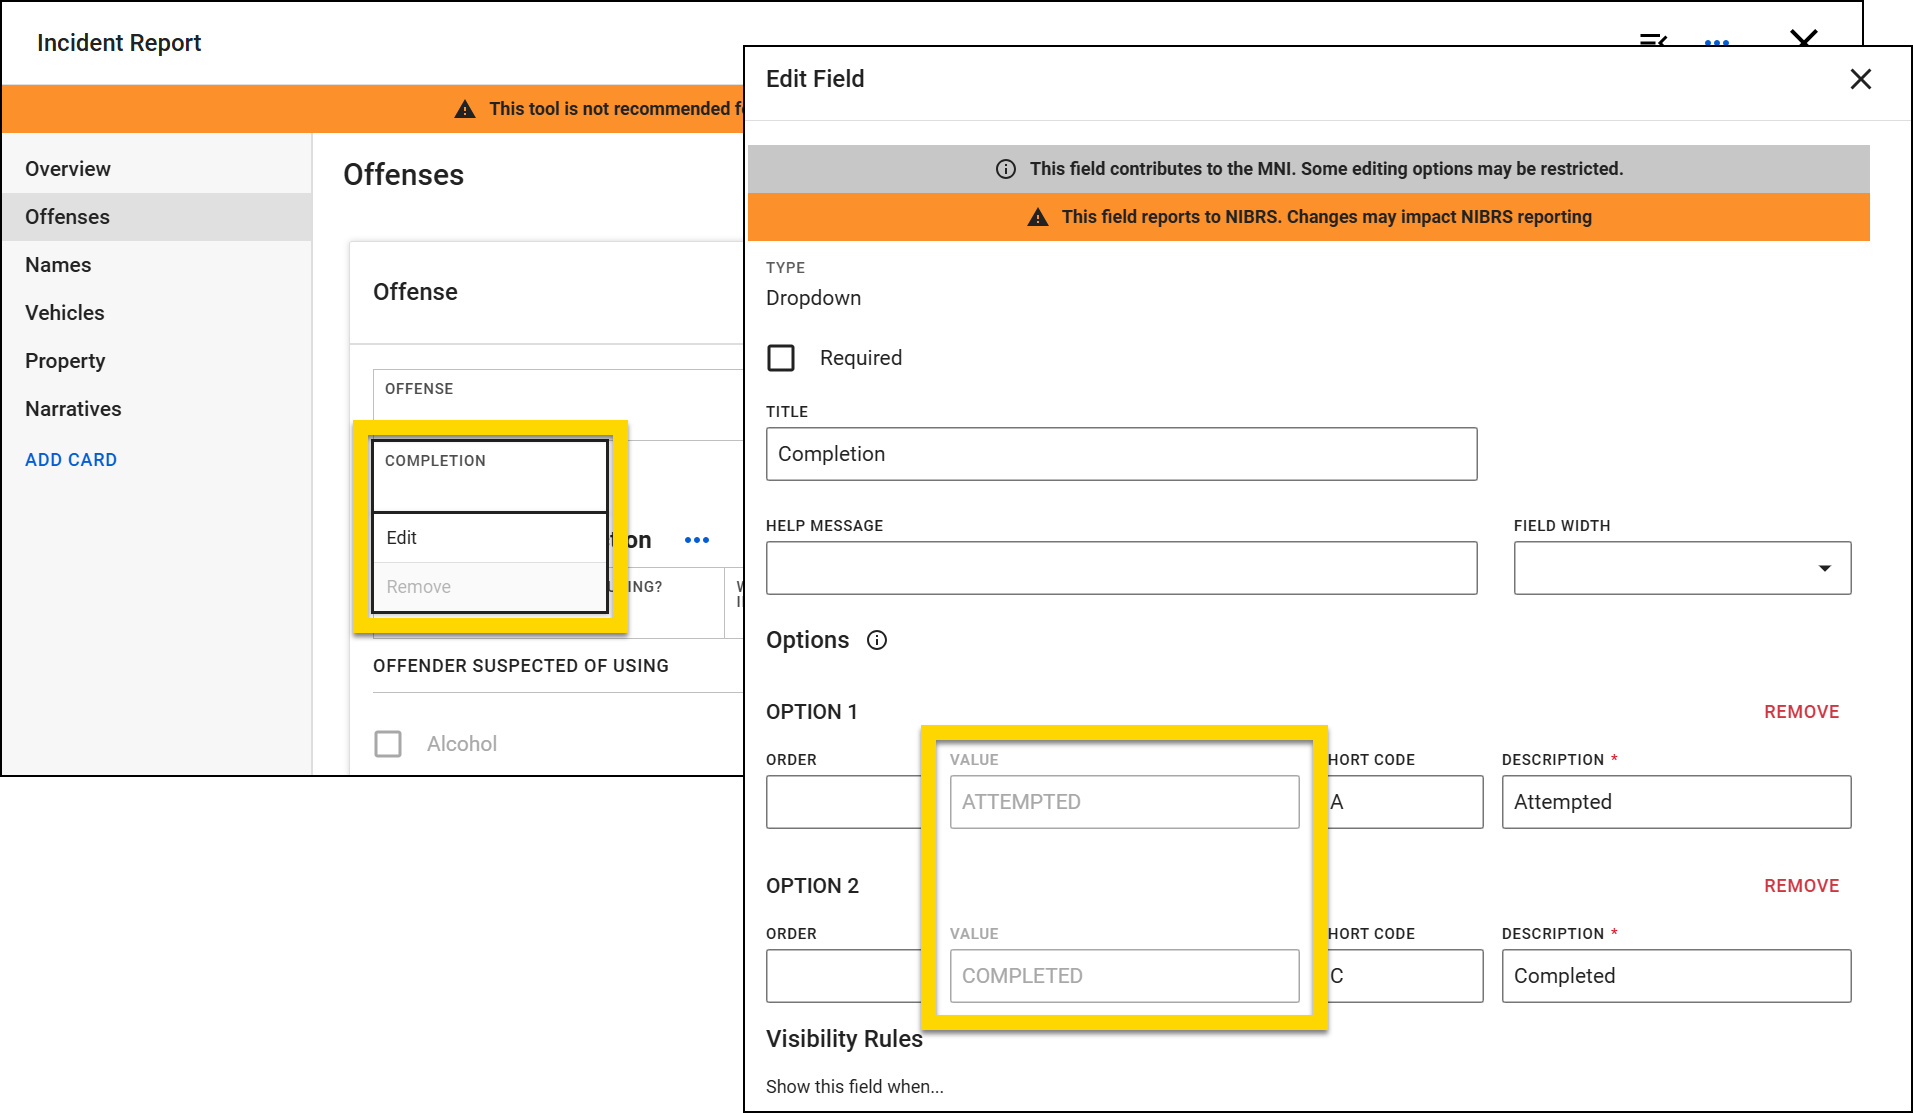
Method 2: Download the form's JSON
This method can be used to find either checkbox or dropdown menu options.
- Open the print template and select the Data Path helper tool.
- Go to the appropriate section of the form to find the Data Path for the checkbox group section.
- Download the form's JSON.
-
Search for the checkbox group's Data Path in the form's JSON and copy the actual value of the checkbox option.
- In this example, the following JSON makes up the options for a checkbox. The actual value for each checkbox option appears above that option's description (highlighted in yellow below).
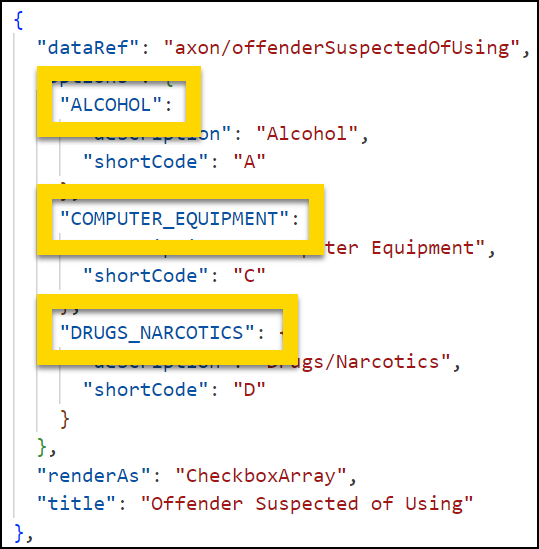
- In this example, the following JSON makes up the options for a checkbox. The actual value for each checkbox option appears above that option's description (highlighted in yellow below).
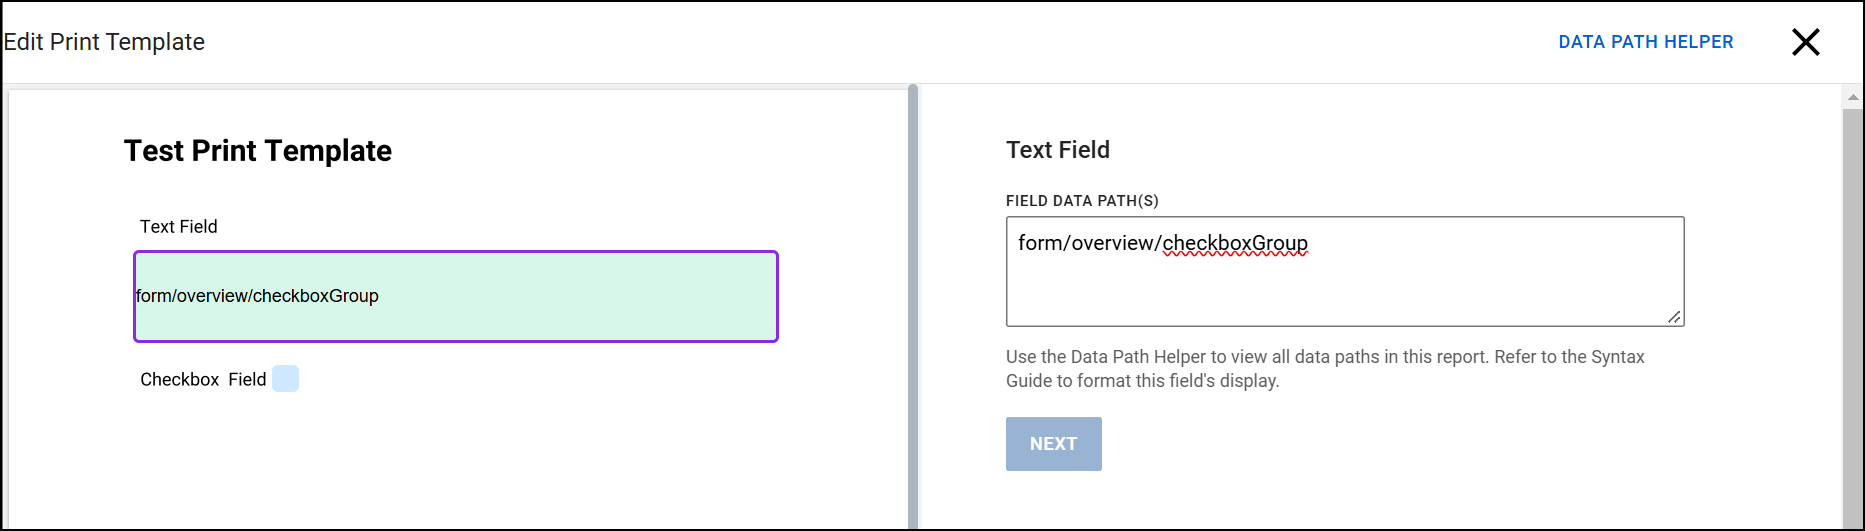
Method 3: Map and test print
- Using the PDF print template workflow, map the checkbox group to a text field in a print template.
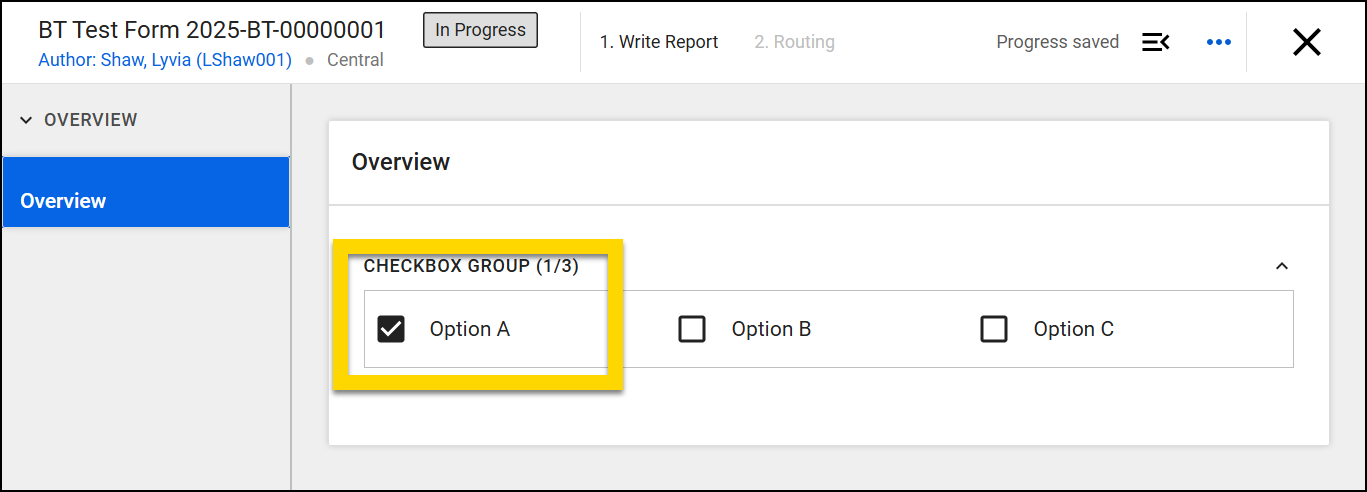
- Create a report and select the checkbox option you need the actual value for.
- Use the Test print feature to generate a test print of your print template using the report you created.
- The checkbox value will appear in your test print. In the example below, the actual value of the checkbox is
OPTION_A.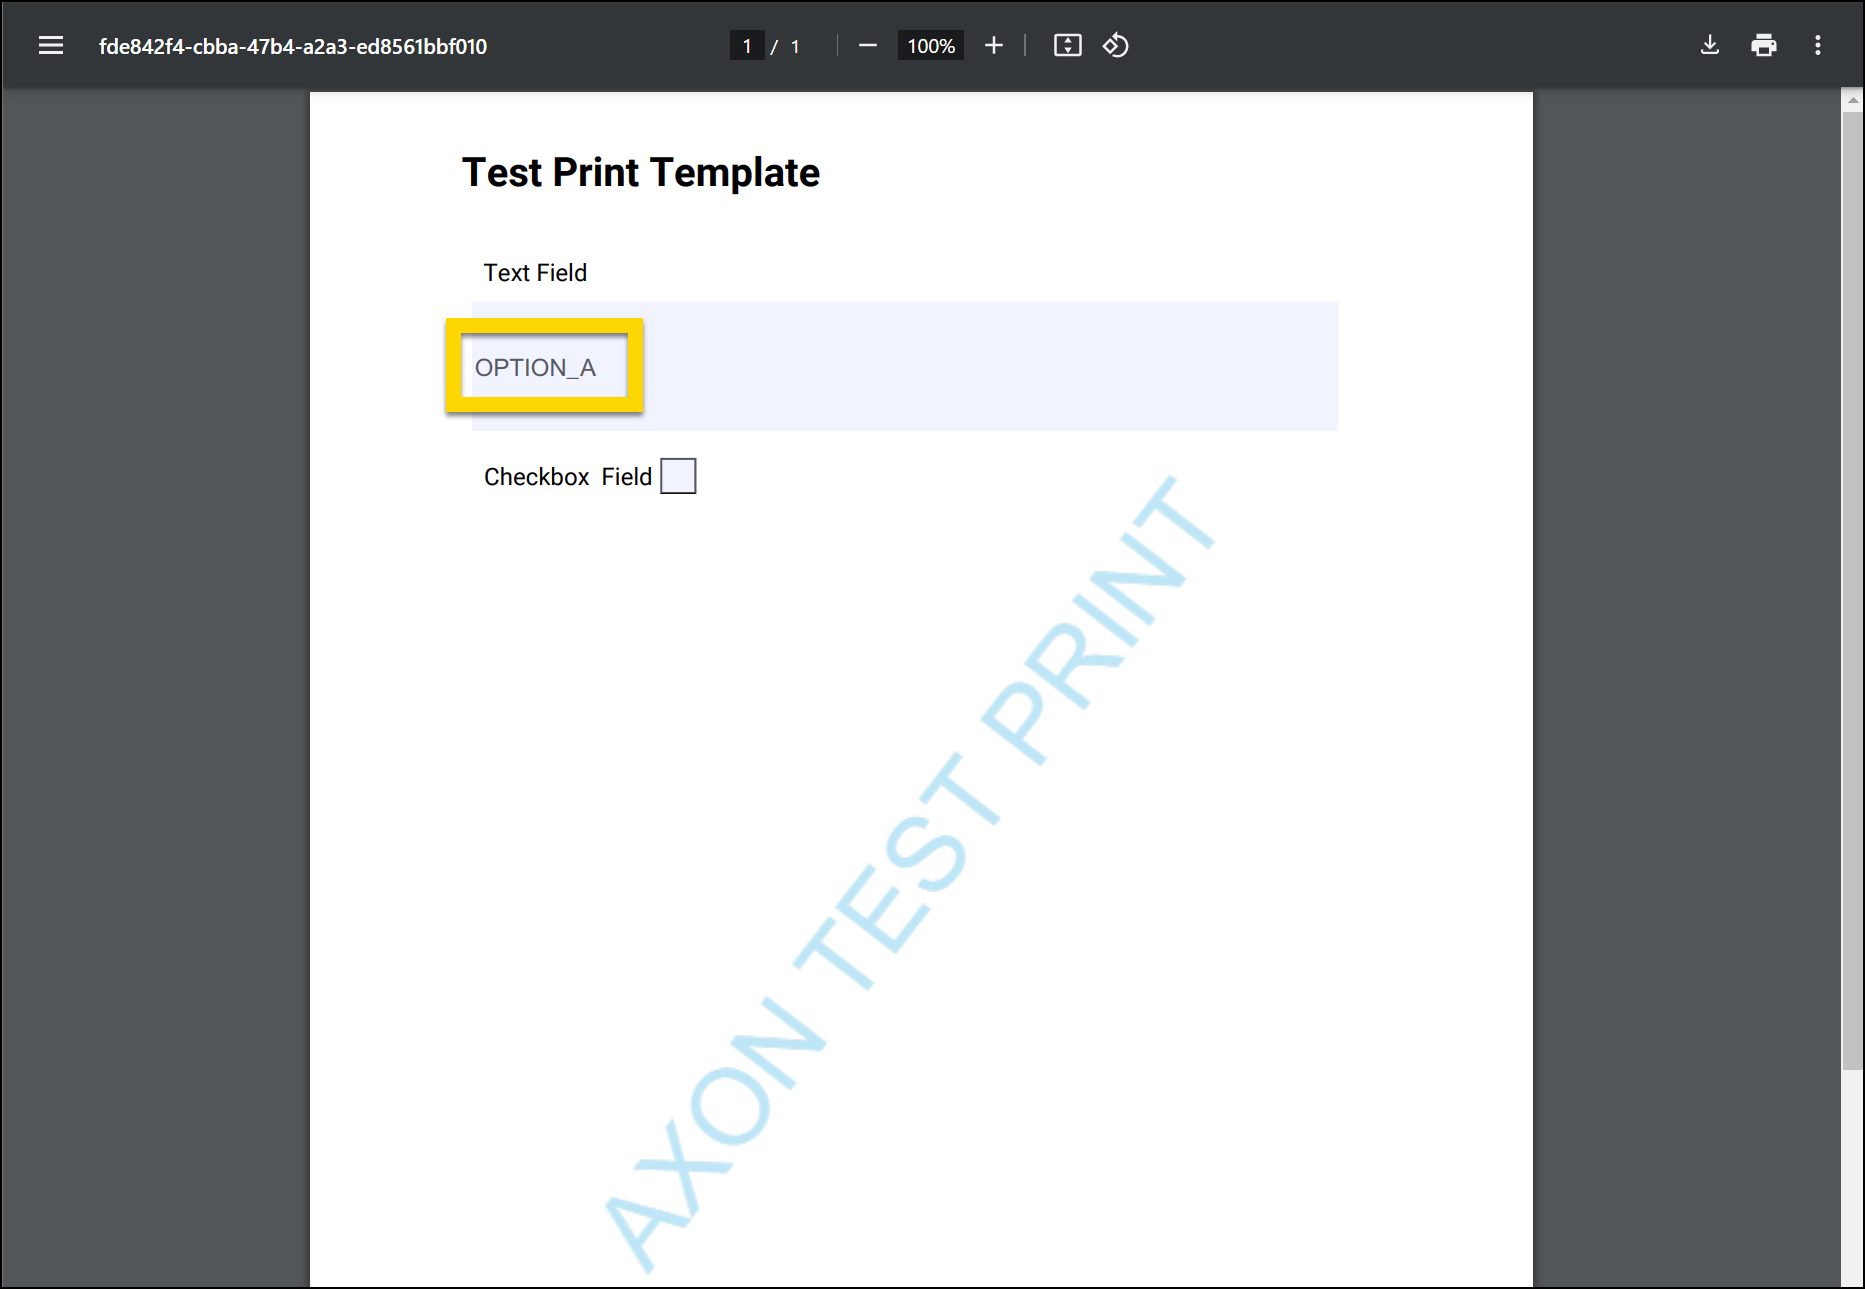
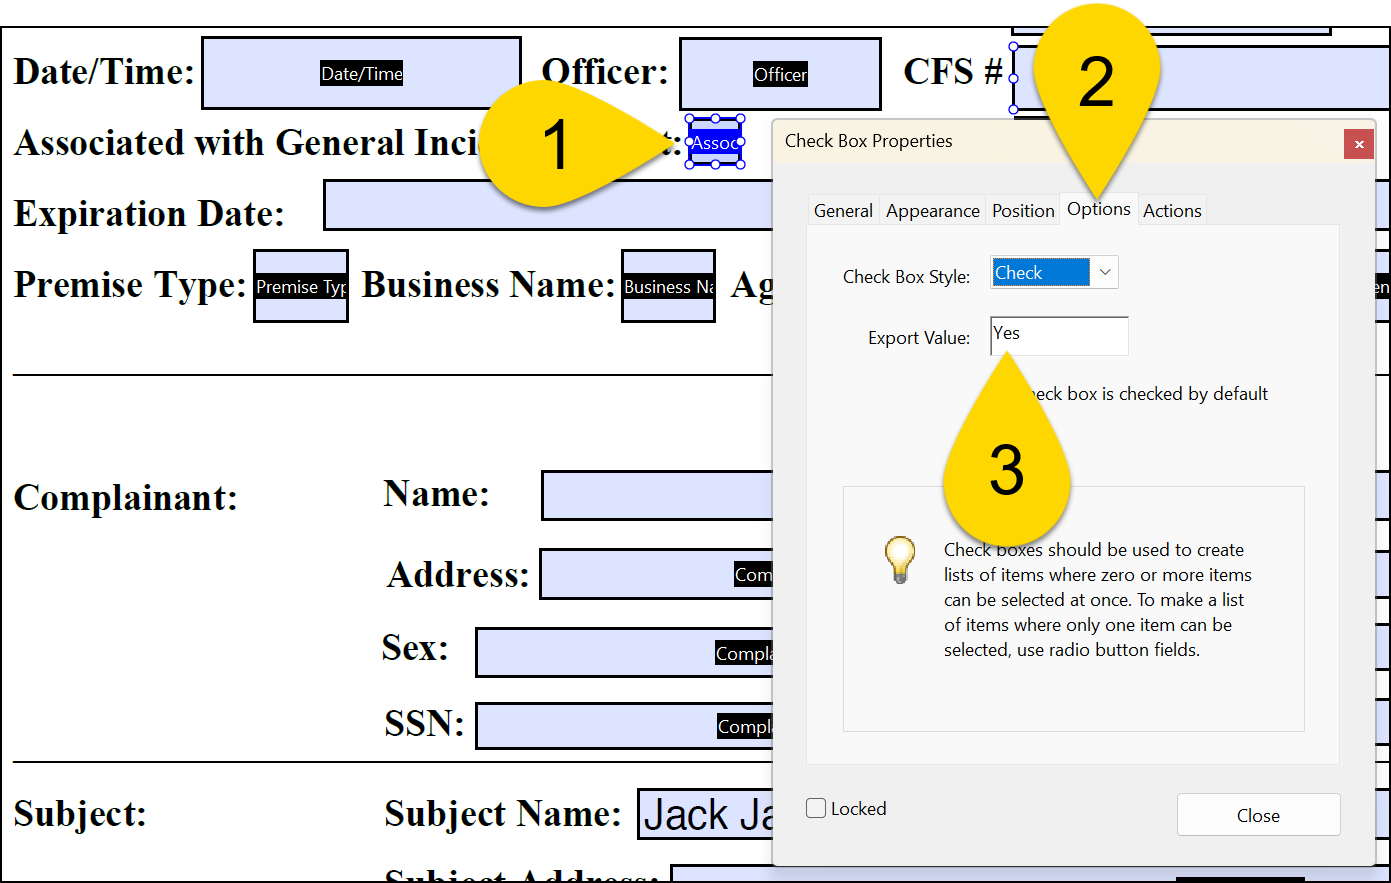
Checkbox tips
PDFs
When adding checkbox fields to a PDF form, make sure that the checkbox properties are set correctly to make sure the boxes are checked as expected:
- When editing the form in Adobe, double-click the checkbox field to open the Properties menu.
- Select the Options tab.
- Set the Export value to "Yes".
Microsoft Word
To add a checkbox in Microsoft Word:
- Switch to the Developer tab.
- In the Controls section, insert a checkbox.
- You may need to select the down arrow to reveal this option.
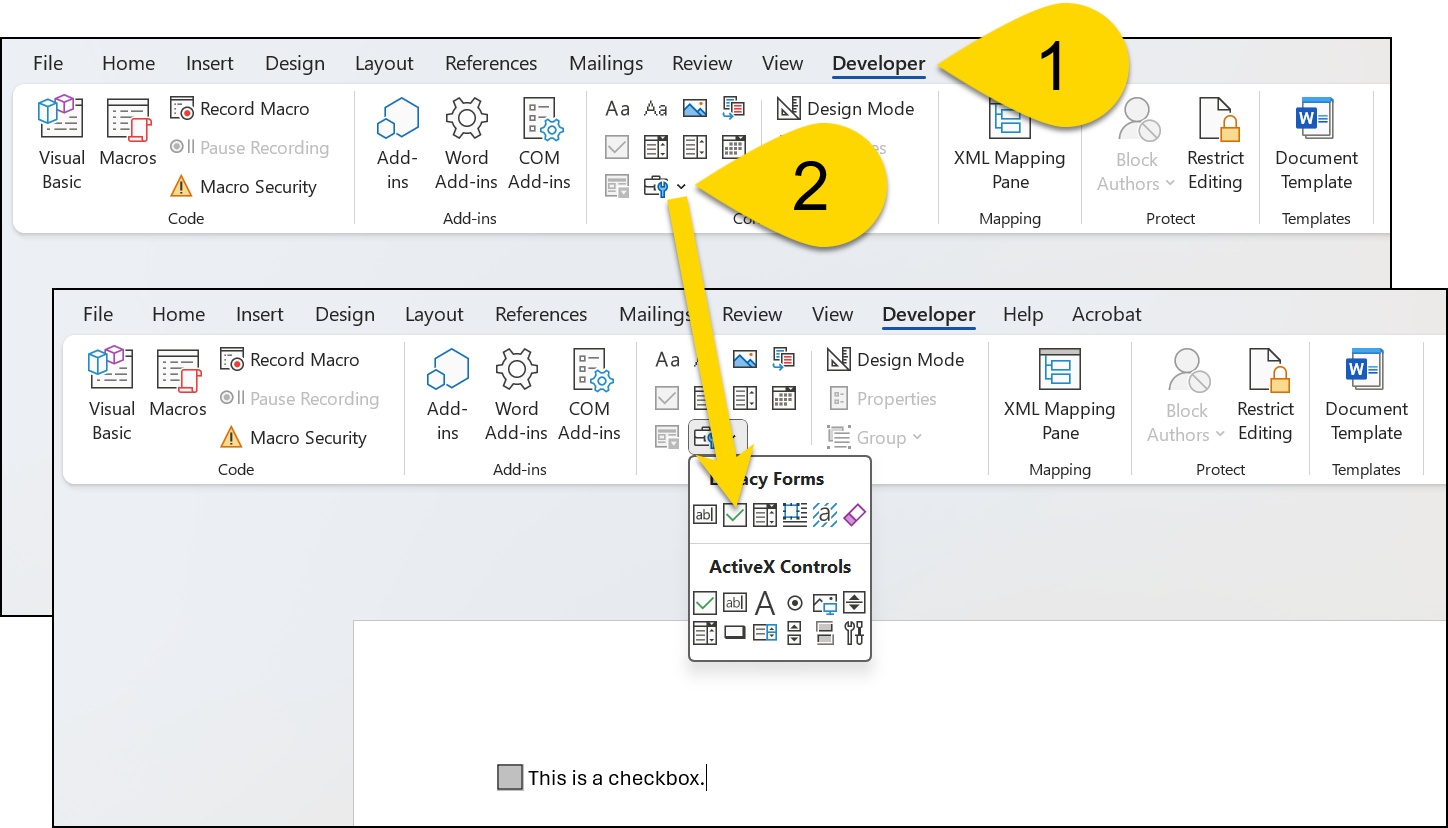
- You may need to select the down arrow to reveal this option.
Once inserted, you can mark a checkbox as checked:
- Double-click the check box.
- In the Default value section, select the Checked option.
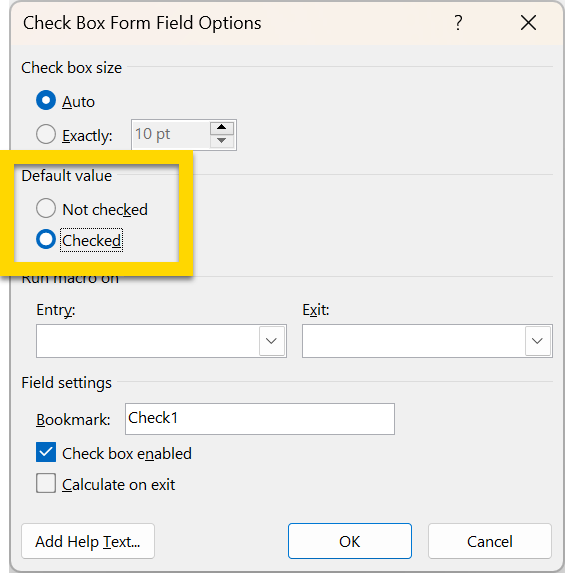
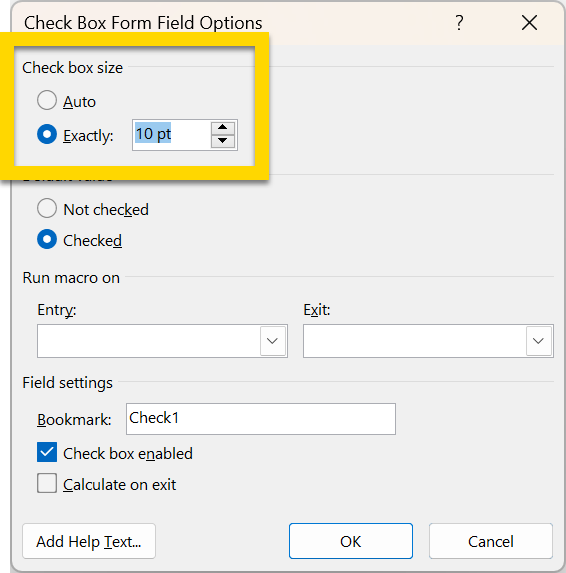
If an empty checkbox does not appear when you upload the template, make sure that the checkbox size is NOT set to Auto.