Tactical Team Training
Tactical Team Training is currently in development and will be available in a future release.
The Tactical Team Training Facilitator's Guide and Sample Course Roster are available for download on the Training Materials page on Axon Help.
Tactical Team Training immerses trainees in dynamic team-based VR scenarios built around coordinated response and decision-making under pressure. Trainers can create customizable multi-room layouts, manage subject behavior in real time, and adapt scenarios as situations evolve. The experience enables repeatable, scenario-driven training that helps agencies reinforce communication, movement, and tactical coordination across a wide range of operational situations.
How Tactical Team Training works
Tactical Team Training uses a local session model that connects trainees and trainers within a shared training space. Trainers use the Samsung VR tablet to create scenarios, control subject behavior, and manage the training session in real time. Trainees use VR headsets and VR Controllers to participate in the scenario. This app supports up to two trainees in a shared physical training space. Tactical Team Training is compatible with every VR Controller type (TASER, Handgun, and Rifle VR Controller).
Tactical Team Training uses PIN-based pairing instead of cloud sign-in. To join a session, trainees share a unique PIN from the headset with the trainer, who enters the PIN on the Samsung VR tablet. The headset remains paired across sessions unless the pairing is removed.
Tactical Team Training does not use cloud-based user accounts or After-Action Report (AAR) storage. Trainers lead scenario review and debrief discussions during or after the session.
How Tactical Team Training differs from Simulator Training: Tactical Clearance
If your agency uses Simulator Training: Tactical Clearance, you may notice similarities between the two applications. Both support up to two trainees working together in the same physical and virtual space, and both allow trainees to use the same VR Controllers.
While Tactical Team Training is designed to extend and build upon the capabilities of Tactical Clearance, it represents a fundamentally different training model:
- Tactical Clearance prepares trainees for room entry and threat response in fixed, pre-built environments with static subjects.
- Tactical Team Training introduces the tools and flexibility needed for more advanced, scenario-driven training, particularly for SWAT and Corrections trainees in addition to patrol.
Tactical Team Training requires more trainer preparation, including configuring scenarios before facilitating a training session. However, it also gives trainers significantly greater control over the training environment and subject behavior.
Safety guidelines
Before you start training, make sure you follow these safety guidelines:
- Make sure the Training Space is free of any live weapons, objects, and other people that may interfere with the simulation. For more information, see the Virtual Reality (VR) Training Safety and Health Warnings.
- If possible, we recommend having a trainer act as a safety officer to monitor the trainee’s movements in the physical space. If a safety officer is unavailable, make sure there is at least 5 feet of clearance between the edge of the virtual boundary (Training Space) and the physical space to help prevent accidental collisions.
Prerequisites
Test your network before training using the built-in network speed test on the VR tablet, or visit https://vr.evidence.com/vr-net-test. This test measures network performance but does not verify that required ports are open. Confirm that your network configuration includes the required ports listed in Network requirements for VR headsets and tablets.
Before launching Tactical Team Training on the tablet or headset, make sure:
- Your agency has met the minimum network requirements.
- The Training Space is free of any live weapons, objects, and other people that may interfere with the simulation.
Choosing the right room for the Training Space
To support accurate tracking and help provide a safe training environment, follow these guidelines when selecting a room for the Training Space.
The headset Play Area dimension list supports values up to 10 m × 10 m. To create larger Training Spaces, such as the maximum supported size of 50 ft × 50 ft (15.24 m × 15.24 m), enter a custom Play Area dimension.
Room requirements
- The room should be well-lit with no harsh shadows.
- The recommended Training Space size is at least 15–20 ft (4.57–6.10 m) in each direction
- The maximum supported Training Space size: 50 ft × 50 ft (15.24 m × 15.24 m)
- Trainers can configure the Training Space dimensions based on the intended training layout and available space. Examples;
- Office: 22 ft × 35 ft (6.71 m × 10.67 m)
- Residential: 40 ft × 50 ft (12.19 m × 15.24 m)
- Trainers can configure the Training Space dimensions based on the intended training layout and available space. Examples;
Avoid rooms with:
- Repeated patterns, like striped flooring or wallpaper.
- Reflective surfaces, such as mirrors. If you have reflective surfaces you can cover or remove them.
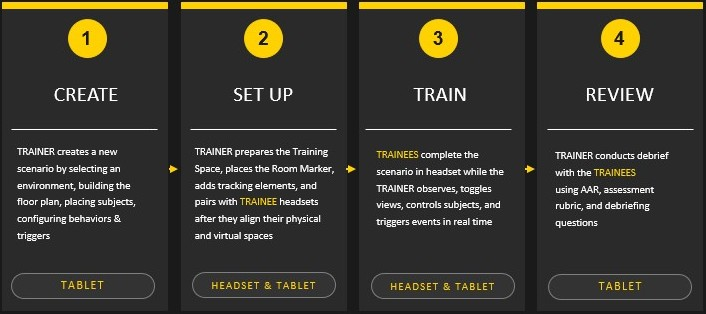
Workflow
Tactical Team Training follows this workflow:
Create > Set up > Train > Review
Manage scenarios (trainer on tablet)
Trainers can manage scenarios from the dashboard, including the following actions:
- Create a scenario
- Duplicate a scenario
- Edit a scenario
- Rename a scenario
- Delete a scenario
- View scenario information
Scenario Editor icons
Use the following icons throughout the Scenario Editor and Training to modify and manage scenario elements.
| Icon | Name | Description |
|---|---|---|

|
Copy | Create a duplicate of the selected icon |

|
Delete | Remove the selected item from the scenario |

|
Door handle |
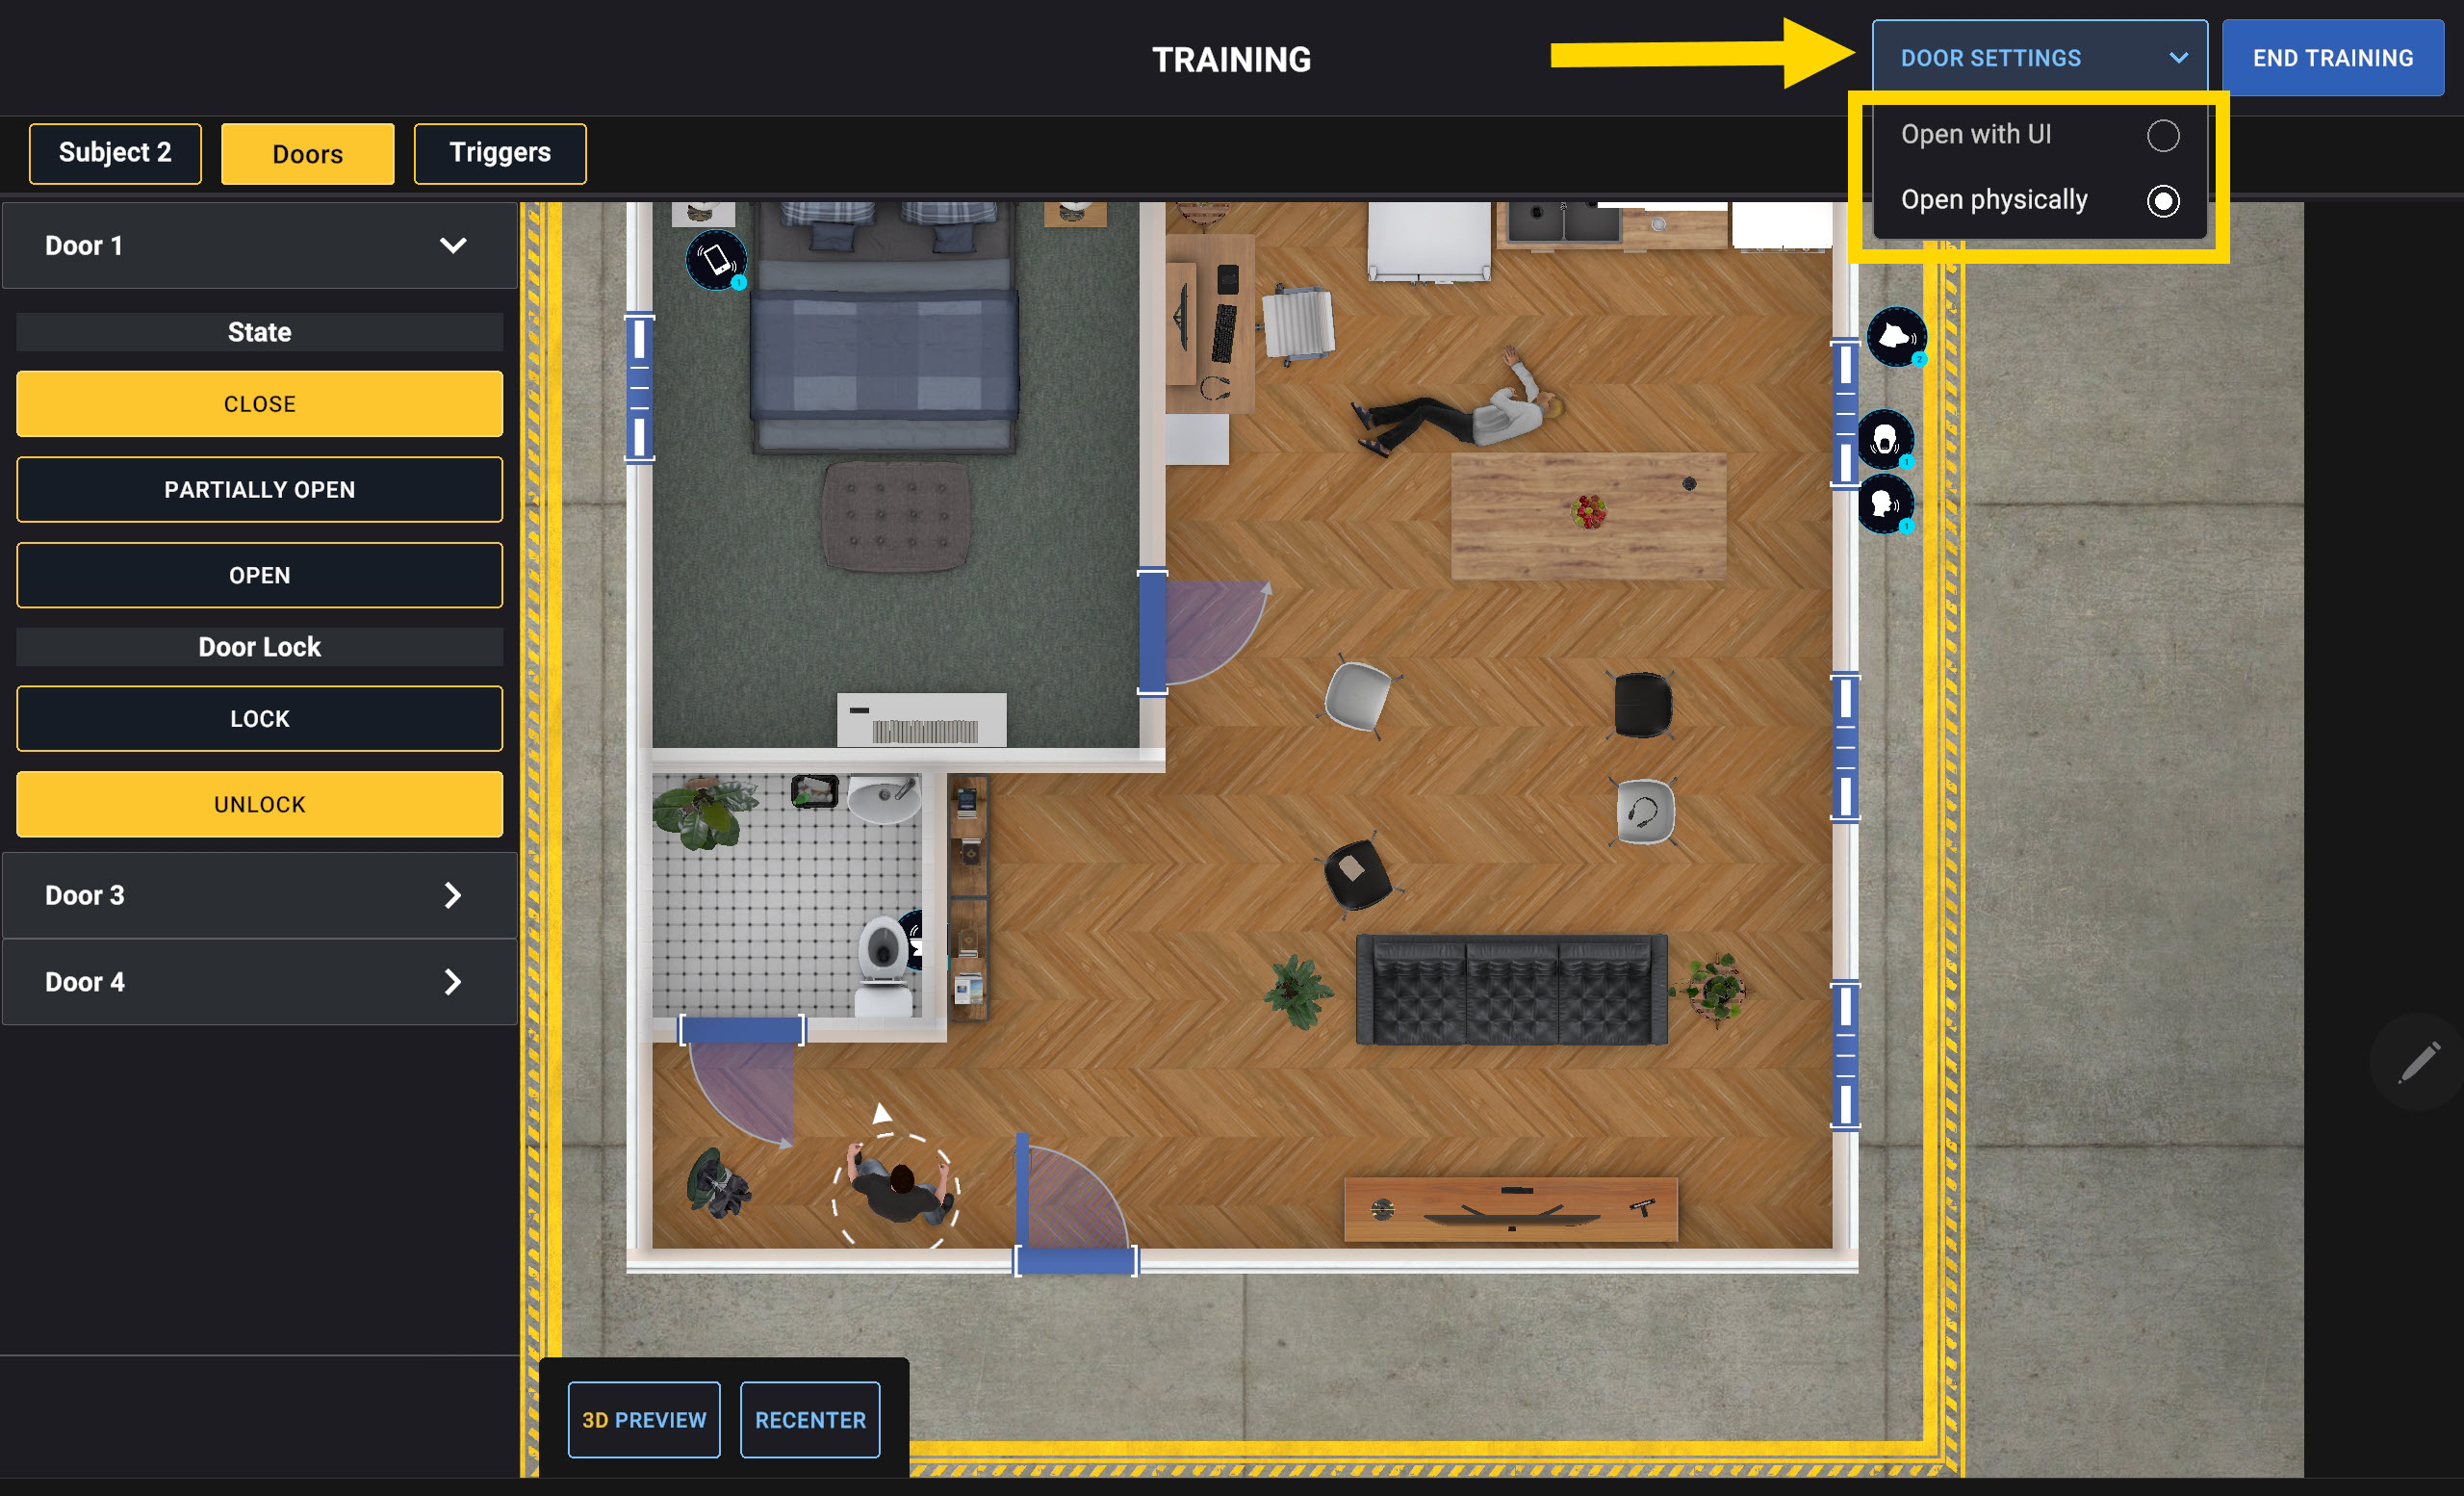
During a session, configure how trainees interact with a door by selecting Door Settings > Open with UI or Open physically
|

|
Flip door direction | Change which side of the doorway the door attaches to |

|
Lights | Turn lights on or off |

|
Lock/unlock | Lock or unlock a door |
 
|
Loop |
|

|
Play | Play a trigger sound effect once |

|
Rotate | Rotate the selected item |
Create scenarios
Trainers can create scenarios from scratch or start with a preinstalled sample layout. Sample layouts can be duplicated, edited, and customized to meet specific training objectives.
Trainers can interact with the session in real time using the tablet, including triggering events, controlling subject behavior, moving subjects, and adjusting the scenario as the session progresses. For more information, see Train (trainer on tablet).
While creating scenarios, monitor the in-headset performance meter. Scenarios with more rendered objects, such as props and subjects, may reduce headset responsiveness. Green indicates better performance, while red may indicate reduced responsiveness.
- Pinch to zoom in or out while customizing the scenario.
- Press and drag one finger to move the view in any direction.
To create a scenario:
- Select New Scenario.
- Select an environment. The number on each tile indicates the number of existing scenarios for that environment.
- Enter the scenario name.
- Enter the dimensions of the Training Space. Select the Units drop-down menu to switch between feet and meters.
- Select Create. The Scenario Editor may take several seconds to load.
Layout
- Select the Layout tab.
- Press and drag walls to create a room.
- Press and drag at least one door to a wall.
- Press and drag windows into the environment.
Props
- Select the Props tab. The available props depend on the selected environment.
- Press and drag a Prop to the desired location.
Decor
- Select the Decor tab.
- If the scenario environment has multiple rooms, select the room you want to customize. A virtual boundary highlights the selected room.
- Select a decor option to change the appearance of the floor and walls.
Flow
- Select the Flow tab.
- Press and drag up to three threatening or non-threatening subjects to their desired locations.
- Set subject poses.
- Select subject props.
- Set subject behaviors.
- Press and drag a situation to the desired starting location.
- Press and drag a narrative object to the desired starting location.
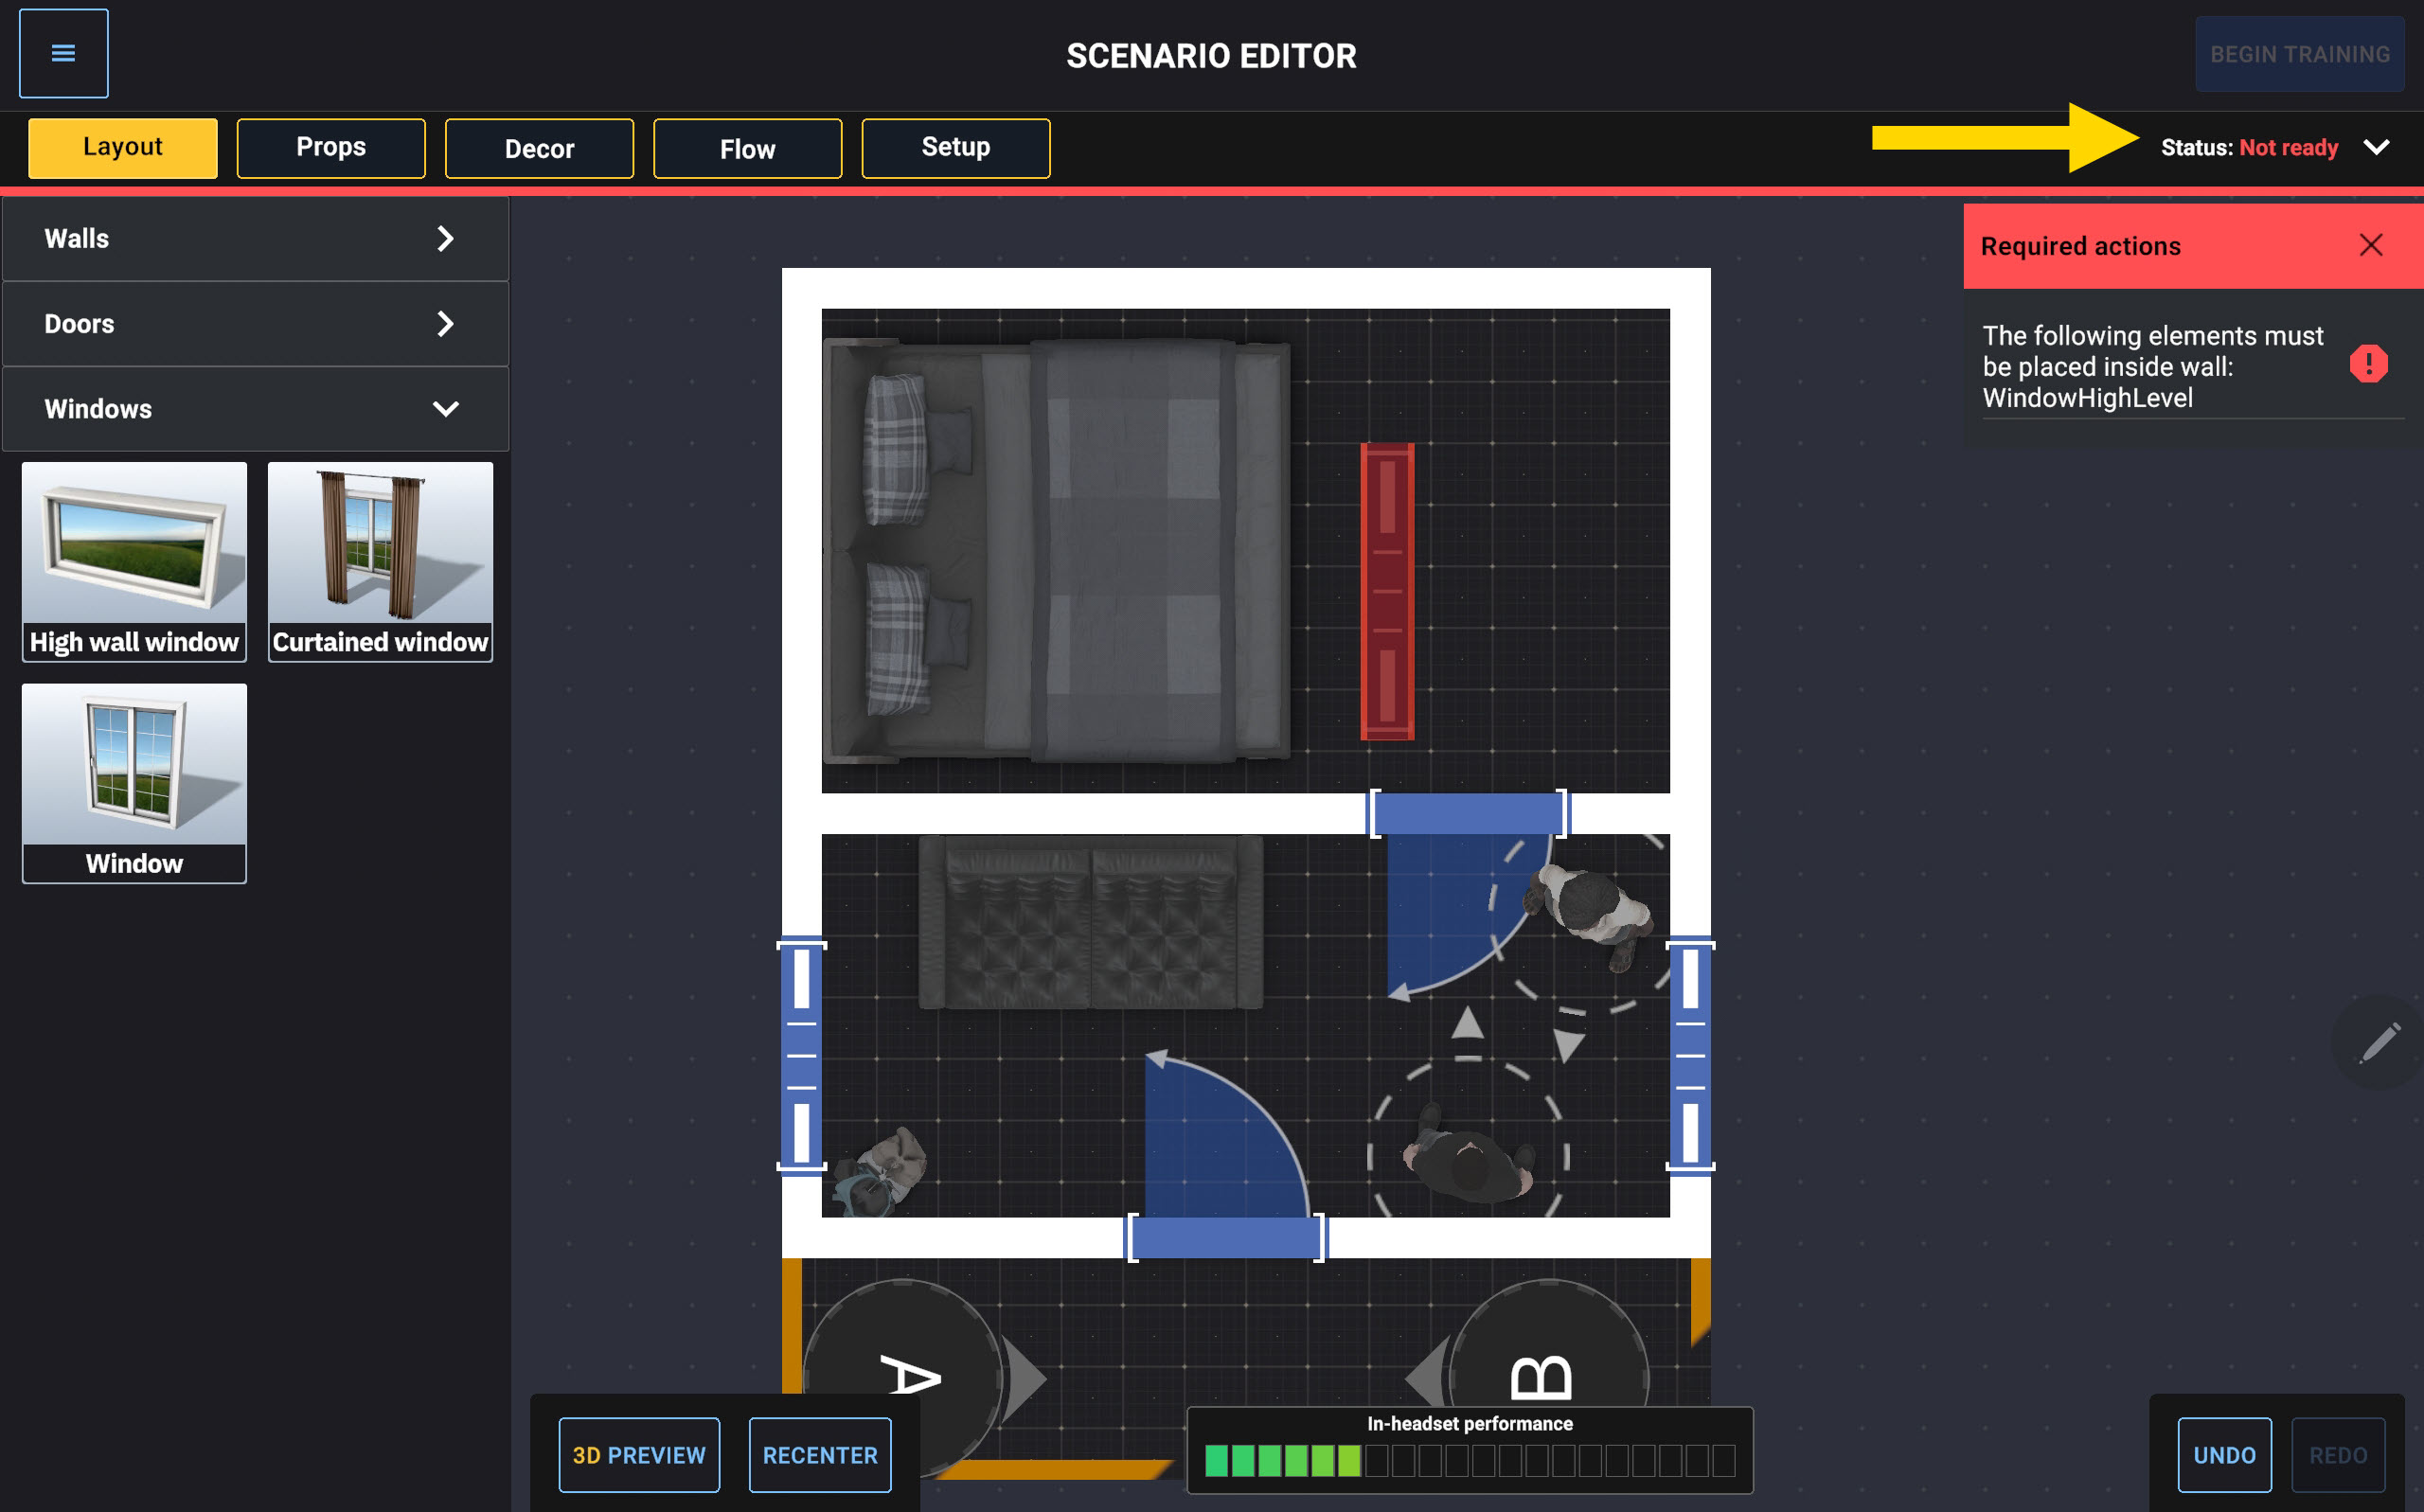
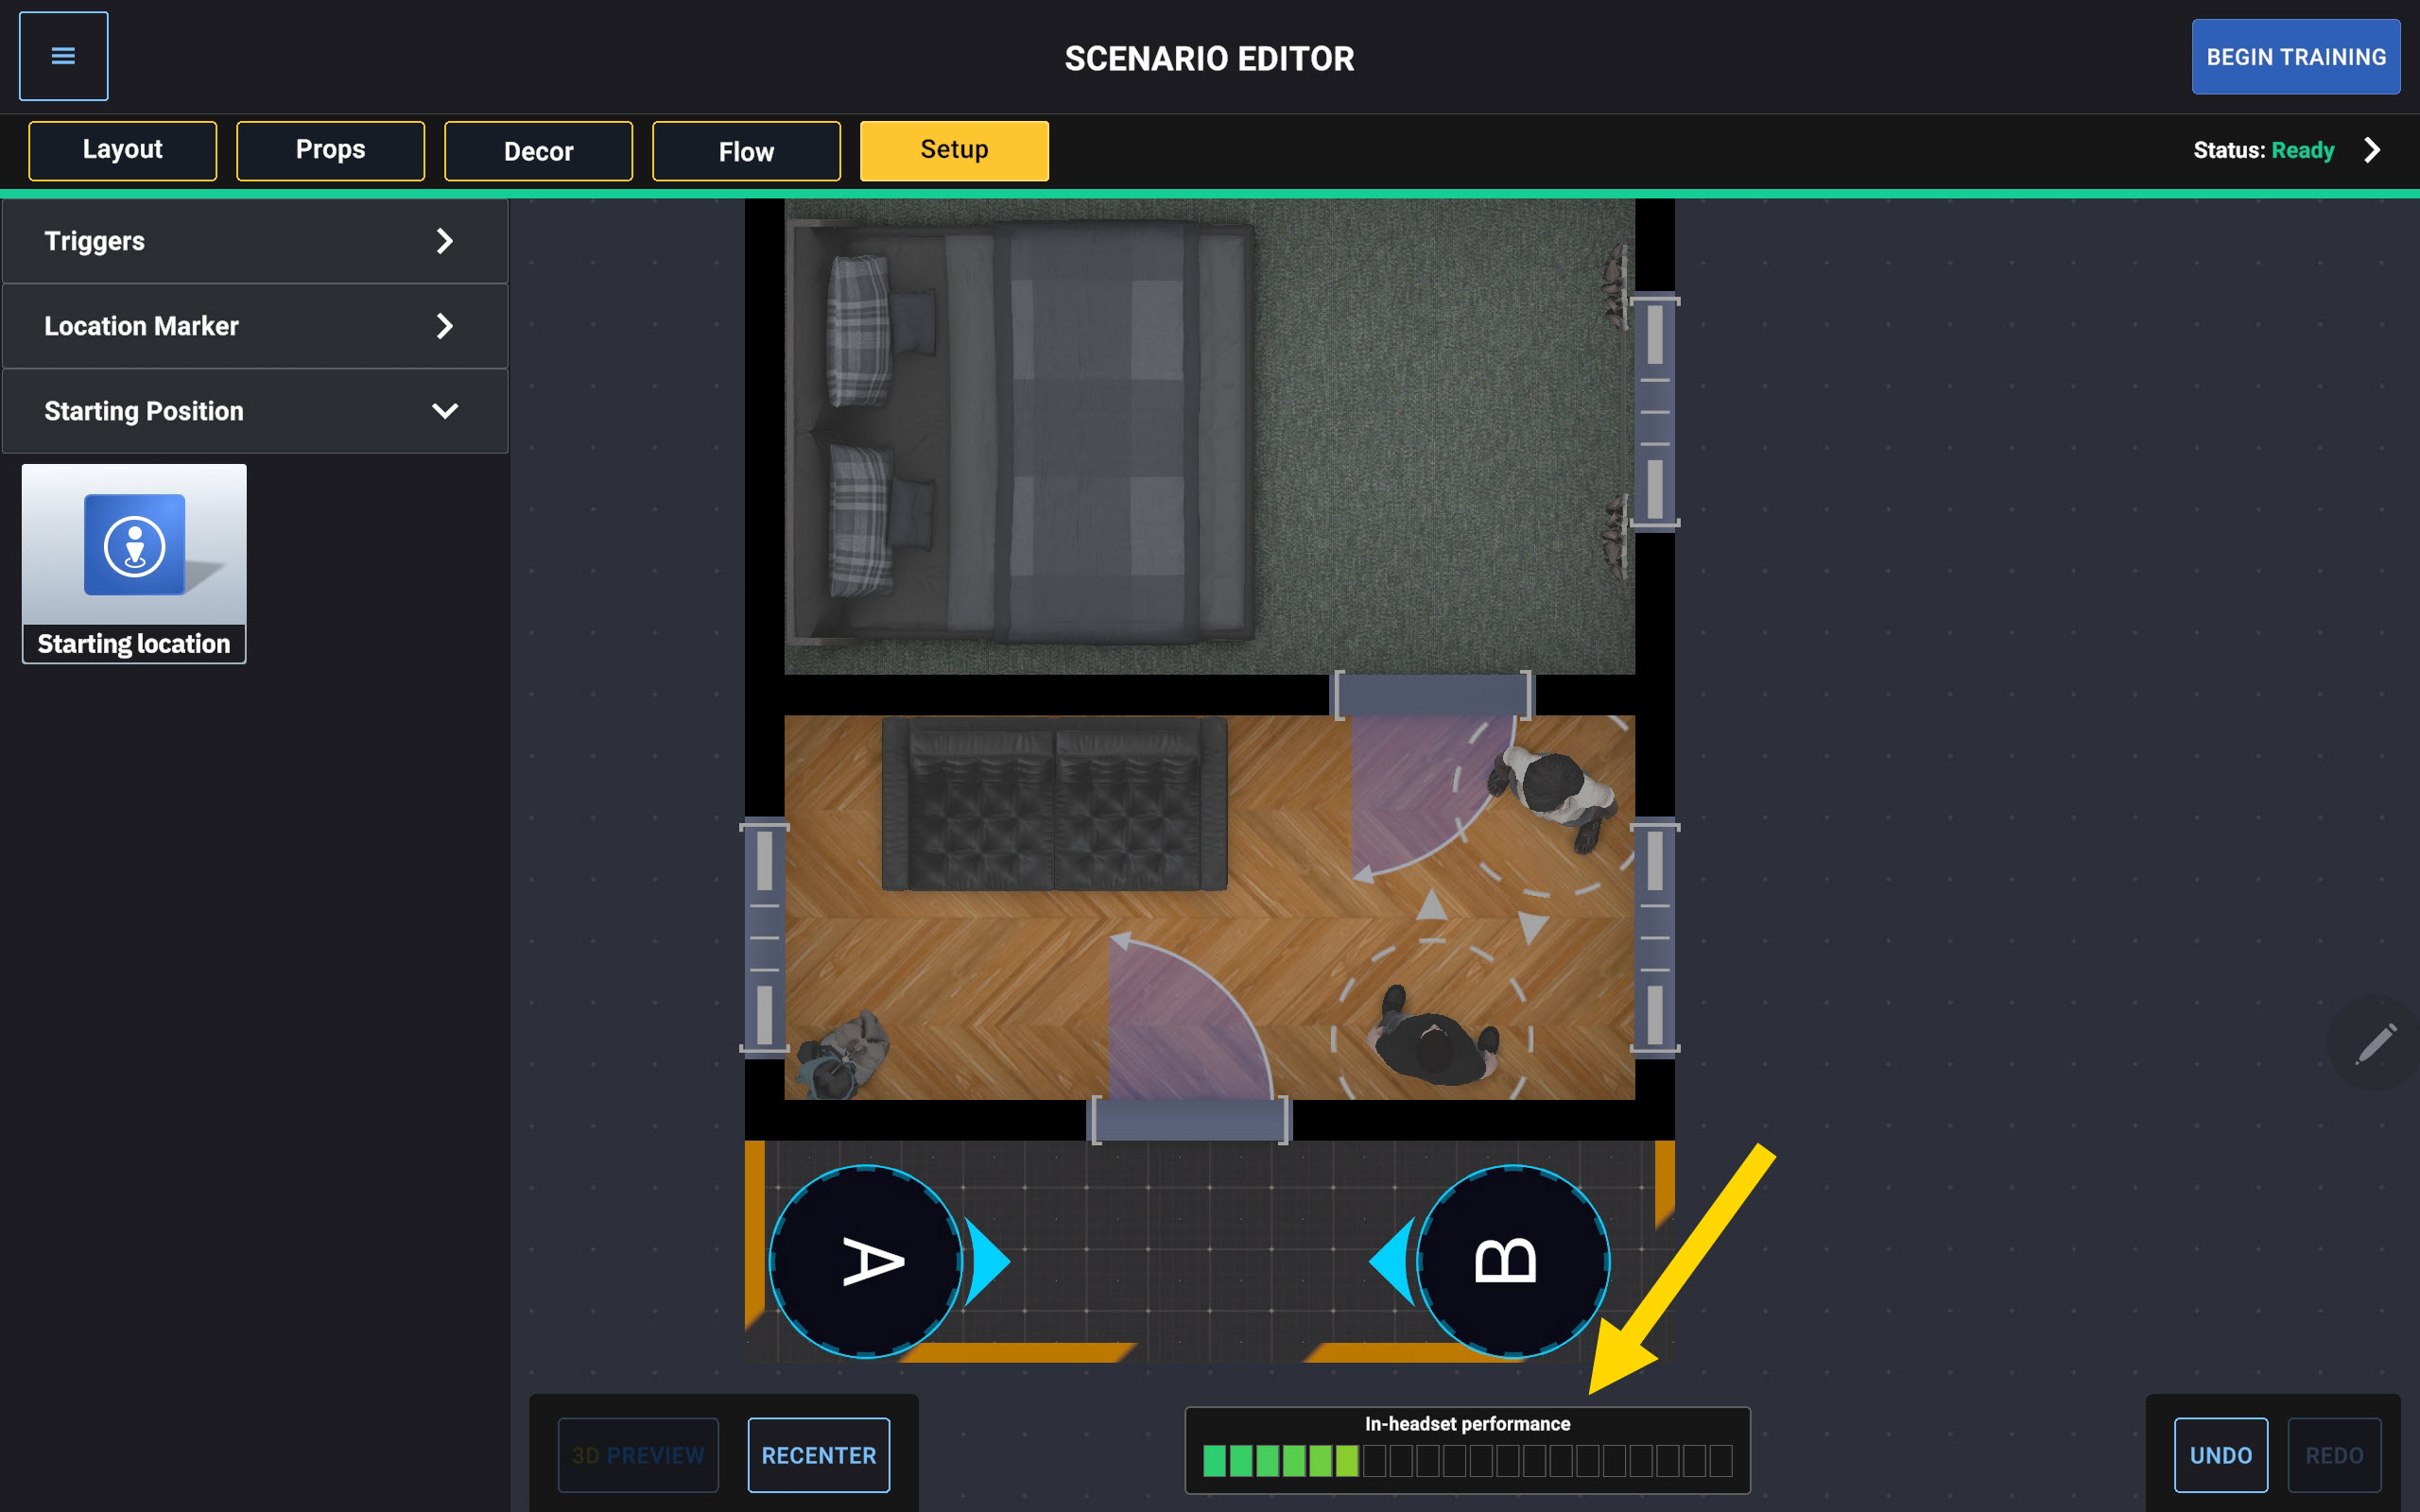
Setup
- Select the Setup tab.
- Press and drag a Trigger to the location where you want the sound effect to originate during the session. Trainers can manually activate triggers during the training.
- Press and drag a Location Marker where you want a subject to move to during the training.
- Press and drag a Starting Location to the area where a trainee will begin the session. You must place two.
Scenario status
- Refer to the Status of the scenario.
- Ready indicates that you can start the training at any time.
- Not Ready indicates that an object placement error is in the scenario. Expand the Status drop-down menu to view the error details.
Duplicate a scenario
Duplicating a scenario can save time when creating variations of an existing scenario.
- Select an environment.
- Select the scenario you want to duplicate.
- Select Duplicate.
Alternatively:
- Select an environment.
- Select the vertical ellipses icon on the scenario tile you want to duplicate.
- Select Duplicate.
A copy of the scenario appears in the scenario list using the following naming format: ScenarioName_Copy
To edit the duplicated scenario:
- Select the duplicated scenario.
- Select Edit.
Edit a scenario
- Select an environment.
- Select the scenario you want to edit.
- Select Edit.
Alternatively:
- Select an environment.
- Select the vertical ellipses icon on the scenario tile you want to edit.
- Select Edit.
Rename a scenario
- Select an environment.
- Select the vertical ellipses icon on the scenario tile you want to rename.
- Select Rename.
Delete a scenario
Note Deleting a scenario is irreversible.
- Select an environment.
- Select the vertical ellipses icon on the scenario tile you want to delete.
- Select Delete.
View scenario information
- Select an environment.
- Select the vertical ellipses icon on the scenario tile you want to view information for.
- Select Info.
The following information displays:
- Status: The status of the scenario. See Scenario status.
- Created: The date the scenario was created.
- Last modified: The date the scenario was last updated.
- Trainees: The number of trainees that can participate in the scenario.
- Subjects: The number of subjects configured in the scenario.
Trainee setup (headset)
- Launch Tactical Team Training.
- Read and accept the disclaimer.
- Select an avatar, then select Next.
- Pair the VR Controllers. (See VR Controllers.)
- Select Ready to pair the headset with the Samsung VR tablet. It may take several seconds to connect to the lobby.
- Read the PIN out loud to the trainer.
- After the trainer begins the training, the headset prompts you to scan the Room Marker. See the section Room Marker in Simulator Training: Tactical Clearance for more information.
- Check the alignment of your partner’s avatar by tapping your partner.
- If the alignment is incorrect, either trainee can select Re-Scan to scan the Room Marker again.
- When the alignment looks correct, select Confirm. (Only one trainee needs to confirm.)
- Walk to the designated starting point marked by a blue circle. Follow the yellow arrow to your starting location.
- When both trainees are standing in the correct starting positions and facing the correct direction, a countdown displays and the scenario begins.
Trainer setup (tablet)
- Launch Tactical Team Training.
- Read and accept the disclaimer.
- Select an environment or create a new scenario.
- The number on each tile indicates the number of existing scenarios for that environment. For more information about creating scenarios, see Create scenarios.
- Select the scenario you want to run.
- Select Train.
- Select Pair new headset.
- Enter the PIN provided by the trainee. The status changes to Ready when the headset is connected and the trainee enters the Briefing Room.
- Repeat steps 7–8 for additional headsets.
- Select + (plus) next to the headset IDs of the trainees participating in the session.
- Select Continue.
- Review the preview of the trainee starting locations.
- Next to each headset ID, select + (plus), then select either A or B to assign the trainee’s starting location.
- Select Begin Training. It may take several seconds for the session to load.
- Wait for the trainees to complete their setup.
- When both trainees are standing in the correct starting positions and facing the correct direction, a countdown displays and the scenario begins.
Train (trainer on tablet)
During a session, trainers use the Samsung VR tablet to make real-time adjustments to adapt the scenario to trainee actions and decisions.
Real-time adjustments can include:
- Repositioning subjects
- Triggering movement actions
- Escalating or de-escalating encounters
- Redirecting subject movement
- Triggering additional events or behaviors
Monitor trainees
- Pinch to zoom in or out while customizing the scenario.
- Press and drag one finger to move the view in any direction.
The tablet provides multiple viewing perspectives that trainers can use throughout the session.
Available perspectives include:
- 2D views: A top-down map view that shows all trainees and subjects within the scenario.
- 3D views: A rendered view of the environment that lets trainers observe the scenario from within the space without viewing through a trainee's headset.
- Trainee A and Trainee B viewpoints: View the session from a specific trainee's perspective to see exactly what they see in the headset.
- Muzzle orientation views: Displayed by default in all tablet views. Shows the direction each trainee's weapon is pointing. The indicator changes color when a trainee points a weapon at another trainee.
- Recenter: Recenter the current view on the middle of the room while maintaining the current zoom level.
These views help trainers monitor trainee positioning, communication, weapon orientation, movement within the scenario, and each trainee's perspective during the session.
Trainers cannot select or control subjects while viewing a trainee's perspective. To control a subject or change a behavior, switch back to a 2D or 3D view.
Control subjects
During the session, trainers can control subject actions in real time.
These controls allow trainers to adjust pacing, difficulty, and subject behavior throughout the session.
Select a subject
To control a subject, switch to either 2D view or 3D view. Trainers cannot select or control subjects while viewing a trainee's perspective.
Subject controls
After selecting a subject, use the available controls to change the subject's behavior.
| Control area | Option | Description |
|---|---|---|
| Left sidebar | Use weapon | Control weapon-related actions for subject equipped with a weapon, including drawing, dropping, attacking, and aiming a weapon. |
| Left sidebar | Change pose |
Change how a subject appears during the training:
|
| Left sidebar | Move |
|
| Left sidebar | Speak |
The subject speaks a voice line.
|
| Right sidebar | Offensive |
|
| Right sidebar | Turn around | The subject turns 180 degrees based on their position. |
| Right sidebar | Kneel | The subject kneels on their ground with their hands behind their head and drops their weapon if one is equipped. |
| Right sidebar | Surrender | The subject puts their hands above their head and drops their weapon if one is equipped. |
| Right sidebar | Lay prone | The subject lies prone with both arms alongside their body. |
| Right sidebar | Flee |
|

Control doors
During a session, trainers can control the state of doors to influence subject and trainee movement, restrict access to specific areas, or change the flow of the scenario.
Set a door state
Set the state of a door or lock one from the Doors tab.
Control triggers
Trainers can activate configured triggers during the session to create environmental distractions, stressors, or scenario events. Trigger sounds originate from the locations where the triggers are placed in the scenario. For example, if a dog barking sound effect is placed outside the walls, trainees hear the sound as if the dogs are outside the room when the trainer activates the trigger.
Activate triggers
Triggers activate at the configured locations within the scenario. Access them from the Triggers tab.
End the session
Select End Training to stop the session. At the end of the session, trainers can stop the scenario and begin the review and debrief process. See Review (trainer and trainee).
Review (trainer and trainee)
Immediately after a session ends, trainers can review the After-Action Report (AAR). The AAR provides a replay of the completed session, including trainee movement paths, field-of-view cones, and muzzle orientation during the scenario.
During the review, trainers can:
- Play or pause the replay
- Move to a specific point in the timeline
- Review trainee actions and decisions
- Conduct a debrief with trainees
The AAR is intended to support discussion and coaching during the debrief process.
Note The AAR is not saved and is not a video recording. Once you leave the AAR screen, the session data is no longer available. Review the AAR before exiting the screen if you want to use it during a debrief. The AAR only displays on the tablet; trainees will not see it in the headset.
FAQs
General
Why don’t I need to sign in?
Tactical Team Training uses a local session with PIN-based pairing instead of cloud sign-in.
What happens if a headset disconnects?
If a headset disconnects or enters sleep mode, reconnect the headset and continue the session setup process if needed. The headset pairing remains associated with the tablet unless the pairing is removed.
How many trainees are supported?
Up to two trainees can train simultaneously.
What VR Controllers are supported?
Tactical Team Training supports all VR Controllers (TASER, Handgun, and Rifle VR Controller).
Are handgun and rifle optics supported?
Yes! Trainees can edit the VR Controller optics prior to launching Tactical Team Training. See Customize VR Controller optics
What are the Training Space limitations?
The Training Space dimensions are determined by the trainer when creating the scenario. The maximum supported Training Space size is 50 ft × 50 ft (15.24 m × 15.24 m). See Room requirements.
Creating scenarios (trainer)
What is the maximum number of subjects in a scenario?
You can add up to three subjects to a scenario.
Can I configure hostile subjects and bystanders in the same scenario?
Yes! Up to three hostile subjects and bystanders can be added to the same scenario.
How do I know when a subject will be holding a weapon versus drawing a concealed weapon once the scenario starts?
The configured subject behavior and weapon actions determine how the subject uses a weapon during the scenario.
What information does the in-headset performance meter provide?
The in-headset performance meter indicates how responsive the headset experience may be during the scenario. Performance is affected by the number of rendered objects in the scenario, such as props and subjects.
Scenarios with more objects may reduce headset performance, while scenarios with fewer objects may improve responsiveness.
How do I avoid gaps between walls/windows/doors?
To avoid gaps, place any windows and doors directly on the walls.
What are location markers?
Location markers are locations that trainers place in the scenario to control subject movement during a scenario. Trainees can use location markers with actions such as flee or walk.
How to the sound triggers work?
Trainers can place sound triggers at specific locations within a scenario and activate them during a session using the tablet. Trigger sounds originate from the locations where the triggers are placed.
What’s the difference between Take Cover and Flee?
- Take Cover: The subject hides behind the nearest object and crouches.
- Flee: The subject runs away from the trainee to another room, if available. If no safe room is available, the subject moves to the area farthest from the trainee within the current room. If the subject cannot move to another location, the subject surrenders.
Can I save scenarios?
Yes. Trainers can save custom scenarios for later use. Saved custom scenarios are only accessible from the tablet where the scenario was created.
Can I share saved scenarios between tablets?
No. Saved scenarios can only be accessed from the tablet where the scenario was created.
In-scenario training (trainer)
If I didn’t assign a weapon to a subject when configuring a scenario, can the subject still draw a weapon during training?
No. The subject can only draw a weapon if one was assigned during scenario setup.
What are the rules or triggers that cause a subject to react?
A subject reacts when a trainee enters the subject’s visual range or when the trainer triggers a behavior or action during the session.
How do I know which subject I have selected?
The selected Subject tab is highlighted in the user interface on the tablet.
In-scenario training (trainee)
How do I open or close doors?
Door interaction depends on how the trainer configured the door during scenario creation.
- Open with UI: Reach toward the virtual door to activate the circular interaction indicator.
- Open physically: Reach toward the virtual door handle to open the door manually.
For more information, see Layout.
Why does my headset view go black?
If a trainee moves too close to a wall or enters a wall, the headset view may fade to black temporarily. Move away from the wall to continue the session.
AAR
Is the AAR saved/uploaded?
No. Tactical Team Training does not save or upload AARs locally or to VR web app.
Troubleshooting
Scenario Editor (trainer)
Safety information error
The following message displays when you've placed an object in the Scenario Editor that crosses beyond the virtual room boundary you're designing: "Part of an object is outside the virtual boundary. Move the object inside the boundary."
You cannot start the scenario until the issue is resolved by either moving the item so it is within the virtual room or deleting it.
I cannot start the scenario from the tablet (Status: Not Ready)
The Begin Training button will be disabled if the Status displays Not Ready.
This status displays when there is an issue with the Scenario Editor. Tap the status to expand the menu to view the required actions to take. The Begin Training button will remain disabled until all actions are complete.