Operation
Admins or armors looking for initial setup guidance should skip to Setup and calibration.
Signal Sensor from Axon mounts to either an integrated holster or a bracket that adapts your existing holster. Once properly installed and calibrated, it uses Axon Signal technology to automatically turn on nearby Axon Body and Fleet cameras if you draw your equipment. If it's on your holster, your armorer has already installed it, assigned it to you, and calibrated it. Let's talk about how to use it.
Operating modes
The LED only illuminates during Mute mode and for setup.
| Mode | Access | LED | Description |
|---|---|---|---|
| Live | Normal state; no button presses needed | none | Sensor enters Live mode once calibrated. |
| Mute | Press button for about five seconds |
 or or  |
Blinks green if firearm is holstered, red if not. After a set time of inactivity, sensor returns to Live mode. |
| Setup | This mode should generally only be used in-office by an admin/armorer. Requires ADM with proper permissions. See Setup and calibration. |
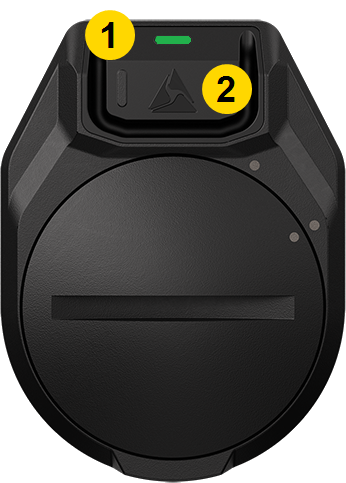
Device layout
The LED mentioned above is on top of the interaction button.
|
|
Mute mode
To remove your firearm without Signal starting a recording on your body camera (or on other nearby cameras), activate Mute mode: press the button for about five seconds until the LED flashes green , then remove your firearm. Mute mode also confirms with a message on the same user's body camera.
If you don't draw your firearm within 30 seconds (agency configurable up to 90 seconds), Signal Sensor returns to Live mode (LED off). Returning the firearm to its holster after the sensor has returned to Live mode does not trigger a recording event.
LED reference
|
|
||||||||||||||||||||
Signal Sensor and your body camera
If you also use an Axon Body camera (Body 4, Body 3, or Body Workforce) and it's assigned to the same user as your Signal Sensor (you), you can use it to view information about your sensor, which updates the body camera about every two hours. The body camera, in turn, passes this information on to Axon Evidence the next time it docks and uploads.
Battery life – A low sensor battery triggers a notification on the camera screen.
Properties – Open the menu of your body camera and use the Volume Down button to scroll down to Signal Sensor. Select it to view your sensor type, serial number, battery status, firmware (FW) version, and time stamp.
- To open the menu on Body 4, double-press Select (between the volume buttons).
- To open the menu on Body 3 or Body Workforce, press Power and Program (below the volume buttons) simultaneously.
Activation – When a Signal Sensor turns on your body camera, its type and serial number appears briefly on the display.
Updating – About once a typical shift, the body camera will push any available firmware updates to your sensor, ensuring it is always fully updated.