Administration
The administration of the Axon app involves several key tasks and features that allow for the management and use of the app. As an admin for an organization that uses the Axon app, you should install and setup the app for yourself.
Manage roles and permissions
The Admin role has access the Axon app by default. For all other roles that need to access the app, you must assign the Axon app role under Login Access in the Roles & Permissions section of the Admin Console.
Repeat these steps for each role that needs to access the app. Note that if you are assigning the permission to troubleshoot a user's access, make sure they sign out of their Axon account and then sign in again after you've updated their role's permissions.
The permissions that give users the ability to take actions in the full desktop applications, such as Axon Evidence or Axon Community Request, carry over to the Axon app. When a user has the Login Access permission listed above, they will only see the functions in the Axon app that match the rest of their permissions for the desktop applications. For example, a user can only view cases in the Axon app that they would be able to view in Axon Evidence on a computer.
For additional information about permissions and privileges, see:
-
Axon Evidence - Roles and Permissions
-
Axon Records and Axon Standards - Privileges
-
Axon Performance - Axon Performance permissions
Records and Standards privileges
If your organization uses the Records or Standards features, you must additionally enable the following privileges in the Administrator Console:
- Admin tools - Access RMS mobile: Lets users access Records/Standards features
- Task inboxes - View Inboxes: Lets users view the My Tasks list on the Home screen
- To view and create Records reports, users must have:
- Reports - Reports-view - View all reports
- Reports - Reports-write - Write incident reports
- To view and create Standards reports, users must have:
- Access - Access to Standards
- Reports - Reports-view - View all Standards Report types
The privileges that give users the ability to view and create specific report types in the full desktop application carry over to the Axon app. In other words, once a user has the privileges listed above, they will see the same report and task management behavior as they do in the desktop application.
Axon Performance permissions and settings
If your organization uses Axon Performance, use the Admin Console to set the permissions for roles of Axon app users to be able to access their tasks in the Axon app:
-
Under Login Access, Axon Performance must be set to Allowed
-
Under Axon Performance -
-
View Own Dashboard must be set to Allowed
-
View Group Performance must be set to Any or Only Their Own
-
View Video Review must be set to Any or Only Their Own
-
You also must make the following settings in Axon Performance settings:
-
Choose Configure, and then Closed Loop Reporting
-
Select the Axon app checkbox
-
- If the user needs to be able to review videos, select Random Video Review and enable it
- The Random Video Review goal must be applied to the user's group or squad that they oversee. If the user does not have a Random Video Review goal applied, the Review Videos task does not appear in the Axon app.
- To enable Priority Ranked Video Audit reviews -
- Enable Priority Ranked Video Audit
- Select which items to include, the keyword detection sampling rate, alert options, filters, skip, and export options
- If desired, select Add Custom Keyword Groups to create a new event or keyword
- Enter the desired keyword(s) and/or phrase(s), separating each with a comma, enter point values, and select Add
Manage historical evidence data
The Axon app includes features for managing historical evidence data. Administrators can set an evidence category start date. This allows for the bulk categorization of evidence items created before current categorization policies were in place, effectively clearing alerts for past uncategorized evidence in the app.
This approach allows you to categorize evidence created before your chosen start date, enabling effective tracking and categorization from that specific point in time.
Follow these steps to create and apply a retention category with your chosen Start Date:
- Sign into your Axon Evidence account.
- Select the Admin tab.
- In Agency Settings section, select Retention Categories.
- Select Add Category.
- Enter a name for your new retention category. Consider using a format like 'Pre-[Chosen Start Date]' (e.g., 'Pre-April 1, 2024') for ease of future reference.
- Set the Retention length and additional settings to align with your organization's policies. For more information on configuring retention categories, refer to Managing Categories.
- Select Save. A confirmation window will appear confirming that the category has been successfully created, select Close to exit.
- Select the Evidence tab, and then select All Evidence.
- Enter the date prior to your chosen start date in the End date filter, and then select Search. This ensures that all uncategorized evidence from the beginning of your records up to your start date is included.
- Use the checkboxes to select all search results.
- Select Edit Metadata, and then select Category.
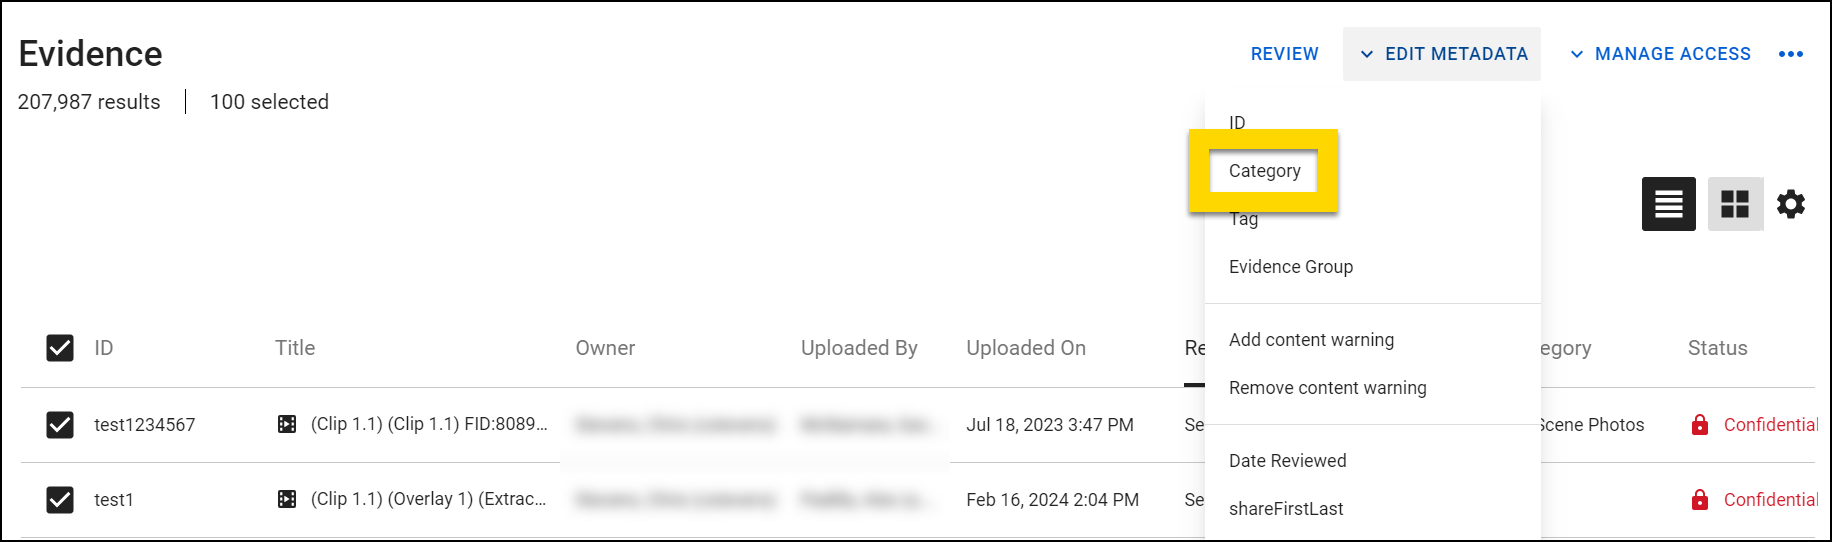
- On the Edit categories window, select the Add option, select your newly created retention category from the Add Category drop-down menu, and then select Submit.
Additional resources
Learn more about using categories and retention policies from the following resources:
- Categories and Retention Policies: Learn more about how to create policies, maintain them, and assign them to evidence.
- Manage categories: Learn more about how to configure retention policies, edit or delete a category.
Adjust security settings
The Axon Application Exceptions settings on the IP Settings page in the admin console allow administrators to easily add exceptions to IP restrictions for specific Axon applications, including the Axon app.
To except the Axon app from your organization's IP restrictions, adjust this setting:
- On the menu bar, select Admin.
- In the Security Settings section, select IP Address.
- Scroll to the bottom of the page to the Axon Application Exceptions section and turn on the Axon app setting.
For more information about the settings on this page, see Security settings.
Mobile Device Management recommendations
If your organization uses a Mobile Device Management (MDM) to manage settings on user's devices, we recommend:
- Activating Screen Pinning (Android devices) or Guided Access (iOS) for Safe Mode in the Axon app
- Activating "focus" or "do not disturb" modes to limit interruptions (bottom of that page)