Person profile actions
You can take various additional actions on person profiles, including:
- Edit profile
- Manage photos
- Generate photo lineups
- View history
- Find duplicates

Edit profile
Person profiles are updated whenever a person is added to a report and their information is changed in the report.
Users with certain privileges can also make changes to a person's information by opening their profile and selecting Actions > Edit profile.
You can't add, update, or remove a person’s Contact Address information directly from a profile. To change this information, add the person to a report, update the contact address, and finalize the report.
After editing the person's information, select Save at the bottom of the page.
All historical profile changes can be viewed by selecting Actions > Show person history.
Simultaneous edits
If you directly edit a person's profile and that person has already been added to a report that is currently in progress, the profile edits you make will NOT appear in the report. When the report is finalized, all information in the report will be applied to the person's profile, and any edits made directly on the profile may be overwritten. The edits you made directly to the person's profile still appear in the person's history.
If you are editing a person's profile and before you select Save another user edits that person (either by directly editing the profile or updating it from a report), a message will appear. This message displays your edits, along with the changes made by the other user. You can select to either discard or keep your edits.
Manage profile photos
You can upload, take, and view all photos on a profile using the Actions menu in the top right corner of the page and the View all photos button below the profile photos.
The various photo-related actions are controlled by the Person profile photo privileges.
View all photos
To view and edit any photos on a person's profile, select View all photos. The photo gallery opens where you can:
- Use the tabs to switch between All photos, Profile, Marking, and Uncategorized photos.
- Switch between photos in the current tab by selecting the thumbnails.
- Edit the selected photo (change the category, type, and date taken).
- Delete the selected photo.
- Make the selected photo the default photo. Default photos display:
- As the first image on that person's profile
- In search results
- In the search results that appear when searching to add an existing person to a report.
- As only image on the person's booking profile
- Turn on the toggle to include the selected photo in photo lineups.
Upload photo
To upload profile photos:
- Open the profile and select Actions > Upload photo.
- Select Upload photo and find the image on your device.
- The maximum file size is 200 MB.
- Set the photo category. Options include:
- Profile
- If selected, you must also indicate the type (Front, Left, or Right).
- Marking
- Uncategorized
- Profile
- Select if the image should be used if users generate a photo lineup that includes the person.
- Select Upload to add the image to the profile.
Take photo
If you have a device that can take photos, follow these steps to take a photo and add it to the profile:
- Open the profile and select Actions > Take photo.
- The live camera feed loads on the left side of the page. Once the person is positioned facing the camera, select Take photo.
- If you need to take a new photo, select Take photo.
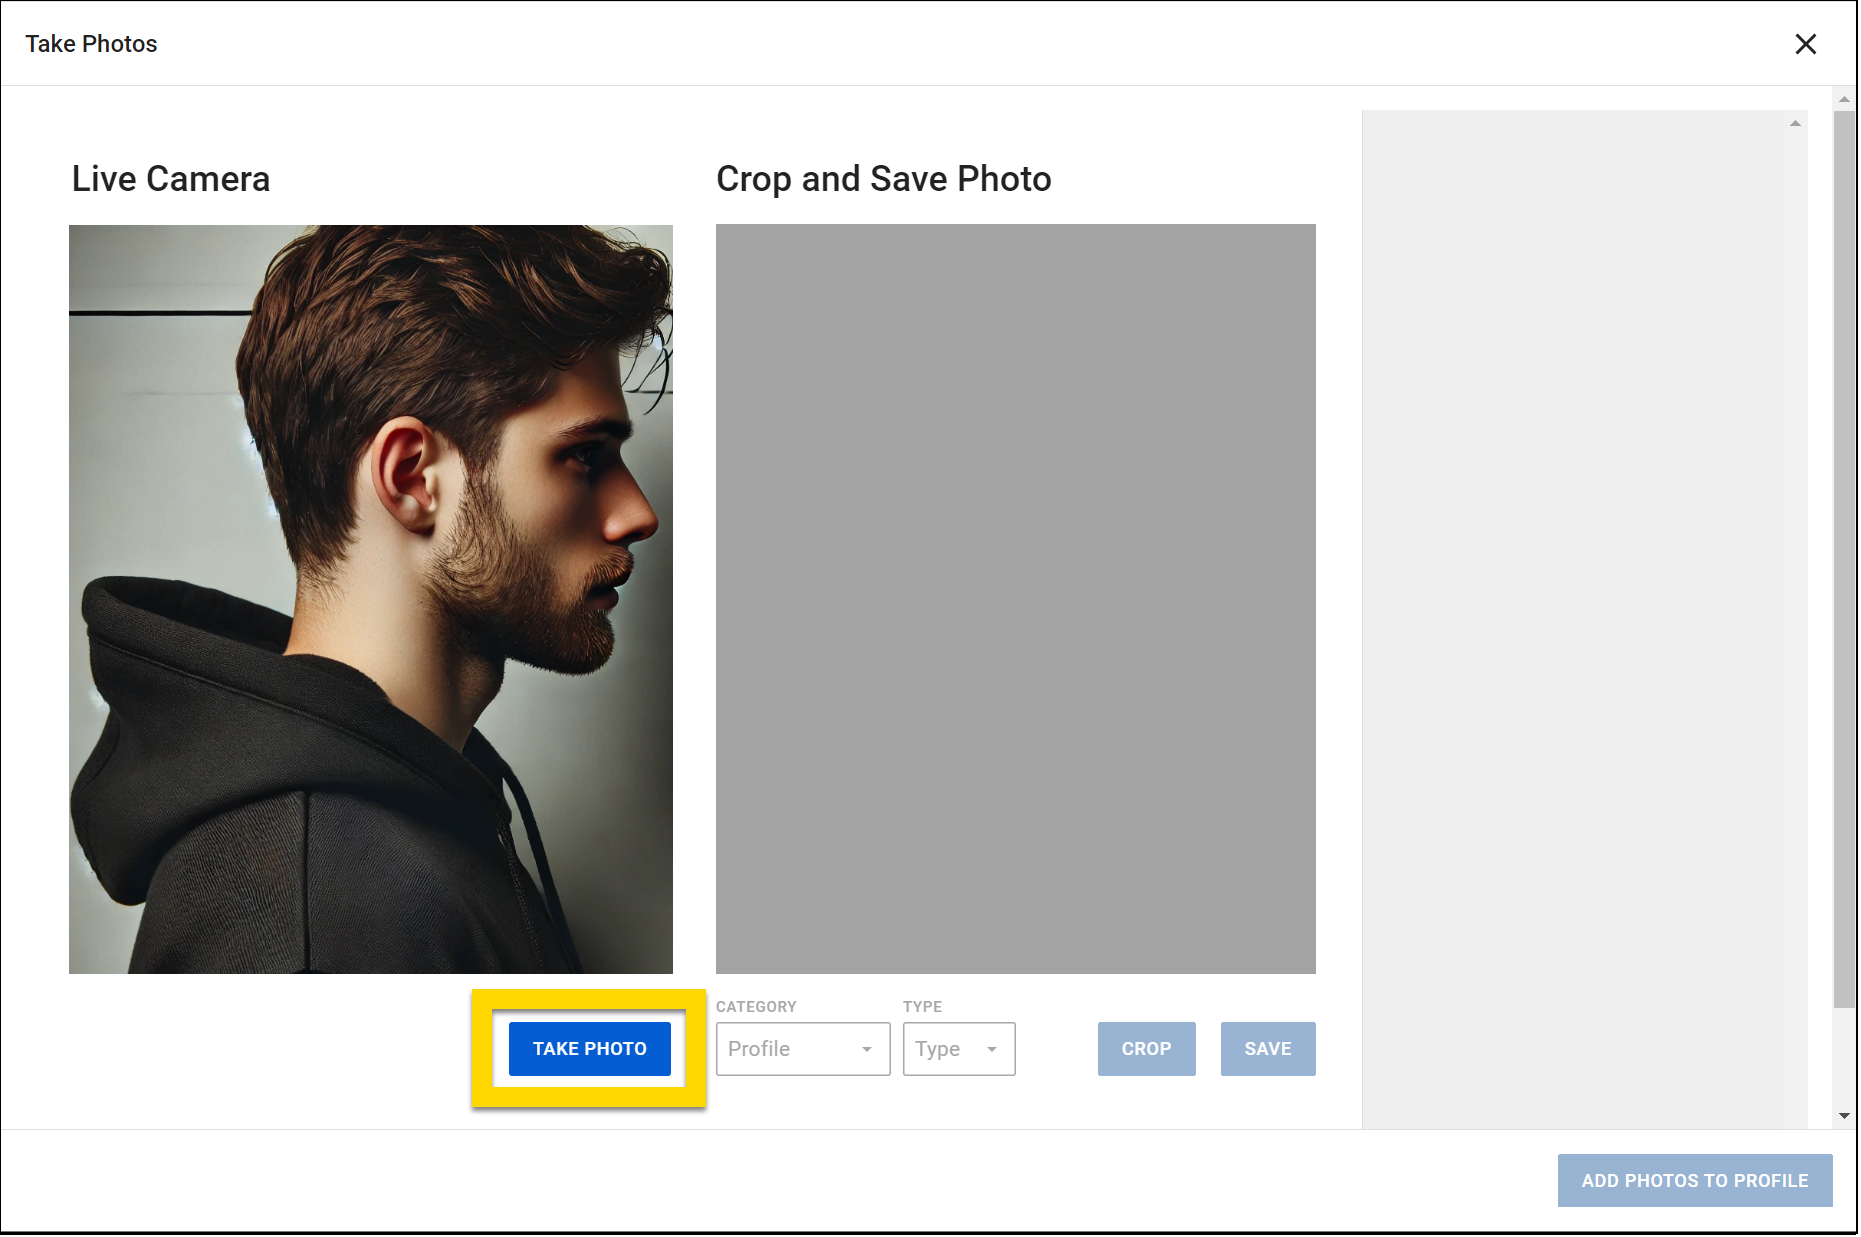
- If you need to take a new photo, select Take photo.
- The photo appears in the center of the page where you can adjust the crop area and add photo details:
- Set the category (Profile, Marking, Uncategorized).
- For profile photos, also set the photo type (Front, Left, Right).
- Click and drag a corner of the blue box to resize the crop selection.
- Select Crop photo to crop the photo to your selection.
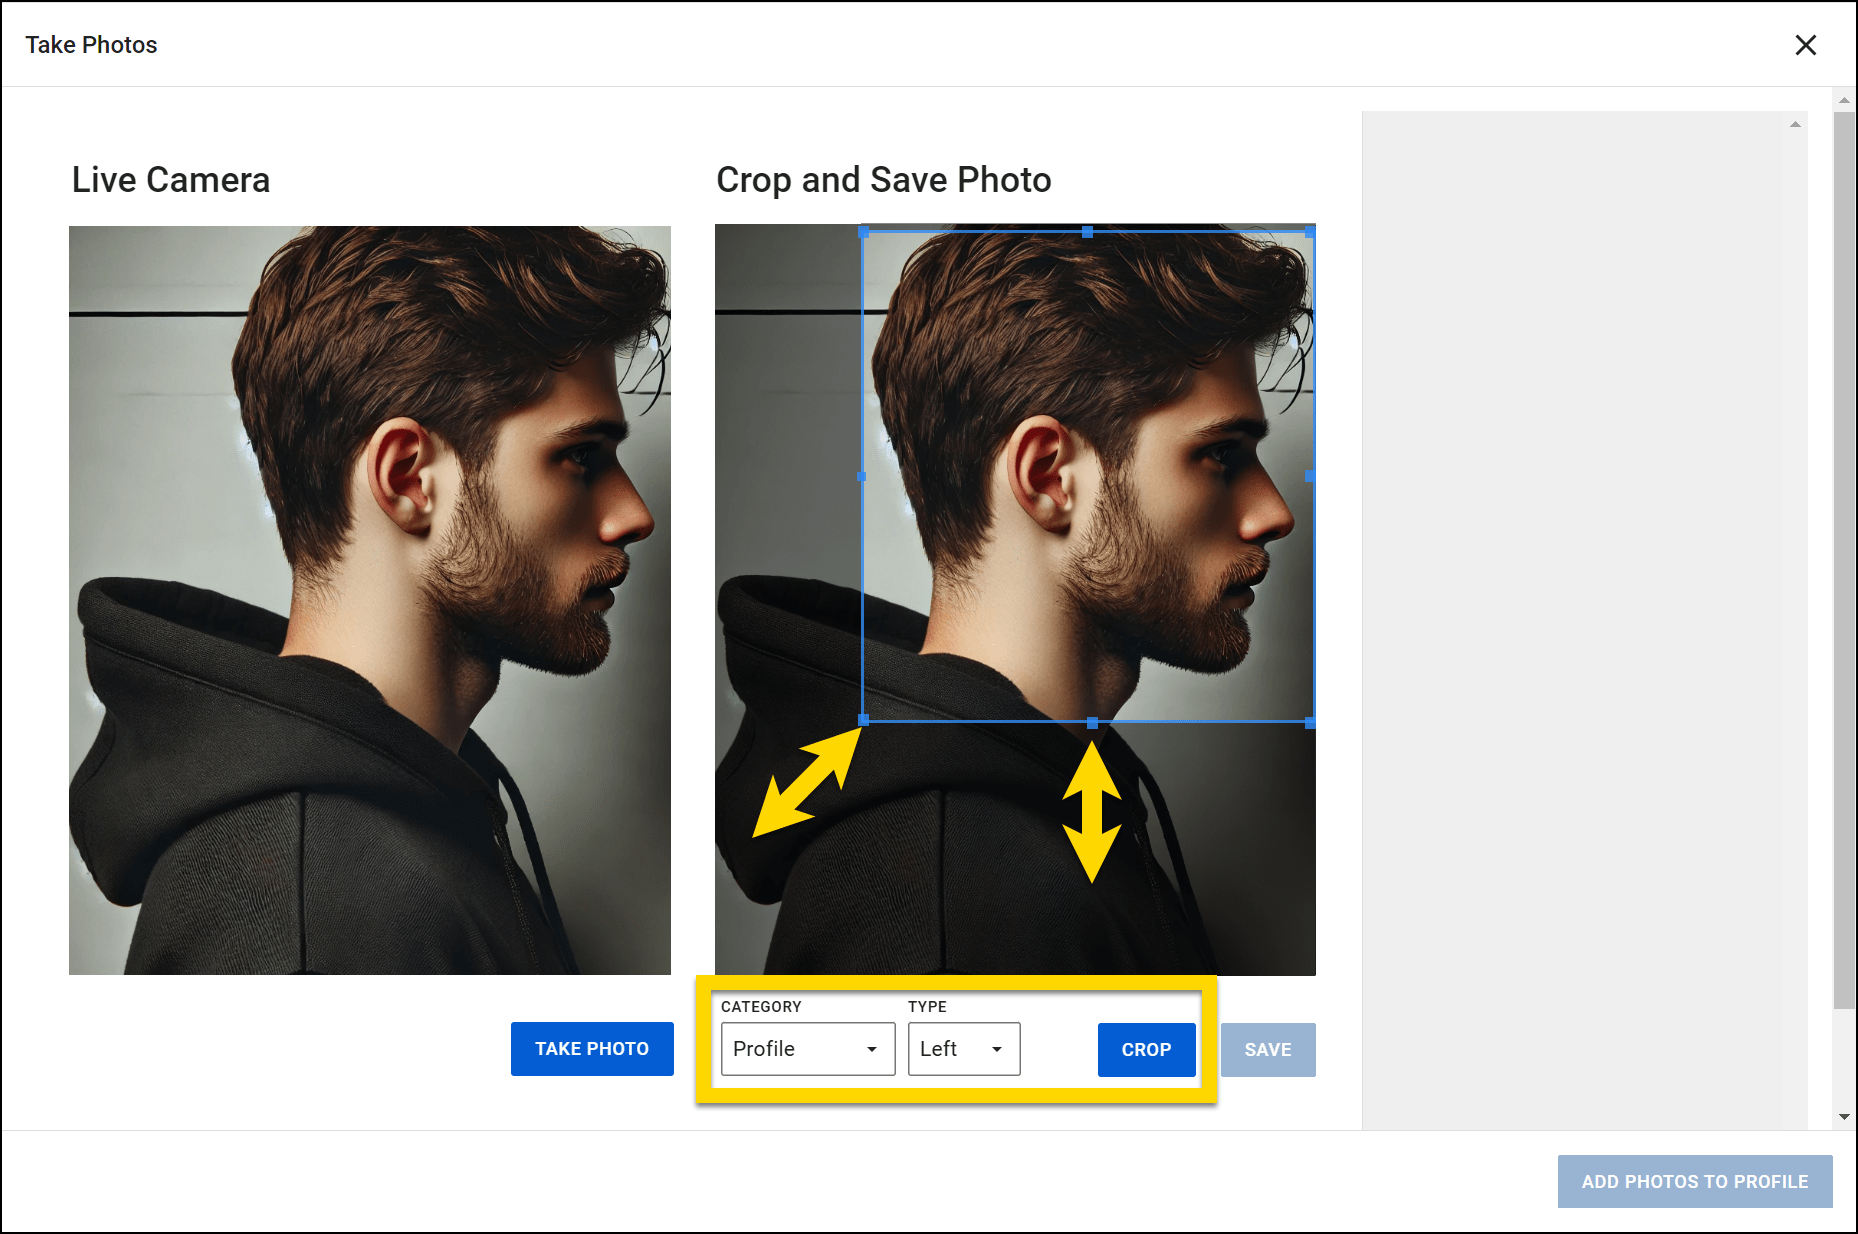
- Set the category (Profile, Marking, Uncategorized).
- After categorizing the photo and adjusting the crop, select Save.
- The cropped photo, its category, and its type appear on the right side of the page.
- Select Edit to adjust the category and type.
- Select Delete to remove the photo.
- Select Add photos to profile in the bottom corner of the page to add the photo to the person's profile.
Generate photo lineup
When viewing a person's profile in Axon Records, users with specific privileges can quickly create a lineup of photos of subjects who share similar visual characteristics. This lineup can be exported to a printable PDF. The images included in a photo lineup are sourced from the images that have been uploaded to Axon Records.
To create a photo lineup, follow these steps:
- Open the suspect's profile either by using People search or by selecting their name in a report and selecting Actions > View profile.
- Once the profile is open, select Actions > Generate photo lineup.
- Add an Incident ID (required) and Lineup ID (optional).
- Adjust the physical attributes. These attributes are used to filter search results and generate potential lineup images in the next step.
- Click Select lineup photos in the bottom corner of the page once you've adjusted the attributes as desired.
- Choose photos to include in the lineup.
- Select Back and adjust the attributes to increase/decrease the number of available photos.
- Select Generate lineup in the bottom corner of the page after you've chosen all photos.
- A PDF will load in a new browser tab where you can download or print it.
- Each image is printed on a single page, resulting in a sequential photo lineup.
- The final page of the printout includes all photos, along with their corresponding names, height, weight, and Person ID.
View history
Person information changes when a person is added to a report, their information is changed, and the report is finalized. When viewing a profile, all fields containing data are marked with a yellow clock icon. Hover over this icon to reveal any historical data that has previously been entered in that field.
To reveal historical data for all fields on the profile, select Actions > Show person history. All previous information that has been recorded about the person appears below the current information. The date appears beside the previous information, indicating the day it was added to their profile.
Find duplicates
To check for duplicate person profiles:
- Select Actions > Find MNI duplicates.
- A new People search tab opens in your browser with the person's first and last name pre-filled in the top search box.
- Select the checkboxes beside any profiles you want to merge.
- Select Merge MNI to open the MNI Merge tool and merge the profiles.
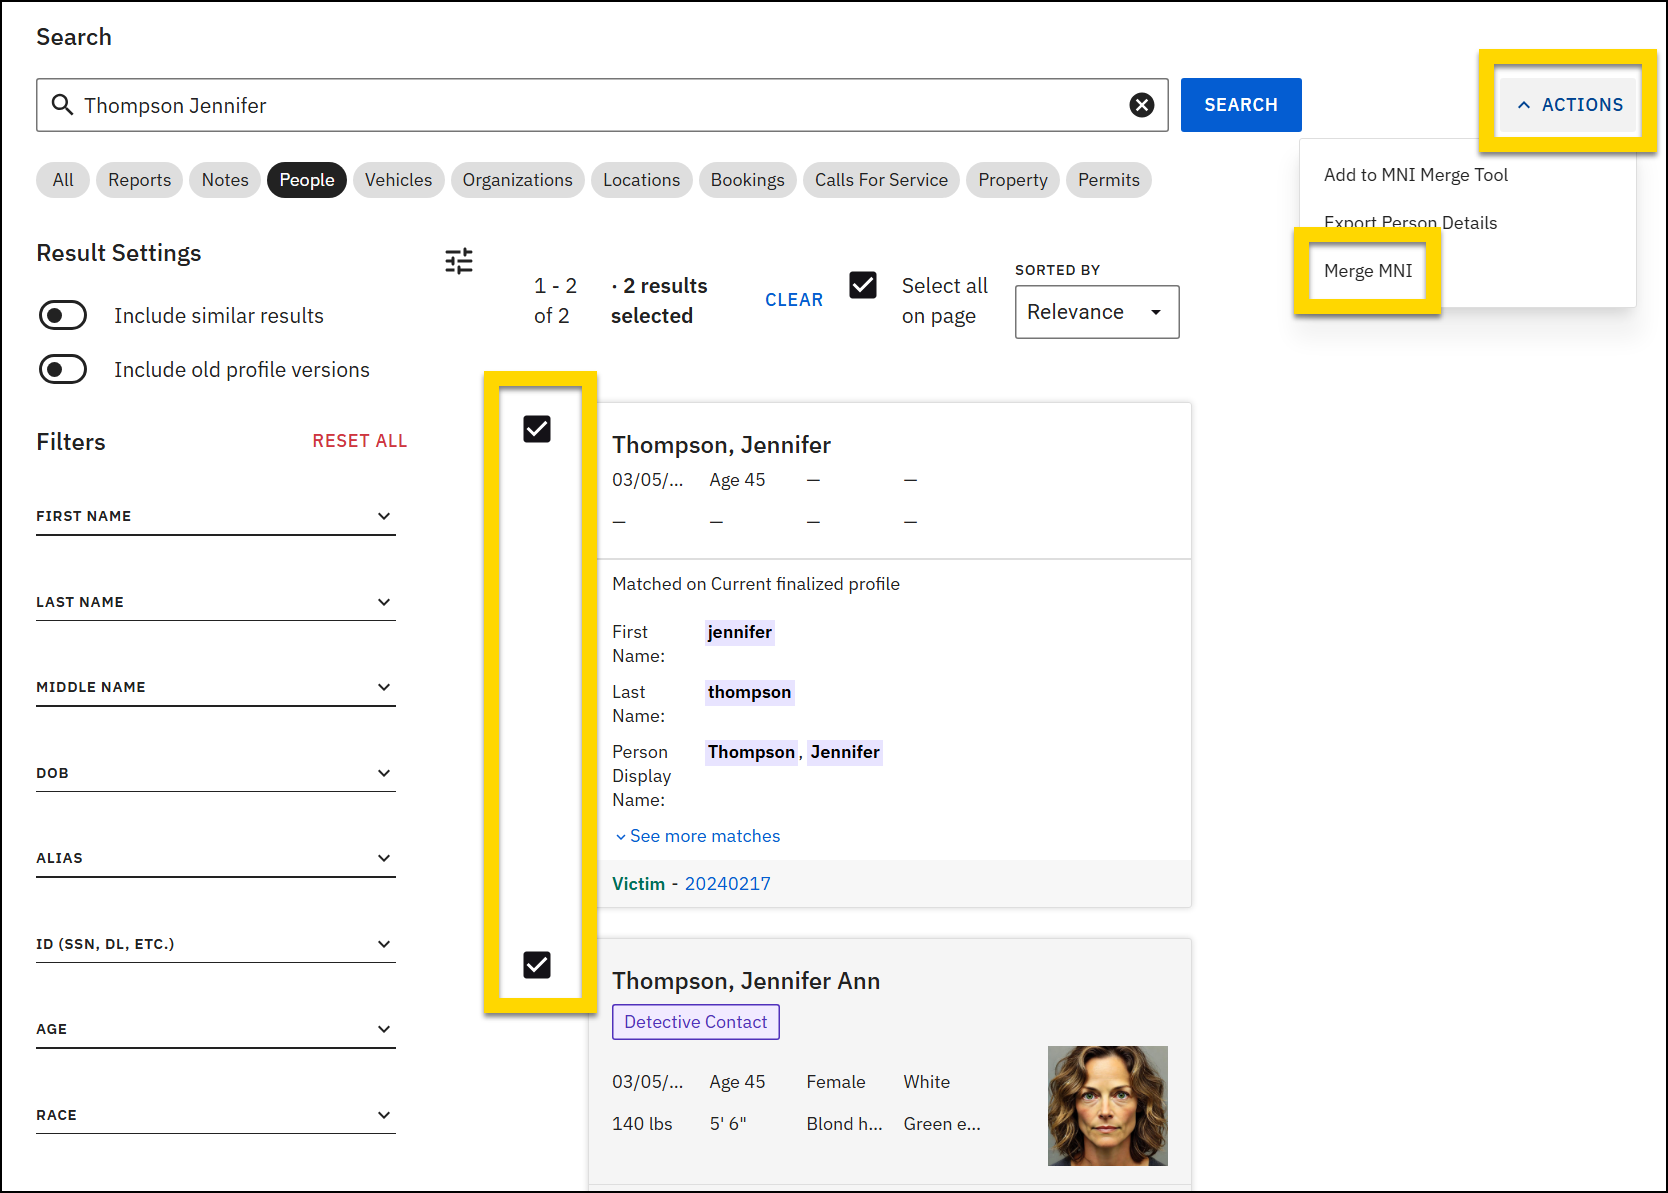
This profile action only appears for users with MNI Merge privileges.