Add report information
When working on reports in Report Writer, use the Add buttons in the navigation menu to add new sections (composed of multiple fields) in the central report writing area where you can enter information.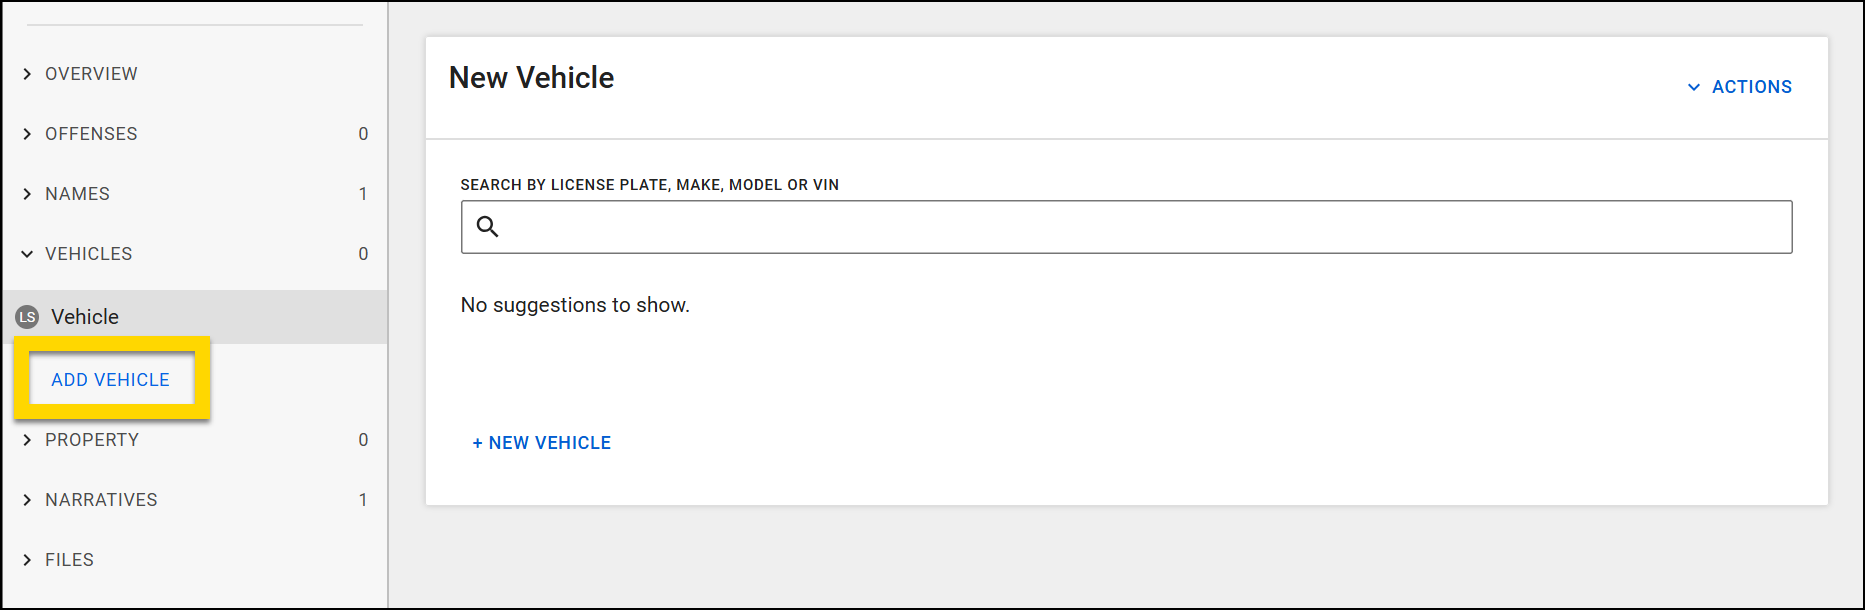
These sections vary depending on the type of report, but often include:
- Overview
- Citizens
- Vehicles
- Units
- Officers
- Response actions
- Acknowledgments
- Narrative
- Files
Overview
Most reports contain an Overview section where you can record basic information, including date, time, and location. Overview sections contain various other fields, depending on the report type. Unlike the other report sections, the Overview section can't be removed from the report.
Date and time
To quickly enter the current date and time, enter "T" in the date field. The current date and time automatically appear in both the Date and Time fields. See Keyboard shortcuts for additional information about quickly entering information into reports.
Location
Depending on the report type, various location-related fields appear, often including Location, Location category/type, and Location note. The location-related fields and entry methods of the options in the Location field are outlined in the table below.
|
Location option |
Entry method |
Appears in search when adding locations to a report |
Appears in Locations search in the Search module |
|---|---|---|---|
|
Auto address |
Users search the system for verified addresses to add to reports |
Yes |
Yes |
|
Cross streets |
Users search the system for verified addresses to add to reports |
Yes |
Yes |
|
Manual address |
Manually entered by users |
No |
Yes |
|
Mile marker |
Manually entered by users |
No |
No |
|
Unknown |
Manually entered by users |
No |
No |
It is generally a best practice to use verified Auto addresses and Cross streets when completing reports. Follow your organization's policy when adding Manual addresses, mile markers, or Unknown locations to reports.
Auto addresses and cross streets
When you select Auto address or Cross streets from the Location field, you can type in the Address/cross street field, and a list of possible location matches will appear.
To enter a location by finding it on a map, instead select the map that displays beside the Address/cross street field. A larger map window loads. Use the plus and minus buttons to zoom in and out. Click and drag to pan the map and reveal new areas.
Click anywhere on the map to drop a pin. The pin you place appears in light purple, and the nearest verified address appears in dark purple. Select Add to report to add the verified address to your report.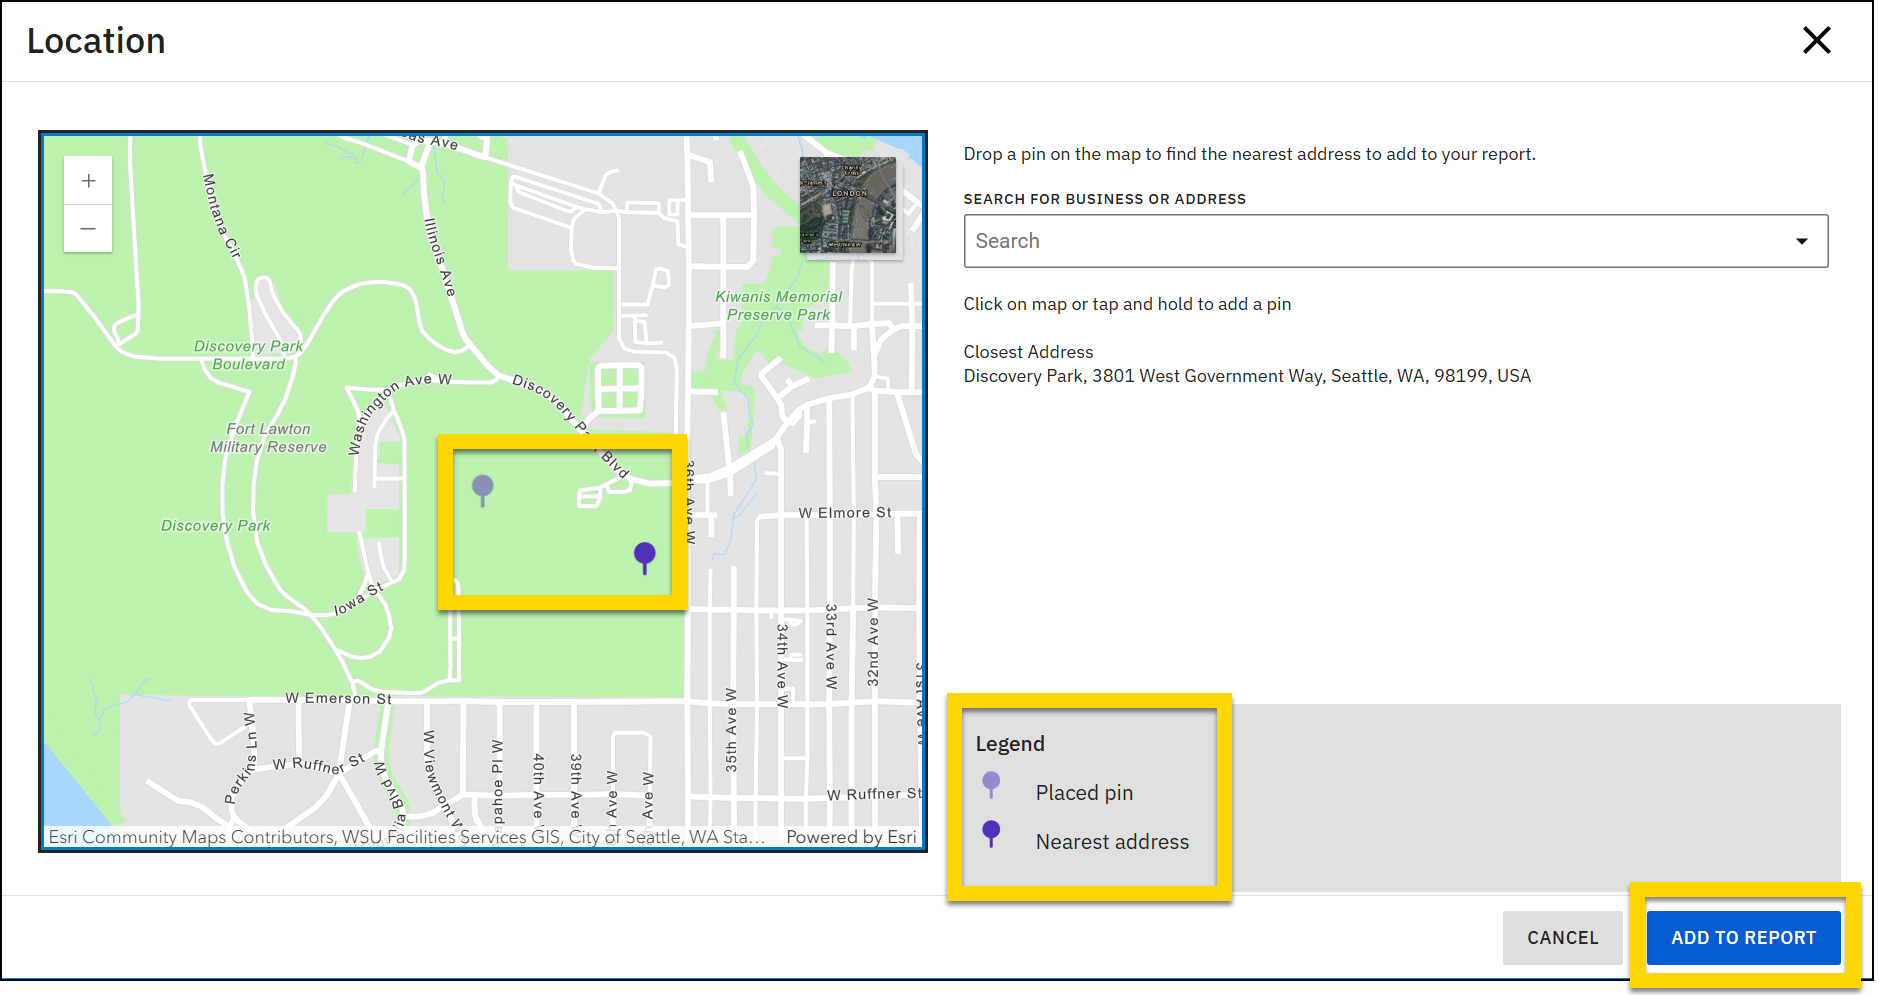
You can add subaddress information to auto addresses to specify a particular unit or apartment number. These unit/apartment numbers are considered unique locations, even though they share the same address.
To add a unit, select Add unit, then provide the Unit type (Apartment, Suite, etc.) and Unit number.
Manual addresses
When you select Manual address from the Location field a set of new fields appears where you can enter the location information.
Mile markers, and unknown
When you select Mile marker or Unknown from the Location field a set of new fields appears where you can enter the location information.
Citizen
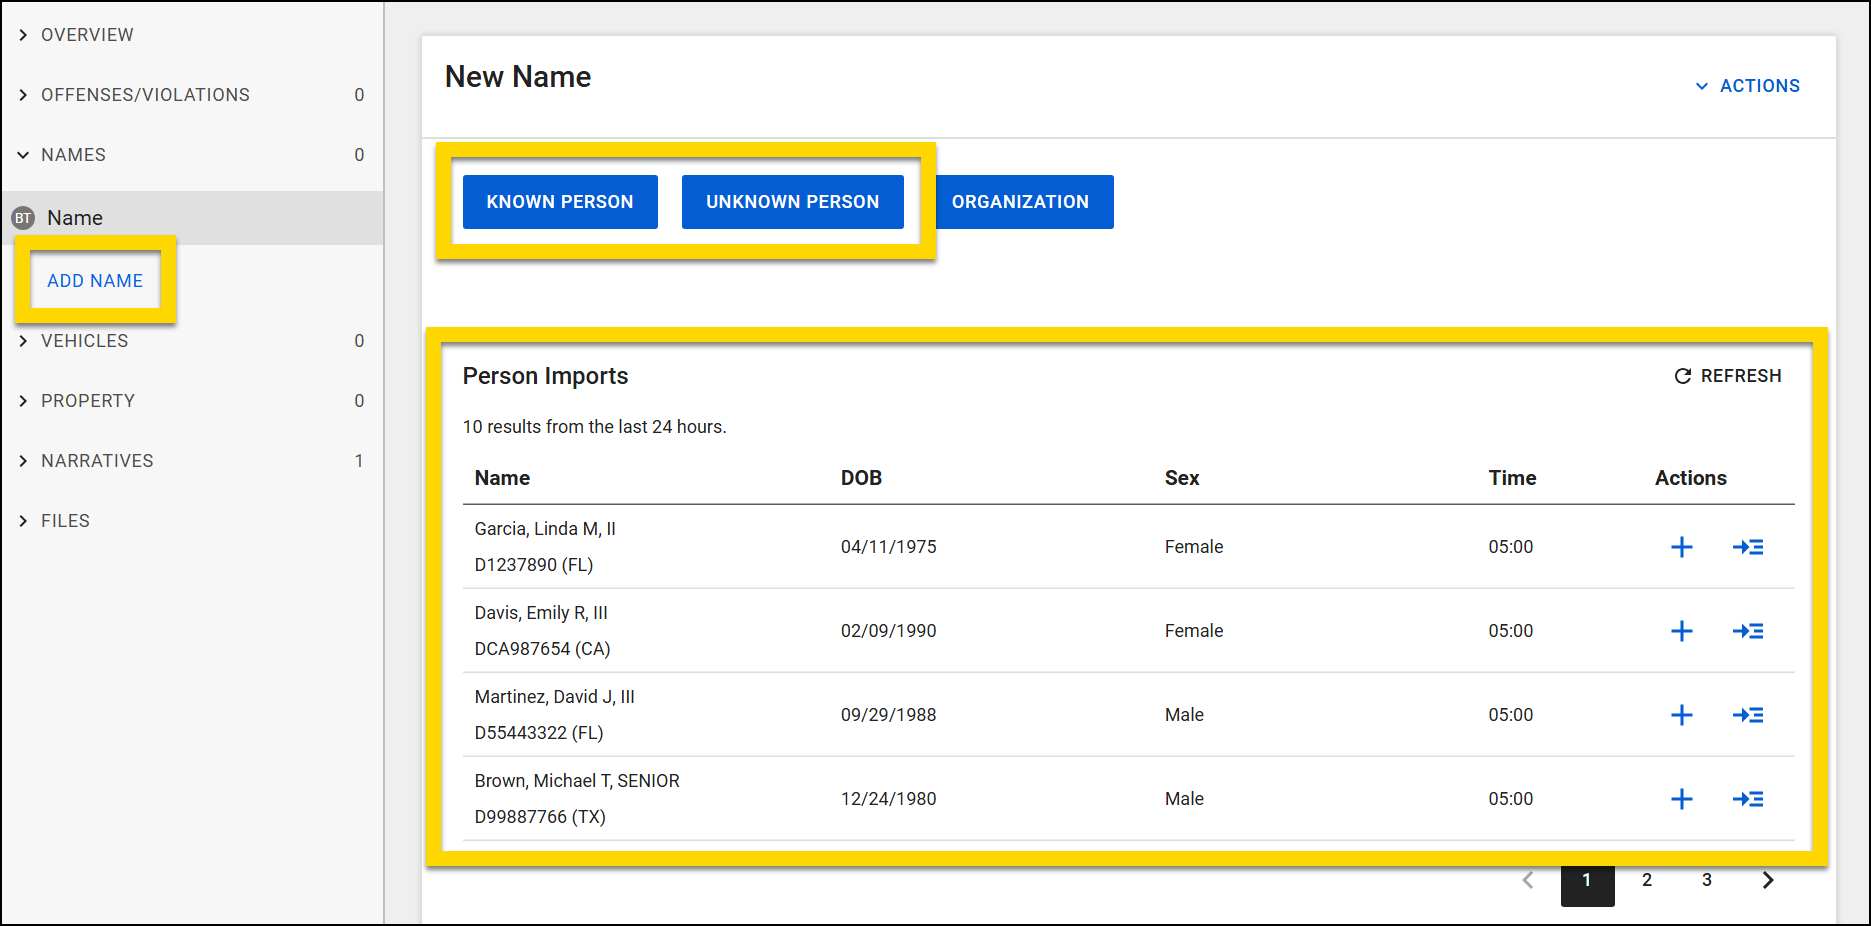
To add a person to a report, select Add Person/Citizen in the report navigation menu, and then select the type of person you want to add: Known or Unknown.
If your organization has integrated with your NCIC search provider, you can also view the people you exported from NCIC and add one to your report.
Once a person has been added to a report, you can add and update their information.
Add a known person
A known person is someone who can be positively identified. This could be someone whose identity is fully confirmed, such as a person who has presented valid identification or has been recognized by someone else. A known person can also be partially known. For example, if witnesses report seeing a male in a blue sweater running from the scene, this individual is considered a known person because some identifying information is available.
To add a known person to a report:
- Select Add name > Known person.
-
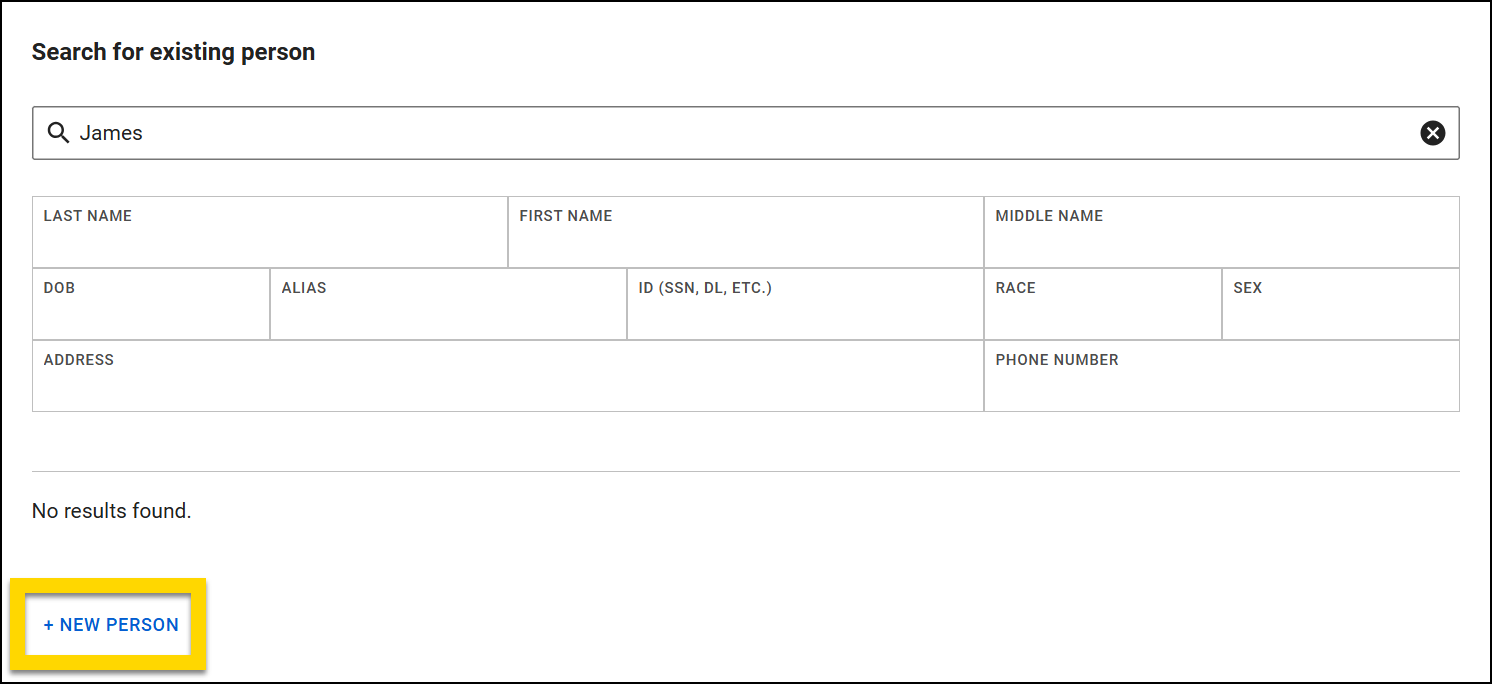
To avoid creating duplicate person profiles, search to see if the person already exists in the database rather than automatically creating a new one.
- Enter keywords in the top search box or use the filters to search.
- Potential matches from the database appear below the search fields as you enter information.
- Select a search result to open a profile preview pane and view more information.
- If your organization has integrated with your NCIC search provider, you can also search for people you imported from NCIC.
- If a profile matches the person you want to add to the report, select Import and update at the bottom of the pane.
- If a profile does NOT exist for the person you want to add to the report, select New person below the list of search results.
An orange banner displays at the top of the window when you add an existing person. If the person was added by mistake, select Remove person in the banner to remove them.
Add an unknown person
An unknown person is someone who cannot be identified or described. For example, if a car is broken into with no witnesses, the person who committed the break-in would be considered an unknown person.
To add an Unknown person to a report:
- Select Add name > Unknown person.
- Fill out the Role this person played and provide any other information you can.
Unknown persons are not added to the database, which means they will not appear in searches and can't be added to other reports.
Add a person from NCIC
The NCIC integration is currently only available for select organizations. Contact Axon Support or your Axon representative for more information about integrating with your NCIC search provider.
To add a person from NCIC search to your report:
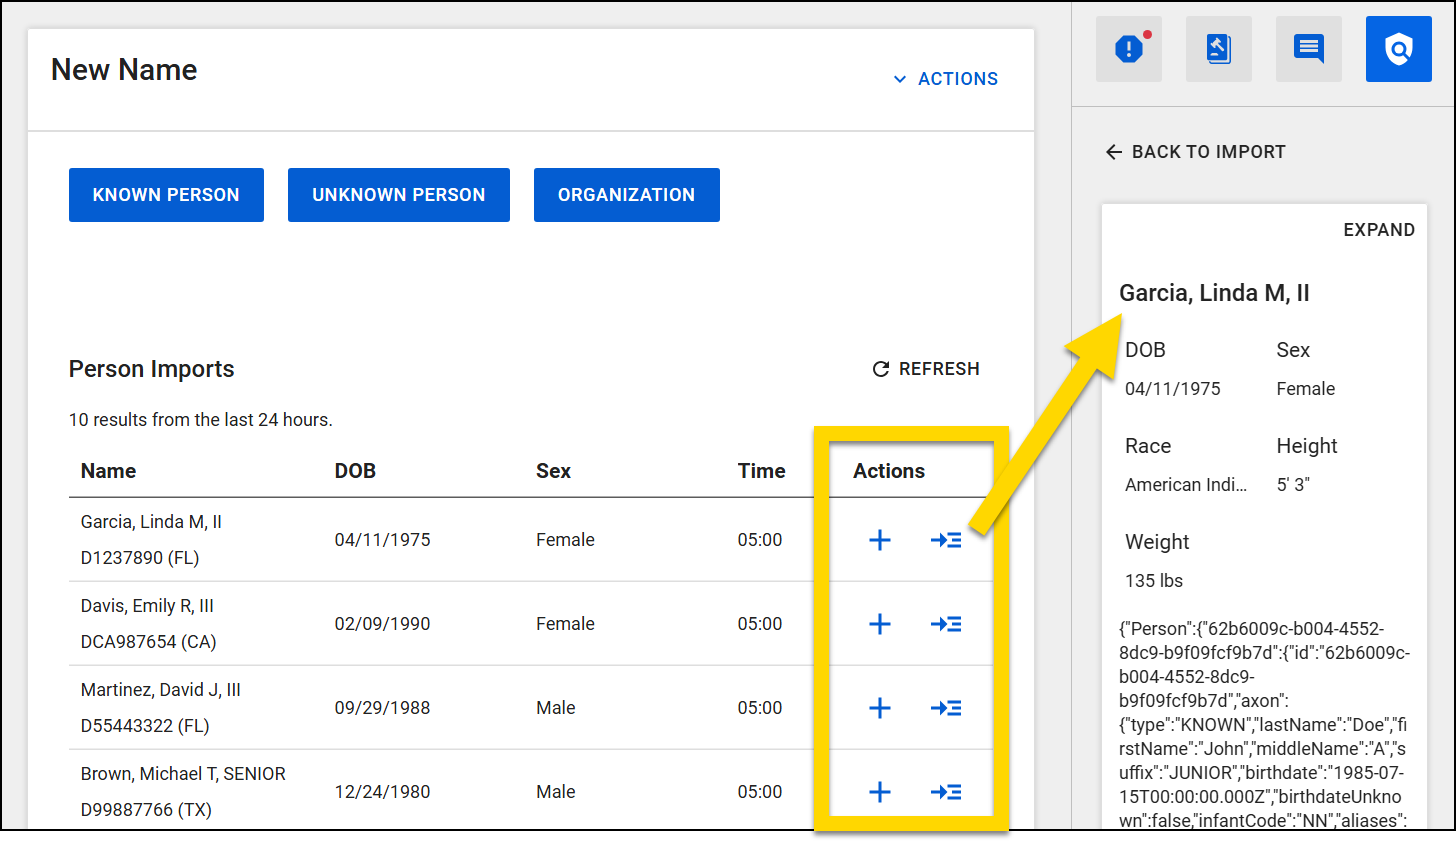
- Export the person from your NCIC search application to make their name appear in the Person Imports table in Axon Standards.
- This table includes person imports, typically from the previous 24 hours. Imports made prior to this timeframe are removed from the table. Select Refresh to refresh the list.
- You may see a timeframe other than 24 hours, depending on how your organization's NCIC integration is configured.
- Depending on your organization's integration and configuration settings, people imported from NCIC may take a few minutes to appear.
- This table includes person imports, typically from the previous 24 hours. Imports made prior to this timeframe are removed from the table. Select Refresh to refresh the list.
- Select the arrow icon in the Actions column to view additional details about them in the side panel.
- The person’s basic information, including DOB, sex, race, height, and weight is displayed at the top (if available).
- Additional data about the person appears below these details. This information comes directly from your NCIC search provider and may contain raw code.
- Select the plus icon in the Actions column to add a person to your report.
- When you select the plus icon, the system searches to see if that person already exists in the database.
- The search fields are auto-filled using the information from your NCIC provider.
- Potential matches from the database appear below the search fields.
- Select a result to open a profile preview pane and view more information.
- If a profile matches the person you want to add to the report, select Import and update at the bottom of the pane.
- If you do not find a matching profile, select New person below the list of search results.
- A new person profile is created, and the information from your NCIC provider is auto-filled into the person fields in the report.
Add and update person information
When adding a person to a report (whether creating a new person or updating an existing one), various fields are revealed where you can record information about them. This information is also added to their profile, which displays all information about the person, including their involvement with any other reports, people, vehicles, etc. The fields vary by report type, but some common fields include:
- Involvement: Description of the person's role in the report.
- Identity details: Full name, date of birth, and other relevant identifiers.
- The Age field shows the person’s age at the time of the report, regardless of their current age. If the report does not have a recorded date, the Age field shows the person's current age.
- People who are added to reports also appear on event/case profiles. The person information shown on these profiles is the person's information at the time of the incident, which may be different from that person's current information.
- For example, at the time of Event 123456, the victim’s name was Debbie Miller. Two years later, her name changed to Debbie Smith. The profile for Event 123456 displays “Debbie Miller,” the name recorded at the time of the event, even after her name changes.
- Description: Details such as height, weight, hair color, eye color, and distinguishing marks.
- Contact information: Current address, phone number, and email, if available.
- Additional forms: Add any forms that may be required, such as an arrest.
Once the report is submitted, the information provided in the report immediately appears on their profile.
Vehicles
To add a vehicle to your report, select Vehicles > Add vehicle in the report navigation menu.
From this screen, you can search for an existing vehicle or create a new one. If your organization has integrated with your NCIC search provider, you can also view the vehicles you exported from NCIC and add one to your report.
Once a vehicle has been added to a report, you can add and update its information.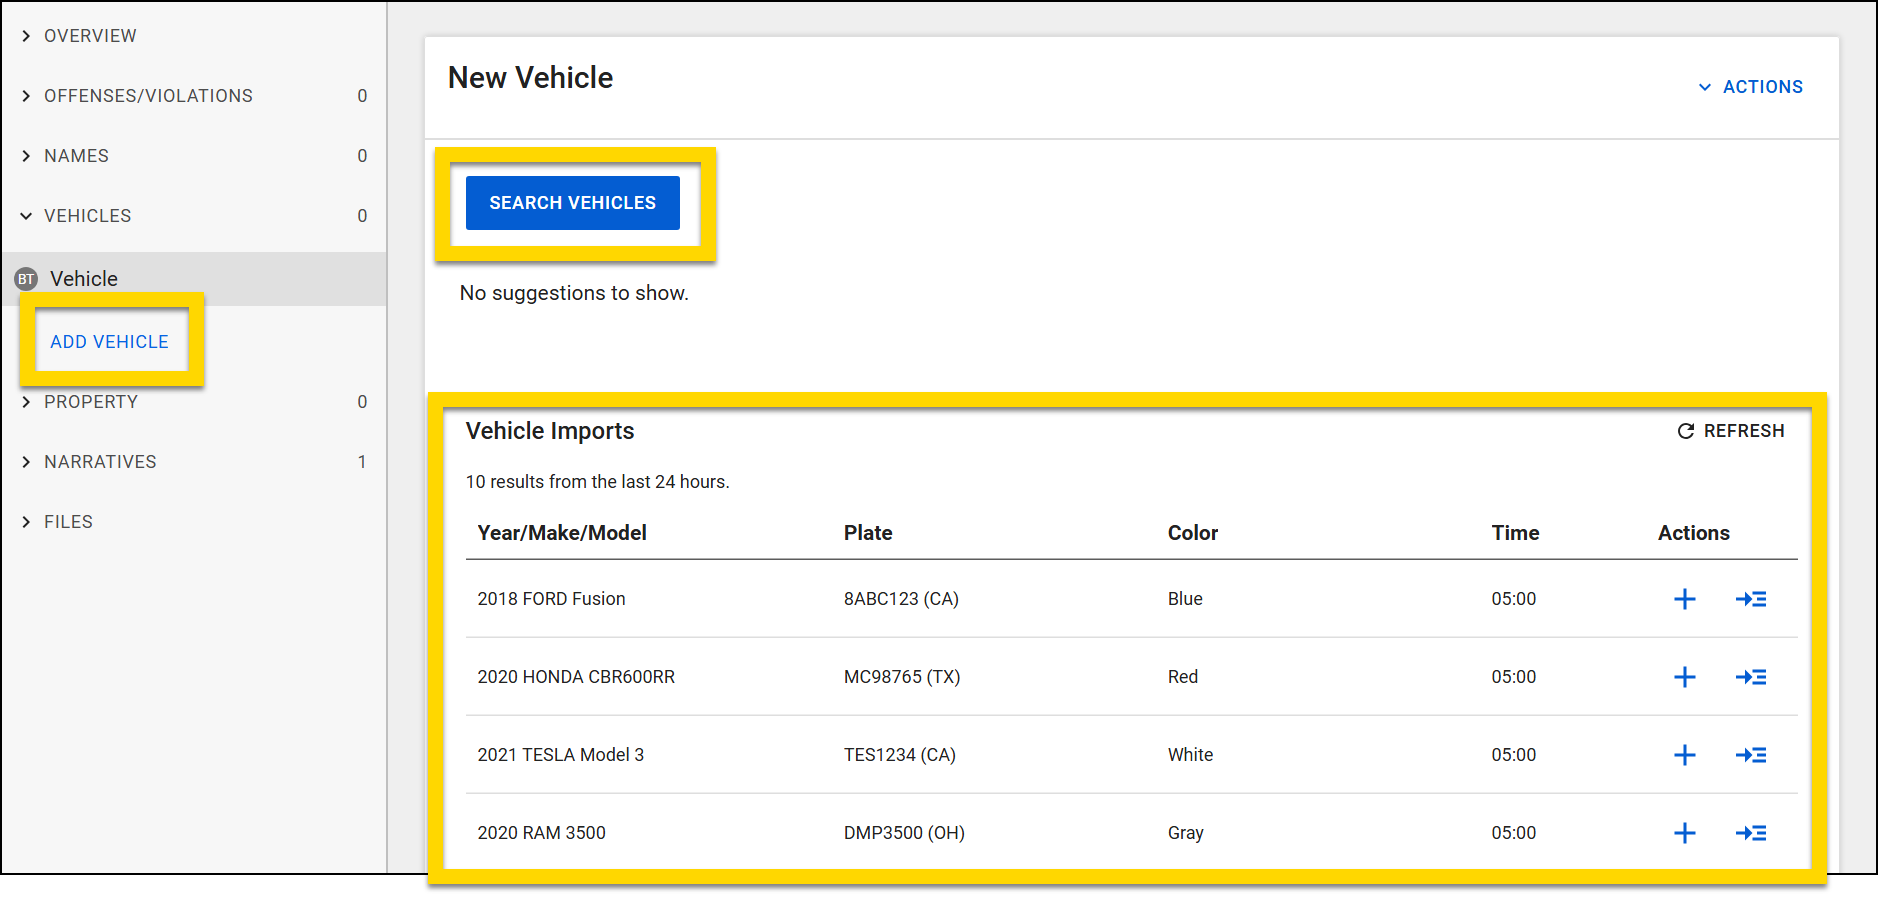
To search for an existing vehicle, or to add a new vehicle, take these steps:
- Select Add vehicle.
- This button may differ depending on the type of report you are writing.
- To avoid creating duplicate vehicle profiles, search to see if the vehicle already exists in the database rather than automatically creating a new one.
- Search by license plate, make, model, or VIN. Wildcard operators are not supported in the search box.
- Potential matches from the database appear below the search fields as you enter information.
- Select a search result to open a profile preview pane and view more information.
- If your organization has integrated with your NCIC search provider, you can also search for vehicles you imported from NCIC.
- If a profile matches the vehicle you want to add to the report, select Import and update at the bottom of the pane.
- If a profile does NOT exist for the vehicle you want to add to the report, select New vehicle below the list of search fields.
- If you search for an existing vehicle using a license plate number and must create a new vehicle, the license plate you searched for is entered in the report.
Add a vehicle from NCIC
The NCIC integration is currently only available for select organizations. Contact Axon Support or your Axon representative for more information about integrating with your NCIC search provider.
To add a vehicle from NCIC search to your report:
- Export the vehicle from your NCIC search application to make their name appear in the Vehicle Imports table in Axon Standards.
- This table only includes vehicle imports, typically from the previous 24 hours. Imports made prior to this timeframe are removed from the table. Select Refresh to refresh the list.
- You may see a timeframe other than 24 hours, depending on how your organization's NCIC integration is configured.
- Depending on your organization's integration and configuration settings, vehicles imported from NCIC may take a few minutes to appear.
- This table only includes vehicle imports, typically from the previous 24 hours. Imports made prior to this timeframe are removed from the table. Select Refresh to refresh the list.
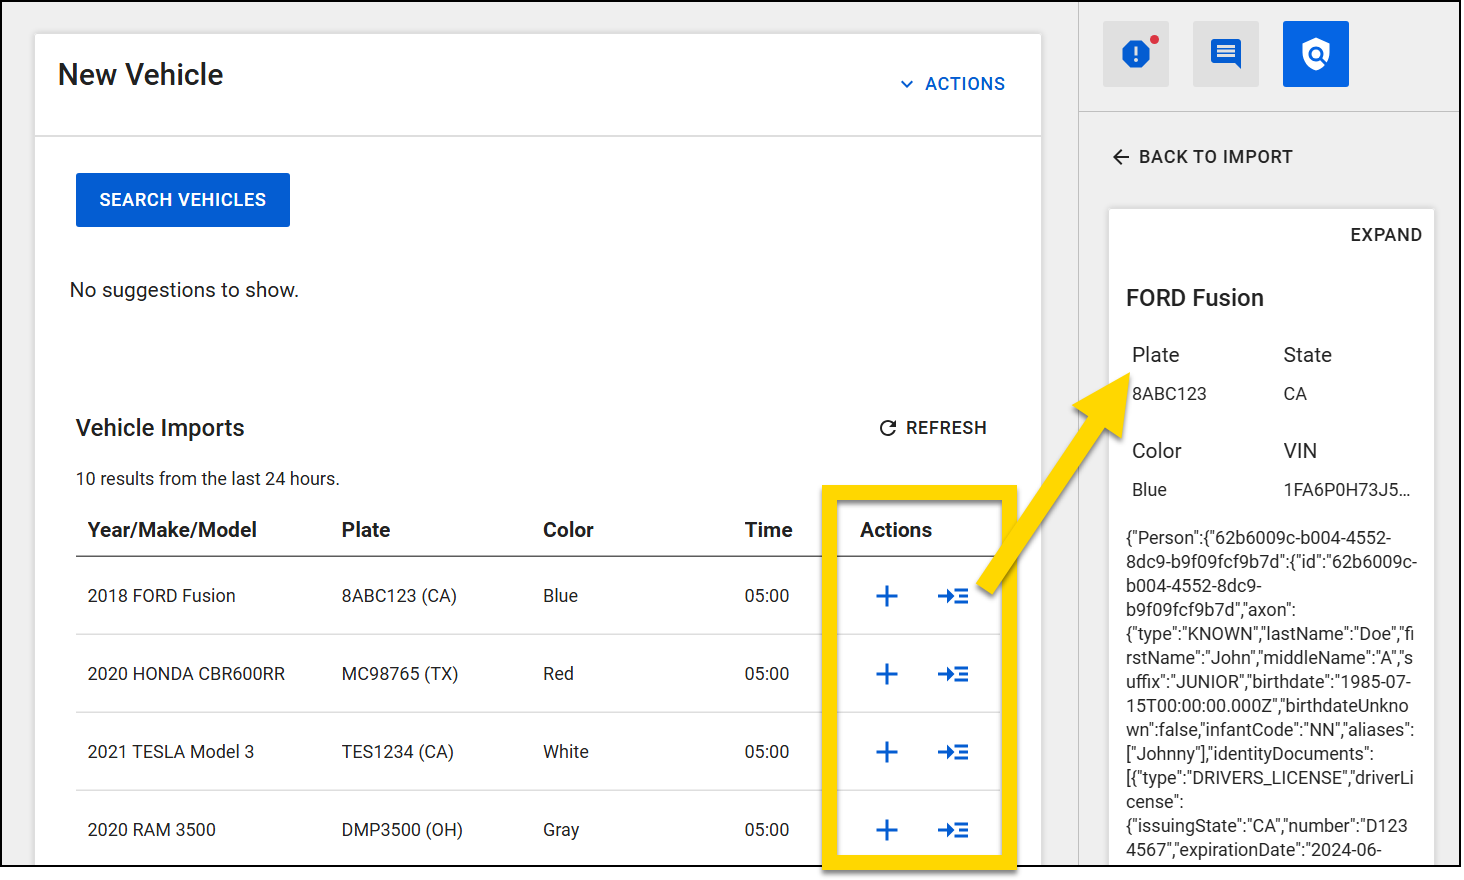
- Select the arrow icon in the Actions column to view additional details about the vehicle in the side panel.
- The vehicle’s basic information, including plate, state, color, and VIN is displayed at the top (if available).
- Additional data about the vehicle appears below these details. This information comes directly from your NCIC search provider and may contain raw code.
- Select the plus icon in the Actions column to add a vehicle to your report.
- When you select the plus icon, the system searches to see if that vehicle already exists in the database.
- The search fields are auto-filled using the information from your NCIC provider.
- Potential matches from the database appear below the search fields.
- Select a result to open a profile preview pane and view more information.
- If a profile matches the vehicle you want to add to the report, select Import and update at the bottom of the pane.
- If you do not find a matching profile, select New vehicle below the list of search fields.
- A new vehicle profile is created, and the information from your NCIC provider is auto-filled into the vehicle fields in the report.
Units
Add a unit to a report by selecting Add unit in the report navigation menu. Enter unit information and add any officers who were drivers or passengers during the vehicle pursuit and any injuries they sustained.
Officers added to the Unit section are NOT automatically added to the Officers section of the report.
Officers
To add an officer to a report, select Add officer in the report navigation menu. Type the officer's name in the Officer/Employee number field to search the list of officers at the agency.
Select the officer's role (Involved, Complaint, Complainant, Witness).
Depending on the report type, additional fields may be included to let you document additional information about the officer's role in the event.
Response actions
The Response Actions section appears primarily in the Response to Resistance report. This report can help organizations track both how an officer perceived a situation, as well as how they reacted to it.
The Response Actions section lets you document all actions by all parties involved in the event. If multiple officers or subjects were involved, you should add multiple Response Actions.
To complete this section, select Add response action in the report navigation menu and document:
- Who was in immediate threat of harm (citizen, officer, self, or none)
- Involved officer
- Force used against (animal or person)
- Subject actions
Add force
Selecting Add force reveals additional fields that let you provide information about the force used:
- Force type
- Based on the type selected, additional fields will appear specific to that force type.
- For example, selecting TASER CEW reveals additional fields for you to provide information about the TASER, including the CEW model, action, and serial number.
- Force level
- Force objective
- Force type details
- Force location
- Selecting a location on the interactive body outline reveals additional fields for the detailed location, number of impacts, and severity of injury from the direct force.
- Select Add force location to document multiple locations for the same force action.
- For example, the show of force was probes deployed from a TASER, and the probes contacted the subject's lower back and buttock.
- Document the effectiveness and issues limiting the effectiveness of the force.
Each response action can include multiple uses of force. For example, an officer used her hands to grab and hold a subject, and eventually used her TASER. In this case there would be two uses of force for the same response action. Select Add force to document such additional force actions.
Add injuries sustained without direct force
Use this report to document injuries that didn't result from direct impact of the force used, but were a byproduct of the force application. For example, an officer used his TASER and hit the abdomen and right leg of a subject, but caused no injury in those areas. However, the subject fell and hit his head, resulting in a moderate injury.
Select Add injuries sustained without direct force to reveal an interactive body outline where you can report such injuries. Selecting an injury location reveals additional fields for the detailed location, number of injuries, injury severity, and details. Select Add Injury Location if additional locations are needed.
Select Add injuries sustained without direct force to add additional injuries.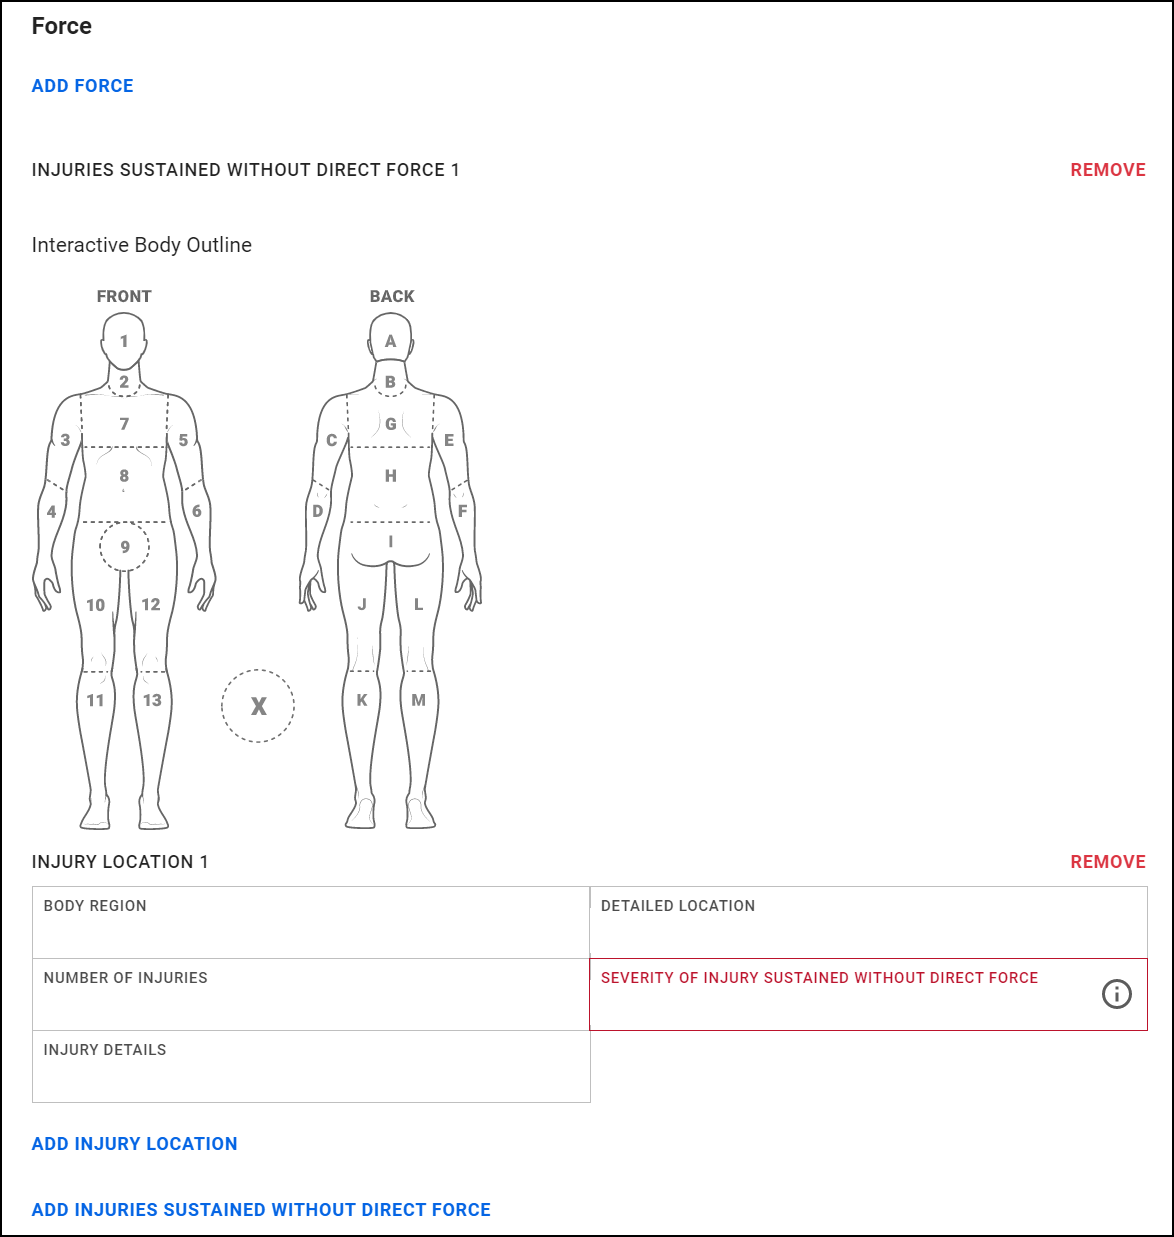
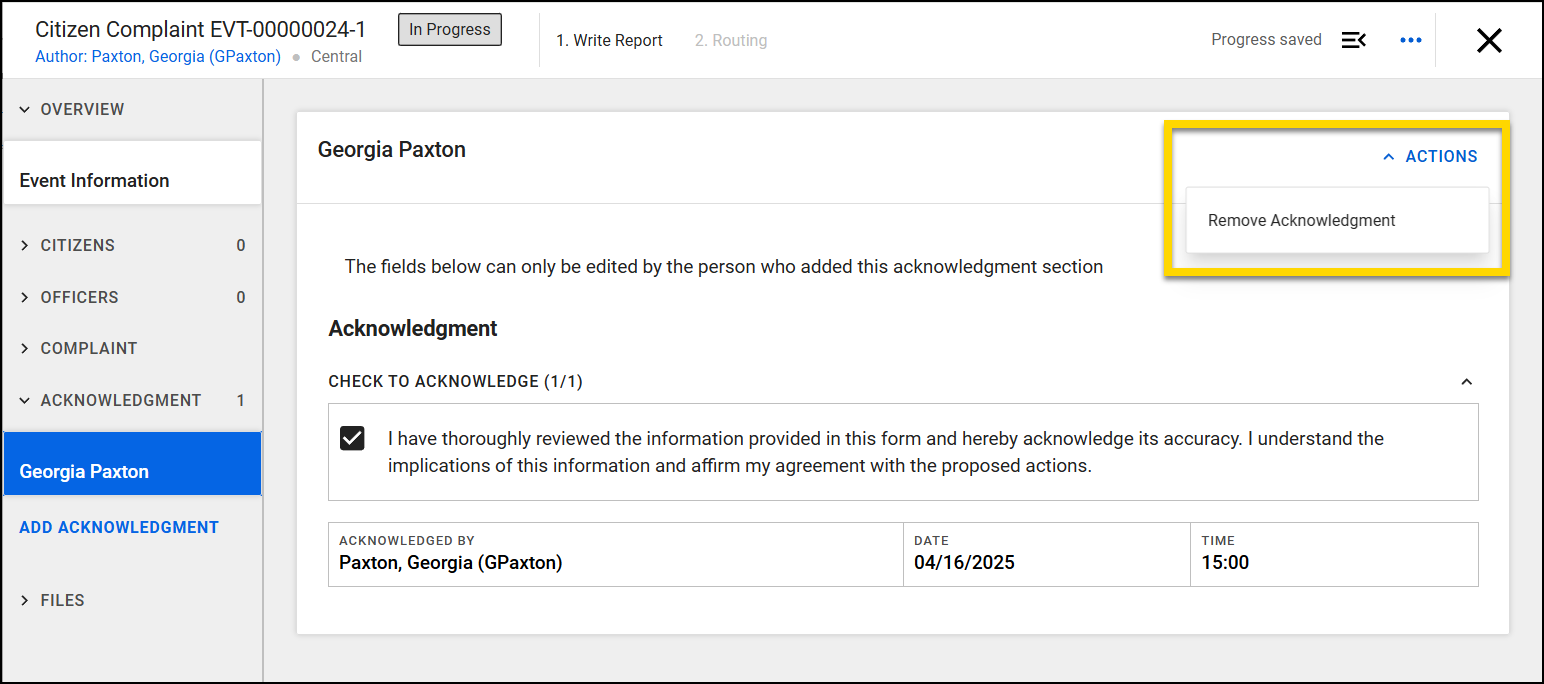
Acknowledgments
The acknowledgment section in a report serves as a digital confirmation that the report information is deemed accurate by the individual completing the acknowledgment. Keep in mind that the text accompanying the acknowledgment checkbox may vary slightly between agencies, but it generally confirms that the user has reviewed the information and agrees with its contents.
To add an acknowledgment to a report:
- Select Add acknowledgment in the report navigation menu.
- Select the checkbox to indicate you have reviewed the report's information and confirm its accuracy
- The Acknowledged by field should auto-populate with your name. If it does not, enter your name.
- Fill in the Date and Time fields.
- If you want to remove the acknowledgment, open the Actions menu and select Remove acknowledgment.
Narratives
To add a narrative to a report, select your name or Narrative from the Narratives section in the report navigation menu. This section name may vary by report type.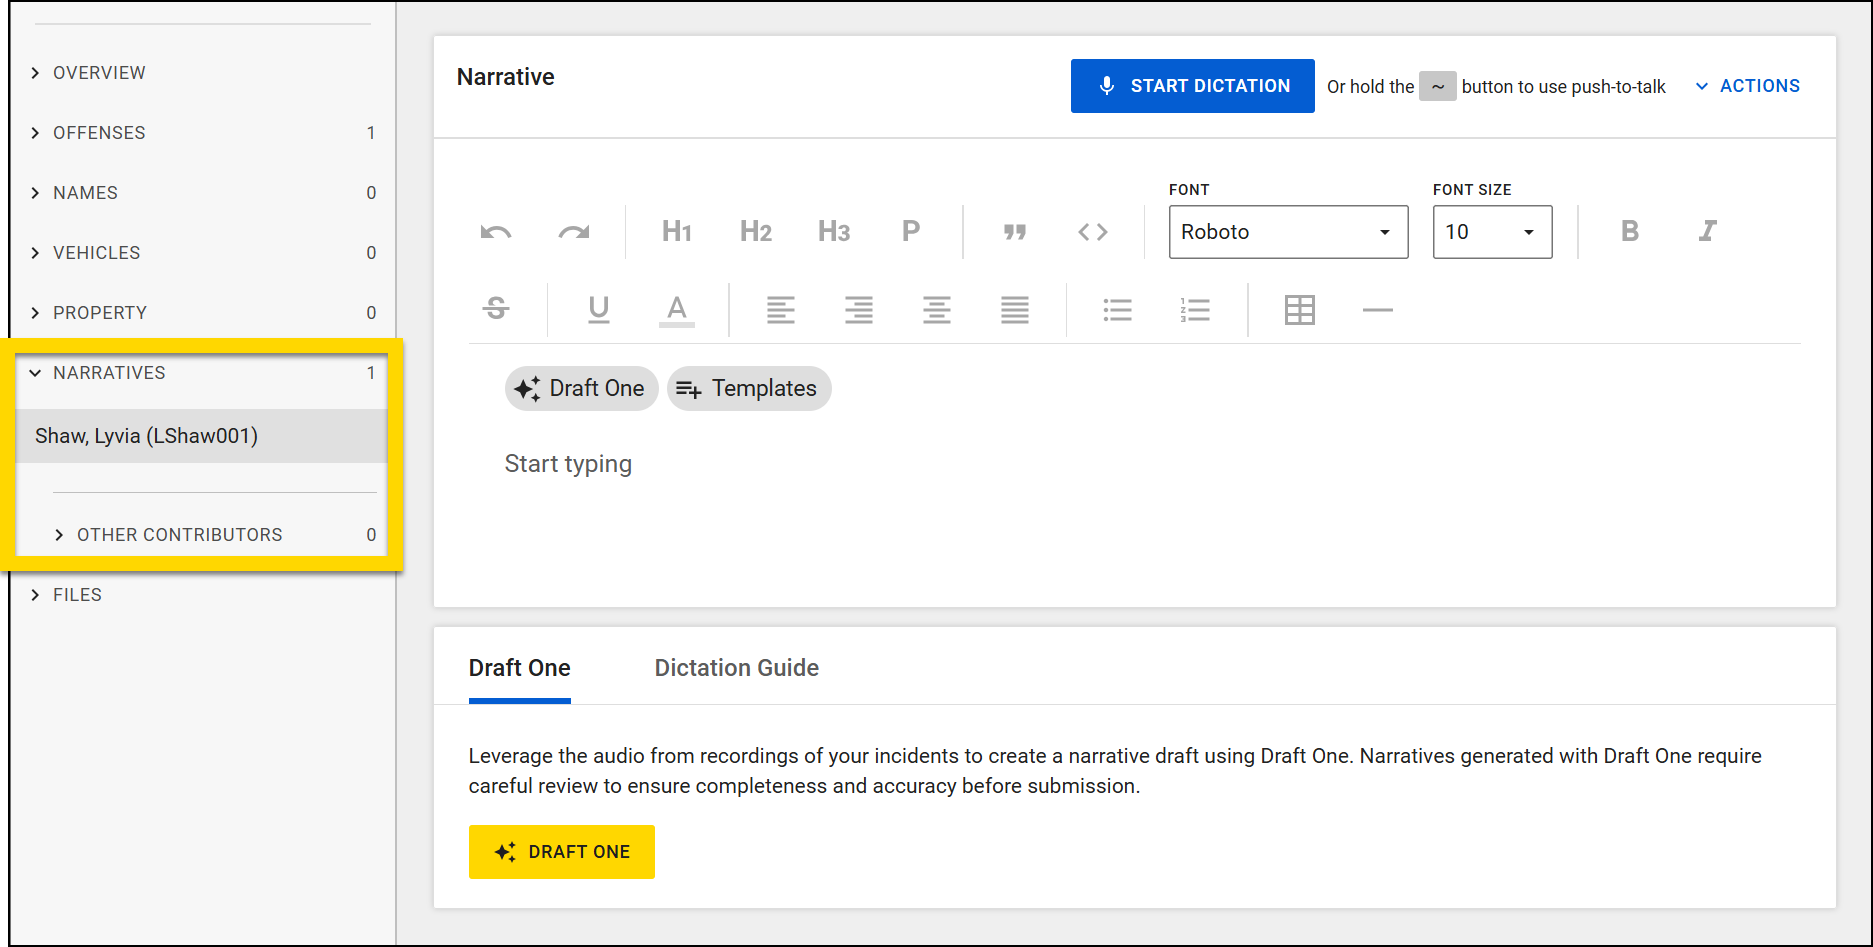
There are several ways to add content to the text field:
- Type directly into the report
- Copy and paste information from another location
- Add inline images
- Import and update a template
- Dictate text
- Generate a draft using Draft One
Note
When Draft One is used in Axon Records and Axon Standards, it includes any data you have already entered into the fields in the rest of the report. To create comprehensive and higher-quality drafts, it is recommended to fill out all report fields BEFORE using Draft One.
After text has been entered into the field, use the toolbar to format the text as desired, including headings, font size/color, lists, and more. Select Actions > Find and replace to quickly bulk change certain words.
Add inline images
You can insert images directly inline inside your narrative. The images must first be attached to the report as evidence items. Once inserted in the narrative, you can resize the images. When printing, you can choose whether or not the images should be included.
To add an image to a narrative:
- Follow the steps in the Files section below to add the file to the report.
- Place your cursor in the narrative field where you want to insert the image.
- Select the image icon in the narrative toolbar.
- When the Add image evidence pane opens, use the checkboxes to select one or more images for insertion.
- Use the arrows to expand the row and view the image.
- After choosing one or more images, select Insert at the bottom of the pane.
- After the image appears in the narrative field, hover over it to reveal the More actions [...] menu in the top right corner of the image.
- Open the More actions [...] menu to change the image size (small, medium, or large) or to remove the image from the narrative.
- Images removed from the narrative are NOT also removed from the report. To remove the image from the report, open the Files section and remove it.
- Images removed from the narrative are NOT also removed from the report. To remove the image from the report, open the Files section and remove it.
Import a template
Your organization may have templates available that you can follow to ensure your narrative adheres to organization policy. Select the Templates button below the narrative toolbar to open a list of available templates. Choose an option and select Import. The template, which contains formatted text, will import into your narrative, where you can update with details for your report.
Dictate
You can write report narratives by speaking instead of typing. While dictating, filler words like “um,” “uh,” and “ah” are removed automatically.
For the best dictation results:
- Speak Clearly: Articulate your words and speak directly into the microphone.
- Use a Quiet Environment: Dictate in a quiet setting to reduce transcription errors.
- Use Verbal Commands: Learn to use voice commands for punctuation and formatting to increase efficiency and accuracy.
- For complex terms or names, you may want to type directly into the report narrative rather than dictating.
Follow these steps to dictate:
- Place your cursor in the text editor wherever you want the dictated text to appear.
- Select Start dictation.
- If prompted, allow your web browser to access the microphone.
- Begin speaking, including the voice commands for punctuation
- Text appears in the narrative text editor as you speak.
- Refer to the Dictation guide tab below the narrative text editor for a reminder of the voice commands.
- Select Stop dictation when you finish.
- You can restart dictation again at any time. Be sure to place your cursor in the location you want the text to appear.
Voice commands
Add punctuation and formatting as you dictate to reduce editing afterward by speaking the following commands:
- Period (.): Say "period" or "full stop" to end a sentence.
- Comma (,): Say "comma" to insert a comma.
- Question mark (?): Say "question mark" to end a sentence with a question.
- Exclamation mark (!): Say "exclamation mark" for emphasis.
- Parentheses (): Say "open parentheses" to begin and "close parentheses" to end a parenthetical statement.
- Quotes ("): Say "open quotes" to start a quote and "close quotes" to end a quote.
- New paragraph: Say "new paragraph" to start a new paragraph.
- New line: Say "new line" to move down one line without starting a new paragraph
Find a list of these voice commands in the Dictation guide tab below the narrative text editor.
Requirements
Before using dictation, ensure you meet the following criteria:
- Axon Evidence Pro license: You must be able to access Axon Evidence and have a Pro license.
- Microphone: Your device needs a functioning microphone. Grant your web browser permission to access the microphone if prompted.
- Speech-to-text connection: Ensure your device can connect to .stt.speech.azure.us (in the United States) or .stt.speech.microsoft.com (in Canada). You may need to work with your agency's IT department to ensure access.
Files
Add photos, videos, documents, and other files to a report by selecting Files > Upload file in the report navigation menu.
The Suggested tab contains recommendations for evidence you may want to add to the incident. Evidence is suggested based on the following criteria:
- Any Evidence ID that matches the ID of a case, incident, report, or the CFS ID
- Evidence you uploaded in the past 72 hours that hasn't been added to the report
Use the search fields to find specific evidence within the suggestion list and the checkboxes to add multiple files at the same time.
To add new files, switch to the Upload tab and either drag and drop files from your computer or select Chose files. After selecting the files, you can optionally add a description, update the title of each file, and update the category of each file. The categories and that appear in the dropdown menu are the same as those that appear in Axon Evidence.
The Search tab lets you search for evidence that has already been uploaded to Axon Evidence. Use the search fields to find specific evidence and the checkboxes to add multiple files at the same time.
When you select a file's title, an evidence preview pane opens and displays additional information about the file. Depending on the file type, this pane may include multiple tabs:
- Overview: This tab shows the same metadata that appears on the Overview tab of the Axon Evidence details page, as well as a transcript summary (if available).
- See Evidence details page for more information.
- Transcript: This tab only appears for audio and video files and behaves the same as the Transcript tab on the Axon Evidence details page.
- See Transcripts on the evidence details page for more information.
- Moments: This tab shows AI-detected key moments (e.g., Miranda Rights) within a piece of evidence with timestamps.
- See Brief One Transcripts for more information.
NoteThis tab only appears for customers who have purchased Brief One. Contact Axon Support or your Axon representative if you are interested in purchasing this product.
To view the full evidence details page in Axon Evidence, select Details page at the bottom of the pane.
After adding the files to the report, use the checkboxes to select one or more files then select Edit Metadata in the top right corner to update (add or remove) the tag or category for the files. The categories and tags that appear in the dropdown menus are the same as those that appear in Axon Evidence.
Select Actions > Remove to remove a file from the report.
If other files have been added to the event associated with the report, you can select the View Files to this Event button below the list of files to open the event profile and view all files associated with the event.