Map interaction & navigation
Learn how to explore and interact with the fususONE map, including zoom, layers, floor plans, and map-based tools.
Navbar overview
The navbar is the vertical menu on the left side of the screen. It is the primary navigation control in fususONE. Selecting an item from the navbar opens its corresponding panel in the main workspace.
fususONE has a companion mobile app called FususOPS for iOS and Android. For mobile-specific tools and instructions, see fususOPS mobile app overview.
Note: Availability of navbar items depends on your user permissions and system configuration.
From the navbar, you can open the main areas of the platform:
- Dashboard – Access dashboards, fususNOTIFY, alert heatmaps, and analytics tools. See Dashboard overview.
- Map – Return to the interactive map to view cameras, draw zones, and manage incidents. See Map overview.
- Grids – Open saved layouts of camera feeds for monitoring or analysis. See Use temporary camera grids.
- fususVault – View saved video clips, screenshots, incidents, and tips. See fususVAULT & Evidence.com.
- fususRegistry – View an alphabetical list of fususREGISTRY registrants.
- Cameras – Manage the camera list, review live feeds, and edit settings. See Live video, playback & clips.
- Dynamic AI – Run object or behavior searches on recorded video. See Run AI searches .
- LPR – Search for vehicle license plate matches across your system. See ALPR search.
- Locations – View and manage locations and their associated cameras and floorplans. See Search locations.
- Users – Manage user accounts and permission groups. See User accounts & permissions.
- fususCore – Manage fususCORE devices.
- Tags – Manage classification tags for cameras or locations.
- Shares – Share access to cameras or assets with other agencies.
- Audit – View logs of system and user activity. See Review audit logs .
- fususAlert – Add/remove users who have access to the fususALERT app for your account.
- Help – Open help articles and support content.
- Chat – Communicate in team channels or send direct messages. See Chat & collaboration.
- Settings – View or modify system-level configuration options. See View or edit system configuration .
Map overview
Learn how to interact with the map, use toolbar tools, and view live feeds or call information. The top toolbar includes map layers, alerts, search, chat, and online user tools. The side toolbar includes drawing tools for geofencing, telestration, and incident mapping.
To navigate the map:
- Use scroll to zoom and select-and-drag to pan.
- Hover over icons for camera or location info.
- Use toolbar icons (Layers, Tips, Locations, etc.) to toggle features.
- Select a camera to view live feed or options.
Icons may vary slightly by agency configuration or user role. Many of these icons show a tooltip label when you point to them, which can help users confirm their function.
Axon device icons and statuses:
- Green icon – device is buffering
- Pulsing red icon – device is actively recording
- Gray icon – device is inactive
- White cluster icon – multiple devices in the same area (zoom in to separate)
When an alert is triggered:
- A bright orange alert window appears on screen.
- A map icon appears above the device with a symbol (e.g., waving hand for Watch Me, lightning bolt for TASER).
- Alerts can include a Play button (open livestream) and a camera icon (dock nearby fixed cameras).
Top toolbar buttons

These buttons are at the top of the screen:
- Call sign – The call sign that is logged in
- Lock/unlock toolbar (lock)
- Search bar
- Chat (chat bubbles) – Opens chat
- Online users (three people) – Shows users logged into the fususOPS app and have the fususOPS app GPS toggled to "On Shift"
- Sentries (eye) – View and manage sentries
- Live Incidents (circles) – View active livestreams from the fususOPS app
- Alerts (light) – New alerts
- Tips (phone) – Citizen tips
- Locations (pin) – Locations list
- Layers (stack) – Layers menu (toggle icons, overlays)
Side toolbar buttons

- Zoom In (+)
- Zoom Out (−)
- Change Style (map) – Light, Dark, Satellite
- Telestrate (pen tip) – Drawing on captured image
- Draw Polygon (polygon) – Geofence tool
- Draw Circle (circles) – Geofence tool
- Draw on Map (pencil in circle) – Geofence tool
- Incident (map pin with plus) – Drag and drop to add incident to map
- Weather (sun, clouds) – Weather forecast for this location
- Hide tools – Hides the toolbar
Use map layers
- On the Map, select the Layers button in the top toolbar.
- Use the slide buttons to toggle overlays. Availability depends on your organization’s setup and your assigned role.
- Camera Layers – Displays stationary (fixed) camera icons and live stream availability.
- Visual Layers
- Panoramas – Panoramic images that the agency has uploaded.
- Weather Radar – Show current weather conditions on the map.
- Traffic – Display current traffic speeds and road closures.
- Dynamic & Alert Layers
- fususALERT – Display alerts when a user presses the panic button on the app.
- Axon Devices – Show Body, Fleet, and Air devices, along with their status and alert icons.
- Users – Shows users that have logged into fususOPS and have GPS set to "On Shift".
- fususTIPS – Display tips submitted via the fususTIPS line on the Map.
- Active Calls – Show current CAD events.
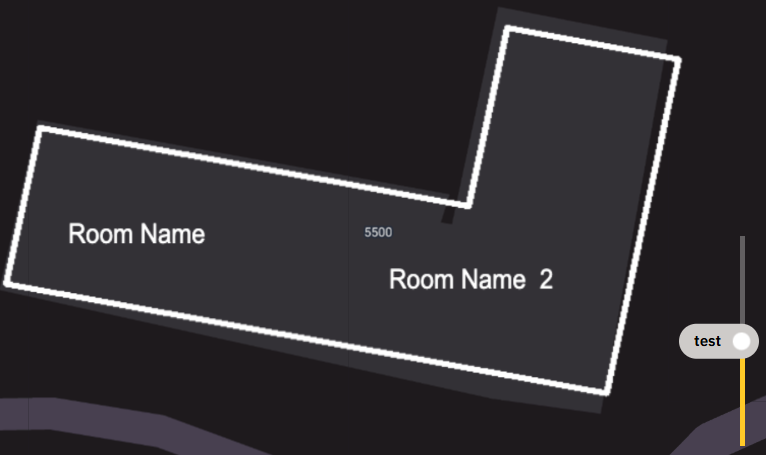
- Room Clearing – Show room status for locations with mapped interiors.
- fususRegistry – Show cameras that are registered at a location but not integrated for live stream viewing.
- As you enable layers, the corresponding icons and overlays appear on the map in real time.
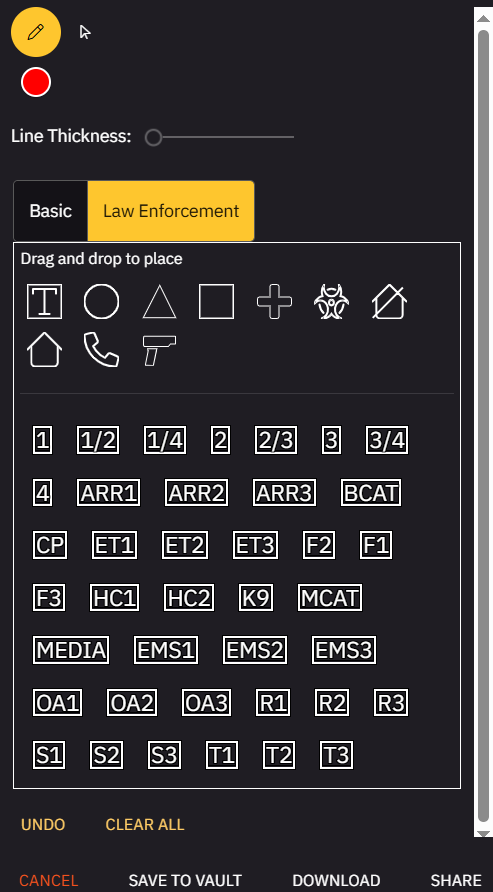
Use telestrate
The Telestrate feature allows users to draw or annotate directly on snapshots of video feeds on the Map for clarity during collaboration.
- On the Map, select the Telestrate (pen tip) button. A frame appears.
- Maneuver the relevant part of the Map into the frame and then select Capture. A new dialog appears.
- Draw and/or place icons on the image. You can change the line thickness and color.
- When you are satisfied with the results, choose a destination:
- Save to Vault – Save as part of an incident or record
- Download – Save to your device as an image file
- Share – Share annotated frame in an active conversation
View floorplans
- On the Map, select a location icon or open the Locations tab and select a location. The floorplan image displays as an overlay on the map.
- To change floors, adjust the vertical slider, if available.
Search locations
Find and select a saved location from the system.
- In the navbar, select Locations.
- Use the Search bar at the top of the panel.
- Enter a location name, tag, or keyword.
- Select a result to zoom the map to that location.
View tips
View tips submitted by the public or system users. Some tips may be submitted anonymously. Filter or archive tips based on agency protocols.
- On the Map, select Tips (phone) from the top toolbar. A list of active tips is displayed.
- Select a tip to open it and review the content.
- View associated media or linked incident, if available.
Locate devices on the map
Use the Axon Devices drawer, online user list, or alert notifications to find and follow a device on the map.
From the Axon Devices drawer:
- First, ensure the Axon Devices layer is turned on. In the top toolbar, select Layers and under Dynamic & Alert Layers, toggle on Axon Devices.
- Once enabled, select the Axon Devices icon that appears on the map.
- Expand one of the status groups: Recording, Buffering, or Inactive.
- Use the search bar to filter by user or device name.
- Select View on Map to center the map on the device’s last known location.
From an alert notification:
- When an alert is triggered, review the device and user listed in the notification.
- Select the alert to move the map to the device’s location.
- Use the map icon to identify the device and open its livestream, if available.